TCZR036 TCZR072 - MaxxVision
TCZR036 TCZR072 - MaxxVision
TCZR036 TCZR072 - MaxxVision
Create successful ePaper yourself
Turn your PDF publications into a flip-book with our unique Google optimized e-Paper software.
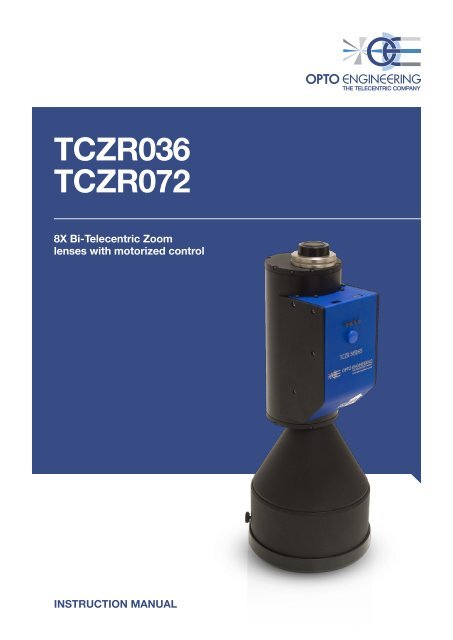
<strong>TCZR036</strong><br />
<strong>TCZR072</strong><br />
8X Bi-Telecentric Zoom<br />
lenses with motorized control<br />
InsTRuCTIon manual
<strong>TCZR036</strong> | <strong>TCZR072</strong> | Instruction manual<br />
Table of contents<br />
1. Product overview ·········································································································································· pag. 3<br />
2. Safety warnings ············································································································································ pag. 3<br />
3. Warranty ····················································································································································· pag. 4<br />
4. Specifications ················································································································································ pag. 4<br />
4.1 Optical Specifications<br />
4.2 Mechanical Specifications<br />
4.2.1 Mass<br />
4.2.2 Dimensions<br />
4.3 Electrical and Electronics Specifications<br />
4.4 Working Conditions<br />
5. Instructions for use ······································································································································· pag. 8<br />
5.1 Clamping, turning on and focusing<br />
5.2 How to change magnification<br />
5.2.1 Magnification change by pressing the button<br />
5.2.2 Magnification change by DLL<br />
5.2.3 Alarms, errors and solutions<br />
6. Software demo ··········································································································································· pag. 16<br />
6.1 DEMO mode Control Panel<br />
2
<strong>TCZR036</strong> | <strong>TCZR072</strong> | Instruction manual<br />
1. Product overview<br />
Zoom Revolver <strong>TCZR036</strong> and <strong>TCZR072</strong> are zoom lenses that provide up to 4<br />
different magnification changes. In particular, Zoom Revolver <strong>TCZR036</strong> and <strong>TCZR072</strong><br />
are varifocal lenses, i.e. they perform discrete (non-continuous) magnification changes<br />
while working at the same fixed working f-number WF/#.<br />
2. Safety warnings<br />
x<br />
x<br />
x<br />
x<br />
x<br />
x<br />
Read carefully this instructions manual<br />
This document contains the necessary information to use the product properly.<br />
Do not inspect the internal parts of the product. Warranty will not be valid<br />
if product is opened<br />
Zoom revolver contains very delicate components that might be permanently<br />
damaged if handled carelessly.<br />
Product must be adequately shielded if employed in dusty and humid<br />
places<br />
Do not use togheter with machines that generate strong vibrations<br />
Zoom Revolver might be permanently damaged if deployed in the presence of<br />
strong vibrations and impulsive forces<br />
Zoom revolver must be properly clamped before usage<br />
Zoom Revolver must be mechanically constrained by adequate clamps,<br />
specifically where indicated (see Mechanical Specifications)<br />
Do not use the product out of the fields of usage marked in the<br />
specifications.<br />
See paragraph 4 for the Specifications.<br />
3. Warranty<br />
OPTO ENGINEERING offers a 1-year warranty for products that have been installed<br />
according to the installation instructions supplied. The product will be either replaced<br />
or repaired in case of defects presence in any component. Warranty does not cover<br />
parts damaged as a result of incorrect usage.<br />
4. Specifications<br />
4.1 Optical Specifications<br />
The following <strong>TCZR036</strong> and <strong>TCZR072</strong> optical specifications are relative to a 2/3”<br />
detector (8.8 mm x 6.6 mm).<br />
3
<strong>TCZR036</strong> | <strong>TCZR072</strong> | Instruction manual<br />
<strong>TCZR036</strong><br />
<strong>TCZR036</strong> performs the following 4 magnification changes: 0.250x, 0.500x, 1.000x,<br />
2.000x. The following table lists usage specifications for each different magnification:<br />
ZOOM REVOLVER TC ZR 036<br />
MAGNIFICATION<br />
OPTICAL PARAMETERS 0.250x 0.500x 1.000x 2.000x<br />
Working Distance 1<br />
WD [mm]<br />
F number 2<br />
F/#<br />
68 mm 68 mm 68 mm 68 mm<br />
12 12 12 12<br />
Telecentricity 3 < 0.05 < 0.05 < 0.05 < 0.05<br />
Distortion < 0.05% < 0.04% < 0.04% < 0.08%<br />
Field Depth<br />
[mm]<br />
CTF@50<br />
[lp/mm]<br />
Object field of view<br />
[mm x mm]<br />
11 mm 2.8 mm 0.7 mm 0.2 mm<br />
> 40% > 35% > 40% > 35%<br />
35.2 x 26.4 17.6 x 13.2 8.8 x 6.6 4.4 x 3.3<br />
TCZR72<br />
I<strong>TCZR072</strong> performs the following 4 magnification changes: 0.125x, 0.250x, 0.500x,<br />
1.000x. The following table lists usage specifications for each different magnification<br />
ZOOM REVOLVER TC ZR 072<br />
MAGNIFICATION<br />
OPTICAL PARAMETERS 0.125x 0.250x 0.500x 1.000x<br />
Working Distance 1<br />
WD [mm]<br />
F number 2<br />
F/#<br />
153.5 mm 153.5 mm 153.5 mm 153.5 mm<br />
12 12 12 12<br />
Telecentricity 3 < 0.05 < 0.05 < 0.05 < 0.05<br />
Distortion < 0.1% < 0.08% < 0.05% < 0.07%<br />
Field Depth<br />
[mm]<br />
CTF@50<br />
[lp/mm]<br />
Object field of view<br />
[mm x mm]<br />
45 mm 11 mm 2.8 mm 0.7 mm<br />
> 35% > 40% > 35% > 40%<br />
70.4 x 52.8 35.2 x 26.4 17.6 x 13.2 8.8 x 6.6<br />
1. Distance between the front lens and<br />
the object. Set this distance within +/-<br />
3% of the nominal value for maximum<br />
resolution and minimum distortion<br />
2. Working F-number: the real F-number<br />
of a lens when used as a macro<br />
3. Maximum slope of the principal rays<br />
inside the lens<br />
4
<strong>TCZR036</strong> | <strong>TCZR072</strong> | Instruction manual<br />
4.2 Mechanical Specifications<br />
4.2.1 Mass<br />
<strong>TCZR036</strong>: m = 1.5kg;<br />
<strong>TCZR072</strong>: m = 2kg.<br />
4.2.2 Dimensions<br />
Refer to the following tables for product dimensions<br />
<strong>TCZR036</strong><br />
<br />
<br />
<br />
<br />
<br />
<br />
<br />
<br />
<br />
<br />
<br />
<br />
<br />
<br />
<br />
<br />
<br />
<br />
<br />
<br />
<br />
<br />
<br />
<br />
<br />
<br />
<br />
<br />
<br />
<br />
<br />
<br />
<br />
<br />
<br />
<br />
<br />
<br />
<br />
<br />
<br />
5
<strong>TCZR036</strong> | <strong>TCZR072</strong> | Instruction manual<br />
<strong>TCZR072</strong><br />
<br />
<br />
<br />
<br />
<br />
<br />
<br />
<br />
<br />
<br />
<br />
<br />
<br />
<br />
<br />
<br />
<br />
<br />
<br />
<br />
<br />
<br />
<br />
<br />
<br />
<br />
<br />
<br />
<br />
<br />
<br />
<br />
<br />
<br />
<br />
<br />
6
<strong>TCZR036</strong> | <strong>TCZR072</strong> | Instruction manual<br />
4.3 Electrical and Electronics Specifications<br />
•<br />
•<br />
•<br />
Input voltage: 24V±2%;<br />
TCZR must be powered by a Class A power unit;<br />
Zoom Revolver can be connected to PC via USB 2.0 (cable provided). Connect<br />
the standard-A plug end of the cable to the PC and the mini-B plug end of the<br />
cable to the Zoom Revolver.<br />
4.4 Working Conditions<br />
•<br />
•<br />
I/O Zone<br />
USB Connector<br />
Max temperature: 60 °C;<br />
The product must be shielded from vibration sources and impulse forces<br />
Power Connector<br />
7
<strong>TCZR036</strong> | <strong>TCZR072</strong> | Instruction manual<br />
5. Instructions for use<br />
5.1 Clamping, turning on and focusing<br />
Zoom Revolver must be mounted on a rigid support by means of adequate clamps.<br />
Specifically it must be constrained in the spaces labelled as “clamping diameter”.<br />
Clamping the product in other positions might seriously damage internal components<br />
and alter the overall optical performance.<br />
Use the CMHOTCZR mechanical clamp for safer and accurate mounting.<br />
CMHOTCZR also allows greater freedom in mounting.<br />
TCZR must be operated according to the drawing above, using the label “THIS SIDE<br />
UP” placed on the carter as a reference.<br />
Turn on the product by connecting the power supply cable to a 24V direct current<br />
source. When you turn on the device, it emits a specific acoustic signal (trill /<br />
“trillo”) and the first available magnification position is automatically selected. If a<br />
magnification position is already selected, the device will only emit the acoustic signal<br />
(trill) without any rotation of the carousel.<br />
The device should always emit the characteristic acoustic signal (trill). If this is not the<br />
case, please contact the seller.<br />
After clamping and turning on the device, please follow step by step the focusing<br />
procedure explained below:<br />
1. Adjust the WD until it is equal to the WD<br />
value listed on the test report you received<br />
with your Zoom Revolver<br />
Front of lens<br />
Object<br />
8
<strong>TCZR036</strong> | <strong>TCZR072</strong> | Instruction manual<br />
2. Set the maximum magnification position by rotating the carousel until you reach the<br />
maximum magnification position;<br />
3. Precisely adjust the mount position by means of adding/removing back focal<br />
adjustment spacers until you find the best focusing position.<br />
4. Adjust the phase angle. Once you find the right phase, lock the screws (M2 metric<br />
thread)<br />
Adjusting screws<br />
Mount<br />
Back focal<br />
adjustment spacers<br />
5. If after the 1-4 steps you still can not accurately focus, manually adjust by using the<br />
bush positioned at the front of the objective.<br />
Lock screw<br />
Bush<br />
9
<strong>TCZR036</strong> | <strong>TCZR072</strong> | Instruction manual<br />
5.2 How to change magnification<br />
Zoom Revolver offers two ways to change magnification:<br />
• “Stand alone” mode by pressing the button;<br />
• On-line mode by DLL.<br />
5.2.1 Magnification change by pressing the button<br />
When used in “stand alone” mode, Zoom<br />
Revolver is not connected to a PC: change<br />
magnification by simply pressing the blue<br />
magnification button located below the LED<br />
position indicators. Just press the button until<br />
you reach the desired magnification position<br />
(the corresponding LED position indicator<br />
will show the position): after a few seconds<br />
the carousel will rotate until it reaches the<br />
selected position and the corresponding LED<br />
position indicator will turn green.<br />
In case of failure of the procedure defined above, connect the TCZR to a PC and<br />
proceed as described in paragraph 5.2.3.<br />
5.2.2 Magnification change by DLL<br />
On-line mode magnification change requires the following system specification:<br />
•<br />
•<br />
•<br />
•<br />
•<br />
•<br />
512 MB RAM<br />
1.5 MB free hard disk space<br />
XGA or higher-resolution monitor<br />
Mouse or other pointing device<br />
Intel® Pentium® III/M 1.4 GHz Processor minimum<br />
Operating System 32 bit:<br />
Microsoft® Windows XP Home or Professional (SP2)<br />
Microsoft® Windows Vista (requires Administrator rights)<br />
Microsoft® Windows 7 (requires Administrator rights)<br />
LEDs<br />
Magnification button<br />
You additionally need to implement a DLL that resembles the following DLL Function<br />
prototypes.<br />
10
<strong>TCZR036</strong> | <strong>TCZR072</strong> | Instruction manual<br />
5.2.3 Alarms, errors and solutions<br />
In case of failure, TCZR must be connected to a PC in order to visualize the error type.<br />
Once your Zoom Revolver is connected to the PC, call the *GetState function to get the error type. You can<br />
subsequently visualize the device state, in particular:<br />
Position return the current position of the device<br />
ErrorOverSupply return 1 if supply voltage (Vin) is too high, otherwise 0<br />
ErrorUnderSupply return 1 if supply voltage (Vin) is too low, otherwise 0<br />
ErrorOverCurrent return 1 if coil current is too high (over Imax), otherwise 0<br />
ErrorI2T return 1 if I2T error, otherwise 0<br />
ErrorPosition return 1 if position not reached, otherwise 0<br />
WarningPosition return 1 if position reached with more steps than StepPulse, otherwise 0<br />
StepDone return to the steps performed to reach the position<br />
Busy return 1 if the device is busy, otherwise 0<br />
Run return 1 if the device is moving, otherwise 0<br />
In case of:<br />
ErrorOverSupply<br />
ErrorUnderSupply<br />
ErrorOverCurrent<br />
Adjust the system’s power supply. If that is not the cause of the failure, contact the seller.<br />
State ErrorI2T is a self-protective condition of the system: the device stops working and then automatically re-starts<br />
after a certain amount of time. In case of ErroreI2T keep monitoring error state and wait for system recovery. Contact<br />
the seller if the system does not re-start correctly.<br />
In case of ErrorPosition call the DLL *Trillo or reboot the system. If the problem persists contact the seller.<br />
11
<strong>TCZR036</strong> | <strong>TCZR072</strong> | Instruction manual<br />
// DLL Function prototypes ----------------------------------------------------<br />
// Start communication -------------------------------------------------------<br />
//<br />
// Parameters:<br />
// PortNumber: Serial port number 1 = COM1 , 2 = COM2 etc.. etc.. max 99<br />
// Baud : Baud 1200,2400,4800,9600,19200,38400,57600,115200<br />
//<br />
// Return value: 0 = ok, -1 = error<br />
int (__stdcall *InitComm)(int PortNumber,int Baud) ;<br />
// ---------------------------------------------------------------------------<br />
// Close communication -------------------------------------------------------<br />
//<br />
// Parameters : none<br />
//<br />
// Return value: none<br />
//<br />
void (__stdcall *CloseComm)(void) ;<br />
// ---------------------------------------------------------------------------<br />
// Return the DLL version-----------------------------------------------------<br />
//<br />
// Parameters: none<br />
//<br />
// Return value: pointer to the version string<br />
//<br />
char * (__stdcall *GetDllVersion)(void) ;<br />
// ---------------------------------------------------------------------------<br />
// Set the timeout for a command response -----------------------------------<br />
//<br />
// Parameters : timeout in ms (value > 0 and
<strong>TCZR036</strong> | <strong>TCZR072</strong> | Instruction manual<br />
// Return the device status ---------------------------------------------------<br />
//<br />
// Parameters:<br />
// Position : return the current position of the device<br />
// ErrorOverSupply : return 1 if supply voltage (Vin) is too high, otherwise 0<br />
// ErrorUnderSupply : return 1 if supply voltage (Vin) is too low, otherwise 0<br />
// ErrorOverCurrent : return 1 if coil current is too high (over Imax), otherwise 0<br />
// ErrorI2T : return 1 if I2T error, otherwise 0<br />
// ErrorPosition : return 1 if position not reached, otherwise 0<br />
// WarningPosition : return 1 if position reached with more steps than StepPulse, otherwise<br />
0<br />
// StepDone : return to the steps performed to reach the position<br />
// Busy : return 1 if the device is busy, otherwise 0<br />
// Run : return 1 if the device is moving, otherwise 0<br />
//<br />
//<br />
// Return value: 0 = 0k ; -1 = timeout error ; -2 = Checksum error ; -3 = serial communication<br />
not started (InitComm)<br />
//<br />
int (__stdcall *GetState)(char unsigned *Position,char unsigned *ErrorOverSupply,<br />
char unsigned *ErrorUnderSupply,char unsigned *ErrorOverCurrent,<br />
char unsigned *ErrorI2T,char unsigned *ErrorPosition,<br />
char unsigned *WarningPosition,char unsigned *StepDone,<br />
char unsigned *Busy,char unsigned *Run) ;<br />
// ------------------------------------------------------------------------------<br />
// -----------------------------------------------------------------------------<br />
// Read working parameters stored in the device --------------------------------<br />
//<br />
// Parameters:<br />
//<br />
// T1 : 0 .. 10000 ms |<br />
// T2 : 0 .. 10000 ms |
<strong>TCZR036</strong> | <strong>TCZR072</strong> | Instruction manual<br />
int (__stdcall *GetParameters)(int *T1,int *T2,int *T3,int *TDuty,int *TT1,int *TT2,int<br />
*TT3,int *TTDuty,int *I2Tmax,int *VinMin,int *VinMax,int *Imax,int *StepPulse,int *ExtraPulse)<br />
;<br />
// --------------------------------------------------------------------------------<br />
// Move command ------------------------------------------------------------------<br />
//<br />
// Parameters:<br />
//<br />
// Position : 0 .. 3 possible positions of the device<br />
//<br />
// Return value: 0 = 0k, -1 = timeout error; -2 = Checksum error , -3 = NAK device busy; -4 =<br />
serial communication is not open (InitComm)<br />
//<br />
int (__stdcall *GoToPosition)(int position) ;<br />
// -------------------------------------------------------------------------------<br />
// Trillo command (special pulse) ------------------------------------------------<br />
//<br />
// Parameters: none<br />
//<br />
//<br />
// Return value: 0 = 0k, -1 = timeout error; -2 = Checksum error ; -3 = NAK device busy; -4 =<br />
serial communication is not open (InitComm)<br />
//<br />
int (__stdcall *Trillo)(void) ;<br />
// ------------------------------------------------------------------------------<br />
// Functions for debugging purposes ---------------------------------------------<br />
// Return the pointer to the transmit buffer (for debugging)<br />
char * (__stdcall *DebugBufferTx)(void) ;<br />
// Return the pointer to the receive buffer (for debugging)<br />
char * (__stdcall *DebugBufferRx)(void) ;<br />
// ------------------------------------------------------------------------------<br />
14
<strong>TCZR036</strong> | <strong>TCZR072</strong> | Instruction manual<br />
6. Software demo<br />
Together with your TCZR, you additionally get the demo software “test DLL”.<br />
System requirements for installing the demo software are the following:<br />
•<br />
•<br />
•<br />
•<br />
•<br />
•<br />
512 MB RAM;<br />
1.5 MB free hard disk space;<br />
XGA or higher-resolution monitor;<br />
Mouse or other pointing device;<br />
Intel® Pentium® III/M 1.4 GHz processor minimum;<br />
Operating Systems 32 bit:<br />
Microsoft® Windows XP Home or Professional (SP2);<br />
Microsoft® Windows Vista (requires Administrator rights);<br />
Microsoft® Windows 7 (requires Administrator rights).<br />
Run the executable file (setup.exe) to start software installation.<br />
6.1 DEMO mode Control Panel<br />
TCZR control panel consists of 5 sections:<br />
• Ports<br />
• Parameters<br />
• Versions<br />
• Device Status<br />
• Commands<br />
In section Ports press the OPEN button to connect your TCZR to the PC. The<br />
“Common Port” window shows the virtual serial port number where the device is<br />
found. Three state coloured indicators show state messages: the system is correctly<br />
connected if the Connected indicator turns green while Timeout and Checksum are<br />
error messages.<br />
In section Parameters, the default factory settings are listed. Press the “GET”<br />
button to update and get the present values. Press the padlock button and type the<br />
password to enter the “Advanced Mode”.<br />
Section Versions lists the DLL release and firmware version.<br />
In the Device Status Section, the following error, warning and state indicators are<br />
listed.<br />
In detail:<br />
1. Over supply error (see 5.2.3);<br />
2. Under supply error (see 5.2.3);<br />
3. Over current error (see 5.2.3);<br />
4. I2T error<br />
5. Position Error (see 5.2.3);<br />
6. Position warning (see 5.2.3);<br />
7. Busy (see 5.2.3);<br />
8.<br />
Run (see 5.2.3).<br />
15
<strong>TCZR036</strong> | <strong>TCZR072</strong> | Instruction manual<br />
Commands section allows the user to set the Zoom Revolver magnification by<br />
selecting the corresponding position (0,1,2,3). In case of position Error, press the<br />
“Trillo” button to recover the position.<br />
<br />
<br />
You can download the complete software package from one of these<br />
locations:<br />
www.opto-engineering.com/download/TCZRXX_SW_package.zip<br />
www.opto-engineering.com/download/TCZRXX_SW_package.rar<br />
<br />
16
<strong>TCZR036</strong> | <strong>TCZR072</strong> | Instruction manual<br />
Note on image decentering compensation<br />
Although the image center remains substantially unchanged when the zoom comes<br />
back to a defined magnification, differences in image centering may be present<br />
from magnification to magnification due to camera detector alignment and other<br />
mechanical tolerances.<br />
NOTE ON IMAGE DECENTERING COMPENSATION<br />
To eliminate this effect you can select a reference point at the image center when the<br />
lens is set at its maximum magnification. Then you can measure the x and y image<br />
center detector displacements aligment and at other the mechanical other three tolerances. magnifications.<br />
The x and y (dx and dy) displacements must be receorded together with other<br />
calibration parameters specific for each zoom configuration (magnification factor,<br />
To eliminate this effect you can select a reference pont at the image center when the lens is set at its maximum<br />
residual distortion correction parameters,...)<br />
tions.<br />
The maximum x or y displacement will define the width and height of a crop-window<br />
which will show the image center always perfectly aligned.<br />
image center always perfectly aligned<br />
2x<br />
1x<br />
0,5x<br />
0,25x<br />
dx<br />
dx<br />
dx<br />
crop window.<br />
On the right side , the images have been cropped adjusting the image decentering.<br />
dy<br />
dy<br />
dy<br />
18<br />
17
Sigmaringer Str. 121<br />
70567 Stuttgart<br />
Tel.: +49 711 997 996 3<br />
www.maxxvision.com


