Caring for Your Tenckhoff® Catheter - Memorial Sloan-Kettering ...
Caring for Your Tenckhoff® Catheter - Memorial Sloan-Kettering ...
Caring for Your Tenckhoff® Catheter - Memorial Sloan-Kettering ...

Create successful ePaper yourself
Turn your PDF publications into a flip-book with our unique Google optimized e-Paper software.
<strong>Caring</strong> <strong>for</strong> <strong>Your</strong> Tenckhoff ® <strong>Catheter</strong><br />
Ellen Hollywood, RN<br />
Natasha Ramrup, RN<br />
Piera M. Coté Robson, RN<br />
Introduction<br />
You will have a Tenckhoff ® catheter to drain fluid from your abdomen. A catheter is a thin, flexible tube. The<br />
Tenckhoff is placed into the lower part of the abdominal cavity to drain fluid called ascites (ah-SYE-teez). This<br />
relieves bloating and breathing problems that ascites may cause. <strong>Your</strong> nurse will show you how to drain ascites and<br />
change the dressing. You will also learn the signs and symptoms that you must report.<br />
<strong>Caring</strong> <strong>for</strong> your Tenckhoff will become part of your daily routine. Talk with your doctor and<br />
nurse if you have questions. Use this booklet to help you recall the instructions.<br />
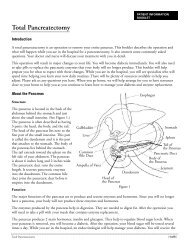
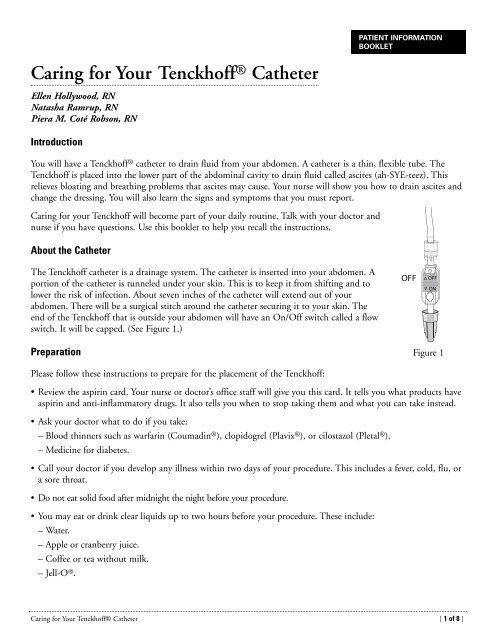
About the <strong>Catheter</strong><br />
The Tenckhoff catheter is a drainage system. The catheter is inserted into your abdomen. A<br />
portion of the catheter is tunneled under your skin. This is to keep it from shifting and to<br />
lower the risk of infection. About seven inches of the catheter will extend out of your<br />
abdomen. There will be a surgical stitch around the catheter securing it to your skin. The<br />
end of the Tenckhoff that is outside your abdomen will have an On/Off switch called a flow<br />
switch. It will be capped. (See Figure 1.)<br />
Preparation<br />
Please follow these instructions to prepare <strong>for</strong> the placement of the Tenckhoff:<br />
• Review the aspirin card. <strong>Your</strong> nurse or doctor’s office staff will give you this card. It tells you what products have<br />
aspirin and anti-inflammatory drugs. It also tells you when to stop taking them and what you can take instead.<br />
• Ask your doctor what to do if you take:<br />
– Blood thinners such as warfarin (Coumadin ® ), clopidogrel (Plavix ® ), or cilostazol (Pletal ® ).<br />
– Medicine <strong>for</strong> diabetes.<br />
• Call your doctor if you develop any illness within two days of your procedure. This includes a fever, cold, flu, or<br />
a sore throat.<br />
• Do not eat solid food after midnight the night be<strong>for</strong>e your procedure.<br />
• You may eat or drink clear liquids up to two hours be<strong>for</strong>e your procedure. These include:<br />
– Water.<br />
– Apple or cranberry juice.<br />
– Coffee or tea without milk.<br />
– Jell-O ® .<br />
PATIENT INFORMATION<br />
BOOKLET<br />
OFF OFF<br />
ON<br />
Figure 1<br />
<strong>Caring</strong> <strong>for</strong> <strong>Your</strong> <strong>Tenckhoff®</strong> <strong>Catheter</strong> [ 1 of 8 ]
If you are coming in from home <strong>for</strong> your procedure, you will receive two telephone calls one business day be<strong>for</strong>e<br />
your procedure. If your procedure is on a Monday, you will be called on Friday. It is important that we have a<br />
phone number where we can reach you. It could be your home, office, hotel, or cell phone. If you give us your cell<br />
phone number, make sure the phone is charged and turned on.<br />
A nurse will call you between 8:00 am and 7:00 pm to:<br />
• Review your instructions.<br />
• Confirm in<strong>for</strong>mation about your procedure.<br />
• Complete a brief assessment.<br />
• Answer your questions.<br />
• Tell you where you should go.<br />
If you do not receive a call by 7:00 p.m., please call (212) 639-6689.<br />
Someone from the Admissions Center will call you between 3:00 p.m. and 7:00 p.m. to:<br />
• Tell you when to arrive.<br />
If you do not receive this call by 7:00 p.m., please call (212) 639-7881.<br />
On the day of the procedure, please be aware that many things can impact the start time of your procedure. The<br />
procedure be<strong>for</strong>e yours may last longer than expected. An emergency may need to be done in the room you are<br />
scheduled <strong>for</strong>. If there is a delay in your start time, we will let you know.<br />
The Day of <strong>Your</strong> Procedure<br />
The Day of <strong>Your</strong> Procedure<br />
• You may shower, but do not apply any cream or lotion.<br />
• Take all medicines you normally take (except blood thinners and those on the aspirin card) with water or another<br />
clear liquid.<br />
• If you use contact lenses, wear glasses instead. If you do not have glasses, bring a container <strong>for</strong> your contact lenses.<br />
• If you are being admitted to the hospital <strong>for</strong> the procedure:<br />
– Bring your medicines with you on the day of the procedure.<br />
– Leave valuables and jewelry at home.<br />
– Bring only the money you need (e.g., <strong>for</strong> a newspaper or parking costs).<br />
– Bring your <strong>Memorial</strong> outpatient ID card.<br />
– Enter the hospital through the main entrance at 1275 York Avenue. Turn right to check in at the Admissions<br />
Center. After you are admitted, you will be sent to the Pre-Surgical Center on the 6th floor.<br />
An interventional radiologist will review the procedure with you. You will then need to sign a consent <strong>for</strong>m. From<br />
start to finish, the procedure lasts about one hour. Most patients stay in the hospital one to two days.<br />
If you do not already have an intravenous (IV) line, one will be started. It will be used to give you medicine to<br />
help you relax. Most patients have little if any discom<strong>for</strong>t during the procedure. The skin in the area where the<br />
Tenckhoff will be placed will be numbed with a local anesthetic.<br />
At the end of the procedure, there will be a dressing over the catheter exit site. The small incision where the<br />
catheter was placed will have either a dressing over it or a shiny coating of skin glue. This special skin glue is called<br />
Dermabond ® .<br />
<strong>Caring</strong> <strong>for</strong> <strong>Your</strong> <strong>Tenckhoff®</strong> <strong>Catheter</strong> [ 2 of 8 ]
After The Procedure<br />
• You will need to stay in bed <strong>for</strong> three hours. You will either stay in our post procedure area or return to your hospital<br />
room. When you are ready to get out of bed, call the nurse. <strong>Your</strong> reflexes will be slow and you may feel<br />
drowsy. You could easily fall if you try to get up without help.<br />
• <strong>Your</strong> abdomen may feel softer because some ascites is drained during the procedure.<br />
• Ask <strong>for</strong> medicine if you feel pain at the incision site.<br />
• You may shower after 48 hours. AquaGuard ® is a one time use waterproof<br />
cover. Each time you shower, cover the catheter with a new AquaGuard to<br />
protect it from getting wet. The edges of the AquaGuard have peelable<br />
tape. Fold over a corner of each side of the tape. (See illustration.) Hold<br />
the AquaGuard with the arrows pointing towards your head. Peel off the<br />
top strip and place the top edge of the AquaGuard above the dressing (if<br />
you have one). Smooth it down. Then grab a folded corner and peel down<br />
one side, smoothing as you go. Do the bottom and remaining side the<br />
same way. If you have a dressing, don’t let the tape on the AquaGuard<br />
touch the dressing. It can lift your dressing when you remove the<br />
AquaGuard after showering.<br />
• Do not take a tub bath or swim while you have the catheter.<br />
• The stitch holding the catheter may come off by itself after the area heals. If the stitch comes off in less than two<br />
weeks, it must be replaced. Call the nurse in Interventional Radiology to see when you should come in. The<br />
number is at the end of this booklet. If the stitch is uncom<strong>for</strong>table, it can be removed after two weeks. You can<br />
ask your doctor or the nurse in Interventional Radiology to remove it.<br />
• If your doctor closed your small incision with Dermabond, do not scratch, pick or pull it off. Do not apply<br />
creams of lotions on it. It will fall off on its own in one to two weeks.<br />
How to Drain the Fluid<br />
Drain the ascites daily unless your doctor or nurse gives you different instructions. Write the amount drained in<br />
the chart on page 8.<br />
1. Prepare a clean area. Clean a table with a cleaning agent and then spread clean paper towels on the surface. Do<br />
not drain the fluid in the bathroom.<br />
2. Wash your hands or clean them with an alcohol hand gel.<br />
3. Gather your supplies:<br />
• Sterile cap<br />
• Non-sterile gloves (optional)<br />
• Two alcohol swabs<br />
• Graduated cylinder<br />
4. Place a stool next to a chair at your work area. The stool should be low enough that the cylinder can rest below<br />
your abdomen.<br />
5. Place the cylinder on the stool and then sit in front of your work area.<br />
6. Open the package containing the new sterile cap to have it ready. Separate the two parts with a twisting<br />
motion. Leave both parts in the package.<br />
<strong>Caring</strong> <strong>for</strong> <strong>Your</strong> <strong>Tenckhoff®</strong> <strong>Catheter</strong> [ 3 of 8 ]<br />
4<br />
1<br />
1.800.426.1042<br />
www.aqua-guard.com<br />
3<br />
GUARD ©<br />
Peel<br />
1.800.426.1042<br />
www.aqua-guard.com<br />
GUARD ©<br />
1208<br />
2
7. Open the two alcohol swabs.<br />
8. Put on the non-sterile gloves if you wish.<br />
9. Hold your Tenckhoff in your non-dominant hand. Check to<br />
make sure the flow switch is in the Off position. (See Figure 1.)<br />
10. Remove the cap from the flow switch with a twisting motion.<br />
Discard the cap.<br />
11. Clean the exposed end of the flow switch with one alcohol swab.<br />
(See Figure 2.)<br />
12. Hold the end over the cylinder. Do not let the end of the flow<br />
switch touch the sides of the cylinder.<br />
13. Slide the flow switch by pushing it away from the Tenckhoff to<br />
turn it on. (See Figure 3.) You will hear a click when it is in the<br />
open position. The fluid will flow into the cylinder. If the fluid<br />
stops draining and you think there is still some left in your<br />
abdomen, shift from one side to other. It can take five to ten<br />
minutes <strong>for</strong> the fluid to drain.<br />
14. After about 500mL or the amount your doctor or nurse tells you should drain, slide the flow switch OFF by<br />
pushing it towards the cylinder. Never drain more than your doctor told you without speaking to your<br />
doctor first. Draining too much can make you sick.<br />
15. Clean the end of the flow switch with the second alcohol swab. Twist the new light blue cap on the end of the<br />
flow switch.<br />
16. Note the amount of drainage. Record it on the flow sheet at the back of this booklet. You may flush the<br />
drainage in the toilet.<br />
17. Remove and discard the gloves. Wash your hands or clean them with an alcohol hand gel.<br />
18. Clean the cylinder with antibacterial dish soap. Allow to air dry.<br />
Dressing Care<br />
Change the dressing once a week or when it becomes soiled or wet.<br />
1. Wash your hands with soap and water.<br />
2. Gather the equipment you will need:<br />
• Waste basket<br />
• 2 Primapore dressings<br />
• Mild soap and water<br />
• Non-sterile gloves<br />
• Alcohol swabs<br />
• Gauze pads<br />
• Skin Prep ® protective wipes<br />
• UC strip to secure the end of the catheter<br />
OFF OFF<br />
ON<br />
Figure 2<br />
Exposed<br />
end of<br />
flow switch<br />
<strong>Caring</strong> <strong>for</strong> <strong>Your</strong> <strong>Tenckhoff®</strong> <strong>Catheter</strong> [ 4 of 8 ]<br />
ON<br />
OFF<br />
ON<br />
Figure 3<br />
CLICK
3. Wash your hands and put on a pair of non-sterile gloves.<br />
4. Gently remove the dressing while you hold the catheter to avoid pulling.<br />
5. Throw away the old dressing.<br />
6. Hold the catheter firmly. Clean the exit site and the skin around it with a gauze pad dampened with soapy<br />
water. To clean the catheter, hold the catheter and wrap moist gauze around it. To prevent pulling, keep holding<br />
it while sliding the gauze down the length of the catheter.<br />
7. Rinse with fresh, damp gauze and dry the catheter and skin with fresh gauze.<br />
8. Wipe around the insertion site with Skin Prep.<br />
9. Check the insertion site <strong>for</strong>:<br />
• Redness<br />
• Foul-smelling drainage<br />
• Leakage in the area<br />
If you have any of these signs of infection or a temperature higher than<br />
100.4° F (38°C), call your doctor after you finish the dressing change.<br />
10.Place the Primapore dressings over catheter site. One should be centered over the<br />
insertion site. The second dressing should be shifted down a half of an inch to<br />
allow the adhesive on the dressing to further secure the catheter.<br />
11.Remove the backing from the center of the UC strip to expose the adhesive.<br />
(See Figure 4.)<br />
12.Place the exposed center section of the adhesive onto the catheter. (See Figure 5.)<br />
Press the adhesive around the catheter. The remaining adhesive will stick together.<br />
13. Select a position <strong>for</strong> the UC strip. There should be no pull or tension on the<br />
catheter. There should be a gentle bowing of the catheter.<br />
14.Remove the backing paper from each side of the UC strip. Smooth one at a time<br />
onto the abdomen. The UC strip will prevent pulling, tension, or kinking of the<br />
catheter. (See Figure 6.)<br />
15.Discard your gloves and wash your hands.<br />
Care Chart<br />
Activity When<br />
Drain fluid Daily, unless your doctor or nurse gives you different instructions<br />
Change the dressing Once a week or when soiled or wet<br />
Figure 4<br />
Figure 5<br />
Figure 6<br />
<strong>Caring</strong> <strong>for</strong> <strong>Your</strong> <strong>Tenckhoff®</strong> <strong>Catheter</strong> [ 5 of 8 ]
Problem Solving<br />
Here are some common problems patients encounter.<br />
Problem: There is no fluid coming out when draining.<br />
What to do:<br />
• Check to see if you removed the cap on the flow switch.<br />
• Check flow switch to make sure it is firmly clicked in the “ON” position.<br />
• Change position. Tilt from side to side.<br />
• Check <strong>for</strong> kinks in the catheter.<br />
If these steps do not resolve the problem, call the nurse or fellow in Interventional Radiology. The numbers are at<br />
the end of the booklet.<br />
Problem: Dressing gets soaked at the catheter exit site.<br />
What to do:<br />
Make sure when you are showering that your catheter is well covered. If your dressing gets wet during showering,<br />
change the dressing immediately afterward.<br />
If the wetness is occurring throughout the day from leaking ascites, your doctor may want to change your drainage<br />
schedule. Call the nurse or fellow in Interventional Radiology.<br />
Call <strong>Your</strong> Primary Doctor or Nurse If You:<br />
• Feel lightheaded or dizzy.<br />
• Have a temperature greater than 100.4°F (38°C).<br />
• Have the following or if you have any other concerns:<br />
– You have much less or much more drainage than you normally have.<br />
– The fluid looks different than usual.<br />
– The drainage is bloody, has an odor, or is cloudy.<br />
Call Intervional Radiology If You:<br />
• Have redness around the exit site of the tubing.<br />
• Have pain at the exit site or in your abdomen.<br />
• Think the catheter may have become dislodged.<br />
<strong>Caring</strong> <strong>for</strong> <strong>Your</strong> <strong>Tenckhoff®</strong> <strong>Catheter</strong> [ 6 of 8 ]
Ordering In<strong>for</strong>mation<br />
<strong>Your</strong> nurse will give you enough supplies when you go home to last <strong>for</strong> two weeks. In most cases, the visiting nurse<br />
service will order supplies after that. If you need to order supplies yourself, you can order them from General<br />
Stores at the hospital. You can also order from the company.<br />
Item MSKCC Number<br />
Adhesive remover 3170<br />
Alcohol swabs 3330<br />
Non-latex, non-sterile gloves 4480<br />
Male/female sterile cap 4092<br />
Measuring cylinder 4860<br />
Primapore dressing 1¾ x2¾ 3199<br />
Skin Prep 3332<br />
UC strip catheter tubing fastener 2676<br />
Gauze pads 3424<br />
AquaGuard 3294<br />
Interventional Radiology Contact In<strong>for</strong>mation<br />
For any issue related to your procedure, please contact Interventional Radiology. Monday through Friday, 9AM to<br />
5PM, call 212-639-2236 and ask <strong>for</strong> the nurse. After hours and on the weekends, call the paging operator, 212-<br />
639-2000 and ask <strong>for</strong> the Interventional Radiology Fellow on call.<br />
In addition, you can contact your primary doctor.<br />
<strong>Caring</strong> <strong>for</strong> <strong>Your</strong> <strong>Tenckhoff®</strong> <strong>Catheter</strong> [ 7 of 8 ]
Drainage Record<br />
Date Notes Morning Evening Total (mL)<br />
©2007 <strong>Memorial</strong> <strong>Sloan</strong>-<strong>Kettering</strong> Cancer Center<br />
1275 York Avenue, New York, New York 10065<br />
Revised 2009<br />
<strong>Caring</strong> <strong>for</strong> <strong>Your</strong> <strong>Tenckhoff®</strong> <strong>Catheter</strong> [ 8 of 8 ]