Caring for Your Biliary Drainage Catheter - Memorial Sloan ...
Caring for Your Biliary Drainage Catheter - Memorial Sloan ...
Caring for Your Biliary Drainage Catheter - Memorial Sloan ...

You also want an ePaper? Increase the reach of your titles
YUMPU automatically turns print PDFs into web optimized ePapers that Google loves.
<strong>Caring</strong> <strong>for</strong> <strong>Your</strong> <strong>Biliary</strong> <strong>Drainage</strong> <strong>Catheter</strong><br />
Piera M. Cote Robson, RN, BSN<br />
Introduction<br />
You will have a biliary drainage catheter to relieve a blockage. The catheter is placed through your skin into your<br />
bile ducts. It allows bile that has been blocked by a tumor to drain out of your body into a bag or inside your body<br />
to your small intestine. Bile is a thick greenish-yellow fluid produced by your liver to help your body digest foods.<br />
This booklet tells you how:<br />
• <strong>Your</strong> biliary system works.<br />
• The biliary tube will be placed in your bile ducts.<br />
• To care <strong>for</strong> your catheter at home.<br />
<strong>Your</strong> nurse will review this in<strong>for</strong>mation with you after the catheter is placed. You and a family member will do the<br />
catheter care with the nurse be<strong>for</strong>e you go home.<br />
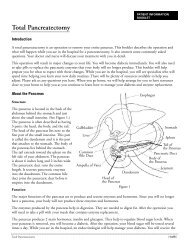
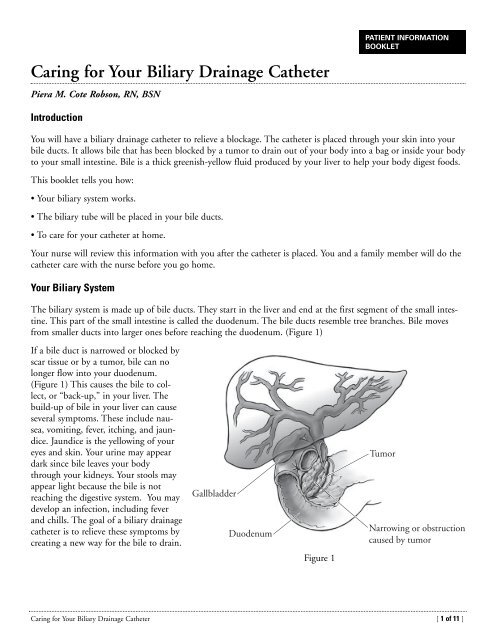
<strong>Your</strong> <strong>Biliary</strong> System<br />
The biliary system is made up of bile ducts. They start in the liver and end at the first segment of the small intestine.<br />
This part of the small intestine is called the duodenum. The bile ducts resemble tree branches. Bile moves<br />
from smaller ducts into larger ones be<strong>for</strong>e reaching the duodenum. (Figure 1)<br />
If a bile duct is narrowed or blocked by<br />
scar tissue or by a tumor, bile can no<br />
longer flow into your duodenum.<br />
(Figure 1) This causes the bile to collect,<br />
or “back-up,” in your liver. The<br />
build-up of bile in your liver can cause<br />
several symptoms. These include nausea,<br />
vomiting, fever, itching, and jaundice.<br />
Jaundice is the yellowing of your<br />
eyes and skin. <strong>Your</strong> urine may appear<br />
dark since bile leaves your body<br />
through your kidneys. <strong>Your</strong> stools may<br />
appear light because the bile is not<br />
reaching the digestive system. You may<br />
develop an infection, including fever<br />
and chills. The goal of a biliary drainage<br />
catheter is to relieve these symptoms by<br />
creating a new way <strong>for</strong> the bile to drain.<br />
Gallbladder<br />
Duodenum<br />
Figure 1<br />
PATIENT INFORMATION<br />
BOOKLET<br />
Tumor<br />
Narrowing or obstruction<br />
caused by tumor<br />
<strong>Caring</strong> <strong>for</strong> <strong>Your</strong> <strong>Biliary</strong> <strong>Drainage</strong> <strong>Catheter</strong> [ 1 of 11 ]
Preparing <strong>for</strong> <strong>Your</strong> Procedure<br />
Please follow these instructions to prepare <strong>for</strong> the procedure:<br />
• Review the aspirin card. <strong>Your</strong> nurse or doctor’s office staff will give you this card. It tells you what products have<br />
aspirin and anti-inflammatory drugs. It also tells you when to stop taking them and what you can take instead.<br />
• Ask your doctor what to do if you take:<br />
– Blood thinners such as Coumadin ® (warfarin) or Plavix ® (clopidogrel).<br />
– Medicine <strong>for</strong> diabetes.<br />
• Call your doctor if you develop any illness a day or two be<strong>for</strong>e your procedure. This includes a fever, cold, flu, or<br />
a sore throat.<br />
• If you are coming in from home, a staff member will call you the day be<strong>for</strong>e the procedure. He or she will review all<br />
instructions with you and tell you when you should be here. Please call us by 8 p.m. if you have not gotten the<br />
phone call. The number is (212) 639-7881.<br />
• Do not eat solid food after midnight the night be<strong>for</strong>e your procedure.<br />
• You may eat or drink clear liquids up to one hour be<strong>for</strong>e your procedure. These include:<br />
– Water.<br />
– Apple or cranberry juice.<br />
– Coffee or tea without milk.<br />
– Jell-O ® .<br />
The Day of <strong>Your</strong> Procedure<br />
• You may shower, but do not apply any cream or lotion.<br />
• Take all medicines you normally take (except blood thinners and those on the aspirin card) with water or another<br />
clear liquid. If you have diabetes, take only the diabetes medicines that you doctor instructed you to take.<br />
• If you use contact lenses, wear glasses instead. If you do not have glasses, bring a container <strong>for</strong> your contact lenses.<br />
• If you are being admitted to the hospital <strong>for</strong> the procedure:<br />
– Bring your medicines with you on the day of the procedure.<br />
– Leave valuables and jewelry at home.<br />
– Bring only the money you need (e.g., <strong>for</strong> a newspaper or parking costs).<br />
– Bring your <strong>Memorial</strong> outpatient ID card.<br />
– Enter the hospital through the main entrance at 1275 York Avenue. Turn right to check in at the Admissions<br />
Center. After you are admitted, you will be sent to the Pre-Surgical Center on the 6th floor.<br />
Insertion of <strong>Your</strong> <strong>Biliary</strong> <strong>Drainage</strong> <strong>Catheter</strong><br />
The biliary drainage catheter is placed by a doctor in Interventional Radiology. The procedure takes about one to<br />
two hours. The doctor will explain it and its risks and benefits. You will be asked to sign a consent <strong>for</strong>m.<br />
<strong>Drainage</strong> of the bile ducts is achieved in one of three ways. <strong>Your</strong> doctor will discuss these options with you be<strong>for</strong>e<br />
beginning your procedure.<br />
<strong>Caring</strong> <strong>for</strong> <strong>Your</strong> <strong>Biliary</strong> <strong>Drainage</strong> <strong>Catheter</strong> [ 2 of 11 ]
Types of drainage:<br />
1. External biliary drainage: This<br />
catheter passes through the skin and<br />
into the bile ducts. The end of the<br />
catheter that is in the bile ducts is<br />
placed above the blockage. (Figure 2) At<br />
the end of the procedure, there will be a<br />
catheter extending from your body. It<br />
will be attached to an external collecting<br />
bag.<br />
2. Internal-external biliary drainage.<br />
This catheter passes through the skin<br />
and into the bile ducts. It is guided<br />
across the obstruction. One end of the<br />
catheter sits in the small intestine. The<br />
other exits outside your body and will<br />
be attached to a drainage bag. (Figure 3)<br />
This lets bile flow in two directions. It<br />
can go out to the external collecting bag<br />
or into the small intestine. This is the<br />
most common kind of drainage.<br />
However, it is not always possible.<br />
3. Internal biliary drainage or stenting.<br />
A small number of patients have only a<br />
small catheter extending from their<br />
body. This occurs when a metal tube, or<br />
stent, was placed across the blockage. The<br />
stent holds the blocked area open. On<br />
the day after the procedure, you will<br />
return to Interventional Radiology to<br />
check that the procedure was successful.<br />
If it was, the catheter will be removed.<br />
You will be brought to Interventional<br />
Radiology thirty to <strong>for</strong>ty-five minutes<br />
be<strong>for</strong>e the start of your procedure. An intra-<br />
Gallbladder<br />
Gallbladder<br />
Duodenum<br />
Duodenum<br />
venous (IV) line will be placed if you don’t already have one. You will get antibiotics through your IV line be<strong>for</strong>e<br />
the procedure.<br />
You will be brought into a room and monitoring equipment will be placed. You will be given medicine through<br />
your IV that will make you feel drowsy. It will control pain and anxiety. The area where the catheter is inserted will<br />
be numbed with local anesthetic.<br />
The doctor uses fluoroscopy to aid in placing the catheter. These real<br />
time x-rays let the doctor see the bile ducts when x-ray dye (called contrast)<br />
is injected. The doctor will then know what type of drainage is<br />
possible.<br />
After the drainage catheter is inserted, a silicone disk is placed on the<br />
catheter. (Figure 4) This disk allows the catheter to be secured to the<br />
Figure 2<br />
Figure 3<br />
<strong>Biliary</strong> drainage<br />
catheter<br />
Narrowing or obstruction<br />
caused by tumor<br />
Narrowing or obstruction<br />
caused by tumor<br />
<strong>Catheter</strong><br />
Black ink mark<br />
Disk nipple<br />
Silicone disk<br />
Figure 4<br />
<strong>Caring</strong> <strong>for</strong> <strong>Your</strong> <strong>Biliary</strong> <strong>Drainage</strong> <strong>Catheter</strong> [ 3 of 11 ]
skin. There are times when the catheter may be secured with a suture, in addition to the disk. The disk is held to<br />
the skin with an adhesive dressing. A black mark is placed immediately above the disk on the catheter. This mark<br />
will let you see if the catheter has moved out of place.<br />
After the Procedure<br />
After the procedure, you will return to your in-patient room if you were already an inpatient. If you were admitted<br />
just be<strong>for</strong>e the procedure, you will go to the PSC (Pre-Surgical Center). You will need to stay in bed <strong>for</strong> 3 hours to<br />
let the sedation to wear off. You will then be taken to your inpatient room.<br />
Care of the <strong>Catheter</strong><br />
<strong>Your</strong> <strong>Catheter</strong><br />
The end of the catheter that is outside your<br />
body will be attached to a three-way stopcock.<br />
(Figure 5) It is called a three-way stopcock<br />
because it has three points of attachment<br />
and a tap that can be turned to control<br />
the flow. The drainage bag will be connected<br />
opposite the catheter. The final attachment<br />
point has a protective cover on it, called a<br />
Clave ® . The Clave is blue.<br />
You will have a drainage bag attached to your catheter. You will see yellow-green fluid flowing into the bag. It is<br />
possible that the drainage will appear bloody at first. <strong>Your</strong> nurse will check the drainage to be certain it improves.<br />
Bile will begin flowing into the bag right after the procedure. If you have an external drainage catheter, you should<br />
expect to see 400 ml to 1 liter of drainage daily. A liter is a little more than a quart. If you have an internal-external<br />
drainage catheter, the amount will vary from person to person. It may be much higher or much lower. You will<br />
soon learn what is normal <strong>for</strong> you. Because bile is very salty, you must replace the salt you lose in the drainage. You<br />
should drink one quart of Gatorade ® or any other sports drink to replace these salts. You may notice a change in<br />
the color of the drainage depending on what you eat or drink. You also need a well-balanced diet with carbohydrates<br />
<strong>for</strong> extra energy.<br />
<strong>Caring</strong> <strong>for</strong> <strong>Your</strong> <strong>Drainage</strong> <strong>Catheter</strong><br />
While you are in the hospital, your nurse will teach you how to care <strong>for</strong> the catheter. Use this booklet at home.<br />
You may have a visiting nurse come until you feel secure doing all of the catheter care.<br />
<strong>Your</strong> daily routine will consist of:<br />
• Inspecting the catheter.<br />
• Flushing the catheter twice a day with normal saline.<br />
• Emptying collected drainage from the bag.<br />
<strong>Drainage</strong><br />
catheter<br />
Once a week, your dressing, stopcock, and drainage bag will need to be changed. You will need to change the<br />
dressing more often if it becomes loose, wet, or soiled. If a wet dressing is left against your skin, it may cause your<br />
skin to become reddened and sore. This makes skin breakdown more likely.<br />
You may need help changing the dressing and drainage equipment. You will be able to inspect the catheter and<br />
instill the sterile normal saline yourself.<br />
<strong>Caring</strong> <strong>for</strong> <strong>Your</strong> <strong>Biliary</strong> <strong>Drainage</strong> <strong>Catheter</strong> [ 4 of 11 ]<br />
Tap<br />
OFF OFF<br />
Center port<br />
with Clave<br />
OFF<br />
Figure 5<br />
Tubing to<br />
drainage bag
Inspecting <strong>Your</strong> <strong>Catheter</strong><br />
Inspect your catheter every day. Use a hand held mirror or a full length mirror or both.<br />
1. Look at the position of the black mark. Make sure it is near the disk. (Figure 4) <strong>Your</strong> nurse will show you what<br />
to look <strong>for</strong> be<strong>for</strong>e you leave the hospital.<br />
2. Check the dressing to assure that it is secure. If the dressing is wet, soiled, has come loose or started to lift from<br />
the skin, it needs to be changed.<br />
3. Examine the skin around the catheter to see that it is in good condition. There should be no redness, areas of<br />
broken skin, or rash. Fluid should not leak around the catheter.<br />
4. Look at the fluid in the bag. It should be flowing freely into the bag. It should not have changed color or consistency.<br />
5. Inspect the catheter and the drainage bag <strong>for</strong> kinks in the tubing.<br />
If you find a problem, call the interventional radiology nurse<br />
practitioner or fellow. The phone numbers are listed at the end of this booklet.<br />
Instilling Sterile Normal Saline into the <strong>Drainage</strong> <strong>Catheter</strong><br />
You will need to flush your catheter with 10ml of normal saline twice a day. To do this you will need:<br />
• A 10ml pre-filled normal saline syringe.<br />
• 2 alcohol wipes.<br />
1. Wash and dry your hands be<strong>for</strong>e you begin.<br />
2. Remove the cap from the syringe with a twisting motion. Lay the syringe on the table. Do not allow the tip of<br />
the syringe to touch anything.<br />
3. Sit or lie com<strong>for</strong>tably. The “off” tap of the stopcock should be facing the Clave. Turn it in the direction of the<br />
drainage bag. (Figure 5)<br />
4. Rub the blue Clave thoroughly with an alcohol wipe. Attach the syringe onto the Clave using a clockwise<br />
motion. Push the plunger of the syringe. Instill the saline in short bursts of two to three ml of fluid at a time<br />
until you have instilled 10 ml total. Never pull the plunger back after pushing the saline through the catheter.<br />
5. Stop the instillation if you:<br />
– Have pain.<br />
– Feel resistance.<br />
– See leaking around the catheter.<br />
Call the nurse practitioner or doctor at the numbers listed at the end of this booklet.<br />
6. Remove the syringe with a twisting motion and discard it.<br />
7. Turn the “off” tap of the stopcock back in the direction of the Clave. (Figure 5)<br />
8. You should see fluid drain into the bag.<br />
Changing the Uresil ® dressing<br />
The Uresil dressing system is designed to help keep the catheter from moving out of the bile ducts. The disk is<br />
secured to the drainage catheter. The dressing covers the disk, which helps to keep the catheter in place.<br />
<strong>Caring</strong> <strong>for</strong> <strong>Your</strong> <strong>Biliary</strong> <strong>Drainage</strong> <strong>Catheter</strong> [ 5 of 11 ]
The dressing, stopcock, and drainage system will need to be changed once a week. The dressing may need to be<br />
changed more often if it gets wet, soiled, pulls away from the skin, or loosens. Although you may need the assistance<br />
of your trained helper to do the dressing and equipment changes, you can assemble the equipment yourself.<br />
Begin by washing your hands. Then gather the following equipment to change the dressing, the stopcock, and the<br />
drainage system:<br />
Dressing<br />
• 1 Uresil adhesive dressing<br />
• 3M ® No Sting Barrier Film<br />
• Adhesive remover wipe<br />
• 1 alcohol wipe<br />
• Plain gauze<br />
• Mild soap and a cup of water<br />
• Non-sterile gloves<br />
• Optional: Telfa ®<br />
• Waste container<br />
Stopcock and <strong>Drainage</strong> Equipment<br />
• Non-sterile gloves<br />
• 1 Clave<br />
• 1 sterile three-way stopcock<br />
• 1 drainage bag<br />
• 1 UCStrip ® catheter tube fastener<br />
• 1-inch Micropore ® paper tape<br />
• Scissors to cut the tape<br />
Sit or lie com<strong>for</strong>tably. At this point, you might need your trained helper to continue. To the person doing the<br />
dressing change:<br />
1. Wash your hands and put on non-sterile gloves.<br />
2. Remove the old dressing. Hold the silicone disk in place using one finger to prevent tension or pulling on the<br />
catheter. Locate the slit in the Uresil dressing. From this spot, slowly and gently peel the adhesive away from the<br />
skin while holding the disk. If your skin is sensitive, ask your helper to rub adhesive remover along the dressing<br />
edge. It may minimize the discom<strong>for</strong>t.<br />
3. Loosen and remove the UC strip fastener. Put the drainage bag in a place where it will not fall.<br />
4. Dispose of the old dressing.<br />
5. Use a gauze pad moistened with soap and water to clean the skin around and under the disk. Then clean the top<br />
and bottom sides of the silicone disk itself. Always hold one side of the disk firmly on the skin while cleaning<br />
under the other side.<br />
6. Rinse and dry the skin and the silicone disk with fresh gauze<br />
and water.<br />
7. Wipe the top side of the silicone disk with an alcohol wipe. This removes any soap residue.<br />
8. Check the drainage catheter. The black ink mark should be just above the disk nipple. (Figure 4)<br />
9. Inspect the insertion site under the silicone disk. Always hold one side of the disk firmly on the skin while tilting<br />
up the other side. Call the nurse practitioner or fellow if you see any:<br />
– Redness.<br />
<strong>Caring</strong> <strong>for</strong> <strong>Your</strong> <strong>Biliary</strong> <strong>Drainage</strong> <strong>Catheter</strong> [ 6 of 11 ]
– Swelling.<br />
– Foul-smelling drainage.<br />
– Leakage of fluid.<br />
10. You may notice new tissue growing around the insertion site. This is harmless, but it can be removed by your<br />
doctor if it is painful.<br />
11. Apply the 3M No Sting Barrier Film to the skin around the silicone disk. Then apply more to the top of the<br />
disk where the dressing will be placed. This protects your skin and helps the adhesive stick better.<br />
12. Cut a slit in a 2 inch by 2 inch piece of Telfa. Slide it<br />
under the disk, around the catheter. (Figure 6) The<br />
slit should point towards the patient’s feet. This will<br />
prevent moisture build up under the disk.<br />
13. Open the slit and place the Uresil dressing around<br />
the catheter. (Figure 7) Place the dressing over the flat<br />
part of the disk, but under the disk’s nipple. The slit<br />
in the dressing should point towards the patient’s<br />
feet.<br />
14. The Uresil dressing has three pieces of backing. Start<br />
at one of the lower corners of the largest piece and<br />
slowly peel the backing paper away. As you peel away the paper,<br />
press the adhesive to the skin. This step will require practice and<br />
you will do it while you are in the hospital. If the dressing does<br />
not adhere properly, remove the Uresil dressing and Telfa and<br />
restart at step 10.<br />
15. Remove the other two pieces of backing paper one at a time.<br />
Press the adhesive to the skin. Overlap the slit edges of the<br />
dressing to make the dressing more secure.<br />
16. Remove your gloves and discard them in the waste container. Wash your hands.<br />
Changing the Stopcock and <strong>Drainage</strong> Equipment<br />
1. Wash your hands.<br />
2. Open the packages containing the Clave, three-way stopcock, and drainage bag. Save the package from the<br />
drainage bag.<br />
3. Remove the protective cover from the base of the Clave. Attach the Clave to center port of the stopcock. (Figure 5)<br />
4. Connect the tubing from the drainage bag to the stopcock with a twisting motion. Close the blue drainage port<br />
on the bottom of the bag by turning it clockwise. Closing the port prevents leaking.<br />
5. Place the assembled drainage bag back in its packaging. This will keep it clean until you are ready to connect it<br />
to the catheter.<br />
6. Put on non-sterile gloves.<br />
7. Loosen and remove the old UC-Strip fastener.<br />
Figure 6<br />
Figure 7<br />
Disk nipple<br />
Dressing<br />
8. Twist off the old stopcock and drainage system from the catheter and discard. Quickly attach the new stopcock<br />
and drainage system.<br />
<strong>Caring</strong> <strong>for</strong> <strong>Your</strong> <strong>Biliary</strong> <strong>Drainage</strong> <strong>Catheter</strong> [ 7 of 11 ]
9. Make sure the off tap of the stopcock is turned in the direction of the Clave.<br />
10. Secure the new tubing to the abdomen with a UC Strip:<br />
• Remove the backing from the center of the UC strip to expose the adhesive.<br />
(Figure 8)<br />
• Place the center section of the adhesive onto the drainage bag tubing about<br />
two to four inches down from stopcock.<br />
• Press the adhesive around the catheter. (Figure 9) The remaining adhesive will<br />
stick together.<br />
• Select a position <strong>for</strong> the UC strip. The UC strip and drainage bag tubing<br />
should be lower than the catheter insertion site. Rest the tubing on the<br />
abdomen on the selected site. There should be no pull or tension on the<br />
catheter. There should be a gentle bowing of the catheter.<br />
• Remove the backing paper from each side of the UC strip, one at a time.<br />
Smooth the adhesive onto the abdomen. The UC strip will prevent pulling,<br />
tension, or kinking of the drainage catheter and tubing. (Figure 10)<br />
11. Secure the drainage bag with the belt or with a safety pin. You can attach the<br />
bag to the waistband of your clothing with the safety pin or to your leg with the<br />
included Velcro straps. The bag should be below the level of the catheter. That<br />
allows the catheter to drain by gravity. (Figure 11)<br />
12. Check to see that the catheter is draining into the new tubing.<br />
13. When you have finished, remove the latex gloves and wash your hands.<br />
Sign and Symptoms of Blockage<br />
There are a number of signs and symptoms that may indicate a blockage in the<br />
drainage catheter. They include:<br />
• Decreased amount or absence of bile.<br />
• Persistent leakage of bile around the insertion site.<br />
• Inability to flush catheter.<br />
• Leaking around catheter during flushing.<br />
• Fever and chills.<br />
• Nausea.<br />
• Increased jaundice.<br />
If any of these signs or symptoms appear, whether alone or together, check the<br />
catheter first.<br />
• The black ink mark should be located slightly above the nipple of the disk. If it is<br />
not, the catheter may have moved out of the bile duct.<br />
• If the black mark has not moved, check the position of the tap on the three-way<br />
stopcock. Make sure it is pointing in the direction of the Clave.<br />
Figure 8<br />
Figure 9<br />
Figure 10<br />
Figure 11<br />
<strong>Caring</strong> <strong>for</strong> <strong>Your</strong> <strong>Biliary</strong> <strong>Drainage</strong> <strong>Catheter</strong> [ 8 of 11 ]
• Remove any kinks in the tubing since they can stop the flow into the drainage bag.<br />
• If there is still no drainage, gently flush the catheter with 10 ml of normal saline. Stop instillation if you have:<br />
– Pain.<br />
– Resistance.<br />
– Leakage around the catheter.<br />
After doing these checks, call the nurse practitioner or fellow at the numbers listed at the end of this booklet.<br />
If you have a fever of 100.4º F (38º C) and you have no symptoms of blockage, it is important that you call<br />
your primary doctor at <strong>Memorial</strong>.<br />
Notify the nurse practitioner or fellow in Interventional Radiology if:<br />
• The location of the black dot has changed.<br />
• The clamp around disk is loose or opened. If your catheter is stitched in place, call Interventional Radiology if<br />
the stitch is broken.<br />
• <strong>Your</strong> skin looks red or irritated.<br />
• <strong>Drainage</strong> fluid is leaking around the catheter.<br />
• There is no longer drainage from the catheter.<br />
• There is a kink in the tube that you can not straighten out, causing a blockage in the flow.<br />
• You have pain, tenderness, or swelling at the catheter site.<br />
• You have fever.<br />
• You experience pain, resistance, or leakage around catheter when instilling normal saline.<br />
• You notice a bloody appearance to your drainage.<br />
• You have any concerns about your catheter.<br />
Routine Change Of <strong>Your</strong> <strong>Biliary</strong> <strong>Drainage</strong> <strong>Catheter</strong><br />
<strong>Your</strong> biliary drainage catheter will need to be changed every 8-12 weeks. The interventional radiologist may tell<br />
you to come in more or less frequently. You can make you own appointment <strong>for</strong> a routine catheter change. Call<br />
(212) 639-7946 at least 3 weeks ahead of time to make an appointment.<br />
You must take antibiotics each time the catheter is changed. Begin taking them the day be<strong>for</strong>e the change; continue<br />
until the day after. If you need a prescription, tell the secretary when you call <strong>for</strong> your appointment. The nurse<br />
practitioner can call your pharmacy <strong>for</strong> you.<br />
Special Points to Remeber<br />
The catheter can be easily covered by clothing. You may go to work and exercise with the catheter in place. Avoid<br />
movements that involve aggressive stretching from side to side or continual bending. These could dislodge the<br />
catheter. You may not swim with your catheter. Speak to the radiologist if you have a warm weather vacation<br />
planned so that you can be taught what to do in this situation.<br />
You may take showers. Remove the belt and empty the drainage bag. Tape the drainage bag to your abdomen.<br />
Tape plastic wrap or a gallon sized bag over the dressing to keep it dry. If the dressing gets wet, you will need to<br />
<strong>Caring</strong> <strong>for</strong> <strong>Your</strong> <strong>Biliary</strong> <strong>Drainage</strong> <strong>Catheter</strong> [ 9 of 11 ]
change it. Wet dressings are the major cause of skin problems. A hand held shower can help direct the water away<br />
from the dressing.<br />
Keep the tubing secured to your body with a UC strip at all times. When you are getting dressed, take care not to<br />
tug on the catheter. Do not allow the tubing to become kinked by clothing such as pantyhose or a belt. Try not to<br />
lie on your catheter when you sleep. This will prevent kinking of the catheter.<br />
A Visiting Nurse Service referral will be made <strong>for</strong> you be<strong>for</strong>e you leave the hospital. This nurse will assist you and<br />
your helper until you can manage the catheter care on you own.<br />
Inspect the bile frequently. It should be flowing freely into the bag. It should always look the same. If there is a<br />
decrease in amount, or if the bile’s color or sediments change, you may not be drinking enough fluids.<br />
If you have an internal-external biliary drainage catheter, your doctor may want you to do a ‘capping trial’. A blue<br />
Clave is put on the end of the catheter and you will no longer need a bag. This is done to see if all of the bile can<br />
drain into your digestive system.<br />
If you have a capped internal-external drainage catheter, you need to attach the catheter to a bag (assembled as<br />
instructed above) if you have any of the following:<br />
• Pain.<br />
• Fever.<br />
• Leaking around the catheter.<br />
• Inability to flush the catheter.<br />
Be sure to remove the stopcock on the catheter be<strong>for</strong>e attaching to a bag.<br />
This will let the bile flow out externally. Call the nurse practitioner or fellow at the numbers listed at the end of<br />
this booklet.<br />
Conclusion<br />
The biliary drainage catheter should decrease or relieve:<br />
• Jaundice.<br />
• Nausea.<br />
• Vomiting.<br />
• Itching.<br />
If you have questions about caring <strong>for</strong> the catheter or adapting your lifestyle, please call us and ask to speak to a<br />
nurse. We will do everything we can to help you.<br />
Ordering In<strong>for</strong>mation<br />
You can order supplies from General Stores at the hospital. You can also order directly from the company. You will<br />
need a prescription to obtain pre-filled normal saline syringes. If your local pharmacy can not supply the syringes,<br />
you can get these from the outpatient pharmacy at <strong>Memorial</strong>.<br />
<strong>Caring</strong> <strong>for</strong> <strong>Your</strong> <strong>Biliary</strong> <strong>Drainage</strong> <strong>Catheter</strong> [ 10 of 11 ]
MSKCC<br />
Item Number Supplied<br />
Adhesive remover 31705 box<br />
Alcohol wipes 33305 box<br />
<strong>Drainage</strong> Discharge Kit 3115 kit<br />
(4 weeks of supplies)<br />
Clave 9679 each<br />
Microfoam 33164 box<br />
Micropore paper tape 43267 box<br />
Non-sterile latex gloves 48606 box<br />
Plain gauze 34245 package<br />
Skin Prep 33321 box<br />
Telfa 33271 each<br />
Three Way Stopcock (Cook brand) 5192 each<br />
Uresil ® drainage bag 33617 each<br />
Uresil ® adhesive dressing 32265 box<br />
UC strip catheter tubing fastener 26762 box<br />
Interventional Radiology Contact In<strong>for</strong>mation<br />
For any issue about with your catheter, please contact Interventional Radiology.<br />
• Monday through Friday, 8AM to 6PM, call 212-639-7326 and ask <strong>for</strong> the nurse practitioner.<br />
• After hours and on the weekends, call the paging operator, 212-639-7900 and ask <strong>for</strong> the Interventional<br />
Radiology Fellow on call.<br />
©1994 <strong>Memorial</strong> <strong>Sloan</strong>-Kettering Cancer Center<br />
1275 York Avenue, New York, New York 10065<br />
Revised 1997, 2007, 2009<br />
<strong>Caring</strong> <strong>for</strong> <strong>Your</strong> <strong>Biliary</strong> <strong>Drainage</strong> <strong>Catheter</strong> [ 11 of 11 ]