Caring for Your Biliary Drainage Catheter - Memorial Sloan ...
Caring for Your Biliary Drainage Catheter - Memorial Sloan ...
Caring for Your Biliary Drainage Catheter - Memorial Sloan ...

You also want an ePaper? Increase the reach of your titles
YUMPU automatically turns print PDFs into web optimized ePapers that Google loves.
– Swelling.<br />
– Foul-smelling drainage.<br />
– Leakage of fluid.<br />
10. You may notice new tissue growing around the insertion site. This is harmless, but it can be removed by your<br />
doctor if it is painful.<br />
11. Apply the 3M No Sting Barrier Film to the skin around the silicone disk. Then apply more to the top of the<br />
disk where the dressing will be placed. This protects your skin and helps the adhesive stick better.<br />
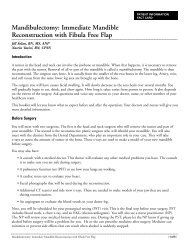
12. Cut a slit in a 2 inch by 2 inch piece of Telfa. Slide it<br />
under the disk, around the catheter. (Figure 6) The<br />
slit should point towards the patient’s feet. This will<br />
prevent moisture build up under the disk.<br />
13. Open the slit and place the Uresil dressing around<br />
the catheter. (Figure 7) Place the dressing over the flat<br />
part of the disk, but under the disk’s nipple. The slit<br />
in the dressing should point towards the patient’s<br />
feet.<br />
14. The Uresil dressing has three pieces of backing. Start<br />
at one of the lower corners of the largest piece and<br />
slowly peel the backing paper away. As you peel away the paper,<br />
press the adhesive to the skin. This step will require practice and<br />
you will do it while you are in the hospital. If the dressing does<br />
not adhere properly, remove the Uresil dressing and Telfa and<br />
restart at step 10.<br />
15. Remove the other two pieces of backing paper one at a time.<br />
Press the adhesive to the skin. Overlap the slit edges of the<br />
dressing to make the dressing more secure.<br />
16. Remove your gloves and discard them in the waste container. Wash your hands.<br />
Changing the Stopcock and <strong>Drainage</strong> Equipment<br />
1. Wash your hands.<br />
2. Open the packages containing the Clave, three-way stopcock, and drainage bag. Save the package from the<br />
drainage bag.<br />
3. Remove the protective cover from the base of the Clave. Attach the Clave to center port of the stopcock. (Figure 5)<br />
4. Connect the tubing from the drainage bag to the stopcock with a twisting motion. Close the blue drainage port<br />
on the bottom of the bag by turning it clockwise. Closing the port prevents leaking.<br />
5. Place the assembled drainage bag back in its packaging. This will keep it clean until you are ready to connect it<br />
to the catheter.<br />
6. Put on non-sterile gloves.<br />
7. Loosen and remove the old UC-Strip fastener.<br />
Figure 6<br />
Figure 7<br />
Disk nipple<br />
Dressing<br />
8. Twist off the old stopcock and drainage system from the catheter and discard. Quickly attach the new stopcock<br />
and drainage system.<br />
<strong>Caring</strong> <strong>for</strong> <strong>Your</strong> <strong>Biliary</strong> <strong>Drainage</strong> <strong>Catheter</strong> [ 7 of 11 ]