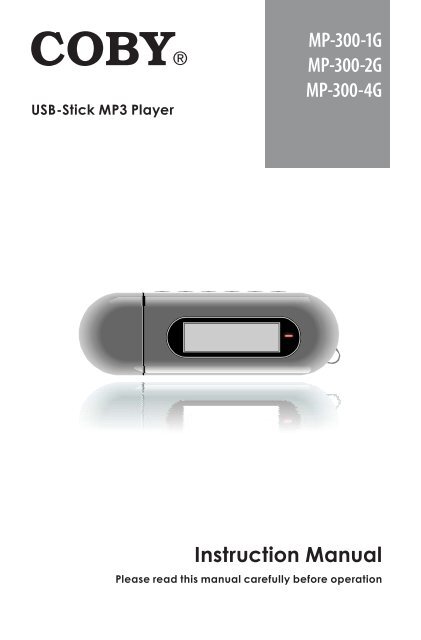
USB-Stick MP3 Player - COBY Electronics
USB-Stick MP3 Player - COBY Electronics
USB-Stick MP3 Player - COBY Electronics

You also want an ePaper? Increase the reach of your titles
YUMPU automatically turns print PDFs into web optimized ePapers that Google loves.
<strong>USB</strong>-<strong>Stick</strong> <strong>MP3</strong> <strong>Player</strong><br />
MP-300-1G<br />
MP-300-2G<br />
MP-300-4G<br />
Instruction Manual<br />
Please read this manual carefully before operation
Precautions<br />
The lightning flash with arrowhead symbol within an equilateral triangle<br />
is intended to alert the user to the presence of uninsulated “dangerous<br />
voltage” within the product’s enclosure that may be of sufficient magnitude<br />
to constitute a risk of electric shock.<br />
The exclamation point within an equilateral triangle is intended to alert<br />
the user to the presence of important operation and servicing instructions<br />
in the literature accompanying the appliance.<br />
For Customer Use:<br />
Enter below the serial number that is located on the unit. Retain this information for<br />
future reference.<br />
Model No. MP-300<br />
Serial No.<br />
WARNING:<br />
To prevent fire or shock hazard, do not expose this device to rain or moisture. Dangerous high<br />
voltage is present inside the enclosure. Do not open the cabinet.<br />
CAUTION:<br />
To prevent electric shock, match wide blade of plug to wide slot of outlet and fully insert.<br />
WARNING:<br />
Handling the cords on this product will expose you to lead, a chemical known to the State<br />
of California to cause cancer, and birth defects or other reproductive harm. Wash hands<br />
after handling.<br />
For recycling or disposal information about this product, please contact your local<br />
authorities or the <strong>Electronics</strong> Industries Alliance: www.eiae.org.<br />
Page Coby <strong>Electronics</strong> Corporation
Precautions<br />
PROTECT YOUR HEARING:<br />
Hearing experts advise against the constant use of personal stereos played at high volume.<br />
Constant exposure to high volumes can lead to hearing loss. If you should experience<br />
ringing in the ears or hearing loss, discontinue use and seek medical advice.<br />
NOTICE:<br />
This product is protected by certain intellectual property rights of Microsoft. Use or distribution<br />
of such technology outside of this product is prohibited without a license from Microsoft.<br />
www.cobyusa.com Page
1.<br />
2.<br />
3.<br />
4.<br />
5.<br />
6.<br />
7.<br />
8.<br />
9.<br />
10.<br />
11.<br />
12.<br />
Important Safety Instructions<br />
Read Instructions: All the safety and operating instructions should be read<br />
before the product is operated.<br />
Retain Instructions: The safety and operating instructions should be retained<br />
for future reference.<br />
Heed Warnings: All warnings on the product and in the operating instructions<br />
should be adhered to.<br />
Follow Instructions: All operating and usage instructions should be followed.<br />
Cleaning: Unplug this product from the wall outlet before cleaning. Do not use<br />
liquid cleaners or aerosol cleaners. Use a damp cloth for cleaning.<br />
Attachments: Use only attachments recommended by the manufacturer. Use<br />
of other attachments may be hazardous.<br />
Water and Moisture: Do not use this product near water (e.g., near a bath tub,<br />
washbowl, kitchen sink, laundry tub, in wet basements, or near a swimming<br />
pool and the like).<br />
Accessories: Do not place this product on an<br />
unstable cart, stand, tripod, bracket, or table. Use<br />
only with carts, stands, tripods, brackets, or tables<br />
recommended by the manufacturer or sold with<br />
the product. Any mounting of the product should<br />
follow the manufacturer’s instructions and should<br />
use a mounting accessory recommended by the<br />
manufacturer.<br />
A product and cart combination should be moved with<br />
care. Quick stops, excessive force, and uneven surfaces<br />
may cause the product and cart combination to overturn.<br />
Ventilation: Slots and openings in the cabinet are provided for ventilation to<br />
ensure reliable operation of the product and to protect it from overheating.<br />
These openings should never be blocked by placing the product on a bed, sofa,<br />
rug, or other similar surface. This product should not be placed in a built-in<br />
installation such as a bookcase or rack unless proper ventilation is provided or<br />
the manufacturer instructions have been adhered to.<br />
Power Sources: This product should be operated only from the type of power<br />
source indicated on the rating label. If you are not sure of the type of power<br />
supply to your home, consult your product dealer or local power company. For<br />
products intended to operate from battery power or other sources, refer to the<br />
operating instructions.<br />
Grounding or Polarization: This product may be equipped with a polarized<br />
alternating-current line plug that has one blade wider than the other. This plug<br />
will only fit into the power outlet in one direction. This is a safety feature. If you<br />
are unable to insert the plug fully into the outlet, try reversing the direction of the<br />
plug. If the plug should still fail to fit, contact an electrician to replace the obsolete<br />
outlet. Do not defeat the safety purpose of the polarized plug.<br />
Page Coby <strong>Electronics</strong> Corporation
13.<br />
14.<br />
15.<br />
16.<br />
17.<br />
18.<br />
Important Safety Instructions<br />
Power-Cord Protection: Power supply cords should be routed so that they<br />
are not likely to be walked on or pinched by items placed upon or against them,<br />
paying particular attention to cords at plugs, convenience receptacles, and at<br />
the point which they exit from the product.<br />
Protective Attachment Plug: The product may be equipped with an attachment<br />
plug with overload protection. This is a safety feature. See the operating<br />
instructions for replacement or directions to reset the protective device. If<br />
replacement of the plug is required, be sure the service technician has used a<br />
replacement plug that has the same overload protection as the original plug as<br />
specified by the manufacturer.<br />
Outdoor Antenna Grounding: If an outside antenna is connected to the<br />
product, be sure the antenna system is grounded so as to provide some protection<br />
against voltage surges and built-up static charges. Article 810 of the<br />
National Electrical Code, ANS/NFPA 70 provides information with regard to<br />
proper grounding of the mast and supporting structure, grounding of the leadin<br />
wire to an antenna-discharge unit, size of grounding conductors, location of<br />
antenna-discharge unit, connection to grounding electrodes, and requirements<br />
for the grounding electrode (see figure).<br />
Lightning: For added protection for this product, unplug it from the wall outlet<br />
and disconnect the antenna or cable system during a lightning storm or when<br />
it is left unattended and unused for long periods of time. This will prevent damage<br />
to the product due to lightning or power-line surges.<br />
Power Lines: An outside antenna system should not be located in the vicinity<br />
of overhead power lines or other electric light or power circuits, or where it<br />
can fall into such power lines or circuits. When installing an outside antenna<br />
system, extreme care should be taken to keep from touching such power lines<br />
or circuits, as contact with them might be fatal.<br />
Overloading: Do not overload wall outlets, extension cords, or integral convenience<br />
receptacles as this can result in a risk of fire or electric shock.<br />
www.cobyusa.com Page
19.<br />
20.<br />
21.<br />
22.<br />
23.<br />
24.<br />
25.<br />
Important Safety Instructions<br />
Object and Liquid Entry: Never push objects of any kind into this product<br />
through openings as they may touch dangerous voltage points or shout-out<br />
parts that could result in a fire or electric shock. Never spill liquid of any kind<br />
on the product.<br />
Servicing: Do not attempt to service this product yourself as opening or removing<br />
covers may expose you to dangerous voltage or other hazards. Refer<br />
all servicing to qualified service personnel.<br />
Damage Requiring Service: Unplug this product from the wall outlet and refer<br />
servicing to qualified service personnel under the following conditions: a) when<br />
the power-supply or plug is damaged; b) if liquid has been spilled or if objects<br />
have fallen into the product; c) if the product has been exposed to rain or water;<br />
d) if the product does not operate normally by following the operating instructions.<br />
Adjust only those controls that are covered by the operating instructions<br />
as improper adjustment of other controls may result in damage and will often<br />
require extensive work by a qualified technician to restore the product to its<br />
normal operation; e) if the product has been dropped or damaged in any way;<br />
f) when the product exhibits a distinct change in performance—this indicates<br />
a need for service.<br />
Replacement Parts: When replacement parts are required, be sure that your<br />
service technician has used replacement parts specified by the manufacturer<br />
or have the same characteristics as the original part. Unauthorized substitutions<br />
may result in fire, electric shock, or other hazards.<br />
Safety Check: Upon completion of any service or repairs to this product, ask<br />
the service technician to perform safety checks to ensure that the product is in<br />
proper operating condition.<br />
Wall or Ceiling Mounting: The product should be mounted to a wall or ceiling<br />
only as recommended by the manufacturer.<br />
Heat: The product should be situated away from heat sources such as radiators,<br />
heat registers, stoves, or other products (including amplifiers) that<br />
produce heat.<br />
Page Coby <strong>Electronics</strong> Corporation
Table of Contents<br />
PreCaUTIonS .................................................................2<br />
IMPorTanT SafeTy InSTrUCTIonS .............................. 4<br />
TaBle of ConTenTS .......................................................7<br />
PaCkage ConTenTS .....................................................9<br />
feaTUreS ....................................................................... 10<br />
geTTIng STarTed ......................................................... 11<br />
MP-300 at a Glance .................................................... 11<br />
Top View ................................................................ 11<br />
Bottom View .......................................................... 11<br />
Front View .............................................................. 11<br />
Right View .............................................................. 11<br />
Play Mode Display ............................................... 12<br />
Record Mode Display .......................................... 12<br />
Connecting Headphones .......................................... 13<br />
Connecting Power ....................................................... 13<br />
Loading a Battery ................................................ 13<br />
<strong>USB</strong> Power .............................................................. 14<br />
Using the MP-300 Controls .......................................... 15<br />
Power On/Off ........................................................ 15<br />
Hold Switch ............................................................ 15<br />
Reset Function ...................................................... 15<br />
Navigating the Menu Interface ......................... 16<br />
Main Menu ........................................................................<br />
Play MUSIC ................................................................... 17<br />
Play Music Controls ...................................................... 17<br />
Repeat A-B Mode ................................................ 18<br />
SeTTIng.......................................................................... 19<br />
folder ..........................................................................21<br />
Folder Controls .............................................................. 21<br />
www.cobyusa.com Page
Table of Contents<br />
<strong>USB</strong> ConneCTIon ........................................................22<br />
Connecting to a Computer........................................22<br />
Transferring Files ............................................................23<br />
Disconnecting from a Computer ..............................24<br />
Microsoft Windows .......................................24<br />
Macintosh OS X ............................................25<br />
fIrMware UPgrade....................................................26<br />
aBoUT <strong>MP3</strong>/wMa fIleS ...............................................27<br />
TroUBleShooTIng ......................................................28<br />
SPeCIfICaTIonS ........................................................... 31<br />
Page Coby <strong>Electronics</strong> Corporation
Package Contents<br />
Please make sure that the items listed below are included<br />
in the package. Should an item be missing, please<br />
contact the local retailer from which you purchased this<br />
product.<br />
1.<br />
2.<br />
3.<br />
4.<br />
5.<br />
MP-300<br />
Stereo Earphones<br />
<strong>USB</strong> Extension Cable<br />
1 x “AAA” Battery<br />
Instruction Booklet<br />
1<br />
4<br />
www.cobyusa.com Page<br />
2<br />
5<br />
3
features<br />
Integrated Flash Memory<br />
High-Contrast LCD Display with Backlight<br />
Plays <strong>MP3</strong> and WMA Digital Music Files<br />
ID3 support for song information display<br />
Mobile Data Storage Function<br />
<strong>USB</strong> 2.0 for Fast File Transfers<br />
Page 10 Coby <strong>Electronics</strong> Corporation
MP-300 at a glance<br />
Top View<br />
1.<br />
2.<br />
3.<br />
4.<br />
5.<br />
6.<br />
MENU button<br />
Volume +<br />
Volume -<br />
Previous/Reverse<br />
Next/Forward<br />
Play/Pause/Stop<br />
Bottom View<br />
7.<br />
8.<br />
9.<br />
HOLD Switch<br />
<strong>USB</strong> Cap<br />
Battery Cover<br />
front View<br />
10.<br />
11.<br />
LCD Display<br />
Neckstrap Hook<br />
right View<br />
12.<br />
Headphone Out Jack<br />
getting Started<br />
www.cobyusa.com Page 11<br />
10<br />
1<br />
3<br />
5<br />
12<br />
2<br />
4<br />
6<br />
11
Play Mode display<br />
record Mode display<br />
getting Started<br />
Page 1 Coby <strong>Electronics</strong> Corporation
Connecting headphones<br />
Connect headphones/earphones<br />
to the Headphone<br />
Out jack for private<br />
listening.<br />
<br />
<br />
<br />
Lower the volume<br />
level before connecting<br />
headphones, then gradually increase the volume<br />
for comfortable listening.<br />
Hearing experts advise against the constant use of<br />
personal stereos played at high volume.<br />
Constant high-volume use can lead to hearing loss.<br />
If you experience ringing in your ears or hearing loss,<br />
discontinue use immediately and seek medical advice.<br />
Connecting Power<br />
getting Started<br />
The MP-300 operates on 1 x “AAA” battery for music<br />
playback.<br />
loading a Battery<br />
1. Remove the <strong>USB</strong> Cap.<br />
2. Remove the Battery<br />
Cover.<br />
3. Insert 1 x “AAA” battery,<br />
taking care to match the<br />
“+” and “–” polarities of the<br />
battery with the markings<br />
inside the battery compartment.<br />
www.cobyusa.com Page 1
4.<br />
Replace the Battery Cover.<br />
<strong>USB</strong> Power<br />
getting Started<br />
When the MP-300 is connected to a computer’s powered<br />
<strong>USB</strong> port, it will draw power over the <strong>USB</strong> connection.<br />
Page 1 Coby <strong>Electronics</strong> Corporation
Using the MP-300 Controls<br />
Power on/off<br />
To turn your player on, press<br />
will light.<br />
. The LED indicator<br />
To turn your player off, hold for at least 3 seconds.<br />
The LED indicator will darken.<br />
hold Switch<br />
The Hold feature locks (disables) your player’s controls to<br />
prevent accidental key presses when it is in your pocket<br />
or bag.<br />
To lock the player’s controls, slide the HOLD switch<br />
to the right in the direction of the arrow. A Lock icon<br />
will be displayed on the screen.<br />
<br />
getting Started<br />
To unlock the player’s controls, slide the HOLD<br />
switch to the left.<br />
reset function<br />
You may reset your player if it should freeze or otherwise<br />
behave abnormally.<br />
1. Disconnect your player if it is connected to a<br />
computer.<br />
2. Remove the battery from the player. Wait 10<br />
seconds, and then replace the battery.<br />
www.cobyusa.com Page 1<br />
HO L D
3.<br />
Power on your player. Your player has now been<br />
reset.<br />
navigating the Menu Interface<br />
It is easy to use the MP-300 controls to select menu options,<br />
items, and files on your player.<br />
<br />
<br />
<br />
To move the selection cursor (highlight), press the<br />
arrow keys. To move quickly in any direction, press<br />
and hold the arrow keys.<br />
<br />
<br />
getting Started<br />
To highlight the previous item to the left (or up),<br />
press .<br />
To highlight the next item to the right (or down),<br />
press .<br />
To confirm and enter the current selection, press<br />
.<br />
To return to the previous screen, press .<br />
Page 1 Coby <strong>Electronics</strong> Corporation
Enter PLAY MUSIC mode from the<br />
Main Menu to play digital <strong>MP3</strong> or<br />
WMA music files.<br />
PLAY MUSIC mode will play all compatible audio<br />
files on your player, regardless of directory.<br />
Play Music Controls<br />
Use the following controls during music playback.<br />
Key Function<br />
Press<br />
Hold (2<br />
seconds)<br />
Start/Resume track playback.<br />
During playback, press to pause<br />
playback.<br />
Stop track playback completely.<br />
Press Play the next track.<br />
Hold<br />
Play Music<br />
Fast-forward through the current<br />
track.<br />
Press Play the previous track.<br />
Hold Reverse through the current track.<br />
Press Decrease the volume level.<br />
Press Increase the volume level.<br />
Press Start Repeat A-B Mode.<br />
Hold Return to Main Menu.<br />
www.cobyusa.com Page 1
For more information about how to get music<br />
onto your player, please refer to the section<br />
“Getting Started > Connecting to a Computer ><br />
Transferring Music to Your MP-300”.<br />
For more information about digital <strong>MP3</strong> and<br />
WMA music files, please refer to the section<br />
“About <strong>MP3</strong>/WMA Music Files”.<br />
repeat a-B Mode<br />
Set a segment of a music track to repeat in a continuous<br />
loop. During playback:<br />
<br />
<br />
<br />
Play Music<br />
To set the starting point “A” of the loop, press .<br />
To set the end point “B” of the loop, press again.<br />
The loop will now play from point “A” to point “B”.<br />
To resume normal playback, press again.<br />
Page 1 Coby <strong>Electronics</strong> Corporation
Enter SETTING mode from the Main<br />
Menu to change your player’s internal<br />
option settings.<br />
The Setting Menu contains 11 options.<br />
<br />
<br />
To select an option, press or . To confirm and<br />
enter, press .<br />
To exit the Setting Menu, press .<br />
Equalizer<br />
Item Description<br />
Repeat Mode<br />
Set a digital equalizer preset. The options are<br />
Normal, Pop, Rock, Classic, Jazz, and Bass.<br />
Set a Repeat Mode option. The options are Normal,<br />
Repeat One, Repeat All, Shuffle Repeat, Dir<br />
Normal, Dir All Repeat, Dir Shuffle Repeat.<br />
Contrast Set the contrast level of the display.<br />
Backlight<br />
Backlight<br />
Color<br />
Power Set<br />
Setting<br />
Set the backlight option to change the duration of<br />
time (in seconds) that the backlight will remain on<br />
after a key press. A setting of “Off” will disable the<br />
backlight completely. A setting of “On” will keep<br />
the backlight on continuously.<br />
Set the color of the backlight. A setting of “Color<br />
All” will change the backlight color with each key<br />
press.<br />
Set the Power Set option to change the duration<br />
of time (in minutes) that the player will remain on<br />
when it is idle. A setting of “Disable” will turn this<br />
power saving feature off.<br />
www.cobyusa.com Page 1
Setting<br />
Item Description<br />
Record Set<br />
Set the Recording Quality level for Voice or FM<br />
recordings. The options are 32Kbps (lowest<br />
quality), 44Kbps, 64Kbps, and 88Kbps (highest<br />
quality). Higher quality recordings will take up<br />
more memory than lower quality recordings.<br />
Langauge Set the Language that the menus appear in.<br />
Version View your player’s firmware information.<br />
Info View your player’s memory information.<br />
<strong>USB</strong> Mode<br />
Set the <strong>USB</strong> mode to MSC or MTP. For more<br />
information on <strong>USB</strong> modes, see the “Connecting<br />
to a Computer” section of this manual.<br />
While the player is connected to a computer,<br />
you can change the <strong>USB</strong> mode by pressing and<br />
holding .<br />
Page 0 Coby <strong>Electronics</strong> Corporation
folder<br />
Enter FOLDER mode to view, play, or<br />
delete files on your player.<br />
You can also connect your player to a computer to easily<br />
manage your file library.<br />
folder Controls<br />
A directory tree will be displayed on-screen upon entering<br />
FOLDER mode from the Main Menu.<br />
Use the following controls in FOLDER mode.<br />
Key Function<br />
Press Select the next file or folder (down).<br />
Press Select the previous file or folder (up).<br />
If a folder is selected, the folder’s contents will<br />
be displayed.<br />
If a file is selected, an option box will be<br />
displayed:<br />
Press<br />
• Select “Play Now” to play the selected file.<br />
• Select “Delete?” to delete the selected file, and<br />
then select “Yes” to confirm the deletion.<br />
If the icon is selected, the previous folder’s<br />
Press<br />
contents will be displayed.<br />
Return to Main Menu.<br />
www.cobyusa.com Page 1
Connect the MP-300 to a computer to:<br />
<br />
<br />
Transfer files to and from your player.<br />
Perform basic file management functions.<br />
If you are using Windows 98 SE, you must install a <strong>USB</strong><br />
driver. Download the driver from the Coby website at:<br />
www.cobyusa.com.<br />
Connecting to a Computer<br />
1.<br />
2.<br />
Make sure the<br />
player is turned off.<br />
<strong>USB</strong> Connection<br />
Remove the <strong>USB</strong><br />
Cap and plug the<br />
MP-300 directly into<br />
your computer’s<br />
<strong>USB</strong> port. You may<br />
choose to use a <strong>USB</strong> extension cable to connect to a<br />
computer.<br />
Your computer will automatically recognize the<br />
player as an MSC Device. An icon representing<br />
your player will appear as a “Removable<br />
Disk” when you open “My Computer”.<br />
It may take Windows several minutes to recognize<br />
and set up the device the first time it is<br />
connected depending on your hardware configuration.<br />
Page Coby <strong>Electronics</strong> Corporation
Transferring files<br />
1.<br />
2.<br />
3.<br />
Connect the MP-200 to a computer.<br />
Open the computer’s file browser (e.g., “Windows<br />
Explorer”).<br />
Select the music files to transfer and drag-and-drop<br />
them onto the “Removable Disk” icon that represents<br />
your MP-300.<br />
<br />
<strong>USB</strong> Connection<br />
You may also transfer files from your MP-300 to<br />
a computer.<br />
Do not disconnect the MP-300 or otherwise interrupt<br />
the file transfer process. Doing so may<br />
corrupt your files and/or the player’s firmware.<br />
Please refer to the documentation that came with<br />
your computer or operating system for more information<br />
and support regarding music transfer<br />
and file management over a <strong>USB</strong> connection.<br />
www.cobyusa.com Page
disconnecting from a Computer<br />
Follow the steps below to prevent data loss or corruption.<br />
Microsoft Windows<br />
1.<br />
2.<br />
3.<br />
<strong>USB</strong> Connection<br />
Double-click the green arrow<br />
in the taskbar located on the<br />
lower-right side of the computer<br />
screen (Safely Remove Hardware).<br />
Safely Remove<br />
Hardware:<br />
Select “<strong>USB</strong> Mass<br />
Storage Device”<br />
from the list that<br />
appears and then<br />
click on “Stop”.<br />
Stop a Hardware<br />
Device: Select<br />
“<strong>USB</strong> Mass Storage<br />
Device” from the list<br />
that appears and<br />
then click on “OK”.<br />
Select “<strong>USB</strong> Mass Storage Device” from the list that<br />
appears and then click on “OK”.<br />
When the “Safe to Remove Hardware” window appears,<br />
click the OK button and disconnect the <strong>USB</strong><br />
cable from the player and your computer.<br />
Page Coby <strong>Electronics</strong> Corporation
Macintosh OS X<br />
1.<br />
2.<br />
3.<br />
<strong>USB</strong> Connection<br />
On the left side of the Finder window, identify the<br />
appropriate Removable Disk icon.<br />
Click on the “Eject” arrow on<br />
the right of the Removable<br />
Disk icon.<br />
Disconnect the <strong>USB</strong> cable<br />
from the player and your computer.<br />
www.cobyusa.com Page
firmware Upgrade<br />
From time to time, <strong>COBY</strong> may release firmware upgrades<br />
to improve the performance of the MP-300 or to add<br />
additional features. Please check the <strong>COBY</strong> website<br />
periodically at www.cobyusa.com to see if new firmware<br />
has been released for your player. If you are experiencing<br />
abnormal behavior with your player, you may choose to<br />
restore (format) your player before updating its firmware.<br />
1.<br />
2.<br />
3.<br />
4.<br />
5.<br />
4.<br />
Do not interrupt the firmware upgrade process—doing<br />
so could damage your player and<br />
render it inoperable.<br />
See the documentation that is included with the<br />
firmware upgrade file for detailed instructions.<br />
Connect your player to the computer.<br />
Download the latest firmware for your player from<br />
www.cobyusa.com. Save this file to the computer.<br />
Double-click the downloaded file (you may need a<br />
file compression utility installed on your computer).<br />
In the window that appears, double-click the file<br />
“factory4.exe” to start the upgrade utility.<br />
Follow the on-screen instructions to start the<br />
upgrade process.<br />
When the upgrade is complete, disconnect your<br />
player from the computer.<br />
Turn on your player to complete the firmware<br />
upgrade process.<br />
Page Coby <strong>Electronics</strong> Corporation
about <strong>MP3</strong>/wMa files<br />
For more information about digital <strong>MP3</strong> and WMA files,<br />
please visit our website at www.cobyusa.com.<br />
www.cobyusa.com Page
Troubleshooting<br />
If you have a problem with this device, please read the<br />
troubleshooting guide below and check our website<br />
at www.cobyusa.com for Frequently Asked Questions<br />
(FAQs) and firmware updates. If these resources do not<br />
resolve the problem, please contact Technical Support.<br />
Address <strong>COBY</strong> <strong>Electronics</strong> Technical Support<br />
56-65 Rust Street<br />
Maspeth, NY 11378<br />
Email techsupport@cobyusa.com<br />
Web www.cobyusa.com<br />
Phone 800-727-3592: Weekdays 8:00AM–11:00PM EST<br />
Weekends 9:00AM–5:30PM EST<br />
718-416-3197: Weekdays 8:00AM–5:30PM EST<br />
The player does not turn on.<br />
<br />
<br />
<br />
Ensure that the battery retains a charge. Try replacing<br />
the battery with a new one.<br />
Try resetting your player (remove and replace the<br />
battery).<br />
Ensure that the Hold switch is disengaged.<br />
The buttons do not work.<br />
<br />
<br />
Ensure that the battery retains a charge. Try replacing<br />
the battery with a new one.<br />
Ensure that the Hold switch is disengaged.<br />
Page Coby <strong>Electronics</strong> Corporation
I cannot transfer files to the player.<br />
<br />
<br />
<br />
<br />
<br />
<br />
Ensure that your computer is running a supported<br />
operating system.<br />
If you are running Microsoft Windows 98 SE, ensure<br />
that the <strong>USB</strong> driver has been properly installed.<br />
If using the supplied <strong>USB</strong> extension cable, ensure<br />
that it is securely attached to the player and the PC,<br />
or try using another <strong>USB</strong> cable.<br />
If you have connected the player through a <strong>USB</strong><br />
hub, try connecting the player directly to your<br />
computer.<br />
Ensure that the player’s memory capacity is not full.<br />
Ensure that the Hold switch is disengaged.<br />
There is no sound during playback.<br />
<br />
<br />
Check the volume level.<br />
Ensure that the headphones are attached securely<br />
to the player.<br />
The sound quality of the music is poor.<br />
<br />
<br />
Troubleshooting<br />
Try playing the file on your computer. If the sound<br />
quality is still poor, try downloading the file again or<br />
re-encoding the file yourself.<br />
Ensure that the bit rate of the file is not too low. The<br />
higher the bit rate of the file, the better it will sound.<br />
The minimum recommended bitrate is 128kbps for<br />
<strong>MP3</strong>s and 96kbps for WMAs.<br />
www.cobyusa.com Page
Try lowering the volume of the player.<br />
Ensure that the headphones are attached securely<br />
to the player.<br />
The player will not play my music file.<br />
<br />
<br />
Ensure that the file is in a compatible format.<br />
The file may be copy-protected and you no longer<br />
have authorization to play this file. If you feel this is<br />
in error, please contact the service from which you<br />
downloaded the file.<br />
The LCD characters are corrupted or something is<br />
wrong with the display.<br />
<br />
<br />
Ensure that the correct menu language has been<br />
set.<br />
Try resetting your player (remove and replace the<br />
battery).<br />
The player has malfunctioned.<br />
<br />
<br />
Troubleshooting<br />
Try resetting your player (remove and replace the<br />
battery).<br />
Try updating the player’s firmware. Please refer to<br />
the Firmware Upgrades section of this manual for<br />
detailed instructions.<br />
Page 0 Coby <strong>Electronics</strong> Corporation
Specifications<br />
Display Type 128 x 32 Dot-Matrix LCD with Backlight<br />
Memory Integrated Flash Memory<br />
MP-300-1G: 1GB<br />
MP-300-2G: 2GB<br />
MP-300-4G: 4GB<br />
Audio Format Support <strong>MP3</strong>, WMA<br />
DRM Support --<br />
Song Info Support ID3<br />
FM Frequency Range 87.5 - 108.0MHz<br />
PC Interface <strong>USB</strong> 2.0 Hi-Speed (MSC)<br />
Plug and Play Support Windows 98SE/2000/ME/XP or newer<br />
Mac OS X<br />
Audio Output 3.5mm Stereo (Headphone)<br />
Power Supply 1 x “AAA” Battery<br />
Unit Dimensions 2.2” x 2.87” x 0.82” (WHD)<br />
Specifications and manual are subject to change without<br />
prior notice.<br />
www.cobyusa.com Page 1
Coby electronics Corporation<br />
56-65 Rust Street<br />
Maspeth, NY 11378<br />
www.cobyusa.com<br />
www.ecoby.com<br />
Coby is a registered trademark of<br />
Coby <strong>Electronics</strong> Corporation.<br />
Printed in China.<br />
3001GAL<br />
3002GAL<br />
3004GAL