VTR Xchange User Guide - Aja
VTR Xchange User Guide - Aja
VTR Xchange User Guide - Aja

You also want an ePaper? Increase the reach of your titles
YUMPU automatically turns print PDFs into web optimized ePapers that Google loves.
2<br />
5.<br />
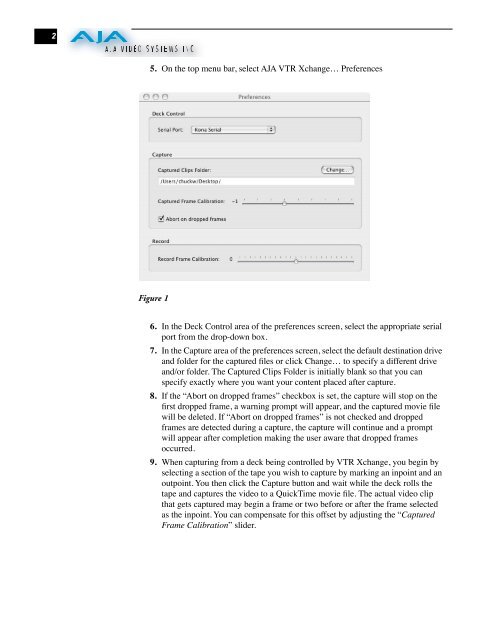
Figure 1<br />
6.<br />
7.<br />
8.<br />
9.<br />
On the top menu bar, select AJA <strong>VTR</strong> <strong>Xchange</strong>… Preferences<br />
In the Deck Control area of the preferences screen, select the appropriate serial<br />
port from the drop-down box.<br />
In the Capture area of the preferences screen, select the default destination drive<br />
and folder for the captured files or click Change… to specify a different drive<br />
and/or folder. The Captured Clips Folder is initially blank so that you can<br />
specify exactly where you want your content placed after capture.<br />
If the “Abort on dropped frames” checkbox is set, the capture will stop on the<br />
first dropped frame, a warning prompt will appear, and the captured movie file<br />
will be deleted. If “Abort on dropped frames” is not checked and dropped<br />
frames are detected during a capture, the capture will continue and a prompt<br />
will appear after completion making the user aware that dropped frames<br />
occurred.<br />
When capturing from a deck being controlled by <strong>VTR</strong> <strong>Xchange</strong>, you begin by<br />
selecting a section of the tape you wish to capture by marking an inpoint and an<br />
outpoint. You then click the Capture button and wait while the deck rolls the<br />
tape and captures the video to a QuickTime movie file. The actual video clip<br />
that gets captured may begin a frame or two before or after the frame selected<br />
as the inpoint. You can compensate for this offset by adjusting the “ Captured<br />
Frame Calibration”<br />
slider.