Using the Microsoft Flight Simulator X plug-in with your X52 Pro ...
Using the Microsoft Flight Simulator X plug-in with your X52 Pro ...
Using the Microsoft Flight Simulator X plug-in with your X52 Pro ...
You also want an ePaper? Increase the reach of your titles
YUMPU automatically turns print PDFs into web optimized ePapers that Google loves.
<strong>Us<strong>in</strong>g</strong> <strong>the</strong> <strong>Microsoft</strong> <strong>Flight</strong> <strong>Simulator</strong> X <strong>plug</strong>-<strong>in</strong> <strong>with</strong> <strong>your</strong> <strong>X52</strong> <strong>Pro</strong> <strong>Flight</strong> Control System<br />
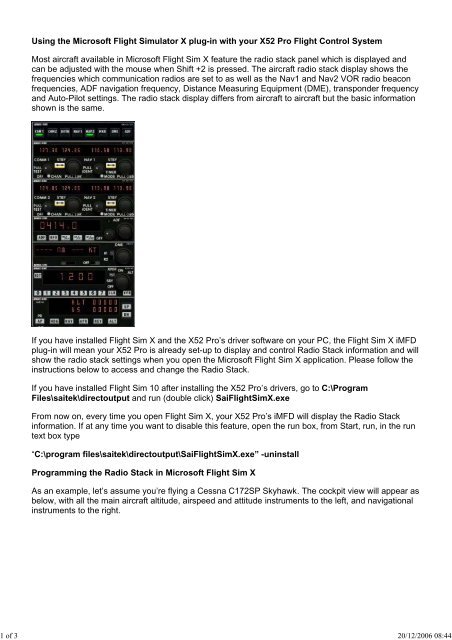
Most aircraft available <strong>in</strong> <strong>Microsoft</strong> <strong>Flight</strong> Sim X feature <strong>the</strong> radio stack panel which is displayed and<br />
can be adjusted <strong>with</strong> <strong>the</strong> mouse when Shift +2 is pressed. The aircraft radio stack display shows <strong>the</strong><br />
frequencies which communication radios are set to as well as <strong>the</strong> Nav1 and Nav2 VOR radio beacon<br />
frequencies, ADF navigation frequency, Distance Measur<strong>in</strong>g Equipment (DME), transponder frequency<br />
and Auto-Pilot sett<strong>in</strong>gs. The radio stack display differs from aircraft to aircraft but <strong>the</strong> basic <strong>in</strong>formation<br />
shown is <strong>the</strong> same.<br />
If you have <strong>in</strong>stalled <strong>Flight</strong> Sim X and <strong>the</strong> <strong>X52</strong> <strong>Pro</strong>’s driver software on <strong>your</strong> PC, <strong>the</strong> <strong>Flight</strong> Sim X iMFD<br />
<strong>plug</strong>-<strong>in</strong> will mean <strong>your</strong> <strong>X52</strong> <strong>Pro</strong> is already set-up to display and control Radio Stack <strong>in</strong>formation and will<br />
show <strong>the</strong> radio stack sett<strong>in</strong>gs when you open <strong>the</strong> <strong>Microsoft</strong> <strong>Flight</strong> Sim X application. Please follow <strong>the</strong><br />
<strong>in</strong>structions below to access and change <strong>the</strong> Radio Stack.<br />
If you have <strong>in</strong>stalled <strong>Flight</strong> Sim 10 after <strong>in</strong>stall<strong>in</strong>g <strong>the</strong> <strong>X52</strong> <strong>Pro</strong>’s drivers, go to C:\<strong>Pro</strong>gram<br />
Files\saitek\directoutput and run (double click) Sai<strong>Flight</strong>SimX.exe<br />
From now on, every time you open <strong>Flight</strong> Sim X, <strong>your</strong> <strong>X52</strong> <strong>Pro</strong>’s iMFD will display <strong>the</strong> Radio Stack<br />
<strong>in</strong>formation. If at any time you want to disable this feature, open <strong>the</strong> run box, from Start, run, <strong>in</strong> <strong>the</strong> run<br />
text box type<br />
“C:\program files\saitek\directoutput\Sai<strong>Flight</strong>SimX.exe” -un<strong>in</strong>stall<br />
<strong>Pro</strong>gramm<strong>in</strong>g <strong>the</strong> Radio Stack <strong>in</strong> <strong>Microsoft</strong> <strong>Flight</strong> Sim X<br />
As an example, let’s assume you’re fly<strong>in</strong>g a Cessna C172SP Skyhawk. The cockpit view will appear as<br />
below, <strong>with</strong> all <strong>the</strong> ma<strong>in</strong> aircraft altitude, airspeed and attitude <strong>in</strong>struments to <strong>the</strong> left, and navigational<br />
<strong>in</strong>struments to <strong>the</strong> right.<br />
1 of 3 20/12/2006 08:44
When you press shift and 2 on <strong>your</strong> computer keyboard, <strong>the</strong> radio stack will appear.<br />
Chang<strong>in</strong>g <strong>the</strong> radio stack sett<strong>in</strong>gs us<strong>in</strong>g <strong>the</strong> <strong>X52</strong>’s iMFD control buttons and display<br />
When still on <strong>the</strong> ground, open <strong>the</strong> radio stack panel.<br />
2 of 3 20/12/2006 08:44
On <strong>the</strong> <strong>X52</strong> <strong>Pro</strong>’s iMFD, turn <strong>the</strong> left hand Pg. up and Pg. down wheel to show each section of <strong>the</strong><br />
radio stack on <strong>the</strong> iMFD’s LCD screen. The sections are:<br />
Com 1 and Nav 1<br />
Com 2 and Nav 2<br />
ADF<br />
DME<br />
Transponder<br />
Autopilot<br />
As an example, to change <strong>the</strong> Com 1 and Nav 1, or Com 2 and Nav 2 frequencies, select <strong>the</strong> page<br />
<strong>with</strong> <strong>the</strong> appropriate Com and Nav channels. To toggle between active and standby frequencies rotate<br />
<strong>the</strong> right hand wheel to move <strong>the</strong> cursor [ ] to <strong>the</strong> active (top) frequency which you want to toggle to<br />
standby and press <strong>the</strong> right hand wheel button (<strong>the</strong> MFD select button).<br />
To edit <strong>the</strong> standby frequencies, rotate <strong>the</strong> right hand wheel until <strong>the</strong> > symbol is on <strong>the</strong> left hand side<br />
of <strong>the</strong> frequency, and press <strong>the</strong> MFD select button, so that <strong>the</strong> > changes to >>. You can now <strong>in</strong>crease<br />
or decrease <strong>the</strong> values of <strong>the</strong> first three digits of <strong>the</strong> frequency by rotat<strong>in</strong>g <strong>the</strong> right hand wheel<br />
upwards or downwards. When you are happy <strong>with</strong> <strong>the</strong> value you have entered press <strong>the</strong> MFD select<br />
button aga<strong>in</strong> to exit edit<strong>in</strong>g that part of <strong>the</strong> frequency.<br />
To change <strong>the</strong> two decimal digits of <strong>the</strong> frequency, rotate <strong>the</strong> right hand wheel upwards or downwards<br />
until <strong>the</strong> < symbol appears to <strong>the</strong> right of <strong>the</strong> frequency. Press MFD select button and <strong>the</strong> < symbol will<br />
switch to


