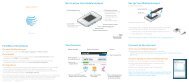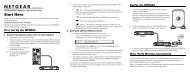
Package Contents Connecting the 3G/UMTS USB Modem ... - Netgear
Package Contents Connecting the 3G/UMTS USB Modem ... - Netgear
Package Contents Connecting the 3G/UMTS USB Modem ... - Netgear

You also want an ePaper? Increase the reach of your titles
YUMPU automatically turns print PDFs into web optimized ePapers that Google loves.
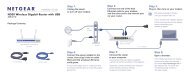
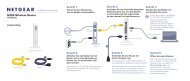
<strong>3G</strong> Mobile Broadband Wireless Router MBR624GU<br />
Your wireless <strong>3G</strong>/<strong>UMTS</strong> <strong>USB</strong> modem (sold separately) must be activated before you<br />
install <strong>the</strong> router. For a list of compatible wireless <strong>USB</strong> modems, see <strong>the</strong> NETGEAR<br />
website at http://www.netgear.com/<strong>3G</strong>. To configure <strong>the</strong> router during installation, you<br />
need a computer with an E<strong>the</strong>rnet port. Your computer must be configured with DHCP<br />
(most PCs are).<br />
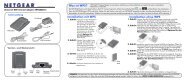
<strong>Package</strong> <strong>Contents</strong><br />
• <strong>3G</strong> Mobile Broadband Wireless Router<br />
• <strong>USB</strong> docking station<br />
• Power Adapter<br />
• Snap-on router stand<br />
• Resource CD<br />
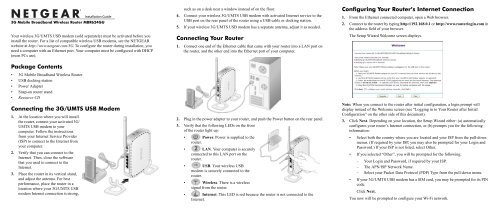
<strong>Connecting</strong> <strong>the</strong> <strong>3G</strong>/<strong>UMTS</strong> <strong>USB</strong> <strong>Modem</strong><br />
1. At <strong>the</strong> location where you will install<br />
<strong>the</strong> router, connect your activated <strong>3G</strong>/<br />
<strong>UMTS</strong> <strong>USB</strong> modem to your<br />
computer. Follow <strong>the</strong> instructions<br />
from your Internet Service Provider<br />
(ISP) to connect to <strong>the</strong> Internet from<br />
your computer.<br />
2. Verify that you can connect to <strong>the</strong><br />
Internet. Then, close <strong>the</strong> software<br />
that you used to connect to <strong>the</strong><br />
Internet.<br />
3. Place <strong>the</strong> router in its vertical stand,<br />
and adjust <strong>the</strong> antenna. For best<br />
performance, place <strong>the</strong> router in a<br />
location where your <strong>3G</strong>/<strong>UMTS</strong> <strong>USB</strong><br />
modem Internet connection is strong,<br />
such as on a desk near a window instead of on <strong>the</strong> floor.<br />
4. Connect your wireless <strong>3G</strong>/<strong>UMTS</strong> <strong>USB</strong> modem with activated Internet service to <strong>the</strong><br />
<strong>USB</strong> port on <strong>the</strong> rear panel of <strong>the</strong> router using a <strong>USB</strong> cable or docking station.<br />
5. If your wireless <strong>3G</strong>/<strong>UMTS</strong> <strong>USB</strong> modem has a separate antenna, adjust it as needed.<br />
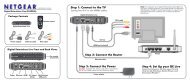
<strong>Connecting</strong> Your Router<br />
1. Connect one end of <strong>the</strong> E<strong>the</strong>rnet cable that came with your router into a LAN port on<br />
<strong>the</strong> router, and <strong>the</strong> o<strong>the</strong>r end into <strong>the</strong> E<strong>the</strong>rnet port of your computer.<br />
2. Plug in <strong>the</strong> power adapter to your router, and push <strong>the</strong> Power button on <strong>the</strong> rear panel.<br />
3. Verify that <strong>the</strong> following LEDs on <strong>the</strong> front<br />
of <strong>the</strong> router light up:<br />
• Power. Power is supplied to <strong>the</strong><br />
router.<br />
• LAN. Your computer is securely<br />
connected to this LAN port on <strong>the</strong><br />
router.<br />
• <strong>USB</strong>. Your wireless <strong>USB</strong><br />
modem is securely connected to <strong>the</strong><br />
router.<br />
• Wireless. There is a wireless<br />
signal from <strong>the</strong> router.<br />
• Internet. This LED is red because <strong>the</strong> router is not connected to <strong>the</strong><br />
Internet.<br />
Configuring Your Router’s Internet Connection<br />
1. From <strong>the</strong> E<strong>the</strong>rnet connected computer, open a Web browser.<br />
2. Connect to <strong>the</strong> router by typing http://192.168.0.1 or http://www.routerlogin.com in<br />
<strong>the</strong> address field of your browser.<br />
The Setup Wizard Welcome screen displays.<br />
Note: When you connect to <strong>the</strong> router after initial configuration, a login prompt will<br />
display instead of <strong>the</strong> Welcome screen (see “Logging in to Your Router after Initial<br />
Configuration” on <strong>the</strong> o<strong>the</strong>r side of this document).<br />
3. Click Next. Depending on your location, <strong>the</strong> Setup Wizard ei<strong>the</strong>r: (a) automatically<br />
configures your router’s Internet connection, or (b) prompts you for <strong>the</strong> following<br />
information:<br />
• Select both <strong>the</strong> country where you are located and your ISP from <strong>the</strong> pull-down<br />
menus. (If required by your ISP, you may also be prompted for your Login and<br />
Password.) If your ISP is not listed, select O<strong>the</strong>r.<br />
• If you selected “O<strong>the</strong>r”, you will be prompted for <strong>the</strong> following:<br />
– Your Login and Password, if required by your ISP.<br />
– The APN/ISP Network Name.<br />
– Select your Packet Data Protocol (PDP) Type from <strong>the</strong> pull-down menu.<br />
• If your <strong>3G</strong>/<strong>UMTS</strong> <strong>USB</strong> modem has a SIM card, you may be prompted for its PIN<br />
code.<br />
Click Next.<br />
You now will be prompted to configure your Wi-Fi network.
Note: If your Internet connection is not working, see <strong>the</strong> “Troubleshooting” section.<br />
Configuring Your Wi-Fi Network<br />
The Setup Wizard prompts you to configure your Wi-Fi settings.<br />
1. Select your Wi-Fi Region from <strong>the</strong> pull-down menu. Depending on your location,<br />
you may be prompted to select <strong>the</strong> region where <strong>the</strong> router will operate. For example,<br />
in North America, this setting is not selectable and is preconfigured. Click Next.<br />
2. Name your Wireless Network by entering a Wireless Network Name (SSID) that<br />
identifies your wireless network. The default is NETGEAR-<strong>3G</strong>. The SSID is casesensitive.<br />
NETGEAR-<strong>3G</strong> is not <strong>the</strong> same as <strong>Netgear</strong>-<strong>3G</strong> or netgear-3g. Click Next.<br />
3. Secure Your Wireless Network. NETGEAR strongly recommends that you<br />
implement wireless security. NETGEAR also recommends using WPA or WPA2<br />
security to secure your network. When you have completed entering your security<br />
setting information, click Next.<br />
A summary of your settings is displayed. You should ei<strong>the</strong>r click Print to print <strong>the</strong><br />
settings or write <strong>the</strong>m down. Save this information in a secure location for future<br />
reference.<br />
4. Click Finish. Your browser automatically goes to <strong>the</strong> NETGEAR website to verify<br />
that <strong>the</strong> Internet connection is working.<br />
Important: For each wireless computer or device that will connect wirelessly to <strong>the</strong><br />
router, you must configure its wireless network name (SSID), wireless security method,<br />
and passphrase (if required) to match <strong>the</strong> router. Then, verify that each wireless computer<br />
or device can connect to <strong>the</strong> Internet via <strong>the</strong> router.<br />
Note: Push 'N' Connect is NETGEAR’s implementation of WPS (Wi-Fi Protected Setup).<br />
You can use Push 'N' Connect to quickly and securely add additional devices to your<br />
wireless network at any time. Please see <strong>the</strong> online User Manual for details on using Push<br />
'N' Connect; to view <strong>the</strong> User Manual, log in to <strong>the</strong> router.<br />
Logging in to Your Router after Initial<br />
Configuration<br />
When you first connect to your router during installation, a Setup Wizard appears. After<br />
<strong>the</strong> initial configuration, you can use your Web browser to log into <strong>the</strong> router.<br />
1. Open a Web browser on your computer, and connect to <strong>the</strong> router by typing<br />
http://192.168.0.1 or http://www.routerlogin.com in <strong>the</strong> address field of your<br />
browser.<br />
2. When prompted, enter <strong>the</strong> router user name and password (admin and password,<br />
both in lowercase letters). The Router Status screen displays.<br />
3. If you have not already done so, configure security for your wireless network. For<br />
help, scroll down and select Documentation to view <strong>the</strong> online User Manual.<br />
Troubleshooting<br />
Situation Recommended Actions<br />
No LEDs light up when<br />
<strong>the</strong> power adapter is<br />
plugged into <strong>the</strong> router.<br />
Cannot access <strong>the</strong><br />
Internet.<br />
Can access <strong>the</strong> Internet<br />
only when <strong>the</strong> modem is<br />
connected directly to <strong>the</strong><br />
computer<br />
A wireless device cannot<br />
connect wirelessly to <strong>the</strong><br />
router.<br />
• Press <strong>the</strong> Power button on <strong>the</strong> rear panel of <strong>the</strong> router.<br />
• Check to make sure that <strong>the</strong> electrical outlet has power.<br />
• Make sure that <strong>the</strong> power adapter is securely connected to<br />
<strong>the</strong> router and <strong>the</strong> electrical outlet.<br />
• Your wireless <strong>USB</strong> modem must be activated based on <strong>the</strong><br />
instructions you received when you purchased it.<br />
• Your Internet Service Provider (ISP) must provide coverage<br />
in your location. Check with your ISP if you are not sure.<br />
• Before installing <strong>the</strong> router, test your Internet connection<br />
directly from a computer, <strong>the</strong>n close <strong>the</strong> software on your<br />
computer that you use to access <strong>the</strong> Internet.<br />
• Check your router’s Internet configuration. Verify that <strong>the</strong><br />
broadband settings such as username, password, and APN<br />
with ISP are set correctly. Also verify that <strong>the</strong> PIN is entered<br />
correctly where applicable.<br />
• If you are using a wireless computer to connect to <strong>the</strong><br />
router, check your wireless connection.<br />
• Check <strong>the</strong> configuration for your wireless device. It must be<br />
configured with exactly <strong>the</strong> same wireless network name<br />
(SSID) and wireless security as <strong>the</strong> router.<br />
• Consider <strong>the</strong> location of <strong>the</strong> router. Move it up to a higher<br />
location. Move <strong>the</strong> wireless device closer to <strong>the</strong> router.<br />
Situation Recommended Actions<br />
Would like to restore <strong>the</strong><br />
factory default settings.<br />
“<strong>3G</strong>/<strong>UMTS</strong> <strong>USB</strong> modem<br />
not supported” message<br />
displays.<br />
For more help with troubleshooting, log in to <strong>the</strong> router, scroll down, and click<br />
Documentation to view <strong>the</strong> Troubleshooting section in <strong>the</strong> online User Manual<br />
Technical Support<br />
On <strong>the</strong> side panel of <strong>the</strong> router, press both <strong>the</strong> WPS button<br />
and <strong>the</strong> Wireless On/Off button simultaneously until <strong>the</strong><br />
Power LED blinks red 3 times and <strong>the</strong>n turns green. This<br />
resets <strong>the</strong> router and returns it to <strong>the</strong> default factory settings.<br />
• Connect <strong>the</strong> <strong>3G</strong>/<strong>UMTS</strong> <strong>USB</strong> modem to your PC and verify<br />
that your Internet connection is working.<br />
• Check to make sure that your <strong>3G</strong>/<strong>UMTS</strong> <strong>USB</strong> modem is<br />
supported on <strong>the</strong> NETGEAR website at<br />
http://www.netgear.com/<strong>3G</strong>.<br />
• If your <strong>3G</strong>/<strong>UMTS</strong> <strong>USB</strong> modem is supported, go to<br />
http://kbserver.netgear.com/products/MBR624GU.asp.<br />
Download <strong>the</strong> latest firmware, and upgrade <strong>the</strong> router.<br />
Thank you for selecting NETGEAR products.<br />
After installing your router, locate <strong>the</strong> serial number on <strong>the</strong> label of your product and use it<br />
to register your product at http://www.NETGEAR.com/register. Registration is required<br />
before you can use our telephone support service. Registration via our website is strongly<br />
recommended. Go to http://kbserver.netgear.com for product updates and Web support.<br />
For Warranty and Regional Customer Support information, see <strong>the</strong> Resource CD that<br />
came with your product.<br />
Please contact your Internet Service Provider for technical support for your <strong>3G</strong>/<strong>UMTS</strong><br />
wireless modem.<br />
This symbol was placed in accordance with <strong>the</strong> European Union Directive 2002/96 on <strong>the</strong> Waste<br />
Electrical and Electronic Equipment (<strong>the</strong> WEEE Directive). If disposed of within <strong>the</strong> European<br />
Union, this product should be treated and recycled in accordance with <strong>the</strong> laws of your jurisdiction<br />
implementing <strong>the</strong> WEEE Directive.<br />
© 2009 by NETGEAR, Inc. All rights reserved. NETGEAR and <strong>the</strong> NETGEAR logo are registered trademarks<br />
of NETGEAR, Inc. in <strong>the</strong> United States and/or o<strong>the</strong>r countries. O<strong>the</strong>r brand and product names are trademarks or<br />
registered trademarks of <strong>the</strong>ir respective holders. Information is subject to change without notice.<br />
May 2009