Download the Motif XS Owner's Manual - Motifator.com
Download the Motif XS Owner's Manual - Motifator.com
Download the Motif XS Owner's Manual - Motifator.com

You also want an ePaper? Increase the reach of your titles
YUMPU automatically turns print PDFs into web optimized ePapers that Google loves.
2<br />
MOTIF <strong>XS</strong> Owner’s <strong>Manual</strong><br />
SPECIAL MESSAGE SECTION<br />
PRODUCT SAFETY MARKINGS: Yamaha electronic products<br />
may have ei<strong>the</strong>r labels similar to <strong>the</strong> graphics shown below<br />
or molded/stamped facsimiles of <strong>the</strong>se graphics on <strong>the</strong><br />
enclosure. The explanation of <strong>the</strong>se graphics appears on<br />
this page. Please observe all cautions indicated on this<br />
page and those indicated in <strong>the</strong> safety instruction section.<br />
The exclamation point within <strong>the</strong> equilateral<br />
triangle is intended to alert <strong>the</strong> user to <strong>the</strong><br />
presence of important operating and<br />
maintenance (servicing) instructions in <strong>the</strong><br />
literature ac<strong>com</strong>panying <strong>the</strong> product.<br />
The lightning flash with arrowhead symbol,<br />
within <strong>the</strong> equilateral triangle, is intended to<br />
alert <strong>the</strong> user to <strong>the</strong> presence of uninsulated<br />
“dangerous voltage” within <strong>the</strong> product’s<br />
enclosure that may be of sufficient magnitude<br />
to constitute a risk of electrical shock.<br />
IMPORTANT NOTICE: All Yamaha electronic products are tested<br />
and approved by an independent safety testing laboratory in order<br />
that you may be sure that when it is properly installed and used in<br />
its normal and customary manner, all foreseeable risks have been<br />
eliminated. DO NOT modify this unit or <strong>com</strong>mission o<strong>the</strong>rs to do so<br />
unless specifically authorized by Yamaha. Product performance<br />
and/or safety standards may be diminished. Claims filed under <strong>the</strong><br />
expressed warranty may be denied if <strong>the</strong> unit is/has been modified.<br />
Implied warranties may also be affected.<br />
SPECIFICATIONS SUBJECT TO CHANGE: The information<br />
contained in this manual is believed to be correct at <strong>the</strong> time of<br />
printing. However, Yamaha reserves <strong>the</strong> right to change or modify<br />
any of <strong>the</strong> specifications without notice or obligation to update<br />
existing units.<br />
ENVIRONMENTAL ISSUES: Yamaha strives to produce products<br />
that are both user safe and environmentally friendly. We sincerely<br />
believe that our products and <strong>the</strong> production methods used to<br />
produce <strong>the</strong>m, meet <strong>the</strong>se goals. In keeping with both <strong>the</strong> letter and<br />
<strong>the</strong> spirit of <strong>the</strong> law, we want you to be aware of <strong>the</strong> following:<br />
92-469- ➀ (rear)<br />
CAUTION<br />
RISK OF ELECTRIC SHOCK<br />
DO NOT OPEN<br />
CAUTION: TO REDUCE THE RISK OF ELECTRIC SHOCK.<br />
DO NOT REMOVE COVER (OR BACK).<br />
NO USER-SERVICEABLE PARTS INSIDE.<br />
REFER SERVICING TO QUALIFIED SERVICE PERSONNEL.<br />
Battery Notice: This product MAY contain a small nonrechargable<br />
battery which (if applicable) is soldered in place. The<br />
average life span of this type of battery is approximately five years.<br />
When replacement be<strong>com</strong>es necessary, contact a qualified service<br />
representative to perform <strong>the</strong> replacement.<br />
Warning: Do not attempt to recharge, disassemble, or incinerate<br />
this type of battery. Keep all batteries away from children. Dispose<br />
of used batteries promptly and as regulated by applicable laws.<br />
Note: In some areas, <strong>the</strong> servicer is required by law to return <strong>the</strong><br />
defective parts. However, you do have <strong>the</strong> option of having <strong>the</strong><br />
servicer dispose of <strong>the</strong>se parts for you.<br />
Disposal Notice: Should this product be<strong>com</strong>e damaged beyond<br />
repair, or for some reason its useful life is considered to be at an<br />
end, please observe all local, state, and federal regulations that<br />
relate to <strong>the</strong> disposal of products that contain lead, batteries,<br />
plastics, etc.<br />
NOTICE: Service charges incurred due to lack of knowledge<br />
relating to how a function or effect works (when <strong>the</strong> unit is operating<br />
as designed) are not covered by <strong>the</strong> manufacturer’s warranty, and<br />
are <strong>the</strong>refore <strong>the</strong> owners responsibility. Please study this manual<br />
carefully and consult your dealer before requesting service.<br />
NAME PLATE LOCATION: The graphic below indicates <strong>the</strong><br />
location of <strong>the</strong> name plate. The model number, serial number,<br />
power requirements, etc., are located on this plate. You should<br />
record <strong>the</strong> model number, serial number, and <strong>the</strong> date of purchase<br />
in <strong>the</strong> spaces provided below and retain this manual as a<br />
permanent record of your purchase.<br />
MOTIF <strong>XS</strong>6<br />
Model<br />
POWER<br />
ON/ OFF<br />
MOTIF <strong>XS</strong>7<br />
MOTIF <strong>XS</strong>8<br />
Serial No.<br />
Purchase Date<br />
AC IN<br />
POWER<br />
ON/ OFF<br />
AC IN<br />
ETHERNET<br />
USB<br />
TO HOST TO DEVICE<br />
LCD CONTRAST<br />
POWER<br />
ON/ OFF<br />
ETHERNET<br />
AC IN<br />
USB<br />
TO HOST TO DEVICE<br />
LCD CONTRAST
CAUTION<br />
RISK OF ELECTRIC SHOCK<br />
DO NOT OPEN<br />
CAUTION: TO REDUCE THE RISK OF<br />
ELECTRIC SHOCK, DO NOT REMOVE<br />
COVER (OR BACK). NO USER-SERVICEABLE<br />
PARTS INSIDE. REFER SERVICING TO<br />
QUALIFIED SERVICE PERSONNEL.<br />
The above warning is located on <strong>the</strong> rear of <strong>the</strong> unit.<br />
Explanation of Graphical Symbols<br />
The lightning flash with arrowhead symbol<br />
within an equilateral triangle is intended to alert<br />
<strong>the</strong> user to <strong>the</strong> presence of uninsulated<br />
“dangerous voltage” within <strong>the</strong> product’s<br />
enclosure that may be of sufficient magnitude to<br />
constitute a risk of electric shock to persons.<br />
The exclamation point within an equilateral<br />
triangle is intended to alert <strong>the</strong> user to <strong>the</strong><br />
presence of important operating and<br />
maintenance (servicing) instructions in <strong>the</strong><br />
literature ac<strong>com</strong>panying <strong>the</strong> product.<br />
IMPORTANT SAFETY INSTRUCTIONS<br />
1 Read <strong>the</strong>se instructions.<br />
2 Keep <strong>the</strong>se instructions.<br />
3 Heed all warnings.<br />
4 Follow all instructions.<br />
5 Do not use this apparatus near water.<br />
6 Clean only with dry cloth.<br />
7 Do not block any ventilation openings. Install in<br />
accordance with <strong>the</strong> manufacturer’s instructions.<br />
8 Do not install near any heat sources such as radiators,<br />
heat registers, stoves, or o<strong>the</strong>r apparatus (including<br />
amplifiers) that produce heat.<br />
9 Do not defeat <strong>the</strong> safety purpose of <strong>the</strong> polarized or<br />
grounding-type plug. A polarized plug has two blades<br />
with one wider than <strong>the</strong> o<strong>the</strong>r. A grounding type plug<br />
has two blades and a third grounding prong. The wide<br />
blade or <strong>the</strong> third prong are provided for your safety. If<br />
<strong>the</strong> provided plug does not fit into your outlet, consult<br />
an electrician for replacement of <strong>the</strong> obsolete outlet.<br />
10 Protect <strong>the</strong> power cord from being walked on or pinched<br />
particularly at plugs, convenience receptacles, and <strong>the</strong><br />
point where <strong>the</strong>y exit from <strong>the</strong> apparatus.<br />
11 Only use attachments/accessories specified by <strong>the</strong><br />
manufacturer.<br />
12 Use only with <strong>the</strong> cart, stand,<br />
tripod, bracket, or table specified<br />
by <strong>the</strong> manufacturer, or sold with<br />
<strong>the</strong> apparatus. When a cart is<br />
used, use caution when moving<br />
<strong>the</strong> cart/apparatus <strong>com</strong>bination<br />
to avoid injury from tip-over.<br />
13 Unplug this apparatus during<br />
lightning storms or when unused for long periods of<br />
time.<br />
14 Refer all servicing to qualified service personnel.<br />
Servicing is required when <strong>the</strong> apparatus has been<br />
damaged in any way, such as power-supply cord or plug<br />
is damaged, liquid has been spilled or objects have<br />
fallen into <strong>the</strong> apparatus, <strong>the</strong> apparatus has been<br />
exposed to rain or moisture, does not operate normally,<br />
or has been dropped.<br />
WARNING<br />
TO REDUCE THE RISK OF FIRE OR ELECTRIC SHOCK, DO NOT EXPOSE THIS APPARATUS TO RAIN OR MOISTURE.<br />
(98-6500)<br />
MOTIF <strong>XS</strong> Owner’s <strong>Manual</strong> 3
4<br />
MOTIF <strong>XS</strong> Owner’s <strong>Manual</strong><br />
PRECAUTIONS<br />
PLEASE READ CAREFULLY BEFORE PROCEEDING<br />
* Please keep this manual in a safe place for future reference.<br />
WARNING<br />
Always follow <strong>the</strong> basic precautions listed below to avoid <strong>the</strong> possibility of serious injury or even death from electrical<br />
shock, short-circuiting, damages, fire or o<strong>the</strong>r hazards. These precautions include, but are not limited to, <strong>the</strong> following:<br />
Power supply/Power cord<br />
• Only use <strong>the</strong> voltage specified as correct for <strong>the</strong> instrument. The required<br />
voltage is printed on <strong>the</strong> name plate of <strong>the</strong> instrument.<br />
• Check <strong>the</strong> electric plug periodically and remove any dirt or dust which may have<br />
accumulated on it.<br />
• Use only <strong>the</strong> supplied power cord/plug.<br />
• Do not place <strong>the</strong> power cord near heat sources such as heaters or radiators, and<br />
do not excessively bend or o<strong>the</strong>rwise damage <strong>the</strong> cord, place heavy objects on<br />
it, or place it in a position where anyone could walk on, trip over, or roll anything<br />
over it.<br />
• Be sure to connect to an appropriate outlet with a protective grounding<br />
connection. Improper grounding can result in electrical shock.<br />
Do not open<br />
• This instrument contains no user-serviceable parts. Do not attempt to<br />
disassemble or modify <strong>the</strong> internal <strong>com</strong>ponents in any way.<br />
CAUTION<br />
• Do not expose <strong>the</strong> instrument to rain, use it near water or in damp or wet<br />
conditions, or place containers on it containing liquids which might spill into<br />
any openings.<br />
• Never insert or remove an electric plug with wet hands.<br />
• Do not put burning items, such as candles, on <strong>the</strong> unit.<br />
A burning item may fall over and cause a fire.<br />
• If <strong>the</strong> power cord or plug be<strong>com</strong>es frayed or damaged, or if <strong>the</strong>re is a sudden<br />
loss of sound during use of <strong>the</strong> instrument, or if any unusual smells or smoke<br />
should appear to be caused by it, immediately turn off <strong>the</strong> power switch,<br />
disconnect <strong>the</strong> electric plug from <strong>the</strong> outlet, and have <strong>the</strong> instrument inspected<br />
by qualified Yamaha service personnel.<br />
Always follow <strong>the</strong> basic precautions listed below to avoid <strong>the</strong> possibility of physical injury to you or o<strong>the</strong>rs, or damage<br />
to <strong>the</strong> instrument or o<strong>the</strong>r property. These precautions include, but are not limited to, <strong>the</strong> following:<br />
• Always connect <strong>the</strong> three-pin attachment plug to a properly grounded power<br />
source. (For more information about <strong>the</strong> main power supply, see page 19.)<br />
• When removing <strong>the</strong> electric plug from <strong>the</strong> instrument or an outlet, always hold<br />
<strong>the</strong> plug itself and not <strong>the</strong> cord. Pulling by <strong>the</strong> cord can damage it.<br />
• Remove <strong>the</strong> electric plug from <strong>the</strong> outlet when <strong>the</strong> instrument is not to be used<br />
for extended periods of time, or during electrical storms.<br />
• Do not connect <strong>the</strong> instrument to an electrical outlet using a multiple-connector.<br />
Doing so can result in lower sound quality, or possibly cause overheating in <strong>the</strong><br />
outlet.<br />
Water warning<br />
Fire warning<br />
Power supply/Power cord Location<br />
(2)-11 1/2<br />
If you notice any abnormality<br />
• Do not expose <strong>the</strong> instrument to excessive dust or vibrations, or extreme cold or<br />
heat (such as in direct sunlight, near a heater, or in a car during <strong>the</strong> day) to<br />
prevent <strong>the</strong> possibility of panel disfiguration or damage to <strong>the</strong> internal<br />
<strong>com</strong>ponents.<br />
• Do not use <strong>the</strong> instrument in <strong>the</strong> vicinity of a TV, radio, stereo equipment,<br />
mobile phone, or o<strong>the</strong>r electric devices. O<strong>the</strong>rwise, <strong>the</strong> instrument, TV, or radio<br />
may generate noise.<br />
• Do not place <strong>the</strong> instrument in an unstable position where it might accidentally<br />
fall over.<br />
• Before moving <strong>the</strong> instrument, remove all connected cables.<br />
• When setting up <strong>the</strong> product, make sure that <strong>the</strong> AC outlet you are using is<br />
easily accessible. If some trouble or malfunction occurs, immediately turn off<br />
<strong>the</strong> power switch and disconnect <strong>the</strong> plug from <strong>the</strong> outlet. Even when <strong>the</strong> power<br />
switch is turned off, electricity is still flowing to <strong>the</strong> product at <strong>the</strong> minimum<br />
level. When you are not using <strong>the</strong> product for a long time, make sure to unplug<br />
<strong>the</strong> power cord from <strong>the</strong> wall AC outlet.
Connections<br />
• Before connecting <strong>the</strong> instrument to o<strong>the</strong>r electronic <strong>com</strong>ponents, turn off <strong>the</strong><br />
power for all <strong>com</strong>ponents. Before turning <strong>the</strong> power on or off for all<br />
<strong>com</strong>ponents, set all volume levels to minimum. Also, be sure to set <strong>the</strong> volumes<br />
of all <strong>com</strong>ponents at <strong>the</strong>ir minimum levels and gradually raise <strong>the</strong> volume<br />
controls while playing <strong>the</strong> instrument to set <strong>the</strong> desired listening level.<br />
Maintenance<br />
• When cleaning <strong>the</strong> instrument, use a soft, dry cloth. Do not use paint thinners,<br />
solvents, cleaning fluids, or chemical-impregnated wiping cloths.<br />
Handling caution<br />
• Do not insert a finger or hand in any gaps on <strong>the</strong> instrument.<br />
• Never insert or drop paper, metallic, or o<strong>the</strong>r objects into <strong>the</strong> gaps on <strong>the</strong> panel<br />
or keyboard. If this happens, turn off <strong>the</strong> power immediately and unplug <strong>the</strong><br />
power cord from <strong>the</strong> AC outlet. Then have <strong>the</strong> instrument inspected by qualified<br />
Yamaha service personnel.<br />
• Do not place vinyl, plastic or rubber objects on <strong>the</strong> instrument, since this might<br />
discolor <strong>the</strong> panel or keyboard.<br />
• Do not rest your weight on, or place heavy objects on <strong>the</strong> instrument, and do not<br />
use excessive force on <strong>the</strong> buttons, switches or connectors.<br />
• Do not use <strong>the</strong> instrument/device or headphones for a long period of time at a<br />
high or un<strong>com</strong>fortable volume level, since this can cause permanent hearing<br />
loss. If you experience any hearing loss or ringing in <strong>the</strong> ears, consult a<br />
physician.<br />
Saving data<br />
Saving and backing up your data<br />
• DRAM data (see page 79) is lost when you turn off <strong>the</strong> power to <strong>the</strong> instrument.<br />
Save <strong>the</strong> data to <strong>the</strong> flash ROM/a USB storage device/external device such as a<br />
<strong>com</strong>puter.<br />
Data stored to <strong>the</strong> flash ROM may be lost due to malfunction or incorrect<br />
operation. Save important data to a USB storage device/external device such as<br />
a <strong>com</strong>puter.<br />
• Never attempt to turn off <strong>the</strong> power while data is being written to Flash ROM<br />
(while an “Executing...” or “Please keep power on” message is shown). Turning<br />
<strong>the</strong> power off in this state results in loss of all user data and may cause <strong>the</strong><br />
system to freeze (due to corruption of data in <strong>the</strong> Flash ROM). This means that<br />
this syn<strong>the</strong>sizer may not be able to start up properly, even when turning <strong>the</strong><br />
power on next time.<br />
Backing up <strong>the</strong> USB storage device/external media<br />
•To protect against data loss through media damage, we re<strong>com</strong>mend that you<br />
save your important data onto two USB storage devices/external media.<br />
Yamaha cannot be held responsible for damage caused by improper use or modifications to <strong>the</strong> instrument, or data that is lost or destroyed.<br />
Always turn <strong>the</strong> power off when <strong>the</strong> instrument is not in use.<br />
About <strong>the</strong> latest Firmware Version<br />
Yamaha may from time to time update firmware of <strong>the</strong> product and <strong>the</strong> accessory application software without notice for<br />
improvement. We re<strong>com</strong>mend that you check our web site for later releases and upgrade your firmware of <strong>the</strong> MOTIF <strong>XS</strong> or <strong>the</strong><br />
accessory application software.<br />
http://www.yamahasynth.<strong>com</strong>/<br />
Note that <strong>the</strong> explanations in this Owner’s <strong>Manual</strong> apply to <strong>the</strong> version of firmware when this Owner’s <strong>Manual</strong> was produced.<br />
For details about <strong>the</strong> additional functions due to later releases, refer to <strong>the</strong> above website.<br />
(2)-11 2/2<br />
MOTIF <strong>XS</strong> Owner’s <strong>Manual</strong> 5
6<br />
Introduction<br />
Congratulations and thank you for your purchase of <strong>the</strong> Yamaha MOTIF <strong>XS</strong>6/MOTIF <strong>XS</strong>7/MOTIF <strong>XS</strong>8 Music Production Syn<strong>the</strong>sizer!<br />
You now own what is perhaps <strong>the</strong> best-sounding, most versatile, and certainly most powerful syn<strong>the</strong>sizer and total music<br />
production instrument on <strong>the</strong> planet. We strove to put virtually all our syn<strong>the</strong>sizer technology and music making know-how into one<br />
instrument—and we succeeded. The new MOTIF <strong>XS</strong> not only gives you <strong>the</strong> latest and greatest sounds and rhythms (as well as <strong>the</strong><br />
ability to create and sample your own), it gives you powerful, easy-to-use tools for playing, <strong>com</strong>bining and controlling <strong>the</strong>se<br />
dynamic sounds/rhythms—in real time, as you perform!<br />
Take time to look through this manual carefully. It’s packed with important information on how to get <strong>the</strong> most from this amazing<br />
instrument. Dive in now and enjoy!<br />
How to use <strong>the</strong> manual<br />
The documentation for MOTIF <strong>XS</strong> consists of <strong>the</strong> following booklets.<br />
■ Owner’s <strong>Manual</strong> (this book)<br />
Start Guide (page 19)<br />
This tutorial section gives you a guided tour through <strong>the</strong> various<br />
functions of this instrument, and provides important hands-on<br />
experience in playing and using it.<br />
Using a Computer (page 43)<br />
In this section, we’ll show you how set up <strong>the</strong> instrument with a<br />
<strong>com</strong>puter (via USB and mLAN) and how to use it with software<br />
programs such as <strong>the</strong> MOTIF <strong>XS</strong> Editor and Cubase.<br />
Basic Section<br />
• Basic Structure (page 54)<br />
This section provides a detailed overview of all of <strong>the</strong> main<br />
functions and features of this instrument, and shows how <strong>the</strong>y fit<br />
toge<strong>the</strong>r.<br />
• Basic Operation (page 81)<br />
This section introduces you to <strong>the</strong> basic operating conventions of<br />
this instrument, such as editing values and changing settings.<br />
• Connections (page 83)<br />
This section covers how to connect <strong>the</strong> MOTIF <strong>XS</strong> to various<br />
external devices such as MIDI instruments, <strong>com</strong>puters and USB<br />
storage devices.<br />
Reference (page 88)<br />
This is <strong>the</strong> MOTIF <strong>XS</strong> encyclopedia. Here, all parameters, settings,<br />
functions, features, modes and operations are explained in full<br />
detail.<br />
Accessories<br />
AC Power cord<br />
<strong>Owner's</strong> manual (this book)<br />
SPECIAL NOTICE<br />
• The contents of this Owner’s <strong>Manual</strong> and <strong>the</strong> copyrights <strong>the</strong>reof are under<br />
exclusive ownership by Yamaha Corporation.<br />
• The illustrations and LCD screens as shown in this owner’s manual are for<br />
instructional purposes only, and may appear somewhat different from<br />
those on your instrument.<br />
• This product incorporates and bundles <strong>com</strong>puter programs and contents<br />
in which Yamaha owns copyrights or with respect to which it has license to<br />
use o<strong>the</strong>rs' copyrights. Such copyrighted materials include, without<br />
limitation, all <strong>com</strong>puter software, style files, MIDI files, WAVE data, musical<br />
scores and sound recordings. Any unauthorized use of such programs<br />
and contents outside of personal use is not permitted under relevant laws.<br />
Any violation of copyright has legal consequences. DON'T MAKE,<br />
DISTRIBUTE OR USE ILLEGAL COPIES.<br />
• This device is capable of using various types/formats of music data by<br />
optimizing <strong>the</strong>m to <strong>the</strong> proper format music data for use with <strong>the</strong> device in<br />
MOTIF <strong>XS</strong> Owner’s <strong>Manual</strong><br />
Appendix (page 286)<br />
This section contains detailed information about this instrument,<br />
including Specifications and Alert Messages, as well as instructions<br />
for installing optional equipment (e.g., DIMM modules and <strong>the</strong><br />
mLAN16E2 interface).<br />
• Troubleshooting (page 288)<br />
If this instrument does not function as expected or you have<br />
some problem with <strong>the</strong> sound or operation, refer to this section<br />
before calling your Yamaha dealer or service center. Most<br />
<strong>com</strong>mon problems and <strong>the</strong>ir solutions are covered here in a very<br />
simple and easy-to-understand way.<br />
■ Data List (separate booklet)<br />
This contains various important lists such as <strong>the</strong> Voice List,<br />
Waveform List, Effect List, MIDI Data Format, and MIDI<br />
Implementation Chart.<br />
■ Data List 2 (separate online documentation)<br />
This contains various lists such as <strong>the</strong> Performance List, Master<br />
Program List, Mixing Template List, Arpeggio Type List and Remote<br />
Control Function List. This special online documentation can be<br />
downloaded from <strong>the</strong> <strong>Manual</strong> Library site.<br />
http://www.yamaha.co.jp/manual/<br />
Data List<br />
Disc x 1 (containing DAW software)*<br />
* For details, see page 305.<br />
advance. As a result, this device may not play <strong>the</strong>m back precisely as <strong>the</strong>ir<br />
producers or <strong>com</strong>posers originally intended.<br />
• Copying of <strong>the</strong> <strong>com</strong>mercially available musical data including but not<br />
limited to MIDI data and/or audio data is strictly prohibited except for your<br />
personal use.<br />
• Windows is <strong>the</strong> registered trademark of Microsoft ® Corporation.<br />
• Apple and Macintosh are trademarks of Apple Computer, Inc., registered<br />
in <strong>the</strong> U.S. and o<strong>the</strong>r countries.<br />
• Steinberg and Cubase are <strong>the</strong> registered trademarks of Steinberg Media<br />
Technologies GmbH.<br />
• ETHERNET is <strong>the</strong> registered trademark of Xerox Corporation.<br />
• The <strong>com</strong>pany names and product names in this Owner’s <strong>Manual</strong> are <strong>the</strong><br />
trademarks or registered trademarks of <strong>the</strong>ir respective <strong>com</strong>panies.
Main Features<br />
■ Responsive, expressive keyboard (page 12)<br />
The MOTIF <strong>XS</strong>6 features a 61-key keyboard, while <strong>the</strong> MOTIF <strong>XS</strong>7<br />
has 76 keys with <strong>the</strong> high-quality FSX keyboard and <strong>the</strong> MOTIF<br />
<strong>XS</strong>8 has 88 keys with <strong>the</strong> high-quality BH (Balanced Hammer)<br />
keyboard. All are equipped with a touch response feature (both<br />
initial touch and aftertouch). These allow you to expressively<br />
change <strong>the</strong> sound in various ways—initial touch by <strong>the</strong> strength<br />
with which you play <strong>the</strong> keys, and aftertouch by how strongly you<br />
press <strong>the</strong> keys when holding <strong>the</strong>m down.<br />
■ Wide Variety of Voices and Category Search Function<br />
(page 24)<br />
The MOTIF <strong>XS</strong> features a huge number and wide range of<br />
dynamic, au<strong>the</strong>ntic Voices. Use <strong>the</strong> Category Search function to<br />
quickly call up <strong>the</strong> Voices you want, based on <strong>the</strong>ir instrument<br />
type.<br />
■ Eight Elements for each Voice (page 56)<br />
Each Normal Voice can contain up to eight separate sound<br />
Elements, enabling Voices of great <strong>com</strong>plexity and rich texture.<br />
These Elements can also be controlled in real time—by using <strong>the</strong><br />
panel sliders, <strong>the</strong> [ASSIGNABLE FUNCTION] buttons, or by <strong>the</strong><br />
way you play <strong>the</strong> keyboard. Special “Mega Voices” are also<br />
available, letting you recreate <strong>the</strong> unique performance sounds of<br />
acoustic instruments.<br />
■ Powerful Arpeggio feature with four different types (pages<br />
24 and 62)<br />
Arpeggio automatically plays a variety of sequenced phrases in<br />
response to <strong>the</strong> keys you play. This function is especially powerful<br />
with Drum Voices—letting you easily call up various rhythm<br />
patterns at <strong>the</strong> touch of a key, and providing instant inspiration for<br />
song creation and performance. With Normal Voices, Arpeggio<br />
changes harmonically according to <strong>the</strong> chords you play, helping<br />
you as you <strong>com</strong>pose or perform. Up to four Arpeggios can be<br />
running simultaneously, and of course, in perfect sync. Velocity<br />
control, Accent Phrase and Random SFX features—as well as <strong>the</strong><br />
eight panel Knobs—give you even greater expressive, realtime<br />
control over Arpeggio playback.<br />
■ Performance consisting of up to four Voices (page 28)<br />
Performance mode lets you use four different Voices toge<strong>the</strong>r—in<br />
layers or in a keyboard split. Moreover, <strong>the</strong> MOTIF <strong>XS</strong> gives you<br />
<strong>com</strong>prehensive control over <strong>the</strong> Performance in real time, as you<br />
play—letting quickly select Parts, turn Parts on/off, turn Arpeggio<br />
playback on/off, and more. You can also record your Performance<br />
in this mode directly to <strong>the</strong> Song or Pattern tracks by pressing <strong>the</strong><br />
[REC] button.<br />
■ Integrated Sampling Sequencer—seamlessly <strong>com</strong>bines<br />
audio and MIDI recording (pages 39, 161 and 242)<br />
The MOTIF <strong>XS</strong> provides full Sample recording and editing<br />
features, plus sample memory (with optional DIMM modules).<br />
Wide data <strong>com</strong>patibility lets you load AIFF and WAV files, as well<br />
as samples and program/voice data from o<strong>the</strong>r popular samplers,<br />
such as <strong>the</strong> Yamaha A-series.<br />
Adding to <strong>the</strong> flexibility is a powerful Slice feature that<br />
automatically chops up your rhythms and riffs into <strong>the</strong>ir individual<br />
beats and notes. This lets you manipulate <strong>the</strong> <strong>com</strong>ponent parts of<br />
your sample loops as MIDI data, and gives you <strong>the</strong> power to easily<br />
change tempo and even <strong>the</strong> rhythmic feel, without disturbing <strong>the</strong><br />
pitch or sound quality.<br />
■ Loop Remix (page 175)<br />
This feature divides <strong>the</strong> data (Audio sample as well as MIDI<br />
sequence data) in a specified track to a variety of note lengths,<br />
and randomly rearranges a portion of <strong>the</strong> data to create totally new<br />
variations.<br />
■ Extensive Effect Processing (page 68)<br />
The MOTIF <strong>XS</strong> gives you a wide array of signal processing<br />
options, including separate Reverb and Chorus, an overall Master<br />
Effect, including multi-band <strong>com</strong>pression, five-band master EQ,<br />
and a total of eight independent Insertion Effects. The latter<br />
include a huge variety of effects, plus a special Vocoder feature.<br />
■ Eight Knobs and Sliders (pages 26, 34, 90 and 136)<br />
Comprehensive real-time control with eight knobs and eight sliders<br />
let you change <strong>the</strong> Voice in real time, adjust Mixing of <strong>the</strong> Song/<br />
Pattern, and control DAW software (such as Cubase) on your<br />
<strong>com</strong>puter.<br />
■ Pattern mode—for creating a Song (page 208)<br />
Pattern mode functions let you craft different rhythmic sections<br />
and riffs as individual elements—which you can easily and<br />
intuitively <strong>com</strong>bine in real time to create full rhythm tracks. The<br />
Sections you create can be <strong>com</strong>bined toge<strong>the</strong>r in Pattern Chains,<br />
and <strong>the</strong>se Chains can be conveniently converted to Song data.<br />
■ Song Scene and Mixing Voice—for creating a Song (pages<br />
179 and 230)<br />
Song Scene is ano<strong>the</strong>r powerful tool that lets you take “snapshots”<br />
of <strong>the</strong> sequencer track settings (such as pan, volume, track mute<br />
and so on). Then, during playback or recording, simply switch<br />
among <strong>the</strong> Scenes for instant, dynamic changes.<br />
In addition to being able to create User Voices in <strong>the</strong> Voice mode,<br />
you can create special Mixing Voices for Songs and Patterns,<br />
letting you customize Voices specifically for your Song/Pattern<br />
recordings.<br />
■ Master mode—for live performance (page 251)<br />
The Master mode lets you use <strong>the</strong> MOTIF <strong>XS</strong> as a master keyboard<br />
controller (with independent Zones), and easily reconfigure <strong>the</strong><br />
instrument between Voice/Performance play and Song/Pattern<br />
play in live applications.<br />
■ Equipped with a variety of connectors (pages 16, 17 and 18)<br />
A full rear panel of input/output connections provides maximum<br />
interfacing flexibility. These include Assignable Outputs, A/D<br />
Inputs, Digital Output, MIDI, E<strong>the</strong>rnet, mLAN (standard on <strong>the</strong><br />
MOTIF <strong>XS</strong>8 and optionally available for <strong>the</strong> MOTIF <strong>XS</strong>6/7) and two<br />
USB connectors.<br />
■ Computer connectivity (page 43)<br />
The <strong>com</strong>prehensive set of connectors—E<strong>the</strong>rnet, mLAN and USB<br />
TO HOST—make interfacing with <strong>com</strong>puters and your favorite<br />
software exceptionally easy. In particular, <strong>the</strong> new E<strong>the</strong>rnet<br />
connection gives you fast transfer of your MOTIF <strong>XS</strong> files to and<br />
from a <strong>com</strong>puter on <strong>the</strong> same network.<br />
■ Quick Setup for using a <strong>com</strong>puter (page 270)<br />
This function lets you instantly reconfigure <strong>the</strong> MOTIF <strong>XS</strong> for<br />
different <strong>com</strong>puter/sequencer related applications by calling up<br />
specially programmed presets.<br />
■ Editor software for <strong>the</strong> MOTIF <strong>XS</strong> (page 50)<br />
The instrument is also <strong>com</strong>patible with <strong>the</strong> MOTIF <strong>XS</strong> Editor—a<br />
<strong>com</strong>prehensive, easy-to-use editing software program that lets<br />
you edit (via USB connection) <strong>the</strong> Mixing setups and Mixing<br />
Voices to be used for Song/Pattern playback. The MOTIF <strong>XS</strong> Editor<br />
is free and can be downloaded from <strong>the</strong> Yamaha website.<br />
■ Integration with Cubase (page 49)<br />
The MOTIF <strong>XS</strong> is specially designed to work seamlessly with<br />
Cubase, Steinberg’s full-featured DAW software—giving you a<br />
<strong>com</strong>prehensive, all-in-one music production system, in which<br />
hardware and software are fully integrated.<br />
MOTIF <strong>XS</strong> Owner’s <strong>Manual</strong> 7
8<br />
MOTIF <strong>XS</strong> Owner’s <strong>Manual</strong><br />
Contents<br />
Introduction ......................................................................................................................................................6<br />
How to use <strong>the</strong> manual.....................................................................................................................................6<br />
Accessories......................................................................................................................................................6<br />
Main Features...................................................................................................................................................7<br />
The Controls & Connectors ............................................................................................................................10<br />
Front Panel .....................................................................................................................................................10<br />
Rear Panel......................................................................................................................................................16<br />
Start Guide 19<br />
Step 1: Setting Up............................................................................................................................................19<br />
Power Supply .................................................................................................................................................19<br />
Connecting speakers or headphones............................................................................................................19<br />
Turning <strong>the</strong> power on .....................................................................................................................................19<br />
Adjusting <strong>the</strong> sound and <strong>the</strong> display contrast ...............................................................................................20<br />
Playing <strong>the</strong> sounds.........................................................................................................................................20<br />
Selecting and playing <strong>the</strong> sounds..................................................................................................................20<br />
Modes ............................................................................................................................................................20<br />
Listening to <strong>the</strong> Demo Song...........................................................................................................................21<br />
Resetting <strong>the</strong> User Memory to <strong>the</strong> Initial Factory Settings..........................................................................22<br />
Step 2: Selecting and Playing a Voice ...........................................................................................................23<br />
Selecting a Voice ...........................................................................................................................................23<br />
Voice Play mode indications ..........................................................................................................................23<br />
Selecting a Drum Voice..................................................................................................................................23<br />
Using <strong>the</strong> Category Search function ..............................................................................................................24<br />
Playing <strong>the</strong> Arpeggio......................................................................................................................................24<br />
Changing <strong>the</strong> Arpeggio type..........................................................................................................................25<br />
Using <strong>the</strong> Controllers......................................................................................................................................25<br />
Using <strong>the</strong> Knobs.............................................................................................................................................26<br />
Adjusting <strong>the</strong> tuning to o<strong>the</strong>r instruments ......................................................................................................27<br />
Transpose ......................................................................................................................................................27<br />
Step 3: Selecting and Playing a Performance...............................................................................................28<br />
Selecting a Performance................................................................................................................................28<br />
Performance Play mode indications ..............................................................................................................28<br />
How Voices are assigned to Parts of a Performance.....................................................................................28<br />
Creating a Performance by <strong>com</strong>bining Voices ..............................................................................................29<br />
Changing <strong>the</strong> Arpeggio settings for each Part ..............................................................................................30<br />
Using <strong>the</strong> Controllers and Knobs ...................................................................................................................31<br />
Recording your Performance .........................................................................................................................31<br />
Step 4: Creating Your Original Song .............................................................................................................33<br />
Terminology....................................................................................................................................................33<br />
Song Playback ...............................................................................................................................................33<br />
Preparing for Realtime Recording..................................................................................................................34<br />
Start Recording! .............................................................................................................................................35<br />
Correcting wrong notes..................................................................................................................................35<br />
Creating a swing feel—Play Effect.................................................................................................................36<br />
Storing <strong>the</strong> created Song ...............................................................................................................................36<br />
Saving Song data to a USB storage device...................................................................................................36<br />
Step 5: Creating a Pattern...............................................................................................................................37<br />
Pattern Structure ............................................................................................................................................37<br />
Listening to <strong>the</strong> Demo Patterns ......................................................................................................................37<br />
Viewing <strong>the</strong> Demo Pattern’s Patch display ....................................................................................................38<br />
Viewing <strong>the</strong> Demo Pattern’s Mixing display ...................................................................................................38<br />
Creating a Pattern by using Arpeggio ...........................................................................................................39<br />
Creating a Pattern with audio—Sampling ......................................................................................................39<br />
Storing <strong>the</strong> Pattern and Saving <strong>the</strong> Sample ...................................................................................................42
Using a Computer 43<br />
Connecting to a Computer ..............................................................................................................................43<br />
Creating a Song by Using a Computer ..........................................................................................................47<br />
Integration Between Yamaha Editors and Cubase .......................................................................................49<br />
Controlling a DAW on Your Computer from <strong>the</strong> MOTIF <strong>XS</strong> .........................................................................51<br />
Basic Section 54<br />
Basic Structure.................................................................................................................................................54<br />
Mode Structure ..............................................................................................................................................54<br />
The Seven Functional Blocks.........................................................................................................................55<br />
Tone Generator Block....................................................................................................................................56<br />
Sampling Block..............................................................................................................................................59<br />
Audio Input block...........................................................................................................................................59<br />
Sequencer Block ...........................................................................................................................................59<br />
Arpeggio Block ..............................................................................................................................................62<br />
Controller Block .............................................................................................................................................67<br />
Effect Block....................................................................................................................................................68<br />
About MIDI.....................................................................................................................................................76<br />
Internal Memory .............................................................................................................................................79<br />
Basic Operation................................................................................................................................................81<br />
Connections .....................................................................................................................................................83<br />
Connecting External MIDI Instruments ..........................................................................................................83<br />
Connecting to an MTR (Multi-track Recorder)...............................................................................................84<br />
Using USB storage devices...........................................................................................................................85<br />
Network connection .......................................................................................................................................86<br />
Reference 88<br />
Playing <strong>the</strong> Keyboard in <strong>the</strong> Voice Play Mode ..............................................................................................88<br />
Editing a Normal Voice ....................................................................................................................................96<br />
Editing a Drum Voice .....................................................................................................................................127<br />
Voice Job—Convenient Functions...............................................................................................................133<br />
Playing in <strong>the</strong> Performance Mode ................................................................................................................135<br />
Editing a Performance ...................................................................................................................................141<br />
Performance Job—Convenient Functions ..................................................................................................159<br />
Creating a Voice/Performance by Using <strong>the</strong> Sampling Function ..............................................................161<br />
Song Playback................................................................................................................................................178<br />
Song Recording .............................................................................................................................................186<br />
Editing MIDI Events (Song Edit) ...................................................................................................................192<br />
Song Job.........................................................................................................................................................195<br />
Pattern Playback ............................................................................................................................................208<br />
Pattern Recording ..........................................................................................................................................218<br />
Editing MIDI Events (Pattern Edit) ................................................................................................................220<br />
Pattern Jobs ...................................................................................................................................................222<br />
Multi-timbral Tone Generator Settings<br />
for Song/Pattern Playback (Mixing mode) ...................................................................................................229<br />
Audio Recording to Song/Pattern (Sampling mode) ..................................................................................242<br />
Using as a Master Keyboard (Master mode) ...............................................................................................251<br />
System Settings (Utility mode, etc.) .............................................................................................................259<br />
File Management (File mode)........................................................................................................................272<br />
Appendix 286<br />
Display Messages ..........................................................................................................................................286<br />
Troubleshooting.............................................................................................................................................288<br />
Installing Optional Hardware ........................................................................................................................293<br />
Specifications.................................................................................................................................................297<br />
Index................................................................................................................................................................299<br />
About <strong>the</strong> accessory disk..............................................................................................................................305<br />
MOTIF <strong>XS</strong> Owner’s <strong>Manual</strong> 9
10<br />
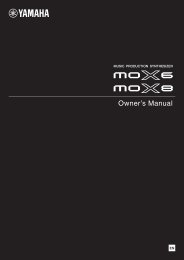
Front Panel<br />
MOTIF <strong>XS</strong>6<br />
MOTIF <strong>XS</strong>7<br />
8<br />
7<br />
9<br />
5<br />
‡<br />
MOTIF <strong>XS</strong> Owner’s <strong>Manual</strong><br />
SELECTED PART<br />
CONTROL<br />
MULTI PART<br />
CONTROL<br />
ASSIGNABLE<br />
FUNCTION<br />
1<br />
2<br />
2 3<br />
4<br />
‡<br />
2 3<br />
4<br />
The Controls & Connectors<br />
TONE 1<br />
TONE 2<br />
ARP FX<br />
REVERB<br />
CHORUS<br />
PAN<br />
MASTER<br />
VOLUME<br />
CUTOFF RESONANCE<br />
EQ LOW EQ MID F<br />
SWING<br />
QUANTIZE<br />
VALUE<br />
AT TACK DECAY<br />
EQ MID EQ MID Q<br />
QUANTIZE<br />
STRENGTH GATE TIME<br />
SELECTED PART<br />
CONTROL<br />
MULTI PART<br />
CONTROL<br />
ASSIGNABLE<br />
FUNCTION<br />
1<br />
2<br />
TONE 1<br />
TONE 2<br />
ARP FX<br />
REVERB<br />
CHORUS<br />
PAN<br />
MASTER<br />
VOLUME<br />
SUSTAIN RELEASE<br />
EQ HIGH PAN<br />
CUTOFF RESONANCE<br />
EQ LOW EQ MID F<br />
SWING<br />
QUANTIZE<br />
VALUE<br />
ASSIGN 1 ASSIGN 2<br />
REVERB CHORUS<br />
VELOCITY OCT RANGE UNITMULTIPLY TEMPO<br />
VOLUME 1 VOLUME 2 VOLUME 3 VOLUME 4 VOLUME 5 VOLUME 6 VOLUME 7 VOLUME 8<br />
ATTACK DECAY<br />
EQ MID EQ MID Q<br />
QUANTIZE<br />
STRENGTH GATE TIME<br />
REMOTE ARPEGGIO<br />
ON/OFF ON/OFF<br />
EFFECT BYPASS<br />
INSERTION SYSTEM<br />
OCTAVE<br />
DOWN UP<br />
SEQ TRANSPORT<br />
LOCATE 1 2<br />
6 ) ^<br />
8<br />
7<br />
9<br />
5<br />
1<br />
! @ $<br />
SUSTAIN RELEASE<br />
EQ HIGH PAN<br />
MASTER<br />
EFFECT<br />
C1 D1 E1 F1 G1 A1 B1 C2 C3<br />
ASSIGN 1 ASSIGN 2<br />
REVERB CHORUS<br />
VELOCITY OCT RANGE UNITMULTIPLY TEMPO<br />
VOLUME 1 VOLUME 2 VOLUME 3 VOLUME 4 VOLUME 5 VOLUME 6 VOLUME 7 VOLUME 8<br />
E0 F0 G0 A0 B0 C1 D1 E1 F1 G1 A1 B1 C2<br />
1<br />
#<br />
%<br />
SF1 SF2 SF3 SF4 SF5 SF6<br />
REMOTE ARPEGGIO<br />
ON/OFF ON/OFF<br />
EFFECT BYPASS<br />
INSERTION SYSTEM<br />
OCTAVE<br />
DOWN UP<br />
1 2 3 4 5<br />
F1 F2 F3 F4 F5 F6<br />
6 7 8 9 0 -<br />
MASTER<br />
EFFECT<br />
SEQ TRANSPORT<br />
&<br />
! @ $<br />
LOCATE 1 2<br />
6 ) ^<br />
#<br />
%<br />
* (<br />
SF1<br />
1<br />
F1 F2<br />
6 7
º ¡ § • <br />
DEC/NO INC/YES<br />
EXIT<br />
2 3 4 5<br />
F2 F3 F4 F5 F6<br />
7 8 9 0<br />
ENTER<br />
EXECUTE<br />
F1 SF2 SF3 SF4 SF5 SF6<br />
-<br />
SEQUENCER<br />
SONG PATTERN<br />
FILE UTILITY<br />
COMPARE<br />
MODE<br />
VOICE PERFORM MASTER<br />
MULTI PART<br />
INTEGRATED MIXING<br />
SAMPLING<br />
SEQ<br />
SETUP<br />
EDIT JOB STORE<br />
SCENE STORE<br />
SET LOCATE<br />
SECTION<br />
I-P<br />
SECTION<br />
A-H<br />
DEC/NO INC/YES<br />
EXIT ENTER<br />
EXECUTE<br />
PRE 1 PRE 2 PRE 3 PRE 4 PRE 5 PRE 6 PRE 7 PRE 8 PROGRAM<br />
PIANO KEYBOARD ORGAN GUITAR BASS STRINGS BRASS<br />
USER 1 USER 2 USER 3 GM GM DR PRE DR USER DR<br />
SYN LEAD PADS/<br />
CHOIRS<br />
PART SELECT ARP ON/OFF<br />
PART MUTE ARP HOLD<br />
SEQUENCER SEQ<br />
SONG PATTERN SETUP<br />
FILE UTILITY<br />
COMPARE<br />
SYN COMP CHROMATIC DRUM/<br />
PERCUSSION PERCUSSION<br />
A B C D E F G H<br />
SUB CATEGORY<br />
MODE<br />
VOICE PERFORM MASTER<br />
MULTI PART<br />
INTEGRATED MIXING<br />
SAMPLING<br />
EDIT JOB STORE<br />
SCENE STORE<br />
SET LOCATE<br />
SECTION<br />
I-P<br />
SECTION<br />
A-H<br />
SAX/<br />
WOODWIND<br />
COMMON EDIT 1 2 3 4 5 6 7<br />
8<br />
TRACK<br />
9 10 11 12 13 14 15 16<br />
PRE 1 PRE 2 PRE 3 PRE 4 PRE 5 PRE 6 PRE 7 PRE 8<br />
PIANO KEYBOARD ORGAN GUITAR BASS STRINGS BRASS<br />
USER 1 USER 2 USER 3 GM GM DR PRE DR USER DR<br />
SYN LEAD PADS/<br />
CHOIRS<br />
CATEGORY SEARCH<br />
PERFORMANCE<br />
CONTROL<br />
¢ £ ∞<br />
‚ ª fi<br />
&<br />
MUTE SOLO<br />
C4 C5 C6<br />
º ¡ § • <br />
SOUND<br />
EFX<br />
MUSICAL<br />
EFX<br />
ETHNIC<br />
SYN COMP CHROMATIC DRUM/<br />
PERCUSSION PERCUSSION<br />
SOUND<br />
EFX<br />
⁄<br />
¤<br />
›<br />
fl<br />
A B C D E F G H<br />
PART SELECT ARP ON/OFF<br />
PART MUTE ARP HOLD<br />
MUSICAL<br />
EFX<br />
SAX/<br />
WOODWIND<br />
ETHNIC<br />
PROGRAM<br />
CATEGORY SEARCH<br />
COMMON EDIT 1 2<br />
SUB CATEGORY<br />
3 4 5 6 7<br />
8<br />
TRACK<br />
9 10 11 12 13 14 15 16<br />
* ( ¢ £ ∞<br />
‚ ª fi<br />
‹<br />
PERFORMANCE<br />
CONTROL<br />
MUTE SOLO<br />
C3 C4 C5 C6<br />
⁄<br />
¤<br />
‹<br />
›<br />
fl<br />
The Controls & Connectors<br />
MOTIF <strong>XS</strong> Owner’s <strong>Manual</strong><br />
11
12<br />
The Controls & Connectors<br />
MOTIF <strong>XS</strong>8<br />
1 Keyboard<br />
‡<br />
The MOTIF <strong>XS</strong>6 features a 61-key keyboard, while <strong>the</strong><br />
MOTIF <strong>XS</strong>7 has 76 keys and <strong>the</strong> MOTIF <strong>XS</strong>8 has 88 keys.<br />
All are equipped with a touch response feature (both initial<br />
touch and aftertouch). With initial touch, <strong>the</strong> instrument<br />
senses how strongly or softly you play <strong>the</strong> keys, and uses<br />
that playing strength to affect <strong>the</strong> sound in various ways,<br />
depending on <strong>the</strong> selected Voice. With aftertouch, <strong>the</strong><br />
instrument senses how much pressure you apply to <strong>the</strong><br />
keys while playing, and uses that pressure to affect <strong>the</strong><br />
sound in various ways, depending on <strong>the</strong> selected Voice.<br />
Moreover, any of a variety of functions can be assigned to<br />
aftertouch for each Voice (page 104).<br />
2 Pitch Bend wheel (page 67)<br />
Controls <strong>the</strong> pitch bend effect. You can also assign o<strong>the</strong>r<br />
functions to this controller.<br />
3 Modulation wheel (page 67)<br />
Controls <strong>the</strong> modulation effect. You can also assign o<strong>the</strong>r<br />
functions to this controller.<br />
4 Ribbon Controller (page 67)<br />
This controller is touch sensitive, and is controlled by<br />
running your finger lightly across its surface laterally. You<br />
can also assign o<strong>the</strong>r functions to this controller.<br />
5 ASSIGNABLE FUNCTION buttons (page 67)<br />
According to <strong>the</strong> XA Mode (Expanded Articulation Mode)<br />
settings in <strong>the</strong> Voice Element Edit mode, you can call up<br />
MOTIF <strong>XS</strong> Owner’s <strong>Manual</strong><br />
2 3<br />
4<br />
1<br />
8<br />
7<br />
9<br />
5<br />
SELECTED PART<br />
CONTROL<br />
MULTI PART<br />
CONTROL<br />
ASSIGNABLE<br />
FUNCTION<br />
1<br />
2<br />
TONE 1<br />
TONE 2<br />
ARP FX<br />
REVERB<br />
CHORUS<br />
PAN<br />
MASTER<br />
VOLUME<br />
CUTOFF RESONANCE<br />
EQ LOW EQ MID F<br />
SWING<br />
QUANTIZE<br />
VALUE<br />
ATTACK DECAY<br />
EQ MID EQ MID Q<br />
QUANTIZE<br />
STRENGTH GATE TIME<br />
SUSTAIN RELEASE<br />
EQ HIGH PAN<br />
ASSIGN 1 ASSIGN 2<br />
REVERB CHORUS<br />
VELOCITY OCT RANGE UNITMULTIPLY TEMPO<br />
VOLUME 1 VOLUME 2 VOLUME 3 VOLUME 4 VOLUME 5 VOLUME 6 VOLUME 7 VOLUME 8<br />
<strong>the</strong> specific Element of <strong>the</strong> selected Voice by pressing<br />
each of <strong>the</strong>se buttons during your keyboard performance.<br />
In addition, you can assign o<strong>the</strong>r functions to <strong>the</strong>se<br />
buttons.<br />
6 MASTER VOLUME (page 20)<br />
! @ $<br />
REMOTE ARPEGGIO<br />
ON/OFF ON/OFF<br />
EFFECT BYPASS<br />
INSERTION SYSTEM<br />
SEQ TRANSPORT<br />
LOCATE 1 2<br />
A-1 B-1 C0 D0 E0 F0 G0 A0 B0 C1<br />
C2 C<br />
Move <strong>the</strong> slider upwards to raise <strong>the</strong> output level from <strong>the</strong><br />
OUTPUT L/R jacks and <strong>the</strong> PHONES jack.<br />
7 Knobs (pages 26, 31, 89, 136, 181 and 252)<br />
These eight highly versatile knobs let you adjust various<br />
aspects or parameters of <strong>the</strong> current Voice. Use <strong>the</strong><br />
[SELECTED PART CONTROL] button or [MULTI PART<br />
CONTROL] button to change <strong>the</strong> functions assigned to <strong>the</strong><br />
knobs.<br />
8 [SELECTED PART CONTROL] button (pages<br />
26, 64, 89, 136, 181 and 252)<br />
Pressing this button changes <strong>the</strong> functions assigned to <strong>the</strong><br />
eight knobs. The lamp next to <strong>the</strong> currently active<br />
parameters will light. A function of each knob is applied to<br />
<strong>the</strong> current Voice in <strong>the</strong> Voice mode while a function of<br />
each knob is applied only to <strong>the</strong> currently selected Part (or<br />
to all Parts depending on <strong>the</strong> setting) in <strong>the</strong> Performance/<br />
Song/Pattern mode.<br />
n Note that <strong>the</strong> functions assigned to <strong>the</strong> Knobs printed<br />
“ASSIGN1” and “ASSIGN2” with <strong>the</strong> TONE 1 lamp turned on<br />
are always applied to all Parts in <strong>the</strong> Performance mode and<br />
<strong>the</strong> specified Part in <strong>the</strong> Song/Pattern mode.<br />
#<br />
%<br />
6 ) ^<br />
DOWN<br />
OCTAVE<br />
UP<br />
MASTER<br />
EFFECT<br />
SF1<br />
1<br />
F1 F2<br />
6 7
&<br />
SF1 SF2 SF3 SF4 SF5 SF6<br />
1 2 3 4 5<br />
F2 F3 F4 F5 F6<br />
7 8 9 0<br />
9 [MULTI PART CONTROL] button (pages 136<br />
and 180)<br />
Pressing this button changes <strong>the</strong> functions assigned to <strong>the</strong><br />
eight knobs in <strong>the</strong> Performance /Song/Pattern mode. The<br />
lamp next to <strong>the</strong> currently active parameters will light. In <strong>the</strong><br />
Performance mode, <strong>the</strong> four knobs at <strong>the</strong> left end<br />
correspond to Parts 1 – 4. In <strong>the</strong> Song/Pattern mode, all<br />
knobs correspond to Parts 1 – 8 or 9 –16 (depending on<br />
<strong>the</strong> currently selected Part).<br />
) Control Sliders<br />
-<br />
º ¡ § • <br />
DEC/NO INC/YES<br />
EXIT ENTER<br />
SEQUENCER SEQ<br />
SONG PATTERN SETUP<br />
FILE UTILITY<br />
These sliders control <strong>the</strong> volume of <strong>the</strong> sound in different<br />
ways depending on <strong>the</strong> mode selected:<br />
Voice mode—volume of <strong>the</strong> eight Elements (page 91)<br />
Performance mode—volume of <strong>the</strong> four Parts (page 137)<br />
Song/Pattern modes—volume of <strong>the</strong> eight Parts, including<br />
<strong>the</strong> current Part (page 180)<br />
Master mode—volume (page 252) or specified Control<br />
Change number (page 257) of <strong>the</strong> eight Zones<br />
n If all of <strong>the</strong> Control Sliders are set to <strong>the</strong> minimum, you may not<br />
hear any sound from <strong>the</strong> instrument, even when playing <strong>the</strong><br />
keyboard or a Song/Pattern. If this is <strong>the</strong> case, raise all <strong>the</strong><br />
sliders to a suitable level.<br />
n The MASTER VOLUME slider adjusts <strong>the</strong> audio output level<br />
from this instrument. On <strong>the</strong> o<strong>the</strong>r hand, <strong>the</strong> Control Slider<br />
adjusts <strong>the</strong> volume for <strong>the</strong> Element of <strong>the</strong> Voice or <strong>the</strong> Part of<br />
<strong>the</strong> Performance/Song/Pattern as a parameter. Accordingly,<br />
<strong>the</strong> values set via <strong>the</strong> Control Sliders can be stored as <strong>the</strong><br />
Voice, Performance, Song, or Pattern data.<br />
EXECUTE<br />
COMPARE<br />
MODE<br />
VOICE PERFORM MASTER<br />
MULTI PART<br />
INTEGRATED MIXING<br />
SAMPLING<br />
EDIT JOB STORE<br />
SCENE STORE<br />
SET LOCATE<br />
SECTION<br />
I-P<br />
SECTION<br />
A-H<br />
PRE 1 PRE 2 PRE 3 PRE 4 PRE 5 PRE 6 PRE 7 PRE 8<br />
PIANO KEYBOARD ORGAN GUITAR BASS STRINGS BRASS<br />
USER 1 USER 2 USER 3 GM GM DR PRE DR USER DR<br />
SYN LEAD<br />
PADS/<br />
CHOIRS<br />
SYN COMP CHROMATIC DRUM/<br />
PERCUSSION PERCUSSION<br />
A B C D E F G H<br />
SUB CATEGORY<br />
PART SELECT ARP ON/OFF<br />
PART MUTE ARP HOLD<br />
PROGRAM<br />
COMMON EDIT 1 2 3 4 5 6 7<br />
8<br />
TRACK<br />
9 10 11 12 13 14 15 16<br />
ETHNIC CATEGORY SEARCH<br />
* ( ¢ £ ∞<br />
‚ ª fi<br />
SAX/<br />
WOODWIND<br />
PERFORMANCE<br />
CONTROL<br />
MUTE SOLO<br />
C3 C4 C5 C6 C7<br />
SOUND<br />
EFX<br />
MUSICAL<br />
EFX<br />
⁄<br />
¤<br />
‹<br />
›<br />
fl<br />
! [REMOTE ON/OFF] button (page 52)<br />
The Controls & Connectors<br />
The Remote mode lets you control sequencer software on<br />
your <strong>com</strong>puter from <strong>the</strong> panel controls of <strong>the</strong> instrument.<br />
Turn <strong>the</strong> [ON/OFF] button on to enter <strong>the</strong> Remote mode.<br />
@ [ARPEGGIO ON/OFF] button (pages 65, 101<br />
and 135)<br />
Press this button to enable or disable playback of <strong>the</strong><br />
Arpeggio for each Voice, Performance, Song, or Pattern. If<br />
<strong>the</strong> Arpeggio Switch of <strong>the</strong> selected Part is set to off in <strong>the</strong><br />
Performance/Song/Pattern mode, however, pressing this<br />
button has no effect.<br />
# EFFECT BYPASS buttons (page 260)<br />
The extensive effect block of <strong>the</strong> instrument provides<br />
Insertion effects (eight sets, with two effect units per set),<br />
System Effects (Reverb and Chorus), and Master Effects.<br />
The effects can be applied to <strong>the</strong> keyboard-played Voices<br />
and to Song/Pattern playback. When <strong>the</strong> lamp of <strong>the</strong><br />
[INSERTION] or [SYSTEM] button is turned on, <strong>the</strong><br />
corresponding Effect is off (or bypassed).<br />
n When <strong>the</strong> checkbox of <strong>the</strong> Reverb/Chorus is set to off in <strong>the</strong><br />
[UTILITY] → [F1] General → [SF2] FXBypass display, <strong>the</strong><br />
Reverb/Chorus is maintained (not bypassed) even if you turn<br />
<strong>the</strong> [SYSTEM] button on.<br />
$ [MASTER EFFECT] button (pages 146 and 264)<br />
When this button is pressed (<strong>the</strong> lamp lights), <strong>the</strong> Master<br />
Effect is applied to <strong>the</strong> overall sound of this instrument.<br />
Also, to access <strong>the</strong> Master Effect setting display, press and<br />
hold <strong>the</strong> [MASTER EFFECT] button for a second or two.<br />
MOTIF <strong>XS</strong> Owner’s <strong>Manual</strong><br />
13
14<br />
The Controls & Connectors<br />
% OCTAVE [UP] and [DOWN] buttons (pages 91,<br />
92, 138, 251 and 260)<br />
Use <strong>the</strong>se buttons to change <strong>the</strong> note range of <strong>the</strong><br />
keyboard. To restore <strong>the</strong> normal octave setting, press both<br />
buttons simultaneously.<br />
^ SEQ TRANSPORT buttons (pages 21, 178 and<br />
208)<br />
These buttons control recording and playback of <strong>the</strong> Song/<br />
Pattern sequence data.<br />
[P] (Top) button<br />
Instantly returns to <strong>the</strong> beginning of <strong>the</strong> current Song or<br />
Pattern (i.e., <strong>the</strong> first beat of <strong>the</strong> first measure).<br />
[G] (Reverse) button<br />
Press briefly to move back one measure at a time, or hold to<br />
continuously rewind.<br />
[H] (Forward) button<br />
Press briefly to move forward one measure at a time, or hold to<br />
continuously fast-forward.<br />
[I] (Record) button<br />
Press this to enable recording (Song or Pattern phrase). (The<br />
indicator lights.)<br />
[J] (Stop) button<br />
Press to stop recording or playback.<br />
[F] (Play) button<br />
Press to start playback from <strong>the</strong> current point in <strong>the</strong> Song or<br />
Pattern. During recording and playback, <strong>the</strong> indicator flashes<br />
at <strong>the</strong> current tempo.<br />
& LCD Display<br />
The large backlit LCD displays <strong>the</strong> parameters and values<br />
related to <strong>the</strong> currently selected operation or mode.<br />
* [F1] – [F6] (Function) buttons (page 81)<br />
These buttons located directly below <strong>the</strong> LCD display call<br />
up <strong>the</strong> corresponding functions indicated in <strong>the</strong> display.<br />
( [SF1] – [SF5] (Sub Function) buttons (page 81)<br />
These buttons located directly below <strong>the</strong> LCD display call<br />
up <strong>the</strong> corresponding sub functions indicated in <strong>the</strong><br />
display. These buttons can be also used to call <strong>the</strong><br />
Arpeggio type in some displays of <strong>the</strong> Play mode, Edit<br />
mode and Record mode. These buttons can be also used<br />
as Scene buttons (pages 179, 182, 209 and 211) in <strong>the</strong><br />
Song Play/Song Record/Pattern Play/Pattern Record<br />
modes.<br />
º Data dial (page 81)<br />
For editing <strong>the</strong> currently selected parameter. To increase<br />
<strong>the</strong> value, turn <strong>the</strong> dial right (clockwise); to decrease <strong>the</strong><br />
value, turn <strong>the</strong> dial left (counter-clockwise). If a parameter<br />
with a wide value range is selected, you can change <strong>the</strong><br />
value in broader strokes by quickly turning <strong>the</strong> dial.<br />
MOTIF <strong>XS</strong> Owner’s <strong>Manual</strong><br />
¡ [INC/YES] button (page 81)<br />
For increasing <strong>the</strong> value of <strong>the</strong> currently selected<br />
parameter. Also use it to actually execute a Job or a Store<br />
operation.<br />
[DEC/NO] button (page 81)<br />
For decreasing <strong>the</strong> value of <strong>the</strong> currently selected<br />
parameter. Also use it to cancel a Job or a Store operation.<br />
n You can also use <strong>the</strong> [INC/YES] and [DEC/NO] buttons to<br />
quickly move through parameter values in 10-unit jumps,<br />
especially those with large ranges. Simply hold down one of<br />
<strong>the</strong> buttons (of <strong>the</strong> direction you want to jump), and<br />
simultaneously press <strong>the</strong> o<strong>the</strong>r. For example, to jump in <strong>the</strong><br />
positive direction, hold down <strong>the</strong> [INC/YES] button and press<br />
[DEC/NO].<br />
£ Cursor buttons (page 81)<br />
The cursor buttons move <strong>the</strong> “cursor” around <strong>the</strong> LCD<br />
display screen, highlighting and selecting <strong>the</strong> various<br />
parameters.<br />
¢ [EXIT] button (page 55)<br />
The menus and displays of <strong>the</strong> MOTIF <strong>XS</strong> are organized<br />
according to a hierarchical structure. Press this button to<br />
exit from <strong>the</strong> current display and return to <strong>the</strong> previous level<br />
in <strong>the</strong> hierarchy.<br />
∞ [ENTER] button<br />
Use this button to actually enter a number when selecting a<br />
Memory or Bank for Voice or Performance. Also use this<br />
button to execute a Job or a Store operation.<br />
§ MODE buttons (page 55)<br />
These buttons select <strong>the</strong> MOTIF <strong>XS</strong> operating modes (e.g.,<br />
Voice mode).<br />
Bank buttons (pages 23 and 88)<br />
Each button selects a Voice or Performance Bank. When<br />
<strong>the</strong> [CATEGORY SEARCH] button is turned on, <strong>the</strong>se<br />
buttons can be used to select <strong>the</strong> Main category (printed<br />
below each button). When <strong>the</strong> [TRACK] button is turned on<br />
in <strong>the</strong> Pattern mode, <strong>the</strong>se lower buttons are used to select<br />
<strong>the</strong> desired Section from I – P.<br />
• Group [A] – [H] buttons (pages 23 and 88)<br />
Each button selects a Voice or Performance Group. When<br />
<strong>the</strong> [CATEGORY SEARCH] button is turned on, <strong>the</strong>se<br />
buttons can be used to select <strong>the</strong> Sub category. When <strong>the</strong><br />
[TRACK] button is turned on in <strong>the</strong> Pattern mode, <strong>the</strong>se<br />
buttons are used to select <strong>the</strong> desired Section from A – H.<br />
ª Number [1] – [16] buttons (pages 23 and 88)<br />
Use of <strong>the</strong>se buttons differs depending on <strong>the</strong> on/off status<br />
of <strong>the</strong> [TRACK], [MUTE], [SOLO] and [PERFORMANCE<br />
CONTROL] buttons.
Functions of <strong>the</strong> Number [1] – [16] buttons<br />
‚ [COMMON EDIT] button<br />
Turning this button on enters <strong>the</strong> Common Edit mode,<br />
which lets you edit <strong>the</strong> parameters <strong>com</strong>monly applied to all<br />
Elements, Parts or Zones in <strong>the</strong> Voice Edit mode,<br />
Performance Edit mode, Song Mixing Edit mode, Pattern<br />
Mixing Edit mode, and Mixing Voice Edit mode.<br />
⁄ [PROGRAM] button<br />
When this button is turned on, using <strong>the</strong> Bank/Group/<br />
Number buttons selects a Voice, Performance, Song,<br />
Pattern, and Master in <strong>the</strong> corresponding mode.<br />
¤ [CATEGORY SEARCH] button (page 24)<br />
When this button is turned on in <strong>the</strong> Voice Play mode/Song<br />
Mixing mode/Pattern Mixing mode, <strong>the</strong> Bank buttons can<br />
be used to select a main category and <strong>the</strong> Group buttons<br />
[A] – [E] can be used to select a sub category of <strong>the</strong> Voice.<br />
When this button is turned on in <strong>the</strong> Performance mode,<br />
<strong>the</strong> Bank buttons can be used to select <strong>the</strong> Performance<br />
category and <strong>the</strong> Group buttons [A] – [E] can be used to<br />
select <strong>the</strong> Performance sub category.<br />
‹ [PERFORMANCE CONTROL] button (page 135)<br />
This button is available only in <strong>the</strong> Performance Mode.<br />
When this button is turned on, <strong>the</strong> following functions are<br />
assigned to <strong>the</strong> Number buttons [1] – [16].<br />
› [TRACK] button (page 34)<br />
Turning this button on in <strong>the</strong> Song/Pattern mode enables<br />
<strong>the</strong> Number [1] – [16] buttons for selecting corresponding<br />
Song/Pattern tracks. When this button is turned on in <strong>the</strong><br />
The Controls & Connectors<br />
Mode<br />
[PERFORMANCE<br />
CONTROL] button<br />
[TRACK] button [MUTE] button [SOLO] button<br />
Voice Play — Keyboard transmit channel setting — —<br />
Normal Voice Edit — Changes <strong>the</strong> Edit mode from Common<br />
Edit to Element Edit and Element<br />
selection (1 – 8)<br />
Element Mute setting (1 – 8) Solo Element selection (1 – 8)<br />
Drum Voice Edit — Changes <strong>the</strong> Edit mode from Common<br />
Edit to Drum Key Edit<br />
— —<br />
Performance Play Performance Control (‹) Keyboard transmit channel setting Part Mute setting (1 – 4) Solo Part selection (1 – 4)<br />
Performance Edit Performance Control (‹) Part selection (1 – 4) Part Mute setting (1 – 4) Solo Part selection (1 – 4)<br />
Master Play — Keyboard transmit channel setting<br />
(when memorizing <strong>the</strong> Voice mode or<br />
Performance mode to <strong>the</strong> current<br />
Master) or Song/Pattern track<br />
selection (when memorizing <strong>the</strong> Song<br />
mode or Pattern mode to <strong>the</strong> current<br />
Master)<br />
— —<br />
Master Edit — Changes <strong>the</strong> Edit mode from Common<br />
Edit to Zone Edit and Zone selection<br />
(1 – 8)<br />
Song Play/<br />
Pattern Play<br />
Song Mixing/<br />
Pattern Mixing<br />
— Song/Pattern track selection Song/Pattern track Mute<br />
setting<br />
— Song/Pattern Part selection Song/Pattern Part Mute<br />
setting<br />
Pattern mode, <strong>the</strong> Group buttons [A] – [H] can be used to<br />
select <strong>the</strong> desired Section from A – H and <strong>the</strong> lower buttons<br />
of <strong>the</strong> Bank buttons can be used to select <strong>the</strong> desired<br />
Section from I – P.<br />
The on/off status of this button affects <strong>the</strong> Number [1] – [16]<br />
buttons in different ways, depending on <strong>the</strong> currently<br />
selected mode. (Refer to “Number [1] – [16] buttons”<br />
above.)<br />
fi [MUTE] button (pages 33 and 179)<br />
Turning this button on in <strong>the</strong> Normal Voice Edit mode and<br />
Mixing Voice Edit mode enables <strong>the</strong> Number buttons [1] –<br />
[8] for muting Voice Elements (1 – 8). Turning this button on<br />
in <strong>the</strong> o<strong>the</strong>r modes enables <strong>the</strong> Number buttons [1] – [16]<br />
for muting Performance Parts (1 – 4), Song Tracks/Parts (1<br />
– 16), and Pattern Tracks/Parts (1 – 16). Refer to “Number<br />
[1] – [16] buttons” above.<br />
fl [SOLO] button (pages 33 and 179)<br />
Turning this button on in <strong>the</strong> Normal Voice Edit mode and<br />
Mixing Voice Edit mode enables <strong>the</strong> Number buttons [1] –<br />
[8] for soloing a Voice Element (1 – 8). Turning this button<br />
on in <strong>the</strong> o<strong>the</strong>r modes enables <strong>the</strong> Number buttons [1] –<br />
[16] for soloing a Performance Part (1 – 4), a Song Track/<br />
Part (1 – 16), and a Pattern Track/Part (1 – 16). Refer to<br />
“Number [1] – [16] buttons” above.<br />
‡ Studio Connections logo<br />
— —<br />
Solo track selection<br />
Solo Part selection<br />
Mixing Voice Edit Element selection (1 – 8) Element selection (1 – 8) Element Mute setting (1 – 8) Solo Element selection (1 – 8)<br />
Number<br />
buttons<br />
Function<br />
[1] – [4] Selecting Parts 1 – 4.<br />
[5] – [8] Setting <strong>the</strong> Arpeggio Switch to on/off for Parts 1 – 4.<br />
[9] – [12] Setting <strong>the</strong> mute status for Parts 1 – 4.<br />
[13] – [16] Setting <strong>the</strong> Arpeggio Hold for Parts 1 – 4.<br />
Studio Connections is a joint<br />
project begun by Steinberg and<br />
Yamaha. Music production<br />
systems now increasingly rely on both software and<br />
hardware, and <strong>the</strong>re is a pressing need for closer<br />
integration between <strong>the</strong> two. Studio Connections provides<br />
a <strong>com</strong>prehensive and seamless music production<br />
environment—making <strong>the</strong> use of hardware and software<br />
both easier and much more efficient.<br />
MOTIF <strong>XS</strong> Owner’s <strong>Manual</strong><br />
15
16<br />
The Controls & Connectors<br />
Rear Panel<br />
MOTIF <strong>XS</strong>6<br />
MOTIF <strong>XS</strong>7<br />
MOTIF <strong>XS</strong>8<br />
1 POWER switch (page 19)<br />
Press to turn power ON or OFF.<br />
2 AC IN (AC Power Cord Socket) (page 19)<br />
Be sure to plug <strong>the</strong> AC power cord into this socket before<br />
plugging <strong>the</strong> power cord into an AC outlet. Use only <strong>the</strong> AC<br />
power cord supplied with this instrument. If <strong>the</strong> supplied<br />
cord is lost or damaged and needs to be replaced, contact<br />
your Yamaha dealer. The use of an inappropriate<br />
replacement can pose a fire and shock hazard!<br />
3 ETHERNET connector (page 86)<br />
You can connect <strong>the</strong> MOTIF <strong>XS</strong> to a LAN network by using<br />
this connector and a LAN cable. When connected to a<br />
network, <strong>the</strong> MOTIF <strong>XS</strong> is capable of mounting and<br />
accessing drives of <strong>com</strong>puters on <strong>the</strong> same network.<br />
4 USB connectors (pages 43 and 85)<br />
There are two different types of USB connectors, and <strong>the</strong><br />
rear panel of <strong>the</strong> instrument features both.<br />
The USB TO HOST connector is used to connect this<br />
instrument to <strong>the</strong> <strong>com</strong>puter via <strong>the</strong> USB cable and allows<br />
you to transfer MIDI data between <strong>the</strong> devices. Unlike<br />
MIDI, USB can handle multiple ports via a single cable.<br />
MOTIF <strong>XS</strong> Owner’s <strong>Manual</strong><br />
POWER<br />
ON/ OFF<br />
1<br />
POWER<br />
ON/ OFF<br />
1<br />
POWER<br />
ON/ OFF<br />
1<br />
AC IN<br />
AC IN<br />
AC IN<br />
3 4 5<br />
The USB connection between <strong>the</strong> instrument and <strong>the</strong><br />
<strong>com</strong>puter can only be used for transfer of MIDI data. No<br />
audio data can be transferred via USB.<br />
The USB TO DEVICE connector is used to connect this<br />
instrument to a USB storage device (hard disk drive, CD-<br />
ROM drive, flash disk, etc.) via <strong>the</strong> USB cable. This lets you<br />
save data created on this instrument to an external USB<br />
storage device and load data from a USB device to <strong>the</strong><br />
instrument. Save/Load operations can be performed in <strong>the</strong><br />
File mode.<br />
n For details about USB, see pages 43 and 85.<br />
5 LCD Contrast Control (page 20)<br />
LCD CONTRAST<br />
Use this control to set <strong>the</strong> LCD display for optimum<br />
legibility.<br />
ETHERNET<br />
ETHERNET<br />
USB<br />
TO HOST TO DEVICE<br />
LCD CONTRAST<br />
2 7<br />
3 4 5<br />
USB<br />
TO HOST TO DEVICE<br />
2 7<br />
ETHERNET<br />
LCD CONTRAST<br />
3 4 5<br />
USB<br />
TO HOST TO DEVICE<br />
2 6<br />
USB<br />
USB is an abbreviation for Universal Serial<br />
Bus. It is a serial interface for connecting a <strong>com</strong>puter with<br />
peripheral devices, and enables much faster data<br />
transfer <strong>com</strong>pared to conventional serial port<br />
connections.
DIGITAL OUT<br />
DIGITAL OUT<br />
6 mLAN (IEEE1394) connector 1, 2 (only MOTIF<br />
<strong>XS</strong>8) (page 44)<br />
The MOTIF <strong>XS</strong> is equipped with two mLAN connectors to<br />
which a IEEE1394 (6-pin) cable can be plugged in. These<br />
connectors enable you to connect <strong>the</strong> MOTIF <strong>XS</strong> to<br />
IEEE1394-<strong>com</strong>patible (FireWire/i.LINK) <strong>com</strong>puters. If <strong>the</strong><br />
connecting device features a 6-pin IEEE1394 jack, use a<br />
standard 6-pin to 6-pin IEEE1394 cable. If it features a 4pin<br />
IEEE1394 jack, use a standard 6-pin to 4-pin IEEE1394<br />
cable.<br />
7 mLAN expansion board (mLAN16E2) cover<br />
(MOTIF <strong>XS</strong>6, MOTIF <strong>XS</strong>7) (page 294)<br />
The optional mLAN16E2 can be installed by removing this<br />
cover of <strong>the</strong> MOTIF <strong>XS</strong>6/MOTIF <strong>XS</strong>7. By installing an<br />
mLAN16E2 board, you can upgrade your MOTIF <strong>XS</strong>6 or<br />
MOTIF <strong>XS</strong>7 for convenient and easy connection to an<br />
IEEE1394-<strong>com</strong>patible <strong>com</strong>puter.<br />
n Yamaha re<strong>com</strong>mends that you use an IEEE1394 cable with a<br />
length of 4.5 meters or less.<br />
n The digital audio output via <strong>the</strong> mLAN connector is fixed to a<br />
resolution of 24 bit/44.1 kHz.<br />
THRU<br />
THRU<br />
DIGITAL OUT<br />
MIDI<br />
FOOT SWITCH FOOT CONTROLLER ASSIGNABLE OUTPUT OUTPUT<br />
OUT IN PH ONES<br />
ASSIGNABLE SUSTAIN 2 1<br />
R R<br />
L L/MONO<br />
MIDI<br />
FOOT SWITCH FOOT CONTROLLER ASSIGNABLE OUTPUT OUTPUT<br />
OUT IN PH ONES<br />
ASSIGNABLE SUSTAIN 2 1<br />
R R<br />
L L/MONO<br />
THRU<br />
MIDI<br />
FOOT SWITCH FOOT CONTROLLER ASSIGNABLE OUTPUT OUTPUT<br />
OUT IN PHONES<br />
ASSIGNABLE SUSTAIN 2 1<br />
R R<br />
L L/MONO<br />
A/D INPUT<br />
R L<br />
8 9 ) ! @ # $ % ^<br />
A/D INPUT<br />
R L<br />
8 9 ) ! @ # $ % ^<br />
GAIN<br />
GAIN<br />
A/D INPUT<br />
R L<br />
8 9 ) ! @ # $ % ^<br />
About mLAN<br />
GAIN<br />
The Controls & Connectors<br />
“mLAN” is a digital network<br />
designed for musical applications.<br />
It uses and extends <strong>the</strong> industry standard IEEE1394 high<br />
performance serial bus. By connecting an mLANequipped<br />
MOTIF <strong>XS</strong> (a MOTIF <strong>XS</strong>6/7 to which <strong>the</strong><br />
optional mLAN16E2 is installed or a MOTIF <strong>XS</strong>8) to a<br />
<strong>com</strong>puter in a peer-to-peer connection via an IEEE1394<br />
cable, you can transfer audio data for all channels and<br />
MIDI data for all ports simultaneously between <strong>the</strong> MOTIF<br />
<strong>XS</strong> and <strong>the</strong> <strong>com</strong>puter. This kind of connection, its<br />
capabilities and uses are referred to as “mLAN” in this<br />
Owner’s <strong>Manual</strong> and <strong>the</strong> MOTIF <strong>XS</strong> instrument.<br />
For details and <strong>the</strong> latest information on mLAN, refer to<br />
<strong>the</strong> following URL:<br />
http://www.yamahasynth.<strong>com</strong>/<br />
*The name “mLAN” and its logo (above) are trademarks.<br />
MOTIF <strong>XS</strong> Owner’s <strong>Manual</strong><br />
17
18<br />
The Controls & Connectors<br />
8 DIGITAL OUT connector<br />
Use this connector to output digital signals over coaxial<br />
(RCA-pin) cable. The digital signal format is CD/DAT (S/P<br />
DIF). This connector outputs a digital signal of 44.1 kHz/24<br />
bit. By using this jack, you can record <strong>the</strong> keyboard<br />
performance or Song/Pattern playback of this syn<strong>the</strong>sizer<br />
to external media (e.g., a CD recorder) with exceptionally<br />
high-quality sound—thanks to <strong>the</strong> direct digital connection.<br />
9 MIDI IN/OUT/THRU connectors (page 83)<br />
MIDI IN is for receiving control or performance data from<br />
ano<strong>the</strong>r MIDI device, such as an external sequencer. MIDI<br />
THRU is simply for redirecting any received MIDI data (via<br />
MIDI IN) to connected devices, allowing convenient<br />
chaining of additional MIDI instruments. MIDI OUT is for<br />
transmitting all control, performance and playback data<br />
from <strong>the</strong> MOTIF <strong>XS</strong> to ano<strong>the</strong>r MIDI device, such as an<br />
external sequencer.<br />
) FOOT SWITCH jacks (pages 104, 123, 147 and<br />
260)<br />
For connection of an optional FC3/FC4/FC5 Footswitch to<br />
<strong>the</strong> SUSTAIN jack and a FC4/FC5 Footswitch to <strong>the</strong><br />
ASSIGNABLE jack. When connected to <strong>the</strong> SUSTAIN jack,<br />
<strong>the</strong> Footswitch controls sustain. When connected to<br />
ASSIGNABLE, it can control one of various different<br />
assignable functions.<br />
! FOOT CONTROLLER jacks (pages 104 and 147)<br />
For connection of optional foot controllers (FC7 and FC9).<br />
Each jack lets you continuously control one of various<br />
different assignable functions—such as volume, tone,<br />
pitch, or o<strong>the</strong>r aspects of <strong>the</strong> sound.<br />
@ ASSIGNABLE OUT L and R jacks<br />
Line level audio signals are output from this instrument via<br />
<strong>the</strong>se phone jacks (1/4" mono phone plug). These outputs<br />
are independent of <strong>the</strong> main output (at <strong>the</strong> L/MONO and R<br />
jacks below), and can be freely assigned to any of <strong>the</strong><br />
Drum Voice keys or <strong>the</strong> Parts. This lets you route specific<br />
Voices or sounds for processing with a favorite outboard<br />
effect unit. The Parts which can be assigned to <strong>the</strong>se jacks<br />
are as follows:<br />
• Audio Part in <strong>the</strong> Voice mode (page 265)<br />
• Drum Voice key to which <strong>the</strong> drum/percussion instrument<br />
is assigned (page 130)<br />
• Any Part of a Performance* (pages 148 and 153)<br />
• Any Part of a Song* (pages 234 and 235)<br />
• Any Part of a Pattern* (pages 234 and 235)<br />
* Including <strong>the</strong> Audio Input Part<br />
# OUTPUT L/MONO and R jacks (page 19)<br />
Line level audio signals are output via <strong>the</strong>se phone jacks.<br />
For monophonic output, use just <strong>the</strong> L/MONO jack.<br />
$ PHONES (Headphone) jack (page 19)<br />
This standard stereo phones jack is for connection to a set<br />
of stereo headphones.<br />
MOTIF <strong>XS</strong> Owner’s <strong>Manual</strong><br />
% A/D INPUT jacks (pages 40, 147, 232 and 265)<br />
External audio signals can be input via <strong>the</strong>se phone jacks<br />
(1/4" mono phone plug). Various devices such as<br />
microphone, guitar, bass, CD player, syn<strong>the</strong>sizer can be<br />
connected to <strong>the</strong>se jacks and <strong>the</strong>ir audio input signal can<br />
be sounded as <strong>the</strong> Audio Part of <strong>the</strong> Voice, Performance,<br />
Song, or Pattern. In <strong>the</strong> Sampling mode (page 242), <strong>the</strong>se<br />
jacks are used for capturing audio data as samples. In<br />
addition, you can use <strong>the</strong> special Vocoder feature by<br />
connecting a microphone to this L jack and inputting your<br />
Voice to <strong>the</strong> microphone.<br />
Use 1/4" mono phone plugs. For stereo signals (such as<br />
from audio equipment), use both jacks. For mono signals<br />
(such as from a microphone or guitar), use only <strong>the</strong> L jack.<br />
^ GAIN knob (page 40)<br />
For adjusting <strong>the</strong> input gain of <strong>the</strong> audio at <strong>the</strong> A/D INPUT<br />
jacks (above). Depending on <strong>the</strong> connected device<br />
(microphone, CD player, etc.), you may need to adjust this<br />
for optimum level.
Start Guide<br />
Step 1: Setting Up<br />
Power Supply<br />
1 Make sure <strong>the</strong> POWER switch on <strong>the</strong> MOTIF <strong>XS</strong><br />
is set to OFF.<br />
2 Connect <strong>the</strong> supplied power cord to <strong>the</strong> AC IN<br />
on <strong>the</strong> instrument’s rear panel.<br />
3 Connect <strong>the</strong> o<strong>the</strong>r end of <strong>the</strong> power cord to an<br />
AC outlet.<br />
Make sure your MOTIF <strong>XS</strong> meets <strong>the</strong> voltage<br />
requirement for <strong>the</strong> country or region in which it is being<br />
used.<br />
WARNING<br />
Make sure your MOTIF <strong>XS</strong> is rated for <strong>the</strong> AC voltage supplied in<br />
<strong>the</strong> area in which it is to be used (as listed on <strong>the</strong> rear panel).<br />
Connecting <strong>the</strong> unit to <strong>the</strong> wrong AC supply can cause serious<br />
damage to <strong>the</strong> internal circuitry and may even pose a shock<br />
hazard!<br />
WARNING<br />
Use only <strong>the</strong> AC power cord supplied with <strong>the</strong> MOTIF <strong>XS</strong>. If <strong>the</strong><br />
supplied cord is lost or damaged and needs to be replaced,<br />
contact your Yamaha dealer. The use of an inappropriate<br />
replacement can pose a fire and shock hazard!<br />
WARNING<br />
AC IN<br />
Power cord (included)<br />
Rear panel<br />
The type of AC power cord provided with <strong>the</strong> MOTIF <strong>XS</strong> may be<br />
different depending on <strong>the</strong> country in which it is purchased (a third<br />
prong may be provided for grounding purposes). Improper<br />
connection of <strong>the</strong> grounding conductor can create <strong>the</strong> risk of<br />
electrical shock. Do NOT modify <strong>the</strong> plug provided with <strong>the</strong> MOTIF<br />
<strong>XS</strong>. If <strong>the</strong> plug will not fit <strong>the</strong> outlet, have a proper outlet installed<br />
by a qualified electrician. Do not use a plug adapter which defeats<br />
<strong>the</strong> grounding conductor.<br />
Connecting speakers or<br />
headphones<br />
Since <strong>the</strong> MOTIF <strong>XS</strong> has no built-in speakers, you will need<br />
to monitor <strong>the</strong> sound of <strong>the</strong> instrument by using external<br />
equipment. Connect a set of headphones, powered<br />
speakers, or o<strong>the</strong>r playback equipment as required.<br />
Headphones<br />
Powered speaker (Left) Powered speaker (Right)<br />
Turning <strong>the</strong> power on<br />
Make sure <strong>the</strong> volume settings of <strong>the</strong> MOTIF <strong>XS</strong> and<br />
external devices such as powered speakers are turned<br />
down to <strong>the</strong> minimum before turning <strong>the</strong> power on.<br />
When connecting <strong>the</strong> MOTIF <strong>XS</strong> to <strong>the</strong> powered speakers,<br />
turn on <strong>the</strong> power switch of each device in <strong>the</strong> following<br />
order.<br />
• When turning <strong>the</strong> power on: First, <strong>the</strong> MOTIF <strong>XS</strong>, <strong>the</strong>n <strong>the</strong><br />
connected powered speakers.<br />
• When turning <strong>the</strong> power off: First, <strong>the</strong> connected<br />
powered speakers, <strong>the</strong>n <strong>the</strong> MOTIF <strong>XS</strong>.<br />
Please keep in mind that <strong>the</strong> POWER switch is located at<br />
<strong>the</strong> right side (from <strong>the</strong> view of <strong>the</strong> keyboard) of <strong>the</strong> AC IN<br />
socket on <strong>the</strong> rear panel of <strong>the</strong> MOTIF <strong>XS</strong>.<br />
CAUTION<br />
OUTPUT L/MONO OUTPUT R<br />
PHONES<br />
MOTIF <strong>XS</strong><br />
MOTIF <strong>XS</strong><br />
AC IN POWER switch<br />
Even when <strong>the</strong> POWER switch is turned off, electricity is still<br />
flowing to <strong>the</strong> instrument at <strong>the</strong> minimum level. When you are not<br />
using <strong>the</strong> instrument for a long time, make sure you unplug <strong>the</strong><br />
power cord from <strong>the</strong> wall AC outlet.<br />
MOTIF <strong>XS</strong> Owner’s <strong>Manual</strong> 19<br />
Start Guide
Start Guide<br />
20<br />
Step 1: Setting Up<br />
Adjusting <strong>the</strong> sound and <strong>the</strong><br />
display contrast<br />
Adjust <strong>the</strong> volume levels of <strong>the</strong> MOTIF <strong>XS</strong> and <strong>the</strong><br />
connected amplifier/speaker system. If <strong>the</strong> display is not<br />
easily visible, use <strong>the</strong> Contrast control to adjust for<br />
optimum visibility.<br />
Adjust <strong>the</strong> volume with <strong>the</strong><br />
MASTER VOLUME slider.<br />
CAUTION<br />
Do not listen with <strong>the</strong> headphones at high volume for long periods<br />
of time. Doing so may cause hearing loss.<br />
n Keep in mind that <strong>the</strong> LCD display is not a touch screen type.<br />
Do not touch and press <strong>the</strong> display directly or forcefully.<br />
Playing <strong>the</strong> sounds<br />
Try playing some of <strong>the</strong> realistic and dynamic MOTIF <strong>XS</strong><br />
sounds from <strong>the</strong> keyboard now. When you turn <strong>the</strong> power<br />
on, <strong>the</strong> display below appears.<br />
Indicates that <strong>the</strong><br />
Master mode is<br />
selected.<br />
Max.<br />
Min.<br />
n In <strong>the</strong> default settings, <strong>the</strong> Master mode is selected. For<br />
details about <strong>the</strong> modes, refer to <strong>the</strong> section “Modes.”<br />
n Keep in mind that <strong>the</strong> example displays shown in this manual<br />
are for instruction purposes only, and <strong>the</strong> contents (for<br />
example, <strong>the</strong> Demo Song/Pattern names) may differ slightly<br />
from those on your instrument.<br />
In this condition you can play <strong>the</strong> keyboard and hear <strong>the</strong><br />
sounds of <strong>the</strong> selected program. The top of <strong>the</strong> Master Play<br />
display (page 251) indicates <strong>the</strong> Master program number<br />
and <strong>the</strong> status (Mode, Bank, Program Number and its<br />
MOTIF <strong>XS</strong> Owner’s <strong>Manual</strong><br />
Adjust <strong>the</strong> display contrast<br />
with <strong>the</strong> Contrast control.<br />
Light<br />
MOTIF <strong>XS</strong><br />
Indicates <strong>the</strong><br />
type of selected<br />
program.<br />
Dark<br />
Indicates <strong>the</strong> name<br />
and number of<br />
selected program.<br />
name) registered to <strong>the</strong> current Master program. Let’s try<br />
playing <strong>the</strong> keyboard.<br />
n For details about Banks, see pages 88 and 135.<br />
Selecting and playing <strong>the</strong><br />
sounds<br />
In <strong>the</strong> default setting, <strong>the</strong> Master mode provides a total of<br />
128 programs each of which includes <strong>the</strong> mode (Voice,<br />
Performance, Song and Pattern) and its program number.<br />
Try out <strong>the</strong> different Master programs to play various Voices<br />
and Performances. You can change <strong>the</strong> Master program<br />
number by using <strong>the</strong> [INC/YES] button, [DEC/NO] button,<br />
or <strong>the</strong> data dial.<br />
Decreases<br />
number<br />
Modes<br />
Decreases<br />
number<br />
DEC/NO INC/YES<br />
Increases<br />
number<br />
Increases<br />
number<br />
In order to make operation of <strong>the</strong> MOTIF <strong>XS</strong> as<br />
<strong>com</strong>prehensive and as smooth as possible, all functions<br />
and operations have been grouped in “modes,” many of<br />
which also have a number of “sub modes.” The MOTIF <strong>XS</strong><br />
provides <strong>the</strong> nine main modes which are divided into<br />
several sub modes. You can master <strong>the</strong> MOTIF <strong>XS</strong> by<br />
understanding <strong>the</strong> mode structure. To enter <strong>the</strong> desired<br />
mode, press <strong>the</strong> corresponding Mode button. For more<br />
details about modes and sub modes, see page 54.<br />
SEQUENCER<br />
SONG PATTERN<br />
FILE UTILITY<br />
COMPARE<br />
MODE<br />
VOICE PERFORM MASTER<br />
INTEGRATED<br />
SAMPLING<br />
MULTI PART<br />
MIXING<br />
SEQ<br />
SETUP<br />
EDIT JOB STORE<br />
SCENE STORE<br />
SET LOCATE
Listening to <strong>the</strong> Demo Song<br />
Try listening to <strong>the</strong> preset Demo Songs, enjoy <strong>the</strong> highquality<br />
sound, and get a taste for how you can use <strong>the</strong><br />
MOTIF <strong>XS</strong> to create your own music.<br />
Playing <strong>the</strong> Demo Song<br />
••••••••••••••••••••••••••••••••••••<br />
1 Press <strong>the</strong> [SONG] button to enter <strong>the</strong> Song<br />
Play mode.<br />
The Track View display of <strong>the</strong> Song Play mode appears.<br />
2 Press <strong>the</strong> SEQ TRANSPORT [F] (Play) button<br />
to start <strong>the</strong> Demo Song.<br />
The Song currently shown on <strong>the</strong> display starts.<br />
n To adjust <strong>the</strong> volume level of <strong>the</strong> Demo Songs, use <strong>the</strong><br />
MASTER VOLUME slider.<br />
3 Press <strong>the</strong> SEQ TRANSPORT [J] (Stop) button<br />
to stop <strong>the</strong> Demo Song.<br />
Selecting ano<strong>the</strong>r Song<br />
••••••••••••••••••••••••••••••••••••<br />
1 Make sure that <strong>the</strong> cursor is located on <strong>the</strong><br />
Song Number in <strong>the</strong> Track View display.<br />
The highlighted frame within <strong>the</strong> display is called <strong>the</strong><br />
“cursor.” You can move <strong>the</strong> cursor up, down, left and<br />
right by using <strong>the</strong> Cursor buttons. If <strong>the</strong> cursor is<br />
located on ano<strong>the</strong>r parameter, move <strong>the</strong> cursor to <strong>the</strong><br />
Song Number.<br />
Song number Song name<br />
SEQ TRANSPORT<br />
LOCATE 1 2<br />
Stop button Play button<br />
Step 1: Setting Up<br />
n Keep in mind that <strong>the</strong> example displays shown in this<br />
manual are for instruction purposes only, and may appear<br />
somewhat different from those on your instrument.<br />
2 Press <strong>the</strong> [INC/YES] and [DEC/NO] buttons or<br />
rotate <strong>the</strong> data dial to change <strong>the</strong> Demo Song<br />
number.<br />
Decreases<br />
number<br />
Decreases<br />
number<br />
n You can change <strong>the</strong> value of various parameters as well<br />
as <strong>the</strong> Song number by using <strong>the</strong> [DEC/NO]/[INC/YES]<br />
button or data dial after moving <strong>the</strong> cursor to <strong>the</strong> desired<br />
location. This basic operation is used for all of <strong>the</strong><br />
selection and adjustment operations on <strong>the</strong> instrument.<br />
Loading <strong>the</strong> Demo data<br />
••••••••••••••••••••••••••••••••••••<br />
In <strong>the</strong> default settings (when shipped from <strong>the</strong> factory),<br />
several Demo Songs and Patterns are stored to <strong>the</strong><br />
instrument, starting at Song 01 and Pattern 01. However,<br />
you may delete <strong>the</strong>m by recording your original data or<br />
loading a different Song/Pattern from an external USB<br />
storage device. To restore <strong>the</strong> original Demo data, follow<br />
<strong>the</strong> instructions below.<br />
CAUTION<br />
DEC/NO INC/YES<br />
EXIT<br />
ENTER<br />
EXECUTE<br />
DEC/NO INC/YES<br />
Increases<br />
number<br />
Increases<br />
number<br />
Loading <strong>the</strong> Demo data overwrites all <strong>the</strong> Songs or Patterns.<br />
Before loading <strong>the</strong> Demo data, please check whe<strong>the</strong>r or not <strong>the</strong>re<br />
is important data in <strong>the</strong> Songs or Patterns. If <strong>the</strong>re is important<br />
data in <strong>the</strong> Songs or Patterns, save it to <strong>the</strong> external USB storage<br />
device or a <strong>com</strong>puter on <strong>the</strong> network before loading <strong>the</strong> Demo<br />
data. For information about how to save, see page 278.<br />
MOTIF <strong>XS</strong> Owner’s <strong>Manual</strong> 21<br />
Start Guide
Start Guide<br />
22<br />
Resetting <strong>the</strong> User Memory to <strong>the</strong> Initial Factory Settings<br />
1 Press <strong>the</strong> [FILE] button and [UTILITY] button<br />
simultaneously.<br />
The Demo Load display appears.<br />
2 Make sure that <strong>the</strong> Load Type is set to “all,”<br />
<strong>the</strong>n press <strong>the</strong> [ENTER] button to load <strong>the</strong><br />
Demo data.<br />
A display prompt appears to confirm whe<strong>the</strong>r or not <strong>the</strong><br />
destination data (Song/Pattern) should be deleted.<br />
n If you want to load only <strong>the</strong> Demo Song data, set <strong>the</strong> Load<br />
Type to “song.” If you want to load only <strong>the</strong> Demo Pattern<br />
data, set <strong>the</strong> Load Type to “pattern.”<br />
3 Press <strong>the</strong> [INC/YES] button to execute <strong>the</strong><br />
Demo Load operation.<br />
The Demo data is loaded to <strong>the</strong> Song and Pattern<br />
memory location, <strong>the</strong>n <strong>the</strong> Song Play Track View display<br />
appears.<br />
n If you set <strong>the</strong> Load Type to “pattern” in step 2 above, <strong>the</strong><br />
Pattern Play display (page 210) appears after loading.<br />
n For more information about <strong>the</strong> Track View display of <strong>the</strong> Song,<br />
see page 181. For more information about <strong>the</strong> Pattern Play<br />
display, see page 210.<br />
MOTIF <strong>XS</strong> Owner’s <strong>Manual</strong><br />
FILE UTILITY<br />
DEC/NO INC/YES<br />
EXIT<br />
ENTER<br />
EXECUTE<br />
Resetting <strong>the</strong> User Memory to<br />
<strong>the</strong> Initial Factory Settings<br />
The original factory settings of this syn<strong>the</strong>sizer’s User<br />
Memory can be restored as follows.<br />
n When connecting a <strong>com</strong>puter to <strong>the</strong> MOTIF-RACK <strong>XS</strong><br />
via a IEEE1394 cable, disable <strong>the</strong> driver used for this<br />
connection beforehand, and follow <strong>the</strong> procedure below<br />
to execute Factory Set.<br />
CAUTION<br />
When <strong>the</strong> factory settings are restored, all <strong>the</strong> Voice,<br />
Performance, Song, Pattern, and system settings in <strong>the</strong><br />
Utility mode you created will be erased. Make sure you are<br />
not overwriting any important data. Be sure to save all<br />
important data to your USB storage device or a <strong>com</strong>puter on<br />
<strong>the</strong> network before executing this procedure (page 278).<br />
1 Press <strong>the</strong> [UTILITY] button <strong>the</strong>n <strong>the</strong> [JOB]<br />
button to call up <strong>the</strong> Factory Set display<br />
(page 269).<br />
2 Press <strong>the</strong> [ENTER] button.<br />
The display prompts you for confirmation. Press<br />
<strong>the</strong> [DEC/NO] button to cancel <strong>the</strong> Load operation.<br />
3 Press <strong>the</strong> [INC/YES] button to execute <strong>the</strong><br />
Factory Set.<br />
After <strong>the</strong> Factory Set has been <strong>com</strong>pleted, a<br />
“Completed” message appears and operation<br />
returns to <strong>the</strong> original display.<br />
CAUTION<br />
For Factory Set operations that take longer to process, you<br />
will see <strong>the</strong> message “Now executing Factory Set…” during<br />
processing. While such a message is shown on <strong>the</strong> display,<br />
never attempt to turn off <strong>the</strong> power while data is being<br />
written to Flash ROM. Turning <strong>the</strong> power off in this state<br />
results in loss of all user data and may cause <strong>the</strong> system to<br />
freeze (due to corruption of data in <strong>the</strong> Flash ROM). This<br />
means that this syn<strong>the</strong>sizer may not be able to start up<br />
properly, even when turning <strong>the</strong> power on next time.<br />
CAUTION<br />
When entering <strong>the</strong> checkmark to <strong>the</strong> box of <strong>the</strong> Power On<br />
Auto Factory Set and executing <strong>the</strong> Factory Set, <strong>the</strong> Factory<br />
Set will automatically be executed each time turning <strong>the</strong><br />
power on. Keep in mind that this also means that your<br />
original data in Flash ROM will be erased each time you turn<br />
on <strong>the</strong> power. Therefore, <strong>the</strong> checkmark of this box should<br />
normally be removed. If you remove <strong>the</strong> checkmark of this<br />
box and execute <strong>the</strong> Factory Set, <strong>the</strong> Factory Set will not be<br />
executed when turning <strong>the</strong> power on next time.
Step 2: Selecting and Playing a Voice<br />
Try playing some of <strong>the</strong> realistic and dynamic Voices from <strong>the</strong> keyboard now. Press <strong>the</strong> [VOICE] button to enter <strong>the</strong> Voice<br />
Play mode, <strong>the</strong>n enjoy <strong>the</strong> powerful, au<strong>the</strong>ntic sounds of <strong>the</strong> MOTIF <strong>XS</strong> Voices, as well as <strong>the</strong> enormous range and wealth of<br />
sounds available.<br />
Selecting a Voice<br />
Here, try selecting <strong>the</strong> Grand Piano for example.<br />
Press <strong>the</strong> [PROGRAM] button (1) so that its lamp lights,<br />
press <strong>the</strong> Bank button [PRE 1] (2) to select <strong>the</strong> Preset<br />
Bank 1, press <strong>the</strong> Group button [A] (3) <strong>the</strong>n Number<br />
button [1] (4) to select a Voice “PRE: 001 (A01).”<br />
PRE 1 PRE 2 PRE 3 PRE 4 PRE 5 PRE 6 PRE 7 PRE 8 PROGRAM<br />
PIANO KEYBOARD ORGAN GUITAR BASS STRINGS BRASS<br />
2<br />
USER 1 USER 2 USER 3 GM GM DR PRE DR USER DR<br />
SYN LEAD PADS/<br />
CHOIRS<br />
SYN COMP CHROMATIC DRUM/<br />
PERCUSSION PERCUSSION<br />
A B C D E F G H<br />
3<br />
SUB CATEGORY<br />
1 2 3 4 5 6 7<br />
8<br />
4<br />
Bank<br />
PART SELECT ARP ON/OFF<br />
PART MUTE ARP HOLD<br />
SAX/<br />
WOODWIND<br />
CATEGORY SEARCH<br />
PERFORMANCE<br />
CONTROL<br />
9 10 11 12 13 14 15 16 MUTE<br />
Number<br />
Next, press <strong>the</strong> Number button [2] to select <strong>the</strong> Voice “PRE:<br />
002 (A02),” <strong>the</strong> 2nd Voice within <strong>the</strong> same Bank and<br />
Group. Select o<strong>the</strong>r Voices (003, 004, etc.) in <strong>the</strong> same way<br />
by pressing <strong>the</strong> appropriate Number button ([3], [4], etc.).<br />
To select a specific Voice from <strong>the</strong> 128 Voices available in<br />
Preset Bank 1, first press <strong>the</strong> appropriate Bank button [A] –<br />
[H], <strong>the</strong>n press <strong>the</strong> desired Number button [1] – [16].<br />
You can also use <strong>the</strong> [DEC/NO] button, [INC/YES] button,<br />
and data dial to select a Voice within a certain Bank. You<br />
can scroll through <strong>the</strong> Voices within <strong>the</strong> same Bank across<br />
<strong>the</strong> different Groups by rotating <strong>the</strong> data dial or pressing<br />
<strong>the</strong> [DEC/NO]/[INC/YES] button.<br />
Now, enjoy various Voices by following <strong>the</strong> above<br />
operations. 128 Voices are available for each Bank. Press<br />
<strong>the</strong> [PRE 2] to [PRE 8] and [GM] buttons to select Voices in<br />
o<strong>the</strong>r Banks.<br />
SOUND<br />
EFX<br />
MUSICAL<br />
EFX<br />
ETHNIC<br />
Group<br />
1<br />
Voice Play mode indications<br />
The top of <strong>the</strong> display in <strong>the</strong> Voice Play mode indicates <strong>the</strong><br />
Voice related information, such as Bank, Voice number<br />
(Group and Number), Category 1, Category 2, and Voice<br />
name. See below.<br />
Bank<br />
Voice number<br />
Group Number<br />
Voice name<br />
Category 1<br />
Category 2<br />
Below is a list of <strong>the</strong> Categories and <strong>the</strong>ir panel<br />
abbreviations.<br />
Abbreviation Category<br />
Piano Piano<br />
Keys Keyboard instruments (Harpsichord, Clav, etc.)<br />
Organ Organ<br />
Guitr Guitar<br />
Bass Bass<br />
Strng Strings<br />
Brass Brass<br />
SaxWW Saxophone and o<strong>the</strong>r woodwind instruments<br />
SynLd Synth Lead<br />
Pads Synth Pad<br />
SyCmp Synth Comp<br />
CPerc Chromatic Percussion (Marimba, Glockenspiel, etc.)<br />
Dr/Pc Drum/Percussion<br />
S.EFX Sound Effect<br />
M.EFX Musical Effect<br />
Ethnc Ethnic<br />
Selecting a Drum Voice<br />
Next, try out <strong>the</strong> Drum Voice. For example, select <strong>the</strong> Drum<br />
Voice of <strong>the</strong> Preset Drum Bank. Press <strong>the</strong> [PROGRAM]<br />
button so that its lamp lights, press <strong>the</strong> Bank button [PRE<br />
DR] to select <strong>the</strong> Preset Drum Bank, press <strong>the</strong> Group<br />
button [A], and finally press Number button [1] to select <strong>the</strong><br />
Voice “PDR: 001 (A01).” Now <strong>the</strong> Drum Voice has been<br />
selected.<br />
Now play <strong>the</strong> Drum Voice. You’ll notice that with <strong>the</strong> Drum<br />
Voice, unlike <strong>the</strong> Normal Voice you tried in <strong>the</strong> previous<br />
page, each key of <strong>the</strong> keyboard has a different drum<br />
instrument assigned to it. This allows you to easily create<br />
and play rhythm patterns made up of various drum/<br />
percussion instruments.<br />
MOTIF <strong>XS</strong> Owner’s <strong>Manual</strong> 23<br />
Start Guide
Start Guide<br />
24<br />
Step 2: Selecting and Playing a Voice<br />
Using <strong>the</strong> Category Search<br />
function<br />
Since <strong>the</strong> MOTIF <strong>XS</strong> has such a huge variety of Voices and<br />
so many to choose from, it may be difficult or time<br />
consuming to find <strong>the</strong> Voice you want. This is where <strong>the</strong><br />
convenient Category Search function <strong>com</strong>es in handy. It<br />
lets you select desired Voices easily, based on general<br />
instrument categories. Here for example, we’ll try selecting<br />
a Guitar Voice.<br />
In <strong>the</strong> Voice Play mode, press <strong>the</strong> [CATEGORY SEARCH]<br />
button so that its indicator lights. The Category Search<br />
window appears on <strong>the</strong> display, indicating that you can use<br />
<strong>the</strong> Cursor buttons and data dial to select <strong>the</strong> desired<br />
Category, Sub Category and Voice. In this state, you can<br />
also use <strong>the</strong> Bank/Group/Number buttons on <strong>the</strong> panel to<br />
select a Voice. Browse <strong>the</strong> Category names printed below<br />
<strong>the</strong> Bank buttons as illustrated below <strong>the</strong>n press <strong>the</strong><br />
desired button. In this example, press <strong>the</strong> [GUITAR] button.<br />
Category<br />
PRE 1 PRE 2 PRE 3 PRE 4 PRE 5 PRE 6 PRE 7 PRE 8 PROGRAM<br />
PIANO KEYBOARD ORGAN GUITAR BASS STRINGS BRASS<br />
USER 1 USER 2 USER 3 GM GM DR PRE DR USER DR<br />
SYN LEAD PADS/<br />
CHOIRS<br />
A B C D E F G H<br />
SUB CATEGORY<br />
The Voice list of <strong>the</strong> selected Category appears in <strong>the</strong><br />
display. You can select <strong>the</strong> desired Voice by moving <strong>the</strong><br />
cursor upward or downward.<br />
At <strong>the</strong> bottom of <strong>the</strong> display, <strong>the</strong> Sub Categories are shown<br />
at <strong>the</strong> tabs corresponding to <strong>the</strong> [SF1] – [SF5] buttons<br />
respectively. When <strong>the</strong> Guitar Category is selected, guitar<br />
types such as Acoustic Guitar, Electric Guitar, and Electric<br />
Distortion Guitar are shown as Sub Categories. From this<br />
display for example, you can instantly call up <strong>the</strong> Clean<br />
Guitar Sub Category by pressing [SF2], which corresponds<br />
to “E.Cln” in <strong>the</strong> display. This feature lets you quickly and<br />
easily get at <strong>the</strong> specific kinds of Voices you want to use.<br />
Press any of <strong>the</strong> [CATEGORY SEARCH], [EXIT] and<br />
[ENTER] buttons to return to <strong>the</strong> original display.<br />
n From this display, you can register your favorite Voices to <strong>the</strong><br />
Favorite Category. For details, see page 88.<br />
MOTIF <strong>XS</strong> Owner’s <strong>Manual</strong><br />
2<br />
SYN COMP CHROMATIC DRUM/<br />
PERCUSSION PERCUSSION<br />
Main Category Sub Category<br />
SOUND<br />
EFX<br />
Sub Category<br />
MUSICAL<br />
EFX<br />
Voice list<br />
SAX/<br />
WOODWIND<br />
ETHNIC<br />
CATEGORY SEARCH<br />
1<br />
Playing <strong>the</strong> Arpeggio<br />
This function lets you trigger rhythm patterns, riffs and<br />
phrases using <strong>the</strong> current Voice by simply playing notes on<br />
<strong>the</strong> keyboard. Since <strong>the</strong> preset Voices already have <strong>the</strong>ir<br />
own Arpeggio types pre-assigned, all you need to do is<br />
select <strong>the</strong> desired Voice and turn on <strong>the</strong> Arpeggio function.<br />
For certain Voices, simply selecting <strong>the</strong> Voice will turn<br />
Arpeggio on.<br />
Try selecting different Voices and check out <strong>the</strong> various<br />
Arpeggio types.<br />
REMOTE ARPEGGIO<br />
ON/OFF ON/OFF<br />
For example, select <strong>the</strong> Voice numbered “A01” of <strong>the</strong><br />
Preset Drum Bank, turn <strong>the</strong> [ARPEGGIO ON/OFF] button<br />
on, <strong>the</strong>n hold down a key (any key) on <strong>the</strong> keyboard, and<br />
listen as a rhythm is played automatically. The rhythm stops<br />
when you release <strong>the</strong> key. O<strong>the</strong>r preset Voices also have<br />
<strong>the</strong>ir own appropriate Arpeggio types for automatic playing<br />
of arpeggio/rhythm patterns.<br />
Up to five Arpeggio types can be assigned to <strong>the</strong> [SF1] –<br />
[SF5] buttons for each Voice.<br />
When a certain Voice is selected, <strong>the</strong> same sequence is<br />
played back both regardless of <strong>the</strong> pressed note or notes.<br />
When a certain Voice is selected, on <strong>the</strong> o<strong>the</strong>r hand, <strong>the</strong><br />
different sequence is played back depending on which<br />
notes are played or how <strong>the</strong>y are played. Check out how<br />
Arpeggios are played back for different Voices by selecting<br />
various Voices and playing notes in various ways.
Changing <strong>the</strong> Arpeggio type<br />
The Arpeggio type assigned to each of <strong>the</strong> [SF1] – [SF5]<br />
buttons can be changed as desired.<br />
1 From <strong>the</strong> Voice Play display, press <strong>the</strong> [F4]<br />
button to call up <strong>the</strong> Arpeggio display.<br />
These global parameters apply to all <strong>the</strong> [SF1] – [SF5]<br />
buttons as a group.<br />
These parameters can be set for each of <strong>the</strong> [SF1] – [SF5]<br />
buttons.<br />
2 Press one of <strong>the</strong> [SF1] – [SF5] buttons.<br />
The lower half of <strong>the</strong> display will be changed for <strong>the</strong><br />
pressed button. The upper half of <strong>the</strong> display is<br />
<strong>com</strong>mon to all <strong>the</strong> [SF1] – [SF5] buttons.<br />
3 In <strong>the</strong> lower half of <strong>the</strong> display, select <strong>the</strong><br />
Category, Sub Category and Type of <strong>the</strong><br />
Arpeggio.<br />
The Category determines <strong>the</strong> instrument type, <strong>the</strong> Sub<br />
Category determines <strong>the</strong> rhythm type, and <strong>the</strong> Type<br />
determines <strong>the</strong> Arpeggio type itself. Press any note to<br />
trigger <strong>the</strong> Arpeggio playback to find your favorite one.<br />
Go on and assign Arpeggio types in <strong>the</strong> same way to <strong>the</strong><br />
o<strong>the</strong>r [SF] buttons as desired.<br />
n For details about <strong>the</strong> Arpeggio, see page 62.<br />
Using <strong>the</strong> Controllers<br />
Step 2: Selecting and Playing a Voice<br />
The MOTIF <strong>XS</strong> gives you an amazing amount of control<br />
options. Not only is it equipped with conventional Pitch<br />
Bend and Modulation Wheels, it also features special<br />
Knobs, Sliders, Ribbon Controller, and Assignable Function<br />
buttons.<br />
ASSIGNABLE FUNCTION [1]/[2] buttons<br />
Sliders Knobs<br />
SELECTED PART<br />
CONTROL<br />
MULTI PART<br />
CONTROL<br />
ASSIGNABLE<br />
FUNCTION<br />
1<br />
2<br />
TONE 1<br />
TONE 2<br />
ARP FX<br />
REVERB<br />
CHORUS<br />
PAN<br />
MASTER<br />
VOLUME<br />
CUTOFF RESONANCE ATTACK DECAY<br />
EQ LOW EQ MID F<br />
The Voice Play display indicates <strong>the</strong> functions assigned to<br />
<strong>the</strong> controllers. Keep in mind that <strong>the</strong> name of <strong>the</strong> Voice<br />
may include an abbreviation of <strong>the</strong> controller most suitable<br />
for use when playing <strong>the</strong> Voice. Using <strong>the</strong> controllers such<br />
as Knobs, Sliders, and <strong>the</strong> ASSIGNABLE FUNCTION<br />
buttons change various aspects of <strong>the</strong> Voice’s sound in real<br />
time—while you play.<br />
Display Functions<br />
SWING<br />
QUANTIZE<br />
VALUE<br />
EQ MID EQ MID Q<br />
QUANTIZE<br />
STRENGTH GATE TIME<br />
SUSTAIN RELEASE<br />
EQ HIGH PAN<br />
ASSIGN 1 ASSIGN 2<br />
REVERB CHORUS<br />
VELOCITY OCT RANGE UNITMULTIPLY TEMPO<br />
VOLUME 1 VOLUME 2 VOLUME 3 VOLUME 4 VOLUME 5 VOLUME 6 VOLUME 7 VOLUME 8<br />
Ribbon Controller<br />
Pitch Bend wheel Modulation wheel<br />
Indicates <strong>the</strong> controller assignment<br />
AS1, AS2 Indicates <strong>the</strong> functions assigned to <strong>the</strong> respective<br />
Knobs (printed “ASSIGN 1” and “ASSIGN 2”) with <strong>the</strong><br />
TONE1 lamp turned on.<br />
AF1, AF2 Indicates <strong>the</strong> functions assigned to <strong>the</strong> two<br />
ASSIGNABLE FUNCTION buttons.<br />
MW Indicates <strong>the</strong> functions assigned to <strong>the</strong> Modulation Wheel.<br />
RB Indicates <strong>the</strong> functions assigned to <strong>the</strong> Ribbon Controller.<br />
n For more information about controllers, see page 67.<br />
REMOTE ARPEGGIO<br />
ON/OFF ON/OFF<br />
EFFECT BYPASS<br />
INSERTION SYSTEM<br />
OCTAVE<br />
DOWN UP<br />
MASTER<br />
EFFECT<br />
SEQ TRANSPORT<br />
LOCATE 1 2<br />
MOTIF <strong>XS</strong> Owner’s <strong>Manual</strong> 25<br />
Start Guide
Start Guide<br />
26<br />
Step 2: Selecting and Playing a Voice<br />
Using <strong>the</strong> Knobs<br />
Try using <strong>the</strong> Knobs with your left hand while playing <strong>the</strong> keyboard with your right with <strong>the</strong> Voice A01 “Full Concert Grand.”<br />
[SELECTED PART<br />
CONTROL] button<br />
SELECTED PART<br />
CONTROL<br />
MULTI PART<br />
CONTROL<br />
1 Press <strong>the</strong> [SELECTED PART CONTROL] button<br />
a few times so that <strong>the</strong> TONE 1 lamp lights.<br />
The Control Function window appears when a display<br />
o<strong>the</strong>r than <strong>the</strong> Voice Play display is shown.<br />
Holding <strong>the</strong> [SELECTED PART CONTROL] button for a<br />
while will light <strong>the</strong> lamp of <strong>the</strong> TONE1 lamp.<br />
2 Rotate <strong>the</strong> Knob 1 (at <strong>the</strong> far left) while playing<br />
keyboard.<br />
Turning <strong>the</strong> knob clockwise results in a brighter sound,<br />
while turning it counterclockwise results in a softer,<br />
muffled sound. The sound changes in this way because<br />
Knob 1 is assigned to <strong>the</strong> Cutoff Frequency parameter<br />
(labeled CUTOFF in <strong>the</strong> matrix above Knob 1 and next<br />
to TONE 1).<br />
n The functions assigned to each of Knobs and current<br />
values are shown in <strong>the</strong> display.<br />
3 Press <strong>the</strong> [SELECTED PART CONTROL] button<br />
a few times so that <strong>the</strong> TONE 2 lamp lights,<br />
<strong>the</strong>n rotate <strong>the</strong> Knob (at <strong>the</strong> far right).<br />
The CHORUS (as printed above <strong>the</strong> Knob) is applied to<br />
<strong>the</strong> current Voice.<br />
n A red point on <strong>the</strong> Knob or Slider graphic indicates <strong>the</strong><br />
current value to which <strong>the</strong> Knob or Slider is set. Moving<br />
<strong>the</strong> Knob or Slider has no effect on <strong>the</strong> sound until this<br />
point is reached. Once you move <strong>the</strong> Knob or Slider past<br />
this point, <strong>the</strong> red point disappears and moving <strong>the</strong> Knob<br />
or Control Slider affects <strong>the</strong> sound.<br />
MOTIF <strong>XS</strong> Owner’s <strong>Manual</strong><br />
3<br />
TONE 1<br />
TONE 2<br />
ARP FX<br />
REVERB<br />
CHORUS<br />
PAN<br />
1 2<br />
5<br />
CUTOFF RESONANCE<br />
EQ LOW EQ MID F<br />
SWING<br />
QUANTIZE<br />
VALUE<br />
4<br />
AT TACK DECAY<br />
EQ MID EQ MID Q<br />
QUANTIZE<br />
STRENGTH GATE TIME<br />
7<br />
SUSTAIN RELEASE<br />
EQ HIGH PAN<br />
VELOCITY OCT RANGE<br />
ASSIGN 1 ASSIGN 2<br />
REVERB CHORUS<br />
UNITMULTIPLY TEMPO<br />
Knob 1 Knob 2 Knob 3 Knob 4 Knob 5 Knob 6 Knob 7 Knob 8<br />
Functions assigned to Knobs<br />
4 Turn Knob 1, Knob 3, and Knob 5 with <strong>the</strong><br />
TONE 2 lamp turned on.<br />
You can change <strong>the</strong> sound by boosting or attenuating<br />
<strong>the</strong> LOW, MID and HIGH band (as printed above <strong>the</strong><br />
Knobs respectively) of <strong>the</strong> EQ (equalizer).<br />
5 Press <strong>the</strong> [SELECTED PART CONTROL] button<br />
a few times so that <strong>the</strong> ARP FX lamp lights,<br />
turn [ARPEGGIO ON/OFF] on, <strong>the</strong>n turn <strong>the</strong><br />
Knobs with your left hand while playing <strong>the</strong><br />
notes with your right hand.<br />
In this status, all <strong>the</strong> Knobs can be used to change how<br />
<strong>the</strong> Arpeggio is played back.<br />
6 Rotate Knob 8 (at <strong>the</strong> far left) while playing<br />
keyboard to change <strong>the</strong> tempo of <strong>the</strong> Arpeggio.<br />
7 Rotate Knob 4 to change <strong>the</strong> gate time of <strong>the</strong><br />
Arpeggio notes, for example, from staccato to<br />
legato playback.<br />
Try out o<strong>the</strong>r Knobs as well.<br />
n For more information about <strong>the</strong> functions assigned to <strong>the</strong><br />
Knobs in <strong>the</strong> Voice mode, see page 90.<br />
By using <strong>the</strong> Knobs in this way, you can change <strong>the</strong> sound<br />
of <strong>the</strong> Preset Voice to create your original Voice.<br />
n Controlling <strong>the</strong> knobs does not affect some voices.<br />
3<br />
6<br />
Storing <strong>the</strong> Voice<br />
The MOTIF <strong>XS</strong> has space for three Banks of your own<br />
User Voices. Store <strong>the</strong> Voice by pressing <strong>the</strong> [STORE]<br />
button. For details, see page 97.
Adjusting <strong>the</strong> tuning to o<strong>the</strong>r<br />
instruments<br />
When you play <strong>the</strong> MOTIF <strong>XS</strong> with o<strong>the</strong>r instruments, you<br />
may need to tune <strong>the</strong> overall sound of <strong>the</strong> MOTIF <strong>XS</strong> to<br />
match that of <strong>the</strong> o<strong>the</strong>r instruments in <strong>the</strong> group.<br />
1 Press <strong>the</strong> [UTILITY] button to enter <strong>the</strong> Utility<br />
mode, press <strong>the</strong> [F1] button, <strong>the</strong>n press <strong>the</strong><br />
[SF1] button to call up <strong>the</strong> Play display as<br />
below.<br />
2 Move <strong>the</strong> cursor to Tune, <strong>the</strong>n set <strong>the</strong> value.<br />
In this example, we’ll change <strong>the</strong> value from “440 Hz” to<br />
“442 Hz.” Since <strong>the</strong> Tune parameter is actually adjusted<br />
in cents (1 cent = 1/100th of a semitone), <strong>the</strong><br />
corresponding value in Hertz is shown at right. Since 1<br />
Hz is roughly equivalent to 4 cents, set this value to<br />
“+8.0.”<br />
3 Press <strong>the</strong> [STORE] button to store <strong>the</strong> Utility<br />
setting.<br />
Transpose<br />
Step 2: Selecting and Playing a Voice<br />
This function allows <strong>the</strong> overall pitch of <strong>the</strong> MOTIF <strong>XS</strong> to be<br />
transposed up or down in semitone increments/<br />
decrements. You can play <strong>the</strong> same notes on <strong>the</strong> keyboard<br />
even when <strong>the</strong> pitch of <strong>the</strong> song is shifted up or down in<br />
semitones.<br />
1 Press <strong>the</strong> [UTILITY] button to enter <strong>the</strong> Utility<br />
mode, press <strong>the</strong> [F1] button, <strong>the</strong>n press <strong>the</strong><br />
[SF1] button to call up <strong>the</strong> Play display as<br />
shown.<br />
2 Move <strong>the</strong> cursor to Transpose, <strong>the</strong>n set <strong>the</strong><br />
value.<br />
Set <strong>the</strong> value to “+1” to transpose <strong>the</strong> pitch up by a<br />
semitone, or set it to “-1” to transpose it down by a<br />
semitone. To transpose it up or down by a whole tone,<br />
set this to “+/-2”; to transpose by an octave, set it to “+/<br />
-12.”<br />
CAUTION<br />
To transpose by octaves, use <strong>the</strong> Octave parameter (above<br />
Transpose).<br />
3 Press <strong>the</strong> [STORE] button to store <strong>the</strong> Utility<br />
setting.<br />
n Make sure to press <strong>the</strong> [STORE] button to store <strong>the</strong> Utility<br />
settings. Please keep in mind that <strong>the</strong> Utility settings will<br />
be lost if you turn off <strong>the</strong> power without executing <strong>the</strong> Store<br />
operation.<br />
MOTIF <strong>XS</strong> Owner’s <strong>Manual</strong> 27<br />
Start Guide
Start Guide<br />
28<br />
Step 3: Selecting and Playing a Performance<br />
As in <strong>the</strong> Voice Play mode, <strong>the</strong> Performance Play mode is where you select and play <strong>the</strong> instrument sounds of this<br />
syn<strong>the</strong>sizer. However, in <strong>the</strong> Performance mode, you can mix several different Voices toge<strong>the</strong>r in a layer, or split <strong>the</strong>m across<br />
<strong>the</strong> keyboard, or even set up a <strong>com</strong>bination layer/split. Each Performance can contain up to four different Parts.<br />
Press <strong>the</strong> [PERFORM] button to enter <strong>the</strong> Performance Play mode.<br />
Selecting a Performance<br />
Selecting a Performance is done in basically <strong>the</strong> same way<br />
as selecting a Voice. The Category Search function is<br />
available also in <strong>the</strong> Performance Play mode. Note that <strong>the</strong><br />
MOTIF <strong>XS</strong> has no Preset Performances and provides only<br />
three User Banks. Consequently, press any of <strong>the</strong> [USR1] –<br />
[USR3] buttons to select a Performance after pressing <strong>the</strong><br />
[PROGRAM] button.<br />
Performance Play mode<br />
indications<br />
The Performance Play display indicates <strong>the</strong> Voice names<br />
for each of four parts making up <strong>the</strong> Performance at <strong>the</strong><br />
bottom right corner. Except for this, <strong>the</strong> display is almost<br />
same as in <strong>the</strong> Voice Play mode.<br />
Bank<br />
Performance<br />
number Category<br />
Status of four Sliders adjusting<br />
<strong>the</strong> volume for each part<br />
How Voices are assigned to<br />
Parts of a Performance<br />
By default (when shipped from <strong>the</strong> factory), various types<br />
of Performances are provided in <strong>the</strong> User Banks. For some<br />
of <strong>the</strong>se Performances, it may not be immediately obvious<br />
how to play <strong>the</strong>m or use <strong>the</strong>m, since <strong>the</strong>y are more<br />
<strong>com</strong>plicated than normal Voices. In this section, you’ll learn<br />
<strong>the</strong> typical ways in which Performances are created, and<br />
thus better understand how to play and use <strong>the</strong>m.<br />
Each Performance can contain up to four different Parts.<br />
Here covers <strong>the</strong> typical four types of <strong>the</strong> Voice assignment<br />
to <strong>the</strong>se four parts.<br />
MOTIF <strong>XS</strong> Owner’s <strong>Manual</strong><br />
Performance<br />
name<br />
Changing <strong>the</strong> Arpeggio type<br />
Functions<br />
assigned<br />
to knobs<br />
Four Voices making<br />
up <strong>the</strong> Performance<br />
Performance Structure Layer<br />
This method lets you play multiple (two or more) Voices<br />
simultaneously by pressing any notes. In <strong>the</strong> Performance<br />
mode, you can create a thicker sound by <strong>com</strong>bining two<br />
similar Voices—for example, two different Strings Voices,<br />
each with a different attack speed.<br />
Strings having a fast attack speed<br />
Strings having a slow attack speed<br />
C1 C2 C3 C4 C5 C6<br />
Part 2<br />
Part 1<br />
Performance Structure Split by Note range<br />
This method lets you play different Voices with your left<br />
hand and right hand. By assigning <strong>the</strong> Strings to <strong>the</strong> lower<br />
range and assigning <strong>the</strong> Flute to <strong>the</strong> higher range<br />
separately as illustrated below, you can play <strong>the</strong> Strings as<br />
ac<strong>com</strong>paniment with your left hand and play <strong>the</strong> Flute as<br />
melody with your right hand,<br />
Part 1<br />
Part 2<br />
Strings Flute<br />
C1 C2 C3 C4 C5 C6<br />
Performance Structure Split by Velocity range<br />
This method lets you trigger different Voices depending on<br />
your playing strength (velocity). In this example below,<br />
playing <strong>the</strong> note with low velocities triggers <strong>the</strong> Strings<br />
having <strong>the</strong> slow attack speed. Playing <strong>the</strong> note with middle<br />
velocities triggers <strong>the</strong> Strings having <strong>the</strong> fast attack speed.<br />
Playing <strong>the</strong> note with high velocities triggers <strong>the</strong> Orchestra<br />
Hit.<br />
Velocity<br />
Orchestra Hit<br />
Strings having <strong>the</strong> fast attack speed<br />
Strings having <strong>the</strong> slow attack speed<br />
C1 C2 C3 C4 C5 C6<br />
Part 3<br />
Part 2<br />
Part 1
Performance Structure Using <strong>the</strong> Arpeggio<br />
With this method, you can play all <strong>the</strong> parts of a band by<br />
yourself. This type of Performance also uses different<br />
Arpeggio types assigned to <strong>the</strong> individual Parts, making it<br />
even easier to sound like a full band. In <strong>the</strong> example below,<br />
<strong>the</strong> Drum pattern (by Arpeggio) will be played back<br />
indefinitely even when you release <strong>the</strong> notes, <strong>the</strong> Bass line<br />
(by Arpeggio) will be played back by your left hand<br />
performance, and <strong>the</strong> Guitar backing (by Arpeggio) or<br />
Piano Arpeggio will be played back by your right hand<br />
performance.<br />
In addition, you can change <strong>the</strong> Arpeggio Type assignment<br />
for each Part by pressing any of <strong>the</strong> [SF1] – [SF5] buttons.<br />
Bass with <strong>the</strong> Arpeggio<br />
Guitar with <strong>the</strong> Arpeggio<br />
Part 2<br />
Piano with <strong>the</strong> Arpeggio<br />
Drum with <strong>the</strong> Arpeggio Hold = ON<br />
C1 C2 C3 C4 C5 C6<br />
Using or <strong>com</strong>bining <strong>the</strong> four methods described above<br />
gives you <strong>the</strong> ability to create a rich variety of<br />
Performances.<br />
By default, many Performances stored in <strong>the</strong> User Banks<br />
may be created via <strong>the</strong> above methods. Try out various<br />
Performances and see which method is used for each.<br />
Creating a Performance by<br />
<strong>com</strong>bining Voices<br />
After checking out <strong>the</strong> pre-programmed Performances in<br />
<strong>the</strong> User Banks, try creating your own original<br />
Performance. In this section, we’ll create a Performance by<br />
<strong>com</strong>bining two Voices.<br />
Preparing to create a Performance<br />
(Initializing <strong>the</strong> Performance)<br />
••••••••••••••••••••••••••••••••••••<br />
1 In <strong>the</strong> Performance Play mode, press <strong>the</strong> [JOB]<br />
button, and <strong>the</strong>n <strong>the</strong> [F1] button.<br />
The Initialize display is shown. Make sure that <strong>the</strong><br />
check box of “All Parameters” is checked. For details<br />
about <strong>the</strong> Initialize function, refer to page 159.<br />
2 Press <strong>the</strong> [ENTER] button. (The display<br />
prompts you for confirmation.)<br />
3 Press <strong>the</strong> [INC/YES] button to initialize <strong>the</strong><br />
Performance.<br />
CAUTION<br />
Part 4<br />
Part 3<br />
Part 1<br />
Keep in mind that when you execute <strong>the</strong> Store operation by<br />
pressing <strong>the</strong> [STORE] button here, <strong>the</strong> Performance at <strong>the</strong><br />
destination will be replaced with <strong>the</strong> Initialized Performance<br />
above.<br />
n For details about <strong>the</strong> Store operation, refer to page 142.<br />
4 Press <strong>the</strong> [PERFORM] button.<br />
Step 3: Selecting and Playing a Performance<br />
The current Performance name will change to<br />
“Initialized Perform” in <strong>the</strong> display.<br />
n When you initialize a Performance, <strong>the</strong> Voice at Preset<br />
Bank 1, Voice number 1 is assigned to each of all Parts<br />
and all <strong>the</strong> Parts are turned on by default.<br />
Playing several Voices toge<strong>the</strong>r<br />
(Layer)<br />
••••••••••••••••••••••••••••••••••••<br />
Try <strong>com</strong>bining two Voices by assigning your favorite Voice<br />
to Part2.<br />
1 In <strong>the</strong> Performance Play display, press <strong>the</strong> [F2]<br />
button to call up <strong>the</strong> Voice display.<br />
From this display, you can confirm what Voices are<br />
assigned to <strong>the</strong> Parts. You can also confirm that all <strong>the</strong><br />
Parts are turned on after executing <strong>the</strong> Initialize function<br />
above.<br />
2 Move <strong>the</strong> cursor to <strong>the</strong> Part 2, <strong>the</strong>n select <strong>the</strong><br />
desired Voice by setting a Bank and Voice<br />
number.<br />
n From this display, you can use <strong>the</strong> Category Search<br />
function to select a Voice. Like in <strong>the</strong> Voice mode<br />
(page 24), use <strong>the</strong> [CATEGORY SEARCH] button. Please<br />
note that <strong>the</strong> category names printed below <strong>the</strong> Bank<br />
buttons correspond not to <strong>the</strong> Performance Category but<br />
to <strong>the</strong> Voice Category.<br />
3 Move <strong>the</strong> cursor to <strong>the</strong> PART SW check box for<br />
Parts 3 and 4, <strong>the</strong>n remove <strong>the</strong> checkmark by<br />
pressing <strong>the</strong> [DEC/NO] button.<br />
When <strong>the</strong> check mark is removed from <strong>the</strong> check box,<br />
<strong>the</strong> corresponding part is turned off. Here, turn <strong>the</strong> Part<br />
1 and 2 on.<br />
Voice settings<br />
for Part 1<br />
Voice settings<br />
for Part 2<br />
4 Play <strong>the</strong> keyboard.<br />
The Part 1 (Piano Voice) and Part 2 (<strong>the</strong> Voice you have<br />
selected above) are sounded simultaneously in a layer.<br />
Next, let’s play different Voices with <strong>the</strong> left and right hands.<br />
MOTIF <strong>XS</strong> Owner’s <strong>Manual</strong> 29<br />
Start Guide
Start Guide<br />
30<br />
Step 3: Selecting and Playing a Performance<br />
Split<br />
••••••••••••••••••••••••••••••••••••<br />
You can play different Voices with <strong>the</strong> left and right hands<br />
by assigning one Voice to Part 1, with a note range in <strong>the</strong><br />
lower section of <strong>the</strong> keyboard, and a different Voice to Part<br />
2, with a note range in <strong>the</strong> higher section of <strong>the</strong> keyboard.<br />
1 Move <strong>the</strong> cursor to <strong>the</strong> NOTE LIMIT HI of <strong>the</strong><br />
Part 1.<br />
2 Set <strong>the</strong> highest note of <strong>the</strong> Part 1 by pressing<br />
<strong>the</strong> corresponding key while holding <strong>the</strong> [SF6]<br />
KBD button.<br />
The illustration of <strong>the</strong> keyboard indicates <strong>the</strong> specified<br />
note range in color.<br />
3 Move <strong>the</strong> cursor to <strong>the</strong> NOTE LIMIT LO of <strong>the</strong><br />
Part 2.<br />
4 Set <strong>the</strong> lowest note of <strong>the</strong> Part 2 by pressing<br />
<strong>the</strong> corresponding key while holding <strong>the</strong> [SF6]<br />
KBD button.<br />
The illustration of <strong>the</strong> keyboard indicates <strong>the</strong> specified<br />
note range in color.<br />
5 Play <strong>the</strong> keyboard.<br />
The notes you play with your left hand sound <strong>the</strong> Piano<br />
Voice (Part 1), while <strong>the</strong> notes you play with your right<br />
hand sound <strong>the</strong> different Voice (Part 2) you have<br />
selected.<br />
Part 1: Piano Voice Part 2: O<strong>the</strong>r Voice<br />
Adjusting <strong>the</strong> Part levels and<br />
storing <strong>the</strong> Performance<br />
••••••••••••••••••••••••••••••••••••<br />
1 Adjust <strong>the</strong> Volume settings of Parts 1 and 2 by<br />
using <strong>the</strong> Control sliders.<br />
2 Store <strong>the</strong> settings as a User Performance by<br />
pressing <strong>the</strong> [STORE] button.<br />
For details, see page 142.<br />
CAUTION<br />
If you are editing a Performance and you select a different<br />
Performance without storing your edited one, all <strong>the</strong> edits<br />
you’ve made will be erased.<br />
MOTIF <strong>XS</strong> Owner’s <strong>Manual</strong><br />
CAUTION<br />
The preset data of <strong>the</strong> Performances is stored in <strong>the</strong> User Bank<br />
memory. Storing <strong>the</strong> Performance data you created erases <strong>the</strong><br />
preset Performance data. If you wish to restore <strong>the</strong> preset data<br />
of <strong>the</strong> Performance, execute <strong>the</strong> Factory Set Job in <strong>the</strong> Utility<br />
mode, resulting that your original data will be erased.<br />
Consequently, make sure to save any important data to an<br />
external USB storage device to avoid losing your important<br />
data.<br />
Changing <strong>the</strong> Arpeggio<br />
settings for each Part<br />
Try changing <strong>the</strong> Arpeggio settings for each Part. You can<br />
assign <strong>the</strong> rhythm or backing pattern that best matches <strong>the</strong><br />
desired style of music to <strong>the</strong> Performance.<br />
1 From <strong>the</strong> Voice Play display, press <strong>the</strong> [F4]<br />
button to call up <strong>the</strong> Arpeggio display.<br />
2 Press <strong>the</strong> desired one from <strong>the</strong> [SF1] – [SF5]<br />
buttons.<br />
The lower half of <strong>the</strong> display will be changed<br />
depending on <strong>the</strong> pressed button. The top of <strong>the</strong><br />
display (Common Switch, Sync Quantize Value and<br />
Tempo) is <strong>com</strong>mon to all <strong>the</strong> Sub Function buttons.<br />
Settings for<br />
Part 1<br />
Settings for<br />
Part 2<br />
Settings for<br />
Part 3<br />
Settings for<br />
Part 4<br />
Settings <strong>com</strong>mon to <strong>the</strong> [SF1] – [SF5] buttons<br />
Step 2<br />
3 Select <strong>the</strong> Category, Sub Category and Type of<br />
<strong>the</strong> Arpeggio for each of <strong>the</strong> Parts 1 – 4.<br />
The Category determines <strong>the</strong> instrument type, <strong>the</strong> Sub<br />
Category determines <strong>the</strong> rhythm type, and <strong>the</strong> Type<br />
determines <strong>the</strong> Arpeggio type itself. Set <strong>the</strong> BANK to<br />
“PRE” when using a Preset Arpeggio type.<br />
Arpeggio Hold parameter<br />
Note that <strong>the</strong> Arpeggio Hold parameter is useful as well<br />
as <strong>the</strong> Arpeggio type selection. When this parameter is<br />
set to “on,” <strong>the</strong> Arpeggio playback continues even if <strong>the</strong><br />
note is released. This parameter should be set to “on”<br />
when <strong>the</strong> Drum Voice is assigned to <strong>the</strong> Part and you
wish to have playback of <strong>the</strong> Arpeggio (rhythm pattern)<br />
continue regardless of whe<strong>the</strong>r you hold <strong>the</strong> note or not.<br />
n Categories and Sub Categories can easily be selected by<br />
calling up <strong>the</strong>ir respective lists on <strong>the</strong> display. When<br />
moving <strong>the</strong> cursor, for example, to <strong>the</strong> Category and<br />
pressing <strong>the</strong> [SF6] button, <strong>the</strong> Category List appears at<br />
<strong>the</strong> cursor location. You can select <strong>the</strong> desired one by<br />
using <strong>the</strong> data dial, [INC/YES] and [DEC/NO] buttons.<br />
After selecting, pressing <strong>the</strong> [ENTER] button actually calls<br />
up <strong>the</strong> selected Arpeggio type. This operation is very<br />
useful and convenient in selecting from <strong>the</strong> huge variety of<br />
available Arpeggios.<br />
Go on and assign Arpeggio types in <strong>the</strong> same way to <strong>the</strong><br />
o<strong>the</strong>r [SF] buttons as desired. After setting <strong>the</strong> Arpeggio<br />
related parameters, store <strong>the</strong> settings to internal memory<br />
as a User Performance. For details, see page 142.<br />
Using <strong>the</strong> Controllers and<br />
Knobs<br />
Like in <strong>the</strong> Voice mode, you can use <strong>the</strong> controllers and<br />
knobs in <strong>the</strong> Performance mode. Try selecting different<br />
Performances and using <strong>the</strong> controllers and knobs.<br />
Recording your Performance<br />
While experimenting and playing around with Arpeggios in<br />
<strong>the</strong> Performance mode, you may find some rhythm<br />
patterns and phrases that you like, and you may want to<br />
store <strong>the</strong>m for future recall. The best and easiest way to<br />
capture <strong>the</strong>se is to record your keyboard playing to a Song<br />
or Pattern.<br />
Performance Record Structure<br />
••••••••••••••••••••••••••••••••••••<br />
By using <strong>the</strong> Performance Record function, your keyboard<br />
performance for Parts 1 – 4 will be recorded to tracks 1 – 4<br />
of <strong>the</strong> Song/Pattern respectively. Controller/Knob<br />
operations and Arpeggio playback as well as your<br />
keyboard playing in <strong>the</strong> Performance mode can be<br />
recorded to <strong>the</strong> specified track as MIDI events.<br />
Playing in <strong>the</strong><br />
Performance mode<br />
Part 1<br />
Part 2<br />
Part 3<br />
Part 4<br />
Record<br />
Song/Pattern<br />
Track 1<br />
Track 2<br />
Track 3<br />
Track 4<br />
n For details about <strong>the</strong> track structure of <strong>the</strong> Song/Pattern, see<br />
“Basic Structure” on page 61.<br />
Step 3: Selecting and Playing a Performance<br />
Recording <strong>the</strong> Melody and<br />
Arpeggio playback to <strong>the</strong> Song<br />
••••••••••••••••••••••••••••••••••••<br />
When <strong>the</strong> Song is selected as destination of <strong>the</strong><br />
Performance recording, you can record your keyboard<br />
playing with <strong>the</strong> Arpeggio without having to worry about<br />
measure limits or running out of recording space. It is a<br />
good idea, for example, to record your keyboard playing,<br />
freely calling up various Arpeggio types, <strong>the</strong>n editing <strong>the</strong><br />
Song later as necessary. You may even want to ‘keep <strong>the</strong><br />
recorder running’ as you improvise, <strong>the</strong>n listen back later<br />
and pick out <strong>the</strong> best parts to create your final Song.<br />
Try recording as shown in <strong>the</strong> instructions below.<br />
1 In <strong>the</strong> Performance Play mode, select a<br />
Performance for recording.<br />
2 Press <strong>the</strong> [I] (Record) button to call up <strong>the</strong><br />
Performance Record display.<br />
3 Set <strong>the</strong> following parameters as required in <strong>the</strong><br />
Performance Record display.<br />
1<br />
2<br />
3<br />
4<br />
5<br />
6<br />
SEQ TRANSPORT<br />
LOCATE 1 2<br />
7<br />
1 Sequencer Mode = “song”<br />
By setting this parameter to “song,” you can record your<br />
keyboard performance to <strong>the</strong> Song.<br />
2 Song number<br />
Select a destination song. Executing Performance recording<br />
overwrites and erases all <strong>the</strong> previously recorded data of <strong>the</strong><br />
specified Song. Make sure to select a Song which contains no<br />
data.<br />
3 Time Signature = “4/4”<br />
Set <strong>the</strong> same value here as that of <strong>the</strong> Arpeggio type.<br />
Normally, set this to “4/4.”<br />
4 Tempo<br />
Set <strong>the</strong> desired tempo of <strong>the</strong> metronome and Arpeggio for<br />
recording.<br />
MOTIF <strong>XS</strong> Owner’s <strong>Manual</strong> 31<br />
Start Guide
Start Guide<br />
32<br />
Step 3: Selecting and Playing a Performance<br />
5 Key On Start Switch = (on)<br />
When set to “on,” recording starts immediately when you press<br />
any note on <strong>the</strong> keyboard. Set this parameter to “on” when<br />
using <strong>the</strong> Arpeggio.<br />
n Indicates <strong>the</strong> off status, whereas indicates <strong>the</strong><br />
on status.<br />
6 Copy Performance Parameters = on<br />
Enter <strong>the</strong> checkmark when you wish to copy <strong>the</strong> parameter<br />
settings for Parts 1 – 4 of <strong>the</strong> Performance to Parts 1 – 4 of <strong>the</strong><br />
Song Mixing.<br />
7 Click O (on)<br />
Press <strong>the</strong> [F5] button to turn <strong>the</strong> metronome on if you wish to<br />
use <strong>the</strong> metronome.<br />
4 Press any note to start recording.<br />
Play <strong>the</strong> keyboard in time with <strong>the</strong> metronome.<br />
You can change <strong>the</strong> Arpeggio type and settings by<br />
pressing any of <strong>the</strong> [SF1] – [SF5] buttons while<br />
recording.<br />
5 Press <strong>the</strong> [J] (Stop) button to stop recording<br />
and return to <strong>the</strong> Performance Play display.<br />
After recording, press <strong>the</strong> [SONG] button to enter <strong>the</strong><br />
Song Play mode <strong>the</strong>n play <strong>the</strong> recorded Song. As<br />
desired, record <strong>the</strong> keyboard performance to ano<strong>the</strong>r<br />
track in <strong>the</strong> Song Record mode and edit <strong>the</strong> recorded<br />
data in <strong>the</strong> Song Edit mode or Song Job mode to<br />
finalize <strong>the</strong> Song data.<br />
Recording Arpeggio playback to a<br />
Pattern<br />
••••••••••••••••••••••••••••••••••••<br />
If you record your keyboard playing along with Arpeggio<br />
playback in <strong>the</strong> Performance mode to a Pattern, you can<br />
quickly create full and <strong>com</strong>plete rhythm patterns lasting<br />
just a few measures. These short “Patterns” of MIDI<br />
sequence data can be played back repeatedly in a loop<br />
and <strong>the</strong>n conveniently used as ‘building blocks’ for your<br />
original Songs.<br />
Follow <strong>the</strong> instructions below, playing with your favorite<br />
Arpeggios in <strong>the</strong> Performance mode, and record your<br />
improvisations to a Pattern. Once you’ve recorded three or<br />
four good Patterns, you’ll have enough building blocks to<br />
create a <strong>com</strong>plete Song!<br />
1 In <strong>the</strong> Performance Play mode, select a<br />
Performance for recording.<br />
Find <strong>the</strong> Performance which triggers your favorite<br />
rhythm pattern or phrases via <strong>the</strong> Arpeggio.<br />
2 Press <strong>the</strong> [I] (Record) button to call up <strong>the</strong><br />
Performance Record display.<br />
3 Set <strong>the</strong> following parameters as required in <strong>the</strong><br />
Performance Record display.<br />
MOTIF <strong>XS</strong> Owner’s <strong>Manual</strong><br />
1<br />
2<br />
3<br />
4<br />
5<br />
6<br />
7<br />
8<br />
9<br />
1 Sequencer Mode = “pattern”<br />
By setting this parameter to “pattern,” you can record your<br />
keyboard performance to <strong>the</strong> Pattern.<br />
2 Pattern number<br />
Select a destination Pattern number. Executing <strong>the</strong><br />
Performance Recording overwrites and erases all <strong>the</strong><br />
previously recorded data of <strong>the</strong> specified Pattern. Make sure<br />
to select a Pattern which contains no data.<br />
3 Section<br />
Select a Section to be recorded, from A – P. If you create<br />
several Sections, you can use <strong>the</strong>m as rhythm variations within<br />
a single Song.<br />
4 Section Length<br />
Set <strong>the</strong> length of <strong>the</strong> Section to be recorded. Set <strong>the</strong> value to 1<br />
– 4 according to <strong>the</strong> length of <strong>the</strong> current Arpeggio types.<br />
5 Time Signature = “4/4”<br />
Set <strong>the</strong> same value here as that of <strong>the</strong> Arpeggio type.<br />
Normally, set this to “4/4.”<br />
6 Tempo<br />
Set <strong>the</strong> desired tempo of <strong>the</strong> metronome and Arpeggio for<br />
recording.<br />
7 Key On Start Switch = (on)<br />
When set to “on,” recording starts immediately when you press<br />
any note on <strong>the</strong> keyboard. Set this parameter to “on” when<br />
using <strong>the</strong> Arpeggio.<br />
8 Copy Performance Parameters = on<br />
Enter <strong>the</strong> checkmark when you wish to copy <strong>the</strong> parameter<br />
settings for Parts 1 – 4 of <strong>the</strong> Performance to Parts 1 – 4 of <strong>the</strong><br />
Pattern Mixing.<br />
9 Click O (on)<br />
Press <strong>the</strong> [F5] button to turn <strong>the</strong> metronome on if you wish to<br />
use <strong>the</strong> metronome.<br />
4 Press any note to start recording. The<br />
recording stops when <strong>the</strong> end of <strong>the</strong> Pattern<br />
length is reached.<br />
Recording stops returns to <strong>the</strong> Performance Play<br />
display. Please note that loop recording is not available<br />
in <strong>the</strong> Performance Record mode, although it is<br />
available in <strong>the</strong> Pattern Record mode.<br />
Create several Sections in <strong>the</strong> Performance Record mode,<br />
<strong>the</strong>n create a Pattern Chain by connecting <strong>the</strong> Sections<br />
toge<strong>the</strong>r to create an entire Song. For details, see<br />
page 213.
Step 4: Creating Your Original Song<br />
Now that you’ve learned some of <strong>the</strong> basic features of <strong>the</strong> MOTIF <strong>XS</strong>—including how to select Voices and Performances,<br />
play with <strong>the</strong> Arpeggios, and record your playing and Arpeggio playback to a Song or Pattern—you’re ready to create your<br />
own original Song.<br />
The MOTIF <strong>XS</strong> features a built-in multitrack sequencer for recording your keyboard performance as MIDI data. This function<br />
by itself is enough to create full, <strong>com</strong>plex multi-instrument arrangements and <strong>com</strong>plete Songs. However, <strong>the</strong> MOTIF <strong>XS</strong> (with<br />
optional DIMMs installed) allows you to also record and edit audio tracks—such as vocal and guitar parts.<br />
Terminology<br />
Song<br />
Songs and Patterns are MIDI sequence data consisting of<br />
up to 16 tracks. A Song on this syn<strong>the</strong>sizer is effectively <strong>the</strong><br />
same as a Song on a MIDI sequencer, and playback<br />
automatically stops at <strong>the</strong> end of <strong>the</strong> recorded data.<br />
Track<br />
This is a memory location on <strong>the</strong> sequencer where your<br />
musical performances (made up of MIDI events) are<br />
stored. The MOTIF <strong>XS</strong> provides 16 tracks, which<br />
correspond to <strong>the</strong> 16 Parts of <strong>the</strong> Mixing.<br />
Mixing<br />
This is a program in which multiple Voices are assigned to<br />
Parts for multi-timbral play in <strong>the</strong> Song and Pattern modes.<br />
Each Mixing can contain up to 16 parts and a separate<br />
Mixing can be created for each Song.<br />
n For more information about <strong>the</strong> Song structure including <strong>the</strong><br />
Track and Mixing, see page 59.<br />
Realtime Recording<br />
With realtime recording, <strong>the</strong> instrument functions in <strong>the</strong><br />
same way as a MD recorder, recording <strong>the</strong> performance<br />
data as it is played. This allows you to capture all <strong>the</strong><br />
nuances of an actual performance. Realtime Record<br />
features three available methods: Replace, Overdub and<br />
Punch In/Out. Replace lets you overwrite an already<br />
recorded track with new data. Overdub lets you add more<br />
data to a track that already contains data. Punch In/Out lets<br />
you re-record only over a specific area of <strong>the</strong> track.<br />
Song Playback<br />
Before you learn how to create a Song, you should know<br />
something about <strong>the</strong> mute/solo functions and how to use<br />
<strong>the</strong> sliders during Song playback. Call up a Demo Song<br />
(page 21) <strong>the</strong>n try out <strong>the</strong> following operations while<br />
playing back <strong>the</strong> Demo Song.<br />
Track mute<br />
••••••••••••••••••••••••••••••••••••<br />
You can mute a specific track or tracks of <strong>the</strong> Song.<br />
1 Press <strong>the</strong> [MUTE] button so that its lamp<br />
lights.<br />
The lamps of <strong>the</strong> Number buttons light.<br />
1 2 3 4 5 6 7<br />
8<br />
PART SELECT ARP ON/OFF<br />
9 10 11 12 13 14 15 16<br />
PART MUTE ARP HOLD<br />
PERFORMANCE<br />
CONTROL<br />
TRACK<br />
MUTE SOLO<br />
Number buttons [1] – [16] [MUTE] button<br />
2 Press any of <strong>the</strong> Number buttons [1] – [16] so<br />
that its lamp will be turned off and <strong>the</strong><br />
corresponding track will be muted.<br />
Multiple tracks can be muted simultaneously.<br />
3 Press <strong>the</strong> button which is turned off so that its<br />
lamp lights and <strong>the</strong> corresponding track will be<br />
sounded.<br />
Track solo<br />
••••••••••••••••••••••••••••••••••••<br />
You can solo a specific track of <strong>the</strong> Song.<br />
1 Press <strong>the</strong> [SOLO] button so that its lamp lights.<br />
1 2 3 4 5 6 7<br />
8<br />
PART SELECT ARP ON/OFF<br />
9 10 11 12 13 14 15 16<br />
PART MUTE ARP HOLD<br />
PERFORMANCE<br />
CONTROL<br />
TRACK<br />
MUTE SOLO<br />
Number buttons [1] – [16] [SOLO] button<br />
2 Press any of <strong>the</strong> number buttons [1] – [16] so<br />
that its lamp flashes to solo <strong>the</strong> corresponding<br />
track.<br />
Press ano<strong>the</strong>r number button to change <strong>the</strong> soloed<br />
track.<br />
3 Press <strong>the</strong> [TRACK] or [MUTE] button to return<br />
to <strong>the</strong> original status.<br />
MOTIF <strong>XS</strong> Owner’s <strong>Manual</strong> 33<br />
Start Guide
Start Guide<br />
34<br />
Step 4: Creating Your Original Song<br />
Adjusting <strong>the</strong> volume of each Part<br />
••••••••••••••••••••••••••••••••••••<br />
You can adjust <strong>the</strong> volume for each of eight Parts, using <strong>the</strong><br />
panel sliders.<br />
VOLUME 1 VOLUME 2 VOLUME 3 VOLUME 4 VOLUME 5 VOLUME 6 VOLUME 7 VOLUME 8<br />
When one of Tracks 1 – 8 is currently selected, <strong>the</strong> eight<br />
sliders are used to adjust <strong>the</strong> volume for Parts 1 – 8. When<br />
one of Tracks 9 – 16 is selected, <strong>the</strong> sliders are used to<br />
adjust <strong>the</strong> volume for Parts 9 – 16. The track can be<br />
selected by turning <strong>the</strong> [TRACK] button on and pressing<br />
<strong>the</strong> desired Number button.<br />
1 2 3 4 5 6 7<br />
8<br />
PART SELECT ARP ON/OFF<br />
9 10 11 12 13 14 15 16<br />
PART MUTE ARP HOLD<br />
Number buttons [9] – [16]<br />
In addition to sliders, Knobs 1 – 8 can be used to affect <strong>the</strong><br />
sound of <strong>the</strong> Song playback in real time. For details, see<br />
page 180.<br />
Preparing for Realtime<br />
Recording<br />
Soon you’ll record your keyboard performance, recording a<br />
melody to Track 1. First though, you’ll need to set up <strong>the</strong><br />
MOTIF <strong>XS</strong> for realtime recording.<br />
1 Press <strong>the</strong> [SONG] button to enter <strong>the</strong> Song<br />
Play mode <strong>the</strong>n select a Song containing no<br />
data.<br />
2 Press <strong>the</strong> [I] (Record) button to enter <strong>the</strong><br />
Song Record mode.<br />
The Record Setup display appears.<br />
MOTIF <strong>XS</strong> Owner’s <strong>Manual</strong><br />
[TRACK] button<br />
PERFORMANCE<br />
CONTROL<br />
TRACK<br />
MUTE SOLO<br />
Track<br />
number<br />
Recording<br />
track<br />
Time Signature<br />
(Meter) Tempo<br />
[F5] Click<br />
Record Type<br />
Quantize<br />
Voice<br />
3 Set <strong>the</strong> following parameters on <strong>the</strong> Record<br />
Setup display.<br />
3-1 With <strong>the</strong> [TRACK] lamp turned on, press <strong>the</strong> Number<br />
button [1] to set <strong>the</strong> recording track to 1. The red<br />
circle symbol is shown at <strong>the</strong> REC TR column of<br />
Track 1. The Record Part is automatically set to 1.<br />
1 2 3 4 5 6 7<br />
8<br />
PART SELECT ARP ON/OFF<br />
9 10 11 12 13 14 15 16<br />
PART MUTE ARP HOLD<br />
PERFORMANCE<br />
CONTROL<br />
TRACK<br />
MUTE SOLO<br />
3-2 Move <strong>the</strong> cursor to Time Signature (Meter) <strong>the</strong>n set<br />
<strong>the</strong> value. Here, set this to “4/4.”<br />
3-3 Move <strong>the</strong> cursor to Tempo <strong>the</strong>n set <strong>the</strong> desired value.<br />
Here, set this to “144.”<br />
3-4 Move <strong>the</strong> cursor to Record Type <strong>the</strong>n select<br />
“replace.” This method overwrites <strong>the</strong> previous<br />
recorded data.<br />
3-5 Set Quantize to “240.” This convenient feature lets<br />
you automatically quantize <strong>the</strong> notes in real time, as<br />
you record. Quantize aligns <strong>the</strong> timing of note events<br />
to <strong>the</strong> nearest beat. Normally, <strong>the</strong> smallest note value<br />
in <strong>the</strong> notation sheet (you will play) should be set.<br />
3-6 Select <strong>the</strong> Voice for recording by specifying <strong>the</strong><br />
Bank and Number. The value set here is applied to<br />
Part 1 of <strong>the</strong> Mixing.<br />
3-7 Press <strong>the</strong> [F5] button to turn <strong>the</strong> Metronome on O.<br />
Pressing <strong>the</strong> [F5] button toggles <strong>the</strong> Metronome on<br />
and off.
Start Recording!<br />
Step 4: Creating Your Original Song<br />
After <strong>com</strong>pleting recording setup above, press <strong>the</strong> [F] (Play) button to start recording. Press <strong>the</strong> [F] (Play) button so that its<br />
indicator flashes, <strong>the</strong>n actually start recording after <strong>the</strong> count-in.<br />
When you reach <strong>the</strong> end of <strong>the</strong> above notation, press <strong>the</strong> [J] (Stop) button to stop recording. If you’ve played any wrong<br />
notes, press <strong>the</strong> [J] (Stop) button, <strong>the</strong>n try recording again.<br />
After recording <strong>the</strong> above melody to Track 1, set <strong>the</strong> REC TR to 2 in <strong>the</strong> Recording Setup display, <strong>the</strong>n record <strong>the</strong> bass line<br />
below to Track 2.<br />
Correcting wrong notes<br />
If you’ve played any wrong notes while recording and wish<br />
to correct <strong>the</strong>m, press <strong>the</strong> [EDIT] button from <strong>the</strong> Song Play<br />
mode to go to <strong>the</strong> Song Edit mode. Song Edit lets you<br />
clean up and edit data of already recorded Songs or insert<br />
new data to <strong>the</strong> Songs.<br />
Check for any mistakenly recorded or wrong events on <strong>the</strong><br />
Event List display of <strong>the</strong> Song Edit mode, <strong>the</strong>n correct <strong>the</strong>m<br />
as needed.<br />
1 Select <strong>the</strong> recorded Song <strong>the</strong>n press <strong>the</strong> [EDIT]<br />
button to enter <strong>the</strong> Song Edit mode.<br />
The Event List display appears.<br />
2 Select <strong>the</strong> track to be edited.<br />
Press <strong>the</strong> Number button [1] or [2]. The list of <strong>the</strong> MIDI<br />
events recorded in <strong>the</strong> previous section appears on <strong>the</strong><br />
display.<br />
n Various MIDI events as well as note on/off data are shown<br />
on <strong>the</strong> display if you operate controllers such as Pitch<br />
Bend wheel, knobs and sliders while recording.<br />
Location Notes<br />
Gate Selected<br />
time track Velocity<br />
3 Use <strong>the</strong> Cursor buttons to move <strong>the</strong> cursor to<br />
<strong>the</strong> location to be edited.<br />
After confirming <strong>the</strong> location at which <strong>the</strong> wrong data is<br />
recorded, use <strong>the</strong> Up/Down Cursor button to move <strong>the</strong><br />
cursor to <strong>the</strong> location, <strong>the</strong>n use <strong>the</strong> Left/Right Cursor<br />
button to move <strong>the</strong> cursor to <strong>the</strong> data type to be<br />
corrected. If you recorded a wrong note data at <strong>the</strong> 2nd<br />
note of <strong>the</strong> 3rd beat (“F” on <strong>the</strong> notation), move <strong>the</strong><br />
cursor to <strong>the</strong> location indicated MEAS (measure) = 002,<br />
BEAT = 03 and CLOCK = 240. Then, move <strong>the</strong> cursor to<br />
NOTE if you wish to correct <strong>the</strong> note data and move <strong>the</strong><br />
cursor to GATE if you wish to correct <strong>the</strong> gate time (note<br />
length).<br />
n Each key has a note name; for example, <strong>the</strong> lowest<br />
(far<strong>the</strong>st left) key on <strong>the</strong> keyboard corresponds to C1 and<br />
<strong>the</strong> highest (far<strong>the</strong>st right) key to C6. See page 10.<br />
n The Song location at which you edit or input <strong>the</strong> event is<br />
indicated by MEAS (measure), BEAT and CLOCK. A<br />
quarter-note (one beat when <strong>the</strong> time signature is set to<br />
“4/4”) consists of 480 divisions. The length of each note<br />
(gate time) is indicated by Beat and Clock. For example,<br />
001:000 is equivalent to <strong>the</strong> 4th note and 000:240 is<br />
equivalent to 8th note.<br />
Measure Beat Clock<br />
4 Turn <strong>the</strong> data dial to edit <strong>the</strong> value.<br />
The entire line of <strong>the</strong> edited event will start flashing. You<br />
can also set <strong>the</strong> note directly from <strong>the</strong> keyboard, by<br />
holding down <strong>the</strong> [SF6] KBD button and pressing <strong>the</strong><br />
desired note.<br />
5 Press <strong>the</strong> [ENTER] button to actually enter <strong>the</strong><br />
edited data (<strong>the</strong> entire line of <strong>the</strong> edited event<br />
will stop flashing).<br />
MOTIF <strong>XS</strong> Owner’s <strong>Manual</strong><br />
35<br />
Start Guide
Start Guide<br />
36<br />
Step 4: Creating Your Original Song<br />
Repeat steps 3 and 5 to correct o<strong>the</strong>r wrong events.<br />
6 After <strong>com</strong>pleting editing, press <strong>the</strong> [EXIT]<br />
button to return back to <strong>the</strong> Song Play mode.<br />
n If you wish to delete an unnecessary note, move <strong>the</strong><br />
cursor to <strong>the</strong> corresponding location, <strong>the</strong>n press <strong>the</strong> [F6]<br />
button.<br />
n For details about <strong>the</strong> Event List, see page 192.<br />
Creating a swing feel—Play<br />
Effect<br />
The Play Effect feature lets you alter <strong>the</strong> rhythm in a variety<br />
of musically useful ways—for example, to take something<br />
that was recorded ‘straight’ and give it a swing feel. Let’s<br />
change <strong>the</strong> melody you recorded above, and apply a<br />
swing feel to it here.<br />
1 From <strong>the</strong> Song Play display, press <strong>the</strong> [F2]<br />
button to call up <strong>the</strong> Play FX display.<br />
Quantize Value of<br />
Track 1<br />
2 Move <strong>the</strong> cursor to <strong>the</strong> Quantize Value of Track<br />
1, <strong>the</strong>n select <strong>the</strong> 8th note icon.<br />
3 Move <strong>the</strong> cursor to <strong>the</strong> Swing Rate of Track 1,<br />
<strong>the</strong>n select “66%.”<br />
This parameter determines <strong>the</strong> strength or amount of<br />
swing applied. Selecting “66%” delays each of <strong>the</strong> up<br />
beat notes to triplet values.<br />
n If you’ve recorded a bass part to track 2, make sure to<br />
apply <strong>the</strong> same settings to this track as well.<br />
After <strong>com</strong>pleting <strong>the</strong> settings, press <strong>the</strong> [P] (Top) button,<br />
<strong>the</strong>n press <strong>the</strong> [F] (Play) button to start <strong>the</strong> Song. You can<br />
hear <strong>the</strong> swing feel playback.<br />
MOTIF <strong>XS</strong> Owner’s <strong>Manual</strong><br />
Swing Rate of<br />
Track 2<br />
Applying <strong>the</strong> Play Effect setting to <strong>the</strong> actual<br />
MIDI data<br />
The Play Effect setting temporarily changes how <strong>the</strong><br />
Song data is played back, but does not actually change<br />
<strong>the</strong> Song MIDI itself. If you want to save <strong>the</strong> Play Effect<br />
changes as part of <strong>the</strong> Song data (for example, as a<br />
Standard MIDI file), you can use <strong>the</strong> Job operation to<br />
permanently apply <strong>the</strong> Play Effect settings. To execute<br />
this Job, press <strong>the</strong> [JOB] button, <strong>the</strong> [F5] button, <strong>the</strong>n<br />
select “05: Normalize Play Effect.” For details, see<br />
page 205.<br />
Storing <strong>the</strong> created Song<br />
After recording, make sure to store <strong>the</strong> created Song to<br />
internal memory by pressing <strong>the</strong> [STORE] button to call up<br />
<strong>the</strong> Song Store window.<br />
CAUTION<br />
When you execute <strong>the</strong> Store operation, <strong>the</strong> settings for <strong>the</strong><br />
destination memory will be overwritten. Important data should<br />
always be backed up to a separate storage device.<br />
Saving Song data to a USB<br />
storage device<br />
Storing different Song data to <strong>the</strong> same destination<br />
memory, loading <strong>the</strong> Demo data, and executing <strong>the</strong><br />
Initialize Job overwrites and erases <strong>the</strong> previously stored<br />
Song data. Be sure to save important data to a separate<br />
USB storage device connected to <strong>the</strong> USB TO DEVICE<br />
connector on <strong>the</strong> rear panel in <strong>the</strong> File mode. For details,<br />
see page 278. When you want to load a Song to DAW<br />
software on your <strong>com</strong>puter, save <strong>the</strong> Song to a separate<br />
USB storage device as a Standard MIDI file. For details,<br />
see page 279.<br />
n The words “save” and “store” here refer to two different<br />
operations. The “Save” operation saves <strong>the</strong> created data as a<br />
file to an external device (in <strong>the</strong> File mode), whereas <strong>the</strong><br />
“Store” operation stores <strong>the</strong> data to internal memory in each<br />
mode.
Step 5: Creating a Pattern<br />
The Patterns of <strong>the</strong> MOTIF <strong>XS</strong> feature short but fully realized instrumental parts that you can repeat (loop), <strong>com</strong>bine, and<br />
arrange in any order you want—giving you <strong>the</strong> basic material for creating a Song. This section covers what you can do in <strong>the</strong><br />
Pattern mode.<br />
Pattern Structure<br />
The MOTIF <strong>XS</strong> provides two modes for creating a Song:<br />
Song mode and Pattern mode.<br />
In <strong>the</strong> Song mode, you can record <strong>the</strong> Song from <strong>the</strong><br />
beginning to <strong>the</strong> end by playing <strong>the</strong> keyboard. In <strong>the</strong><br />
Pattern mode, on <strong>the</strong> o<strong>the</strong>r hand, you can create <strong>the</strong><br />
ac<strong>com</strong>paniment of <strong>the</strong> Song by creating several sections,<br />
such as intro, melody A, main <strong>the</strong>me and ending by<br />
recording your rhythm pattern to <strong>the</strong> different Sections,<br />
<strong>the</strong>n <strong>com</strong>bining <strong>the</strong>m as a Pattern Chain.<br />
The Pattern mode also lets you record your rhythm patterns<br />
or riffs to <strong>the</strong> different Sections as you wish—and as <strong>the</strong><br />
inspiration hits—<strong>the</strong>n <strong>com</strong>bine <strong>the</strong> Sections into a Pattern<br />
Chain to create a <strong>com</strong>plete Song. Along with <strong>the</strong> Arpeggio<br />
feature and Performance recording, you have a wide range<br />
of easy-to-use tools to quickly create fully arranged,<br />
professional sounding Songs.<br />
1st measure ...................................................................... 120th measure<br />
Intro Melody A Main <strong>the</strong>me Melody B Ending<br />
Section A<br />
Section B<br />
Section C<br />
n You can create a Pattern Chain (page 213) by programming<br />
<strong>the</strong> order of Sections. The created Pattern Chain can be<br />
converted to Song data by using <strong>the</strong> Pattern Chain Edit<br />
(page 215).<br />
Listening to <strong>the</strong> Demo Patterns<br />
Before creating your own original pattern, you should give<br />
a listen to some of <strong>the</strong> preset Demo Patterns. These<br />
specially recorded Patterns cover a wide range of musical<br />
genres and are full of great hints and ideas on how you can<br />
create and use Patterns in your own music.<br />
1 Load <strong>the</strong> Demo Patterns following <strong>the</strong><br />
procedure on page 21.<br />
2 Press <strong>the</strong> [PATTERN] button to enter <strong>the</strong><br />
Pattern mode.<br />
The Pattern Play display will appear.<br />
Section D<br />
Section E<br />
Track<br />
1 – 16<br />
n As indicated in <strong>the</strong> Pattern Play display, a Pattern consists<br />
of 16 separate tracks. Accordingly, a Pattern is played<br />
back via <strong>the</strong> various instrument Voices such as bass,<br />
guitar and keyboard.<br />
3 Select a Pattern by turning <strong>the</strong> data dial.<br />
4 Press <strong>the</strong> [F] (Play) button to start playback of<br />
<strong>the</strong> Pattern.<br />
The Pattern will be played back repeatedly until you<br />
press <strong>the</strong> [J] (Stop) button.<br />
5 Change <strong>the</strong> Section from A – P.<br />
Pressing <strong>the</strong> [A] – [H] buttons calls up Sections A – H<br />
and pressing <strong>the</strong> [USER 1] – [USER DR] and [ETHNIC]<br />
buttons calls up <strong>the</strong> Sections I – P.<br />
SECTION<br />
I-P<br />
SECTION<br />
A-H<br />
Section Pattern number, Pattern name<br />
n By changing <strong>the</strong> Sections, you can create rhythmic<br />
variations, and easily improvise arrangements (such as<br />
intro, verse, chorus, verse, chorus, ending) in real time.<br />
Now, try o<strong>the</strong>r Patterns.<br />
Section A – P<br />
PRE 1 PRE 2 PRE 3 PRE 4 PRE 5 PRE 6 PRE 7 PRE 8<br />
PIANO KEYBOARD ORGAN GUITAR BASS STRINGS BRASS<br />
USER 1 USER 2 USER 3 GM GM DR PRE DR USER DR<br />
SYN LEAD<br />
PADS/<br />
CHOIRS<br />
SYN COMP CHROMATIC DRUM/<br />
PERCUSSION PERCUSSION<br />
A B C D E F G H<br />
SUB CATEGORY<br />
SOUND<br />
EFX<br />
MUSICAL<br />
EFX<br />
SAX/<br />
WOODWIND<br />
ETHNIC<br />
MOTIF <strong>XS</strong> Owner’s <strong>Manual</strong> 37<br />
Start Guide
Start Guide<br />
38<br />
Step 5: Creating a Pattern<br />
Viewing <strong>the</strong> Demo Pattern’s<br />
Patch display<br />
From <strong>the</strong> Patch display called up via <strong>the</strong> [F4] button, you<br />
can confirm what “Phrase” is assigned to each track of <strong>the</strong><br />
Pattern Section.<br />
A “Phrase” is a short musical/rhythmic passage consisting<br />
of a single track for a single instrument, such as drum,<br />
bass, and guitar. This MIDI sequence data can be used as<br />
small building blocks for a Song, and can be assigned to<br />
any track and any Section. A single Pattern provides<br />
memory space for 256 of your own original User Phrases.<br />
As indicated in this display, <strong>the</strong> performance data is<br />
recorded to <strong>the</strong> Phrase <strong>the</strong>n <strong>the</strong> Phrase is assigned to <strong>the</strong><br />
recording track. Note that <strong>the</strong> created Phrase can be<br />
assigned to a different track of <strong>the</strong> same/different Section.<br />
Section A<br />
Track 1<br />
Track 2<br />
:<br />
Track 16<br />
Section B<br />
Track 1<br />
Track 2<br />
:<br />
Track 16<br />
Phrase 001<br />
Phrase 002<br />
:<br />
Phrase 003<br />
Phrase 002<br />
Phrase 003<br />
:<br />
Phrase 004<br />
Try changing <strong>the</strong> Phrase for each track and assign each<br />
Phrase to an empty track.<br />
n Please keep in mind that Phrases are provided only for <strong>the</strong><br />
Demo Patterns and <strong>the</strong> number of provided Phrases differs<br />
depending on <strong>the</strong> Demo Pattern. When you want to use a<br />
Phrase assigned to a different Pattern, execute <strong>the</strong> Copy<br />
Phrase function by using <strong>the</strong> [SF5] Copy button. For details,<br />
see page 212.<br />
MOTIF <strong>XS</strong> Owner’s <strong>Manual</strong><br />
Phrase number Phrase name<br />
Phrase 001<br />
Phrase 002<br />
Phrase 003<br />
Phrase 004<br />
:<br />
MIDI data<br />
MIDI data<br />
MIDI data<br />
MIDI data<br />
:<br />
Viewing <strong>the</strong> Demo Pattern’s<br />
Mixing display<br />
A Mixing refers to <strong>the</strong> multi-timbral tone generator settings<br />
for <strong>the</strong> Pattern playback. A Mixing consists of 16 Parts,<br />
which correspond to <strong>the</strong> tracks, and in this display you can<br />
adjust <strong>the</strong> various mixing related parameters for each Part.<br />
From <strong>the</strong> Pattern Play display, press <strong>the</strong> [MIXING] button to<br />
call up <strong>the</strong> Mixing display, letting you confirm <strong>the</strong> Mixing<br />
settings for each Part: Voice, volume, pan, etc.<br />
Now, let’s adjust <strong>the</strong> Mixing parameters in <strong>the</strong> Mixing<br />
display.<br />
Part<br />
number<br />
Voice<br />
Pan<br />
Volume<br />
1 From <strong>the</strong> Pattern Play display, press <strong>the</strong><br />
[MIXING] button to enter <strong>the</strong> Mixing mode.<br />
The Mixing display will appear.<br />
2 To select <strong>the</strong> desired Part, press <strong>the</strong> [TRACK]<br />
button (<strong>the</strong> lamp lights), <strong>the</strong>n press <strong>the</strong><br />
appropriate Number button [1] – [16].<br />
Here, select <strong>the</strong> Part corresponding to <strong>the</strong> track to<br />
which <strong>the</strong> Phrase is assigned.<br />
n If you want to confirm to which track <strong>the</strong> Phrase is<br />
assigned, press <strong>the</strong> [EXIT] button to return to <strong>the</strong> Pattern<br />
Play display.<br />
3 Move <strong>the</strong> cursor to <strong>the</strong> Bank and Number, <strong>the</strong>n<br />
change <strong>the</strong> Voice by specifying <strong>the</strong> Bank and<br />
Number.<br />
If you press <strong>the</strong> [PROGRAM] button (<strong>the</strong> lamp lights),<br />
you can select <strong>the</strong> desired Voice by using <strong>the</strong><br />
appropriate Bank buttons, Group buttons and <strong>the</strong><br />
Number buttons.<br />
4 Move <strong>the</strong> cursor to <strong>the</strong> desired parameter,<br />
such as pan or volume, <strong>the</strong>n rotate <strong>the</strong> data<br />
dial to change <strong>the</strong> value.<br />
n If you wish to edit more detailed Mixing parameters, enter<br />
<strong>the</strong> Mixing Edit mode by pressing <strong>the</strong> [EDIT] button. For<br />
more information about <strong>the</strong> Mixing Edit, see page 233.<br />
The Mixing settings are included in each Pattern and can<br />
be stored as an entire Pattern. For instructions on storing a<br />
Pattern, see page 218.
Creating a Pattern by using<br />
Arpeggio<br />
In addition to creating a Pattern by recording your<br />
keyboard performance conventionally, you can also use<br />
<strong>the</strong> powerful Arpeggio playback features of <strong>the</strong> MOTIF <strong>XS</strong><br />
(described below) and even record audio data from<br />
<strong>com</strong>mercially available sample CDs.<br />
This section explains how to create a Pattern by using<br />
Arpeggio.<br />
1 Press <strong>the</strong> [PATTERN] button to enter <strong>the</strong><br />
Pattern Play mode.<br />
2 Press <strong>the</strong> [I] (Record) button to call up <strong>the</strong><br />
Record Setup display.<br />
3 Press <strong>the</strong> [F2] button to call up <strong>the</strong> Record<br />
Arpeggio display.<br />
Arpeggio<br />
Switch<br />
Voice with<br />
Arpeggio<br />
Arpeggio type<br />
selection<br />
4 Set <strong>the</strong> following parameters as required in <strong>the</strong><br />
Arpeggio Record display.<br />
4-1 Set <strong>the</strong> Switch parameter to on.<br />
4-2 Set <strong>the</strong> Voice with Arpeggio (ARP) parameter to on.<br />
When this is set to “on,” <strong>the</strong> Voice matching <strong>the</strong><br />
selected Arpeggio type is automatically called up<br />
each time <strong>the</strong> Arpeggio type is changed.<br />
4-3 Select <strong>the</strong> Arpeggio type by specifying <strong>the</strong> Category,<br />
Sub Category and Type.<br />
5 Press <strong>the</strong> [F1] button to call up <strong>the</strong> Record<br />
Setup display.<br />
Recording Track Time Signature<br />
Length<br />
Keyboard<br />
start<br />
Loop<br />
Step 5: Creating a Pattern<br />
6 Set <strong>the</strong> following parameters in <strong>the</strong> Record<br />
Setup display.<br />
6-1 To select <strong>the</strong> desired track, press <strong>the</strong> [TRACK]<br />
button (<strong>the</strong> lamp lights), <strong>the</strong>n press <strong>the</strong> appropriate<br />
Number button [1] – [16].<br />
6-2 Set <strong>the</strong> Time Signature to “4/4.”<br />
6-3 Set <strong>the</strong> Pattern length to a value equivalent to <strong>the</strong><br />
Arpeggio length.<br />
6-4 Turn <strong>the</strong> Keyboard Start icon “on.”<br />
6-5 Set <strong>the</strong> Loop parameter to “off.”<br />
6-6 Set <strong>the</strong> Quantize parameter to “off.”<br />
7 After <strong>com</strong>pleting setup, press a note on <strong>the</strong><br />
keyboard to start recording.<br />
Recording will stop automatically when <strong>the</strong> last<br />
measure (specified by <strong>the</strong> Length) is reached.<br />
Creating a Pattern with audio—<br />
Sampling<br />
In this section, you’ll learn how to record audio data (from<br />
<strong>com</strong>mercially available sample CDs, for example) to <strong>the</strong><br />
Pattern track, using <strong>the</strong> versatile Sampling feature. After<br />
recording <strong>the</strong> audio, you can slice it into individual<br />
Samples, which can <strong>the</strong>n be played back at any desired<br />
tempo—without <strong>com</strong>promising <strong>the</strong> sound or introducing<br />
pitch changes. These step-by-step instructions assume<br />
that <strong>the</strong> recorded audio data is a one-measure drum<br />
pattern in 4/4 time.<br />
Important<br />
In order to use <strong>the</strong> Sampling function, DIMM modules must be<br />
installed to <strong>the</strong> instrument. For details on installing DIMMs, see<br />
page 295. The recorded (edited) sample data residing temporarily<br />
in DIMM is lost when <strong>the</strong> power is turned off. Make sure to prepare<br />
a USB storage device or a <strong>com</strong>puter connected to <strong>the</strong> same<br />
network as <strong>the</strong> MOTIF <strong>XS</strong> before using <strong>the</strong> Sampling function.<br />
Sampling Setup<br />
••••••••••••••••••••••••••••••••••••<br />
1 Turn <strong>the</strong> power off and set <strong>the</strong> GAIN knob on<br />
<strong>the</strong> rear panel to <strong>the</strong> minimum.<br />
Quantize Min. Max.<br />
MOTIF <strong>XS</strong> Owner’s <strong>Manual</strong> 39<br />
Start Guide
Start Guide<br />
40<br />
Step 5: Creating a Pattern<br />
2 Connect an audio device (CD player, etc.) to<br />
<strong>the</strong> A/D INPUT connector on <strong>the</strong> rear panel.<br />
3 Turn <strong>the</strong> power of <strong>the</strong> MOTIF <strong>XS</strong> on.<br />
4 Press <strong>the</strong> [UTILITY] button to enter <strong>the</strong> Utility<br />
mode, <strong>the</strong>n press <strong>the</strong> [F2] button to call up <strong>the</strong><br />
I/O display.<br />
5 Set <strong>the</strong> Mic/Line parameter to “line.”<br />
Sampling Setup is <strong>com</strong>pleted.<br />
Sampling<br />
••••••••••••••••••••••••••••••••••••<br />
1 Press <strong>the</strong> [PATTERN] button to enter <strong>the</strong><br />
Pattern Play mode, <strong>the</strong>n select a Pattern and<br />
Section to be recorded.<br />
2 Press <strong>the</strong> [INTEGRATED SAMPLING] button to<br />
enter <strong>the</strong> Sampling mode.<br />
3 Press <strong>the</strong> [F6] button to call up <strong>the</strong> Setup<br />
display.<br />
4 Set <strong>the</strong> following parameters as required in <strong>the</strong><br />
Setup display.<br />
MOTIF <strong>XS</strong> Owner’s <strong>Manual</strong><br />
Stereo audio equipment<br />
(CD player, etc.)<br />
L<br />
R<br />
A/D INPUT L A/D INPUT R<br />
MOTIF <strong>XS</strong><br />
1<br />
2<br />
3<br />
4<br />
5 6<br />
1 Set <strong>the</strong> Recording Type to “slice+seq.”<br />
2 Set <strong>the</strong> Input Source to “A/D Input.”<br />
3 Set <strong>the</strong> Stereo/Mono parameter to “stereo.”<br />
4 Set <strong>the</strong> Record Next to “off.”<br />
5 Set <strong>the</strong> Frequency to “44.1 kHz.”<br />
6 Select <strong>the</strong> destination track.<br />
5 Press <strong>the</strong> [F6] button to call up <strong>the</strong> Standby<br />
display.<br />
6 Set <strong>the</strong> Trigger Mode to “level,” <strong>the</strong>n set <strong>the</strong><br />
Trigger Level to “1.”<br />
n The Trigger Mode parameter lets you determine how <strong>the</strong><br />
Sampling actually starts. When Trigger Mode is set to<br />
“level,” sampling will begin automatically as soon as <strong>the</strong><br />
input signal exceeds <strong>the</strong> specified Trigger Level. Since<br />
Trigger Level is set to “1” here, sampling will begin<br />
automatically as soon as <strong>the</strong> audio signal is input from <strong>the</strong><br />
CD player.<br />
When <strong>the</strong> Trigger mode is set to “manual,” actual<br />
Sampling starts by pressing <strong>the</strong> [F5] Start button.<br />
7 Play back <strong>the</strong> audio source (CD player) and<br />
adjust <strong>the</strong> audio input level with <strong>the</strong> GAIN knob<br />
on <strong>the</strong> rear panel to get <strong>the</strong> appropriate level.<br />
Adjust <strong>the</strong> GAIN so that <strong>the</strong> level is high enough for a<br />
clean recording but not so high as to cause clipping or<br />
distortion.<br />
L R<br />
A/D INPUT<br />
R<br />
L<br />
Trigger Level<br />
Trigger Mode<br />
Level Meter<br />
n Please note that <strong>the</strong> input sound may be clipped or<br />
distorted if <strong>the</strong> meter reaches maximum level.<br />
8 Stop playback of <strong>the</strong> audio source (CD player).<br />
Min.<br />
9 Press <strong>the</strong> [F5] button to call up <strong>the</strong> WAITING<br />
indicator (Trigger Standby status).<br />
GAIN<br />
Max.
10 Start <strong>the</strong> CD player.<br />
Since <strong>the</strong> Trigger Level is set to “1” here, sampling<br />
will begin automatically as soon as <strong>the</strong> audio signal is<br />
input from <strong>the</strong> CD player. In this example, record a<br />
one-measure drum pattern from <strong>the</strong> CD.<br />
11 Press <strong>the</strong> [F6] button to stop sampling, <strong>the</strong>n<br />
stop <strong>the</strong> CD player.<br />
The wave of <strong>the</strong> recorded audio signal will be shown<br />
on <strong>the</strong> display.<br />
12 Press <strong>the</strong> [SF1] button to hear your newly<br />
recorded sound.<br />
Sample Edit Setting <strong>the</strong> End Point of <strong>the</strong><br />
Recorded Sample<br />
The start point of <strong>the</strong> recorded Sample will probably be at<br />
<strong>the</strong> correct place—<strong>the</strong> first beat of <strong>the</strong> measure—since<br />
Sampling start was set to begin automatically with <strong>the</strong><br />
Trigger Level setting. However, <strong>the</strong> end point may not be at<br />
<strong>the</strong> end of <strong>the</strong> measure as desired, since Sampling was<br />
stopped manually. Accordingly, you may need to edit <strong>the</strong><br />
End Point of <strong>the</strong> recorded sample so that playback of <strong>the</strong><br />
recorded sample properly matches <strong>the</strong> beat timing.<br />
End<br />
Point<br />
Tempo<br />
Measure<br />
1 Press <strong>the</strong> [SF2] button once or twice so that<br />
<strong>the</strong> LP=ST is shown.<br />
2 Move <strong>the</strong> cursor to <strong>the</strong> End Point <strong>the</strong>n adjust<br />
<strong>the</strong> value by using <strong>the</strong> data dial.<br />
Press <strong>the</strong> [SF1] button to hear <strong>the</strong> sample. Adjust <strong>the</strong><br />
End Point so that <strong>the</strong> Sample plays back smoothly and<br />
continuously without stutters, glitches or problems in<br />
timing.<br />
3 After setting <strong>the</strong> Ending Point, press <strong>the</strong><br />
[ENTER] button to delete unnecessary data<br />
(located after <strong>the</strong> End point).<br />
After <strong>the</strong> display prompts you for confirmation, <strong>the</strong>n<br />
press <strong>the</strong> [INC/YES] button to execute <strong>the</strong> Extract<br />
operation.<br />
n Many <strong>com</strong>mercially available sample/loop CDs include<br />
information on <strong>the</strong> tempo, measure and meter of specific<br />
Step 5: Creating a Pattern<br />
loops. If this information is available, enter <strong>the</strong> appropriate<br />
values to <strong>the</strong> parameters above.<br />
Sample Edit Slice<br />
Next, let’s use <strong>the</strong> Slice function to match <strong>the</strong> recorded<br />
sample with <strong>the</strong> tempo. This Slice feature lets you<br />
automatically divide <strong>the</strong> recorded sample into separate<br />
“slices.” These slices are <strong>the</strong>n assigned to successive<br />
notes and arranged as MIDI data. This lets you manipulate<br />
<strong>the</strong> <strong>com</strong>ponent parts of your sample loops as MIDI data,<br />
and gives you <strong>the</strong> power to easily change tempo and even<br />
<strong>the</strong> rhythmic feel, without disturbing <strong>the</strong> pitch or sound<br />
quality.<br />
Sample<br />
Slice <strong>the</strong> Sample and assign <strong>the</strong><br />
sliced Samples to specified keys<br />
(notes) to create a Sample Voice.<br />
MIDI data<br />
n Before executing <strong>the</strong> Slice operation, you’ll need to accurately<br />
adjust <strong>the</strong> length of <strong>the</strong> sample by adjusting <strong>the</strong> End Point.<br />
1 Press <strong>the</strong> [F6] button to call up <strong>the</strong> Slice display.<br />
2 Set <strong>the</strong> following parameters on <strong>the</strong> Slice<br />
display.<br />
Since <strong>the</strong> recorded sample is a one-measure drum<br />
pattern in 4/4 time, set <strong>the</strong> parameters below as shown.<br />
2-1 Set <strong>the</strong> Slice Type to “beat1.”<br />
2-2 Set <strong>the</strong> Measure to “1.”<br />
2-3 Set <strong>the</strong> Sensitivity to “4.”<br />
3 Press <strong>the</strong> [SF4] button to execute <strong>the</strong> Slice<br />
operation.<br />
MOTIF <strong>XS</strong> Owner’s <strong>Manual</strong> 41<br />
Start Guide
Start Guide<br />
42<br />
Step 5: Creating a Pattern<br />
4 Press <strong>the</strong> keys to which <strong>the</strong> sliced sample are<br />
assigned in order (from C1 for <strong>the</strong> MOTIF <strong>XS</strong>6,<br />
E0 for <strong>the</strong> MOTIF <strong>XS</strong>7, and A-1 for <strong>the</strong> MOTIF<br />
<strong>XS</strong>8) to confirm whe<strong>the</strong>r or not <strong>the</strong> Sample has<br />
been sliced properly.<br />
Listen carefully to <strong>the</strong> results. If you’re not satisfied,<br />
press <strong>the</strong> [SF4] Apply button again to abort <strong>the</strong> Slice<br />
operation and return <strong>the</strong> sample to <strong>the</strong> original status,<br />
<strong>the</strong>n try <strong>the</strong> operation again. Repeat steps 2 – 4 by<br />
trying ano<strong>the</strong>r Slice Type and adjusting <strong>the</strong> value of <strong>the</strong><br />
Sensitivity until you are satisfied with <strong>the</strong> sound.<br />
5 Press <strong>the</strong> [ENTER] button to fix <strong>the</strong> Slice result<br />
as Sample data.<br />
6 Press <strong>the</strong> [PATTERN] button to call up <strong>the</strong><br />
Pattern Play display <strong>the</strong>n press <strong>the</strong> [F] (Play)<br />
button to hear <strong>the</strong> sliced Sample.<br />
You can change <strong>the</strong> tempo of <strong>the</strong> sliced rhythm<br />
pattern. Try changing <strong>the</strong> tempo in <strong>the</strong> Pattern Play<br />
mode.<br />
Tempo<br />
Storing <strong>the</strong> Pattern and Saving<br />
<strong>the</strong> Sample<br />
After <strong>the</strong> Sampling operation, store <strong>the</strong> created Pattern to<br />
internal memory <strong>the</strong>n save <strong>the</strong> Sample to a separate USB<br />
storage device. For instructions on storing a Pattern, see<br />
page 218. For instructions on saving a Sample, see<br />
page 279.<br />
CAUTION<br />
Sample data will be lost when <strong>the</strong> power is turned off. Make sure to<br />
save <strong>the</strong> Sample data to a USB storage device or to a <strong>com</strong>puter<br />
connected to <strong>the</strong> same network as <strong>the</strong> MOTIF <strong>XS</strong> in <strong>the</strong> File mode<br />
after <strong>the</strong> Sampling operation.<br />
n After creating several Patterns (Sections), use <strong>the</strong> Pattern<br />
Chain feature (page 213) to string <strong>the</strong>m toge<strong>the</strong>r.<br />
MOTIF <strong>XS</strong> Owner’s <strong>Manual</strong>
Using a Computer<br />
Connecting to a Computer<br />
Although <strong>the</strong> MOTIF <strong>XS</strong> is exceptionally powerful and versatile all by itself, connecting it to a <strong>com</strong>puter—via USB or<br />
IEEE1394 cable—provides even greater power and versatility. This feature lets you transfer audio data (via an IEEE1394<br />
cable only) and MIDI data (via both USB and IEEE1394 cable) between <strong>the</strong> MOTIF <strong>XS</strong> and your <strong>com</strong>puter. In this section<br />
you’ll learn how to make <strong>the</strong> connections.<br />
n This section shows how to connect <strong>the</strong> MOTIF <strong>XS</strong> to a <strong>com</strong>puter directly. O<strong>the</strong>r MIDI devices can be connected between MOTIF <strong>XS</strong> and <strong>the</strong><br />
<strong>com</strong>puter. For details about connection between <strong>the</strong> MOTIF <strong>XS</strong> and ano<strong>the</strong>r MIDI device, see page 83. For details about connection<br />
between <strong>the</strong> MIDI device and <strong>the</strong> <strong>com</strong>puter, refer to <strong>the</strong> owner’s manual of <strong>the</strong> particular MIDI device.<br />
Using a USB TO HOST connector<br />
This section shows you how to connect <strong>the</strong> MOTIF <strong>XS</strong> to a<br />
<strong>com</strong>puter via a USB cable. Note that <strong>the</strong> MIDI data can be<br />
transmitted through a USB cable.<br />
n Since <strong>the</strong> MOTIF <strong>XS</strong> has no built-in speakers, you’ll need an<br />
external audio system or a set of stereo headphones to<br />
properly monitor it. For details, refer to “Start Guide” on<br />
page 19.<br />
1 <strong>Download</strong> <strong>the</strong> USB-MIDI driver from our<br />
website:<br />
http://www.global.yamaha.<strong>com</strong>/download/usb_midi/<br />
n Information on system requirements is also available at<br />
<strong>the</strong> above web site.<br />
n The USB-MIDI driver may be revised and updated without<br />
prior notice. Make sure to check and download <strong>the</strong> latest<br />
version from <strong>the</strong> above site.<br />
2 Install <strong>the</strong> downloaded USB-MIDI driver to <strong>the</strong><br />
<strong>com</strong>puter.<br />
For instructions on installing, refer to <strong>the</strong> online<br />
Installation Guide included in <strong>the</strong> downloaded file<br />
package. When connecting <strong>the</strong> MOTIF <strong>XS</strong> to a<br />
<strong>com</strong>puter in <strong>the</strong> Installation procedure, connect <strong>the</strong><br />
USB cable to <strong>the</strong> USB TO HOST of <strong>the</strong> MOTIF <strong>XS</strong> and<br />
<strong>the</strong> USB connector of <strong>the</strong> <strong>com</strong>puter as shown below.<br />
USB connector<br />
USB cable<br />
USB TO HOST connector<br />
TO HOST<br />
3 Make sure that <strong>the</strong> USB TO HOST connector of<br />
<strong>the</strong> MOTIF <strong>XS</strong> is enabled.<br />
Press <strong>the</strong> [UTILITY] button to enter <strong>the</strong> Utility mode,<br />
<strong>the</strong>n press <strong>the</strong> [F5] button followed by <strong>the</strong> [SF2] button<br />
USB<br />
TO DEVICE<br />
Rear panel of<br />
<strong>the</strong> MOTIF <strong>XS</strong><br />
to call up <strong>the</strong> MIDI display (page 267). Set <strong>the</strong> MIDI In/<br />
Out parameter to “USB.”<br />
4 Press <strong>the</strong> [STORE] button to store this setting.<br />
Precautions when using <strong>the</strong> USB TO HOST<br />
connector<br />
When connecting <strong>the</strong> <strong>com</strong>puter to <strong>the</strong> USB TO HOST<br />
connector, make sure to observe <strong>the</strong> following points.<br />
Failing to do so risks freezing <strong>the</strong> <strong>com</strong>puter and<br />
corrupting or even losing <strong>the</strong> data. If <strong>the</strong> <strong>com</strong>puter or <strong>the</strong><br />
instrument freezes, turn <strong>the</strong> power to <strong>the</strong> instrument off or<br />
restart <strong>the</strong> <strong>com</strong>puter.<br />
CAUTION<br />
• Before connecting <strong>the</strong> <strong>com</strong>puter to <strong>the</strong> USB TO HOST<br />
connector, exit from any power-saving mode (such as<br />
suspended, sleep, standby) of <strong>the</strong> <strong>com</strong>puter.<br />
• Before turning on <strong>the</strong> power to <strong>the</strong> instrument, connect<br />
<strong>the</strong> <strong>com</strong>puter to <strong>the</strong> USB TO HOST connector.<br />
• Execute <strong>the</strong> following before turning <strong>the</strong> power to <strong>the</strong><br />
instrument on/off or plugging/unplugging <strong>the</strong> USB<br />
cable to/from <strong>the</strong> USB TO HOST connector.<br />
- Quit any open applications (such as MOTIF <strong>XS</strong> Editor<br />
and sequencer software).<br />
- Make sure that data is not being transmitted from <strong>the</strong><br />
instrument. (Data is transmitted only by playing notes<br />
on <strong>the</strong> keyboard or playing back a Song.)<br />
• While a USB device is connected to <strong>the</strong> instrument,<br />
you should wait for six seconds or more between <strong>the</strong>se<br />
operations: (1) when turning <strong>the</strong> power of <strong>the</strong><br />
instrument off <strong>the</strong>n on again, or (2) when alternately<br />
connecting/disconnecting <strong>the</strong> USB cable.<br />
MIDI channels and MIDI ports<br />
MIDI song data can be sent independently over sixteen<br />
separate channels, and this instrument is capable of<br />
simultaneously playing sixteen separate parts via <strong>the</strong>se<br />
channels. While a single MIDI cable is equipped to<br />
handle data over up to sixteen channels simultaneously,<br />
a USB connection or a IEEE1394 connection is capable<br />
of handling far more—thanks to <strong>the</strong> use of MIDI ports.<br />
Each MIDI port can handle sixteen channels, and <strong>the</strong><br />
USB connection or IEEE1394 connection allows up to<br />
eight ports, letting you use up to 128 channels (8 ports x<br />
16 channels) on your <strong>com</strong>puter.<br />
MOTIF <strong>XS</strong> Owner’s <strong>Manual</strong> 43<br />
Connecting to<br />
a Computer
Connecting to<br />
a Computer<br />
44<br />
Connecting to a Computer<br />
When connecting <strong>the</strong> MOTIF <strong>XS</strong> to a <strong>com</strong>puter using a<br />
USB cable or an IEEE1394 cable, <strong>the</strong> MIDI ports are<br />
defined as follows:<br />
Port 1<br />
The tone generator block in <strong>the</strong> MOTIF <strong>XS</strong> can recognize<br />
and use only this port.<br />
When playing <strong>the</strong> MOTIF <strong>XS</strong> as a tone generator from <strong>the</strong><br />
external MIDI instrument or <strong>com</strong>puter, you should set <strong>the</strong><br />
MIDI Port to 1 on <strong>the</strong> connected MIDI device or<br />
<strong>com</strong>puter.<br />
Port 2<br />
This port is used to control <strong>the</strong> DAW software on <strong>the</strong><br />
<strong>com</strong>puter from <strong>the</strong> MOTIF <strong>XS</strong> by using <strong>the</strong> Remote<br />
Control feature.<br />
Port 3<br />
This port is used as <strong>the</strong> MIDI Thru Port. The MIDI data<br />
received over Port 3 via <strong>the</strong> USB TO HOST or mLAN<br />
connector will be re-transmitted to an external MIDI<br />
device via <strong>the</strong> MIDI OUT connector. The MIDI data<br />
received over Port 3 via <strong>the</strong> MIDI IN connector will be retransmitted<br />
to an external device (<strong>com</strong>puter, etc.) via <strong>the</strong><br />
USB TO HOST or mLAN connector.<br />
When using a USB connection or IEEE1394 connection<br />
between <strong>the</strong> MOTIF <strong>XS</strong> and <strong>the</strong> <strong>com</strong>puter, make sure to<br />
match <strong>the</strong> MIDI transmit port and <strong>the</strong> MIDI receive port<br />
as well as <strong>the</strong> MIDI transmit channel and <strong>the</strong> MIDI receive<br />
channel following <strong>the</strong> above description.<br />
Using a MIDI interface<br />
Use standard MIDI cables to connect <strong>the</strong> MOTIF <strong>XS</strong> to a<br />
<strong>com</strong>puter, connecting <strong>the</strong> MIDI IN and MIDI OUT terminals<br />
on <strong>the</strong> MOTIF <strong>XS</strong> to <strong>the</strong> appropriate terminals on a MIDI<br />
interface.<br />
Using a mLAN connector<br />
This section shows you how to connect <strong>the</strong> MOTIF <strong>XS</strong> to a<br />
<strong>com</strong>puter via an IEEE1394 (FireWire) cable. Note that <strong>the</strong><br />
audio data as well as MIDI data can be transmitted through<br />
an IEEE1394 cable.<br />
n The MOTIF <strong>XS</strong>6/7 can be connected to <strong>the</strong> mLAN <strong>com</strong>patible<br />
device or a <strong>com</strong>puter equipped with <strong>the</strong> IEEE1394 connector<br />
only when an optional mLAN16E2 has been installed to <strong>the</strong><br />
MOTIF <strong>XS</strong>6/7. For instructions on installing <strong>the</strong> mLAN16E2,<br />
see page 294.<br />
n The mLAN-equipped MOTIF <strong>XS</strong> can provide up to 6 Mono In<br />
(3 Stereo In), 16 Mono Out (8 Stereo Out) audio channels and<br />
3 MIDI In/3 MIDI Out channels.<br />
MOTIF <strong>XS</strong> Owner’s <strong>Manual</strong><br />
1 <strong>Download</strong> <strong>the</strong> proper AI Driver from our<br />
website:<br />
http://www.yamahasynth.<strong>com</strong>/download/<br />
n Information on system requirements is also available at<br />
<strong>the</strong> above web site.<br />
n The AI Driver may be revised and updated without prior<br />
notice. Make sure to check and download <strong>the</strong> latest<br />
version from <strong>the</strong> above site.<br />
2 Install <strong>the</strong> downloaded AI Driver to <strong>the</strong><br />
<strong>com</strong>puter.<br />
For instructions on installing, refer to <strong>the</strong> online<br />
Installation Guide included in <strong>the</strong> downloaded file<br />
package. When connecting <strong>the</strong> MOTIF <strong>XS</strong> to a<br />
<strong>com</strong>puter in <strong>the</strong> Installation procedure, connect <strong>the</strong><br />
IEEE1394 cable to <strong>the</strong> mLAN connector of <strong>the</strong> MOTIF<br />
<strong>XS</strong> and <strong>the</strong> IEEE1394 connector of <strong>the</strong> <strong>com</strong>puter as<br />
shown below.<br />
IEEE1394 connector<br />
CAUTION<br />
mLAN<br />
connector<br />
IEEE1394 cable<br />
Be sure to connect <strong>the</strong> IEEE1394 (mLAN) cable plug to <strong>the</strong><br />
mLAN jack with <strong>the</strong> correct orientation.<br />
Plug in <strong>the</strong> jack with <strong>the</strong> correct orientation.<br />
Rear panel of<br />
<strong>the</strong> MOTIF <strong>XS</strong><br />
n For optimum results, use an IEEE1394 cable shorter than<br />
4.5 meters.<br />
3 Make sure that <strong>the</strong> mLAN connector of <strong>the</strong><br />
MOTIF <strong>XS</strong> is enabled for MIDI <strong>com</strong>munication.<br />
Press <strong>the</strong> [UTILITY] button to enter <strong>the</strong> Utility mode,<br />
<strong>the</strong>n press <strong>the</strong> [F6] button followed by <strong>the</strong> [SF2] button<br />
to call up <strong>the</strong> MIDI display (page 267). Set <strong>the</strong> MIDI In/<br />
Out parameter to “mLAN.”<br />
4 Make sure that <strong>the</strong> mLAN connector of <strong>the</strong><br />
MOTIF <strong>XS</strong> is enabled for audio <strong>com</strong>munication.<br />
When transmitting audio signals via <strong>the</strong> mLAN<br />
connector, set <strong>the</strong> Output Select parameter of <strong>the</strong><br />
MOTIF <strong>XS</strong>. When receiving audio signals via <strong>the</strong> mLAN<br />
connector, set <strong>the</strong> mLAN audio input part parameters of<br />
<strong>the</strong> MOTIF <strong>XS</strong>. For details, see page 45.<br />
5 Press <strong>the</strong> [STORE] button to store this setting.
What you can do with <strong>the</strong> IEEE1394<br />
connection<br />
You can integrate <strong>the</strong> MOTIF <strong>XS</strong> with DAW software on a<br />
<strong>com</strong>puter by connecting <strong>the</strong> mLAN equipped MOTIF <strong>XS</strong><br />
(MOTIF <strong>XS</strong>6/7 to which <strong>the</strong> optional mLAN16E2 is installed<br />
or MOTIF <strong>XS</strong>8) to a <strong>com</strong>puter in a peer-to-peer<br />
arrangement. For details, see below.<br />
•Transfer data of multiple audio channels between <strong>the</strong><br />
MOTIF <strong>XS</strong> and <strong>the</strong> <strong>com</strong>puter (up to 16 channels from <strong>the</strong><br />
MOTIF <strong>XS</strong> to <strong>the</strong> <strong>com</strong>puter and up to 6 channels from <strong>the</strong><br />
<strong>com</strong>puter to <strong>the</strong> MOTIF <strong>XS</strong>)<br />
• Simultaneously record to <strong>the</strong> sequence software (a) your<br />
performance on <strong>the</strong> MOTIF <strong>XS</strong> and (b) <strong>the</strong> performance<br />
of <strong>the</strong> <strong>com</strong>puter sequence software that uses <strong>the</strong> MOTIF<br />
<strong>XS</strong> as a MIDI tone generator<br />
• Monitor via <strong>the</strong> MOTIF <strong>XS</strong> <strong>the</strong> audio output from <strong>the</strong><br />
<strong>com</strong>puter and <strong>the</strong> audio output from <strong>the</strong> MOTIF <strong>XS</strong><br />
• Use Cubase 4 toge<strong>the</strong>r with <strong>the</strong> MOTIF <strong>XS</strong> with a variety<br />
of convenient functions (page 49)<br />
n The capabilities and uses of connecting <strong>the</strong> MOTIF <strong>XS</strong> to a<br />
<strong>com</strong>puter via an IEEE1394 cable in a peer-to-peer<br />
arrangement is referred to as “mLAN” in this Owner’s <strong>Manual</strong><br />
and <strong>the</strong> MOTIF <strong>XS</strong> instrument. For details and <strong>the</strong> latest<br />
information on mLAN, refer to <strong>the</strong> following URL:<br />
http://www.yamahasynth.<strong>com</strong>/<br />
Connecting to a Computer<br />
Signal flow of audio and MIDI data via<br />
an IEEE1394 cable<br />
The illustration below shows <strong>the</strong> flow of audio signals and<br />
MIDI messages when connecting <strong>the</strong> MOTIF <strong>XS</strong> and a<br />
<strong>com</strong>puter via an IEEE1394 cable.<br />
IEEE1394-<strong>com</strong>patible <strong>com</strong>puter<br />
IEEE1394 cable<br />
mLAN IN 1-3 Ports<br />
MIDI<br />
MIDI<br />
(*1)<br />
MIDI<br />
mLAN OUT 1-3 Ports<br />
MIDI transmission/reception (*1)<br />
Setting <strong>the</strong> port on <strong>the</strong> MOTIF <strong>XS</strong> is not necessary since <strong>the</strong><br />
MIDI Port of <strong>the</strong> MOTIF <strong>XS</strong> is automatically fixed according<br />
to <strong>the</strong> application. For information on which port should be<br />
selected on your <strong>com</strong>puter, refer to page 43.<br />
Audio signal transmission<br />
■ mLAN OUT 1 – 14 (*2)<br />
Audio signals are output via mLAN OUT 1 – 14 when <strong>the</strong><br />
MOTIF <strong>XS</strong> Output Select parameter is set to any of <strong>the</strong> settings<br />
“m1&2” – “m13&14” and “m1” – “m14” in one of <strong>the</strong> following<br />
displays.<br />
[VOICE] (When a Drum Voice is selected) → [EDIT] → Key<br />
selection → [F1] Oscillator (page 130)<br />
[VOICE] → [UTILITY] → [F4] VoiceAudio → [SF1] Output<br />
(page 266)<br />
[PERFORM] → [EDIT] → [COMMON EDIT] → [F4] Audio In →<br />
[SF1] Output (page 148)<br />
[PERFORM] → [EDIT] → Part selection → [F1] Voice → [SF2]<br />
Output (page 153)<br />
[SONG]/[PATTERN] → [MIXING] → [EDIT] → [COMMON<br />
EDIT] → [F4] Audio In → [SF1] Output (page 234)<br />
[SONG]/[PATTERN] → [MIXING] → [EDIT] → Part selection →<br />
[F1] Voice → [SF2] Output (page 235)<br />
■ OUTPUT L/R (*3)<br />
AUDIO<br />
mLAN OUT<br />
1-14<br />
(*2)<br />
mLAN connectors of <strong>the</strong><br />
MOTIF <strong>XS</strong>8 or <strong>the</strong> mLAN16E2<br />
installed to <strong>the</strong> MOTIF <strong>XS</strong>6/7<br />
mLAN OUT 1-14ch<br />
MOTIF <strong>XS</strong><br />
AUDIO<br />
mLAN OUT L/R<br />
mLAN OUT<br />
L/R<br />
(*3)<br />
AUDIO<br />
mLAN IN L/R, etc.<br />
mLAN IN<br />
(*4)<br />
Powered speakers<br />
(such as <strong>the</strong><br />
HS80M)<br />
The audio signal is output via both <strong>the</strong> OUTPUT L/R and mLAN<br />
OUT L/R channels when <strong>the</strong> Output Select parameter<br />
described above is set to “L&R.”<br />
MOTIF <strong>XS</strong> Owner’s <strong>Manual</strong> 45<br />
Connecting to<br />
a Computer
Connecting to<br />
a Computer<br />
46<br />
Connecting to a Computer<br />
Audio signal reception (*4)<br />
The mLAN IN Main Out Monitor L/R and mLAN IN<br />
Assignable Out Monitor L/R are available as well as <strong>the</strong><br />
mLAN IN L/R as <strong>the</strong> mLAN audio input channel of <strong>the</strong><br />
MOTIF <strong>XS</strong>. These channels can be used for monitoring <strong>the</strong><br />
sound when using <strong>the</strong> DAW software on <strong>the</strong> <strong>com</strong>puter. The<br />
audio signal received via <strong>the</strong> mLAN IN Main Out Monitor L/<br />
R will be output via <strong>the</strong> OUTPUT L/R jacks while <strong>the</strong> audio<br />
signal received via <strong>the</strong> mLAN IN Assignable Out Monitor L/<br />
R will be output via <strong>the</strong> ASSIGNABLE OUTPUT L/R jacks.<br />
Setting <strong>the</strong> audio output channel on <strong>the</strong> <strong>com</strong>puter<br />
determines which channel is used. As for audio signals<br />
received via <strong>the</strong> mLAN connector, parameters such as<br />
volume and output channel can be applied as <strong>the</strong> mLAN<br />
audio input part of <strong>the</strong> MOTIF <strong>XS</strong>. The display of <strong>the</strong>se<br />
parameter settings differs depending on <strong>the</strong> mode, as<br />
listed below.<br />
[VOICE] → [UTILITY] → [F4] VoiceAudio → [SF1] Output →<br />
mLAN setting (page 266)<br />
[PERFORM] → [EDIT] → [COMMON EDIT] → [F4] Audio In →<br />
[SF1] Output → mLAN setting (page 148)<br />
[SONG]/[PATTERN] → [MIXING] → [EDIT] → [COMMON<br />
EDIT] → [F4] Audio In → [SF1] Output → mLAN setting<br />
(page 234)<br />
mLAN Audio Channels of <strong>the</strong> MOTIF <strong>XS</strong> and<br />
<strong>the</strong> <strong>com</strong>puter<br />
When connecting <strong>the</strong> MOTIF <strong>XS</strong> to a <strong>com</strong>puter via an<br />
IEEE1394 cable, set <strong>the</strong> audio channel of <strong>the</strong> <strong>com</strong>puter<br />
referring to <strong>the</strong> table below.<br />
Input Channel of <strong>the</strong> MOTIF <strong>XS</strong><br />
MOTIF <strong>XS</strong> Owner’s <strong>Manual</strong><br />
Output Channel of<br />
<strong>the</strong> <strong>com</strong>puter<br />
mLAN IN Main Out Monitor L, R 1, 2<br />
mLAN IN L, R 3, 4<br />
mLAN IN Assignable Out Monitor L, R 5, 6<br />
Output Channel of <strong>the</strong> MOTIF <strong>XS</strong><br />
Input Channel of<br />
<strong>the</strong> <strong>com</strong>puter<br />
mLAN OUT L, R (L&R)* 1, 2<br />
mLAN OUT 1 – 14 (m1 – m14)* 3 – 16
Creating a Song by Using a Computer<br />
By connecting <strong>the</strong> MOTIF <strong>XS</strong> to your <strong>com</strong>puter via USB or mLAN, you can use a DAW or sequence software on <strong>the</strong><br />
<strong>com</strong>puter to create your own original songs. This section contains an overview on how to use a DAW or sequence software<br />
on <strong>the</strong> <strong>com</strong>puter with <strong>the</strong> MOTIF <strong>XS</strong> after connecting.<br />
n The acronym DAW (digital audio workstation) refers to music software for recording, editing and mixing audio and MIDI data. The main DAW<br />
applications are Cubase, Logic, SONAR and Digital Performer. Though all of <strong>the</strong>se can be effectively used with <strong>the</strong> MOTIF <strong>XS</strong>, we<br />
re<strong>com</strong>mend using Cubase when creating songs toge<strong>the</strong>r with <strong>the</strong> instrument.<br />
Song playback from a <strong>com</strong>puter using<br />
<strong>the</strong> MOTIF <strong>XS</strong> as a tone generator<br />
The instructions below show how to use <strong>the</strong> Song or<br />
Pattern mode of <strong>the</strong> MOTIF <strong>XS</strong> as a MIDI tone generator. In<br />
this case, actual MIDI sequence data is to be transmitted<br />
from a DAW or sequencer on <strong>the</strong> <strong>com</strong>puter.<br />
Setting up <strong>the</strong> MOTIF <strong>XS</strong><br />
1 Press <strong>the</strong> [SONG] or [PATTERN] button to<br />
enter <strong>the</strong> Song mode or Pattern mode.<br />
2 Select a Song or Pattern which contains no data.<br />
3 Press <strong>the</strong> [MIXING] button to enter <strong>the</strong> Mixing<br />
mode.<br />
4 Set up <strong>the</strong> Mixing for parts 1 – 16 as necessary.<br />
For details about Mixing, see page 229.<br />
Setting up <strong>the</strong> DAW on <strong>the</strong> <strong>com</strong>puter<br />
1 Set <strong>the</strong> MIDI output port of <strong>the</strong> tracks to Port 1<br />
of USB or mLAN.<br />
When connecting via a USB cable, set this to “Yamaha<br />
MOTIF <strong>XS</strong>6(7, 8)-1” or “YAMAHA MOTIF <strong>XS</strong>6(7, 8)<br />
Port1.” When connecting via an IEEE1394 cable, set<br />
this to “mLAN MIDI Out” or “MOTIF <strong>XS</strong>.”<br />
2 Enter <strong>the</strong> MIDI data to each track of <strong>the</strong> DAW/<br />
sequencer on <strong>the</strong> <strong>com</strong>puter.<br />
The tone generator settings of <strong>the</strong> part corresponding<br />
to <strong>the</strong> MIDI track will be set in <strong>the</strong> Mixing mode on <strong>the</strong><br />
MOTIF <strong>XS</strong>.<br />
n By using <strong>the</strong> MOTIF <strong>XS</strong> Editor, you can create your original<br />
Mixing setup of <strong>the</strong> MOTIF <strong>XS</strong> from your <strong>com</strong>puter. The<br />
created Mixing setup can be saved as a file for future recall.<br />
n By using <strong>the</strong> Studio Manager V2, you can use <strong>the</strong> MOTIF<br />
<strong>XS</strong> Editor as a plug-in software within Cubase and save<br />
<strong>the</strong> edited Mixing setup of <strong>the</strong> MOTIF <strong>XS</strong> as a project file<br />
of Cubase.<br />
Recording your performance on <strong>the</strong><br />
MOTIF <strong>XS</strong> to <strong>com</strong>puter<br />
The instructions below show how to use <strong>the</strong> MOTIF <strong>XS</strong> as a<br />
Master Keyboard. The note events you play on <strong>the</strong> MOTIF<br />
<strong>XS</strong> are transmitted and recorded to a track of a DAW/<br />
sequencer software on your <strong>com</strong>puter, <strong>the</strong>n returned back<br />
to <strong>the</strong> tone generator block of <strong>the</strong> MOTIF <strong>XS</strong>.<br />
Setting up <strong>the</strong> MOTIF <strong>XS</strong><br />
1 Set Local Control to “off.”<br />
Press <strong>the</strong> [UTILITY] button to enter <strong>the</strong> Utility mode, <strong>the</strong>n<br />
press <strong>the</strong> [F5] followed by <strong>the</strong> [SF2] button to call up <strong>the</strong><br />
MIDI display (page 267). Move <strong>the</strong> cursor to <strong>the</strong> Local<br />
Control <strong>the</strong> set this parameter to “off.” When MIDI Thru is<br />
set to “on” in a DAW/sequencer software on your<br />
<strong>com</strong>puter, <strong>the</strong> note events you play on <strong>the</strong> MOTIF <strong>XS</strong> are<br />
transmitted to <strong>the</strong> <strong>com</strong>puter <strong>the</strong>n returned back to <strong>the</strong><br />
MOTIF <strong>XS</strong>, producing a “double” sound, since <strong>the</strong> tone<br />
generator block is receiving performance data (MIDI data)<br />
from both <strong>the</strong> keyboard directly and <strong>the</strong> <strong>com</strong>puter. To<br />
prevent such a situation, you need to separate <strong>the</strong><br />
keyboard block from <strong>the</strong> tone generator block of <strong>the</strong><br />
MOTIF <strong>XS</strong>. This is why Local Control should be set to “off.”<br />
2 Press <strong>the</strong> [STORE] button to store this setting.<br />
3 Press <strong>the</strong> [SONG] or [PATTERN] button to<br />
enter <strong>the</strong> Song mode or Pattern mode when<br />
you want to using <strong>the</strong> MOTIF <strong>XS</strong> as a multitimbral<br />
tone generator.<br />
Setting up <strong>the</strong> DAW on <strong>the</strong> <strong>com</strong>puter<br />
1 Set MIDI Thru to “on” on <strong>the</strong> DAW.<br />
By setting MIDI Thru to “on,” <strong>the</strong> MIDI data generated by<br />
playing <strong>the</strong> keyboard and transmitted to <strong>the</strong> <strong>com</strong>puter will<br />
be returned back to <strong>the</strong> MOTIF <strong>XS</strong>. As shown in <strong>the</strong><br />
example below, <strong>the</strong> MIDI data transmitted from <strong>the</strong> MOTIF<br />
<strong>XS</strong> <strong>the</strong>n recorded to <strong>the</strong> <strong>com</strong>puter via MIDI channel 1 will<br />
be returned back from <strong>the</strong> <strong>com</strong>puter to <strong>the</strong> MOTIF <strong>XS</strong> via<br />
MIDI channel 3 according to <strong>the</strong> setting of <strong>the</strong> recording<br />
track. As a result, <strong>the</strong> tone generator of <strong>the</strong> MOTIF <strong>XS</strong> will<br />
sound <strong>the</strong> MIDI data generated by playing <strong>the</strong> keyboard<br />
as <strong>the</strong> MIDI data of channel 3.<br />
MOTIF <strong>XS</strong> Owner’s <strong>Manual</strong> 47<br />
Connecting to<br />
a Computer
Connecting to<br />
a Computer<br />
48<br />
Creating a Song by Using a Computer<br />
USB TO HOST connector<br />
Tone generator<br />
block<br />
(recognizing<br />
MIDI Channel 3<br />
data)<br />
n The above explanation can be applied to <strong>the</strong> case when<br />
connecting <strong>the</strong> MOTIF <strong>XS</strong> to <strong>the</strong> <strong>com</strong>puter via an IEEE1394 cable<br />
as well as via a USB cable.<br />
Using ano<strong>the</strong>r tone generator<br />
toge<strong>the</strong>r with <strong>the</strong> MOTIF <strong>XS</strong><br />
By using ano<strong>the</strong>r tone generator (such as <strong>the</strong> MOTIF-RACK<br />
ES) toge<strong>the</strong>r with <strong>the</strong> MOTIF <strong>XS</strong> as illustrated below, you can<br />
play up to 32 Parts simultaneously.<br />
Setting up <strong>the</strong> MOTIF <strong>XS</strong><br />
1 Connect <strong>the</strong> MIDI OUT connector to <strong>the</strong> MIDI IN<br />
connector of <strong>the</strong> external tone generator module<br />
such as MOTIF-RACK ES, as illustrated below.<br />
2 Make sure to set <strong>the</strong> MOTIF <strong>XS</strong> to <strong>the</strong> multitimbral<br />
tone generator by entering <strong>the</strong> Song<br />
mode or Pattern mode.<br />
MIDI IN<br />
connector<br />
Computer<br />
(Cubase, etc.)<br />
1 Set <strong>the</strong> MIDI output port of <strong>the</strong> tracks (for playing<br />
<strong>the</strong> MOTIF <strong>XS</strong>) to Port 1 of USB or mLAN.<br />
When connecting via a USB cable, set this to “Yamaha<br />
MOTIF <strong>XS</strong>6(7, 8)-1” or “YAMAHA MOTIF <strong>XS</strong>6(7, 8) Port1.”<br />
When connecting via an IEEE1394 cable, set this to<br />
“mLAN MIDI Out” or “MOTIF <strong>XS</strong>.”<br />
MOTIF <strong>XS</strong> Owner’s <strong>Manual</strong><br />
Local Control<br />
= off<br />
MOTIF-RACK ES, etc.<br />
Keyboard<br />
(output via<br />
MIDI<br />
Channel 1)<br />
MOTIF <strong>XS</strong> IN<br />
CH1<br />
MIDI OUT<br />
connector USB TO HOST connector<br />
MOTIF <strong>XS</strong><br />
MIDI Through = on<br />
Setting up <strong>the</strong> DAW on <strong>the</strong> <strong>com</strong>puter<br />
OUT<br />
CH3<br />
Computer<br />
2 Set <strong>the</strong> MIDI output port of <strong>the</strong> tracks (for playing<br />
<strong>the</strong> MOTIF-RACK ES) to Port 3 of USB or mLAN.<br />
When connecting via a USB cable, set this to “Yamaha<br />
MOTIF <strong>XS</strong>6(7, 8)-3” or “YAMAHA MOTIF <strong>XS</strong>6(7, 8) Port3.”<br />
When connecting via an IEEE1394 cable, set this to<br />
“mLAN MIDI Out (3)” or “MOTIF <strong>XS</strong> MIDI OUT.”<br />
n Please keep in mind that <strong>the</strong> MIDI Thru Port of <strong>the</strong> MOTIF <strong>XS</strong><br />
(in o<strong>the</strong>r words, <strong>the</strong> port with which <strong>the</strong> received MIDI data is<br />
to be transmitted to ano<strong>the</strong>r external device via <strong>the</strong> MIDI<br />
OUT connector) is fixed to 3.<br />
Using <strong>the</strong> MOTIF <strong>XS</strong> as an audio<br />
interface<br />
By using <strong>the</strong> A/D INPUT connector and mLAN connector, <strong>the</strong><br />
MOTIF <strong>XS</strong> can conveniently be used as an audio interface for<br />
your <strong>com</strong>puter. Note that you need install <strong>the</strong> optional<br />
mLAN16E2 when using <strong>the</strong> MOTIF <strong>XS</strong>6/7 for this application.<br />
Setting up <strong>the</strong> MOTIF <strong>XS</strong><br />
1 Set <strong>the</strong> parameters as below so that <strong>the</strong> audio<br />
signal input via <strong>the</strong> A/D INPUT connector is<br />
output via <strong>the</strong> mLAN connector to <strong>the</strong> <strong>com</strong>puter.<br />
In <strong>the</strong> Voice mode, press <strong>the</strong> [UTILITY] button to enter <strong>the</strong><br />
Utility mode, press <strong>the</strong> [F4] button followed by <strong>the</strong> [SF1]<br />
button to call up <strong>the</strong> Output display (page 265). From this<br />
display, move <strong>the</strong> cursor to <strong>the</strong> Output Select of <strong>the</strong> A/D<br />
Input, <strong>the</strong>n select one of <strong>the</strong> following settings: “m1&2” –<br />
“m9&10,” “m11&12” and “m13&14.”<br />
2 Set <strong>the</strong> parameters as below so that <strong>the</strong> audio<br />
signal output from <strong>the</strong> <strong>com</strong>puter and input to <strong>the</strong><br />
MOTIF <strong>XS</strong> via <strong>the</strong> mLAN connector is output from<br />
<strong>the</strong> OUTPUT L/R or ASSIGNABLE OUTPUT L/R<br />
connectors.<br />
From <strong>the</strong> Output display called in step 1, move <strong>the</strong> cursor<br />
to <strong>the</strong> Output Select of <strong>the</strong> mLAN, <strong>the</strong>n select “L&R” or<br />
“asL&R.”<br />
n The setting here applies to <strong>the</strong> audio signals output from<br />
mLAN ports 3 and 4 of a <strong>com</strong>puter.<br />
3 Press <strong>the</strong> [STORE] button to store this setting.<br />
Setting up <strong>the</strong> DAW on <strong>the</strong> <strong>com</strong>puter<br />
Install <strong>the</strong> AI Driver and make <strong>the</strong> proper settings. Select<br />
ASIO mLAN (when using an ASIO driver) or mLAN Audio<br />
Out (when using a WDM driver) as Audio driver.<br />
n Confirming <strong>the</strong> Audio Ports is much easier when using Cubase<br />
and installing <strong>the</strong> Extensions for Steinberg DAW. For details, see<br />
below.
Integration Between Yamaha Editors and Cubase<br />
Yamaha and Steinberg have formed a partnership to develop a useful and convenient environment for effectively using<br />
Yamaha hardware (including <strong>the</strong> MOTIF <strong>XS</strong>) toge<strong>the</strong>r with Steinberg software. This section explains how you can use<br />
Cubase 4 and <strong>the</strong> special joint Yamaha/Steinberg Studio Connections software.<br />
For more details, including <strong>the</strong> latest information and software downloads, refer to <strong>the</strong> following URL.<br />
http://www.yamahasynth.<strong>com</strong>/download/<br />
What you can do by using Cubase 4<br />
toge<strong>the</strong>r with <strong>the</strong> MOTIF <strong>XS</strong><br />
IMPORTANT<br />
To use <strong>the</strong> following features and operations, you’ll first need to<br />
install <strong>the</strong> AI driver and Extensions for Steinberg DAW.<br />
Automatic setting of <strong>the</strong> IEEE1394<br />
connection<br />
When using a hardware syn<strong>the</strong>sizer such as <strong>the</strong> MOTIF <strong>XS</strong><br />
with <strong>com</strong>puter software, a variety of settings—such as<br />
audio connection, driver setup and port setup—must be<br />
made. Those <strong>com</strong>plicated settings will be made<br />
automatically for you as soon as you connect <strong>the</strong> MOTIF <strong>XS</strong><br />
to a <strong>com</strong>puter via an IEEE1394 cable.<br />
Indicating <strong>the</strong> Audio/MIDI port<br />
including <strong>the</strong> model name when<br />
connecting via an IEEE1394 cable<br />
The Device Setup window of <strong>the</strong> Cubase indicates <strong>the</strong><br />
Audio Port or MIDI Port including <strong>the</strong> model name such as<br />
“MOTIF <strong>XS</strong> Main L” and “MOTIF <strong>XS</strong> MIDI IN,” making it<br />
easy to confirm <strong>the</strong> current connection or change <strong>the</strong><br />
connection. For details, see <strong>the</strong> illustration below.<br />
Using <strong>the</strong> Project Template for multichannel<br />
audio recording via an<br />
IEEE1394 cable<br />
When creating a new project file within Cubase, you can<br />
select <strong>the</strong> template for multi-channel audio recording using<br />
<strong>the</strong> MOTIF <strong>XS</strong>. By selecting a template, you can easily<br />
perform <strong>the</strong> recording in Cubase without having to make<br />
<strong>com</strong>plicated or detailed settings.<br />
For details refer to <strong>the</strong> following page:<br />
http://www.yamahasynth.<strong>com</strong>/<br />
MOTIF <strong>XS</strong> Owner’s <strong>Manual</strong> 49<br />
Connecting to<br />
a Computer
Connecting to<br />
a Computer<br />
50<br />
Integration Between Yamaha Editors and Cubase<br />
Studio Connections<br />
What is Studio Connections?<br />
Studio Connections is a sophisticated<br />
software/hardware solution that lets<br />
you seamlessly integrate hardware<br />
syn<strong>the</strong>sizers such as MOTIF <strong>XS</strong> and<br />
MO into your <strong>com</strong>puter music system. If you are using<br />
sequencer software that is <strong>com</strong>patible with Studio<br />
Connections (such as Cubase 4) and <strong>the</strong> MOTIF <strong>XS</strong> Editor,<br />
you can use <strong>the</strong> MOTIF <strong>XS</strong> within your sequencer, just as if<br />
it were a plug-in software syn<strong>the</strong>sizer—without <strong>the</strong> need for<br />
any <strong>com</strong>plicated connections or <strong>com</strong>plex setup<br />
procedures.<br />
Fur<strong>the</strong>rmore, you can save all MOTIF <strong>XS</strong> settings along<br />
with <strong>the</strong> project (song) file of <strong>the</strong> sequencer. Then, when<br />
you open <strong>the</strong> project again, all your MOTIF <strong>XS</strong> settings for<br />
<strong>the</strong> song are instantly recalled. This eliminates <strong>the</strong><br />
repetitive work of recreating all your hardware settings<br />
when you reopen a song file.<br />
For details about Studio Connections, visit our web site at:<br />
http://www.studioconnections.org/<br />
Tools <strong>com</strong>patible with Studio Connections<br />
Studio Manager<br />
Studio Manager V2 is a cross-platform application that<br />
enables you to start multiple Editors that control Yamaha<br />
hardware products remotely, and to save multiple Editor<br />
settings. You can run Studio Manager as a stand-alone<br />
application, or as a plug-in within DAW applications such<br />
as Cubase SX 3.0 or later. In ei<strong>the</strong>r case, <strong>the</strong> basic<br />
functionality is <strong>the</strong> same.<br />
Start Studio Manager<br />
as a plug-in within<br />
Cubase<br />
MOTIF <strong>XS</strong> Owner’s <strong>Manual</strong><br />
Start Studio<br />
Manager as a standalone<br />
application<br />
MOTIF <strong>XS</strong> Editor MOTIF-RACK ES Editor<br />
MOTIF <strong>XS</strong> Editor<br />
What is MOTIF <strong>XS</strong> Editor?<br />
The MOTIF <strong>XS</strong> Editor lets you edit <strong>the</strong> Mixing setup and<br />
Mixing Voice in <strong>the</strong> Song/Pattern mode of <strong>the</strong> MOTIF <strong>XS</strong> from<br />
your <strong>com</strong>puter, giving you even greater editing convenience.<br />
The data created on <strong>the</strong> MOTIF <strong>XS</strong> Editor is transferred<br />
between <strong>the</strong> <strong>com</strong>puter and <strong>the</strong> MOTIF <strong>XS</strong> via a USB or<br />
IEEE1394 cable as bulk data. You can load files created on<br />
<strong>the</strong> MOTIF <strong>XS</strong> Editor to <strong>the</strong> MOTIF <strong>XS</strong> in <strong>the</strong> File mode via <strong>the</strong><br />
LAN connection or by using a USB storage device.<br />
Fur<strong>the</strong>rmore, <strong>the</strong> data edited on <strong>the</strong> MOTIF <strong>XS</strong> is always<br />
synchronized with <strong>the</strong> data on <strong>the</strong> <strong>com</strong>puter (MOTIF <strong>XS</strong><br />
Editor) and vice versa. This provides a smooth, seamless<br />
interface, and makes it very easy to create and edit your<br />
data.<br />
Bulk transmission/reception<br />
Parameter transmission/reception<br />
Using <strong>the</strong> MOTIF <strong>XS</strong> Editor<br />
MOTIF <strong>XS</strong><br />
1. Using as a stand alone editor.<br />
The MOTIF <strong>XS</strong> Editor is a client application using Studio<br />
Manager as host. To use <strong>the</strong> MOTIF <strong>XS</strong> Editor, start Studio<br />
Manager <strong>the</strong>n start <strong>the</strong> MOTIF <strong>XS</strong> Editor as a plug-in<br />
software within <strong>the</strong> Studio Manager.<br />
2. Using within Cubase<br />
To use <strong>the</strong> MOTIF <strong>XS</strong> Editor within Cubase, you’ll need<br />
register Studio Manager to Cubase. Installing Studio<br />
Manager automatically registers it to Cubase. After<br />
registering, start <strong>the</strong> MOTIF <strong>XS</strong> Editor as a plug-in of <strong>the</strong><br />
Studio Manager.<br />
n For Macintosh <strong>com</strong>puters, <strong>the</strong> MOTIF <strong>XS</strong> Editor can be used<br />
with Cubase 4 or later.<br />
The Studio Manager and MOTIF <strong>XS</strong> Editor can be<br />
downloaded from <strong>the</strong> following URL:<br />
http://www.yamahasynth.<strong>com</strong>/download/<br />
For instructions on using <strong>the</strong> Studio Manager and MOTIF<br />
<strong>XS</strong> Editor, refer to <strong>the</strong> respective PDF manuals included<br />
with <strong>the</strong> software.
Controlling a DAW on Your Computer from <strong>the</strong> MOTIF <strong>XS</strong><br />
The MOTIF <strong>XS</strong> features a highly convenient Remote Control mode which lets you control <strong>the</strong> DAW software on your <strong>com</strong>puter<br />
<strong>the</strong> MOTIF <strong>XS</strong> panel (when <strong>the</strong> instrument is connected to <strong>the</strong> <strong>com</strong>puter via USB). For example, you can start/stop playback<br />
of <strong>the</strong> DAW software on <strong>the</strong> <strong>com</strong>puter by using <strong>the</strong> SEQ TRANSPORT buttons and control <strong>the</strong> song position on <strong>the</strong> DAW<br />
software by using <strong>the</strong> data dial, [INC/YES] and [DEC/NO] buttons instead of using <strong>the</strong> mouse or keyboard of <strong>the</strong> <strong>com</strong>puter.<br />
The DAW applications Cubase, Logic, SONAR and Digital Performer can be controlled by <strong>the</strong> Remote Control mode of <strong>the</strong><br />
MOTIF <strong>XS</strong>.<br />
Remote Function<br />
The Remote Control lets you control <strong>the</strong> following<br />
operations.<br />
•You can use <strong>the</strong> sliders, knobs and buttons of <strong>the</strong> MOTIF<br />
<strong>XS</strong> to control <strong>the</strong> sequencer tracks and mixer channels of<br />
<strong>the</strong> DAW on <strong>the</strong> <strong>com</strong>puter.<br />
Display information Remote Control<br />
MOTIF <strong>XS</strong><br />
•You can view <strong>the</strong> parameter values on <strong>the</strong> LCD display of<br />
<strong>the</strong> MOTIF <strong>XS</strong> as well as on <strong>the</strong> <strong>com</strong>puter display, since<br />
<strong>the</strong> values of <strong>the</strong> controlled parameters are returned<br />
back to <strong>the</strong> MOTIF <strong>XS</strong> from <strong>the</strong> <strong>com</strong>puter.<br />
MOTIF <strong>XS</strong><br />
Parameter value<br />
Volume<br />
Computer<br />
DAW<br />
Remote Control<br />
Computer Software that can be<br />
controlled from <strong>the</strong> MOTIF <strong>XS</strong><br />
Windows Macintosh<br />
Cubase 4, Cubase Studio 4,<br />
Cubase AI 4<br />
Cubase 4, Cubase Studio 4,<br />
Cubase AI 4<br />
Sonar 5 Version 5.2 Logic Pro 7 Version 7.2.1<br />
Digital Performer 5.1<br />
Setting up for Remote Control<br />
Setting up on <strong>the</strong> MOTIF <strong>XS</strong><br />
1 Connect <strong>the</strong> MOTIF <strong>XS</strong> to <strong>the</strong> <strong>com</strong>puter via a<br />
USB or IEEE1394 cable (pages 43 and 44).<br />
2 Press <strong>the</strong> [UTILITY] button to enter <strong>the</strong> Utility<br />
mode <strong>the</strong>n press <strong>the</strong> [F6] button and <strong>the</strong> [SF1]<br />
button to call up <strong>the</strong> Remote Setting display<br />
(page 267).<br />
3 Set <strong>the</strong> DAW type to <strong>the</strong> desired DAW.<br />
4 Press <strong>the</strong> [STORE] button to store this setting.<br />
5 Start <strong>the</strong> DAW software on <strong>the</strong> <strong>com</strong>puter<br />
connected to <strong>the</strong> MOTIF <strong>XS</strong>.<br />
Setting up <strong>the</strong> DAW of <strong>the</strong> <strong>com</strong>puter<br />
This section explains how to set up after starting each<br />
application.<br />
n When <strong>the</strong> cable between <strong>the</strong> MOTIF <strong>XS</strong> and <strong>the</strong> Windows<br />
<strong>com</strong>puter is disconnected or <strong>the</strong> MOTIF <strong>XS</strong> is turned off<br />
accidentally, <strong>the</strong> DAW will not recognize <strong>the</strong> MOTIF <strong>XS</strong> again<br />
even if you connect <strong>the</strong> cable again or turn <strong>the</strong> MOTIF <strong>XS</strong> on. If<br />
this occurs, exit <strong>the</strong> DAW software, <strong>the</strong>n restart it after setting<br />
up <strong>the</strong> MOTIF <strong>XS</strong> and making sure <strong>the</strong> connection is secure.<br />
MOTIF <strong>XS</strong> Owner’s <strong>Manual</strong> 51<br />
Connecting to<br />
a Computer
Connecting to<br />
a Computer<br />
52<br />
Controlling a DAW on Your Computer from <strong>the</strong> MOTIF <strong>XS</strong><br />
Cubase<br />
1 Pull down <strong>the</strong> [Devices] menu and select [Device<br />
Setup] to call up <strong>the</strong> “Device Setup” window.<br />
2 Click <strong>the</strong> [+] button and add <strong>the</strong> “Mackie Control” or<br />
“Yamaha MOTIF <strong>XS</strong>.”<br />
3 Select <strong>the</strong> device of “Mackie Control” or “Yamaha<br />
MOTIF <strong>XS</strong>” added to <strong>the</strong> list.<br />
4 Set <strong>the</strong> MIDI Input Port to “Yamaha MOTIF <strong>XS</strong>6(7, 8)-2”<br />
or “YAMAHA MOTIF <strong>XS</strong>6(7, 8) Port2” or “mLAN MIDI In<br />
(2)” or “MOTIF <strong>XS</strong> Remote,” <strong>the</strong>n set <strong>the</strong> MIDI Output<br />
Port to “Yamaha MOTIF <strong>XS</strong>6 (7, 8)-2” or “YAMAHA<br />
MOTIF <strong>XS</strong>6(7, 8) Port2” or “mLAN MIDI Out (2)” or<br />
“MOTIF <strong>XS</strong> Remote.”<br />
n Unlike with <strong>the</strong> Mackie Control, <strong>the</strong> MOTIF <strong>XS</strong> does not<br />
support UserA and UserB (FootSw).<br />
n When connecting <strong>the</strong> MOTIF <strong>XS</strong> to a <strong>com</strong>puter via an<br />
IEEE1394 cable, starting Cubase (with <strong>the</strong> Extension Module<br />
installed) executes <strong>the</strong> above settings automatically. The<br />
Extension Module can be downloaded from <strong>the</strong> following URL:<br />
http://www.yamahasynth.<strong>com</strong>/download/<br />
* Mackie Control is <strong>the</strong> trademark of Mackie Designs, Inc.<br />
SONAR<br />
1 Pull down <strong>the</strong> [Options] menu and select [MIDI<br />
Devices] to call up <strong>the</strong> “MIDI Devices” window.<br />
2 Add “Yamaha MOTIF <strong>XS</strong>6(7, 8)-2” or “mLAN MIDI In<br />
(2)” to <strong>the</strong> Input Device, <strong>the</strong>n add “Yamaha MOTIF<br />
<strong>XS</strong>6(7, 8)-2” or “mLAN MIDI Out (2)” to <strong>the</strong> Output<br />
Device.<br />
3 Pull down <strong>the</strong> [Options] menu and select [Control<br />
Surfaces] to call up <strong>the</strong> Control Surface window.<br />
4 Click <strong>the</strong> [+] button, select “Mackie Control,” <strong>the</strong>n set<br />
<strong>the</strong> Input Port to “Yamaha MOTIF <strong>XS</strong>6(7, 8)-2” or “mLAN<br />
MIDI In (2)” and set <strong>the</strong> Output Port to “Yamaha MOTIF<br />
<strong>XS</strong>6(7, 8)-2” or “mLAN MIDI Out (2).”<br />
Digital Performer<br />
1 In <strong>the</strong> Audio/MIDI setup of a Macintosh <strong>com</strong>puter,<br />
connect Port 2 of <strong>the</strong> interface to Port 2 of <strong>the</strong> tone<br />
generator. When <strong>the</strong>re is only one Port for <strong>the</strong> tone<br />
generator, add <strong>the</strong> new Port, <strong>the</strong>n connect it to <strong>the</strong><br />
interface.<br />
2 Pull down <strong>the</strong> [Setup] menu and select [Control<br />
Surfaces] to call up <strong>the</strong> Control Surface window.<br />
3 Click <strong>the</strong> [+] button.<br />
4 Select “Mackie Control” in <strong>the</strong> Driver section.<br />
5 In <strong>the</strong> box for setting “Unit” and “MIDI,” select “Mackie<br />
Control” in <strong>the</strong> “Unit” section and select “MOTIF <strong>XS</strong><br />
New Port 2” in <strong>the</strong> “MIDI” section.<br />
MOTIF <strong>XS</strong> Owner’s <strong>Manual</strong><br />
Logic<br />
1 Set <strong>the</strong> software to be controlled to “Logic” in <strong>the</strong> Utility<br />
mode, <strong>the</strong>n press <strong>the</strong> [REMOTE ON/OFF] button so that<br />
its lamp lights to enter <strong>the</strong> Remote Control mode.<br />
2 Start Logic on <strong>the</strong> <strong>com</strong>puter.<br />
Logic automatically recognizes <strong>the</strong> MOTIF <strong>XS</strong> as Logic<br />
Control and performs <strong>the</strong> required settings.<br />
3 Set both <strong>the</strong> Input Port and <strong>the</strong> Output Port to “Yamaha<br />
MOTIF <strong>XS</strong>6 (7, 8) Port 2.”<br />
Remote Control mode<br />
To enter <strong>the</strong> Remote Control mode, press <strong>the</strong> REMOTE<br />
[ON/OFF] button (<strong>the</strong> lamp flashes). The REMOTE display<br />
appears (like those shown below), and <strong>the</strong> panel controls<br />
(such as buttons, knobs, sliders, and data dial) are<br />
enabled for Remote operation of <strong>the</strong> <strong>com</strong>puter software<br />
(<strong>the</strong>ir normal functions are disabled). Press this button<br />
again to exit from <strong>the</strong> Remote Control mode.<br />
5<br />
1 Knob Functions/Values<br />
Indicates <strong>the</strong> function assigned to <strong>the</strong> knob and <strong>the</strong> current<br />
value. When <strong>the</strong> same function is assigned to all eight<br />
knobs, <strong>the</strong> function is indicated only at <strong>the</strong> column of knob<br />
1. The knob function can be specified by pressing one of<br />
<strong>the</strong> [F1] – [F5] and [SF1] – [SF4] buttons after selecting a<br />
page in <strong>the</strong> Page Select (5) menu. For details about <strong>the</strong><br />
functions of <strong>the</strong> knobs for each DAW software, refer to <strong>the</strong><br />
Remote Control Function List in <strong>the</strong> Data List 2 (PDF<br />
documentation) which can be downloaded from <strong>the</strong> online<br />
Yamaha <strong>Manual</strong> Library. Visit <strong>the</strong> following URL, enter<br />
“MOTIF <strong>XS</strong>” in <strong>the</strong> Model Name box, <strong>the</strong>n click “Search.” In<br />
<strong>the</strong> results. you can find “Data List 2” for <strong>the</strong> MOTIF <strong>XS</strong>.<br />
Yamaha <strong>Manual</strong> Library URL:<br />
http://www.yamaha.co.jp/manual/<br />
2 Channel number<br />
Indicates <strong>the</strong> channel number. The background of <strong>the</strong><br />
selected channel number turns black. The channel number<br />
can be changed by using <strong>the</strong> [F4] E Bank and [F5] Bank<br />
F buttons.<br />
3 LEVEL METER<br />
1<br />
2<br />
3<br />
Indicates <strong>the</strong> volume level of playback for each channel in<br />
real time.<br />
4
4 Dial Function<br />
Indicates <strong>the</strong> function assigned to <strong>the</strong> data dial. The circle<br />
is shown at left of <strong>the</strong> active function. You can change <strong>the</strong><br />
dial function by pressing <strong>the</strong> [SF4] button only when “Dial”<br />
is shown on <strong>the</strong> tab corresponding to <strong>the</strong> [SF4] button.<br />
When no channel is selected on <strong>the</strong> display, <strong>the</strong> song<br />
location function is assigned to <strong>the</strong> data dial, regardless of<br />
<strong>the</strong> [SF4] tab indication, even if <strong>the</strong> edit parameter is set<br />
here. Controlling any knob changes <strong>the</strong> function of <strong>the</strong> data<br />
dial automatically to <strong>the</strong> edit parameter, allowing you to edit<br />
<strong>the</strong> channel parameter of <strong>the</strong> knob.<br />
Settings: Song Location, Edit Parameter<br />
Song Location<br />
Moves <strong>the</strong> current location of song playback.<br />
Edit Parameter<br />
Changes <strong>the</strong> value of <strong>the</strong> current parameter.<br />
5 Page Select<br />
Determines <strong>the</strong> functions assigned to <strong>the</strong> [F1] – [F5] and<br />
[SF1] – [SF5] buttons by selecting a page. The circle is<br />
shown at left of <strong>the</strong> selected page. Use <strong>the</strong> [SELECTED<br />
PART CONTROL] and [MULTI PART CONTROL] button to<br />
select <strong>the</strong> desired page, with <strong>the</strong> result that <strong>the</strong> functions<br />
assigned to <strong>the</strong> [F1] – [F5] and [SF1] – [SF5] buttons are<br />
changed. The page structure differs depending on <strong>the</strong><br />
DAW software on your <strong>com</strong>puter. For details, refer to <strong>the</strong><br />
Remote Control Function List in <strong>the</strong> Data List 2 (PDF)<br />
documentation which can be downloaded from <strong>the</strong> online<br />
Yamaha <strong>Manual</strong> Library. Visit <strong>the</strong> following URL, enter<br />
“MOTIF <strong>XS</strong>” in <strong>the</strong> Model Name box, <strong>the</strong>n click “Search.” In<br />
<strong>the</strong> results, you can find “Data List 2” for <strong>the</strong> MOTIF <strong>XS</strong>.<br />
Yamaha <strong>Manual</strong> Library URL:<br />
http://www.yamaha.co.jp/manual/<br />
[SF5] Page List<br />
Pressing this button calls up <strong>the</strong> Page List display. The<br />
Page List display indicates five sets of functions assigned<br />
to <strong>the</strong> [F1] – [F5] and [SF1] – [SF5] buttons toge<strong>the</strong>r. The<br />
active function set of five sets is highlighted. Also from this<br />
display, use <strong>the</strong> [SELECTED PART CONTROL] and [MULTI<br />
PART CONTROL] button to change <strong>the</strong> function set.<br />
Controlling a DAW on Your Computer from <strong>the</strong> MOTIF <strong>XS</strong><br />
[SF6] INFO (Information)<br />
Pressing this button calls up <strong>the</strong> Information window about<br />
<strong>the</strong> Remote Control function. From <strong>the</strong> Information window,<br />
any panel operation (pressing a button, turning a knob,<br />
controlling a slider) indicates <strong>the</strong> following three types of<br />
information about <strong>the</strong> operated controller (button, knob or<br />
slider). To close this window, press <strong>the</strong> [SF6] INFO button<br />
again.<br />
Panel Button<br />
Indicates <strong>the</strong> controller name on <strong>the</strong> panel.<br />
Function<br />
Indicates <strong>the</strong> function of <strong>the</strong> operated controller.<br />
LED<br />
Indicates <strong>the</strong> function of <strong>the</strong> lamp for <strong>the</strong> operated controller.<br />
n No description here indicates that <strong>the</strong> lamp for <strong>the</strong><br />
operated controller has no function or <strong>the</strong> operated<br />
controller has no lamp.<br />
n If <strong>com</strong>munication between <strong>the</strong> DAW on <strong>the</strong> <strong>com</strong>puter and<br />
<strong>the</strong> MOTIF <strong>XS</strong> has not been achieved, pressing <strong>the</strong><br />
[REMOTE ON/OFF] button calls up <strong>the</strong> display indicating<br />
“Computer DAW Software Control Mode” as shown below.<br />
If this happens, restart <strong>the</strong> DAW application software. If<br />
doing this does not achieve <strong>com</strong>munication, press <strong>the</strong><br />
[REMOTE ON/OFF] button again to exit from <strong>the</strong> Remote<br />
Control mode, <strong>the</strong>n try setting up for Remote Control<br />
(page 51) again.<br />
For details about <strong>the</strong> Remote Control functions, refer to<br />
<strong>the</strong> PDF documentation by visiting <strong>the</strong> following URL.<br />
Yamaha <strong>Manual</strong> Library URL:<br />
http://www.yamaha.co.jp/manual/<br />
Visit <strong>the</strong> above URL, enter “MOTIF <strong>XS</strong>” in <strong>the</strong> Model<br />
Name box, <strong>the</strong>n click “Search.” In <strong>the</strong> results, you can<br />
find “Data List 2” for <strong>the</strong> MOTIF <strong>XS</strong>.<br />
MOTIF <strong>XS</strong> Owner’s <strong>Manual</strong> 53<br />
Connecting to<br />
a Computer
Basic Section<br />
Basic Structure Basic Operation Connections<br />
54<br />
Basic Section<br />
Mode Structure<br />
MOTIF <strong>XS</strong> Owner’s <strong>Manual</strong><br />
Basic Structure<br />
In order to make operation of <strong>the</strong> MOTIF <strong>XS</strong> as smooth as possible, all functions and operations have been grouped in<br />
“modes,” many of which also have a number of “sub modes.”<br />
The MOTIF <strong>XS</strong> provides nine main modes which are divided into several sub modes. For details, see <strong>the</strong> mode table below.<br />
Mode table<br />
Mode Sub Mode Function How to enter <strong>the</strong> mode Page<br />
Voice mode Voice Play mode Playing a Voice [VOICE] 88<br />
Voice Edit mode Editing/Creating a Voice [VOICE] → [EDIT] 96<br />
Voice Job Initializing a Voice, etc. [VOICE] → [JOB] 133<br />
Voice Store mode Storing a Voice to internal memory [VOICE] → [STORE] 97<br />
Performance Performance Play mode Playing a Performance [PERFORM] 135<br />
mode<br />
Performance Edit mode Editing/Creating a Performance [PERFORM] → [EDIT] 141<br />
Performance Job mode Initializing a Performance, etc. [PERFORM] → [JOB] 159<br />
Performance Store mode Storing a Performance to internal memory [PERFORM] → [STORE] 142<br />
Song mode Song Play mode Playing a Song [SONG] 178<br />
Song Record mode Recording a Song [SONG] → [I] (Record) 186<br />
Song Edit mode Editing <strong>the</strong> MIDI events of a Song [SONG] → [EDIT] 192<br />
Song Job mode Converting and transforming Song data [SONG] → [JOB] 195<br />
Song Store mode Storing a Song to internal memory [SONG] → [STORE] 186<br />
Pattern mode Pattern Play mode Playing a Pattern [PATTERN] 208<br />
Pattern Record mode Recording a Pattern [PATTERN] → [I] (Record) 218<br />
Pattern Edit mode Editing <strong>the</strong> MIDI events of a Pattern [PATTERN] → [EDIT] 220<br />
Pattern Job mode Converting and transforming Pattern data [PATTERN] → [JOB] 222<br />
Pattern Store mode Storing a Pattern to internal memory [PATTERN] → [STORE] 218<br />
Mixing mode Mixing Play mode Setting multi-timbral tone generator<br />
settings for Song/Pattern playback<br />
[SONG]/[PATTERN] → [MIXING] 231<br />
Mixing Edit mode Editing a Mixing program [SONG]/[PATTERN] → [MIXING] → [EDIT] 233<br />
Mixing Job mode Initializing a Mixing, etc. [SONG]/[PATTERN] → [MIXING] → [JOB] 236<br />
Mixing Store mode Storing a Mixing to internal memory [SONG]/[PATTERN] → [MIXING] → [STORE] 233<br />
Mixing Voice Edit mode Editing a Mixing Voice [SONG]/[PATTERN] → [MIXING] → [F6] Vce Edit 239<br />
Mixing Voice Job mode Initializing a Mixing Voice, etc. [SONG]/[PATTERN] → [MIXING] → [F6] Vce Edit<br />
→ [JOB]<br />
240<br />
Mixing Voice Store mode Storing a Mixing Voice to internal memory [SONG]/[PATTERN] → [MIXING] → [F6] Vce Edit<br />
→ [STORE]<br />
240<br />
Sampling Sampling Record mode Recording audio signals to create a Voice/ [VOICE]/[PERFORM] → [INTEGRATED<br />
161<br />
mode<br />
Performance<br />
SAMPLING]<br />
Sampling Record mode Recording audio signals to a Song/Pattern [SONG]/[PATTERN] → [INTEGRATED<br />
SAMPLING]<br />
242<br />
Sampling Edit mode Editing a sample [INTEGRATED SAMPLING] → [EDIT] 167<br />
Sampling Job mode Converting and transforming Sample data [INTEGRATED SAMPLING] → [JOB] 171<br />
Utility mode Utility mode Setting System related parameters [UTILITY] 259<br />
Utility Job mode Resetting <strong>the</strong> User Memory to <strong>the</strong> Initial<br />
Factory Settings<br />
[UTILITY] → [JOB] 269<br />
Sequencer Setup Setting sequencer (Song/Pattern) related<br />
parameters<br />
[SONG]/[PATTERN] → [SEQ SETUP] 269<br />
Master mode Master Play mode Playing a Master [MASTER] 251<br />
Master Edit mode Editing/Creating a Master [MASTER] → [EDIT] 253<br />
Master Job mode Initializing a Master, etc. [MASTER] → [JOB] 257<br />
Master Store mode Storing a Master to internal memory [MASTER] → [STORE] 254<br />
File mode File mode Managing Files and Folders (Directories) [FILE] 272<br />
n In addition to <strong>the</strong> modes above, <strong>the</strong> MOTIF <strong>XS</strong> features <strong>the</strong> Remote Control mode. In this mode, you can control <strong>the</strong> DAW software on your<br />
<strong>com</strong>puter from <strong>the</strong> panel operations of <strong>the</strong> MOTIF <strong>XS</strong> connected to <strong>the</strong> <strong>com</strong>puter via USB. For details, see page 51.
Basic Structure<br />
Selecting Modes<br />
Mode and sub mode selection is ac<strong>com</strong>plished by using <strong>the</strong> corresponding mode buttons. For details, see <strong>the</strong> Mode table<br />
above. To return back from <strong>the</strong> sub mode to <strong>the</strong> “parent” mode, press <strong>the</strong> [EXIT] button.<br />
[EXIT] button<br />
DEC/NO INC/YES<br />
The Seven Functional Blocks<br />
EXIT<br />
SEQUENCER<br />
SONG PATTERN<br />
FILE UTILITY<br />
The MOTIF <strong>XS</strong> system consists of 7 main functional blocks: Tone Generator, Sampling, Audio Input, Sequencer, Arpeggio,<br />
Controller, and Effect.<br />
Controller block (page 67)<br />
Keyboard<br />
Controllers<br />
Sequencer block (page 59)<br />
16 track MIDI Sequencer<br />
Songs and Patterns<br />
Song Mixing<br />
Pattern Mixing<br />
ENTER<br />
EXECUTE<br />
Sampling block (page 67)<br />
Samples, Waveforms<br />
COMPARE<br />
MODE<br />
VOICE PERFORM MASTER<br />
INTEGRATED<br />
SAMPLING<br />
MULTI PART<br />
MIXING<br />
Arpeggio block (page 62)<br />
Arpeggio Playback x 4<br />
Preset Arpeggio<br />
User Arpeggio<br />
Tone Generator<br />
block (page 56)<br />
AWM2 Tone Generator<br />
16 Parts<br />
Voices and Performances<br />
SEQ<br />
SETUP<br />
EDIT JOB STORE<br />
MIDI OUT MIDI IN USB TO HOST<br />
A/D INPUT<br />
External MIDI device Computer Microphone, guitar,<br />
audio equipment, etc.<br />
SCENE STORE<br />
SET LOCATE<br />
mLAN<br />
(mLAN16E2)<br />
MODE buttons<br />
Effect block (page 68)<br />
System Effects<br />
Insertion Effect x 8<br />
Element EQ<br />
Part EQ x 16<br />
Master Effect<br />
Master EQ<br />
Audio Input block (page 59)<br />
A/D Input, mLAN<br />
Computer with<br />
IEEE1394<br />
connector(s)<br />
MIDI messages flow<br />
Audio signal flow<br />
OUTPUT/<br />
ASSIGNABLE OUTPUT<br />
Powered speakers, etc.<br />
MOTIF <strong>XS</strong> Owner’s <strong>Manual</strong><br />
Basic Structure<br />
Basic Operation<br />
Connections<br />
55<br />
Basic Section
Basic Section<br />
56<br />
Basic Structure<br />
Basic Structure Basic Operation Connections<br />
Tone Generator Block<br />
The tone generator block is what actually produces sound in response to <strong>the</strong> MIDI messages received from <strong>the</strong> Sequencer<br />
block, <strong>the</strong> Controller block, <strong>the</strong> Arpeggio block and from <strong>the</strong> external MIDI instrument via <strong>the</strong> MIDI IN connector or <strong>the</strong> USB<br />
connector. The structure of <strong>the</strong> tone generator block differs depending on <strong>the</strong> mode.<br />
Tone Generator block in <strong>the</strong> Voice<br />
Mode<br />
Part structure in <strong>the</strong> Voice mode<br />
In this mode, <strong>the</strong> tone generator block receives MIDI data<br />
over a single channel. This status is referred to as a “single<br />
timbre” tone generator. A Voice is played from <strong>the</strong><br />
keyboard, using a single part.<br />
Keep in mind that song data on an external sequencer<br />
consisting of multiple MIDI channels will not play back<br />
properly in this mode. If you are using an external MIDI<br />
sequencer or <strong>com</strong>puter to play <strong>the</strong> instrument, make sure<br />
to use <strong>the</strong> Song mode or Pattern mode.<br />
Voice<br />
A program that contains <strong>the</strong> sonic elements for generating<br />
a specific musical instrument sound is referred to as a<br />
“Voice.” Internally, <strong>the</strong>re are two Voice Types: Normal<br />
Voices and Drum Voices. Normal Voices are mainly pitched<br />
musical instrument type sounds that can be played over<br />
<strong>the</strong> range of <strong>the</strong> keyboard. Drum Voices are mainly<br />
percussion/drum sounds that are assigned to individual<br />
notes on <strong>the</strong> keyboard.<br />
n For instructions on editing a Normal Voice, see page 96. For<br />
instructions on editing a Drum Voice, see page 127.<br />
Normal Voices & Drum Voices<br />
Normal Voice<br />
This is a Voice which is played conventionally from <strong>the</strong><br />
keyboard, with standard pitches sounding for each key. A<br />
Normal Voice consists of up to eight Elements. Depending<br />
on <strong>the</strong> settings in <strong>the</strong> Voice Edit mode, <strong>the</strong>se Elements are<br />
sounded simultaneously, or <strong>the</strong> different Elements are<br />
sounded according to <strong>the</strong> note range, velocity range and<br />
<strong>the</strong> XA (Expanded Articulation) settings.<br />
The illustration below is an example of a Normal Voice.<br />
Since <strong>the</strong> six Elements here are distributed across both <strong>the</strong><br />
note range of <strong>the</strong> keyboard and <strong>the</strong> velocity range, a<br />
different Element sounds depending on which note you<br />
play and how strongly you play it. In <strong>the</strong> note distribution,<br />
Elements 1 and 2 sound in <strong>the</strong> lower range of <strong>the</strong><br />
keyboard, Elements 3 and 4 sound in <strong>the</strong> middle range,<br />
and Elements 5 and 6 sound in <strong>the</strong> higher range. In <strong>the</strong><br />
velocity distribution, Elements 1, 3 and 5 sound when<br />
MOTIF <strong>XS</strong> Owner’s <strong>Manual</strong><br />
playing <strong>the</strong> keyboard softly, while Elements 2, 4 and 6<br />
sound when playing it strongly. In a practical example of<br />
this in use, a piano Voice could be <strong>com</strong>posed of six<br />
different samples. Elements 1, 3 and 5 would be <strong>the</strong><br />
sounds of <strong>the</strong> piano played softly, over <strong>the</strong> respective note<br />
ranges, while Elements 2, 4 and 6 would be strongly<br />
played sounds, for each respective note range. Actually,<br />
<strong>the</strong> MOTIF <strong>XS</strong> is even more flexible than this, since it allows<br />
up to eight independent Elements.<br />
Velocity<br />
Drum Voice<br />
Drum Voices are mainly percussion/drum sounds that are<br />
assigned to individual notes on <strong>the</strong> keyboard. A collection<br />
of assigned percussion/drum waves or Normal Voices is<br />
known as a Drum Kit.<br />
Individual<br />
drum sounds<br />
(different for<br />
each key)<br />
Element 2<br />
Element 1<br />
Element 4<br />
Element 3<br />
Element 6<br />
Element 5<br />
C0 C1 C6<br />
Key 1 Key 5 Key 10 Key 18 Key 21 Key 73<br />
Expanded Articulation (XA)<br />
Expanded Articulation (XA) is a specially designed tone<br />
generation system of <strong>the</strong> MOTIF <strong>XS</strong> that provides greater<br />
performance flexibility and acoustic realism. It allows you<br />
to more effectively recreate realistic sound and natural<br />
performance techniques—such as legato and staccato—<br />
and provides o<strong>the</strong>r unique modes for random and alternate<br />
sound changes as you play.<br />
Realistic legato performance<br />
Conventional syn<strong>the</strong>sizers recreate a legato effect by<br />
continuing <strong>the</strong> volume envelope of a previous note on to<br />
<strong>the</strong> next one, in <strong>the</strong> mono mode. However, this results in an<br />
unnatural sound different from that of an actual acoustic<br />
instrument. The MOTIF <strong>XS</strong> more accurately reproduces a<br />
legato effect by allowing specific Elements to be sounded<br />
when playing legato and o<strong>the</strong>r Elements to be played
normally (with <strong>the</strong> XA Control parameter settings “normal”<br />
and “legato”).<br />
Au<strong>the</strong>ntic note release sound<br />
Conventional syn<strong>the</strong>sizers are not good at realizing <strong>the</strong><br />
sound produced when <strong>the</strong> note of <strong>the</strong> acoustic instrument<br />
is released. The MOTIF <strong>XS</strong> realizes <strong>the</strong> sound produced<br />
when <strong>the</strong> note of <strong>the</strong> acoustic instrument is released, by<br />
setting <strong>the</strong> XA Control parameter of a certain Element to<br />
“key off sound.”<br />
Subtle sound variations for each note played<br />
Conventional syn<strong>the</strong>sizers attempt to reproduce this by<br />
randomly changing <strong>the</strong> pitch and/or filter. However, this<br />
produces an electronic effect and is different from <strong>the</strong> real<br />
sound changes on an acoustic instrument. The MOTIF <strong>XS</strong><br />
more accurately reproduces <strong>the</strong>se subtle sound variations<br />
by using <strong>the</strong> XA Control parameter settings, “wave cycle”<br />
and “wave random.”<br />
Switching among different sounds to<br />
recreate <strong>the</strong> natural performance on an<br />
acoustic instrument<br />
Acoustic instruments have <strong>the</strong>ir own unique<br />
characteristics—even specific, unique sounds that are<br />
produced only at certain times in a performance. These<br />
include <strong>the</strong> flutter tonguing on a flute or playing high<br />
harmonics on an acoustic guitar. The MOTIF <strong>XS</strong> recreates<br />
<strong>the</strong>se by allowing you to switch between <strong>the</strong> sounds while<br />
you play—using <strong>the</strong> ASSIGNABLE FUNCTION buttons and<br />
<strong>the</strong> XA Control parameter settings, “AF 1 on,” “AF 2 on”<br />
and “all AF off.”<br />
New sounds and new styles of playing<br />
The highly versatile functions above can be applied<br />
effectively not only to acoustic sounds but also to<br />
syn<strong>the</strong>sizer and electronic Voices as well. The XA feature<br />
opens up enormous potential for realizing au<strong>the</strong>ntic<br />
sounds, performing expressively and <strong>com</strong>ing up with<br />
creative new styles of playing.<br />
To create sounds such as those described above using<br />
Expanded Articulation, refer to page 113.<br />
Elements and Drum Keys<br />
Elements and Drum Keys are <strong>the</strong> smallest “building<br />
blocks” in <strong>the</strong> MOTIF <strong>XS</strong> that <strong>com</strong>prise a Voice; in fact, only<br />
one Element or one Drum Key could be used to create a<br />
Voice. These small sound units can be built, enhanced and<br />
processed by a variety of traditional syn<strong>the</strong>sizer<br />
parameters, such as Oscillator, Pitch Filter, Amplitude, and<br />
LFO (shown below).<br />
Basic Structure<br />
Oscillator<br />
This unit outputs <strong>the</strong> wave which determines <strong>the</strong> basic<br />
pitch. You can assign <strong>the</strong> waveform (or basic sound<br />
material) to each Element of a Normal Voice or each Key of<br />
a Drum Voice. In <strong>the</strong> case of a Normal Voice, you can set<br />
<strong>the</strong> note range for <strong>the</strong> Element (<strong>the</strong> range of notes on <strong>the</strong><br />
keyboard over which <strong>the</strong> Element will sound) as well as <strong>the</strong><br />
velocity response (<strong>the</strong> range of note velocities within which<br />
<strong>the</strong> Element will sound). In addition, <strong>the</strong> XA related<br />
parameters can be set in this unit.<br />
Oscillator related parameters can be set in <strong>the</strong> Oscillator<br />
display (pages 112 and 129).<br />
Pitch<br />
This unit controls <strong>the</strong> pitch of <strong>the</strong> sound (wave) output from<br />
<strong>the</strong> Oscillator. In <strong>the</strong> case of a Normal Voice, you can<br />
detune separate Elements, apply Pitch Scaling and so on.<br />
Also, by setting <strong>the</strong> PEG (Pitch Envelope Generator), you<br />
can control how <strong>the</strong> pitch changes over time.<br />
Pitch related parameters can be set in <strong>the</strong> Pitch display<br />
(page 114) and Pitch EG display (page 115) of <strong>the</strong> Voice<br />
Edit mode. Note that Pitch related parameters of a Drum<br />
Voice can be set in <strong>the</strong> Oscillator display.<br />
Filter<br />
OSC<br />
(Oscillator)<br />
Waveform<br />
(AWM2)<br />
PITCH<br />
Controls <strong>the</strong><br />
pitch of <strong>the</strong><br />
sound.<br />
Pitch EG<br />
(Pitch<br />
Envelope<br />
Generator)<br />
LFO<br />
Low Frequency<br />
Oscillator<br />
FILTER<br />
Changes <strong>the</strong><br />
tonal quality of<br />
<strong>the</strong> sound<br />
output from <strong>the</strong><br />
PITCH unit.<br />
Filter EG<br />
(Filter<br />
Envelope<br />
Generator)<br />
AMP<br />
Controls <strong>the</strong> output<br />
level (amplitude)<br />
of <strong>the</strong> sound<br />
output from <strong>the</strong><br />
FILTER unit. The<br />
signals are <strong>the</strong>n<br />
sent at this level to<br />
<strong>the</strong> Effect block.<br />
Amplitude EG<br />
(Amplitude<br />
Envelope<br />
Generator)<br />
This unit modifies <strong>the</strong> tone of <strong>the</strong> sound output from Pitch<br />
by cutting <strong>the</strong> output of a specific frequency portion of <strong>the</strong><br />
sound. Also, by setting <strong>the</strong> FEG (Filter Envelope<br />
Generator), you can control how <strong>the</strong> Cutoff Frequency of<br />
<strong>the</strong> Filter changes over time.<br />
Filter related parameters can be set in <strong>the</strong> Filter display<br />
(pages 117 and 131), Filter EG display (page 119) and<br />
Filter Scale display (page 121) of <strong>the</strong> Voice Edit mode.<br />
Amplitude<br />
This unit controls <strong>the</strong> output level (amplitude) of <strong>the</strong> sound<br />
output from <strong>the</strong> Filter block. The signals are <strong>the</strong>n sent at<br />
this level to <strong>the</strong> Effect block. Also, by setting <strong>the</strong> AEG<br />
(Amplitude Envelope Generator), you can control how <strong>the</strong><br />
volume changes over time.<br />
Basic Structure<br />
Basic Operation<br />
Connections<br />
MOTIF <strong>XS</strong> Owner’s <strong>Manual</strong> 57<br />
Basic Section
Basic Section<br />
58<br />
Basic Structure<br />
Basic Structure Basic Operation Connections<br />
Amplitude related parameters can be set in <strong>the</strong> Amplitude<br />
display (pages 122 and 131), Amplitude EG display<br />
(page 123) and Amplitude Scale display (page 124) of <strong>the</strong><br />
Voice Edit mode.<br />
LFO (Low Frequency Oscillator)<br />
As its name suggests, <strong>the</strong> LFO produces a wave of a low<br />
frequency. These waves can be used to vary <strong>the</strong> pitch,<br />
filter or amplitude of each Element to create effects such as<br />
vibrato, wah and tremolo. LFO can be set independently<br />
for each Element; it can also be set globally for all<br />
Elements.<br />
LFO related parameters can be set in <strong>the</strong> Common LFO<br />
display (page 105) and <strong>the</strong> Element LFO display<br />
(page 125) of <strong>the</strong> Voice Edit mode.<br />
Memory structure of Voice<br />
Normal Voice<br />
Preset Banks 1 – 8 1024 Normal Voices<br />
(128 Voices for each Bank)<br />
GM Bank 128 Voices<br />
User Banks 1 – 3 384 Normal Voices<br />
(128 Voices for each Bank)<br />
(Picked up from Preset Voices by default)<br />
Drum Voice<br />
Preset Drum Bank 32 Voices<br />
GM Drum Bank 1 Voice<br />
User Drum Bank 64 Voices<br />
(Picked up from Preset Voices by default)<br />
Tone Generator block in <strong>the</strong><br />
Performance Mode<br />
Part structure in <strong>the</strong> Performance mode<br />
In this mode, <strong>the</strong> tone generator block receives MIDI data<br />
over a single channel. This status is referred to as a “single<br />
timbre” tone generator. This mode lets you play a<br />
Performance (which multiple Voices (Parts) are<br />
<strong>com</strong>bined—in a layer, or in o<strong>the</strong>r configurations) using <strong>the</strong><br />
keyboard.<br />
Keep in mind that song data on an external sequencer<br />
consisting of multiple MIDI channels will not play back<br />
properly in this mode. If you are using an external MIDI<br />
sequencer or <strong>com</strong>puter to play <strong>the</strong> instrument, make sure<br />
to use <strong>the</strong> Song mode or Pattern mode.<br />
Performance<br />
A program in which multiple Voices (Parts) are <strong>com</strong>bined in<br />
a layer, or in o<strong>the</strong>r configurations is referred to as a<br />
MOTIF <strong>XS</strong> Owner’s <strong>Manual</strong><br />
“Performance.” Each Performance can contain up to four<br />
different Parts (Voices). Each Performance can be created<br />
by editing parameters unique to each part and parameters<br />
<strong>com</strong>mon to all <strong>the</strong> Parts.<br />
Memory structure of Performance<br />
Three User Banks are provided. Each Bank contains 128<br />
Performances. Accordingly, a total of 384 User<br />
Performances are provided. These 384 Performances are<br />
preprogrammed by default and can be changed in <strong>the</strong><br />
Performance mode.<br />
Tone Generator block in <strong>the</strong> Song<br />
mode/Pattern mode<br />
Part structure of <strong>the</strong> tone generator<br />
block in <strong>the</strong> Song mode/Pattern mode<br />
In <strong>the</strong>se modes, multiple Parts are provided and different<br />
Voices and different melodies or phrases can be played<br />
back for each Part. Because <strong>the</strong>se modes let you set <strong>the</strong><br />
MIDI channel for each part of <strong>the</strong> tone generator block, you<br />
can use an external MIDI sequencer as well as <strong>the</strong><br />
sequencer block of <strong>the</strong> instrument to play <strong>the</strong> sounds. The<br />
sequence data of each track plays <strong>the</strong> corresponding<br />
Parts (those having <strong>the</strong> same MIDI channel assignment) in<br />
<strong>the</strong> tone generator block.<br />
About Mixing<br />
A program in which multiple Voices are assigned to Parts<br />
for multi-timbral play in <strong>the</strong> Song and Pattern modes is<br />
referred to as a “Mixing.” Each Mixing can contain up to 16<br />
parts. Each Mixing can be created by editing parameters<br />
unique to each Part and parameters <strong>com</strong>mon to all <strong>the</strong><br />
Parts in <strong>the</strong> Mixing mode (page 233).<br />
Memory structure of Mixing<br />
A Mixing program is provided for each Song or Pattern.<br />
Selecting a different Song/Pattern calls up <strong>the</strong> different<br />
Mixing program.<br />
Song mode<br />
64 Mixing settings (one Mixing for each Song)<br />
Pattern mode<br />
64 Mixing settings (one Mixing for each Pattern)
Basic Structure<br />
Maximum Polyphony<br />
Maximum polyphony refers to <strong>the</strong> highest number of notes that can be sounded simultaneously from <strong>the</strong> internal tone<br />
generator of <strong>the</strong> instrument. The maximum polyphony of this syn<strong>the</strong>sizer is 128. When <strong>the</strong> internal tone generator block<br />
receives a number of notes exceeding <strong>the</strong> maximum polyphony, previously played notes are cut off. Keep in mind this may be<br />
especially noticeable with Voices not having decay. Fur<strong>the</strong>rmore, <strong>the</strong> maximum polyphony applies to <strong>the</strong> number of Voice<br />
Elements used, not <strong>the</strong> number of Voices. When Normal Voices that include up to eight Elements are used, <strong>the</strong> maximum<br />
number of simultaneous notes may be less than 128.<br />
Sampling Block<br />
The Sampling Block lets you bring your own recorded sounds—your voice, an instrument, rhythms, special sound effects,<br />
etc.—into <strong>the</strong> system of this syn<strong>the</strong>sizer, and play those sounds just like any o<strong>the</strong>r voices. These sounds, <strong>the</strong> audio data can<br />
be captured from <strong>the</strong> A/D Input and mLAN connector (MOTIF <strong>XS</strong>8, or MOTIF <strong>XS</strong> 6/7 with <strong>the</strong> mLAN16E2 installed) with up to<br />
16 bit and 44.1 kHz quality.<br />
Keep in mind that <strong>the</strong> data created by <strong>the</strong> Sampling operation differs depending on <strong>the</strong> mode from which you entered <strong>the</strong><br />
Sampling mode: Voice/Performance or Song/Pattern. See pages 161 and 242 respectively.<br />
Audio Input block<br />
This block handles <strong>the</strong> audio signal input from <strong>the</strong> A/D Input and <strong>the</strong> mLAN connector (MOTIF <strong>XS</strong>8, and MOTIF <strong>XS</strong> 6/7 with<br />
<strong>the</strong> optional mLAN16E2 installed). Various parameters such as volume, pan, and effect can be set for <strong>the</strong> audio signal and<br />
<strong>the</strong> sound is output toge<strong>the</strong>r with o<strong>the</strong>r Voices. The Insertion Effect as well as <strong>the</strong> System Effects can be applied to <strong>the</strong> audio<br />
signal input via <strong>the</strong> A/D INPUT connector.<br />
The Audio Input related parameters can be set in <strong>the</strong> following display.<br />
Mode Display Page<br />
Voice mode [F4] Voice Audio display in <strong>the</strong> Utility mode 265<br />
Performance mode [F4] Audio In display in <strong>the</strong> Performance Edit mode 147<br />
Song/Pattern mode [F4] Audio In display in <strong>the</strong> Mixing Edit mode 234<br />
The gain of <strong>the</strong> audio signal from <strong>the</strong> A/D INPUT connector can be adjusted via <strong>the</strong> Gain knob (page 18) on <strong>the</strong> rear panel.<br />
Sequencer Block<br />
This block lets you create Songs and Patterns by recording and editing your performances as MIDI data (from <strong>the</strong> controller<br />
block), <strong>the</strong>n playing it back with <strong>the</strong> tone generator block.<br />
Sequencer block in <strong>the</strong> Song mode<br />
What is a Song?<br />
A Song (page 33) is made by <strong>the</strong> MIDI sequence data<br />
created by recording your keyboard performance to each<br />
track. A Song on this syn<strong>the</strong>sizer is effectively <strong>the</strong> same as<br />
a Song on a MIDI sequencer, and playback automatically<br />
stops at <strong>the</strong> end of <strong>the</strong> recorded data.<br />
Song Track Structure<br />
A Song consists of 16 separate tracks, a Scene track, and<br />
a Tempo track.<br />
Sequence tracks 1 – 16<br />
Record your keyboard performance to <strong>the</strong>se tracks using<br />
Realtime recording (page 186) and edit <strong>the</strong> recorded data<br />
in <strong>the</strong> Song Edit mode (page 192).<br />
MOTIF <strong>XS</strong> Owner’s <strong>Manual</strong><br />
Basic Structure<br />
Basic Operation<br />
Connections<br />
59<br />
Basic Section
Basic Section<br />
60<br />
Basic Structure<br />
Basic Structure Basic Operation Connections<br />
Scene track<br />
This track lets you record Scene change settings, such as<br />
<strong>the</strong> status of track mute and solo. These can be set in <strong>the</strong><br />
Song Play display (page 178) and recalled during Song<br />
playback. During Song playback, <strong>the</strong> track mute and solo<br />
settings change automatically according to <strong>the</strong> settings<br />
you’ve recorded to <strong>the</strong> Scene track. You can record this<br />
track with using Realtime recording (page 186) and edit<br />
<strong>the</strong> recorded data in <strong>the</strong> Song Edit mode (page 192).<br />
Tempo track<br />
This track lets you record Tempo change settings. During<br />
Song playback, <strong>the</strong> Tempo changes automatically<br />
according to <strong>the</strong> settings you’ve recorded to this track. You<br />
can record this track with using Realtime recording<br />
(page 186) and edit <strong>the</strong> recorded data in <strong>the</strong> Song Edit<br />
mode (page 192).<br />
Song Chain<br />
This function allows Songs to be “chained” toge<strong>the</strong>r for<br />
automatic sequential playback. For instructions on using<br />
this, see page 185.<br />
Song 01 Song 22 Song 15<br />
Sequencer Block in <strong>the</strong> Pattern mode<br />
What is a Pattern?<br />
In <strong>the</strong> MOTIF <strong>XS</strong>, <strong>the</strong> term “Pattern” refers to a relatively<br />
short musical or rhythmic phrase—1 to 256 measures—<br />
which is used for looped playback. Therefore, once Pattern<br />
playback starts, it continues until you press <strong>the</strong> [J] (Stop)<br />
button.<br />
Section<br />
Patterns are more than just a single phrase—<strong>the</strong>y include<br />
16 variations called “Sections.” These Sections can be<br />
changed during playback and used as rhythmic/backing<br />
variations for <strong>the</strong> various parts of a Song. For example, you<br />
could use one Section for <strong>the</strong> verse, ano<strong>the</strong>r for <strong>the</strong> chorus,<br />
and a third for <strong>the</strong> bridge. The Pattern related settings such<br />
as tempo and Mixing do not change even when <strong>the</strong> Section<br />
is switched, keeping <strong>the</strong> overall playback consistent in feel<br />
and rhythm through <strong>the</strong> changes.<br />
For instructions on selecting a Pattern and Section, see<br />
page 208.<br />
MOTIF <strong>XS</strong> Owner’s <strong>Manual</strong><br />
Pattern Chain<br />
Pattern Chain allows you to string several different Sections<br />
(within a single Pattern) toge<strong>the</strong>r to make a single,<br />
<strong>com</strong>plete Song. You can have <strong>the</strong> MOTIF <strong>XS</strong> automatically<br />
change Sections by creating a Pattern Chain beforehand,<br />
recording Pattern playback with Section changes from <strong>the</strong><br />
Pattern Chain display. You can also use this feature when<br />
creating Songs based on a certain Pattern, since <strong>the</strong><br />
created Pattern Chain can be converted into a Song in <strong>the</strong><br />
Pattern Chain Edit (page 215). One Pattern Chain can be<br />
created for each Pattern.<br />
Section A Section B Section C<br />
Phrase<br />
This is <strong>the</strong> basic MIDI sequence data in a track—and <strong>the</strong><br />
smallest unit—used in creating a Pattern. “Phrase” is a<br />
short musical/rhythmic passage for a single instrument,<br />
such as a rhythm pattern for <strong>the</strong> rhythm part, a bass line for<br />
<strong>the</strong> bass part, or a chord backing for <strong>the</strong> guitar part. This<br />
syn<strong>the</strong>sizer features memory space for 256 of your own<br />
original User Phrases.<br />
n The MOTIF <strong>XS</strong> provides no Preset Phrases.<br />
Pattern Track Structure<br />
A Pattern consists of 16 separate tracks, a Scene track,<br />
and a Tempo track (just as in a Song). See page 59.<br />
Pattern Tracks and Phrases<br />
A Pattern consists of 16 tracks to which <strong>the</strong> Phrase can be<br />
assigned. MIDI data cannot be directly recorded to each<br />
track in <strong>the</strong> Pattern mode. Recording is done to an empty<br />
user phrase. The newly created phrase is automatically<br />
assigned to <strong>the</strong> recording track.<br />
Track 1<br />
Track 2<br />
:<br />
Track 16<br />
Phrase 001<br />
Phrase 002<br />
:<br />
Phrase 003<br />
Phrase 001<br />
Phrase 002<br />
Phrase 003<br />
:<br />
MIDI data<br />
MIDI data<br />
MIDI data<br />
:
Sequencer Block applied to both<br />
<strong>the</strong> Song and Pattern<br />
MIDI tracks and Audio tracks<br />
Depending on <strong>the</strong> recording method, <strong>the</strong> Song/Pattern<br />
tracks (1 – 16) of this syn<strong>the</strong>sizer are divided into two<br />
groups: MIDI tracks and Audio tracks.<br />
MIDI tracks are created by recording your keyboard<br />
performance in <strong>the</strong> Song Record mode/Pattern Record<br />
mode. MIDI sequence data is recorded to <strong>the</strong> MIDI track<br />
and <strong>the</strong> Normal Voice or Drum Voice is assigned to <strong>the</strong><br />
Mixing part corresponding to <strong>the</strong> track.<br />
Audio tracks are created by recording audio signal from<br />
<strong>the</strong> external equipment or microphone via <strong>the</strong> A/D Input<br />
jack in <strong>the</strong> Sampling Record mode. Actually, audio data is<br />
not recorded directly to a track but ra<strong>the</strong>r is sampled via<br />
<strong>the</strong> Sampling operation. The recorded audio signal is<br />
stored as a Sample Voice to a Song/Pattern. The stored<br />
Sample Voice will automatically be assigned to <strong>the</strong> Mixing<br />
Part corresponding to <strong>the</strong> specified track, and <strong>the</strong> MIDI<br />
data for triggering <strong>the</strong> Sample Voice is recorded to <strong>the</strong><br />
specified track. During playback, <strong>the</strong> MIDI data of <strong>the</strong> track<br />
triggers <strong>the</strong> Sample Voice. As a result, <strong>the</strong> track effectively<br />
functions as an Audio recorded track.<br />
Recording<br />
Audio<br />
recording<br />
Sequencer block<br />
Sequence data<br />
(Song, Pattern)<br />
Track 1<br />
Track 2<br />
Track 3<br />
Track 16<br />
Audio data<br />
Sample Voice<br />
MIDI data<br />
Audio data<br />
MIDI data for triggering <strong>the</strong> Sample Voice<br />
Tone Generator block<br />
Mixing<br />
Part 1: Voice 1<br />
Part 2: Voice 2<br />
Part 3: Sample Voice<br />
Part 16: Voice 16<br />
Assigning<br />
Sample Voice<br />
Audio data is recorded to a Sample Voice which is to be assigned to a<br />
Song/Pattern, and note on/off events for triggering <strong>the</strong> recorded audio<br />
signal are recorded to Track 3.<br />
Output<br />
Play Effect (Play FX)<br />
Basic Structure<br />
The Play Effect lets you change <strong>the</strong> rhythmic “feel” of <strong>the</strong><br />
Pattern playback by changing <strong>the</strong> timing and velocity of<br />
<strong>the</strong> notes temporarily and on playback only, leaving <strong>the</strong><br />
original data intact. This feature can be set in <strong>the</strong> Play FX<br />
display of <strong>the</strong> Song Play mode and Pattern Play mode. See<br />
pages 183 and 211 respectively. If you find a setting you<br />
like, you can convert it to actual MIDI data by using <strong>the</strong><br />
Song Job (page 195) or Pattern Job (page 222).<br />
Song/<br />
Pattern<br />
Track 1<br />
Track 2<br />
:<br />
Track 16<br />
Play Effect (Play FX)<br />
Changing <strong>the</strong> timing and<br />
velocity of <strong>the</strong> notes<br />
Changing <strong>the</strong> timing and<br />
velocity of <strong>the</strong> notes<br />
:<br />
Changing <strong>the</strong> timing and<br />
velocity of <strong>the</strong> notes<br />
Sequencer Block applied to <strong>the</strong><br />
Performance mode<br />
Performance Recording<br />
Tone<br />
Generator<br />
Block<br />
You can record your keyboard performance in <strong>the</strong><br />
Performance mode to <strong>the</strong> Song or Pattern. You can record<br />
knob operations, controller operations and Arpeggio<br />
playback as well as your keyboard playing to <strong>the</strong> specified<br />
track as MIDI events. (Knob operations that cannot be<br />
recorded include sustain level, EQ settings, Arpeggio<br />
related settings, and Pan/Reverb Send/Chorus Send of <strong>the</strong><br />
multi part control.) Arpeggio playback data for Parts 1 – 4<br />
of <strong>the</strong> Performance will be recorded to <strong>the</strong> tracks 1 – 4 of<br />
<strong>the</strong> Song/Pattern respectively. Your keyboard performance<br />
and controller/knob operations (<strong>com</strong>mon to Parts 1 – 4) will<br />
be recorded to tracks 1 – 4 separately.<br />
n For instructions on recording a Performance, see page 140.<br />
Basic Structure<br />
Basic Operation<br />
Connections<br />
MOTIF <strong>XS</strong> Owner’s <strong>Manual</strong> 61<br />
Basic Section
Basic Section<br />
62<br />
Basic Structure<br />
Basic Structure Basic Operation Connections<br />
Arpeggio Block<br />
This block lets you automatically trigger musical and rhythmic phrases using <strong>the</strong> current Voice by simply pressing a note or<br />
notes on <strong>the</strong> keyboard. The Arpeggio sequence also changes in response to <strong>the</strong> actual notes or chords you play, giving you<br />
a wide variety of inspiring musical phrases and ideas—both in <strong>com</strong>posing and performing.<br />
Four Arpeggio types can be played back at <strong>the</strong> same time even in <strong>the</strong> Song mode and Pattern mode.<br />
Arpeggio Category<br />
The Arpeggio types are divided into 17 categories<br />
(excepting “NoAsg”) as listed below.<br />
Category List<br />
ApKb Acoustic Piano & Keyboard<br />
Organ Organ<br />
GtPl Guitar / Plucked<br />
GtMG Guitar for “Mega Voice”<br />
Bass Bass<br />
BaMG Bass for “Mega Voice”<br />
Strng Strings<br />
Brass Brass<br />
RdPp Reed / Pipe<br />
Lead Synth Lead<br />
PdMe Synth Pad / Musical Effect<br />
CPrc Chromatic Percussion<br />
DrPc Drum / Percussion<br />
Seq Synth Seq<br />
Chord Chord Seq<br />
Hybrd Hybrid Seq<br />
Cntr Control<br />
NoAsg No Assignment<br />
n Categories named “GtMG” and “BaMG” include Arpeggio<br />
types appropriate for using with a Mega Voice.<br />
Mega Voices and Mega Voice Arpeggios<br />
Normal Voices use velocity switching to make <strong>the</strong> sound<br />
quality and/or level of a Voice change according to how<br />
strongly or softly you play <strong>the</strong> keyboard. This makes<br />
<strong>the</strong>se Voices respond naturally. However Mega Voices<br />
have a very <strong>com</strong>plex structure with many different layers<br />
that is not suitable for playing manually. Mega Voices<br />
were developed specifically to be played by Mega Voice<br />
arpeggios to produce incredibly realistic results. You<br />
should always use Mega Voices with Mega Voice<br />
Arpeggios (included in “GtMG” and “BaMG” category).<br />
See <strong>the</strong> Voice with ARP parameter on page 189 for more<br />
details.<br />
MOTIF <strong>XS</strong> Owner’s <strong>Manual</strong><br />
Arpeggio Sub Category<br />
The Arpeggio categories are divided into sub categories<br />
as listed below. Because <strong>the</strong> sub categories are listed<br />
based on <strong>the</strong> music genre, it is easy to find <strong>the</strong> sub<br />
category appropriate for your desired music style.<br />
Sub Category List<br />
Rock Rock Z.Pad Zone Velocity for Pad*<br />
R&B R&B Filtr Filter<br />
Elect Electronic Exprs Expression<br />
Jazz Jazz Pan Pan<br />
World World Mod Modulation<br />
Genrl General Pbend Pitch Bend<br />
Comb Combination Asign Assign 1/2<br />
Zone Zone Velocity* NoAsg No Assignment<br />
n Arpeggio types belonging to <strong>the</strong> Sub Categories marked with<br />
an asterisk (*) contain some velocity ranges, to each of which<br />
a different phrase is assigned. When a type of <strong>the</strong>se<br />
categories is selected in <strong>the</strong> Voice mode, it is a good idea to<br />
set <strong>the</strong> Velocity Limit of each Element to <strong>the</strong> same range as<br />
below.<br />
Velocity ranges of each Arpeggio type<br />
2Z_*****: 1 – 90, 91 – 127<br />
4Z_*****: 1 – 70, 71 – 90, 91 – 110, 111 – 127<br />
8Z_*****: 1 – 16, 17 – 32, 33 – 48, 49 – 64, 65 – 80, 81 – 96, 97<br />
– 108, 109 – 127<br />
PadL_*****: 1 – 1, 2 – 2, 3 – 127<br />
PadH_*****: 1 – 112, 113 – 120, 121 – 127<br />
Arpeggio Type Name<br />
The Arpeggio Types are named according to certain rules<br />
and abbreviations. Once you understand <strong>the</strong>se rules and<br />
abbreviations, you’ll find it easy to browse through and<br />
select <strong>the</strong> desired Arpeggio Types.<br />
Arpeggio type with “_ES” at <strong>the</strong> end of <strong>the</strong><br />
type name (example: HipHop1_ES)<br />
These Arpeggio types use <strong>the</strong> same multi track Arpeggio<br />
architecture as <strong>the</strong> MOTIF ES. This ES type of arpeggio has<br />
<strong>the</strong> following benefits:<br />
• These arpeggios can create <strong>com</strong>plex notes and chords<br />
even when triggered by one note.<br />
• The arpeggio closely follows <strong>the</strong> notes played on <strong>the</strong><br />
keyboard (but <strong>the</strong> area where <strong>the</strong> arpeggio is assigned)<br />
allowing a good deal of harmonic freedom and <strong>the</strong><br />
possibility to “solo” using <strong>the</strong>se arpeggios.<br />
For details, see page 64.
Arpeggio type with “_<strong>XS</strong>” at <strong>the</strong> end of <strong>the</strong><br />
type name (example: Rock1_<strong>XS</strong>)<br />
These Arpeggios use a newly developed chord recognition<br />
technology to determine what notes should be played<br />
back by <strong>the</strong> Arpeggio. This <strong>XS</strong> type of arpeggio has <strong>the</strong><br />
following benefits:<br />
• The arpeggios respond only to any area on <strong>the</strong> keyboard<br />
where an <strong>XS</strong> type of arpeggio is assigned. O<strong>the</strong>r areas of<br />
<strong>the</strong> keyboard do not effect <strong>the</strong> chord recognition. This<br />
allows very natural keyboard playing across <strong>the</strong> entire<br />
keyboard with arpeggio generated bass and backing<br />
parts.<br />
• The arpeggio will always play harmonically correct parts.<br />
These are especially useful for bass and chordal<br />
backing parts.<br />
See page 64 for more details.<br />
n Combining <strong>the</strong>se two kinds of Arpeggios types (named<br />
“***_ES” and “***_<strong>XS</strong>”) in performances when creating Songs<br />
and Patterns allows tremendous interactivity and creative<br />
freedom.<br />
Arpeggio type with a normal name (example:<br />
UpOct1)<br />
In addition to <strong>the</strong> above types, <strong>the</strong>re are three playback<br />
types: <strong>the</strong> Arpeggios created for use of Normal Voices and<br />
played back using only <strong>the</strong> played notes and <strong>the</strong>ir octave<br />
notes (page 64), <strong>the</strong> Arpeggios created for use of Drum<br />
Voices (page 65), and Arpeggios containing mainly nonnote<br />
events (page 65).<br />
How to use <strong>the</strong> Arpeggio Type List<br />
The Arpeggio Type list in <strong>the</strong> Data List 2 (PDF)<br />
documentation contains <strong>the</strong> following columns.<br />
1 2 3 4 5 6 7 8 9 )<br />
Main Sub<br />
Category Category ARP<br />
No.<br />
ARP Name<br />
Time<br />
Signature<br />
Length<br />
Original<br />
Tempo<br />
Accent<br />
Random<br />
SFX<br />
Voice Type<br />
ApKb Rock 1 70sRockB 4 / 4 2 130 Accoustic Piano<br />
ApKb Rock 2 70sRockC 4 / 4 1 130 :<br />
ApKb Rock 3 70sRockD 4 / 4 2 130<br />
ApKb Rock 4 70sRockE 4 / 4 4 130<br />
ApKb Rock 5 70sRockF 4 / 4 2 130<br />
ApKb Rock 6 70sRockG 4 / 4 1 130<br />
ApKb Rock 7 70sRockH 4 / 4 1 130<br />
n Note that this list is for illustration purposes only. For a<br />
<strong>com</strong>plete listing of <strong>the</strong> Arpeggio Types, refer to <strong>the</strong> Data List 2.<br />
1 Category<br />
Indicates an Arpeggio Category.<br />
2 Sub Category<br />
Indicates an Arpeggio Sub Category.<br />
3 ARP No. (Arpeggio Number)<br />
4 ARP Name<br />
Indicates <strong>the</strong> Arpeggio Name.<br />
5 Time Signature<br />
Indicates <strong>the</strong> time signature or meter of <strong>the</strong> Arpeggio type.<br />
6 Length<br />
Basic Structure<br />
Indicates <strong>the</strong> data length (amount of measures) of <strong>the</strong><br />
Arpeggio type. When <strong>the</strong> Loop parameter *1 is set to “off,”<br />
<strong>the</strong> Arpeggio plays back for this length and stops.<br />
7 Original Tempo<br />
Indicates <strong>the</strong> appropriate tempo value of <strong>the</strong> Arpeggio<br />
type. Note that this tempo is not set automatically when<br />
selecting an Arpeggio type.<br />
8 Accent<br />
The circle indicates that <strong>the</strong> Arpeggio uses <strong>the</strong> Accent<br />
Phrase feature (page 64).<br />
9 Random SFX<br />
The circle indicates that <strong>the</strong> Arpeggio uses <strong>the</strong> SFX feature<br />
(page 64).<br />
) Voice Type<br />
Indicates <strong>the</strong> voice type appropriate for <strong>the</strong> Arpeggio Type.<br />
When <strong>the</strong> Voice With Arpeggio parameter *2 is set to “on” in<br />
<strong>the</strong> Song/Pattern Record mode, <strong>the</strong> voice of this type is<br />
automatically selected.<br />
*1 The Loop parameter can be set in <strong>the</strong> Arpeggio O<strong>the</strong>r display<br />
of Voice Common Edit (page 102), Performance Part Edit<br />
(page 156) and Mixing Part Edit (page 235).<br />
*2 The Voice with Arpeggio parameter can be set in <strong>the</strong> Arpeggio<br />
display (page 189) of <strong>the</strong> Song/Pattern Record display.<br />
Arpeggio related settings<br />
There are several methods for triggering and stopping <strong>the</strong><br />
Arpeggio playback. In addition, you can set whe<strong>the</strong>r or not<br />
SFX sounds and special Accent Phrases are triggered<br />
along with <strong>the</strong> normal sequence data. This section covers<br />
<strong>the</strong> Arpeggio related parameters which can be set in <strong>the</strong><br />
Voice, Performance and Mixing modes.<br />
Turning Arpeggio playback on/off<br />
The following three settings are available for turning <strong>the</strong><br />
Arpeggio playback on/off.<br />
To play <strong>the</strong> Arpeggio only when<br />
<strong>the</strong> note is pressed:<br />
To continue <strong>the</strong> Arpeggio even if<br />
<strong>the</strong> note is released:<br />
To toggle <strong>the</strong> Arpeggio playback<br />
on/off whenever <strong>the</strong> note is<br />
pressed:<br />
Set <strong>the</strong> Hold parameter to “off”<br />
and <strong>the</strong> Trigger mode to “gate.”<br />
Set <strong>the</strong> Hold parameter to “on.”<br />
Set <strong>the</strong> Trigger mode to “toggle.”<br />
The Hold parameter can be set to<br />
ei<strong>the</strong>r “on” or “off.”<br />
n For <strong>the</strong> displays including <strong>the</strong> Hold and Trigger mode<br />
parameter, refer to “Arpeggio setting display” below.<br />
Basic Structure<br />
Basic Operation<br />
Connections<br />
MOTIF <strong>XS</strong> Owner’s <strong>Manual</strong> 63<br />
Basic Section
Basic Section<br />
64<br />
Basic Structure<br />
Basic Structure Basic Operation Connections<br />
Using <strong>the</strong> knobs to control Arpeggios<br />
When <strong>the</strong> ARP FX lamp is turned on by pressing <strong>the</strong><br />
[SELECTED PART CONTROL] button a few times, you can<br />
use <strong>the</strong> knobs to control Arpeggio playback. Try this out<br />
and listen for <strong>the</strong> changes in <strong>the</strong> sound. For details, see<br />
page 90.<br />
Press this button a few times<br />
so that <strong>the</strong> lamp lights.<br />
SELECTED PART<br />
CONTROL<br />
MULTI PART<br />
CONTROL<br />
TONE 1<br />
TONE 2<br />
ARP FX<br />
REVERB<br />
CHORUS<br />
PAN<br />
Accent Phrase<br />
Accent Phrases are <strong>com</strong>posed of sequence data included<br />
in some Arpeggio types, sounding only when you play<br />
notes at a velocity higher (stronger) than that specified in<br />
<strong>the</strong> Accent Velocity Threshold parameter. If it is hard to play<br />
at velocities necessary to trigger <strong>the</strong> Accent Phrase, set<br />
<strong>the</strong> Accent Velocity Threshold parameter to a lower value.<br />
n For <strong>the</strong> displays including <strong>the</strong> Accent Velocity Threshold<br />
parameter, refer to “Arpeggio setting display” below.<br />
n For information on Arpeggio types that use this function, refer<br />
to <strong>the</strong> Arpeggio Type List in <strong>the</strong> Data List 2 (PDF)<br />
documentation, available from <strong>the</strong> online Yamaha <strong>Manual</strong><br />
Library.<br />
Random SFX<br />
CUTOFF RESONANCE<br />
EQ LOW EQ MID F<br />
SWING<br />
QUANTIZE<br />
VALUE<br />
Some Arpeggio types feature a Random SFX function<br />
which will trigger special sounds (such as guitar fret<br />
noises) when <strong>the</strong> note is released. The following<br />
parameters affecting Random SFX are provided.<br />
For turning <strong>the</strong> Random SFX on/<br />
off:<br />
For setting <strong>the</strong> volume of <strong>the</strong> SFX<br />
sound:<br />
For determining whe<strong>the</strong>r or not<br />
<strong>the</strong> volume of <strong>the</strong> SFX sound is<br />
controlled by velocity:<br />
n For <strong>the</strong> displays that include Random SFX, Random SFX<br />
Velocity Offset and Random SFX Key On Control, refer to<br />
“Arpeggio setting display” below.<br />
n For information on Arpeggio types that use this function, refer<br />
to <strong>the</strong> Arpeggio Type List in <strong>the</strong> Data List 2 (PDF)<br />
documentation, available from <strong>the</strong> online Yamaha <strong>Manual</strong><br />
Library.<br />
MOTIF <strong>XS</strong> Owner’s <strong>Manual</strong><br />
Arpeggio functions<br />
controlled via <strong>the</strong> knobs<br />
AT TACK DECAY<br />
EQ MID EQ MID Q<br />
QUANTIZE<br />
STRENGTH GATE TIME<br />
SUSTAIN RELEASE<br />
EQ HIGH PAN<br />
Random SFX parameter<br />
ASSIGN 1 ASSIGN 2<br />
REVERB CHORUS<br />
VELOCITY OCT RANGE UNITMULTIPLY TEMPO<br />
Random SFX Velocity Offset<br />
parameter<br />
Random SFX Key On Control<br />
parameter<br />
Arpeggio setting displays<br />
Mode Display Page<br />
Voice mode Arpeggio Main display of Voice<br />
Common Edit<br />
Arpeggio O<strong>the</strong>r display of Voice<br />
Common Edit<br />
Performance mode Arpeggio Main display of<br />
Performance Part Edit<br />
Arpeggio O<strong>the</strong>r display of<br />
Performance Part Edit<br />
Song mode/Pattern<br />
mode (for playback)<br />
Arpeggio Main display of Mixing<br />
Part Edit<br />
Arpeggio O<strong>the</strong>r display of Mixing<br />
Part Edit<br />
Song Record mode Arpeggio display of Song<br />
Record<br />
Pattern Record mode Arpeggio display of Pattern<br />
Record<br />
Arpeggio playback types<br />
101<br />
102<br />
154<br />
156<br />
The Arpeggio playback features four main playback types<br />
as described below.<br />
Arpeggio Types for Normal Voices<br />
235<br />
235<br />
189<br />
Arpeggio types (belonging to <strong>the</strong> categories except for <strong>the</strong><br />
DrPC and Cntr) created for use of Normal Voices have <strong>the</strong><br />
following three playback types.<br />
Playback only of <strong>the</strong> played notes<br />
The Arpeggio is played back using only <strong>the</strong> played note<br />
and its octave notes.<br />
Playback of a programmed sequence<br />
according to <strong>the</strong> played notes<br />
These Arpeggio types have <strong>the</strong> several sequences each of<br />
which is suited for a certain chord type. Even if you press<br />
only one note, <strong>the</strong> Arpeggio is played back using <strong>the</strong><br />
programmed sequence—meaning that notes o<strong>the</strong>r than<br />
<strong>the</strong> ones you play may be sounded. Pressing ano<strong>the</strong>r note<br />
triggers <strong>the</strong> transposed sequence regarding <strong>the</strong> pressed<br />
note as a root note. Adding notes to those already held<br />
changes <strong>the</strong> sequence accordingly. An Arpeggio with such<br />
a playback type has “_ES” at <strong>the</strong> end of <strong>the</strong> type name.<br />
Playback of a programmed sequence<br />
according to <strong>the</strong> played chord type<br />
These Arpeggio types created for use with Normal Voices<br />
are played back to match <strong>the</strong> chord type determined by<br />
detecting <strong>the</strong> notes you play on <strong>the</strong> keyboard. An Arpeggio<br />
with such a playback type has “_<strong>XS</strong>” at <strong>the</strong> end of <strong>the</strong> type<br />
name.<br />
n When <strong>the</strong> Key Mode parameter is set to “sort” or “sort+direct,”<br />
<strong>the</strong> same sequence is played back no matter what order you<br />
play <strong>the</strong> notes. When <strong>the</strong> Key Mode parameter is set to “thru”
or “thru+direct,” a different sequence is played back<br />
depending on <strong>the</strong> order you play <strong>the</strong> notes.<br />
n Since <strong>the</strong>se types are programmed for Normal Voices, using<br />
<strong>the</strong>m with Drum Voices may not give musically appropriate<br />
results.<br />
Arpeggio Types for Drum Voices<br />
(Category: DrPc)<br />
These arpeggio types are programmed specifically for use<br />
with Drum Voices, giving you instant access to various<br />
rhythm patterns. Three different playback types are<br />
available.<br />
Playback of a drum pattern<br />
Pressing any note(s) will trigger <strong>the</strong> same rhythm pattern.<br />
Playback of a drum pattern, plus additional<br />
played notes (assigned drum instruments)<br />
Pressing any note will trigger <strong>the</strong> same rhythm pattern.<br />
Adding notes to <strong>the</strong> one already held produces additional<br />
sounds (assigned drum instruments) for <strong>the</strong> drum pattern.<br />
Playback only of <strong>the</strong> played notes (assigned<br />
drum instruments)<br />
Playing a note or notes will trigger a rhythm pattern using<br />
only <strong>the</strong> notes played (assigned drum instruments). Keep<br />
in mind that even if you play <strong>the</strong> same notes, <strong>the</strong> triggered<br />
rhythm pattern differs depending on <strong>the</strong> order of <strong>the</strong> notes<br />
played. This gives you access to different rhythm patterns<br />
using <strong>the</strong> same instruments simply by changing <strong>the</strong> order<br />
in which you play <strong>the</strong> notes when <strong>the</strong> Key Mode parameter<br />
is set to “thru” or “thru+direct.”<br />
n The three playback types above are not distinguished by<br />
category name or type name. You’ll have to actually play <strong>the</strong><br />
types and hear <strong>the</strong> difference.<br />
n Since <strong>the</strong>se types are programmed for Drum Voices, using<br />
<strong>the</strong>m with Normal Voices may not give musically appropriate<br />
results.<br />
Arpeggio Types containing mainly nonnote<br />
events (Category: Cntr)<br />
These arpeggio types are programmed primarily with<br />
Control Change and Pitch Bend data. They are used to<br />
change <strong>the</strong> tone or pitch of <strong>the</strong> sound, ra<strong>the</strong>r than play<br />
specific notes. In fact, some types contain no note data at<br />
all. When using a type of this category, set <strong>the</strong> Key Mode<br />
parameter to “direct,” “thru+direct,” or “sort+direct.”<br />
n The Key Mode parameter can be set in <strong>the</strong> Arpeggio Main<br />
display of Voice Common Edit (page 101), Performance Part<br />
Edit (page 154) and Mixing Part Edit (page 235).<br />
Tips for Arpeggio playback<br />
Basic Structure<br />
Arpeggio playback in <strong>the</strong> Voice Play mode<br />
Try out <strong>the</strong> Arpeggio playback assigned to <strong>the</strong> preset Voice.<br />
1 In <strong>the</strong> Voice Play mode, make sure that <strong>the</strong><br />
[ARPEGGIO ON/OFF] button is lit, <strong>the</strong>n play<br />
any note to trigger Arpeggio playback.<br />
2 Try playing different notes and chords on <strong>the</strong><br />
keyboard and listen to <strong>the</strong> Arpeggio play.<br />
Arpeggio playback responds in different ways,<br />
depending on <strong>the</strong> order of <strong>the</strong> notes you play and, of<br />
course, <strong>the</strong> selected Arpeggio Type. Also, try hitting <strong>the</strong><br />
notes strongly and listen for <strong>the</strong> Accent Phrase feature.<br />
3 Try out various Arpeggio types by pressing <strong>the</strong><br />
[SF1] – [SF5] buttons.<br />
n If <strong>the</strong> 8th note icon is not shown at <strong>the</strong> right of ARP1 –<br />
ARP5 (meaning that Arpeggio Type is set to off in <strong>the</strong><br />
corresponding display), <strong>the</strong> Arpeggio Type does not<br />
change even if you press <strong>the</strong> corresponding [SF1] ARP1 –<br />
[SF5] ARP5 button.<br />
4 Use <strong>the</strong> knobs to control Arpeggio playback<br />
after pressing <strong>the</strong> [SELECTED PART<br />
CONTROL] button a few times (<strong>the</strong> ARP FX<br />
lamp lights).<br />
Now that you’ve listened to <strong>the</strong> Arpeggio Types assigned to<br />
<strong>the</strong> preset Voice, go on and try out some of <strong>the</strong> o<strong>the</strong>r<br />
Arpeggio Types available.<br />
5 During Arpeggio playback, press <strong>the</strong> [F4]<br />
button to call up <strong>the</strong> Arpeggio display, <strong>the</strong>n<br />
select an Arpeggio type.<br />
For best results, you should select a Category and Sub<br />
Category containing Arpeggio Types that most closely<br />
match <strong>the</strong> currently selected Voice. Once you find an<br />
Arpeggio Type that fits, keep it in <strong>the</strong> display settings<br />
and store <strong>the</strong> Voice (below).<br />
6 Store <strong>the</strong> Arpeggio settings as a User Voice.<br />
For detailed instructions on storing a Voice, see<br />
page 97.<br />
Basic Structure<br />
Basic Operation<br />
Connections<br />
MOTIF <strong>XS</strong> Owner’s <strong>Manual</strong> 65<br />
Basic Section
Basic Section<br />
66<br />
Basic Structure<br />
Basic Structure Basic Operation Connections<br />
Arpeggio playback/recording in <strong>the</strong><br />
Performance mode<br />
Call up some of <strong>the</strong> Performances in User Banks 1 – 3, and<br />
play some of <strong>the</strong> Arpeggios assigned by default to <strong>the</strong><br />
Performances. In <strong>the</strong> Performance mode, each of four<br />
Arpeggio types is assigned to each of four Parts. This<br />
means up to four Arpeggio types can be played back<br />
simultaneously. Let’s play <strong>the</strong> Performance making full use<br />
of this function.<br />
1 Make sure that <strong>the</strong> [ARPEGGIO ON/OFF]<br />
button is lit, <strong>the</strong>n play any note to trigger<br />
Arpeggio playback.<br />
Steps 2 – 4 are same as in “Arpeggio playback in <strong>the</strong> Voice<br />
mode” above. Once you’ve tried out <strong>the</strong> Arpeggio Types<br />
assigned to <strong>the</strong> Performance, go on and try some of <strong>the</strong><br />
o<strong>the</strong>r Arpeggio Types available.<br />
5 During Arpeggio playback, press <strong>the</strong> [F4]<br />
button to call up <strong>the</strong> Arpeggio display <strong>the</strong>n<br />
select an Arpeggio type for each Part.<br />
For best results, you should select a Category and Sub<br />
Category containing Arpeggio Types that most closely<br />
match <strong>the</strong> Voice for <strong>the</strong> Part. Once you find an<br />
Arpeggio Type that fits, keep it in <strong>the</strong> display settings<br />
and store <strong>the</strong> Performance (below).<br />
6 Store <strong>the</strong> Arpeggio settings as a User<br />
Performance.<br />
For detailed instructions on storing a Performance, see<br />
page 142.<br />
You can record your keyboard performance to a Song/<br />
Pattern in <strong>the</strong> Performance Record mode. Keep in mind<br />
that any Arpeggio playback you trigger in <strong>the</strong> Performance<br />
mode can be recorded to <strong>the</strong> Song or Pattern as well. For<br />
details about <strong>the</strong> Performance recording, see page 140.<br />
n The Arpeggio playback data is recorded to <strong>the</strong> Song or<br />
Pattern track as MIDI sequence data. Note that pressing <strong>the</strong><br />
note only triggers <strong>the</strong> Arpeggio playback. The Song or Pattern<br />
data will not trigger <strong>the</strong> Arpeggio playback.<br />
Arpeggio playback/recording in <strong>the</strong><br />
Pattern mode<br />
Arpeggios are also useful for creating Phrases, which can<br />
be used as <strong>the</strong> basic building blocks in making a Pattern.<br />
Create User Phrases as desired <strong>the</strong>n assign <strong>the</strong>m to <strong>the</strong><br />
desired track in <strong>the</strong> Patch display (page 212).<br />
This section shows how to record a Arpeggio playback to a<br />
Pattern track.<br />
1 Select an Arpeggio type in <strong>the</strong> Arpeggio<br />
display (page 219) of <strong>the</strong> Pattern Record mode.<br />
MOTIF <strong>XS</strong> Owner’s <strong>Manual</strong><br />
When <strong>the</strong> Arpeggio With Voice Switch parameter is set<br />
to “on,” <strong>the</strong> Voice appropriate for this Arpeggio type is<br />
automatically selected.<br />
2 Record playback of <strong>the</strong> selected Arpeggio to<br />
<strong>the</strong> Pattern track.<br />
Record different Arpeggios to o<strong>the</strong>r tracks by repeating<br />
steps 1 – 2. It is a good idea to assign a name to <strong>the</strong><br />
created Phrase in <strong>the</strong> Pattern Patch display (page 212) for<br />
future recall.<br />
3 Create Pattern data by assigning <strong>the</strong> created<br />
Phrases to <strong>the</strong> Section in <strong>the</strong> Pattern Patch<br />
display (page 212).<br />
For example, create a Section A for <strong>the</strong> intro, a Section<br />
B for <strong>the</strong> verse, a Section C for <strong>the</strong> chorus, and a<br />
Section D for <strong>the</strong> ending—and you have <strong>the</strong> basic<br />
blocks to build an original Song.<br />
4 Create <strong>the</strong> Pattern Chain data by programming<br />
<strong>the</strong> playback order of <strong>the</strong> Sections.<br />
Pattern Chain allows you to string several different<br />
Patterns toge<strong>the</strong>r to make a single Song. For details,<br />
see page 213.<br />
5 Convert <strong>the</strong> Pattern Chain data to Song data.<br />
For details, see page 215.<br />
Creating an original Arpeggio type<br />
In addition using <strong>the</strong> preset Arpeggios, you can also create<br />
your own original Arpeggio data. The procedure is as<br />
follows.<br />
1 Record <strong>the</strong> MIDI sequence data to a Song or<br />
Pattern.<br />
Up to four tracks can be used in creating an Arpeggio.<br />
Up to 16 unique note numbers can be recorded to <strong>the</strong><br />
Arpeggio track. If more than 16 different note numbers<br />
have been recorded to <strong>the</strong> MIDI sequence data, <strong>the</strong><br />
Convert operation automatically reduces <strong>the</strong> notes in<br />
excess of <strong>the</strong> limit. Because of this, be careful to record<br />
only up to 16 different notes when you create an<br />
Arpeggio.<br />
2 Convert <strong>the</strong> recorded MIDI sequence data to<br />
Arpeggio data.<br />
Use <strong>the</strong> “Put Track to Arpeggio” Job in <strong>the</strong> Song Job<br />
mode (page 206) or <strong>the</strong> Pattern Job mode (page 227).<br />
After setting <strong>the</strong> related parameters, press <strong>the</strong> [ENTER]<br />
button to execute <strong>the</strong> Job.<br />
The created Arpeggio types can be selected from <strong>the</strong><br />
User bank in <strong>the</strong> Arpeggio display.
Controller Block<br />
Basic Structure<br />
This block consists of <strong>the</strong> keyboard, Pitch Bend and Modulation Wheels, Ribbon Controller, Knobs, Sliders and so on. The<br />
keyboard itself doesn’t generate sounds, but instead generates/transmits note on/off, velocity and o<strong>the</strong>r information (MIDI<br />
messages) to <strong>the</strong> syn<strong>the</strong>sizer’s tone generator block when you play notes. The controllers also generate/transmit MIDI<br />
messages. The syn<strong>the</strong>sizer’s tone generator block produces <strong>the</strong> sound according to <strong>the</strong> MIDI messages transmitted from<br />
<strong>the</strong> keyboard and controllers.<br />
Keyboard<br />
The keyboard transmits <strong>the</strong> note on/off messages to <strong>the</strong><br />
Tone Generator Block (for sounding) and Sequencer Block<br />
(for recording). The keyboard is also used for triggering<br />
Arpeggio playback. You can change <strong>the</strong> note range of <strong>the</strong><br />
keyboard in octaves by using <strong>the</strong> OCTAVE [UP] and<br />
[DOWN] buttons, transpose <strong>the</strong> notes in <strong>the</strong> Play display<br />
(page 259) of <strong>the</strong> Utility mode, and set how <strong>the</strong> actual<br />
velocity is generated according to <strong>the</strong> strength with which<br />
you play notes in <strong>the</strong> same display.<br />
Pitch Bend wheel<br />
Use <strong>the</strong> Pitch Bend wheel to bend notes up (roll <strong>the</strong> wheel<br />
away from you) or down (roll <strong>the</strong> wheel toward you) while<br />
playing <strong>the</strong> keyboard. This wheel is self-centering and will<br />
automatically return to normal pitch when released. Try out<br />
<strong>the</strong> Pitch Bend wheel while pressing a note on <strong>the</strong><br />
keyboard.<br />
Each preset Voice has its own default Pitch Bend Range<br />
setting. The Pitch Bend Range setting for each Voice can<br />
be changed in <strong>the</strong> Play Mode display (page 98) of <strong>the</strong><br />
Voice Edit mode. From this display you can also reverse<br />
<strong>the</strong> Pitch Bend function—so that moving <strong>the</strong> wheel up<br />
lowers <strong>the</strong> pitch, and moving it down raises <strong>the</strong> pitch.<br />
Functions o<strong>the</strong>r than Pitch Bend can be assigned to <strong>the</strong><br />
Pitch Bend wheel in <strong>the</strong> Controller Set display (page 104)<br />
of <strong>the</strong> Voice Edit mode.<br />
Pitch Up<br />
Pitch Down<br />
Modulation wheel<br />
Even though <strong>the</strong> Modulation wheel is conventionally used<br />
to apply vibrato to <strong>the</strong> sound, many of <strong>the</strong> preset Voices<br />
have o<strong>the</strong>r functions and effects assigned to <strong>the</strong> wheel.<br />
The more you move this wheel up, <strong>the</strong> greater <strong>the</strong> effect<br />
that is applied to <strong>the</strong> sound. Try out <strong>the</strong> Modulation wheel<br />
with various preset Voices while playing <strong>the</strong> keyboard. To<br />
avoid accidentally applying effects to <strong>the</strong> current Voice,<br />
make sure <strong>the</strong> Modulation wheel is set to minimum before<br />
you start playing. Various functions can be assigned to <strong>the</strong><br />
Modulation wheel in <strong>the</strong> Controller Set display (page 104)<br />
of <strong>the</strong> Voice Edit mode.<br />
Ribbon Controller<br />
Maximum<br />
Minimum<br />
The Ribbon Controller is touch sensitive, and is controlled<br />
by running your finger laterally across <strong>the</strong> surface. Various<br />
functions are assigned to each preset Voice. Try out <strong>the</strong><br />
Ribbon Controller with various preset Voices while playing<br />
<strong>the</strong> keyboard. Various functions can be assigned to <strong>the</strong><br />
Ribbon Controller in <strong>the</strong> Controller Set display (page 104)<br />
of <strong>the</strong> Voice Edit mode. You can also determine whe<strong>the</strong>r<br />
<strong>the</strong> Ribbon Controller value returns to <strong>the</strong> center, or stays at<br />
<strong>the</strong> point where you released your finger in <strong>the</strong> General<br />
O<strong>the</strong>r display (page 100) of <strong>the</strong> Voice Common Edit mode.<br />
Assignable Function Buttons<br />
According to <strong>the</strong> XA (Expanded Articulation) Control<br />
settings in <strong>the</strong> Oscillator display (page 112) of <strong>the</strong> Voice<br />
Element Edit mode, you can call up <strong>the</strong> specific Element of<br />
<strong>the</strong> current Voice by pressing each of <strong>the</strong>se buttons during<br />
your keyboard performance. You can select how <strong>the</strong> on/off<br />
status of <strong>the</strong>se buttons is switched by using <strong>the</strong> Assignable<br />
Function 1 Mode and Assignable Function 2 Mode<br />
parameters in <strong>the</strong> General O<strong>the</strong>r display (page 100) of <strong>the</strong><br />
Voice Common Edit mode. Fur<strong>the</strong>rmore, you can assign<br />
various functions (o<strong>the</strong>r than calling up specific Elements)<br />
to <strong>the</strong>se buttons.<br />
MOTIF <strong>XS</strong> Owner’s <strong>Manual</strong><br />
Basic Structure<br />
Basic Operation<br />
Connections<br />
67<br />
Basic Section
Basic Section<br />
68<br />
Basic Structure<br />
Basic Structure Basic Operation Connections<br />
Knobs and Sliders<br />
These eight knobs let you change various aspects of <strong>the</strong><br />
Voice’s sound in real time—while you play. The eight sliders<br />
let you adjust <strong>the</strong> volume of <strong>the</strong> Voice Elements,<br />
Performance Parts and Mixing Parts.<br />
Effect Block<br />
MOTIF <strong>XS</strong> Owner’s <strong>Manual</strong><br />
For more information about how to use <strong>the</strong> knobs and<br />
sliders in <strong>the</strong> respective modes, see page 90 (Voice<br />
mode), page 136 (Performance mode), and page 180<br />
(Song/Pattern mode).<br />
This block applies effects to <strong>the</strong> output of <strong>the</strong> tone generator block, and audio input block, processing and enhancing <strong>the</strong><br />
sound. Effects are applied in <strong>the</strong> final stages of editing, letting you change <strong>the</strong> sound of <strong>the</strong> created Voice as desired.<br />
Effect structure<br />
System Effects—Reverb and Chorus<br />
System Effects are applied to <strong>the</strong> overall sound—a Voice,<br />
an entire Performance, a Song, etc. With System Effects,<br />
<strong>the</strong> sound of each Part is sent to <strong>the</strong> effect according to <strong>the</strong><br />
effect Send Level for each Part. The processed sound<br />
(referred to as “wet”) is sent back to <strong>the</strong> mixer, according to<br />
<strong>the</strong> Return Level, and output—after being mixed with <strong>the</strong><br />
unprocessed “dry” sound. This arrangement lets you<br />
prepare an optimum balance of <strong>the</strong> effect sound and <strong>the</strong><br />
original sound of <strong>the</strong> Parts.<br />
Insertion Effect<br />
Insertion Effects can be applied individually to each Part.<br />
Insertion Effects are mainly used to directly process a<br />
single Part. The depth of <strong>the</strong> effect is adjusted by setting<br />
<strong>the</strong> dry/wet balance. Since an Insertion Effect can only be<br />
applied to one particular Part, it should be used for sounds<br />
you want to drastically change or for sounds that use an<br />
effect unintended for o<strong>the</strong>r sounds. You can also set <strong>the</strong><br />
balance so that only <strong>the</strong> effect sound is heard, by setting<br />
Wet to 100%. This syn<strong>the</strong>sizer features eight sets of<br />
Insertion Effects (one set has A and B units). They can be<br />
applied to all Parts of <strong>the</strong> Performance, and applied to<br />
eight Parts (maximum) of <strong>the</strong> Song/Pattern. Ano<strong>the</strong>r<br />
important Insertion Effect is <strong>the</strong> Vocoder, which can be<br />
applied only to one Part.<br />
n In <strong>the</strong> Voice mode, <strong>the</strong> Vocoder Effect can be applied to each<br />
of <strong>the</strong> Voices. In <strong>the</strong> Mixing (Song/Pattern) and Performance<br />
mode, <strong>the</strong> Vocoder Effect can be applied only to Part 1. The<br />
Vocoder Effect does not work even if you assign <strong>the</strong> Voice (to<br />
which <strong>the</strong> Vocoder is applied in <strong>the</strong> Voice mode) to <strong>the</strong> o<strong>the</strong>r<br />
parts (Part 2 or higher).<br />
Master Effect<br />
This block applies effects to <strong>the</strong> final stereo output signal of<br />
<strong>the</strong> entire sound.<br />
Element EQ<br />
The Element EQ is applied to each element of <strong>the</strong> Normal<br />
Voice and each key of <strong>the</strong> Drum Voice. You can specify<br />
which shape is used among six types, such as shelving<br />
and peaking.<br />
Part EQ<br />
This 3-band parametric EQ is applied to each part of <strong>the</strong><br />
Performance/Song Mixing/Pattern Mixing. The high band<br />
and low band are <strong>the</strong> shelving type. The middle band is <strong>the</strong><br />
peaking type.<br />
Master EQ<br />
Master EQ is applied to <strong>the</strong> final (post-effect), overall sound<br />
of <strong>the</strong> instrument. In this EQ, all five bands can be set to<br />
peaking, or <strong>the</strong> lowest and highest bands can also be set<br />
to shelving.
Effect connection in each mode<br />
In <strong>the</strong> Voice mode<br />
1<br />
Voice<br />
Element or Drum Key<br />
Element EQ<br />
Element 1 – 8<br />
Drum Key C0 – C6<br />
AD Part (set in <strong>the</strong> Utility mode)<br />
1 Sets <strong>the</strong> Element EQ parameters applied to<br />
each Element (for a Normal Voice) and each<br />
key (for a Drum Voice).<br />
The Element EQ parameters can be set in <strong>the</strong> EQ<br />
display (pages 126 and 132) of <strong>the</strong> Voice Edit mode.<br />
2 Determines which Insertion Effect, A or B, is<br />
applied to each Element (or to each key when a<br />
Drum Voice is selected).<br />
The Insertion Effect can also be bypassed. This can be<br />
set in <strong>the</strong> Connect display (page 107) of <strong>the</strong> Voice<br />
Common Edit or <strong>the</strong> Oscillator display (page 112) of <strong>the</strong><br />
Voice Element Edit (or Key Edit).<br />
n These two display types are linked and feature <strong>the</strong> same<br />
settings, only in different formats.<br />
3 Determines <strong>the</strong> Insertion A/B connection from<br />
<strong>the</strong> following four types: parallel, A F B, B F A,<br />
and Vocoder.<br />
This block also selects <strong>the</strong> Effect Types of Insertion A<br />
and B respectively and sets <strong>the</strong> related parameters.<br />
2<br />
In <strong>the</strong> Performance mode<br />
1<br />
Part<br />
Part EQ<br />
Performance<br />
Voice<br />
Insertion A/B<br />
Part 1 – 4<br />
AD Part<br />
3<br />
Insertion A<br />
Insertion B<br />
Send<br />
Level<br />
Send Level<br />
Chorus<br />
2<br />
Reverb<br />
Chorus<br />
Chorus To<br />
Reverb<br />
4<br />
Reverb<br />
Chorus To<br />
Reverb<br />
Return Level<br />
5 6<br />
Master Effect Master EQ<br />
Basic Structure<br />
These can be set in <strong>the</strong> Connect display (page 107)<br />
and <strong>the</strong> Insertion A/B display (page 109) of Voice<br />
Common Edit.<br />
4 Determines <strong>the</strong> Send Level/Return Level to/<br />
from <strong>the</strong> Reverb/Chorus and <strong>the</strong> signal level<br />
sent from <strong>the</strong> Chorus to <strong>the</strong> Reverb.<br />
This block also selects <strong>the</strong> Effect Types of Reverb and<br />
Chorus respectively and sets <strong>the</strong> related parameters.<br />
These can be set in <strong>the</strong> Connect display (page 107)<br />
and <strong>the</strong> Reverb display/Chorus display (page 109) of<br />
Voice Common Edit.<br />
5 Selects <strong>the</strong> Master Effect type and sets <strong>the</strong><br />
Effect parameters in <strong>the</strong> Master Effect display<br />
(page 264) of <strong>the</strong> Utility mode.<br />
6 Sets <strong>the</strong> Master EQ parameters in <strong>the</strong> Master<br />
EQ display (page 264) of <strong>the</strong> Utility mode.<br />
Return<br />
Level<br />
3 4<br />
Master Effect Master EQ<br />
MOTIF <strong>XS</strong> Owner’s <strong>Manual</strong><br />
Basic Structure<br />
Basic Operation<br />
Connections<br />
69<br />
Basic Section
Basic Section<br />
70<br />
Basic Structure<br />
Basic Structure Basic Operation Connections<br />
1 Sets <strong>the</strong> Part EQ parameters applied to each<br />
part in <strong>the</strong> EQ display (page 144) of<br />
Performance Part Edit.<br />
2 Determines <strong>the</strong> Send Level/Return Level to/<br />
from <strong>the</strong> Reverb/Chorus and <strong>the</strong> signal level<br />
sent from <strong>the</strong> Chorus to <strong>the</strong> Reverb.<br />
This block also selects <strong>the</strong> Effect Types of Reverb and<br />
Chorus respectively and sets <strong>the</strong> related parameters.<br />
These can be set in <strong>the</strong> Connect display (page 149)<br />
and <strong>the</strong> Reverb display/Chorus display (page 150) of<br />
Performance Common Edit.<br />
Mixing mode<br />
1<br />
Part<br />
Part EQ<br />
Mixing<br />
1 Sets <strong>the</strong> Part EQ parameters applied to each<br />
part in <strong>the</strong> EQ display (page 236) of Mixing Part<br />
Edit.<br />
2 Selects <strong>the</strong> eight Parts to which <strong>the</strong> Insertion<br />
Effect is applied from Parts 1 – 16 and <strong>the</strong> AD<br />
Part.<br />
This can be set in <strong>the</strong> Insertion Effect Switch display<br />
(page 234) of <strong>the</strong> Mixing Edit.<br />
3 Determines <strong>the</strong> Send Level/Return Level to/<br />
from <strong>the</strong> Reverb/Chorus and <strong>the</strong> signal level<br />
sent from <strong>the</strong> Chorus to <strong>the</strong> Reverb.<br />
This block also selects <strong>the</strong> Effect Types of Reverb and<br />
Chorus respectively and sets <strong>the</strong> related parameters.<br />
These can be set in <strong>the</strong> Connect display (page 234)<br />
and <strong>the</strong> Reverb display/Chorus display (page 235) of<br />
Mixing Common Edit.<br />
4 Selects <strong>the</strong> Master Effect type and sets <strong>the</strong><br />
Effect parameters in <strong>the</strong> Master Effect display<br />
(page 234) of Mixing Common Edit.<br />
5 Sets <strong>the</strong> Master EQ parameters in <strong>the</strong> Master<br />
EQ display (page 234) of Mixing Common Edit.<br />
n The Effect settings of 1 – 3 in <strong>the</strong> Voice mode illustrated on<br />
page 69 are available for up to eight parts for which <strong>the</strong><br />
Insertion Effect is turned on.<br />
MOTIF <strong>XS</strong> Owner’s <strong>Manual</strong><br />
Voice<br />
Insertion A/B<br />
Part 1 – 16<br />
AD Part<br />
2<br />
Send<br />
Level<br />
Chorus<br />
3<br />
Reverb<br />
Chorus To<br />
Reverb<br />
3 Selects <strong>the</strong> Master Effect type and sets <strong>the</strong><br />
Effect parameters in <strong>the</strong> Master Effect display<br />
(page 146) of Performance Common Edit.<br />
4 Sets <strong>the</strong> Master EQ parameters in <strong>the</strong> Master<br />
EQ display (page 146) of Performance<br />
Common Edit.<br />
n The Effect settings of 1 – 3 in <strong>the</strong> Voice mode illustrated on<br />
page 69 are available also in <strong>the</strong> Performance mode.<br />
Return<br />
Level<br />
4 5<br />
Master Effect Master EQ<br />
Effect Category and Type<br />
This section explains <strong>the</strong> Effect categories and <strong>the</strong>ir types.<br />
The Effect Type list described below for each category<br />
contains <strong>the</strong> columns: Rev (Reverb), Cho (Chorus), Ins<br />
(Insertion) and Mas (Master Effect). The checkmarks<br />
indicated in <strong>the</strong>se columns means <strong>the</strong> Effect Type is<br />
available for each block. These Effect types (with <strong>the</strong><br />
checkmarks indicated in each list) can be selected from<br />
<strong>the</strong> panel controls.<br />
Reverb<br />
Also called “reverberation,” this refers to <strong>the</strong> sound energy<br />
remaining in a room or closed space after <strong>the</strong> original<br />
sound stops. Similar to yet different from echo, reverb is <strong>the</strong><br />
indirect, diffuse sound of reflections from <strong>the</strong> walls and<br />
ceiling that ac<strong>com</strong>pany <strong>the</strong> direct sound. The<br />
characteristics of this indirect sound depends on <strong>the</strong> size<br />
of <strong>the</strong> room or space and <strong>the</strong> materials and furnishings in<br />
<strong>the</strong> room. Reverb Effect types use digital signal processing<br />
to simulate <strong>the</strong>se characteristics.<br />
Effect Type Rev Cho Ins Description<br />
REV-X HALL ✔ – – Reverb emulating <strong>the</strong><br />
acoustics of a concert hall<br />
using <strong>the</strong> REV-X technology.<br />
R3 HALL ✔ – – Reverb emulating <strong>the</strong><br />
acoustics of a concert hall<br />
using <strong>the</strong> algorithm derived<br />
from <strong>the</strong> Yamaha ProR3.
Effect Type Rev Cho Ins Description<br />
SPX HALL ✔ ✔ ✔ Reverb emulating <strong>the</strong><br />
acoustics of a concert hall<br />
derived from <strong>the</strong> Yamaha<br />
SPX1000.<br />
REV-X ROOM ✔ – – Reverb emulating <strong>the</strong><br />
acoustics of a room using<br />
<strong>the</strong> REV-X technology.<br />
R3 ROOM ✔ – – Reverb emulating <strong>the</strong><br />
acoustics of a room using<br />
<strong>the</strong> algorithm derived from<br />
<strong>the</strong> Yamaha ProR3.<br />
SPX ROOM ✔ ✔ ✔ Reverb emulating <strong>the</strong><br />
acoustics of a room derived<br />
from <strong>the</strong> Yamaha SPX1000.<br />
R3 PLATE ✔ – – Reverb emulating a metal<br />
plate using <strong>the</strong> algorithm<br />
derived from <strong>the</strong> Yamaha<br />
ProR3.<br />
SPX STAGE ✔ ✔ ✔ Reverb appropriate for a<br />
solo instrument derived from<br />
<strong>the</strong> Yamaha SPX1000.<br />
SPACE<br />
SIMULATOR<br />
Delay<br />
An effect (or device) that delays an audio signal.<br />
Chorus<br />
✔ – – Reverb which lets you set<br />
<strong>the</strong> space size by specifying<br />
<strong>the</strong> width, height, and depth.<br />
Effect Type Rev Ins Mas Description<br />
CROSS DELAY ✔ ✔ – The feedback of <strong>the</strong> two<br />
delayed sounds is crossed.<br />
TEMPO CROSS<br />
DELAY<br />
TEMPO DELAY<br />
MONO<br />
TEMPO DELAY<br />
STEREO<br />
CONTROL<br />
DELAY<br />
✔ ✔ – Cross delay synchronized<br />
with <strong>the</strong> tempo of Song/<br />
Pattern/Arpeggio.<br />
✔ ✔ – Mono delay synchronized<br />
with <strong>the</strong> tempo of Song/<br />
Pattern/Arpeggio.<br />
✔ ✔ – Stereo delay synchronized<br />
with <strong>the</strong> tempo of Song/<br />
Pattern/Arpeggio.<br />
– ✔ – Delay with delay time<br />
controllable in real time.<br />
DELAY LR ✔ ✔ – Produces two delayed<br />
sounds: L and R.<br />
DELAY LCR ✔ ✔ – Produces three delayed<br />
sounds: L, R and C (center).<br />
DELAY LR<br />
(Stereo)<br />
✔ ✔ ✔ Produces two delayed<br />
sounds in stereo: L and R.<br />
Depending on <strong>the</strong> particular chorus type and parameters,<br />
this can make a voice sound “larger,” as if several identical<br />
instruments were playing in unison, or it can give a voice<br />
greater warmth and depth.<br />
Effect Type Cho Ins Description<br />
G CHORUS ✔ ✔ A Chorus Effect that produces a<br />
richer and more <strong>com</strong>plex<br />
modulation than normal chorus.<br />
2 MODULATOR ✔ ✔ A Chorus Effect consisting of <strong>the</strong><br />
pitch modulation and <strong>the</strong> amplitude<br />
modulation.<br />
SPX CHORUS ✔ ✔ An effect which uses a 3-phase<br />
LFO to add modulation and<br />
spaciousness to <strong>the</strong> sound.<br />
SYMPHONIC ✔ ✔ A multi-stage version of SPX<br />
CHORUS modulation.<br />
Effect Type Cho Ins Description<br />
ENSEMBLE<br />
DETUNE<br />
Flanger<br />
This effect creates a swirling, metallic sound.<br />
Basic Structure<br />
Phaser<br />
Cyclically modulates <strong>the</strong> phase to add modulation to <strong>the</strong><br />
sound.<br />
Tremolo & Rotary<br />
✔ ✔ Chorus effect without modulation,<br />
created by adding a slightly pitchshifted<br />
sound.<br />
Effect Type Cho Ins Description<br />
VCM FLANGER ✔ ✔ Flanger with VCM technology<br />
producing a vintage sound.<br />
CLASSIC<br />
FLANGER<br />
✔ ✔ Conventional type of flanger.<br />
TEMPO<br />
FLANGER<br />
✔ ✔ Tempo-synchronized flanger.<br />
DYNAMIC<br />
FLANGER<br />
– ✔ Dynamically controlled flanger.<br />
Effect Type Cho Ins Description<br />
VCM PHASER<br />
MONO<br />
VCM PHASER<br />
STEREO<br />
TEMPO<br />
PHASER<br />
DYNAMIC<br />
PHASER<br />
✔ ✔ Mono phaser with VCM technology<br />
producing a vintage sound.<br />
✔ ✔ Stereo phaser with VCM technology<br />
producing a vintage sound.<br />
✔ ✔ Tempo-synchronized phaser.<br />
– ✔ Dynamically controlled phase<br />
shifter<br />
The tremolo effect cyclically modulates <strong>the</strong> volume.<br />
The Rotary Speaker effect simulates <strong>the</strong> characteristic<br />
vibrato effect of a rotary speaker.<br />
Effect Type Ins Description<br />
AUTO PAN ✔ An effect which cyclically moves <strong>the</strong> sound<br />
left/right and front/back.<br />
TREMOLO ✔ An effect which cyclically modulates <strong>the</strong><br />
volume.<br />
ROTARY<br />
SPEAKER<br />
✔ Simulation of a rotary speaker<br />
Distortion<br />
This type can be used mainly for guitar, adding distortion<br />
with an edge to <strong>the</strong> sound.<br />
Effect Type Ins Mas Description<br />
AMP<br />
SIMULATOR 1<br />
AMP<br />
SIMULATOR 2<br />
COMP<br />
DISTORTION<br />
COMP<br />
DISTORTION<br />
DELAY<br />
✔ – A simulation of a guitar amp.<br />
✔ – A simulation of a guitar amp.<br />
✔ – Since a Compressor is included in<br />
<strong>the</strong> first stage, steady distortion can<br />
be produced regardless of<br />
changes in input level.<br />
✔ ✔ Compressor, Distortion and Delay<br />
are connected in series.<br />
Basic Structure<br />
Basic Operation<br />
Connections<br />
MOTIF <strong>XS</strong> Owner’s <strong>Manual</strong> 71<br />
Basic Section
Basic Section<br />
72<br />
Basic Structure<br />
Basic Structure Basic Operation Connections<br />
Compressor<br />
Compressor is an effect <strong>com</strong>monly used to limit and<br />
<strong>com</strong>press <strong>the</strong> dynamics (softness/loudness) of an audio<br />
signal. For signals that vary widely in dynamics, such as<br />
vocals and guitar parts, it “squeezes” <strong>the</strong> dynamic range,<br />
effectively making soft sounds louder and loud sounds<br />
softer. When used with gain to boost <strong>the</strong> overall level, this<br />
creates a more powerful, more consistently high-level<br />
sound. Compression can be used to increase sustain for<br />
electric guitar, smooth out <strong>the</strong> volume of a vocal, or bring a<br />
drum kit or rhythm pattern fur<strong>the</strong>r up-front in <strong>the</strong> mix.<br />
Effect Type Ins Mas Description<br />
VCM<br />
COMPRESSOR<br />
376<br />
✔ ✔ Compressor with VCM technology.<br />
CLASSIC<br />
COMPRESSOR<br />
MULTI BAND<br />
COMP<br />
Wah<br />
This Effect cyclically modulates <strong>the</strong> tone brightness (cutoff<br />
frequency of a filter). Auto Wah modulates <strong>the</strong> tone via<br />
LFO, Touch Wah modulates <strong>the</strong> tone via volume (note on<br />
velocity) and Pedal Wah modulates <strong>the</strong> tone <strong>the</strong> pedal<br />
control.<br />
Lo-Fi<br />
This Effect intentionally degrades <strong>the</strong> audio quality of <strong>the</strong><br />
input signal via several methods such as lowering <strong>the</strong><br />
sampling frequency.<br />
Tech<br />
This Effect changes <strong>the</strong> tonal characteristics radically by<br />
using a filter and modulation.<br />
MOTIF <strong>XS</strong> Owner’s <strong>Manual</strong><br />
✔ – Conventional type of <strong>com</strong>pressor.<br />
✔ ✔ 3-band type <strong>com</strong>pressor.<br />
Effect Type Ins Description<br />
VCM AUTO WAH ✔ Modulates <strong>the</strong> tone via <strong>the</strong> LFO.<br />
VCM TOUCH WAH ✔ Modulates <strong>the</strong> tone via <strong>the</strong> volume<br />
(note on velocity).<br />
VCM PEDAL WAH ✔ Modulates <strong>the</strong> tone via <strong>the</strong> pedal<br />
control. For best results, assign <strong>the</strong><br />
Pedal Control parameter of this<br />
Effect type to <strong>the</strong> Foot Controller in<br />
<strong>the</strong> Controller Set display, <strong>the</strong>n use<br />
<strong>the</strong> Foot Controller to control this<br />
effect in real time.<br />
Effect Type Ins Mas Description<br />
LO-FI ✔ ✔ Degrades <strong>the</strong> audio quality of <strong>the</strong><br />
input signal to get a lo-fi sound.<br />
NOISY ✔ – Adds <strong>the</strong> noise to <strong>the</strong> current<br />
sound.<br />
DIGITAL<br />
TURNTABLE<br />
✔ – Simulates <strong>the</strong> noise of an analog<br />
record.<br />
Effect Type Ins Mas Description<br />
RING<br />
MODULATOR<br />
DYNAMIC RING<br />
MODULATOR<br />
✔ ✔ An effect that modifies <strong>the</strong> pitch by<br />
applying amplitude modulation to<br />
<strong>the</strong> frequency of <strong>the</strong> input.<br />
✔ – Dynamically controlled Ring<br />
Modulator<br />
Effect Type Ins Mas Description<br />
DYNAMIC<br />
FILTER<br />
✔ ✔ Dynamically controlled filter<br />
AUTO SYNTH ✔ – Processes <strong>the</strong> input signal into a<br />
syn<strong>the</strong>sizer-type sound.<br />
ISOLATOR ✔ ✔ Controls <strong>the</strong> level of a specified<br />
frequency band of <strong>the</strong> input signal.<br />
SLICE ✔ ✔ Slices <strong>the</strong> AEG of <strong>the</strong> Voice sound.<br />
TECH<br />
MODULATION<br />
Vocoder<br />
✔ – Adds a unique feeling of<br />
modulation similar to ring<br />
modulation.<br />
The Vocoder effect does not belong to any category.<br />
When you want to use this effect, set <strong>the</strong> INSERTION<br />
CONNECT parameter in <strong>the</strong> Effect Connect display<br />
(page 109) to “ins L.”<br />
Effect Type Ins Description<br />
VOCODER ✔ This effect extracts characteristics from <strong>the</strong><br />
microphone sound and applies it to <strong>the</strong><br />
Voice played from <strong>the</strong> keyboard. This<br />
creates a distinctive, “robot voice” effect<br />
which is generated when you play <strong>the</strong><br />
keyboard and sing or speak into <strong>the</strong><br />
microphone at <strong>the</strong> same time.<br />
Misc<br />
This category includes <strong>the</strong> o<strong>the</strong>r effect types.<br />
Effect Type Cho Ins Description<br />
VCM EQ 501 – ✔ Vintage 5-band parametric EQ with<br />
VCM technology.<br />
PITCH<br />
CHANGE<br />
EARLY<br />
REFLECTION<br />
HARMONIC<br />
ENHANCER<br />
TALKING<br />
MODULATOR<br />
DAMPER<br />
RESONANCE<br />
– ✔ Changes <strong>the</strong> pitch of <strong>the</strong> input<br />
signal.<br />
✔ ✔ This effect isolates only <strong>the</strong> early<br />
reflection <strong>com</strong>ponents of <strong>the</strong><br />
reverb.<br />
– ✔ Adds new harmonics to <strong>the</strong> input<br />
signal to make <strong>the</strong> sound stand out.<br />
– ✔ Adds a vowel sound to <strong>the</strong> input<br />
signal.<br />
– ✔ Simulates <strong>the</strong> resonance produced<br />
when <strong>the</strong> damper pedal of <strong>the</strong><br />
piano is pressed.<br />
VCM (Virtual Circuitry Modeling)<br />
VCM is a technology that au<strong>the</strong>ntically models <strong>the</strong><br />
elements in analog circuitry (such as resistors and<br />
capacitors). Effect types using <strong>the</strong> VCM technology<br />
produce <strong>the</strong> uniquely warm characteristics of vintage<br />
processing gear.<br />
VCM Compressor 376<br />
This effect emulates <strong>the</strong> characteristics of analog<br />
<strong>com</strong>pressors, used as standard effects in recording<br />
studios. It frames and thickens <strong>the</strong> sound, and is suitable<br />
for drum and bass sounds.
VCM Equalizer 501<br />
This effect emulates <strong>the</strong> characteristics of analog<br />
equalizers used in <strong>the</strong> 1970s, recreating a warm, highquality<br />
flanger effect.<br />
VCM Flanger<br />
These effects emulate <strong>the</strong> characteristics of analog flanger<br />
used in <strong>the</strong> 1970s, recreating a warm, high-quality flanger<br />
effect.<br />
VCM Phaser Mono, VCM Phaser Stereo<br />
This effect emulates <strong>the</strong> characteristics of analog phasers<br />
used in <strong>the</strong> 1970s, recreating a warm, high-quality phaser<br />
effect.<br />
VCM Auto Wah, VCM Touch Wah, VCM Pedal<br />
Wah<br />
These effects emulate <strong>the</strong> characteristics of analog Wah<br />
used in <strong>the</strong> 1970s, recreating a warm, high-quality wahwah<br />
effect.<br />
REV-X<br />
REV-X is a reverb algorithm developed by Yamaha. It<br />
provides a high-density, richly reverberant sound quality,<br />
with smooth attenuation, spread and depth that work<br />
toge<strong>the</strong>r to enhance <strong>the</strong> original sound.<br />
The MOTIF <strong>XS</strong> features two types of REV-X effects: REV-X<br />
Hall and REV-X Room.<br />
Effect Parameters<br />
Each of <strong>the</strong> Effect Types has parameters determining how<br />
<strong>the</strong> Effect is applied to <strong>the</strong> sound. A variety of sounds can<br />
be obtained from a single effect type by setting <strong>the</strong>se<br />
parameters. For information about <strong>the</strong> Effect parameters,<br />
see below.<br />
Preset settings for Effect parameters<br />
Preset settings for parameters of each effect type are<br />
provided as templates and can be selected in <strong>the</strong> Effect<br />
Type selection display. To get a desired effect sound, try<br />
first selecting one of <strong>the</strong> Presets close to your imagined<br />
sound, <strong>the</strong>n change <strong>the</strong> parameters as necessary.<br />
Effect Parameters<br />
Basic Structure<br />
Preset settings can be selected here.<br />
n Some parameters below may appear in different effect types<br />
with <strong>the</strong> same name, but actually have different functions<br />
depending on <strong>the</strong> particular effect type. For <strong>the</strong>se parameters,<br />
two or three types of explanations are given.<br />
Parameter name Descriptions<br />
AEG Phase Offsets <strong>the</strong> phase of <strong>the</strong> AEG.<br />
AM Depth Determines <strong>the</strong> depth of <strong>the</strong> amplitude modulation.<br />
AM Inverse R Determines <strong>the</strong> phase of <strong>the</strong> amplitude modulation for <strong>the</strong> R<br />
channel.<br />
AM Speed Determines <strong>the</strong> amplitude modulation speed.<br />
AM Wave Selects <strong>the</strong> wave for modulating <strong>the</strong> amplitude.<br />
AMP Type Selects <strong>the</strong> amplifier type to be simulated.<br />
Analog Feel Adds <strong>the</strong> characteristics of an analog flanger to <strong>the</strong> sound.<br />
Attack Determines <strong>the</strong> amount of time that elapses between <strong>the</strong> playing<br />
of a key and <strong>the</strong> start of <strong>the</strong> <strong>com</strong>pressor effect.<br />
Attack Offset Determines <strong>the</strong> amount of time that elapses between <strong>the</strong> playing<br />
of a key and <strong>the</strong> start of <strong>the</strong> wah effect.<br />
Attack Time Determines <strong>the</strong> attack time of <strong>the</strong> envelope follower.<br />
Bit Assign Determines how <strong>the</strong> Word Length is applied to <strong>the</strong> sound.<br />
Bottom *1 Determines <strong>the</strong> minimum value of <strong>the</strong> wah filter.<br />
BPF1–10 Gain Determines each output gain of BPFs 1 – 10 of <strong>the</strong> Vocoder<br />
effect.<br />
Click Density Determines <strong>the</strong> frequency at which <strong>the</strong> click sounds.<br />
Click Level Determines <strong>the</strong> click level.<br />
Color *2<br />
Determines <strong>the</strong> fixed phase modulation.<br />
Common Release This is a parameter of “Multi Band Comp.” This parameter<br />
determines <strong>the</strong> amount of time that elapses between <strong>the</strong><br />
releasing of a note and <strong>the</strong> end of <strong>the</strong> effect.<br />
Compress Determines <strong>the</strong> minimum input level at which <strong>the</strong> <strong>com</strong>pressor<br />
effect is applied.<br />
Control Type This is a parameter of “Control Delay.” When set to “Normal,” <strong>the</strong><br />
delay effect is always applied to <strong>the</strong> sound. When set to<br />
“Scratch,” <strong>the</strong> delay effect is not applied if both <strong>the</strong> Delay Time<br />
and Delay Time Offset are set to “0.”<br />
Damper Control When <strong>the</strong> half-damper <strong>com</strong>patible FC3 footswitch is connected<br />
to <strong>the</strong> SUSTAIN jack, <strong>the</strong> Damper Control parameter is controlled<br />
by <strong>the</strong> FC3 over a range of 0 – 127, allowing for partial damper<br />
effects, such as is available on an actual grand piano.<br />
Decay Controls how <strong>the</strong> reverb sound decays.<br />
Delay Level C Determines <strong>the</strong> level of <strong>the</strong> delayed sound for <strong>the</strong> center channel.<br />
Delay Mix Determines <strong>the</strong> level of <strong>the</strong> delayed mixed sound when multiple<br />
effects are applied.<br />
Delay Offset Determines <strong>the</strong> offset value of <strong>the</strong> delay modulation.<br />
Delay Time Determines <strong>the</strong> delay of <strong>the</strong> sound in note value or absolute time.<br />
Delay Time C, L, R Determines <strong>the</strong> delay time for each channel: center, left and right.<br />
Delay Time L>R Determines <strong>the</strong> amount of time between <strong>the</strong> moment <strong>the</strong> sound is<br />
input from <strong>the</strong> L channel and <strong>the</strong> moment <strong>the</strong> sound is output to<br />
<strong>the</strong> R channel.<br />
Delay Time Ofst R Determines <strong>the</strong> delay time for <strong>the</strong> R channel as offset.<br />
Delay Time R>L Determines <strong>the</strong> amount of time between <strong>the</strong> moment <strong>the</strong> sound is<br />
input from <strong>the</strong> R channel and <strong>the</strong> moment <strong>the</strong> sound is output to<br />
<strong>the</strong> L channel.<br />
Delay Transition Determines <strong>the</strong> speed (rate) at which <strong>the</strong> delay time is changed<br />
Rate<br />
from <strong>the</strong> current value to <strong>the</strong> specified new value.<br />
Density Determines <strong>the</strong> density of <strong>the</strong> reverberations or reflections.<br />
Depth When “Space Simulator” is selected, this parameter determines<br />
<strong>the</strong> depth of <strong>the</strong> simulated room.<br />
When “VCM Flanger” is selected, this parameter determines <strong>the</strong><br />
amplitude of <strong>the</strong> LFO wave which controls <strong>the</strong> cyclic change of<br />
<strong>the</strong> delay modulation.<br />
Basic Structure<br />
Basic Operation<br />
Connections<br />
MOTIF <strong>XS</strong> Owner’s <strong>Manual</strong> 73<br />
Basic Section
Basic Section<br />
74<br />
Basic Structure<br />
Basic Structure Basic Operation Connections<br />
Parameter name Descriptions<br />
Depth When phaser type is selected, this parameter determines <strong>the</strong><br />
amplitude of <strong>the</strong> LFO wave which controls <strong>the</strong> cyclic change of<br />
<strong>the</strong> phase modulation.<br />
Detune Determines <strong>the</strong> amount of pitch to be detuned.<br />
Device Selects <strong>the</strong> device for changing how to distort <strong>the</strong> sound.<br />
Diffusion Determines <strong>the</strong> spread of <strong>the</strong> selected effect.<br />
Direction Determines <strong>the</strong> direction of <strong>the</strong> modulation controlled by <strong>the</strong><br />
envelope follower.<br />
Divide Freq High Determines <strong>the</strong> high frequency for dividing <strong>the</strong> entire sound into<br />
three bands.<br />
Divide Freq Low Determines <strong>the</strong> low frequency for dividing <strong>the</strong> entire sound into<br />
three bands.<br />
Divide Min Level Determines <strong>the</strong> minimum level of <strong>the</strong> portions extracted via <strong>the</strong><br />
slice effect.<br />
Divide Type Determines how <strong>the</strong> sound (wave) is sliced by <strong>the</strong> note length.<br />
Drive When one of <strong>the</strong> distortion, noisy and slice effects is selected,<br />
this parameter determines <strong>the</strong> extent to which <strong>the</strong> sound is<br />
distorted.<br />
When one of <strong>the</strong> misc effects is selected, this parameter<br />
determines <strong>the</strong> extent to which <strong>the</strong> enhancer or talking modulator<br />
is applied.<br />
Drive Horn Determines <strong>the</strong> depth of <strong>the</strong> modulation generated via <strong>the</strong><br />
rotation of <strong>the</strong> horn.<br />
Drive Rotor Determines <strong>the</strong> depth of <strong>the</strong> modulation generated via <strong>the</strong><br />
rotation of <strong>the</strong> rotor.<br />
Dry Level Determines <strong>the</strong> level of <strong>the</strong> dry sound (to which <strong>the</strong> effect is not<br />
applied).<br />
Dry LPF Cutoff<br />
Frequency<br />
MOTIF <strong>XS</strong> Owner’s <strong>Manual</strong><br />
Determines <strong>the</strong> cutoff frequency of <strong>the</strong> low pass filter applied to<br />
<strong>the</strong> dry sound.<br />
Dry Mix Level Determines <strong>the</strong> level of <strong>the</strong> dry sound (to which <strong>the</strong> effect is not<br />
applied).<br />
Dry Send to Noise Determines <strong>the</strong> level of <strong>the</strong> dry signal sent to <strong>the</strong> noise effect.<br />
Dry/Wet Balance Determines <strong>the</strong> balance of <strong>the</strong> dry sound and effect sound.<br />
Dyna Level Offset Determines <strong>the</strong> offset value added to <strong>the</strong> output from <strong>the</strong><br />
envelope follower.<br />
Dyna Threshold<br />
Level<br />
Determines <strong>the</strong> minimum level at which <strong>the</strong> envelope follower<br />
starts.<br />
Edge Sets <strong>the</strong> curve that determines how <strong>the</strong> sound is distorted.<br />
Emphasis Determines <strong>the</strong> change of <strong>the</strong> characteristics in high frequencies.<br />
EQ Frequency Determines <strong>the</strong> center frequency for each band of <strong>the</strong> EQ.<br />
EQ Gain Determines <strong>the</strong> level gain of <strong>the</strong> EQ center frequency for each<br />
band.<br />
EQ High<br />
Determines <strong>the</strong> center frequency of <strong>the</strong> high EQ band that is<br />
Frequency attenuated/boosted.<br />
EQ High Gain Determines <strong>the</strong> amount of boost or attenuation applied to <strong>the</strong><br />
high EQ band.<br />
EQ Low<br />
Determines <strong>the</strong> center frequency of <strong>the</strong> low EQ band that is<br />
Frequency attenuated/boosted.<br />
EQ Low Gain Determines <strong>the</strong> amount of boost or attenuation applied to <strong>the</strong> low<br />
EQ band.<br />
EQ Mid Frequency Determines <strong>the</strong> center frequency of <strong>the</strong> middle EQ band that is<br />
attenuated/boosted.<br />
EQ Mid Gain Determines <strong>the</strong> amount of boost or attenuation applied to <strong>the</strong><br />
middle EQ band.<br />
EQ Mid Width Determines <strong>the</strong> width of <strong>the</strong> middle EQ band.<br />
EQ Width Determines <strong>the</strong> width of <strong>the</strong> EQ band.<br />
ER/Rev Balance Determines <strong>the</strong> level balance of <strong>the</strong> early reflection and reverb<br />
sound.<br />
F/R Depth This parameter of “Auto Pan” (available when PAN Direction is<br />
set to “L turn” and “R turn”) determines <strong>the</strong> depth of <strong>the</strong> F/R<br />
(front/rear) pan.<br />
FB Hi Damp Ofst R Determines <strong>the</strong> amount of decay in high frequencies for <strong>the</strong> R<br />
channel as offset.<br />
FB Level Ofst R Determines <strong>the</strong> feedback level for <strong>the</strong> R channel as offset.<br />
Feedback Determines <strong>the</strong> level of <strong>the</strong> sound signal output from <strong>the</strong> effect<br />
block and returned to its own input.<br />
Feedback High Determines how <strong>the</strong> high frequencies of <strong>the</strong> feedback sound<br />
Damp<br />
decay.<br />
Feedback Level When one of <strong>the</strong> reverb and early reflection effects is selected,<br />
this parameter determines <strong>the</strong> feedback level of <strong>the</strong> initial delay.<br />
When one of <strong>the</strong> delay, chorus, flanger, <strong>com</strong>p distortion delay,<br />
and TEC effects is selected, this parameter determines <strong>the</strong><br />
feedback level output from <strong>the</strong> delay and returned to <strong>the</strong> input.<br />
When “Tempo Phaser” or “Dynamic Phaser” is selected, this<br />
parameter determines <strong>the</strong> feedback level output from <strong>the</strong> phaser<br />
and returned to <strong>the</strong> input.<br />
Feedback Level 1, Determines <strong>the</strong> feedback level of <strong>the</strong> delayed sound in each of<br />
2<br />
<strong>the</strong> 1st and 2nd series.<br />
Feedback Time Determines <strong>the</strong> delay time of <strong>the</strong> feedback.<br />
Feedback Time 1, Determines <strong>the</strong> time of <strong>the</strong> feedback delay 1, 2, L and R.<br />
2, L, R<br />
Filter Type When “Lo-Fi” is selected, this parameter selects <strong>the</strong> tonal<br />
characteristic type.<br />
When “Dynamic Filter” is selected, this parameter determines <strong>the</strong><br />
filter type.<br />
Fine 1, 2 Determines <strong>the</strong> pitch finely for each of <strong>the</strong> 1st series and 2nd<br />
series.<br />
Parameter name Descriptions<br />
Formant Offset This parameter of <strong>the</strong> Vocoder adds <strong>the</strong> offset value to <strong>the</strong> cutoff<br />
frequency of BPF for <strong>the</strong> Inst input.<br />
Formant Shift This parameter of <strong>the</strong> Vocoder shifts <strong>the</strong> cutoff frequency of <strong>the</strong><br />
BPF for Inst input.<br />
Gate Switch When set to “off,” <strong>the</strong> output from <strong>the</strong> HPF and <strong>the</strong> Noise<br />
Generator is passed through <strong>the</strong> gate. When set to “on,” <strong>the</strong><br />
output from <strong>the</strong> HPF and <strong>the</strong> Noise Generator passes through <strong>the</strong><br />
gate only if <strong>the</strong> audio signal is input to <strong>the</strong> Inst.<br />
Gate Time Determines <strong>the</strong> gate time of <strong>the</strong> sliced portion.<br />
Height Determines <strong>the</strong> height of <strong>the</strong> simulated room.<br />
Hi Resonance Adjusts <strong>the</strong> resonance of <strong>the</strong> high frequencies.<br />
High Attack Determines <strong>the</strong> amount of time from <strong>the</strong> moment a note is<br />
pressed to <strong>the</strong> moment <strong>the</strong> <strong>com</strong>pressor is applied to <strong>the</strong> high<br />
frequencies.<br />
High Gain Determines <strong>the</strong> output gain for <strong>the</strong> high frequencies.<br />
High Level Determines <strong>the</strong> level of <strong>the</strong> high frequencies.<br />
High Mute Switches <strong>the</strong> mute status of <strong>the</strong> high frequencies.<br />
High Ratio When “REV-X Hall” or “REV-X Room” is selected, this parameter<br />
determines <strong>the</strong> ratio of <strong>the</strong> high frequencies.<br />
When “Multi Band Comp” is selected, this parameter determines<br />
<strong>the</strong> ratio of <strong>the</strong> <strong>com</strong>pressor for <strong>the</strong> high frequencies.<br />
High Threshold Determines <strong>the</strong> minimum input level at which <strong>the</strong> effect is applied<br />
to <strong>the</strong> high frequencies.<br />
Horn Speed Fast Determines <strong>the</strong> speed of <strong>the</strong> horn when <strong>the</strong> slow/fast switch is set<br />
to “fast.”<br />
Horn Speed SLow Determines <strong>the</strong> speed of <strong>the</strong> horn when <strong>the</strong> slow/fast switch is set<br />
to “slow.”<br />
HPF Freq Determines <strong>the</strong> Cutoff frequency for <strong>the</strong> High Pass Filter applied<br />
to <strong>the</strong> microphone sound.<br />
HPF Output Level Determines how much <strong>the</strong> output from high pass filter is mixed<br />
with <strong>the</strong> output from <strong>the</strong> Vocoder.<br />
Initial Delay Determines <strong>the</strong> amount of time that elapses between <strong>the</strong> direct,<br />
original sound and <strong>the</strong> initial reflections.<br />
Initial Delay 1, 2 Determines <strong>the</strong> delay time until <strong>the</strong> initial reflection for each of <strong>the</strong><br />
1st series and 2nd series.<br />
Initial Delay Lch,<br />
Rch<br />
Determines <strong>the</strong> amount of time that elapses between <strong>the</strong> direct,<br />
original sound and <strong>the</strong> initial reflections (echoes) that follow it for<br />
each of R and L channels.<br />
Input Level Determines <strong>the</strong> input level of <strong>the</strong> signal to which <strong>the</strong> <strong>com</strong>pressor<br />
is applied.<br />
Input Mode Selects mono or stereo configuration for <strong>the</strong> input sound.<br />
Input Select Selects an input channel.<br />
Inst Input Level Determines <strong>the</strong> level of <strong>the</strong> instrument sound to which <strong>the</strong><br />
Vocoder is applied.<br />
L/R Depth Determines <strong>the</strong> depth of <strong>the</strong> L/R pan effect.<br />
L/R Diffusion Determines <strong>the</strong> spread of <strong>the</strong> sound.<br />
Lag Determines <strong>the</strong> lagging time additionally applied to <strong>the</strong> delayed<br />
sound specified via a note length.<br />
LFO Depth When one of “SPX Chorus,” “Symphonic,” “Classic Flanger,” and<br />
“Ring Modulator” is selected, this parameter determines <strong>the</strong><br />
depth of <strong>the</strong> modulation.<br />
When “Tempo Phase” is selected, this parameter determines <strong>the</strong><br />
frequency of <strong>the</strong> phase modulation.<br />
LFO Phase Determines <strong>the</strong> L/R phase difference of <strong>the</strong> modulated wave.<br />
difference<br />
LFO Phase Reset Determines how to reset <strong>the</strong> initial phase of <strong>the</strong> LFO.<br />
LFO Speed When one ny of <strong>the</strong> chorus effects, flanger effects, tremolo and<br />
ring modulator is selected, this parameter determines <strong>the</strong><br />
frequency of <strong>the</strong> modulation.<br />
When “Tempo Phaser” is selected, this parameter determines <strong>the</strong><br />
modulation speed via a note type.<br />
When “Auto Pan” is selected, this parameter determines <strong>the</strong><br />
frequency of <strong>the</strong> Auto Pan.<br />
LFO Wave When any of <strong>the</strong> flanger effects and “Ring Modulator,” this<br />
parameter selects <strong>the</strong> wave for modulation.<br />
When “Auto Pan” is selected, this parameter determines <strong>the</strong><br />
panning curve.<br />
When “VCM Auto Wah” is selected, this parameter selects <strong>the</strong><br />
wave, sine or square.<br />
Liveness Determines <strong>the</strong> decay characteristic of Early Reflection.<br />
Low Attack Determines <strong>the</strong> amount of time from <strong>the</strong> moment a note is<br />
pressed to <strong>the</strong> moment <strong>the</strong> <strong>com</strong>pressor is applied to <strong>the</strong> low<br />
frequencies.<br />
Low Gain Determines <strong>the</strong> output gain for <strong>the</strong> low frequencies.<br />
Low Level Determines <strong>the</strong> output level for <strong>the</strong> low frequencies.<br />
Low Mute Determines whe<strong>the</strong>r <strong>the</strong> low frequency band is off or on.<br />
Low Ratio When “REV-X Hall” or “REV-X Room” is selected, this parameter<br />
determines <strong>the</strong> ratio of <strong>the</strong> low frequencies.<br />
When “Multi Band Comp” is selected, this parameter determines<br />
<strong>the</strong> ratio of <strong>the</strong> <strong>com</strong>pressor for <strong>the</strong> low frequencies.<br />
Low Threshold Determines <strong>the</strong> minimum input level at which <strong>the</strong> effect is applied<br />
to <strong>the</strong> low frequencies.<br />
LPF Resonance Determines <strong>the</strong> resonance of <strong>the</strong> low pass filter for <strong>the</strong> input<br />
sound.<br />
<strong>Manual</strong> When “VCM Flanger” is selected, this parameter determines <strong>the</strong><br />
offset value of <strong>the</strong> delay modulation.
Parameter name Descriptions<br />
<strong>Manual</strong> When “VCM Phaser mono” or “VCM Phaser stereo” is selected,<br />
this parameter determines <strong>the</strong> offset value of <strong>the</strong> phase<br />
modulation.<br />
Meter Changes <strong>the</strong> meter.<br />
Mic Gate<br />
Threshold<br />
Determines <strong>the</strong> threshold level of <strong>the</strong> noise gate for <strong>the</strong><br />
microphone sound.<br />
Mic Level Determines <strong>the</strong> input level of <strong>the</strong> microphone sound.<br />
Mic L-R Angle Determines <strong>the</strong> L/R angle of <strong>the</strong> microphone.<br />
Mid Attack Determines <strong>the</strong> amount of time from <strong>the</strong> moment a note is<br />
pressed to <strong>the</strong> moment <strong>the</strong> <strong>com</strong>pressor is applied to <strong>the</strong> mid<br />
frequencies.<br />
Mid Gain Determines <strong>the</strong> output gain for <strong>the</strong> mid frequencies.<br />
Mid Level Determines <strong>the</strong> output level for <strong>the</strong> mid frequencies.<br />
Mid Mute Switches <strong>the</strong> mute status of <strong>the</strong> mid frequencies.<br />
Mid Ratio Determines <strong>the</strong> ratio of <strong>the</strong> <strong>com</strong>pressor for <strong>the</strong> mid frequencies.<br />
Mid Threshold Determines <strong>the</strong> minimum input level at which <strong>the</strong> effect is applied<br />
for <strong>the</strong> mid frequencies.<br />
Mix Determines <strong>the</strong> volume of <strong>the</strong> effect sound.<br />
Mix Level Determines <strong>the</strong> level of <strong>the</strong> effect sound mixed to <strong>the</strong> dry sound.<br />
Mod Depth Determines <strong>the</strong> depth of <strong>the</strong> modulation.<br />
Mod Depth Ofst R Determines <strong>the</strong> depth of <strong>the</strong> modulation for R channel as offset.<br />
Mod Feedback Determines <strong>the</strong> feedback level to <strong>the</strong> modulation.<br />
Mod Gain Determines <strong>the</strong> gain of <strong>the</strong> modulation.<br />
Mod LPF Cutoff Determines <strong>the</strong> cutoff frequency of <strong>the</strong> low pass filter applied to<br />
Frequency <strong>the</strong> modulated sound.<br />
Mod LPF<br />
Determines <strong>the</strong> resonance of <strong>the</strong> low pass filter for <strong>the</strong> modulated<br />
Resonance sound.<br />
Mod Mix Balance When “Noisy” is selected, this parameter determines <strong>the</strong> mix<br />
balance of <strong>the</strong> modulated element.<br />
When “Tech Modulation” is selected, this parameter determines<br />
<strong>the</strong> volume of <strong>the</strong> modulated sound.<br />
Mod Speed Determines <strong>the</strong> modulation speed.<br />
Mod Wave Type Selects <strong>the</strong> wave type for modulation.<br />
Mode Determines <strong>the</strong> phaser type, or more specifically, <strong>the</strong> factor for<br />
forming <strong>the</strong> phaser effect.<br />
Modulation Phase Determines <strong>the</strong> L/R phase difference of <strong>the</strong> modulated wave.<br />
Move Speed Determines how long it takes to move <strong>the</strong> sound from <strong>the</strong> current<br />
status to <strong>the</strong> sound specified via <strong>the</strong> Vowel parameter.<br />
Noise Input Level Determines <strong>the</strong> noise level which is to be input.<br />
Noise Level Determines <strong>the</strong> noise level.<br />
Noise LPF Cutoff Determines <strong>the</strong> cutoff frequency of <strong>the</strong> low pass filter applied to<br />
Frequency <strong>the</strong> noise.<br />
Noise LPF Q Determines <strong>the</strong> resonance of <strong>the</strong> low pass filter applied to <strong>the</strong><br />
noise.<br />
Noise Mod Depth Determines <strong>the</strong> depth of <strong>the</strong> noise modulation.<br />
Noise Mod Speed Determines <strong>the</strong> speed of <strong>the</strong> noise modulation.<br />
Noise Tone Determines <strong>the</strong> characteristics of <strong>the</strong> noise.<br />
On/Off Switch Turns <strong>the</strong> isolator on or off.<br />
OSC Frequency<br />
Coarse<br />
Determines <strong>the</strong> frequency for modulating <strong>the</strong> input wave.<br />
OSC Frequency<br />
Fine<br />
Finely determines <strong>the</strong> frequency for modulating <strong>the</strong> input wave.<br />
Output Determines <strong>the</strong> level of <strong>the</strong> signal output from <strong>the</strong> effect block.<br />
Output Gain Determines <strong>the</strong> gain of <strong>the</strong> signal output from <strong>the</strong> effect block.<br />
Output Level Determines <strong>the</strong> level of <strong>the</strong> signal output from <strong>the</strong> effect block.<br />
Output Level 1, 2 Determines <strong>the</strong> level of <strong>the</strong> signal output from <strong>the</strong> 1st block and<br />
2nd block respectively.<br />
Over Drive Determines <strong>the</strong> degree and character of <strong>the</strong> distortion effect.<br />
Pan 1, 2 Determines <strong>the</strong> pan for each of <strong>the</strong> 1st series and 2nd series.<br />
Pan AEG Min This parameter of <strong>the</strong> Slice effect determines <strong>the</strong> minimum level<br />
Level<br />
of <strong>the</strong> AEG applied to <strong>the</strong> panned sound.<br />
Pan AEG Type This parameter of <strong>the</strong> Slice effect determines <strong>the</strong> type of <strong>the</strong> AEG<br />
applied to <strong>the</strong> panned sound.<br />
Pan Depth Determines <strong>the</strong> depth of <strong>the</strong> pan effect.<br />
Pan Direction Determines <strong>the</strong> direction toward which <strong>the</strong> stereo pan position of<br />
<strong>the</strong> sound moves.<br />
Pan Type Determines <strong>the</strong> pan type.<br />
Pedal Control When “VCM PEDAL WAH” is selected, this parameter determines<br />
<strong>the</strong> cutoff frequency of <strong>the</strong> wah filter. For best results, assign <strong>the</strong><br />
this parameter to <strong>the</strong> Foot Controller in <strong>the</strong> Controller Set display,<br />
<strong>the</strong>n use <strong>the</strong> Foot Controller to control this parameter.<br />
Pedal Response Determines how <strong>the</strong> sound responds to <strong>the</strong> change of <strong>the</strong><br />
damper control.<br />
Phase Shift Offset Determines <strong>the</strong> offset value of <strong>the</strong> phase modulation.<br />
Pitch 1, 2 Determines <strong>the</strong> pitch in semitones for each of <strong>the</strong> 1st series and<br />
2nd series.<br />
PM Depth Determines <strong>the</strong> depth of <strong>the</strong> pitch modulation.<br />
Pre Mod HPF Determines <strong>the</strong> Cutoff frequency of <strong>the</strong> High Pass Filter before<br />
Cutoff Frequency <strong>the</strong> modulation.<br />
Pre-LPF Cutoff Determines <strong>the</strong> Cutoff frequency of <strong>the</strong> Low Pass Filter before <strong>the</strong><br />
Frequency modulation.<br />
Pre-LPF<br />
Determines <strong>the</strong> Resonance of <strong>the</strong> Low Pass Filter for <strong>the</strong> input<br />
Resonance sound.<br />
Basic Structure<br />
Presence This parameter of <strong>the</strong> guitar amp effect controls high frequencies.<br />
Ratio Determines <strong>the</strong> ratio of <strong>the</strong> <strong>com</strong>pressor.<br />
Release Determines <strong>the</strong> amount of time that elapses between <strong>the</strong><br />
releasing of a key and <strong>the</strong> end of <strong>the</strong> <strong>com</strong>pressor effect.<br />
Release Curve Determines <strong>the</strong> release curve of <strong>the</strong> envelope follower.<br />
Release Time Determines <strong>the</strong> release time of <strong>the</strong> envelope follower.<br />
Resonance Determines <strong>the</strong> resonance of <strong>the</strong> filter.<br />
Resonance Offset Determines <strong>the</strong> resonance as offset.<br />
Reverb Delay Determines <strong>the</strong> delay time from <strong>the</strong> early reflections until <strong>the</strong><br />
reverberations.<br />
Reverb Time Determines <strong>the</strong> reverb time.<br />
Room Size Determines <strong>the</strong> size of <strong>the</strong> room in which <strong>the</strong> instrument sounds.<br />
Rotor Speed Fast Determines <strong>the</strong> speed of <strong>the</strong> rotor when <strong>the</strong> slow/fast switch is set<br />
to “fast.”<br />
Rotor Speed Slow Determines <strong>the</strong> speed of <strong>the</strong> rotor when <strong>the</strong> slow/fast switch is set<br />
to “slow.”<br />
Rotor/Horn Determines <strong>the</strong> volume balance of <strong>the</strong> horn and rotor.<br />
Balance<br />
Sampling Freq. Controls <strong>the</strong> sampling frequency.<br />
Control<br />
Sensitivity When one of “Dynamic Flanger,” “Dynamic Phaser,” and <strong>the</strong> TEC<br />
effects is selected, this parameter determines <strong>the</strong> sensitivity of<br />
<strong>the</strong> modulation applied to <strong>the</strong> input change.<br />
When one of <strong>the</strong> VCM Touch Wah effects is selected, this<br />
parameter determines <strong>the</strong> sensitivity of <strong>the</strong> wah filter’s change<br />
applied to <strong>the</strong> input change.<br />
Slow-Fast Time of Determines how long it takes for <strong>the</strong> rotation speed of <strong>the</strong> horn to<br />
H<br />
change from <strong>the</strong> current speed (slow or fast) to <strong>the</strong> o<strong>the</strong>r one<br />
(fast or slow) when <strong>the</strong> rotation speed is switched.<br />
Slow-Fast Time of Determines how long it takes for <strong>the</strong> rotation speed of <strong>the</strong> rotor to<br />
R<br />
change from <strong>the</strong> current speed (slow or fast) to <strong>the</strong> o<strong>the</strong>r one<br />
(fast or slow) when <strong>the</strong> rotation speed is switched.<br />
Space Type Selects <strong>the</strong> type of space simulation.<br />
Speaker Type Selects <strong>the</strong> type of speaker simulation.<br />
Speed When “VCM Flanger” is selected, this parameter determines <strong>the</strong><br />
frequency of <strong>the</strong> LFO wave which controls <strong>the</strong> cyclic change of<br />
<strong>the</strong> delay modulation.<br />
When any of <strong>the</strong> phaser types is selected, this parameter<br />
determines <strong>the</strong> frequency of <strong>the</strong> LFO wave which controls <strong>the</strong><br />
cyclic change of <strong>the</strong> phase modulation.<br />
When “VCM Auto Wah” is selected, this parameter determines<br />
<strong>the</strong> speed of <strong>the</strong> LFO.<br />
Speed Control Switches <strong>the</strong> rotary speed.<br />
Spread Determines <strong>the</strong> spread of <strong>the</strong> sound.<br />
Stage Determines <strong>the</strong> step number of <strong>the</strong> phase shifter.<br />
Threshold Determines <strong>the</strong> minimum input level at which <strong>the</strong> effect is<br />
applied.<br />
Top *3 Parameter name Descriptions<br />
Determines <strong>the</strong> maximum value of <strong>the</strong> wah filter.<br />
Type When “VCM Flanger” is selected, this parameter determines <strong>the</strong><br />
flanger type.<br />
When any of <strong>the</strong> wah effects is selected, this parameter<br />
determines <strong>the</strong> type of Wah.<br />
When “Early Reflection” is selected, this parameter determines<br />
<strong>the</strong> type of <strong>the</strong> reflection sound.<br />
Vocoder Attack Determines <strong>the</strong> attack time of <strong>the</strong> Vocoder sound.<br />
Vocoder Release Determines <strong>the</strong> release time of <strong>the</strong> Vocoder sound.<br />
Vowel Selects a vowel type.<br />
Wall Vary Determines <strong>the</strong> wall status of <strong>the</strong> simulated room. Higher settings<br />
produces more diffuse reflections.<br />
Width Determines <strong>the</strong> width of <strong>the</strong> simulated room.<br />
Word Length Determines <strong>the</strong> degree of sound roughness.<br />
*1 The Bottom parameter is available only when <strong>the</strong> value is less than that of <strong>the</strong> Top<br />
parameter.<br />
*2 The Color parameter may not be effective depending on <strong>the</strong> values of <strong>the</strong> Mode and<br />
Stage parameters.<br />
*3 The Top parameter is available only when <strong>the</strong> value is more than that of <strong>the</strong> Bottom<br />
parameter.<br />
Basic Structure<br />
Basic Operation<br />
Connections<br />
MOTIF <strong>XS</strong> Owner’s <strong>Manual</strong> 75<br />
Basic Section
Basic Section<br />
76<br />
Basic Structure<br />
Basic Structure Basic Operation Connections<br />
About MIDI<br />
MIDI (Musical Instrument Digital Interface) is a standard which allows electronic musical instruments to <strong>com</strong>municate with<br />
each o<strong>the</strong>r, by sending and receiving <strong>com</strong>patible Note, Control Change, Program Change and various o<strong>the</strong>r types of MIDI<br />
data, or messages.<br />
This syn<strong>the</strong>sizer can control o<strong>the</strong>r MIDI devices by transmitting note related data and various types of controller data. It can<br />
also be controlled by in<strong>com</strong>ing MIDI messages which automatically determine <strong>the</strong> tone generator mode, select MIDI<br />
channels, voices and effects, change parameter values, and of course play <strong>the</strong> voices specified for <strong>the</strong> various Parts.<br />
MIDI channels<br />
MIDI performance data is assigned to one of sixteen MIDI<br />
channels. Using <strong>the</strong>se channels, 1 – 16, <strong>the</strong> performance data<br />
for sixteen different instrument parts can be simultaneously<br />
sent over one MIDI cable.<br />
Think of <strong>the</strong> MIDI channels as TV channels. Each TV station<br />
transmits its broadcasts over a specific channel.<br />
Your home TV set receives many different programs<br />
simultaneously from several TV stations and you select <strong>the</strong><br />
appropriate channel to watch <strong>the</strong> desired program.<br />
MIDI operates on <strong>the</strong> same basic principle.<br />
The transmitting instrument sends MIDI data on a specific<br />
MIDI channel (MIDI Transmit Channel) via a single MIDI cable<br />
to <strong>the</strong> receiving instrument. If <strong>the</strong> receiving instrument’s MIDI<br />
channel (MIDI Receive Channel) matches <strong>the</strong> Transmit<br />
Channel, <strong>the</strong> receiving instrument will sound according to <strong>the</strong><br />
data sent by <strong>the</strong> transmitting instrument.<br />
For information on how to set <strong>the</strong> MIDI transmit channel and<br />
<strong>the</strong> MIDI receive channel, see page 267.<br />
MIDI messages transmitted/<br />
recognized by this syn<strong>the</strong>sizer<br />
The messages transmitted/received by <strong>the</strong> MOTIF <strong>XS</strong> are<br />
shown in <strong>the</strong> MIDI Data Format and MIDI Implementation<br />
Chart in <strong>the</strong> separate Data List booklet. The MOTIF <strong>XS</strong> tone<br />
generator block (indicated “synth. part” in <strong>the</strong> Data List) and<br />
sequencer block (indicated “seq. part” in <strong>the</strong> Data List) handle<br />
different MIDI messages. The MIDI messages which <strong>the</strong><br />
sequencer block can receive can be recorded to tracks of a<br />
Song/Pattern. On <strong>the</strong> o<strong>the</strong>r hand, <strong>the</strong> MIDI messages which<br />
<strong>the</strong> tone generator can receive can affect <strong>the</strong> MOTIF <strong>XS</strong><br />
sound.<br />
MOTIF <strong>XS</strong> Owner’s <strong>Manual</strong><br />
1<br />
MIDI Transmit channel 2<br />
2<br />
Wea<strong>the</strong>r Report<br />
MIDI<br />
cable<br />
News<br />
News<br />
2<br />
MIDI Receive channel 2<br />
MIDI events handled by <strong>the</strong> MOTIF <strong>XS</strong><br />
This section covers MIDI events, <strong>the</strong> data format by which <strong>the</strong><br />
MIDI messages generated by your keyboard performance are<br />
recorded to a track of a Song/Pattern. Theses events<br />
described below can be edited or inserted in <strong>the</strong> displays of<br />
<strong>the</strong> Song Edit/Pattern Edit modes.<br />
Note<br />
These are <strong>the</strong> events that define notes, making up <strong>the</strong> largest<br />
portion of all performance data. The note name (C -2 – G8)<br />
defines <strong>the</strong> pitch. The gate time specifies <strong>the</strong> length of <strong>the</strong><br />
note in beats and clocks. Velocity (1 – 127) is “how hard” <strong>the</strong><br />
note is played. The bar graph to <strong>the</strong> right is a graphic<br />
representation of <strong>the</strong> value.<br />
Pitch Bend<br />
Note name<br />
Pitch bend events are generated by pitch bend wheel<br />
operation and define continuous changes in pitch. The value<br />
(-8192 – +0000 – +8191) is a numerical representation of pitch<br />
bend wheel position. The bar graph to <strong>the</strong> right is a graphic<br />
representation of <strong>the</strong> value.<br />
Program Change (PC)<br />
Velocity Bar graph<br />
Gate time<br />
of velocity<br />
Data value<br />
Bar graph of<br />
<strong>the</strong> data value<br />
Bank Select MSB Program number<br />
Bank Select LSB<br />
Voice name<br />
Program change events select Voices. The Bank Select MSB<br />
and LSB parameters are actually included in <strong>the</strong> Control<br />
Change category, below, but since in <strong>the</strong> MOTIF <strong>XS</strong> <strong>the</strong>se
three events are used to select Voices, <strong>the</strong>y are grouped and<br />
described here. Bank Select MSB and LSB select <strong>the</strong> Voice<br />
Bank. The program number selects a Voice from <strong>the</strong> Voice<br />
category and bank specified by <strong>the</strong> MSB and LSB. For a list of<br />
<strong>the</strong> Voices, see <strong>the</strong> separate Data List booklet. When you<br />
specify a program change as a number in <strong>the</strong> range of 0 –<br />
127, specify a number that is one less than <strong>the</strong> program<br />
number listed in <strong>the</strong> Voice List. For example, to specify<br />
program number 128, you would actually enter program<br />
change 127.<br />
Control Change (CC)<br />
Control number Data value Bar graph of<br />
Controller (function)<br />
<strong>the</strong> data value<br />
Control Change events control Voice and effect parameters.<br />
Control Change events are generated when a controller such<br />
as a modulation wheel or foot controller is operated.<br />
The Control number (000 – 127) specifies <strong>the</strong> controller<br />
(function), such as volume or pan. The value (000 – 127)<br />
specifies <strong>the</strong> “position” of <strong>the</strong> controller assigned to <strong>the</strong><br />
selected control number. The bar graph to <strong>the</strong> right is a<br />
graphic representation of <strong>the</strong> data value.<br />
Some of <strong>the</strong> more important control numbers and controllers<br />
are listed below.<br />
n When “---” is shown at <strong>the</strong> column of <strong>the</strong> Controller (Function),<br />
<strong>the</strong> Control number can be handled by <strong>the</strong> sequencer block<br />
and cannot be handled by <strong>the</strong> tone generator block.<br />
Modulation Wheel (Control Number 001)<br />
The MIDI data produced when a modulation wheel is<br />
operated. No modulation is applied when <strong>the</strong> value is “0,” and<br />
“127” produces maximum modulation.<br />
Portamento Time (Control Number 005)<br />
This MIDI message controls <strong>the</strong> portamento effect. No<br />
portamento is produced when <strong>the</strong> value is “0,” and “127”<br />
produces maximum portamento time. Portamento is only<br />
produced when Portamento (Control Number 065) is ON.<br />
Data Entry MSB (Control Number 006)<br />
Data Entry LSB (Control Number 038)<br />
These parameters specify <strong>the</strong> value of RPN MSB, RPN LSB<br />
(page 78), NRPN MSB, and NRPN LSB events. The value is<br />
represented by two control change data numbers—<strong>the</strong> MSB<br />
and <strong>the</strong> LSB.<br />
Volume (Control Number 007)<br />
Sets <strong>the</strong> volume for each individual Part. No sound is<br />
produced when <strong>the</strong> value is “0,” and “127” produces<br />
maximum volume.<br />
Pan (Control Number 010)<br />
Sets <strong>the</strong> pan position for each individual Part. The sound is<br />
panned fully left when <strong>the</strong> value is “0” and fully right when <strong>the</strong><br />
value is “127.” The displayed values are -64 – +63.<br />
Expression (Control Number 011)<br />
Sets <strong>the</strong> expression for each individual Part. No sound is<br />
produced when <strong>the</strong> value is “0,” and “127” produces<br />
maximum volume. This parameter produces volume variations<br />
during playback.<br />
Basic Structure<br />
Sustain (Hold 1) (Control Number 064)<br />
This MIDI message represents sustain pedal ON/OFF<br />
operations. Notes playing when <strong>the</strong> pedal is pressed will be<br />
sustained. When <strong>the</strong> value is “0” – “63” sustain is OFF, and<br />
when <strong>the</strong> data is “64” – “127” sustain is ON.<br />
Portamento (Control Number 065)<br />
This MIDI message turns portamento ON or OFF. When <strong>the</strong><br />
value is “0” – “63” portamento is OFF, and when <strong>the</strong> data is<br />
“64” – “127” portamento is ON. The length (degree) of <strong>the</strong><br />
portamento effect is controlled by Portamento Time (Control<br />
Number 005).<br />
Sostenuto Pedal (Control Number 066)<br />
This MIDI message represents sostenuto pedal ON/OFF<br />
operations. When <strong>the</strong> value is “0” – “63” sostenuto is OFF, and<br />
when <strong>the</strong> data is “64” – “127” sostenuto is ON.<br />
Harmonic Content (Control Change 071)<br />
Adjusts <strong>the</strong> resonance of <strong>the</strong> filter assigned to a Voice. The<br />
resonance is adjusted by using <strong>the</strong> data range of 0 – 127 as<br />
an offset value with a display range of -64 – +63 which is<br />
added to <strong>the</strong> Voice data.<br />
Release Time (Control Change 072)<br />
Adjusts <strong>the</strong> release time of <strong>the</strong> Voice AEG. The release time is<br />
adjusted by using <strong>the</strong> data range of 0 – 127 as an offset value<br />
with a display range of -64 – +63 which is added to <strong>the</strong> Voice<br />
data.<br />
Attack Time (Control Change 073)<br />
Adjusts <strong>the</strong> attack time of <strong>the</strong> Voice AEG. The attack time is<br />
adjusted by using <strong>the</strong> data range of 0 – 127 as an offset value<br />
with a display range of -64 – +63 which is added to <strong>the</strong> Voice<br />
data.<br />
Brightness (Control Change 074)<br />
Adjusts <strong>the</strong> cutoff frequency of <strong>the</strong> filter assigned to a Voice.<br />
The cutoff is adjusted by using <strong>the</strong> data range of 0 – 127 as an<br />
offset value with a display range of -64 – +63 which is added<br />
to <strong>the</strong> Voice data.<br />
Decay Time (Control Change 075)<br />
Adjusts <strong>the</strong> decay time of <strong>the</strong> Voice AEG. The decay time is<br />
adjusted by using <strong>the</strong> data range of 0 – 127 as an offset value<br />
with a display range of -64 – +63 which is added to <strong>the</strong> Voice<br />
data.<br />
Effect Send Level 1 (Reverb Effect) (Control Number 091)<br />
Specifies <strong>the</strong> reverb effect send level.<br />
Effect Send Level 3 (Chorus Effect) (Control Number 093)<br />
Specifies <strong>the</strong> delay/chorus effect send level.<br />
Effect Send Level 4 (Variation Effect) (Control Number 094)<br />
Specifies <strong>the</strong> variation effect send level.<br />
n This MIDI event cannot be handled by <strong>the</strong> tone generator<br />
block, although it can be recorded to a Song/Pattern track.<br />
Data Increment (Control Number 096)<br />
Data Decrement (Control Number 097)<br />
These MIDI messages increment or decrement by one <strong>the</strong><br />
value of pitch bend sensitivity, fine tune, or coarse tune<br />
settings made using RPN (page 78).<br />
NRPN MSB (Non-Registered Parameter Number MSB)<br />
(Control Number 099)<br />
NRPN LSB (Non-Registered Parameter Number LSB)<br />
(Control Number 098)<br />
Basic Structure<br />
Basic Operation<br />
Connections<br />
MOTIF <strong>XS</strong> Owner’s <strong>Manual</strong> 77<br />
Basic Section
Basic Section<br />
78<br />
Basic Structure<br />
Basic Structure Basic Operation Connections<br />
Used primarily as offset values for vibrato, filter, EG and o<strong>the</strong>r<br />
settings. Data Entry is used to set <strong>the</strong> parameter value after<br />
specifying <strong>the</strong> parameter using <strong>the</strong> NRPN MSB and LSB.<br />
Once an NRPN is specified, <strong>the</strong> following data entry message<br />
received on <strong>the</strong> same channel is processed as <strong>the</strong> value of<br />
that NRPN. Prevent operational errors by transmitting an RPN<br />
Null message (7FH, 7FH) after using <strong>the</strong>se messages to<br />
perform a control operation. Refer to “NRPN” for information<br />
about <strong>the</strong> parameter (page 79).<br />
n This MIDI event cannot be handled by <strong>the</strong> tone generator<br />
block, although it can be recorded to a Song/Pattern track.<br />
RPN MSB (Registered Parameter Number MSB)<br />
(Control Number 101)<br />
RPN LSB (Registered Parameter Number LSB)<br />
(Control Number 100)<br />
Used primarily as offset values for pitch bend sensitivity,<br />
tuning, and o<strong>the</strong>r part settings. Data Entry (page 77) is used to<br />
set <strong>the</strong> parameter value after specifying <strong>the</strong> parameter using<br />
<strong>the</strong> RPN MSB and RPN LSB. Once an RPN is specified, <strong>the</strong><br />
following data entry message received on <strong>the</strong> same channel is<br />
processed as <strong>the</strong> value of that RPN. Prevent operational errors<br />
by transmitting an Null message (7FH, 7FH) after using <strong>the</strong>se<br />
messages to perform a control operation. Refer to “RPN” for<br />
information about <strong>the</strong> parameter.<br />
All Sound Off (Control Number 120)<br />
Turns all currently sounding notes off for all Parts.<br />
Reset All Controllers (Control Number 121)<br />
Resets all controllers to <strong>the</strong>ir initial values. The following<br />
parameters are affected: Pitch Bend, Channel Pressure,<br />
Polyphonic Key Pressure, Modulation, Expression, Hold 1,<br />
Portamento, Sostenuto, Soft Pedal, Portamento Control, RPN*,<br />
NRPN* (*The RPN and NRPN are specified as having no<br />
number, and no internal data is changed). The following data<br />
is not affected: Program Change, Bank Select MSB and LSB,<br />
Volume, Pan, Dry Send Level, Effect Send Level 1, 3, and 4,<br />
Pitch Sensitivity, Fine Tuning, Coarse Tuning.<br />
Omni Mode Off (Control Number 124)<br />
Performs <strong>the</strong> same operation as when an All Notes Off<br />
message is received. The receive channel is set to 1.<br />
Omni Mode On (Control Number 125)<br />
Performs <strong>the</strong> same operation as when an All Notes Off message<br />
is received. Only <strong>the</strong> receive channel is set to Omni On.<br />
Mono (Control Number 126)<br />
Performs <strong>the</strong> same operation as when an All Sound Off<br />
message is received. If <strong>the</strong> 3rd byte parameter (<strong>the</strong> parameter<br />
that determines <strong>the</strong> mono number) is 0 – 16, <strong>the</strong> Parts<br />
corresponding to those channels are set to mono.<br />
Poly (Control Number 127)<br />
Performs <strong>the</strong> same operation as when an All Sound Off<br />
message is received, and <strong>the</strong> Parts corresponding to those<br />
channels are set to poly.<br />
RPN Parameter List<br />
MOTIF <strong>XS</strong> Owner’s <strong>Manual</strong><br />
Channel Aftertouch (CAT)<br />
This event is generated when pressure is applied to a key after<br />
<strong>the</strong> note is played.<br />
The data (000 – 127) represents <strong>the</strong> amount of pressure<br />
applied to <strong>the</strong> key. The bar graph to <strong>the</strong> right is a graphic<br />
representation of <strong>the</strong> value.<br />
Polyphonic Aftertouch (PAT)<br />
Note name<br />
Data value<br />
Data value<br />
This event is generated when pressure is applied to a key after<br />
<strong>the</strong> note is played. Unlike <strong>the</strong> Channel Aftertouch event,<br />
however, individual data is provided for each key. Note Name<br />
(C -2 – G8) specifies <strong>the</strong> key. The data (000 – 127) represents<br />
<strong>the</strong> amount of pressure applied to <strong>the</strong> key. The bar graph to<br />
<strong>the</strong> right is a graphic representation of <strong>the</strong> value.<br />
n The Polyphonic Aftertouch cannot be handled by <strong>the</strong> tone<br />
generator block although this event can be recorded to a<br />
Song/Pattern track.<br />
Registered Parameter Number (RPN)<br />
RPN number<br />
MSB-LSB<br />
Data entry<br />
MSB-LSB<br />
Bar graph of<br />
<strong>the</strong> data value<br />
Bar graph of<br />
<strong>the</strong> data value<br />
Changes parameter values for each tone generator part.<br />
Normally three types of control change data are sent: RPN<br />
MSB (101), RPN LSB (100), and Data Entry MSB (6). In <strong>the</strong><br />
MOTIF <strong>XS</strong>, Data Entry LSB (38) is added to this and <strong>the</strong><br />
resulting group of control change events is handled as one.<br />
Once an RPN is specified, <strong>the</strong> following data entry message<br />
received on <strong>the</strong> same channel is processed as <strong>the</strong> value of<br />
that RPN. Prevent operational errors by transmitting a Null<br />
message (7FH, 7FH) after using <strong>the</strong>se messages to perform a<br />
control operation. The MOTIF <strong>XS</strong> tone generator block allows<br />
control of <strong>the</strong> 4 following parameters:<br />
RPN Number<br />
MSB LSB<br />
Parameter Name<br />
Data Entry (Range)<br />
MSB LSB<br />
Initial<br />
Value<br />
Function<br />
000 000 Pitch Bend Sensitivity 000 – 024 — 024 Specifies <strong>the</strong> amount of pitch bend produced in response to pitch<br />
bend data in semitone increments.<br />
000 001 Fine Tune -64 – +63 — +00 Adjusts <strong>the</strong> tuning in cent increments.<br />
000 002 Coarse Tune -24 – +24 — +00 Adjusts <strong>the</strong> tuning in semitone increments.<br />
127 127 Null — — — Voids <strong>the</strong> RPN and NRPN settings so no tone generator settings are<br />
changed when subsequent Data Entry messages are received.
Non-Registered Parameter Number (NRPN)<br />
Changes parameter values for each tone generator Part.<br />
There is no <strong>com</strong>patibility between different manufacturers.<br />
Numerous parameters specific to each tone generator can be<br />
controlled to produce tonal changes. Normally three types of<br />
control change data are sent: NRPN MSB (99), NRPN LSB<br />
(98), and Data Entry MSB (6). In <strong>the</strong> MOTIF <strong>XS</strong>, this group of<br />
control change events is handled as one. Once an NRPN is<br />
specified, <strong>the</strong> following data entry message received on <strong>the</strong><br />
same channel is processed as <strong>the</strong> value of that NRPN. Prevent<br />
operational errors by transmitting an RPN Null message (7FH,<br />
7FH) after using <strong>the</strong>se messages to perform a control<br />
operation. For filter cutoff frequency, resonance, and o<strong>the</strong>r<br />
independent control change parameters, it is normal to use<br />
Internal Memory<br />
Basic Structure<br />
<strong>the</strong> independent control change parameters ra<strong>the</strong>r than <strong>the</strong><br />
NRPN.<br />
n This MIDI event cannot be handled by <strong>the</strong> tone generator<br />
block, although it can be recorded to a Song/Pattern track.<br />
System Exclusive<br />
Changes internal tone generator settings such as Voice and<br />
effect settings, remote switch control, tone generator mode<br />
switching, and o<strong>the</strong>rs via MIDI. The 2nd byte is a manufacturer<br />
ID number, and <strong>the</strong>re is no data <strong>com</strong>patibility between<br />
manufacturers. This type of event is used to control MOTIF <strong>XS</strong>specific<br />
functions. The cursor can be used to scroll through<br />
<strong>the</strong> data if <strong>the</strong> data size is greater than 17 bytes.<br />
As you use <strong>the</strong> MOTIF <strong>XS</strong>, you will create many different kinds of data, including Voices, Performances, Songs, and Patterns.<br />
This section describes how to maintain <strong>the</strong> various types of data and use <strong>the</strong> memory devices/media for storing <strong>the</strong>m.<br />
Internal Memory<br />
NRPN number<br />
MSB-LSB<br />
Data entry<br />
MSB-LSB<br />
Below are explanations of <strong>the</strong> basic terms related to<br />
memory.<br />
Flash ROM<br />
ROM (Read Only Memory) is memory designed<br />
specifically for reading out of data, and as such data<br />
cannot be written to it. Unlike conventional ROM, Flash<br />
ROM can be overwritten—allowing you to store your own<br />
original data. The contents of Flash ROM are maintained<br />
even when <strong>the</strong> power is turned off.<br />
DRAM<br />
RAM (Random Access Memory) is memory designed<br />
specifically for data writing and data reading operations.<br />
There are two different kinds of RAM, depending on <strong>the</strong><br />
condition for storing <strong>the</strong> data: SRAM (Static RAM) and<br />
DRAM (Dynamic RAM). The MOTIF <strong>XS</strong> is equipped with<br />
only DRAM. The created data stored on DRAM is lost when<br />
<strong>the</strong> power is turned off. Because of this, you should always<br />
store any data residing in DRAM to <strong>the</strong> USB storage device<br />
or <strong>the</strong> <strong>com</strong>puter connected to <strong>the</strong> network before turning<br />
off <strong>the</strong> power.<br />
n Among data residing in DRAM, only Waveform data can be<br />
saved to <strong>the</strong> external USB storage device or a <strong>com</strong>puter<br />
mounted by <strong>the</strong> MOTIF <strong>XS</strong>.<br />
Data<br />
DIMM<br />
DIMM modules must be installed in order to use <strong>the</strong><br />
Sampling function or to load audio data (Waveform/WAV<br />
file/AIFF file) to <strong>the</strong> instrument. As with DRAM described<br />
above, <strong>the</strong> created data stored on DIMM is lost when <strong>the</strong><br />
power is turned off. Because of this, you should always<br />
store any data residing in DIMM to <strong>the</strong> USB storage device<br />
or <strong>the</strong> <strong>com</strong>puter connected to <strong>the</strong> network before turning<br />
off <strong>the</strong> power.<br />
Edit Buffer and User Memory<br />
The edit buffer is <strong>the</strong> memory location for edited data of<br />
<strong>the</strong>se types: Voice, Performance, Master, Song Mixing, and<br />
Pattern Mixing. Data edited in this location will be stored to<br />
<strong>the</strong> User Memory.<br />
If you select ano<strong>the</strong>r Voice, Performance, Master, Song, or<br />
Pattern, <strong>the</strong> entire contents of <strong>the</strong> edit buffer will be<br />
rewritten with <strong>the</strong> newly selected Voice/Performance/<br />
Master/Song Mixing/Pattern Mixing data. Make sure to<br />
store any important data before selecting ano<strong>the</strong>r Voice,<br />
etc.<br />
Edit Buffer and Recall Buffer<br />
If you’ve selected ano<strong>the</strong>r Voice/Performance/Song/Pattern<br />
without storing <strong>the</strong> one you were editing, you can recall<br />
your original edits, since <strong>the</strong> edit buffer’s contents are<br />
stored in backup memory.<br />
n Keep in mind that <strong>the</strong> recall buffer is not available in <strong>the</strong><br />
Master Edit mode.<br />
MOTIF <strong>XS</strong> Owner’s <strong>Manual</strong><br />
Basic Structure<br />
Basic Operation<br />
Connections<br />
79<br />
Basic Section
Basic Section<br />
80<br />
Basic Structure<br />
Basic Structure Basic Operation Connections<br />
Memory Structure<br />
This diagram details <strong>the</strong> relationship among <strong>the</strong> functions of <strong>the</strong> MOTIF <strong>XS</strong> and <strong>the</strong> internal memory and external devices<br />
such as USB storage device and <strong>com</strong>puter.<br />
Recall Buffer<br />
Compare Buffer<br />
(DRAM)<br />
Excluding Master and Utility<br />
settings<br />
*1 Only <strong>the</strong> currently edited data can be transmitted as Bulk data. Note that <strong>the</strong> Mixing Voice cannot be transmitted as Bulk data.<br />
*2 The Mixing settings can be stored/recalled as a template in <strong>the</strong> Song Mixing Job mode/Pattern Mixing Job mode.<br />
*3 You can convert <strong>the</strong> MIDI sequence data recorded in <strong>the</strong> Song Record mode/Pattern Record mode to Arpeggio data. This can be executed with<br />
<strong>the</strong> following operations: [SONG] → [JOB] → [F5] Track → 07: Put Track to Arpeggio or [PATTERN] → [JOB] → [F5] Track → 07: Put Track to<br />
Arpeggio<br />
*4 In order to create a Waveform by sampling or importing an audio file, optional DIMM modules must be installed.<br />
MOTIF <strong>XS</strong> Owner’s <strong>Manual</strong><br />
*1<br />
Edit Buffer<br />
(DRAM)<br />
• Voice Edit<br />
• Mixing Voice Edit<br />
• Performance Edit<br />
• Performance Record<br />
• Song Record<br />
• Song Mixing Edit<br />
• Song Chain<br />
• Pattern Record<br />
• Pattern Patch<br />
• Pattern Mixing Edit<br />
• Pattern Chain<br />
• Utility and Sequencer<br />
Setup settings<br />
• Master Edit<br />
Sampling<br />
Internal Memory<br />
*2<br />
*2<br />
Store<br />
Store<br />
Store<br />
Preset Data (ROM)<br />
• Voice<br />
• Preset Arpeggio<br />
• Demo<br />
• User Performance<br />
*3<br />
• User Arpeggio<br />
Waveform<br />
*4<br />
User Memory<br />
Flash ROM<br />
• User Voice (Normal, Drum)<br />
• Song<br />
• Song Mixing<br />
• Song Chain<br />
Bulk Dump<br />
• Pattern<br />
• Pattern Mixing<br />
• Phrase<br />
• Pattern Chain<br />
• System settings<br />
(Utility settings + Sequencer Setup<br />
settings + Mixing Template)<br />
• User Master<br />
DRAM<br />
Bulk Dump<br />
Load/Save (executed in <strong>the</strong> File mode)<br />
Internal data <strong>com</strong>munication<br />
Data <strong>com</strong>munication between this<br />
syn<strong>the</strong>sizer and an external device<br />
MIDI instrument or <strong>com</strong>puter<br />
Sequence software<br />
MOTIF <strong>XS</strong> Editor<br />
USB storage device/<br />
Computer drive connected to<br />
<strong>the</strong> network<br />
File extensions “.XOV”<br />
File extensions “.XOE”<br />
File extensions “.WAV” & “AIF”<br />
File extensions “.XOG”<br />
File extensions “.MID”<br />
File extensions “.XOS”<br />
File extensions “XOA”<br />
(including all data in User Memory)<br />
File extensions “.MID”<br />
File extensions “.XOP”<br />
File extensions “.XOW”<br />
File extensions “.WAV” & “AIF”
Moving <strong>the</strong> Cursor<br />
Use <strong>the</strong>se four buttons to navigate <strong>the</strong> display, moving <strong>the</strong><br />
cursor around <strong>the</strong> various selectable items and parameters<br />
in <strong>the</strong> screen. When selected, <strong>the</strong> relevant item is<br />
highlighted (<strong>the</strong> cursor appears as a dark block with<br />
inverse characters). You can change <strong>the</strong> value of <strong>the</strong> item<br />
(parameter) at which <strong>the</strong> cursor is located by using <strong>the</strong><br />
data dial, [INC/YES] and [DEC/NO] buttons.<br />
Changing (editing) parameter values<br />
Rotating <strong>the</strong> data dial to <strong>the</strong> right (clockwise) increases <strong>the</strong><br />
value, while rotating it to <strong>the</strong> left (counter-clockwise)<br />
decreases it. For parameters with large value ranges, you<br />
can increase <strong>the</strong> value by 10 by simultaneously holding<br />
down <strong>the</strong> [INC/YES] button and pressing <strong>the</strong> [DEC/NO]<br />
button.<br />
To decrease by 10, do <strong>the</strong> opposite; simultaneously hold<br />
down <strong>the</strong> [DEC/NO] button and press <strong>the</strong> [INC/YES]<br />
button.<br />
Decreasing by 1<br />
Decreasing<br />
DEC/NO INC/YES<br />
EXIT<br />
ENTER<br />
EXECUTE<br />
DEC/NO INC/YES<br />
Functions and Sub-Functions<br />
Increasing<br />
Each mode described above contains various displays,<br />
with various functions and parameters. To navigate your<br />
way through <strong>the</strong>se displays and select a desired function,<br />
use <strong>the</strong> [F1] – [F6] buttons and <strong>the</strong> [SF1] – [SF5] buttons.<br />
When you select a mode, <strong>the</strong> available displays or menus<br />
appear directly above <strong>the</strong> buttons at <strong>the</strong> bottom of <strong>the</strong><br />
display (as shown below).<br />
Depending on <strong>the</strong> currently selected mode, up to six<br />
functions are available and can be called up with <strong>the</strong> [F1] –<br />
[F6] buttons. Keep in mind that <strong>the</strong> available functions<br />
differ depending on <strong>the</strong> selected mode.<br />
Depending on <strong>the</strong> currently selected mode, up to five<br />
functions (sub-functions) are available and can be called<br />
up with <strong>the</strong> [SF1] – [SF5] buttons (<strong>the</strong> [SF6] button is used<br />
Basic Operation<br />
Increasing by 1<br />
mainly to call up <strong>the</strong> INFO and LIST displays). Keep in<br />
mind that <strong>the</strong> available functions differ depending on <strong>the</strong><br />
selected mode. (Some displays may not have any subfunctions<br />
for <strong>the</strong>se buttons.)<br />
The example display below is called up by pressing <strong>the</strong><br />
[F5] button <strong>the</strong>n pressing <strong>the</strong> [SF1] button.<br />
These functions can be selected<br />
via <strong>the</strong> corresponding button<br />
([F1] – [F6]).<br />
SF1 SF2 SF3 SF4 SF5 SF6<br />
1 2 3 4 5<br />
F1 F2 F3 F4 F5 F6<br />
6 7 8 9 0 -<br />
Inputting a number directly<br />
These functions can be selected<br />
via <strong>the</strong> corresponding button<br />
([SF1] – [SF6]).<br />
For parameters having large value ranges (such as <strong>the</strong><br />
start and end points of a sample), you can also enter <strong>the</strong><br />
value directly, using <strong>the</strong> buttons below <strong>the</strong> LCD display as<br />
a numeric keypad. When <strong>the</strong> cursor is located on such a<br />
parameter, <strong>the</strong> [NUM] icon appears at <strong>the</strong> lower right<br />
corner of <strong>the</strong> LCD display. When <strong>the</strong> [SF6] NUM button is<br />
pressed in this status, each digit (1 – 9, 0) is assigned to<br />
<strong>the</strong> [SF1] – [SF5] and [F1] – [F5] buttons as shown below,<br />
allowing you to input a number directly by using <strong>the</strong>se<br />
buttons. Depending on <strong>the</strong> selected parameter, a negative<br />
value can be input. When such a parameter is selected<br />
and you wish to input a negative value, press <strong>the</strong> [F6]<br />
button (to which “-” is assigned) <strong>the</strong>n use <strong>the</strong> [SF1] – [SF5]<br />
and [F1] – [F5] buttons.<br />
After <strong>com</strong>pleting <strong>the</strong> number input, press <strong>the</strong> [ENTER]<br />
button to actually enter <strong>the</strong> number.<br />
SF1 SF2 SF3 SF4 SF5 SF6<br />
1 2 3 4 5<br />
F1 F2 F3 F4 F5 F6<br />
6 7 8 9 0 -<br />
SF1 SF2 SF3 SF4 SF5 SF6<br />
1 2 3 4 5<br />
F1 F2 F3 F4 F5 F6<br />
6 7 8 9 0 -<br />
You can use <strong>the</strong>se buttons as <strong>the</strong> numeric keypad.<br />
Basic Structure<br />
Basic Operation<br />
Connections<br />
MOTIF <strong>XS</strong> Owner’s <strong>Manual</strong> 81<br />
Basic Section
Basic Section<br />
82<br />
Basic Operation<br />
Basic Structure Basic Operation Connections<br />
Naming (Inputting Characters)<br />
You can freely name <strong>the</strong> data you’ve created, such as<br />
Voices, Performances, Songs, Patterns and files saved to a<br />
USB storage device.<br />
When <strong>the</strong> cursor is located on such a naming parameter,<br />
<strong>the</strong> CHAR icon appears at <strong>the</strong> lower right corner of <strong>the</strong><br />
display. When pressing <strong>the</strong> [SF6] button in this status, <strong>the</strong><br />
Input Character window appears as shown below. In <strong>the</strong><br />
Edit area, you can move <strong>the</strong> cursor to determine <strong>the</strong><br />
location at which <strong>the</strong> character is to be input by using <strong>the</strong><br />
[F1] and [F2] buttons. In <strong>the</strong> Character List, you can move<br />
<strong>the</strong> cursor to determine <strong>the</strong> character to be input by using<br />
<strong>the</strong> Cursor buttons, [INC/YES] button, [DEC/NO] button<br />
and <strong>the</strong> data dial. After selecting <strong>the</strong> character, press <strong>the</strong><br />
[F4] button to actually enter <strong>the</strong> selected character to <strong>the</strong><br />
location specified in <strong>the</strong> Edit area. To delete <strong>the</strong> character<br />
at <strong>the</strong> cursor location, press <strong>the</strong> [F5] Delete button. To<br />
delete all <strong>the</strong> characters, press <strong>the</strong> [F6] All Clear button.<br />
After <strong>com</strong>pleting <strong>the</strong> character input, press <strong>the</strong> [ENTER]<br />
button to actually enter <strong>the</strong> currently edited name.<br />
Editing<br />
area<br />
Calling up <strong>the</strong> List<br />
Depending on <strong>the</strong> parameter, you can call up a convenient<br />
pop-up List by pressing <strong>the</strong> [SF6] LIST button, from which<br />
you can select <strong>the</strong> desired parameter setting or item. When<br />
<strong>the</strong> cursor is located on such a parameter (indicated with<br />
an upside down triangular arrow), <strong>the</strong> LIST icon appears at<br />
<strong>the</strong> lower right corner of <strong>the</strong> display. In this condition, press<br />
<strong>the</strong> [SF6] button to call up <strong>the</strong> List. To select <strong>the</strong> desired<br />
item or setting, use <strong>the</strong> [INC/YES], [DEC/NO] buttons and<br />
<strong>the</strong> data dial. After selecting, press <strong>the</strong> [ENTER] button to<br />
fix <strong>the</strong> selection and close <strong>the</strong> List.<br />
MOTIF <strong>XS</strong> Owner’s <strong>Manual</strong><br />
SF1 SF2 SF3 SF4 SF5 SF6<br />
1 2 3 4 5<br />
F1 F2 F3 F4 F5 F6<br />
6 7 8 9 0 -<br />
SF1 SF2 SF3 SF4 SF5 SF6<br />
1 2 3 4 5<br />
F1 F2 F3 F4 F5 F6<br />
6 7 8 9 0 -<br />
Character<br />
List<br />
This indicates that you can call up <strong>the</strong> List by pressing<br />
<strong>the</strong> [SF6] LIST button.<br />
SF1 SF2 SF3 SF4 SF5 SF6<br />
1 2 3 4 5<br />
F1 F2 F3 F4 F5 F6<br />
6 7 8 9 0 -<br />
The List appears. You can select one from this List.<br />
Note (Key) and Velocity settings<br />
Several parameters let you set a key range or velocity<br />
range for a function—for example, in setting up a keyboard<br />
split—by specifying certain note values. You can use <strong>the</strong><br />
[INC/YES] and [DEC/NO] buttons or data dial to set <strong>the</strong>se<br />
parameters, or you can directly enter <strong>the</strong> values from <strong>the</strong><br />
keyboard by pressing <strong>the</strong> appropriate keys.<br />
When <strong>the</strong> cursor is located on such a parameter, <strong>the</strong> KBD<br />
icon appears at <strong>the</strong> lower right corner of <strong>the</strong> display. You<br />
can set <strong>the</strong> note or velocity directly from <strong>the</strong> Keyboard, by<br />
holding down <strong>the</strong> [SF6] button and pressing <strong>the</strong> desired<br />
key.<br />
SF1 SF2 SF3 SF4 SF5 SF6<br />
1 2 3 4 5<br />
F1 F2 F3 F4 F5 F6<br />
6 7 8 9 0 -
Connections<br />
n For <strong>the</strong> external connections depicted below, you will also need speakers or headphones to listen to <strong>the</strong> sound. See “Start Guide” on<br />
page 19.<br />
Connecting External MIDI Instruments<br />
With a standard MIDI cable (available separately), you can connect an external MIDI instrument, and control it from <strong>the</strong><br />
MOTIF <strong>XS</strong>. Likewise, you can use an external MIDI instrument (such as a keyboard or sequencer) to control <strong>the</strong> sounds of<br />
<strong>the</strong> MOTIF <strong>XS</strong>. Below are several different MIDI connection examples; use <strong>the</strong> one most similar to your intended setup.<br />
n Any one of <strong>the</strong> <strong>the</strong>se interfaces can be used for MIDI data transmission/reception: <strong>the</strong> MIDI connectors, <strong>the</strong> mLAN connector (available only<br />
for <strong>the</strong> MOTIF <strong>XS</strong>8, and MOTIF <strong>XS</strong>6/7 with an optional mLAN16E2 installed), or <strong>the</strong> USB connector. However, <strong>the</strong>y cannot be used at <strong>the</strong><br />
same time. Select which connector is used for MIDI data transfer in <strong>the</strong> MIDI display (page 267) of <strong>the</strong> Utility mode.<br />
Controlling an external tone generator or syn<strong>the</strong>sizer from <strong>the</strong> MOTIF <strong>XS</strong><br />
This connection lets you sound an external MIDI tone generator (syn<strong>the</strong>sizer, tone generator module, etc.) by playing <strong>the</strong><br />
MOTIF <strong>XS</strong> or playing back <strong>the</strong> Song/Pattern of <strong>the</strong> MOTIF <strong>XS</strong>. Use this connection when you wish to sound <strong>the</strong> o<strong>the</strong>r<br />
instrument along with <strong>the</strong> MOTIF <strong>XS</strong>.<br />
MOTIF <strong>XS</strong><br />
Make sure match <strong>the</strong> MIDI Transmit Channel of <strong>the</strong> MOTIF <strong>XS</strong> with <strong>the</strong> MIDI Receive Channel of <strong>the</strong> external MIDI tone<br />
generator. The MIDI Transmit Channel in <strong>the</strong> Voice mode and Performance mode can be set in <strong>the</strong> MIDI display (page 267)<br />
of <strong>the</strong> Utility mode. The Transmit Channels of each track can be set in <strong>the</strong> Song Track display (page 184) of <strong>the</strong> Song Play<br />
mode. The Transmit Channels of each track can be set in <strong>the</strong> Pattern Track display (page 211) of <strong>the</strong> Pattern Play mode.<br />
Controlling from an external MIDI keyboard<br />
Use an external keyboard or syn<strong>the</strong>sizer (such as <strong>the</strong> S90 ES) to remotely select and play <strong>the</strong> Voices of <strong>the</strong> MOTIF <strong>XS</strong>.<br />
MOTIF <strong>XS</strong><br />
MIDI OUT<br />
MIDI OUT<br />
Make sure match <strong>the</strong> MIDI Transmit Channel of <strong>the</strong> external MIDI instrument with <strong>the</strong> MIDI Receive Channel of <strong>the</strong> MOTIF <strong>XS</strong>.<br />
For details on setting <strong>the</strong> MIDI Transmit Channel of <strong>the</strong> external MIDI instrument, refer to <strong>the</strong> Owner’s <strong>Manual</strong> of <strong>the</strong> MIDI<br />
instrument. The MIDI Receive Channel in <strong>the</strong> Voice mode and Performance mode can be set in <strong>the</strong> MIDI display (page 267)<br />
of <strong>the</strong> Utility mode. The MIDI Receive Channels in <strong>the</strong> Song mode and Pattern mode can be set in <strong>the</strong> Voice display<br />
(page 235) of <strong>the</strong> Mixing Part Edit mode.<br />
MIDI IN<br />
External MIDI tone generator such as<br />
MOTIF-RACK ES<br />
MIDI IN<br />
External MIDI tone generator such as S90 ES<br />
Basic Structure<br />
Basic Operation<br />
Connections<br />
MOTIF <strong>XS</strong> Owner’s <strong>Manual</strong> 83<br />
Basic Section
Basic Section<br />
84<br />
Connections<br />
Basic Structure Basic Operation Connections<br />
Controlling ano<strong>the</strong>r MIDI device via MIDI THRU<br />
The playback data of an external MIDI sequencer is used to play <strong>the</strong> sounds of ano<strong>the</strong>r MIDI instrument (connected to <strong>the</strong><br />
MIDI THRU connector) along with <strong>the</strong> MOTIF <strong>XS</strong>. The MIDI THRU connector simply redirects any received MIDI data (via<br />
MIDI IN) to connected instrument.<br />
MIDI IN<br />
In this case, make sure that <strong>the</strong> MOTIF <strong>XS</strong> is set to <strong>the</strong> Song mode or Pattern mode. If <strong>the</strong> instrument is set to <strong>the</strong> Voice mode<br />
or to <strong>the</strong> Performance mode in which multi-channel MIDI messages are not recognized, <strong>the</strong> external sequence data<br />
(containing multi-channel data) will not play back properly on <strong>the</strong> MOTIF <strong>XS</strong>. In addition, you may have to make certain MIDI<br />
synchronization settings (see below). Likewise, make sure to set <strong>the</strong> MIDI tone generator (connected to <strong>the</strong> MIDI THRU<br />
connector) to <strong>the</strong> multi-timbral mode. In addition, you’ll need to enable <strong>the</strong> MOTIF <strong>XS</strong> to respond to external clock, set from<br />
<strong>the</strong> MIDI display (page 267) in <strong>the</strong> Utility mode.<br />
Connecting to an MTR (Multi-track Recorder)<br />
Since this syn<strong>the</strong>sizer can receive <strong>the</strong> MTC (MIDI Time Code) and can transmit <strong>the</strong> MMC (MIDI Machine Control), you can<br />
produce music by synchronizing to an MTC- or MMC-<strong>com</strong>patible multi-track recording device. You can use two types of<br />
MTR control (illustrated below) by setting <strong>the</strong> MIDI Sync to MTC in <strong>the</strong> MIDI display (page 267) of <strong>the</strong> Utility mode.<br />
n MTC and MMC are available only in <strong>the</strong> Song mode.<br />
Synchronizing <strong>the</strong> MOTIF <strong>XS</strong> to <strong>the</strong> MTC signal from an external MTR<br />
After receiving <strong>the</strong> MTC signal transmitted from <strong>the</strong> MTR by starting <strong>the</strong> MTR playback, <strong>the</strong> Song of <strong>the</strong> MOTIF <strong>XS</strong> will start at<br />
<strong>the</strong> moment <strong>the</strong> MTC Start Offset time set in <strong>the</strong> MIDI display (page 267) of <strong>the</strong> Utility mode is received.<br />
n MTC (MIDI Time Code) allows simultaneous synchronization of multiple audio devices via standard MIDI cables. It includes data<br />
corresponding to hours, minutes, seconds, and frames. The MOTIF <strong>XS</strong> does not transmit MTC. An instrument such as <strong>the</strong> Yamaha AW2400<br />
which can transmit MTC is necessary as an MTC master.<br />
MOTIF <strong>XS</strong> Owner’s <strong>Manual</strong><br />
MOTIF <strong>XS</strong><br />
MIDI OUT<br />
MIDI THRU MIDI IN MIDI IN MIDI OUT<br />
MIDI IN<br />
MOTIF <strong>XS</strong><br />
MIDI tone generator MIDI syn<strong>the</strong>sizer MIDI sequencer<br />
C<br />
MIDI OUT<br />
AW2400, etc.
Controlling an MTR by using MMC transmitted from <strong>the</strong> MOTIF <strong>XS</strong><br />
You can control <strong>the</strong> start/stop and fast forward/rewind of an MMC-<strong>com</strong>patible MTR from <strong>the</strong> SEQ TRANSPORT buttons on<br />
<strong>the</strong> front panel of this syn<strong>the</strong>sizer, outputting MMC messages via MIDI.<br />
Connections<br />
n MMC (MIDI Machine Control) allows remote control of multitrack recorders, MIDI sequencers, etc. An MMC-<strong>com</strong>patible multitrack recorder,<br />
for example, will automatically respond to start, stop, fast forward, and fast reverse operations performed on <strong>the</strong> controlling sequencer, thus<br />
keeping playback of <strong>the</strong> sequencer and multitrack recorder aligned.<br />
Using USB storage devices<br />
You can connect a USB storage device such as flash memory or a hard disk unit to <strong>the</strong> USB TO DEVICE connector on <strong>the</strong><br />
rear panel and save/load <strong>the</strong> files (including data created on <strong>the</strong> MOTIF <strong>XS</strong>) to and from it. When using USB storage<br />
devices, follow <strong>the</strong> important precautions below.<br />
USB storage device such as<br />
MOTIF <strong>XS</strong><br />
hard disk drive<br />
Compatible USB devices<br />
Connect only a USB storage device (such as hard disk, CD-ROM, flash disk and o<strong>the</strong>r drives) to <strong>the</strong> USB TO DEVICE<br />
connector. O<strong>the</strong>r devices such as a <strong>com</strong>puter keyboard or mouse cannot be used. Both bus-powered (powered by <strong>the</strong> host<br />
device) or self-powered (battery or external power supply) types can be used. The MOTIF <strong>XS</strong> does not necessarily support<br />
all <strong>com</strong>mercially available USB storage devices. Yamaha cannot guarantee operation of USB storage devices that you<br />
purchase. Before purchasing USB storage devices, please consult your Yamaha dealer, or an authorized Yamaha distributor<br />
(see list at end of <strong>the</strong> Owner’s <strong>Manual</strong>) for advice, or visit <strong>the</strong> following website: http://www.yamahasynth.<strong>com</strong>/<br />
n Although CD-R/W drives can be used to load data to <strong>the</strong> instrument, <strong>the</strong>y cannot be used for saving data. However, you can transfer <strong>the</strong> data<br />
to a <strong>com</strong>puter and save it to a CD using <strong>the</strong> CD-R/W drive on <strong>the</strong> <strong>com</strong>puter.<br />
Formatting USB storage media<br />
When an unformatted USB storage device is connected to <strong>the</strong> USB TO DEVICE connector or when unformatted media is<br />
inserted to <strong>the</strong> USB device connected to <strong>the</strong> USB TO DEVICE connector, <strong>the</strong> indication “unknown device (usb***)” is shown<br />
in <strong>the</strong> device list on <strong>the</strong> [F3] Format window of <strong>the</strong> File mode. If this happens, execute <strong>the</strong> Format operation in <strong>the</strong> Format<br />
display (page 278).<br />
n The three asterisks (***) in <strong>the</strong> example indication above denote <strong>the</strong> sequential serial numbers of <strong>the</strong> connected devices which need to be<br />
formatted. When several partitions are included in a single device, <strong>the</strong> partition number is indicated at <strong>the</strong> right of <strong>the</strong> serial number.<br />
Precautions when using <strong>the</strong> USB TO DEVICE connector<br />
CAUTION<br />
SEQ TRANSPORT<br />
LOCATE 1 2<br />
USB flash memory<br />
or<br />
MIDI IN MIDI OUT<br />
MOTIF <strong>XS</strong><br />
USB TO DEVICE connector<br />
MIDI IN MIDI OUT<br />
AW2400, etc.<br />
• Never turn <strong>the</strong> USB device’s power on/off and never plug/unplug <strong>the</strong> USB cable when <strong>the</strong> connected USB storage device is <strong>the</strong><br />
self-powered type. Doing so may result in <strong>the</strong> operation of <strong>the</strong> syn<strong>the</strong>sizer “freezing” or hanging up.<br />
• While <strong>the</strong> instrument is accessing data (such as in <strong>the</strong> Save, Load and Delete operations in <strong>the</strong> File mode), do NOT unplug <strong>the</strong> USB<br />
cable, do NOT remove <strong>the</strong> media from <strong>the</strong> device, and do NOT turn <strong>the</strong> power off to ei<strong>the</strong>r device. Doing so may corrupt <strong>the</strong> data on<br />
ei<strong>the</strong>r or both devices.<br />
Basic Structure<br />
Basic Operation<br />
Connections<br />
MOTIF <strong>XS</strong> Owner’s <strong>Manual</strong> 85<br />
Basic Section
Basic Section<br />
86<br />
Connections<br />
Basic Structure Basic Operation Connections<br />
Protecting your data (write-protect)<br />
To prevent important data from being inadvertently erased, apply <strong>the</strong> write-protect provided with each storage device or<br />
media.<br />
Network connection<br />
LAN connection<br />
The MOTIF <strong>XS</strong> can be connected to a LAN network via <strong>the</strong> ETHERNET cable. When <strong>the</strong> MOTIF <strong>XS</strong> is connected to <strong>the</strong> LAN<br />
network, <strong>the</strong> File mode lets you save <strong>the</strong> file created on <strong>the</strong> MOTIF <strong>XS</strong> to <strong>the</strong> <strong>com</strong>puter drive connected to <strong>the</strong> same network.<br />
Connect <strong>the</strong> MOTIF <strong>XS</strong> to <strong>the</strong> router or hub with a LAN cable. Connect a <strong>com</strong>puter to <strong>the</strong> router or hub with a LAN cable or<br />
<strong>the</strong> wireless connection.<br />
n Make sure to use a straight LAN cable.<br />
n Due to EU regulations, users within Europe should use an STP (shielded twisted pair) cable to prevent electromagnetic interference.<br />
n If your <strong>com</strong>puter is not equipped with an ETHERNET connector, install a <strong>com</strong>mercially available LAN adaptor to <strong>the</strong> PCI slot or PC Card slot<br />
of your <strong>com</strong>puter.<br />
n If you have a broadband router to connect your <strong>com</strong>puter to <strong>the</strong> Internet, use an unused ETHERNET connector on <strong>the</strong> router to connect <strong>the</strong><br />
MOTIF <strong>XS</strong>. Keep in mind however, that this does not allow you <strong>the</strong> MOTIF <strong>XS</strong> to be connected to <strong>the</strong> Internet, but only to o<strong>the</strong>r <strong>com</strong>puters and<br />
drives on <strong>the</strong> network.<br />
Network Settings<br />
After <strong>the</strong> LAN connection is <strong>com</strong>pleted, you should set <strong>the</strong> network related parameters to make <strong>the</strong> connection active. Once<br />
<strong>the</strong> MOTIF <strong>XS</strong> has been connected to <strong>the</strong> network, files can be saved or loaded between <strong>the</strong> MOTIF <strong>XS</strong> and <strong>the</strong> <strong>com</strong>puter<br />
connected to <strong>the</strong> same network. Call up <strong>the</strong> Network display (page 260) in <strong>the</strong> Utility mode.<br />
File Sharing for accessing a <strong>com</strong>puter from<br />
<strong>the</strong> MOTIF <strong>XS</strong><br />
Follow <strong>the</strong> instructions below so that you can access a<br />
<strong>com</strong>puter from <strong>the</strong> MOTIF <strong>XS</strong> via <strong>the</strong> LAN network.<br />
1 Call up <strong>the</strong> Network display (page 260) of <strong>the</strong><br />
Utility mode.<br />
Press <strong>the</strong> [UTILITY] button to enter <strong>the</strong> Utility mode <strong>the</strong>n<br />
press <strong>the</strong> [F1] button and <strong>the</strong> [SF3] button to call up <strong>the</strong><br />
Network display.<br />
2 Set <strong>the</strong> parameters related to <strong>the</strong> network.<br />
MOTIF <strong>XS</strong> Owner’s <strong>Manual</strong><br />
MOTIF <strong>XS</strong><br />
LAN cable<br />
ETEHRNET connector<br />
Hub or router<br />
1<br />
2<br />
3<br />
5<br />
6<br />
7<br />
8<br />
9<br />
LAN cable<br />
Here, <strong>the</strong> minimum required settings (parameters 3<br />
and )) are explained. For details on <strong>the</strong> o<strong>the</strong>r<br />
parameters, see page 260.<br />
3 DHCP Client<br />
Computer equipped with an<br />
ETHERNET connector<br />
Set this parameter to “on,” if you have <strong>the</strong> network<br />
using <strong>the</strong> device with <strong>the</strong> DHCP server function such as<br />
a broadband router. When this is set to on, setting<br />
4<br />
)<br />
!<br />
@<br />
#
parameters 5 – 9 are not necessary. Set this<br />
parameter to “off,” if your network does not use a<br />
device with <strong>the</strong> DHCP server function.<br />
) Security<br />
Set this parameter to “workgroup,” if your network<br />
administrator does not specify o<strong>the</strong>rwise.<br />
Parameters 1 and 2 are not necessary here.<br />
Parameters 5 – 9 are necessary to be set if your<br />
network does not use a device with <strong>the</strong> DHCP server<br />
function. For details, see page 260. For instructions on<br />
setting <strong>the</strong>se parameters, consult your network<br />
administrator or provider.<br />
For information on <strong>the</strong> o<strong>the</strong>r parameters, refer to <strong>the</strong><br />
explanation of <strong>the</strong> Network display (page 260) in <strong>the</strong><br />
Utility mode.<br />
3 Press <strong>the</strong> [ENTER] button to actually apply <strong>the</strong><br />
settings to <strong>the</strong> MOTIF <strong>XS</strong>.<br />
4 Set <strong>the</strong> shared directory on your <strong>com</strong>puter.<br />
On your <strong>com</strong>puter, set <strong>the</strong> folder which you want to access<br />
from <strong>the</strong> MOTIF <strong>XS</strong> via network to <strong>the</strong> shared folder. For<br />
details, refer to <strong>the</strong> owner’s manual of your <strong>com</strong>puter.<br />
5 Confirm whe<strong>the</strong>r or not <strong>the</strong> MOTIF <strong>XS</strong> and <strong>the</strong><br />
<strong>com</strong>puter are properly connected to <strong>the</strong><br />
network.<br />
Press <strong>the</strong> [FILE] button to enter <strong>the</strong> File mode, <strong>the</strong>n press<br />
<strong>the</strong> [F2] button to call up <strong>the</strong> Mount display (page 277). If<br />
<strong>the</strong> MOTIF <strong>XS</strong> and <strong>the</strong> <strong>com</strong>puter are connected properly,<br />
<strong>the</strong> <strong>com</strong>puter name is shown in <strong>the</strong> HOST column. If <strong>the</strong><br />
<strong>com</strong>puter name is not shown, press <strong>the</strong> [SF5] Char button<br />
<strong>the</strong>n enter <strong>the</strong> <strong>com</strong>puter name directly in <strong>the</strong> Host ($)<br />
column. If <strong>the</strong> MOTIF <strong>XS</strong> and <strong>the</strong> <strong>com</strong>puter are connected<br />
properly, <strong>the</strong> name you input will be recognized.<br />
$<br />
%<br />
Mount<br />
Indicator<br />
n Confirm <strong>the</strong> <strong>com</strong>puter name on <strong>the</strong> operating system of<br />
your <strong>com</strong>puter. For details, refer to <strong>the</strong> owner’s manual of<br />
your <strong>com</strong>puter.<br />
6 In <strong>the</strong> File mode of <strong>the</strong> MOTIF <strong>XS</strong>, access <strong>the</strong><br />
<strong>com</strong>puter via network so that <strong>the</strong> shared<br />
directory appears on <strong>the</strong> display.<br />
Call up <strong>the</strong> Mount display of <strong>the</strong> File mode. When setting<br />
<strong>the</strong> HOST (1) to a <strong>com</strong>puter name containing <strong>the</strong> desired<br />
shared directory, “Press [ENTER] to access” appears on<br />
<strong>the</strong> display. Next, press <strong>the</strong> [ENTER] button so that <strong>the</strong><br />
display prompts you to enter <strong>the</strong> password as illustrated<br />
Connections<br />
below. Here, enter <strong>the</strong> User Account of your <strong>com</strong>puter to<br />
<strong>the</strong> User Name box, enter <strong>the</strong> password of your <strong>com</strong>puter<br />
to <strong>the</strong> Password box, <strong>the</strong>n press <strong>the</strong> [ENTER] button so<br />
that <strong>the</strong> access between <strong>the</strong> MOTIF <strong>XS</strong> and <strong>the</strong> <strong>com</strong>puter<br />
is established. The shared directories of <strong>the</strong> selected<br />
<strong>com</strong>puter are listed in <strong>the</strong> Sharing Point box (2).<br />
n Once access between <strong>the</strong> MOTIF <strong>XS</strong> and <strong>the</strong> <strong>com</strong>puter<br />
has been established, <strong>the</strong> shared directories are<br />
automatically listed on <strong>the</strong> display simply by selecting a<br />
<strong>com</strong>puter in <strong>the</strong> Host column. If you turn <strong>the</strong> power off,<br />
however, <strong>the</strong> operations for establishing access (entering<br />
<strong>the</strong> User Account and Password) are necessary after<br />
turning <strong>the</strong> power on next time.<br />
n For details about how to confirm <strong>the</strong> User Account and<br />
Password of your <strong>com</strong>puter, refer to <strong>the</strong> owner’s manual of<br />
your <strong>com</strong>puter.<br />
n If a password has not been set on your <strong>com</strong>puter, you<br />
need not enter <strong>the</strong> password. Access can be established<br />
even if you enter no password.<br />
7 Mount <strong>the</strong> desired directories.<br />
In <strong>the</strong> Sharing Point box (2), you can mount <strong>the</strong> shared<br />
directory by moving <strong>the</strong> cursor to <strong>the</strong> desired directory,<br />
<strong>the</strong>n pressing <strong>the</strong> [ENTER] button. The mount indicator<br />
appears at <strong>the</strong> left side of <strong>the</strong> mounted directory’s name.<br />
By following <strong>the</strong> instructions above, you can access a<br />
<strong>com</strong>puter from <strong>the</strong> MOTIF <strong>XS</strong> via <strong>the</strong> LAN network. For<br />
details, see page 86.<br />
File Sharing for accessing <strong>the</strong> MOTIF <strong>XS</strong> from<br />
a <strong>com</strong>puter<br />
Follow <strong>the</strong> instructions below so that you can access <strong>the</strong><br />
MOTIF <strong>XS</strong> (actually a USB storage device connected to <strong>the</strong><br />
MOTIF <strong>XS</strong>) from a <strong>com</strong>puter via <strong>the</strong> LAN network. Call up<br />
<strong>the</strong> Network display (page 260) in <strong>the</strong> Utility mode.<br />
n Keep in mind that <strong>the</strong> internal Flash memory of <strong>the</strong> MOTIF <strong>XS</strong><br />
cannot be accessed from a <strong>com</strong>puter via <strong>the</strong> LAN network.<br />
Only <strong>the</strong> data saved to a USB storage device connected to <strong>the</strong><br />
MOTIF <strong>XS</strong> can be accessed from a <strong>com</strong>puter via <strong>the</strong> LAN<br />
network. If you want to share files between <strong>the</strong> MOTIF <strong>XS</strong> and<br />
a <strong>com</strong>puter, save <strong>the</strong> data stored in internal Flash memory to<br />
an external USB storage device.<br />
1 Call up <strong>the</strong> Network display (page 260) <strong>the</strong>n set<br />
<strong>the</strong> File Server Account (#).<br />
If <strong>the</strong> account has not been set, <strong>the</strong> MOTIF <strong>XS</strong> can be<br />
accessed using <strong>the</strong> account named “nobody.”<br />
2 Set <strong>the</strong> password.<br />
Press <strong>the</strong> [SF5] Password button to call up <strong>the</strong> password<br />
window. For instructions on setting, see page 262.<br />
3 Set <strong>the</strong> File Server parameter (4) to “on.”<br />
Basic Structure<br />
Basic Operation<br />
Connections<br />
MOTIF <strong>XS</strong> Owner’s <strong>Manual</strong> 87<br />
Basic Section
Reference<br />
Voice mode Performance Sampling Song mode Pattern mode Mixing mode Sampling Master mode Utility mode File mode<br />
mode mode 1<br />
mode 2<br />
88<br />
Reference<br />
MOTIF <strong>XS</strong> Owner’s <strong>Manual</strong><br />
Playing <strong>the</strong> Keyboard in <strong>the</strong> Voice Play Mode<br />
The Voice mode is used for selecting, playing, and editing a desired Voice. The Voice Play mode is <strong>the</strong> main ‘portal’ by<br />
which you enter <strong>the</strong> Voice mode, and it is here where you select and play a Voice. Some of <strong>the</strong> Voice settings can also be<br />
edited in this mode. To call up <strong>the</strong> Voice Play display and enter <strong>the</strong> Voice mode, simply press <strong>the</strong> [VOICE] button.<br />
Selecting a Voice<br />
This syn<strong>the</strong>sizer has 128 Voices in each of 15 Banks:<br />
Preset 1 – 8, User 1 – 3, GM, Preset Drum, User Drum, and<br />
GM Drum. The Bank consists of eight Groups (A to H),<br />
each of which contains 16 Voices. To select <strong>the</strong> desired<br />
Voice, select <strong>the</strong> Bank, Group, <strong>the</strong>n Number.<br />
2<br />
3<br />
4<br />
PRE 1 PRE 2 PRE 3 PRE 4 PRE 5 PRE 6 PRE 7 PRE 8 PROGRAM<br />
PIANO KEYBOARD ORGAN GUITAR BASS STRINGS BRASS<br />
USER 1 USER 2 USER 3 GM GM DR PRE DR USER DR<br />
SYN LEAD PADS/<br />
CHOIRS<br />
SYN COMP CHROMATIC DRUM/<br />
PERCUSSION PERCUSSION<br />
SUB CATEGORY<br />
[PROGRAM] lamp is turned on<br />
PART SELECT ARP ON/OFF<br />
PART MUTE ARP HOLD<br />
SAX/<br />
WOODWIND<br />
A B C D E F G H<br />
1 2 3 4 5 6 7<br />
8<br />
1 Press <strong>the</strong> [VOICE] button to enter <strong>the</strong> Voice<br />
Play mode.<br />
The [PROGRAM] lamp lights, indicating that you can<br />
select <strong>the</strong> desired Voice by specifying <strong>the</strong> Bank/Group/<br />
Number.<br />
2 Select a Voice Bank.<br />
Press one of <strong>the</strong> Bank buttons listed below to select a<br />
Bank. Selecting a Bank calls up <strong>the</strong> Voice Select<br />
window.<br />
Buttons Banks<br />
[PRE 1] – [PRE 8] buttons Preset Banks 1 – 8<br />
[USER 1] – [USER 3] buttons User Banks 1 – 3<br />
[GM] button GM Bank<br />
[GM DR] button GM Drum Bank<br />
[PRE DR] button Preset Drum Bank<br />
[USER DR] button User Drum Bank<br />
CATEGORY SEA<br />
PERFORMANC<br />
CONTROL<br />
9 10 11 12 13 14 15 16 MUTE<br />
3 Select a Group.<br />
Press one of <strong>the</strong> [A] to [H] buttons to select a Group. If<br />
you’ve selected a Drum Bank in <strong>the</strong> previous step,<br />
press one of <strong>the</strong> [A] to [D] buttons to select a Group.<br />
The name list of <strong>the</strong> 16 Voices in <strong>the</strong> selected Group will<br />
SOUND<br />
EFX<br />
MUSICAL<br />
EFX<br />
ETHNIC<br />
appear on <strong>the</strong> display. Note that <strong>the</strong> GM Drum Bank<br />
contains only one Drum Voice, indicating that you<br />
cannot select a Group.<br />
4 Select a Voice.<br />
Press one of <strong>the</strong> [1] to [16] buttons to select a Voice.<br />
In this way (Steps 2 – 4), you can call up your desired<br />
Voice.<br />
n When selecting <strong>the</strong> Voice within <strong>the</strong> same Bank or Group,<br />
it is not necessary to select <strong>the</strong> Bank or Group again. You<br />
can use <strong>the</strong> [INC/YES] and [DEC/NO] buttons or data dial<br />
to select <strong>the</strong> Voice number. This operation lets you call up<br />
Voices in subsequent or previous Groups and Banks.<br />
Decreases<br />
number<br />
Decreases<br />
number<br />
DEC/NO INC/YES<br />
Increases<br />
number<br />
Increases<br />
number<br />
Select a Voice using <strong>the</strong> Category<br />
Search function<br />
The MOTIF <strong>XS</strong> features a Category Search function that<br />
gives you quick access to <strong>the</strong> sound you want, irrespective<br />
of <strong>the</strong>ir Bank locations. For instructions on using <strong>the</strong><br />
Category Function, refer to “Start Guide” on page 24.<br />
Grouping your most-used Voices<br />
toge<strong>the</strong>r—Favorite Category<br />
Category Search also has a convenient Favorite Category<br />
that lets you bring toge<strong>the</strong>r your most often used and<br />
favorite Voices for easy selection. This is one more useful<br />
way <strong>the</strong> MOTIF <strong>XS</strong> lets you quickly select <strong>the</strong> Voices you<br />
need from <strong>the</strong> huge number available.
Registering your favorite Voices to <strong>the</strong><br />
Favorite Category<br />
1 Press <strong>the</strong> [VOICE] button to enter <strong>the</strong> Voice<br />
Play mode.<br />
2 Call up <strong>the</strong> Category Search window.<br />
Press <strong>the</strong> [CATEGORY SEARCH] button so that its<br />
indicator lights and <strong>the</strong> Category Search window<br />
appears.<br />
3 Select your favorite Voice.<br />
Find <strong>the</strong> desired Voice by following <strong>the</strong> instructions on<br />
page 24.<br />
4 Register <strong>the</strong> Voice to <strong>the</strong> Favorite Category.<br />
Press <strong>the</strong> [F5] button to register <strong>the</strong> Voice and turn on<br />
<strong>the</strong> Favorite Switch. A checkmark appears in <strong>the</strong> box to<br />
<strong>the</strong> left of <strong>the</strong> Voice name, indicating that <strong>the</strong> Voice has<br />
been included in <strong>the</strong> Favorite Category. (Pressing <strong>the</strong><br />
[F5] button again turns <strong>the</strong> checkmark off, clearing <strong>the</strong><br />
selected Voice from <strong>the</strong> Favorite Category.) To clear all<br />
previously registered Voices from <strong>the</strong> Favorite<br />
Category—useful for when you want to create <strong>the</strong><br />
Favorite Category from scratch—press <strong>the</strong> [F6] button.<br />
Favorite Switch<br />
Selecting a Voice from <strong>the</strong> Favorite<br />
Category<br />
1 Call up <strong>the</strong> Favorite Select window.<br />
From <strong>the</strong> Category Search window, press <strong>the</strong> [F4]<br />
button to call up <strong>the</strong> Favorite Select window.<br />
The Favorite Select window shows all Voices registered<br />
to <strong>the</strong> Favorite Category.<br />
Playing <strong>the</strong> Keyboard in <strong>the</strong> Voice Play Mode<br />
2 Select a Voice.<br />
Select <strong>the</strong> desired Voice by using <strong>the</strong> [INC/YES] and<br />
[DEC/NO] buttons or data dial to move <strong>the</strong> cursor<br />
upward or downward in <strong>the</strong> Voice List.<br />
n The order of <strong>the</strong> Voices in <strong>the</strong> Favorite Category cannot be<br />
changed. If you want to create a custom order of Voices<br />
for quick selection during your performance, store <strong>the</strong><br />
Voices to one of <strong>the</strong> User banks.<br />
Using Knobs and Control Sliders<br />
One of <strong>the</strong> more powerful performance features of <strong>the</strong><br />
MOTIF <strong>XS</strong> is its extensive set of real-time controls—<br />
especially <strong>the</strong> Knobs and Control Sliders. These let you<br />
adjust a variety of parameters for <strong>the</strong> current Voice, such<br />
as effect depth, attack/release characteristics, tonal color,<br />
and o<strong>the</strong>rs. These real-time controls can be used to<br />
change <strong>the</strong> sound as you play or to quickly edit and<br />
customize <strong>the</strong> Voice. Three functions can be assigned to<br />
each knob, alternatively selected via <strong>the</strong> [SELECTED PART<br />
CONTROL] button. Each time <strong>the</strong> button is pressed, <strong>the</strong><br />
lamp lights alternatively in descending order, TONE1 →<br />
TONE2 → ARP FX. For details, see page 26 in <strong>the</strong> Start<br />
Guide.<br />
n If <strong>the</strong> [E] (Edit) Indicator appears in <strong>the</strong> top right of <strong>the</strong> display,<br />
<strong>the</strong> current Voice can be stored (page 97) as a new User<br />
Voice.<br />
n Holding down <strong>the</strong> [SELECTED PART CONTROL] button for a<br />
few seconds will alternate <strong>the</strong> lit lamp from <strong>the</strong> current one to<br />
TONE 1.<br />
n A red point on <strong>the</strong> Knob or Slider graphic indicates <strong>the</strong> current<br />
value to which <strong>the</strong> Knob or Slider is set. Moving <strong>the</strong> Knob or<br />
Slider has no effect on <strong>the</strong> sound until this point is reached.<br />
Once you move <strong>the</strong> Knob or Slider past this point, <strong>the</strong> red<br />
point disappears and moving <strong>the</strong> Knob or Control Slider<br />
affects <strong>the</strong> sound.<br />
n You can confirm <strong>the</strong> functions assigned to <strong>the</strong> eight knobs in<br />
<strong>the</strong> Voice Play display, called up via <strong>the</strong> [F1] button. When a<br />
display o<strong>the</strong>r than <strong>the</strong> Voice display is shown, you can confirm<br />
<strong>the</strong> knob functions by pressing <strong>the</strong> [SELECTED PART<br />
CONTROL] button, which calls up <strong>the</strong> Control Function<br />
window.<br />
Red point (current value)<br />
Voice mode<br />
Performance<br />
mode<br />
Sampling<br />
mode 1<br />
Song mode<br />
Pattern mode<br />
Mixing mode<br />
Sampling<br />
mode 2<br />
Master mode<br />
Utility mode<br />
File mode<br />
MOTIF <strong>XS</strong> Owner’s <strong>Manual</strong> 89<br />
Reference
Reference<br />
90<br />
Playing <strong>the</strong> Keyboard in <strong>the</strong> Voice Play Mode<br />
Voice mode Performance Sampling Song mode Pattern mode Mixing mode Sampling Master mode Utility mode File mode<br />
mode mode 1<br />
mode 2<br />
Knob Functions<br />
1 When <strong>the</strong> TONE 1 lamp is turned on: Moving Knobs 1 and 2 changes <strong>the</strong> Filter parameters on <strong>the</strong> EG/EQ display. Moving Knobs 3 – 6<br />
changes <strong>the</strong> Amplitude EG parameters.<br />
Knob 1 CUTOFF Raises or lowers <strong>the</strong> Filter Cutoff Frequency (page 94) to adjust <strong>the</strong> tone brilliance.<br />
Knob 2 RESONANCE Raises or lowers <strong>the</strong> Resonance (page 94) to boost <strong>the</strong> level of <strong>the</strong> signal in <strong>the</strong> area of <strong>the</strong> cutoff<br />
frequency. By emphasizing <strong>the</strong> overtones in this area, this can produce a distinctive “peaky” tone,<br />
making <strong>the</strong> sound brighter and harder.<br />
Knob 3 ATTACK Increases or decreases <strong>the</strong> EG Attack Time (page 94) of <strong>the</strong> current Voice. The smaller <strong>the</strong> value, <strong>the</strong><br />
faster <strong>the</strong> attack.<br />
Knob 4 DECAY Increases or decreases <strong>the</strong> EG Decay Time (page 94) of <strong>the</strong> current Voice to determine how fast <strong>the</strong><br />
volume falls from maximum attack level to <strong>the</strong> sustain level. The smaller <strong>the</strong> value, <strong>the</strong> faster <strong>the</strong> decay.<br />
Knob 5 SUSTAIN Increases or decreases <strong>the</strong> EG Sustain Level (page 94) at which <strong>the</strong> volume will continue while a key<br />
is held, after <strong>the</strong> initial attack and decay. Turn <strong>the</strong> knob counter-clockwise to make <strong>the</strong> sound cut off<br />
more sharply after <strong>the</strong> decay.<br />
Knob 6 RELEASE Increases or decreases <strong>the</strong> EG Release Time (page 94) of <strong>the</strong> sound to determine how fast <strong>the</strong> volume<br />
falls from <strong>the</strong> sustain level to zero when a key is released. The lower <strong>the</strong> value, <strong>the</strong> faster <strong>the</strong> release.<br />
Knob 7 ASSIGN 1 A variety of functions can be assigned to <strong>the</strong>se Knobs. You can confirm <strong>the</strong> functions currently<br />
Knob 8 ASSIGN 2<br />
assigned to <strong>the</strong>se Knobs in <strong>the</strong> Voice Play display (page 91). The Controller Set display (page 104) in<br />
<strong>the</strong> Voice Common Edit mode lets you assign <strong>the</strong> functions to <strong>the</strong>se Knobs.<br />
2 When <strong>the</strong> TONE 2 lamp is turned on: Moving Knobs 1 – 5 changes <strong>the</strong> EQ parameters in <strong>the</strong> EG/EQ display (page 94). Moving Knobs 6 – 8<br />
changes <strong>the</strong> parameters in <strong>the</strong> Play Mode display (page 98) and <strong>the</strong> Effect Connect display<br />
(page 107) of <strong>the</strong> Voice Common Edit mode.<br />
Knob 1 EQ LOW Increases or decreases <strong>the</strong> EQ Low Gain (page 95) to change <strong>the</strong> sound.<br />
Knob 2 EQ MID F<br />
(EQ Middle Frequency)<br />
n Controlling <strong>the</strong> Knob adds <strong>the</strong> parameter value to <strong>the</strong> current one for <strong>the</strong> current Voice. Accordingly, if <strong>the</strong> parameter has been already set to<br />
<strong>the</strong> maximum or minimum value, its value will not be changed even if you operate <strong>the</strong> Knob.<br />
MOTIF <strong>XS</strong> Owner’s <strong>Manual</strong><br />
[SELECTED PART CONTROL] button<br />
SELECTED PART<br />
CONTROL<br />
MULTI PART<br />
CONTROL<br />
1<br />
2<br />
3<br />
TONE 1<br />
TONE 2<br />
ARP FX<br />
REVERB<br />
CHORUS<br />
PAN<br />
CUTOFF RESONANCE<br />
EQ LOW EQ MID F<br />
SWING<br />
QUANTIZE<br />
VALUE<br />
ATTACK DECAY<br />
EQ MID EQ MID Q<br />
QUANTIZE<br />
STRENGTH GATE TIME<br />
SUSTAIN RELEASE<br />
EQ HIGH PAN<br />
VELOCITY OCT RANGE<br />
ASSIGN 1 ASSIGN 2<br />
REVERB CHORUS<br />
UNITMULTIPLY TEMPO<br />
Increases or decreases <strong>the</strong> EQ Middle Frequency (page 95) around which <strong>the</strong> band is adjusted via<br />
Knob 3 (EQ MID).<br />
Knob 3 EQ MID (EQ Middle Gain) Increases or decreases <strong>the</strong> EQ Middle Gain (page 95) to change <strong>the</strong> current Voice.<br />
Knob 4 EQ MID Q (EQ Middle Q) Increases or decreases <strong>the</strong> EQ Middle Q (page 95) to change <strong>the</strong> width of <strong>the</strong> band over which you<br />
can adjust <strong>the</strong> gain via Knob 3 (EQ Middle Gain). Turning Knob 4 clockwise increases <strong>the</strong> Q value to<br />
reduce <strong>the</strong> band width. Turning Knob 4 counter-clockwise decreases <strong>the</strong> Q value to widen <strong>the</strong> band<br />
width.<br />
Knob 5 EQ HIGH (EQ High Gain) Increases or decreases <strong>the</strong> EQ High Gain (page 95) to change <strong>the</strong> current Voice.<br />
Knob 6 PAN Adjusts <strong>the</strong> stereo pan position of <strong>the</strong> current Voice (page 99).<br />
Knob 7 REVERB Adjusts <strong>the</strong> Reverb Send Level (page 108).<br />
Knob 8 CHORUS Adjusts <strong>the</strong> Chorus Send Level (page 108).<br />
3 When <strong>the</strong> ARP FX lamp is turned on: Moving Knobs changes <strong>the</strong> Arpeggio related parameters in <strong>the</strong> Voice Common Edit mode.<br />
This operation is available when <strong>the</strong> Arpeggio function is turned on.<br />
Knob 1 SWING Adjusts <strong>the</strong> swing feel of <strong>the</strong> Arpeggio playback (page 103). Turning it clockwise increases <strong>the</strong> swing<br />
feel whereas turning it counter-clockwise decreases it.<br />
Knob 2 QUANTIZE VALUE Adjusts <strong>the</strong> Quantize Value (page 102), or note resolution, to which <strong>the</strong> note data of <strong>the</strong> Arpeggio will<br />
be aligned. Turning it clockwise increases <strong>the</strong> gate time of <strong>the</strong> note type set as <strong>the</strong> Quantize Value<br />
whereas turning it counter-clockwise decreases it.<br />
Knob 3 QUANTIZE STRENGTH Adjusts <strong>the</strong> Quantize Strength (page 103) by which note events of <strong>the</strong> Arpeggio are pulled toward <strong>the</strong><br />
nearest quantize beats. Turning <strong>the</strong> Knob clockwise pulls note events to <strong>the</strong> quantize beat.<br />
Knob 4 GATE TIME Adjusts <strong>the</strong> Gate Time Rate (page 103) of <strong>the</strong> Arpeggio notes. Turning it clockwise leng<strong>the</strong>ns <strong>the</strong> gate<br />
times to produce legato playback whereas turning it counter-clockwise shortens <strong>the</strong>m.<br />
Knob 5 VELOCITY Adjusts <strong>the</strong> Velocity Rate (page 103) of <strong>the</strong> Arpeggio notes.<br />
Knob 6 OCT RANGE (Octave Range) Adjusts <strong>the</strong> Octave Range (page 103) for <strong>the</strong> Arpeggio playback.<br />
Knob 7 UNITMULTIPLY Adjusts <strong>the</strong> Unit Multiply (page 102) of <strong>the</strong> Arpeggio playback to expand/reduce <strong>the</strong> Arpeggio<br />
playback time based on tempo.<br />
Knob 8 TEMPO Adjusts <strong>the</strong> tempo for <strong>the</strong> Arpeggio playback.
Control Slider functions<br />
The eight Control Sliders let you adjust <strong>the</strong> volume of eight<br />
Elements (page 56) making up <strong>the</strong> current Normal Voice.<br />
Each of <strong>the</strong> Control Sliders 1 – 8 corresponds to each of<br />
Elements 1 – 8. It is a good idea to check which Elements<br />
are used for <strong>the</strong> current Normal Voice by using <strong>the</strong><br />
Information display (page 93) before using <strong>the</strong> Control<br />
Sliders. Keep in mind that when a Drum Voice is selected,<br />
a single Slider may affect <strong>the</strong> volume of all sounds/keys<br />
simultaneously.<br />
The [E] Indicator<br />
When changing <strong>the</strong> value of <strong>the</strong> parameter in <strong>the</strong> Voice<br />
Play or Edit mode, <strong>the</strong> [E] (Edit) Indicator will appear on <strong>the</strong><br />
top right corner of <strong>the</strong> LCD display. This gives a quick<br />
confirmation that <strong>the</strong> current Voice has been modified but<br />
not yet stored. To store <strong>the</strong> current edited status, follow <strong>the</strong><br />
instructions on page 97.<br />
Edit Indicator<br />
Keyboard MIDI transmit channel<br />
setting<br />
You can set <strong>the</strong> MIDI transmit channel over which <strong>the</strong><br />
keyboard/controller performance sends MIDI data (to an<br />
external sequencer, tone generator, or o<strong>the</strong>r device).<br />
1 Press <strong>the</strong> [TRACK] button so that its lamp<br />
lights.<br />
2 Pressing any of <strong>the</strong> Number buttons [1] – [16]<br />
to determine <strong>the</strong> MIDI transmit channel.<br />
3 After setting, press <strong>the</strong> [PROGRAM] button to<br />
return to <strong>the</strong> original status.<br />
n This parameter is same as <strong>the</strong> Keyboard Transmit<br />
Channel (page 268) in <strong>the</strong> MIDI display of <strong>the</strong> Utility<br />
mode. Making a setting here automatically changes <strong>the</strong><br />
setting of that parameter as well.<br />
Playing <strong>the</strong> Keyboard in <strong>the</strong> Voice Play Mode<br />
Keyboard Octave setting<br />
Sometimes when playing a Voice, you may wish to play in a<br />
lower or higher pitch range. For example, you may want to<br />
shift <strong>the</strong> pitch down lower to get extra bass notes, or shift up<br />
to get higher notes for leads and solos. The Octave Up/Down<br />
controls let you do this quickly and easily. Each time you press<br />
<strong>the</strong> OCTAVE [UP] button on <strong>the</strong> panel, <strong>the</strong> overall pitch of <strong>the</strong><br />
Voice goes up by one octave. Likewise, each press of <strong>the</strong><br />
OCTAVE [DOWN] button takes <strong>the</strong> pitch down by one octave.<br />
The range is from -3 to +3, with 0 being standard pitch. The<br />
current octave setting is shown at <strong>the</strong> top right of <strong>the</strong> display.<br />
You can instantly restore standard pitch (0) by simultaneously<br />
pressing both <strong>the</strong> OCTAVE [UP] button and <strong>the</strong> OCTAVE<br />
[DOWN] button (both lamps turn off).<br />
The lamp status of <strong>the</strong> OCTAVE [DOWN]/[UP] button lets you<br />
recognize at a glance <strong>the</strong> current octave setting. When set to<br />
one octave down or up, <strong>the</strong> corresponding lamp lights. When<br />
set to two octaves down or up, <strong>the</strong> corresponding lamp<br />
flashes slowly. When set to three octaves down or up, <strong>the</strong><br />
corresponding lamp flashes quickly.<br />
n This parameter is same as <strong>the</strong> Octave (page 260) in <strong>the</strong> Play<br />
display of <strong>the</strong> Utility mode. Making a setting here automatically<br />
changes <strong>the</strong> setting of that parameter as well.<br />
n If you wish to shift notes on <strong>the</strong> keyboard up or down in<br />
semitones, edit <strong>the</strong> Transpose parameter (page 260) in <strong>the</strong><br />
Play display of <strong>the</strong> Utility mode.<br />
Using <strong>the</strong> Arpeggio function<br />
The Arpeggio function lets you trigger rhythm patterns, riffs<br />
and phrases using <strong>the</strong> current Voice by simply playing<br />
notes on <strong>the</strong> keyboard. For instructions on using <strong>the</strong><br />
Arpeggio, refer to <strong>the</strong> Start Guide on page 24.<br />
The Voice Play display<br />
The Voice Play display is <strong>the</strong> first display called up when<br />
pressing <strong>the</strong> [VOICE] button and entering <strong>the</strong> Voice mode.<br />
4<br />
7<br />
1<br />
2 3 5 6<br />
8<br />
9 )<br />
! @ # $ %<br />
Voice mode<br />
Performance<br />
mode<br />
Sampling<br />
mode 1<br />
Song mode<br />
Pattern mode<br />
Mixing mode<br />
Sampling<br />
mode 2<br />
Master mode<br />
Utility mode<br />
File mode<br />
MOTIF <strong>XS</strong> Owner’s <strong>Manual</strong> 91<br />
Reference
Reference<br />
Voice mode Performance Sampling Song mode Pattern mode Mixing mode Sampling Master mode Utility mode File mode<br />
mode mode 1<br />
mode 2<br />
92<br />
Playing <strong>the</strong> Keyboard in <strong>the</strong> Voice Play Mode<br />
1 Voice Bank<br />
Indicates <strong>the</strong> Bank of <strong>the</strong> current Voice.<br />
The Voice Bank is <strong>the</strong> memory that includes data of Normal<br />
Voices and Drum Voices. There are 15 Voice Banks as<br />
follows.<br />
PRE1 – 8 (Preset Bank 1 – 8)<br />
Each of <strong>the</strong>se Banks includes 128 different preset Voices.<br />
USR1 – 3 (User Bank 1 – 3)<br />
These Banks can be used for storing <strong>the</strong> Voices you create<br />
and edit. 128 different Voices are pre-programmed in each of<br />
<strong>the</strong>se Banks.<br />
GM<br />
This Bank contains 128 different Voices which correspond to<br />
<strong>the</strong> order specified by <strong>the</strong> General MIDI (GM) format.<br />
GMDR (GM Drum Bank)<br />
This Bank contains a single Drum Voice, in which <strong>the</strong> drum<br />
instrument assignment corresponds to <strong>the</strong> General MIDI (GM)<br />
format.<br />
PDR (Preset Drum Bank)<br />
This Bank includes 64 different preset Drum Voices.<br />
UDR (User Drum Bank)<br />
This Bank can be used for storing <strong>the</strong> Drum Voices you create<br />
and edit.<br />
GM Voices<br />
GM (General MIDI) is a worldwide standard for Voice<br />
organization and MIDI functions of syn<strong>the</strong>sizers and tone<br />
generators. It was designed primarily to ensure that any<br />
song data created with a specific GM device would<br />
sound virtually <strong>the</strong> same on any o<strong>the</strong>r GM device—no<br />
matter <strong>the</strong> manufacturer or <strong>the</strong> model. The GM Voice<br />
bank on this syn<strong>the</strong>sizer is designed to appropriately<br />
play back GM song data. However, keep in mind that <strong>the</strong><br />
sound may not be exactly <strong>the</strong> same as played by <strong>the</strong><br />
original tone generator.<br />
2 Voice Number (Group/Number)<br />
Each Voice within a Bank is assigned to a Voice Number of<br />
001 to 128.<br />
Voice Numbers 001 to 128 are converted to <strong>the</strong> format<br />
(shown in <strong>the</strong> paren<strong>the</strong>ses) related to Banks A to H and<br />
Numbers 1 to 16 (for each Bank). This format is related to<br />
<strong>the</strong> Group buttons [A] – [H] and <strong>the</strong> Number buttons [1] –<br />
[16]. The Voice Numbers and <strong>the</strong> corresponding Group/<br />
Numbers are listed below.<br />
MOTIF <strong>XS</strong> Owner’s <strong>Manual</strong><br />
Voice Bank Group<br />
Voice Number<br />
Group/Number Voice Number<br />
A01 – 16 001 – 016<br />
B01 – 16 017 – 032<br />
C01 – 16 033 – 048<br />
D01 – 16 049 – 064<br />
E01 – 16 065 – 080<br />
F01 – 16 081 – 096<br />
G01 – 16 097 – 112<br />
H01 – 16 113 – 128<br />
Number<br />
3 Category (Main Category 1/Main Category 2)<br />
Indicates <strong>the</strong> Main Category of <strong>the</strong> selected Voice.<br />
“Category” is a keyword that indicates <strong>the</strong> instrument<br />
characteristics or <strong>the</strong> type of sound. A Preset Voice is<br />
registered to two Main Categories. The Category settings<br />
can be edited in <strong>the</strong> General display (page 98) of <strong>the</strong> Voice<br />
Common Edit. For details, refer to <strong>the</strong> explanation of <strong>the</strong><br />
General display.<br />
4 Voice Name<br />
Indicates <strong>the</strong> name of <strong>the</strong> current Voice.<br />
5 Transmit CH (MIDI Transmit Channel)<br />
Indicates <strong>the</strong> MIDI channel over which <strong>the</strong> keyboard/<br />
controller performance sends MIDI data (to an external<br />
sequencer, tone generator, or o<strong>the</strong>r device). For<br />
information about how to set <strong>the</strong> value, see page 91.<br />
6 Octave<br />
Indicates Keyboard Octave setting set via <strong>the</strong> OCTAVE<br />
buttons. This parameter determines how much higher or<br />
lower <strong>the</strong> pitch of each key is <strong>com</strong>pared to normal pitch.<br />
7 Control Function<br />
Indicates <strong>the</strong> status of <strong>the</strong> Knobs and Control Sliders on <strong>the</strong><br />
panel. This is same as <strong>the</strong> Control Function window<br />
(page 89).<br />
8 Assign Settings<br />
Indicates <strong>the</strong> functions assigned to <strong>the</strong> respective Knobs,<br />
ASSIGNABLE FUNCTION buttons, and o<strong>the</strong>r controllers.<br />
The function assignment can be set in <strong>the</strong> Control Assign<br />
display (page 147) of <strong>the</strong> Performance Common Edit mode<br />
and Controller Set display (page 104) of <strong>the</strong> Voice<br />
Common Edit mode.<br />
MW (Modulation Wheel)<br />
Indicates <strong>the</strong> function assigned to <strong>the</strong> Modulation Wheel.<br />
RB (Ribbon Controller)<br />
Indicates <strong>the</strong> function assigned to <strong>the</strong> Ribbon Controller.<br />
AF1, AF2 (Assignable Function 1, 2)<br />
Indicates <strong>the</strong> functions assigned to <strong>the</strong> two ASSIGNABLE<br />
FUNCTION buttons.<br />
AS1, AS2 (Assign 1, 2)<br />
Indicates <strong>the</strong> functions assigned to <strong>the</strong> respective Knobs<br />
(printed “ASSIGN 1” and “ASSIGN 2”) when <strong>the</strong> TONE1 lamp<br />
is lit.<br />
9 [SF1] ARP1 – [SF5] ARP5 (Arpeggio 1 – 5)<br />
The Arpeggio types are assigned to <strong>the</strong> buttons with <strong>the</strong><br />
8th note icon on <strong>the</strong> display tab. You can call <strong>the</strong>m up by<br />
pressing <strong>the</strong>se buttons any time during your keyboard<br />
performance. Assigning Arpeggio types to <strong>the</strong> buttons can<br />
be done from <strong>the</strong> Arpeggio display (page 95).<br />
) [SF6] INFO (Information)<br />
Pressing this button calls up <strong>the</strong> information page of <strong>the</strong><br />
current Voice. For details, refer to “Voice Information”<br />
below.
! [F1] Play (Voice Play)<br />
Pressing this button returns from <strong>the</strong> previous display to <strong>the</strong><br />
Voice Play display.<br />
@ [F2] Porta (Portamento)<br />
Pressing this button calls up <strong>the</strong> Portamento display<br />
(page 93).<br />
# [F3] EG/EQ (Envelope Generator/Equalizer)<br />
Pressing this button to call up <strong>the</strong> display that contains <strong>the</strong><br />
basic EG, Filter, and EQ settings (page 94).<br />
$ [F4] Arpeggio<br />
Pressing this button calls up <strong>the</strong> Arpeggio display<br />
page 95).<br />
% [F6] Effect<br />
Pressing this button calls up <strong>the</strong> Effect Connect display<br />
(page 107) of <strong>the</strong> Voice Common Edit mode.<br />
Voice information—[SF6] INFO<br />
(Information)<br />
This display indicates <strong>the</strong> information of <strong>the</strong> current Voice.<br />
Settings cannot be changed here.<br />
1<br />
2<br />
3<br />
4<br />
5<br />
7<br />
9<br />
)<br />
1 Bank<br />
Indicates <strong>the</strong> Bank of <strong>the</strong> selected Voice program. The<br />
values in paren<strong>the</strong>ses indicates <strong>the</strong> Bank Select MSB and<br />
LSB which can be used to select <strong>the</strong> current Voice via<br />
MIDI.<br />
2 Program (Voice Number)<br />
To each Voice within a Bank, a Number of 001 to 128 is<br />
assigned. The values in paren<strong>the</strong>ses indicates Group and<br />
Number.<br />
3 Main Category 1<br />
Main Category 2<br />
Indicates <strong>the</strong> Main Category 1/Main Category 2 of <strong>the</strong><br />
current Voice.<br />
4 Name<br />
Indicates <strong>the</strong> name of <strong>the</strong> current Voice.<br />
6<br />
8<br />
5 Voice Type<br />
Playing <strong>the</strong> Keyboard in <strong>the</strong> Voice Play Mode<br />
Indicates whe<strong>the</strong>r <strong>the</strong> current Voice type is <strong>the</strong> Normal<br />
Voice or Drum Voice.<br />
6 Mono/Poly<br />
Indicates whe<strong>the</strong>r <strong>the</strong> current Voice is set to Mono (only<br />
one note can be played at a time) or Poly (multiple notes<br />
can be played at a time).<br />
7 Element Switch<br />
Indicates <strong>the</strong> status (active/inactive) of <strong>the</strong> eight Elements<br />
making up <strong>the</strong> current Voice. Elements that are active are<br />
indicated by <strong>the</strong>ir corresponding numbers. An asterisk “*”<br />
indicates <strong>the</strong> corresponding Element is muted although <strong>the</strong><br />
Element Switch parameter is turned on.<br />
A hyphen “-” indicates <strong>the</strong> corresponding Element Switch<br />
parameter is turned off.<br />
8 Portamento<br />
Indicates <strong>the</strong> Portamento Switch on/off status (page 93) of<br />
<strong>the</strong> current Voice.<br />
9 Pitch Bend Range<br />
Indicates <strong>the</strong> Upper/Lower setting of <strong>the</strong> Pitch Bend Range<br />
(page 99) for <strong>the</strong> current Voice.<br />
) Effects<br />
Indicates <strong>the</strong> Effect settings (for Insertion A, Insertion B,<br />
Reverb and Chorus) of <strong>the</strong> current Voice.<br />
n Parameters 6, 7 and 8 are not available when <strong>the</strong> Drum<br />
Voice is selected.<br />
Portamento settings—[F2] Porta<br />
From this display you can select monophonic or<br />
polyphonic playback and set <strong>the</strong> Portamento parameters.<br />
Portamento is used to create a smooth transition in pitch<br />
from <strong>the</strong> first note played on <strong>the</strong> keyboard to <strong>the</strong> next. The<br />
value set here is applied to <strong>the</strong> parameters having <strong>the</strong><br />
same names in <strong>the</strong> Play Mode display (page 91) of <strong>the</strong><br />
Voice Common Edit mode.<br />
n This display is not available when a Drum Voice is selected.<br />
1<br />
2<br />
3<br />
4<br />
1 Portamento Switch<br />
2 Portamento Time<br />
3 Portamento Mode<br />
4 Mono/Poly Mode<br />
These are <strong>the</strong> same as in <strong>the</strong> Play Mode display (page 98)<br />
of <strong>the</strong> Voice Common Edit.<br />
Voice mode<br />
Performance<br />
mode<br />
Sampling<br />
mode 1<br />
Song mode<br />
Pattern mode<br />
Mixing mode<br />
Sampling<br />
mode 2<br />
Master mode<br />
Utility mode<br />
File mode<br />
MOTIF <strong>XS</strong> Owner’s <strong>Manual</strong> 93<br />
Reference
Reference<br />
Voice mode Performance Sampling Song mode Pattern mode Mixing mode Sampling Master mode Utility mode File mode<br />
mode mode 1<br />
mode 2<br />
94<br />
Playing <strong>the</strong> Keyboard in <strong>the</strong> Voice Play Mode<br />
Applying <strong>the</strong> Portamento to <strong>the</strong> Voice<br />
Follow <strong>the</strong> instructions below to apply <strong>the</strong> Portamento to<br />
<strong>the</strong> current Voice you play on <strong>the</strong> keyboard.<br />
1 Press <strong>the</strong> [VOICE] button to enter <strong>the</strong> Voice<br />
Play mode.<br />
Select a Voice to which <strong>the</strong> Portamento is applied. The<br />
Portamento is effective especially for a Voice that<br />
sustains or continues to sound while <strong>the</strong> key is being<br />
held down.<br />
2 Press <strong>the</strong> [F2] button to call up <strong>the</strong> Portamento<br />
display.<br />
3 Set <strong>the</strong> Portamento Switch to on.<br />
4 Set <strong>the</strong> Portamento Time.<br />
For best results, set this to a relatively high value.<br />
5 Play two different keys alternatively to confirm<br />
<strong>the</strong> Portamento.<br />
It is a good idea to press a certain note <strong>the</strong>n press <strong>the</strong><br />
one octave higher or lower note for confirming how <strong>the</strong><br />
Portamento is applied.<br />
Changing tonal color—[F3] EG/EQ<br />
You can change <strong>the</strong> tonal color or timbre of <strong>the</strong> sound by<br />
editing <strong>the</strong> EG/EQ settings for all Elements making up <strong>the</strong><br />
Voice. The EG settings made here will be applied to <strong>the</strong><br />
same parameters in <strong>the</strong> Amplitude EG display (page 123)<br />
and Filter EG display (page 119) for all Elements as an<br />
offset. In o<strong>the</strong>r words, editing <strong>the</strong> value here will add to or<br />
subtract from <strong>the</strong> current value. Accordingly, if <strong>the</strong><br />
parameter has been already set to <strong>the</strong> maximum or<br />
minimum value, its value will not be changed even if you<br />
set <strong>the</strong> parameter to higher or lower value in this display.<br />
Note that <strong>the</strong> EQ settings here are applied to <strong>the</strong> Voice<br />
directly.<br />
1<br />
2<br />
3<br />
4<br />
5<br />
MOTIF <strong>XS</strong> Owner’s <strong>Manual</strong><br />
1 AEG (Amplitude EG)<br />
Using <strong>the</strong> AEG, you can control <strong>the</strong> transition in volume<br />
from <strong>the</strong> moment <strong>the</strong> sound starts is to <strong>the</strong> moment <strong>the</strong><br />
sound stops.<br />
Attack (Attack Time)<br />
Determines <strong>the</strong> speed of attack from <strong>the</strong> time a key is played<br />
until <strong>the</strong> maximum initial level of <strong>the</strong> EG is reached.<br />
Decay (Decay Time)<br />
Determines how fast <strong>the</strong> volume falls from maximum attack<br />
level to <strong>the</strong> sustain level.<br />
Sustain (Sustain Level)<br />
Determines <strong>the</strong> sustain level at which <strong>the</strong> volume will continue<br />
while a note is held, after <strong>the</strong> initial attack and decay. The<br />
smaller <strong>the</strong> value, <strong>the</strong> sharper <strong>the</strong> sound.<br />
Release (Release Time)<br />
Determines how fast <strong>the</strong> volume falls from <strong>the</strong> sustain level to<br />
zero when a note is released.<br />
Settings: -64 – +0 – +63<br />
n When a Drum Voice is selected, <strong>the</strong> Sustain Level and<br />
Release Time are not available. “---” appears at each of<br />
<strong>the</strong> corresponding columns and <strong>the</strong>se parameters cannot<br />
be edited.<br />
2 FEG (Filter EG)<br />
Using <strong>the</strong> FEG, you can control <strong>the</strong> transition in tonal color<br />
(Cutoff Frequency) from <strong>the</strong> moment <strong>the</strong> sound starts to <strong>the</strong><br />
moment <strong>the</strong> sound stops. Actual transition of tonal color<br />
differs depending on <strong>the</strong> Filter type (page 117) of <strong>the</strong> Voice<br />
Element.<br />
Attack (Attack Time)<br />
Determines <strong>the</strong> speed of filter variation from <strong>the</strong> time a note is<br />
played until <strong>the</strong> maximum initial level of <strong>the</strong> Cutoff Frequency<br />
is reached.<br />
Decay (Decay Time)<br />
Determines how fast <strong>the</strong> Cutoff Frequency falls from maximum<br />
attack level to <strong>the</strong> sustain level.<br />
Release (Release Time)<br />
Determines how fast <strong>the</strong> Cutoff Frequency falls from <strong>the</strong><br />
sustain level to zero when a note is released.<br />
Depth<br />
Determines <strong>the</strong> range over which <strong>the</strong> cutoff frequency of <strong>the</strong><br />
Filter EG changes. A setting of 0 will result in no change in <strong>the</strong><br />
cutoff frequency. The far<strong>the</strong>r from 0 <strong>the</strong> value is, <strong>the</strong> larger <strong>the</strong><br />
range of <strong>the</strong> cutoff frequency. For negative values, <strong>the</strong> change<br />
of <strong>the</strong> cutoff frequency is reversed.<br />
Settings: -64 – +0 – +63<br />
3 Filter<br />
This unit modifies <strong>the</strong> tonal color of <strong>the</strong> sound by cutting<br />
<strong>the</strong> output of a specific frequency portion of <strong>the</strong> sound.<br />
Actual tonal color differs depending on <strong>the</strong> Filter type<br />
(page 117) of <strong>the</strong> Voice Element. The Low Pass Filter cuts<br />
<strong>the</strong> signals above <strong>the</strong> Cutoff Frequency while <strong>the</strong> High<br />
Pass Filter cuts <strong>the</strong> signals below <strong>the</strong> Cutoff Frequency.<br />
Cutoff<br />
Determines <strong>the</strong> Cutoff Frequency for <strong>the</strong> Filter, when <strong>the</strong> Low<br />
Pass Filter is selected, for example, <strong>the</strong> larger <strong>the</strong> value <strong>the</strong><br />
brighter <strong>the</strong> decay.
Reso (Resonance)<br />
Determines <strong>the</strong> emphasis given to <strong>the</strong> Cutoff Frequency.<br />
Higher values result in a more pronounced effect.<br />
Settings: -64 – +0 – +63<br />
4 EQ<br />
This is a parametric EQ featuring three bands (High, Mid<br />
and Low). You can attenuate or boost <strong>the</strong> level of each<br />
frequency band (High, Mid, Low) to change <strong>the</strong> Voice<br />
sound. For <strong>the</strong> Mid band, you can also set <strong>the</strong> Q (Band<br />
Width).<br />
Frequency<br />
Determines <strong>the</strong> frequency for each frequency band. Set <strong>the</strong><br />
value to <strong>the</strong> frequency around which you wish to attenuate or<br />
boost.<br />
Settings:<br />
Low: 50.1Hz – 2.00kHz<br />
Mid: 139.7Hz – 10.1kHz<br />
High: 503.8Hz – 14.0kHz<br />
Gain<br />
Determines <strong>the</strong> level gain for <strong>the</strong> Frequency (set above), or <strong>the</strong><br />
amount <strong>the</strong> selected frequency band is attenuated or boosted.<br />
The higher <strong>the</strong> value, <strong>the</strong> greater <strong>the</strong> Gain. The lower <strong>the</strong><br />
value, <strong>the</strong> lesser <strong>the</strong> Gain.<br />
Settings: -12.00 dB – +0.00 dB – +12.00 dB<br />
Q (Bandwidth)<br />
Determines <strong>the</strong> Q (bandwidth) for <strong>the</strong> Mid band. The higher<br />
<strong>the</strong> value, <strong>the</strong> smaller <strong>the</strong> bandwidth. The lower <strong>the</strong> value, <strong>the</strong><br />
wider <strong>the</strong> bandwidth.<br />
Settings: 0.7 – 10.3<br />
n The Q setting is available only for <strong>the</strong> Mid band, which is a<br />
Peaking type EQ. Peaking (referring to <strong>the</strong> “peak” shape)<br />
lets you attenuate/boost a specific frequency and allows<br />
you to control how wide or narrow <strong>the</strong> bandwidth is. On<br />
<strong>the</strong> o<strong>the</strong>r hand, <strong>the</strong> EQ shape of <strong>the</strong> High and Low band is<br />
<strong>the</strong> Shelving type which lets you attenuate/boost <strong>the</strong><br />
signal at frequencies above or below <strong>the</strong> specified<br />
Frequency setting.<br />
5 EQ graph<br />
Indicates <strong>the</strong> EQ settings as a graph. The vertical axis<br />
indicates <strong>the</strong> gain, and <strong>the</strong> horizontal axis indicates <strong>the</strong><br />
frequency.<br />
Low Mid High<br />
Gain<br />
Frequency Q<br />
Playing <strong>the</strong> Keyboard in <strong>the</strong> Voice Play Mode<br />
Arpeggio settings—[F4] Arpeggio<br />
This display determines <strong>the</strong> basic settings of <strong>the</strong> Arpeggio.<br />
Keep in mind that <strong>the</strong> parameters of Bank (6) – Type (9)<br />
have five settings which can be edited in each of <strong>the</strong> [SF1]<br />
ARP1 through [SF5] ARP5 displays. The value set here is<br />
applied to <strong>the</strong> parameters having <strong>the</strong> same names in <strong>the</strong><br />
Arpeggio Main display (page 101) of <strong>the</strong> Voice Common<br />
Edit mode.<br />
1<br />
2<br />
3<br />
4<br />
6<br />
7<br />
8<br />
9<br />
5<br />
Arpeggio Type Name<br />
1 Switch<br />
2 Hold<br />
3 Tempo<br />
4 Velocity Limit<br />
5 [SF1] ARP1 – [SF5] ARP5 (Arpeggio 1 – 5)<br />
buttons<br />
6 Bank<br />
7 Category<br />
8 Sub Category<br />
9 Type<br />
These are <strong>the</strong> same as in <strong>the</strong> Arpeggio Main display<br />
(page 101) of <strong>the</strong> Voice Common Edit.<br />
Voice mode<br />
Performance<br />
mode<br />
Sampling<br />
mode 1<br />
Song mode<br />
Pattern mode<br />
Mixing mode<br />
Sampling<br />
mode 2<br />
Master mode<br />
Utility mode<br />
File mode<br />
MOTIF <strong>XS</strong> Owner’s <strong>Manual</strong> 95<br />
Reference
Reference<br />
Voice mode Performance Sampling Song mode Pattern mode Mixing mode Sampling Master mode Utility mode File mode<br />
mode mode 1<br />
mode 2<br />
96<br />
MOTIF <strong>XS</strong> Owner’s <strong>Manual</strong><br />
Editing a Normal Voice<br />
“Editing” refers to <strong>the</strong> process of creating a Voice by changing <strong>the</strong> parameters that make up <strong>the</strong> Voice. This can be done in<br />
Voice Edit, a sub mode within <strong>the</strong> Voice mode. To enter <strong>the</strong> Voice Edit mode, press <strong>the</strong> [VOICE] button to first call up <strong>the</strong><br />
Voice mode, <strong>the</strong>n press <strong>the</strong> [EDIT] button.<br />
Common Edit and Element Edit<br />
A Normal Voice, which contains pitched musical<br />
instrument-type sounds that can be played over <strong>the</strong> range<br />
of <strong>the</strong> keyboard, can consist of up to eight Elements. There<br />
are two types of Normal Voice Edit displays: those for<br />
Common Edit to edit <strong>the</strong> settings <strong>com</strong>mon to all Elements,<br />
and those for Element Edit to edit individual Elements.<br />
Common Edit<br />
Lets you edit <strong>the</strong><br />
parameters <strong>com</strong>mon to<br />
all Elements of <strong>the</strong><br />
selected Voice.<br />
Editing Normal Voices<br />
1 Press <strong>the</strong> [VOICE] button to enter <strong>the</strong> Voice<br />
Play mode.<br />
Select a Normal Voice to be edited.<br />
2 Press <strong>the</strong> [EDIT] button to enter <strong>the</strong> Voice Edit<br />
mode.<br />
3 Call up <strong>the</strong> desired Edit display, Common Edit<br />
or Element Edit.<br />
To call up <strong>the</strong> Common Edit display, press <strong>the</strong><br />
[COMMON EDIT] button. To call up <strong>the</strong> Element Edit<br />
display, press one of <strong>the</strong> Number buttons [1] – [8] to<br />
select <strong>the</strong> Element to be edited.<br />
COMMON EDIT<br />
Normal Voice Edit<br />
Element Edit 1– 8<br />
Lets you edit <strong>the</strong><br />
parameters of <strong>the</strong><br />
individual Elements that<br />
make up a Voice.<br />
Indicates this display is in <strong>the</strong> Common Edit mode.<br />
1 2 3 4 5 6 7<br />
8<br />
PART SELECT ARP ON/OFF<br />
Selecting an Element<br />
Indicates this display is in <strong>the</strong> Element Edit mode.<br />
4 Call up <strong>the</strong> desired display.<br />
To find <strong>the</strong> desired display, note <strong>the</strong> tab menu items<br />
corresponding to <strong>the</strong> [F1] – [F6] buttons and [SF1] –<br />
[SF5] buttons at <strong>the</strong> bottom of <strong>the</strong> display.<br />
Tab menus corresponding<br />
to <strong>the</strong> [F1] – [F6] buttons<br />
n By pressing <strong>the</strong> [SF6] button, you can use various<br />
functions such as <strong>the</strong> Information display, Character input<br />
(page 82), Number button function (page 81), and List<br />
display/selection (page 82). The function called up via <strong>the</strong><br />
[SF6] button differs depending on <strong>the</strong> selected parameter<br />
where <strong>the</strong> cursor is located.<br />
5 Move <strong>the</strong> cursor to <strong>the</strong> desired parameter.<br />
6 Edit <strong>the</strong> value by using <strong>the</strong> [INC/YES], [DEC/<br />
NO] buttons and <strong>the</strong> data dial.<br />
7 Repeat steps 3 – 6 as desired.<br />
8 Enter <strong>the</strong> desired name for <strong>the</strong> edited Voice.<br />
Use <strong>the</strong> Name display (page 98) of <strong>the</strong> Voice Common<br />
Edit mode.<br />
9 Store <strong>the</strong> edited Voice.<br />
Press <strong>the</strong> [STORE] button to call up <strong>the</strong> Store window<br />
(page 97) <strong>the</strong>n store <strong>the</strong> edited Voice.<br />
CAUTION<br />
Tab menus corresponding<br />
to <strong>the</strong> [SF1] – [SF6] buttons<br />
The edited Voice will be lost when selecting <strong>the</strong> different Voice<br />
or turning <strong>the</strong> power off. Make sure to store <strong>the</strong> Voice data to<br />
<strong>the</strong> internal memory by pressing <strong>the</strong> [STORE] button before<br />
selecting a different Voice or turning <strong>the</strong> power off.<br />
n If desired, save <strong>the</strong> edited and stored Voices to a USB<br />
storage device connected to <strong>the</strong> USB TO DEVICE<br />
connector or a <strong>com</strong>puter connected to <strong>the</strong> network to<br />
which <strong>the</strong> MOTIF <strong>XS</strong> is also connected. Keep in mind that<br />
edited Voice data is stored to internal User memory (Flash<br />
ROM) and is maintained even when turning <strong>the</strong> power off.<br />
As such it is not necessary to save <strong>the</strong> data to an external<br />
device; however, we still re<strong>com</strong>mend that you save or<br />
archive all important data to an external device. Refer to<br />
page 278 for details.
Convenient functions for editing<br />
Voices<br />
Switching an Element on/off<br />
In <strong>the</strong> Voice Edit mode, you can always use <strong>the</strong> number<br />
buttons [1] – [8] to select an Element. The [1] – [8] buttons<br />
indicate <strong>the</strong> Element being edited. To switch each Element<br />
on/off, turn <strong>the</strong> [MUTE] button on, and <strong>the</strong>n use number<br />
buttons [9] – [16].<br />
Use number buttons [1] – [8] to select <strong>the</strong> Element you want to edit<br />
1 2 3 4 5 6 7<br />
8<br />
PART SELECT ARP ON/OFF<br />
9 10 11 12 13 14 15 16<br />
PART MUTE ARP HOLD<br />
Use number buttons [9] – [16] to turn each Element on/off<br />
Soloing <strong>the</strong> Element to be edited<br />
If you want to turn on only <strong>the</strong> Element you're editing, press<br />
<strong>the</strong> [SOLO] button to turn it on, and <strong>the</strong>n press a number<br />
button [1] – [8] or [9] – [16]. For example, if you want to turn<br />
on only Element 1 and edit it, press <strong>the</strong> [1] or [9] button to<br />
make <strong>the</strong> [1] indicator light and <strong>the</strong> [9] indicator flash.<br />
The [E] Indicator<br />
The [E] (Edit) indicator will appear in <strong>the</strong> Voice Edit mode<br />
as well as in <strong>the</strong> Voice Play mode. For details, see page 97.<br />
Compare function<br />
PERFORMANCE<br />
CONTROL<br />
TRACK<br />
MUTE SOLO<br />
Use number buttons [1] – [8] / [9] – [16] to turn on only <strong>the</strong> Element<br />
you want to edit<br />
1 2 3 4 5 6 7<br />
8<br />
PART SELECT ARP ON/OFF<br />
9 10 11 12 13 14 15 16<br />
PART MUTE ARP HOLD<br />
PERFORMANCE<br />
CONTROL<br />
TRACK<br />
MUTE SOLO<br />
The Compare function lets you switch between <strong>the</strong> justedited<br />
Voice and its original, unedited condition, allowing<br />
you to hear how your edits affect <strong>the</strong> sound.<br />
1 Press <strong>the</strong> [EDIT] button to call up <strong>the</strong> Compare<br />
mode.<br />
In <strong>the</strong> Voice Edit mode (with <strong>the</strong> [EDIT] lamp lit), press<br />
<strong>the</strong> [EDIT] button so that its lamp flashes. The [E]<br />
indicator at <strong>the</strong> top right of <strong>the</strong> screen will change to <strong>the</strong><br />
[C] indicator and <strong>the</strong> Voice settings prior to editing will<br />
temporarily be reinstated for <strong>com</strong>parison purposes.<br />
Editing a Normal Voice<br />
When <strong>the</strong> [E] indicator is shown in <strong>the</strong> Voice Play mode,<br />
press <strong>the</strong> [EDIT] button to enter <strong>the</strong> Voice Edit mode<br />
<strong>the</strong>n press <strong>the</strong> [EDIT] button again to call up <strong>the</strong><br />
Compare mode.<br />
2 Press <strong>the</strong> [EDIT] button again to return to <strong>the</strong><br />
original status.<br />
When <strong>the</strong> [C] indicator is shown at <strong>the</strong> right top of <strong>the</strong><br />
display, press <strong>the</strong> [EDIT] button (<strong>the</strong> lamp lights<br />
continuously, and <strong>the</strong> [C] indicator changes back to <strong>the</strong><br />
[E] indicator).<br />
Compare <strong>the</strong> edited sound with <strong>the</strong> unedited sound as<br />
desired by repeating steps 1 and 2.<br />
n While Compare is active, you cannot make edits to <strong>the</strong> Voice.<br />
Storing <strong>the</strong> created Voice<br />
1 Press <strong>the</strong> [STORE] button to call up <strong>the</strong> Voice<br />
Store window.<br />
2 Set <strong>the</strong> destination for storing <strong>the</strong> Voice.<br />
Select <strong>the</strong> destination User Bank (USER 1 – 3 for <strong>the</strong><br />
Normal Voice, USER DR for <strong>the</strong> Drum Voice) and <strong>the</strong><br />
Voice number to be stored by using <strong>the</strong> data dial, [INC/<br />
YES] and [DEC/NO] buttons. You can also use <strong>the</strong><br />
[USER 1] – [USER 3], [USER DR], Group [A] – [H], and<br />
Number [1] – [16] buttons to specify <strong>the</strong> destination.<br />
3 Press <strong>the</strong> [ENTER] button. (The display<br />
prompts you for confirmation.)<br />
To cancel <strong>the</strong> Store operation, press <strong>the</strong> [DEC/NO]<br />
button.<br />
4 Press <strong>the</strong> [INC/YES] button to execute <strong>the</strong><br />
Store operation.<br />
After <strong>the</strong> Voice has been stored, a “Completed”<br />
message appears and operation returns to <strong>the</strong> Voice<br />
Play display. In this condition, <strong>the</strong> just stored Voice is<br />
selected as shown in <strong>the</strong> display, letting you instantly<br />
play <strong>the</strong> just edited Voice.<br />
CAUTION<br />
Compare indicator (sound prior to editing)<br />
When you execute <strong>the</strong> Store operation, <strong>the</strong> settings for <strong>the</strong><br />
destination memory will be overwritten. Important data should<br />
always be backed up to a separate USB storage device. For<br />
detailed instructions on saving, see page 278.<br />
n Keep in mind that <strong>the</strong> destination of “Store” is internal<br />
memory (Flash ROM) whereas <strong>the</strong> destination of “Save” is<br />
external memory such as a USB storage device.<br />
Voice mode<br />
Performance<br />
mode<br />
Sampling<br />
mode 1<br />
Song mode<br />
Pattern mode<br />
Mixing mode<br />
Sampling<br />
mode 2<br />
Master mode<br />
Utility mode<br />
File mode<br />
MOTIF <strong>XS</strong> Owner’s <strong>Manual</strong> 97<br />
Reference
Reference<br />
98<br />
Editing a Normal Voice<br />
Voice mode Performance Sampling Song mode Pattern mode Mixing mode Sampling Master mode Utility mode File mode<br />
mode mode 1<br />
mode 2<br />
Common Edit parameters<br />
[VOICE] ➞ Normal Voice selection ➞ [EDIT] ➞ [COMMON EDIT]<br />
Common Edit lets you edit <strong>the</strong> parameters <strong>com</strong>mon to all Elements of <strong>the</strong> selected Normal Voice.<br />
About <strong>the</strong> asterisk (*) marks<br />
For users who are new to Voice editing and may be confused by <strong>the</strong> large amount of parameters, <strong>the</strong> most basic and easy-to-understand<br />
parameters are conveniently marked with asterisks. If you are just starting out with Voice editing, try <strong>the</strong>se parameters first.<br />
General settings for <strong>the</strong> selected<br />
Voice—[F1] General<br />
Naming <strong>the</strong> edited Voice—[SF1] Name<br />
1<br />
2<br />
4<br />
1 Name*<br />
Enters <strong>the</strong> desired name for <strong>the</strong> Voice. The Voice name can<br />
contain up to 20 characters.<br />
You can call up <strong>the</strong> character list by pressing <strong>the</strong> [SF6]<br />
CHAR button, <strong>the</strong>n select <strong>the</strong> desired one from <strong>the</strong> list. For<br />
detailed instructions on naming, refer to “Basic Operation”<br />
on page 82.<br />
2 Main Category 1*<br />
3 Sub Category 1*<br />
4 Main Category 2*<br />
5 Sub Category 2*<br />
Determines <strong>the</strong> two Main Categories and <strong>the</strong>ir Sub<br />
Categories to which <strong>the</strong> Voice belongs respectively.<br />
“Category” can be used as a keyword representing <strong>the</strong><br />
characteristic of <strong>the</strong> Voice. The appropriate setting makes it<br />
easy to find <strong>the</strong> desired Voice from a variety of Voices. There<br />
are 16 Main Categories which indicate types of instruments.<br />
There are up to five Sub Categories for each Main Category,<br />
indicating more detailed types of instruments.<br />
MOTIF <strong>XS</strong> Owner’s <strong>Manual</strong><br />
3<br />
5<br />
Settings: See <strong>the</strong> following list.<br />
Main Category Sub Category<br />
Acoustic Piano Pn Acoustic Layer Modern Vintage Arpeggio<br />
Keyboard Kb Electric<br />
Piano<br />
FM Piano Clavi Synth Arpeggio<br />
Organ Or Tone Wheel Combo Pipe Synth Arpeggio<br />
Guitar Gt Acoustic Electric<br />
Clean<br />
Electric<br />
Distortion<br />
Synth Arpeggio<br />
Bass Bs Acoustic Electric Synth Arpeggio —<br />
Strings St Solo Ensemble Pizzicato Synth Arpeggio<br />
Brass Br Solo Brass<br />
Ensemble<br />
Orchestra Synth Arpeggio<br />
Sax / Woodwind SW Saxophone Flute Woodwind Reed / Pipe Arpeggio<br />
Synth Lead Ld Analog Digital Hip Hop Dance Arpeggio<br />
Synth Pad/Choir Pd Analog Warm Bright Choir Arpeggio<br />
Synth Comp Sc Analog Digital Fade Hook Arpeggio<br />
Chromatic<br />
Percussion<br />
Cp Mallet<br />
Percussion<br />
Bell Synth Bell Pitched<br />
Drum<br />
Arpeggio<br />
Drum /<br />
Percussion<br />
Dr Drums Percussion Synth Arpeggio —<br />
Sound Effect Se Moving Ambient Nature Sci-Fi Arpeggio<br />
Musical Effect Me Moving Ambient Sweep Hit Arpeggio<br />
Ethnic Et Bowed Plucked Struck Blown Arpeggio<br />
n You can call up <strong>the</strong> list by pressing <strong>the</strong> [SF6] LIST button <strong>the</strong>n<br />
select <strong>the</strong> desired one from <strong>the</strong> list. For details, see page 82.<br />
Play Mode Settings such as Micro Tuning<br />
and Mono/Poly—[SF2] Play Mode<br />
From this display, you can make various settings such as<br />
Mono or Poly, Pitch, Portamento, and Micro Tuning.<br />
1<br />
2<br />
3<br />
4<br />
5<br />
6<br />
7<br />
1 Volume*<br />
Determines <strong>the</strong> output level of <strong>the</strong> Voice. Set this parameter<br />
to adjust <strong>the</strong> balance between <strong>the</strong> current Voice and o<strong>the</strong>r<br />
Voices.<br />
Settings: 0 – 127<br />
9<br />
)<br />
!<br />
@<br />
#<br />
$<br />
%<br />
8
2 Pan*<br />
Determines <strong>the</strong> stereo pan position of <strong>the</strong> Voice. You can<br />
also adjust this parameter using <strong>the</strong> PAN knob on <strong>the</strong> front<br />
panel.<br />
Settings: L63 (far left) – C (center) – R63 (far right)<br />
n Note that this Voice Pan parameter may have little or no<br />
audible effect if <strong>the</strong> Pan for a specific element is set to <strong>the</strong> left<br />
position and <strong>the</strong> Pan for ano<strong>the</strong>r element is set to <strong>the</strong> right<br />
position.<br />
3 Note Shift*<br />
Determines <strong>the</strong> transpose setting for <strong>the</strong> amount (in<br />
semitones) by which <strong>the</strong> pitch is raised or lowered.<br />
Settings: -24 – +0 – 24<br />
4 PB Range Upper (Pitch Bend Range Upper)*<br />
5 PB Range Lower (Pitch Bend Range Lower)*<br />
Determines <strong>the</strong> maximum Pitch Bend range in semitones.<br />
Setting <strong>the</strong> Upper parameter to +12 would result in a<br />
maximum pitch rise of one octave when <strong>the</strong> Pitch Bend<br />
wheel is moved upwards. On <strong>the</strong> o<strong>the</strong>r hand, <strong>the</strong> Lower<br />
setting of -12 would result in <strong>the</strong> pitch being lowered up to<br />
a maximum of one octave (12 semitones) when <strong>the</strong> Pitch<br />
Bend wheel is moved downwards.<br />
Settings: -48 semi – +0 semi – +24 semi<br />
6 Bank (Micro Tuning Bank)<br />
Determines <strong>the</strong> Micro Tuning Bank.<br />
Settings: PRE, USR<br />
PRE (Preset)<br />
Contains <strong>the</strong> 13 preset Micro Tuning types.<br />
USR (User)<br />
Contains your original Micro Tuning types created in <strong>the</strong> Micro Tuning<br />
display (page 265) of <strong>the</strong> Utility mode.<br />
7 Tuning Number<br />
Determines <strong>the</strong> Micro Tuning number. The Preset Bank<br />
provides 13 types including <strong>the</strong> most <strong>com</strong>mon “equal<br />
temperament.”<br />
Settings:<br />
Preset Bank: 1 – 13 (See <strong>the</strong> Micro Tuning list below.)<br />
User Bank: 1 – 8<br />
8 Tuning Root<br />
Sets <strong>the</strong> base note for each scale. For some scales this<br />
setting may not be necessary.<br />
Settings: C – B<br />
What is Micro Tuning?<br />
This function lets you change <strong>the</strong> keyboard scale from<br />
normal tuning (equal temperament) to one of a variety of<br />
special scales. You can determine <strong>the</strong> scale type for<br />
each voice by simply selecting a Tuning number. You can<br />
also use original Micro Tuning types that you’ve created<br />
in <strong>the</strong> Micro Tuning display (page 265) of <strong>the</strong> Utility<br />
mode.<br />
Micro Tuning List<br />
Micro<br />
Tuning<br />
No.<br />
1<br />
2<br />
3<br />
4<br />
5<br />
6<br />
7<br />
8<br />
9<br />
10<br />
Equal<br />
Type<br />
PureMajor<br />
PureMinor<br />
Werckmeist<br />
Kirnberger<br />
Vallot&Yng<br />
1/4 Shift<br />
1/4 tone<br />
1/8 tone<br />
Indian<br />
11 Arabic 1<br />
12 Arabic 2<br />
13 Arabic 3<br />
9 Mono/Poly*<br />
Selects monophonic or polyphonic.<br />
Settings: mono, poly<br />
Micro<br />
Tuning<br />
Root<br />
—<br />
C – B<br />
C – B<br />
C – B<br />
C – B<br />
C – B<br />
—<br />
—<br />
—<br />
—<br />
C – B<br />
Editing a Normal Voice<br />
Comments<br />
The “<strong>com</strong>promise” tuning used for<br />
most of <strong>the</strong> last 200 years of Western<br />
music, and found on most electronic<br />
keyboards. Each half step is exactly<br />
1/12 of an octave, and music can be<br />
played in any key with equal ease.<br />
However, none of <strong>the</strong> intervals are<br />
perfectly in tune.<br />
This tuning is designed so that most<br />
of <strong>the</strong> intervals (especially <strong>the</strong> major<br />
third and perfect fifth) in <strong>the</strong> major<br />
scale are pure. This means that o<strong>the</strong>r<br />
intervals will be correspondingly out<br />
of tune. You need to specify <strong>the</strong> key<br />
(C – B) you will be playing in.<br />
The same as Pure Major, but<br />
designed for <strong>the</strong> minor scale.<br />
Andreas Werckmeister, a<br />
contemporary of Bach, designed this<br />
tuning so that keyboard instruments<br />
could be played in any key. Each key<br />
has a unique character.<br />
Johann Philipp Kirnberger, an 18th<br />
century <strong>com</strong>poser, created this<br />
tempered scale to allow<br />
performances in any key.<br />
Francescatonio Vallotti and Thomas<br />
Young (both mid-1700s) devised this<br />
adjustment to <strong>the</strong> Pythagorean<br />
tuning, in which <strong>the</strong> first six fifths are<br />
lowered by <strong>the</strong> same amount.<br />
This is <strong>the</strong> normal equal tempered<br />
scale shifted up 50 cents.<br />
Twenty-four equally spaced notes per<br />
octave. (Play twenty-four notes to<br />
move one octave.)<br />
Forty-eight equally spaced notes per<br />
octave. (Play forty-eight notes to<br />
move one octave.)<br />
Usually observed in Indian music<br />
(white keys only).<br />
Usually observed in Arabic music.<br />
mono<br />
When set to “mono,” <strong>the</strong> selected Voice is played back monophonically<br />
(only a single note is played back simultaneously). For many<br />
instrument sounds (such as bass and synth lead), this allows a more<br />
natural and smooth sounding legato performance than when this<br />
parameter is set to “poly.”<br />
poly<br />
When set to “poly,” <strong>the</strong> selected Voice is played back polyphonically<br />
(multiple notes can be played back simultaneously or a chord is<br />
played back).<br />
Voice mode<br />
Performance<br />
mode<br />
Sampling<br />
mode 1<br />
Song mode<br />
Pattern mode<br />
Mixing mode<br />
Sampling<br />
mode 2<br />
Master mode<br />
Utility mode<br />
File mode<br />
MOTIF <strong>XS</strong> Owner’s <strong>Manual</strong> 99<br />
Reference
Reference<br />
100<br />
Editing a Normal Voice<br />
Voice mode Performance Sampling Song mode Pattern mode Mixing mode Sampling Master mode Utility mode File mode<br />
mode mode 1<br />
mode 2<br />
) Key Assign Mode<br />
When this is set to “single,” double playback of <strong>the</strong> same<br />
note is prevented. This is useful when two or more<br />
instances of <strong>the</strong> same note are received nearly<br />
simultaneously, or without a corresponding note off<br />
message. To allow playback of each instance of <strong>the</strong> same<br />
note, set this to “multi.”<br />
Settings: single, multi<br />
single<br />
When this is set to “single” and double playback of <strong>the</strong> same note are<br />
transmitted to <strong>the</strong> internal tone generator, <strong>the</strong> first note will be stopped<br />
<strong>the</strong>n <strong>the</strong> next note will be sounded.<br />
multi<br />
When this is set to “multi” and double playback of <strong>the</strong> same note are<br />
transmitted to <strong>the</strong> internal tone generator, all <strong>the</strong> notes are sounded<br />
simultaneously.<br />
! Portamento Switch*<br />
Determines whe<strong>the</strong>r Portamento is applied to <strong>the</strong> current<br />
Voice or not.<br />
Settings: on, off<br />
@ Portamento Time*<br />
Determines <strong>the</strong> pitch transition time when Portamento is<br />
applied. The effect of <strong>the</strong> parameter differs depending on<br />
<strong>the</strong> settings of <strong>the</strong> Portamento Time Mode ($). Higher<br />
values result in a longer pitch change time.<br />
Settings: 0 – 127<br />
# Portamento Mode<br />
Determines how Portamento is applied to your keyboard<br />
performance.<br />
Settings: fingered, fulltime<br />
fingered<br />
Portamento is only applied when you play legato (playing <strong>the</strong> next note<br />
before releasing <strong>the</strong> previous one).<br />
fulltime<br />
Portamento is applied to all notes.<br />
$ Portamento Time Mode<br />
Determines how <strong>the</strong> pitch changes in time.<br />
Settings: rate1, time1, rate2, time2<br />
rate1<br />
Pitch changes at <strong>the</strong> specified rate.<br />
time1<br />
Pitch changes in <strong>the</strong> specified time.<br />
rate2<br />
Pitch changes at <strong>the</strong> specified rate within an octave.<br />
time2<br />
Pitch changes in <strong>the</strong> specified time within an octave.<br />
% Portamento Legato Slope<br />
When <strong>the</strong> Mono/Poly is set to “mono,” legato playing may<br />
produce an unnatural attack depending on <strong>the</strong> waveform<br />
assigned to <strong>the</strong> selected Voice. To solve such a problem,<br />
you can use this parameter to adjust <strong>the</strong> attack of <strong>the</strong><br />
Voice. Normally, this should be set to a low value for<br />
waveforms with short attack times, and should be set to a<br />
high value for waveforms with long attack times.<br />
Settings: 0 – 7<br />
MOTIF <strong>XS</strong> Owner’s <strong>Manual</strong><br />
O<strong>the</strong>r settings—[SF3] O<strong>the</strong>r<br />
From this display, you can set <strong>the</strong> control functions for <strong>the</strong><br />
Knobs, and <strong>the</strong> up/down range for <strong>the</strong> Pitch Bend wheel.<br />
1<br />
2<br />
3<br />
4<br />
5<br />
6<br />
1 Knob Control Assign<br />
Determines which lamp among <strong>the</strong> TONE 1, TONE 2, and<br />
ARP FX is turned on when selecting a Voice. This setting<br />
can be stored for each Voice.<br />
Settings: tone1, tone2, ARP FX<br />
2 Assign 1 Value<br />
3 Assign 2 Value<br />
Indicates <strong>the</strong> level of <strong>the</strong> Knobs printed “ASSIGN 1” and<br />
“ASSIGN 2” at <strong>the</strong> time at which <strong>the</strong> Voice is selected with<br />
<strong>the</strong> TONE 1 lamp turned on. The functions assigned to <strong>the</strong><br />
Knobs are indicated at right of <strong>the</strong> values respectively.<br />
Settings: -64 – +0 – +63<br />
n The functions assigned to <strong>the</strong> ASSIGN 1/2 Knobs can be set in<br />
<strong>the</strong> Controller Set display (page 104).<br />
4 A. Function 1 Mode<br />
(Assignable Function 1 Mode)<br />
5 A. Function 2 Mode<br />
(Assignable Function 2 Mode)<br />
Determines whe<strong>the</strong>r <strong>the</strong> ASSIGNABLE FUNCTION [1] and<br />
[2] buttons functions as a latch type or momentary type.<br />
When set to “latch,” pressing <strong>the</strong> button alternates <strong>the</strong><br />
lamp status between on and off. When set to “momentary,”<br />
pressing/holding <strong>the</strong> button turns <strong>the</strong> lamp on and<br />
releasing <strong>the</strong> button turns <strong>the</strong> lamp off.<br />
Settings: momentary, latch<br />
6 Ribbon Mode (Ribbon Controller mode)<br />
Determines how <strong>the</strong> Ribbon Controller responds when<br />
released. When set to reset, releasing your finger from <strong>the</strong><br />
Ribbon Controller automatically returns <strong>the</strong> value to <strong>the</strong><br />
center. When set to hold, releasing your finger from <strong>the</strong><br />
Ribbon Controller maintains <strong>the</strong> value at <strong>the</strong> last point of<br />
contact.<br />
Settings: hold, reset
Arpeggio settings—[F2] ARP Main<br />
(Arpeggio Main)<br />
This display determines <strong>the</strong> basic settings of <strong>the</strong> Arpeggio.<br />
Keep in mind that parameters Bank (!) through Gate Time<br />
Rate Offset (^) have five settings which can be edited in<br />
each of <strong>the</strong> [SF1] ARP1 through [SF5] ARP5 displays.<br />
For details about Arpeggio, see page 62.<br />
1<br />
2<br />
3<br />
4<br />
5<br />
!<br />
@<br />
#<br />
$<br />
)<br />
n Depending on <strong>the</strong> selected parameter, <strong>the</strong> KBD icon appears<br />
on <strong>the</strong> tab corresponding to <strong>the</strong> [SF6] button. In this condition,<br />
you can enter <strong>the</strong> note number or velocity by pressing <strong>the</strong><br />
appropriate note on <strong>the</strong> keyboard while holding <strong>the</strong> [SF6] KBD<br />
button. For details, see page 82.<br />
1 Switch<br />
Determines whe<strong>the</strong>r Arpeggio is on or off. When calling up<br />
a Voice for which <strong>the</strong> Common Switch is set to on, <strong>the</strong><br />
[ARPEGGIO ON/OFF] button on <strong>the</strong> panel will be turned on<br />
automatically.<br />
Settings: on, off<br />
2 Hold*<br />
When this is set to “on,” <strong>the</strong> Arpeggio cycles automatically,<br />
even if you release your fingers from <strong>the</strong> keys.<br />
Settings: sync-off (see below), off, on<br />
sync-off<br />
When set to “sync-off,” <strong>the</strong> Arpeggio playback continues to run silently,<br />
even when you release <strong>the</strong> keys. Pressing any key turns <strong>the</strong> Arpeggio<br />
playback on again, and <strong>the</strong> Arpeggio is heard from <strong>the</strong> point in <strong>the</strong><br />
cycle where playback is resumed.<br />
3 Change Timing*<br />
Determines <strong>the</strong> actual timing at which <strong>the</strong> Arpeggio type is<br />
switched when you select ano<strong>the</strong>r type during Arpeggio<br />
playback. When set to “realtime,” <strong>the</strong> Arpeggio type is<br />
switched immediately. When set to “measure,” <strong>the</strong><br />
Arpeggio type is switched at <strong>the</strong> top of <strong>the</strong> next measure.<br />
Settings: realtime, measure<br />
4 Velocity Limit<br />
6<br />
7<br />
8<br />
9<br />
%<br />
^<br />
Determines <strong>the</strong> lowest and highest velocity which can<br />
trigger <strong>the</strong> Arpeggio playback. This lets you set <strong>the</strong> velocity<br />
range with which you press <strong>the</strong> note to trigger <strong>the</strong> Arpeggio<br />
playback. You can also create separate low and high<br />
trigger ranges for <strong>the</strong> Arpeggio playback, with a velocity<br />
“hole” in <strong>the</strong> middle, by specifying <strong>the</strong> maximum value first.<br />
For example, setting a Velocity Limit of 93 – 34 lets you play<br />
Editing a Normal Voice<br />
<strong>the</strong> Arpeggio from two separate velocity ranges: soft (1 –<br />
34) and hard (93 – 127). Notes played at middle velocities<br />
between 35 and 92 do not play <strong>the</strong> Arpeggio.<br />
Settings: 001 – 127<br />
5 Note Limit<br />
Determines <strong>the</strong> lowest and highest notes in <strong>the</strong> Arpeggio’s<br />
note range. Notes played in this range trigger <strong>the</strong><br />
Arpeggio. For example, setting a Note Limit of “C5 – C4”<br />
lets you trigger <strong>the</strong> Arpeggio by playing notes in <strong>the</strong> two<br />
ranges of C -2 to C4 and C5 to G8; notes played between<br />
C4 and C5 have no effect on <strong>the</strong> Arpeggio.<br />
Settings: C -2 – G8<br />
n Please keep in mind that no sound is produced when <strong>the</strong> Key<br />
Mode is set to “sort” or “thru” and notes are played outside <strong>the</strong><br />
Note Limit setting here.<br />
6 Tempo*<br />
Determines <strong>the</strong> Arpeggio Tempo. This parameter can be<br />
changed via <strong>the</strong> Knob directly.<br />
Settings: 5 – 300<br />
n If you are using this instrument with an external sequencer,<br />
MIDI <strong>com</strong>puter, or o<strong>the</strong>r MIDI device, and you want to<br />
synchronize it to that device, set <strong>the</strong> MIDI sync (5) parameter<br />
in <strong>the</strong> MIDI display (page 268) of <strong>the</strong> Utility mode to “MIDI” or<br />
“auto.” In this case, <strong>the</strong> Tempo parameter here indicates<br />
“MIDI” or “auto” and cannot be changed.<br />
7 Key Mode<br />
Determines how <strong>the</strong> Arpeggio plays back when playing <strong>the</strong><br />
keyboard.<br />
Settings: sort, thru, direct, sort+direct, thru+direct<br />
sort<br />
When you play specific notes (for example, <strong>the</strong> notes of a chord), <strong>the</strong><br />
same sequence plays, no matter what order you play <strong>the</strong> notes.<br />
thru<br />
When you play specific notes (for example, <strong>the</strong> notes of a chord), <strong>the</strong><br />
resulting sequence differs depending on <strong>the</strong> order of <strong>the</strong> notes.<br />
direct<br />
Note events of <strong>the</strong> Arpeggio sequence do not play; only <strong>the</strong> notes you<br />
play on <strong>the</strong> keyboard are heard. When <strong>the</strong> Arpeggio plays back, <strong>the</strong><br />
events such as Pan and Brightness are applied to <strong>the</strong> sound of your<br />
keyboard performance. Use this setting when <strong>the</strong> Arpeggio types<br />
includes non-note data or when <strong>the</strong> Category type “Ctrl” is selected.<br />
sort+direct<br />
The Arpeggio is played back according to <strong>the</strong> “sort” setting here, and<br />
<strong>the</strong> note pressed is also sounded.<br />
thru+direct<br />
The Arpeggio is played back according to <strong>the</strong> “thru” setting here, and<br />
<strong>the</strong> note pressed is also sounded.<br />
n Some Arpeggio types belonging to <strong>the</strong> “Cntr” Category may<br />
not have note events (page 65). When such an Arpeggio type<br />
is selected and <strong>the</strong> Key Mode is set to “sort” or “thru,” no<br />
sound is produced even if you press a note on <strong>the</strong> keyboard.<br />
Voice mode<br />
Performance<br />
mode<br />
Sampling<br />
mode 1<br />
Song mode<br />
Pattern mode<br />
Mixing mode<br />
Sampling<br />
mode 2<br />
Master mode<br />
Utility mode<br />
File mode<br />
MOTIF <strong>XS</strong> Owner’s <strong>Manual</strong> 101<br />
Reference
Reference<br />
102<br />
Editing a Normal Voice<br />
Voice mode Performance Sampling Song mode Pattern mode Mixing mode Sampling Master mode Utility mode File mode<br />
mode mode 1<br />
mode 2<br />
8 Velocity Mode<br />
Adjusts <strong>the</strong> velocity of <strong>the</strong> Arpeggio notes.<br />
Settings: original, thru<br />
original<br />
The Arpeggio plays back at <strong>the</strong> preset velocities included in <strong>the</strong><br />
Arpeggio sequence data.<br />
thru<br />
The Arpeggio plays back according to <strong>the</strong> velocity of your playing. For<br />
example, if you play <strong>the</strong> notes strongly, <strong>the</strong> playback volume of <strong>the</strong><br />
Arpeggio increases.<br />
9 Output Octave Shift<br />
Specifies <strong>the</strong> maximum Arpeggio range in octaves.<br />
Settings: -10 – +10<br />
) [SF1] ARP1 – [SF5] ARP5 (Arpeggio 1 – 5)<br />
buttons<br />
The six parameters Bank (!) through Gate Time Rate<br />
Offset (^) at <strong>the</strong> lower half part of <strong>the</strong> display, can be<br />
edited in each of <strong>the</strong> [SF1] ARP1 through [SF5] ARP5<br />
displays. You can set <strong>the</strong> parameters in <strong>the</strong> lower half of <strong>the</strong><br />
display for each of <strong>the</strong> five Arpeggio settings by pressing<br />
one of <strong>the</strong> [SF1] – [SF5] buttons. The 8th note icon shown<br />
in <strong>the</strong> tab menu indicates that any Arpeggio Type (o<strong>the</strong>r<br />
than “off”) is selected in <strong>the</strong> display corresponding to <strong>the</strong><br />
Sub Function button.<br />
Settings: [SF1] – [SF5] (Sub Function) buttons<br />
! Bank*<br />
Determines <strong>the</strong> Arpeggio Bank containing <strong>the</strong> desired<br />
Arpeggio type. Select “PRE” if you wish to select a preset<br />
Arpeggio Type. Select “USER” if you wish to select an<br />
Arpeggio Type you originally created and stored.<br />
Settings: PRE, USR<br />
n For detailed instructions on creating your original Arpeggio<br />
type, see page 66.<br />
@ Category*<br />
# Sub Category*<br />
You can select <strong>the</strong> Category and its Sub Category<br />
including your desired Arpeggio Type. This parameter is<br />
available when “PRE” is selected as <strong>the</strong> Bank.<br />
Settings: Refer to <strong>the</strong> Arpeggio Category List on page 62.<br />
n You can call up <strong>the</strong> list by pressing <strong>the</strong> [SF6] LIST button <strong>the</strong>n<br />
select <strong>the</strong> desired one from <strong>the</strong> list. For details, see page 82.<br />
$ Type*<br />
Determines <strong>the</strong> desired Arpeggio Type number from <strong>the</strong><br />
specified Category. The name of <strong>the</strong> selected Arpeggio<br />
Type is shown at right of <strong>the</strong> specified number on <strong>the</strong><br />
display. Refer to <strong>the</strong> Arpeggio Type List in Data List 2<br />
(separate online documentation).<br />
For details about Data List 2, refer to “How to use <strong>the</strong><br />
manual” (page 6).<br />
n For details about how to use <strong>the</strong> Arpeggio Type List, see<br />
page 63.<br />
MOTIF <strong>XS</strong> Owner’s <strong>Manual</strong><br />
% Velocity Rate<br />
Determines <strong>the</strong> offset value by which <strong>the</strong> Arpeggio notes<br />
will be shifted from <strong>the</strong>ir original velocities. If <strong>the</strong> resultant<br />
velocity value is less than zero it will be set to 1, and if <strong>the</strong><br />
resultant velocity is greater than 128 it will be set to 127.<br />
This parameter can be changed via <strong>the</strong> Knob directly.<br />
Settings: -100% – +0% – +100%<br />
^ Gate Time Rate<br />
Determines <strong>the</strong> Gate Time (length) of <strong>the</strong> Arpeggio notes.<br />
The Gate Time cannot be decreased beyond its normal<br />
minimum of 1; any values outside that range will<br />
automatically be limited to <strong>the</strong> minimum. This parameter<br />
can be changed via <strong>the</strong> Knob directly.<br />
Settings: -100% – +0% – +100%<br />
Arpeggio settings—[F3] ARP O<strong>the</strong>r<br />
(Arpeggio O<strong>the</strong>r)<br />
By changing <strong>the</strong> timing and velocity of <strong>the</strong> notes, you can<br />
change <strong>the</strong> rhythmic “feel” of <strong>the</strong> Arpeggio playback.<br />
1<br />
2<br />
3<br />
4<br />
5<br />
6<br />
7<br />
1 Unit Multiply<br />
Adjusts <strong>the</strong> Arpeggio playback time based on tempo. By<br />
using this parameter, you can create a different Arpeggio<br />
type from <strong>the</strong> original one. For example, if you set a value<br />
of 200%, <strong>the</strong> playback time will be doubled (tempo is<br />
halved). On <strong>the</strong> o<strong>the</strong>r hand, if you set a value of 50%, <strong>the</strong><br />
playback time will be halved and <strong>the</strong> tempo doubled.<br />
Normal playback time is 100%. This parameter can be<br />
changed via <strong>the</strong> Knob directly.<br />
Settings: 50%, 66%, 75%, 100%, 133%, 150%, 200%<br />
2 Quantize Value*<br />
$ #<br />
8<br />
9<br />
)<br />
!<br />
@<br />
Determines to what beats <strong>the</strong> note data in <strong>the</strong> Song will be<br />
aligned, or determines to what beats in <strong>the</strong> Song <strong>the</strong> swing<br />
is applied.<br />
This parameter can be changed via <strong>the</strong> Knob directly.<br />
Settings: 2 60 (32nd note), 63 80 (16th note triplet), 6 120 (16th<br />
note), 83 160 (8th note triplet), 8 240 (8th note), 43 320<br />
(1/4 note triplet), 4 480 (1/4 note)
3 Quantize Strength<br />
Sets <strong>the</strong> “strength” by which note events are pulled toward<br />
<strong>the</strong> nearest quantize beats. A setting of 100% produces<br />
exact timing set via <strong>the</strong> Quantize Value parameter above. A<br />
setting of 0% results in no quantization. A setting of 50%<br />
results in <strong>the</strong> note events being pulled halfway between 0%<br />
and 100%.<br />
This parameter can be changed via <strong>the</strong> Knob directly.<br />
Settings: 0% – 100%<br />
4 Swing*<br />
Delays notes on even-numbered beats (backbeats) to<br />
produce a swing feel. Settings above 1 delay <strong>the</strong> Arpeggio<br />
notes, whereas settings below 1 advance <strong>the</strong>m. A setting<br />
of 0 produces exact timing set via <strong>the</strong> Quantize Value,<br />
resulting in no swing. Judicious use of this setting lets you<br />
create swing rhythms and triplet feels, such as shuffle and<br />
bounce.<br />
This parameter can be changed via <strong>the</strong> Knob directly.<br />
Settings: -120 – +120<br />
5 Velocity Rate<br />
Determines how much <strong>the</strong> velocity of <strong>the</strong> Arpeggio<br />
playback is offset from <strong>the</strong> original value. For example, a<br />
setting of 100% means <strong>the</strong> original velocities are used.<br />
Settings below 100% will reduce <strong>the</strong> velocities of <strong>the</strong><br />
Arpeggio notes, whereas settings above 100% will<br />
increase <strong>the</strong> velocities. If <strong>the</strong> resultant velocity value is less<br />
than zero it will be set to 1, and if <strong>the</strong> resultant velocity is<br />
greater than 128 it will be set to 127.<br />
Settings: 0 – 200%<br />
6 Gate Time Rate<br />
Determines how much <strong>the</strong> Gate Time (length) of <strong>the</strong><br />
Arpeggio notes is offset from <strong>the</strong> original value. A setting of<br />
100% means <strong>the</strong> original gate times are used. Settings<br />
below 100% will shorten <strong>the</strong> gate times of <strong>the</strong> Arpeggio<br />
notes, whereas settings above 100% will leng<strong>the</strong>n <strong>the</strong>m.<br />
The Gate Time cannot be decreased beyond its normal<br />
minimum of 1; any values outside that range will<br />
automatically be limited to <strong>the</strong> minimum.<br />
Settings: 0 – 200%<br />
7 Octave Range<br />
Specifies <strong>the</strong> maximum Arpeggio range in octaves.<br />
Positive value settings increase <strong>the</strong> octave range of <strong>the</strong><br />
Arpeggio playback upward, whereas negative value<br />
settings increase it downward. This parameter can be<br />
changed via <strong>the</strong> Knob directly.<br />
Settings: -3 – +0 – +3<br />
8 Loop<br />
When this is set to “on,” <strong>the</strong> Arpeggio cycles while notes<br />
are held. When this is set to “off,” <strong>the</strong> Arpeggio plays only<br />
once even if notes are held.<br />
Settings: off, on<br />
9 Trigger Mode<br />
Editing a Normal Voice<br />
When this is set to “gate,” pressing <strong>the</strong> note starts<br />
Arpeggio playback and releasing <strong>the</strong> note stops it. When<br />
this is set to “toggle,” pressing <strong>the</strong> note starts/stops<br />
Arpeggio playback and releasing <strong>the</strong> note does not affect<br />
Arpeggio playback. Normally, this parameter should be set<br />
to “gate.”<br />
Settings: gate, toggle<br />
n The Trigger Mode “toggle” setting over<strong>com</strong>es <strong>the</strong> Hold “on”<br />
setting in <strong>the</strong> Arpeggio Main display (page 101). In o<strong>the</strong>r<br />
words, even when <strong>the</strong> Hold parameter is set to “on,” pressing<br />
<strong>the</strong> note start/stops Arpeggio playback when <strong>the</strong> Trigger Mode<br />
is set to “toggle.”<br />
) Accent Vel Threshold<br />
(Accent Velocity Threshold)<br />
Some Arpeggio types include special sequence data<br />
called “Accent Phrase,” which will be played back only<br />
when <strong>the</strong> velocities higher than a specified value are<br />
received. This parameter determines <strong>the</strong> minimum velocity<br />
that will trigger <strong>the</strong> Accent Phrase.<br />
Settings: off, 1 – 127<br />
! Accent Start Quantize<br />
Determines <strong>the</strong> start timing of <strong>the</strong> Accent Phrase when <strong>the</strong><br />
Velocity specified in Accent Vel Threshold above is<br />
received. When set to off, <strong>the</strong> Accent Phrase starts as soon<br />
as <strong>the</strong> Velocity is received. When set to on, <strong>the</strong> Accent<br />
Phrase starts on <strong>the</strong> beat specified for each Arpeggio type<br />
after <strong>the</strong> Velocity is received.<br />
Settings: off, on<br />
@ Random SFX<br />
Some Arpeggio types feature <strong>the</strong> Random SFX function<br />
which will trigger <strong>the</strong> special sound such as fret noise of<br />
<strong>the</strong> guitar when <strong>the</strong> note is released. This parameter<br />
determines whe<strong>the</strong>r <strong>the</strong> Random SFX is active or not.<br />
Settings: off, on<br />
# Random SFX Velocity Offset<br />
Determines <strong>the</strong> offset value by which <strong>the</strong> Random SFX<br />
notes will be shifted from <strong>the</strong>ir original velocities. If <strong>the</strong><br />
resultant velocity value is less than zero it will be set to 1,<br />
and if <strong>the</strong> resultant velocity is greater than 128 it will be set<br />
to 127.<br />
Settings: -64 – +0 – +63<br />
$ Random SFX Key On Control<br />
When this is set to “on,” <strong>the</strong> Random SFX special sound is<br />
played with <strong>the</strong> preprogrammed velocity. When this is set<br />
to “off,” <strong>the</strong> Random SFX special sound is played with <strong>the</strong><br />
velocity generated when <strong>the</strong> note is pressed.<br />
Settings: off, on<br />
Voice mode<br />
Performance<br />
mode<br />
Sampling<br />
mode 1<br />
Song mode<br />
Pattern mode<br />
Mixing mode<br />
Sampling<br />
mode 2<br />
Master mode<br />
Utility mode<br />
File mode<br />
MOTIF <strong>XS</strong> Owner’s <strong>Manual</strong> 103<br />
Reference
Reference<br />
104<br />
Editing a Normal Voice<br />
Voice mode Performance Sampling Song mode Pattern mode Mixing mode Sampling Master mode Utility mode File mode<br />
mode mode 1<br />
mode 2<br />
Controller settings—[F4] Ctrl Set<br />
(Controller Set)<br />
The controllers such as knobs on <strong>the</strong> front panel can be<br />
used to change and adjust a variety of parameters for each<br />
Voice—in real time, and simultaneously. For example,<br />
keyboard aftertouch can be used to control vibrato and <strong>the</strong><br />
Modulation Wheel could be used to control tonal<br />
brightness.<br />
The function settings for all <strong>the</strong> controllers are referred to as<br />
a “Controller Set,” and up to six Controller Sets can be<br />
created for each Voice. The controller is referred to as<br />
Source, and <strong>the</strong> controlled function is referred to as<br />
Destination. From this display, you can determine <strong>the</strong><br />
Controller Sets.<br />
n Depending on <strong>the</strong> selected parameter, <strong>the</strong> LIST icon is shown<br />
at <strong>the</strong> tab menu corresponding to <strong>the</strong> [SF6] button. In this<br />
condition, you can call up <strong>the</strong> list by pressing <strong>the</strong> [SF6] LIST<br />
button, <strong>the</strong>n select <strong>the</strong> desired item from <strong>the</strong> list. For details,<br />
see page 82.<br />
1 Source*<br />
Determines which panel controller is to be assigned and<br />
used for <strong>the</strong> selected Set. You can also assign multiple<br />
functions to a controller. You can set this parameter by<br />
operating <strong>the</strong> desired controller while holding <strong>the</strong> [SF5]<br />
Controller button.<br />
Settings:<br />
PitchBend<br />
Indicates <strong>the</strong> built-in Pitch Bend wheel.<br />
ModWheel<br />
Indicates <strong>the</strong> built-in Modulation wheel.<br />
AfterTch (Aftertouch)<br />
Indicates <strong>the</strong> event generated when pressure is applied to a key after<br />
<strong>the</strong> note is played.<br />
FootCtrl1 (Foot Controller2)<br />
FootCtrl2 (Foot Controller2)<br />
Indicates <strong>the</strong> Foot Controller connected to each of <strong>the</strong> FOOT<br />
CONTROLLER 1 and 2 jacks on <strong>the</strong> rear panel.<br />
FootSw (Footswitch)<br />
Indicates <strong>the</strong> Footswitch connected to <strong>the</strong> FOOT SWITCH<br />
ASSIGNABLE jack on <strong>the</strong> rear panel.<br />
Ribbon<br />
Indicates <strong>the</strong> built-in Ribbon Controller.<br />
Breath<br />
Indicates <strong>the</strong> external controller which sends <strong>the</strong> control change<br />
number assigned to <strong>the</strong> Breath Controller in <strong>the</strong> Utility mode<br />
(page 264) to <strong>the</strong> MOTIF <strong>XS</strong> via MIDI.<br />
MOTIF <strong>XS</strong> Owner’s <strong>Manual</strong><br />
1 2 3 4<br />
Assign1<br />
Assign2<br />
Indicates <strong>the</strong> Knobs printed “ASSIGN 1” and “ASSIGN 2” with <strong>the</strong><br />
TONE 1 lamp turned on.<br />
A. Func 1<br />
A. Func 2<br />
Indicates <strong>the</strong> built-in ASSIGNABLE FUNCTION [1] and [2] buttons.<br />
n You can determine <strong>the</strong> degree to which <strong>the</strong> Pitch Bend wheel<br />
affects <strong>the</strong> Destination parameter (below) by setting <strong>the</strong> Pitch<br />
Bend Range Upper (4) and Pitch Bend Range Lower (5) in<br />
<strong>the</strong> Play Mode display (page 98).<br />
2 Destination*<br />
Determines <strong>the</strong> parameter that is controlled by <strong>the</strong> Source<br />
controller (above). You can select a parameter for each<br />
controller from <strong>the</strong> 67 parameters, such as volume, pitch<br />
and LFO depth.<br />
Settings: Settings: Refer to <strong>the</strong> Control List in <strong>the</strong> separate Data List<br />
booklet.<br />
n Regarding “Insertion Effect A Parameter 1 – 16,” “Insertion<br />
Effect B Parameter 1 – 16” and “Insertion Effect L Parameter 1<br />
– 32” described in <strong>the</strong> Control List, <strong>the</strong> actual parameter<br />
names of <strong>the</strong> selected Effect type are shown on <strong>the</strong> display. If<br />
one of <strong>the</strong>se names is shown, no function is assigned to that<br />
parameter.<br />
Setting examples of <strong>the</strong> Destination<br />
5 To control <strong>the</strong> volume: Volume<br />
To apply vibrato to <strong>the</strong><br />
Voice:<br />
Concerning *1 – *4, <strong>the</strong> following settings are necessary in<br />
addition to <strong>the</strong> above setting.<br />
3 Depth*<br />
Determines <strong>the</strong> degree to which <strong>the</strong> Source controller<br />
affects <strong>the</strong> Destination parameter. For negative values, <strong>the</strong><br />
controller operation is reversed; maximum controller<br />
settings produce minimum parameter changes.<br />
Settings: -64 – +0 – +63<br />
4 Element Switch*<br />
Common LFO Depth 1 – 3<br />
(C-LFO dpth1 – 3) *1<br />
To change <strong>the</strong> pitch: Element Pitch<br />
(coarse tune) *2<br />
To control <strong>the</strong> brightness of<br />
<strong>the</strong> Voice:<br />
To change <strong>the</strong> speed of <strong>the</strong><br />
Rotary Speaker:<br />
To apply a wah pedal to <strong>the</strong><br />
Voice:<br />
Element Filter Frequency<br />
(cutoff) *2<br />
Insertion A/B Parameter 1<br />
(insA-prm1/insB-prm1) *3<br />
Insertion A/B Parameter 1<br />
(insA-prm1/insB-prm1) *4<br />
*1 [F4] Com LFO → [SF1] Wave → Play Mode = loop<br />
[F4] Com LFO → [SF2] Set → Control Dest = P mod<br />
*2 [F3] Ctrl Set → Element Switch = on<br />
*3 [F6] Effect → Insertion A/B Type = Rotary Speaker<br />
[F6] Effect → Element Out = insA/insB<br />
*4 [F6] Effect → Insertion A/B Type = Wah effect<br />
[F6] Effect → Element Out = insA/insB<br />
Determines whe<strong>the</strong>r or not <strong>the</strong> selected controller affects<br />
each individual element. This parameter is disabled when<br />
<strong>the</strong> Destination (2) described above is set to a parameter<br />
unrelated to <strong>the</strong> Voice Elements.
5 Graph (Indication only)<br />
The horizontal axis indicates <strong>the</strong> value generated via <strong>the</strong><br />
Source of <strong>the</strong> selected Set, whereas <strong>the</strong> vertical axis<br />
indicates <strong>the</strong> degree to which <strong>the</strong> Destination parameter is<br />
affected.<br />
Modulating <strong>the</strong> Voice—[F5] Com<br />
LFO (Common LFO)<br />
Determines how <strong>the</strong> vibrato, tremolo and wah effect are<br />
produced by using <strong>the</strong> LFO (Low Frequency Oscillator).<br />
From <strong>the</strong> following displays, you can set <strong>the</strong> basic LFO<br />
parameters <strong>com</strong>mon to all elements of <strong>the</strong> Voice.<br />
LFO Wave settings—[SF1] Wave<br />
(Common LFO Wave)<br />
This display contains a variety of LFO parameters,<br />
including LFO wave type, speed and effects such as LFO<br />
delay or fade in/out.<br />
1<br />
2<br />
3<br />
4<br />
5<br />
6<br />
7<br />
8<br />
n Depending on <strong>the</strong> selected parameter, <strong>the</strong> LIST icon is shown<br />
at <strong>the</strong> tab menu corresponding to <strong>the</strong> [SF6] button. In this<br />
condition, you can call up <strong>the</strong> list by pressing <strong>the</strong> [SF6] LIST<br />
button, <strong>the</strong>n select <strong>the</strong> desired item from <strong>the</strong> list. For details,<br />
see page 82.<br />
1 Wave*<br />
Selects <strong>the</strong> Wave and determines how <strong>the</strong> LFO waveform<br />
vibrates. The illustration of <strong>the</strong> selected wave is shown on<br />
<strong>the</strong> display.<br />
Settings: triangle, triangle+, saw up, saw down, squ1/4, squ1/3,<br />
square, squ2/3, squ3/4, trapezoid, S/H1, S/H2, user<br />
user<br />
You can create your original LFO wave by selecting this. The LFO wave<br />
can be created in <strong>the</strong> Common LFO User display (page 105).<br />
2 Play Mode<br />
Determines whe<strong>the</strong>r <strong>the</strong> LFO cycles repeatedly (loop) or<br />
only once (one shot).<br />
Settings: loop, one shot<br />
3 Speed*<br />
9<br />
)<br />
!<br />
@<br />
Determines <strong>the</strong> speed of <strong>the</strong> LFO Wave. The higher <strong>the</strong><br />
value, <strong>the</strong> faster <strong>the</strong> speed.<br />
Settings: 0 – 63<br />
4 Phase<br />
Editing a Normal Voice<br />
Determines <strong>the</strong> starting phase point for <strong>the</strong> LFO Wave<br />
when it is reset.<br />
Settings: 0°, 90°, 120°, 180°, 240°, 270°<br />
Phase<br />
5 Tempo Sync<br />
Determines whe<strong>the</strong>r or not <strong>the</strong> LFO speed is synchronized<br />
to <strong>the</strong> tempo of <strong>the</strong> Arpeggio or sequencer (Song or<br />
Pattern).<br />
Settings: off (not synchronized), on (synchronized)<br />
n When this parameter is set to “on” and <strong>the</strong> MIDI sync<br />
parameter in <strong>the</strong> MIDI display of <strong>the</strong> Utility mode (page 268) is<br />
set to “MIDI,” <strong>the</strong> LFO speed is synchronized with <strong>the</strong> external<br />
clock.<br />
6 Tempo Speed<br />
This parameter is available only when Tempo Sync above<br />
has been set to “on.” It allows you to make detailed note<br />
value settings that determine how <strong>the</strong> LFO pulses in sync<br />
with <strong>the</strong> Arpeggio or sequencer.<br />
Settings: 16th, 8th/3 (eighth-note triplets), 16th. (dotted sixteenth<br />
note), 8th (eighth note), 4th/3 (quarter-note triplets), 8th.<br />
(dotted 8th note), 4th (quarter notes), 2nd/3 (half-note<br />
triplets), 4th. (dotted quarter notes), 2nd (half notes), whole/<br />
3 (whole-note triplets), 2nd. (dotted half note), 4thx4<br />
(quarter-note quadruplets; four quarter notes to <strong>the</strong> beat),<br />
4thx5 (quarter-note quintuplets; five quarter notes to <strong>the</strong><br />
beat), 4thx6 (quarter-note sextuplets; six quarter notes to <strong>the</strong><br />
beat), 4thx7 (quarter-note septuplets; seven quarter notes to<br />
<strong>the</strong> beat), 4thx8 (quarter-note octuplets; eight quarter notes<br />
to <strong>the</strong> beat), 4thx16 (sixteen quarter notes to <strong>the</strong> beat),<br />
4thx32 (32 quarter notes to <strong>the</strong> beat), 4thx64 (64 quarter<br />
notes to <strong>the</strong> beat)<br />
n The note type setting above is synchronized with <strong>the</strong> tempo of<br />
<strong>the</strong> Arpeggio/Song/Pattern playback.<br />
7 Key On Reset<br />
0° 90° 180° 270°<br />
120° 240°<br />
Determines whe<strong>the</strong>r or not <strong>the</strong> LFO is reset each time a<br />
note is pressed. The following three settings are available.<br />
Settings: off, each-on, 1st-on<br />
off<br />
The LFO cycles freely with no key synchronization. Pressing a key<br />
starts <strong>the</strong> LFO wave at whatever phase <strong>the</strong> LFO happens to be at that<br />
point.<br />
Key On<br />
Time<br />
Time<br />
Voice mode<br />
Performance<br />
mode<br />
Sampling<br />
mode 1<br />
Song mode<br />
Pattern mode<br />
Mixing mode<br />
Sampling<br />
mode 2<br />
Master mode<br />
Utility mode<br />
File mode<br />
MOTIF <strong>XS</strong> Owner’s <strong>Manual</strong> 105<br />
Reference
Reference<br />
106<br />
Editing a Normal Voice<br />
Voice mode Performance Sampling Song mode Pattern mode Mixing mode Sampling Master mode Utility mode File mode<br />
mode mode 1<br />
mode 2<br />
each-on<br />
The LFO resets with each note you play and starts a waveform at <strong>the</strong><br />
phase specified by <strong>the</strong> Phase parameter (above).<br />
1st-on<br />
The LFO resets with each note you play and starts a waveform at <strong>the</strong><br />
phase specified by <strong>the</strong> Phase parameter (above). If you play a second<br />
note while <strong>the</strong> first is being held, <strong>the</strong> LFO continues cycling according<br />
to <strong>the</strong> same phase as triggered by <strong>the</strong> first note. In o<strong>the</strong>r words, <strong>the</strong><br />
LFO only resets if <strong>the</strong> first note is released before <strong>the</strong> second is played.<br />
n The starting phase is determined by <strong>the</strong> Phase parameter (4)<br />
although <strong>the</strong> starting phase is shown as 0 in <strong>the</strong> illustration.<br />
8 Random Speed<br />
Determines <strong>the</strong> degree to which <strong>the</strong> LFO speed changes at<br />
random. A setting of “0” results in <strong>the</strong> original speed.<br />
Higher values result in a larger degree of speed change.<br />
This parameter cannot be set when <strong>the</strong> Tempo Sync (5) is<br />
set to on.<br />
Settings: 0 – 127<br />
9 Delay*<br />
Determines <strong>the</strong> delay time between <strong>the</strong> moment you press<br />
note on <strong>the</strong> keyboard and <strong>the</strong> moment <strong>the</strong> LFO <strong>com</strong>es into<br />
effect. A higher value results in a longer delay time.<br />
Settings: 0 – 127<br />
) Fade In Time<br />
Key On<br />
(first note)<br />
Determines <strong>the</strong> amount of time for <strong>the</strong> LFO effect to fade in<br />
after <strong>the</strong> Delay time has elapsed. A higher value results in a<br />
slower fade-in. When set to “0,” <strong>the</strong> LFO effect will not fade<br />
in and reach <strong>the</strong> maximum level immediately after <strong>the</strong><br />
Delay time has elapsed.<br />
Settings: 0 – 127<br />
! Hold (Hold Time)<br />
Determines <strong>the</strong> length of time for which <strong>the</strong> LFO is held at<br />
its maximum level. A higher value results in a longer Hold<br />
time. A setting of 127 produces no fade out.<br />
Settings: 0 – 126, hold<br />
@ Fade Out Time<br />
Key On<br />
(first note)<br />
Determines <strong>the</strong> amount of time for <strong>the</strong> LFO effect to fade<br />
out (after <strong>the</strong> Hold time has elapsed). A higher value results<br />
in a slower fade-out.<br />
Settings: 0 – 127<br />
MOTIF <strong>XS</strong> Owner’s <strong>Manual</strong><br />
Key On<br />
(second note)<br />
Key On<br />
(second note)<br />
Time<br />
Time<br />
LFO Effect Settings—[SF2] Set<br />
(Common LFO Set)<br />
From this display you can select <strong>the</strong> destination parameter<br />
for <strong>the</strong> LFO (which aspect of <strong>the</strong> sound <strong>the</strong> LFO controls),<br />
<strong>the</strong> Elements to be affected by <strong>the</strong> LFO, and <strong>the</strong> LFO<br />
Depth. Three Destinations can be assigned, and you can<br />
choose from several parameters per Destination.<br />
5<br />
1 Control Dest (Control Destination)*<br />
Determines <strong>the</strong> parameters which are to be controlled<br />
(modulated) by <strong>the</strong> LFO Wave.<br />
Settings: insA1 – insA16, insB1 – insB16, insL1 – insL32, A mod, P<br />
mod, F mod, reso, pan, LFOspd<br />
insA1 – insA16, insB1 – insB16, insL1 – insL32 (Effect parameters)<br />
Each parameter of <strong>the</strong> selected Effect type is modulated cyclically.<br />
When one of those parameters is selected, <strong>the</strong> corresponding<br />
parameter name of <strong>the</strong> selected Effect type is shown at <strong>the</strong> lower<br />
section of <strong>the</strong> display.<br />
A mod (Amplitude Modulation Depth)<br />
A tremolo effect produced by cyclically modulating <strong>the</strong> volume.<br />
P mod (Pitch Modulation Depth)<br />
A vibrato effect produced by cyclically modulating <strong>the</strong> pitch.<br />
F mod (Filter Modulation Depth)<br />
A wah effect produced by cyclically modulating <strong>the</strong> tonal brightness.<br />
reso (Resonance)<br />
A special wah effect produced by cyclically modulating <strong>the</strong> resonance.<br />
pan<br />
An effect produced by cyclically modulating <strong>the</strong> stereo pan position.<br />
LFOspd (Element LFO Speed)<br />
When this is selected, <strong>the</strong> Common LFO speed cyclically modulates<br />
<strong>the</strong> Element LFO speed.<br />
2 Control Depth*<br />
Determines <strong>the</strong> LFO Wave Depth.<br />
Settings: 0 – 127<br />
1 2<br />
3 Element Switch 1 – 8*<br />
Determines whe<strong>the</strong>r or not each Element is to be affected<br />
by <strong>the</strong> LFO.<br />
Settings: B (active), A (inactive)<br />
4 Depth Offset 1 – 8<br />
3<br />
4<br />
3<br />
4<br />
3<br />
4<br />
Determines <strong>the</strong> offset values of <strong>the</strong> Control Depth<br />
parameter (above) for <strong>the</strong> respective Elements. If <strong>the</strong><br />
resultant Control Depth value is less than zero it will be set
to 0, and if <strong>the</strong> resultant Control Depth value is greater than<br />
127 it will be set to 127.<br />
Settings: 0 – 127<br />
5 LFO Phase Offset<br />
Determines <strong>the</strong> offset values of <strong>the</strong> Phase parameter in <strong>the</strong><br />
[SF1] Wave display for <strong>the</strong> respective Elements.<br />
Settings: 0°, 90°, 120°, 180°, 240°, 270°<br />
Making your own LFO—[SF3] User<br />
(Common LFO User)<br />
From this display you can create your own original LFO<br />
wave. You can create a custom LFO wave consisting of up<br />
to sixteen steps. The created LFO wave be<strong>com</strong>es available<br />
when <strong>the</strong> Wave parameter in <strong>the</strong> Common LFO Wave<br />
display is set to “user.”<br />
1<br />
2<br />
3<br />
4<br />
Phase<br />
1 Template<br />
0° 90° 180° 270°<br />
120° 240°<br />
You can select a pre-programmed template for <strong>the</strong> LFO<br />
wave.<br />
Settings: all -64, all 0, all +63, saw up, saw down, even step, odd step<br />
all -64<br />
Values of all <strong>the</strong> steps are set to -64.<br />
all 0<br />
Values of all <strong>the</strong> steps are set to 0.<br />
all +63<br />
Values of all <strong>the</strong> steps are set to +63.<br />
saw up<br />
Creates a saw shaped upward wave.<br />
saw down<br />
Creates a saw shaped downward wave.<br />
Time<br />
even step<br />
Values of all odd steps are set to +63, and values of all even steps are<br />
set to -64.<br />
odd step<br />
Values of all even steps are set to +63, and values of all odd steps are<br />
set to -64.<br />
n You can call up <strong>the</strong> list by pressing <strong>the</strong> [SF6] LIST button <strong>the</strong>n<br />
select <strong>the</strong> desired one from <strong>the</strong> list. For details, see page 82.<br />
Editing a Normal Voice<br />
n You can use <strong>the</strong> [SF5] Random button to call up <strong>the</strong> base<br />
wave at random. Each time you press <strong>the</strong> [SF5] Random<br />
button, a different LFO wave appears on <strong>the</strong> display randomly.<br />
2 Slope<br />
Determines <strong>the</strong> slope or ramp characteristics of <strong>the</strong> LFO<br />
wave.<br />
Settings: off, up, down, up&down<br />
off<br />
Creates no slope.<br />
up<br />
Creates an upward slope.<br />
down<br />
Creates a downward slope.<br />
up&down<br />
Creates an upward <strong>the</strong>n downward slope.<br />
3 Cycle<br />
Determines <strong>the</strong> amount of steps for creating <strong>the</strong> wave.<br />
Settings: 2, 3, 4, 6, 8, 12, 16<br />
4 Level 1 – 16<br />
Determines <strong>the</strong> level for each step.<br />
Settings: -64 – +63<br />
Effect settings—[F6] Effect<br />
Determines <strong>the</strong> Effect connection and values of o<strong>the</strong>r<br />
parameters for <strong>the</strong> selected Voice. For details about <strong>the</strong><br />
structure in <strong>the</strong> Voice mode, see page 69.<br />
Effect Connection Settings—[SF1]<br />
Connect<br />
This display gives you at-a-glance, overall view of <strong>the</strong><br />
effect routing and <strong>com</strong>prehensive control over <strong>the</strong> effects.<br />
1<br />
7<br />
8<br />
9<br />
2<br />
5<br />
6<br />
! #<br />
n Depending on <strong>the</strong> selected parameter, <strong>the</strong> LIST icon is shown<br />
at <strong>the</strong> tab menu corresponding to <strong>the</strong> [SF6] button. In this<br />
condition, you can call up <strong>the</strong> list by pressing <strong>the</strong> [SF6] LIST<br />
button, <strong>the</strong>n select <strong>the</strong> desired item from <strong>the</strong> list. For details,<br />
see page 82.<br />
)<br />
@<br />
3<br />
4<br />
Voice mode<br />
Performance<br />
mode<br />
Sampling<br />
mode 1<br />
Song mode<br />
Pattern mode<br />
Mixing mode<br />
Sampling<br />
mode 2<br />
Master mode<br />
Utility mode<br />
File mode<br />
MOTIF <strong>XS</strong> Owner’s <strong>Manual</strong> 107<br />
Reference
Reference<br />
108<br />
Editing a Normal Voice<br />
Voice mode Performance Sampling Song mode Pattern mode Mixing mode Sampling Master mode Utility mode File mode<br />
mode mode 1<br />
mode 2<br />
1 Element Out 1 – 8*<br />
Determines which Insertion Effect (A or B) is used to<br />
process each individual Element. The “thru” setting lets<br />
you bypass <strong>the</strong> Insertion Effects for <strong>the</strong> specified element.<br />
When INSERTION CONNECT (2) is set to “ins L,” <strong>the</strong><br />
signal from each Element is output to <strong>the</strong> Insertion L<br />
regardless of <strong>the</strong> setting here.<br />
Settings: thru (through), ins A (Insertion A), ins B (Insertion B)<br />
2 INSERTION CONNECT (Insertion Connection)<br />
From this display you can set <strong>the</strong> effect routing for Insertion<br />
Effects A and B. The setting changes are shown on <strong>the</strong><br />
diagram in <strong>the</strong> display, giving you a clear picture of how<br />
<strong>the</strong> signal is routed. For details, see page 69.<br />
Settings: parallel, ins A F B, ins B F A, ins L<br />
parallel<br />
Signals processed with <strong>the</strong> Insertion Effect A and B block will be sent<br />
to Master Effect, Master EQ, Reverb and Chorus block.<br />
ins A F B<br />
Signals processed with <strong>the</strong> Insertion Effect A will be sent to <strong>the</strong><br />
Insertion Effect B and signals processed with <strong>the</strong> Insertion Effect B is<br />
sent to Master Effect, Master EQ, Reverb and Chorus block.<br />
ins B F A<br />
Signals processed with <strong>the</strong> Insertion Effect B will be sent to <strong>the</strong><br />
Insertion Effect A and signals processed with <strong>the</strong> Insertion Effect A is<br />
sent to Master Effect, Master EQ, Reverb and Chorus block.<br />
ins L<br />
The Insertion Effects A and B are unified, <strong>the</strong>n used as <strong>the</strong> Vocoder.<br />
Signals processed with <strong>the</strong> Vocoder block will be sent to Master Effect,<br />
Master EQ, Reverb and Chorus block.<br />
n When “ins L” is selected, “ins L” is shown in <strong>the</strong> tab menu of<br />
<strong>the</strong> [SF2] button and <strong>the</strong> tab menu of <strong>the</strong> [SF3] button<br />
disappears.<br />
n For detailed instructions on using <strong>the</strong> Vocoder, see page 109.<br />
n When “ins L” is selected, <strong>the</strong> audio signal will be output from<br />
this instrument in mono.<br />
3 Insertion A (Insertion A Category/Type)*<br />
4 Insertion B (Insertion B Category/Type)*<br />
Determines <strong>the</strong> Effect type for Insertion A and B. From <strong>the</strong><br />
Category column, you can select one of <strong>the</strong> Effect<br />
Categories, each of which contains similar Effect types.<br />
From <strong>the</strong> Type column, you can select one of <strong>the</strong> Effect<br />
Types listed in <strong>the</strong> selected Category.<br />
Settings: Details about <strong>the</strong> Effect categories and types are described<br />
on page 70.<br />
MOTIF <strong>XS</strong> Owner’s <strong>Manual</strong><br />
A to B B to A<br />
A<br />
A<br />
B<br />
parallel ins L<br />
A<br />
Vocoder<br />
B<br />
B<br />
5 Chorus (Chorus Category/Type)*<br />
Selects a Chorus Effect type after selecting a category.<br />
From <strong>the</strong> Category column, you can select one of <strong>the</strong> Effect<br />
Categories, each of which contains similar Effect types.<br />
From <strong>the</strong> Type column, you can select one of <strong>the</strong> Effect<br />
types listed in <strong>the</strong> selected Category.<br />
Settings: Details about <strong>the</strong> Effect categories and types are described<br />
on page 70.<br />
6 Reverb (Reverb Type)*<br />
Determines <strong>the</strong> Reverb Effect type. It is not necessary to<br />
select a Category because <strong>the</strong>re is only one category in<br />
Reverb.<br />
Settings: Details about <strong>the</strong> Effect types are described on page 70.<br />
7 Chorus Send*<br />
Adjusts <strong>the</strong> chorus send level. The higher <strong>the</strong> value <strong>the</strong><br />
deeper <strong>the</strong> Chorus.<br />
Settings: 0 – 127<br />
8 Reverb Send*<br />
Adjusts <strong>the</strong> reverb send level. The higher <strong>the</strong> value <strong>the</strong><br />
deeper <strong>the</strong> reverb.<br />
Settings: 0 – 127<br />
9 CHORUS TO REVERB<br />
Determines <strong>the</strong> Send level of <strong>the</strong> signal sent from <strong>the</strong><br />
Chorus Effect to <strong>the</strong> Reverb Effect. The higher <strong>the</strong> value,<br />
<strong>the</strong> deeper <strong>the</strong> Reverb that is applied to <strong>the</strong> Chorusprocessed<br />
signal.<br />
Settings: 0 – 127<br />
) Reverb Return<br />
Determines <strong>the</strong> Return level of <strong>the</strong> Reverb Effect.<br />
Settings: 0 – 127<br />
! Chorus Return<br />
Determines <strong>the</strong> Return level of <strong>the</strong> Chorus Effect.<br />
Settings: 0 – 127<br />
@ Reverb Pan<br />
Determines <strong>the</strong> pan position of <strong>the</strong> Reverb effect sound.<br />
Settings: L63 (far left) – C (center) – R63 (far right)<br />
# Chorus Pan<br />
Determines <strong>the</strong> pan position of <strong>the</strong> Chorus effect sound.<br />
Settings: L63 (far left) – C (center) – R63 (far right)
Effect Parameter settings—[SF2] Ins A,<br />
[SF3] Ins B, [SF4] Reverb, [SF5] Chorus<br />
From <strong>the</strong>se displays, you can set <strong>the</strong> Effect related<br />
parameters when <strong>the</strong> INSERTION CONNECT parameter<br />
(2) is set to “parallel” or “ins A F B” or “ins B F A.”<br />
1<br />
n Depending on <strong>the</strong> selected parameter, <strong>the</strong> LIST icon is shown<br />
at <strong>the</strong> tab menu corresponding to <strong>the</strong> [SF6] button. In this<br />
condition, you can call up <strong>the</strong> list by pressing <strong>the</strong> [SF6] LIST<br />
button, <strong>the</strong>n select <strong>the</strong> desired item from <strong>the</strong> list. For details,<br />
see page 82.<br />
1 Category<br />
2 Type<br />
Editing a Normal Voice<br />
From <strong>the</strong> Category column, you can select one of <strong>the</strong> Effect<br />
Categories each of which contains similar Effect types.<br />
From <strong>the</strong> Type column, you can select one of <strong>the</strong> Effect<br />
Types listed in <strong>the</strong> selected Category.<br />
Settings: Details about <strong>the</strong> Effect categories and types are described<br />
on page 70.<br />
n The Category (1) is not shown in <strong>the</strong> Reverb display.<br />
3 Preset<br />
Effect Parameter Settings—[SF2] Ins L (Insertion Large)<br />
You can set various parameters in order to change how <strong>the</strong><br />
sound is affected by <strong>the</strong> selected Effect type. This<br />
parameter lets you call up <strong>the</strong> preprogrammed settings of<br />
<strong>the</strong>se effect parameters.<br />
4 Effect Parameters<br />
The number of parameters and values available differs<br />
depending on <strong>the</strong> currently selected effect type. Refer to<br />
page 73 for details about <strong>the</strong> Effect parameters. Refer to<br />
<strong>the</strong> separate Data List booklet for information on <strong>the</strong><br />
parameters for each Effect type.<br />
From this display, you can set <strong>the</strong> Vocoder related parameters. This display called up via <strong>the</strong> [SF2] button is available only<br />
when <strong>the</strong> INSERTION CONNECT parameter (2) is set to “ins L” in <strong>the</strong> Connect display (page 107). Vocoder is a distinctive,<br />
“robot voice” effect which extracts <strong>the</strong> characteristic of <strong>the</strong> microphone sound and adds it to <strong>the</strong> sound via your keyboard<br />
performance. To create this Vocoder effect, you play <strong>the</strong> keyboard and sing or speak into <strong>the</strong> microphone at <strong>the</strong> same time.<br />
To use <strong>the</strong> Vocoder effect, connect a microphone to <strong>the</strong> A/D INPUT connector on <strong>the</strong> rear panel, <strong>the</strong>n follow <strong>the</strong> instructions<br />
on page 111.<br />
Microphone Input<br />
Inst Input<br />
(Keyboard Performance)<br />
Noise<br />
Gate<br />
Noise Input (*1)<br />
2 3<br />
4<br />
Band 10<br />
Band 9<br />
Band 2<br />
Band 1<br />
HPF<br />
Extracting <strong>the</strong> tonal<br />
characteristic<br />
BPF1’<br />
(*2)<br />
BPF1<br />
Level<br />
detection<br />
Volume<br />
control<br />
*1 The noise generated in <strong>the</strong> Vocoder unit is used.<br />
*2 The cutoff frequency of <strong>the</strong> BPF1’ may not be same as <strong>the</strong> one of <strong>the</strong> BPF1. This depends on <strong>the</strong> settings of <strong>the</strong> Formant Shift and Formant Offset.<br />
BPF1<br />
Gain<br />
Wet<br />
Dry<br />
Output<br />
MOTIF <strong>XS</strong> Owner’s <strong>Manual</strong><br />
Voice mode<br />
Performance<br />
mode<br />
Sampling<br />
mode 1<br />
Song mode<br />
Pattern mode<br />
Mixing mode<br />
Sampling<br />
mode 2<br />
Master mode<br />
Utility mode<br />
File mode<br />
109<br />
Reference
Reference<br />
110<br />
Editing a Normal Voice<br />
Voice mode Performance Sampling Song mode Pattern mode Mixing mode Sampling Master mode Utility mode File mode<br />
mode mode 1<br />
mode 2<br />
2<br />
3<br />
4<br />
5<br />
6<br />
7<br />
8<br />
9<br />
)<br />
!<br />
@<br />
#<br />
1 Type<br />
Determines whe<strong>the</strong>r or not <strong>the</strong> Vocoder is applied to <strong>the</strong><br />
current Voice. When set to “Thru,” <strong>the</strong> Vocoder is not<br />
applied to <strong>the</strong> Voice.<br />
Settings: Thru, Vocoder<br />
2 Vocoder Attack<br />
Determines <strong>the</strong> attack time of <strong>the</strong> Vocoder sound. The<br />
higher <strong>the</strong> value, <strong>the</strong> slower <strong>the</strong> attack.<br />
Settings: 1ms – 200ms<br />
3 Vocoder Release<br />
Determines <strong>the</strong> release time of <strong>the</strong> Vocoder sound. The<br />
higher <strong>the</strong> value, <strong>the</strong> slower <strong>the</strong> decay.<br />
Settings: 10ms – 3000ms<br />
4 Mic Gate Threshold<br />
Determines <strong>the</strong> threshold level of <strong>the</strong> noise gate for <strong>the</strong><br />
microphone sound. If noise interferes with <strong>the</strong> Vocoder<br />
effect, set this parameter to a relatively high value to<br />
prevent noise from producing inadvertent, unexpected<br />
sounds.<br />
Settings: -72dB – -30dB<br />
5 Gate Switch<br />
Determines whe<strong>the</strong>r or not <strong>the</strong> microphone sound will be<br />
output from <strong>the</strong> HPF while you release <strong>the</strong> notes. Normally,<br />
set this to “on.”<br />
Settings: off, on<br />
off: The microphone sound always will be output. (You can always hear<br />
<strong>the</strong> microphone sound.)<br />
on: The microphone sound will be output only while pressing <strong>the</strong> note.<br />
6 HPF Freq (High Pass Filter Frequency)<br />
Determines <strong>the</strong> HPF cutoff frequency for <strong>the</strong> microphone<br />
input sound. Setting this to a low value results in a<br />
minimally processed input sound—in o<strong>the</strong>r words, close to<br />
<strong>the</strong> original. Setting this to higher values emphasizes <strong>the</strong><br />
higher frequency consonant and sibilant sounds (which<br />
make words easier to understand).<br />
Settings: thru, 500Hz – 16.0kHz<br />
7 HPF Output Level<br />
Determines <strong>the</strong> level of <strong>the</strong> microphone sound output from<br />
<strong>the</strong> HPF (High Pass Filter).<br />
Settings: 0 – 127<br />
MOTIF <strong>XS</strong> Owner’s <strong>Manual</strong><br />
1<br />
$<br />
%<br />
8 Formant Shift<br />
Determines <strong>the</strong> amount (in BPF) by which <strong>the</strong> cutoff<br />
frequency value of <strong>the</strong> BPFs (for <strong>the</strong> Inst Input) is shifted.<br />
This parameter can be used to adjust <strong>the</strong> pitch of <strong>the</strong><br />
Vocoder sound.<br />
Settings: -2, -1, +0, +1, +2<br />
9 Formant Offset<br />
Adjusts <strong>the</strong> cutoff frequencies of all BPFs (for <strong>the</strong> Inst Input)<br />
finely. This parameter can be used to adjust <strong>the</strong> pitch of <strong>the</strong><br />
Vocoder sound finely.<br />
Settings: -63 – +0 – +63<br />
) Mic Level<br />
Determines <strong>the</strong> microphone sound level, which is to be<br />
input to <strong>the</strong> Vocoder.<br />
Settings: 0 – 127<br />
! Inst Input Level<br />
Determines <strong>the</strong> level of <strong>the</strong> keyboard performance sound,<br />
which is to be input to <strong>the</strong> Vocoder.<br />
Settings: 0 – 127<br />
@ Noise Input Level<br />
Determines <strong>the</strong> noise level which is input to <strong>the</strong> Vocoder.<br />
This can be used to emphasize sibilant and plosive<br />
sounds, and make <strong>the</strong> speech-like characteristics more<br />
pronounced.<br />
Settings: 0 – 127<br />
# Output Level<br />
Determines <strong>the</strong> output level of <strong>the</strong> Vocoder.<br />
Settings: 0 – 127<br />
$ Dry/Wet Balance<br />
Determines <strong>the</strong> balance between <strong>the</strong> dry sound to which<br />
<strong>the</strong> effect is not applied and <strong>the</strong> wet sound to which <strong>the</strong><br />
effect is applied. The higher <strong>the</strong> W setting, <strong>the</strong> deeper <strong>the</strong><br />
effect.<br />
Settings: D63>W – D=W – D
Vocoder structure<br />
The human voice consists of sounds generated from <strong>the</strong><br />
vocal cords, and filtered by <strong>the</strong> throat, nose and mouth.<br />
These resonant sections have specific frequency<br />
characteristics and <strong>the</strong>y function effectively as a filter,<br />
creating many formants (harmonic content). The Vocoder<br />
effect extracts <strong>the</strong> filter characteristics of <strong>the</strong> voice from <strong>the</strong><br />
microphone input and recreates <strong>the</strong> vocal formants by <strong>the</strong><br />
use of multiple band pass filters. The machine-like ‘robot’<br />
voice is created by passing <strong>the</strong> pitched sounds of musical<br />
instruments (such as a syn<strong>the</strong>sizer sound) through <strong>the</strong><br />
filters.<br />
Mic Input<br />
Keyboard<br />
performance<br />
Extracting <strong>the</strong><br />
characteristic of <strong>the</strong><br />
input voice<br />
Creating <strong>the</strong><br />
Formant<br />
Vocoder<br />
Using <strong>the</strong> Vocoder effect<br />
After connecting a microphone to <strong>the</strong> A/D INPUT connector<br />
on <strong>the</strong> rear panel, follow <strong>the</strong> instructions below to use <strong>the</strong><br />
Vocoder effect.<br />
1 Set <strong>the</strong> Vocoder related parameters.<br />
Robot Voice<br />
In <strong>the</strong> Voice Play mode, press <strong>the</strong> [UTILITY] button to<br />
enter <strong>the</strong> Utility mode, press <strong>the</strong> [F4] button, <strong>the</strong>n press<br />
<strong>the</strong> [SF1] button to call up <strong>the</strong> Output display<br />
(page 265). Set <strong>the</strong> Output Select (4) to “ins L.”<br />
n When using <strong>the</strong> Vocoder in <strong>the</strong> Performance mode, set <strong>the</strong><br />
Output Select parameter to “ins L” in <strong>the</strong> Output display<br />
(page 266) of <strong>the</strong> Performance Edit mode. When using <strong>the</strong><br />
Vocoder in <strong>the</strong> Song/Pattern mode, set <strong>the</strong> Output Select<br />
parameter to “ins L” in <strong>the</strong> Audio In display (page 234) of<br />
<strong>the</strong> Mixing Edit mode.<br />
2 Set <strong>the</strong> Input Gain of <strong>the</strong> A/D INPUT connector<br />
to microphone.<br />
In <strong>the</strong> Utility mode, press <strong>the</strong> [F2] button to call up <strong>the</strong><br />
Input/Output display (page 263), <strong>the</strong>n set <strong>the</strong> Mic/Line<br />
parameter to “mic.”<br />
3 In <strong>the</strong> Voice Play mode, select <strong>the</strong> desired<br />
Voice to which <strong>the</strong> Vocoder is applied.<br />
Editing a Normal Voice<br />
4 Select <strong>the</strong> Vocoder as <strong>the</strong> Insertion Effect<br />
connection.<br />
In <strong>the</strong> Voice Play mode, press <strong>the</strong> [EDIT] button <strong>the</strong>n<br />
[COMMON EDIT] button to enter <strong>the</strong> Voice Common<br />
Edit. Press <strong>the</strong> [SF1] button to call up <strong>the</strong> Connect<br />
display (page 107), set <strong>the</strong> INSERTION CONNECT<br />
parameter to “ins L,” <strong>the</strong>n set <strong>the</strong> Insertion L parameter<br />
to “Vocoder.”<br />
n When <strong>the</strong> INSERTION CONNECT (2) is set to “ins L,” <strong>the</strong><br />
audio signal will be output from this instrument in mono.<br />
5 Set <strong>the</strong> Vocoder related parameters if<br />
necessary.<br />
Input your voice to <strong>the</strong> microphone while pressing <strong>the</strong><br />
note(s) to generate <strong>the</strong> machine-like Vocoder sound.<br />
Press <strong>the</strong> [SF2] button to call up <strong>the</strong> Insertion L display,<br />
<strong>the</strong>n set <strong>the</strong> related parameters while listening to <strong>the</strong><br />
Vocoder sound.<br />
6 Press <strong>the</strong> [STORE] button to call up <strong>the</strong> Store<br />
window (page 97) <strong>the</strong>n store <strong>the</strong> edited Voice.<br />
Voice mode<br />
Performance<br />
mode<br />
Sampling<br />
mode 1<br />
Song mode<br />
Pattern mode<br />
Mixing mode<br />
Sampling<br />
mode 2<br />
Master mode<br />
Utility mode<br />
File mode<br />
MOTIF <strong>XS</strong> Owner’s <strong>Manual</strong> 111<br />
Reference
Reference<br />
112<br />
Editing a Normal Voice<br />
Voice mode Performance Sampling Song mode Pattern mode Mixing mode Sampling Master mode Utility mode File mode<br />
mode mode 1<br />
mode 2<br />
Element Edit parameters<br />
[VOICE] ➞ Normal Voice selection ➞ [EDIT] ➞ [1] – [8]<br />
If you wish to edit <strong>the</strong> sounds that make up a Voice and <strong>the</strong> basic parameters that determine <strong>the</strong> sound, such as Oscillator,<br />
Pitch, Filter, Amplitude, and EG (Envelope Generator), call up <strong>the</strong> Element Edit display.<br />
About <strong>the</strong> asterisk (*) marks<br />
For users who are new to Voice editing and may be confused by <strong>the</strong> large amount of parameters, <strong>the</strong> most basic and easy-to-understand<br />
parameters are conveniently marked with asterisks in this section. If you are just starting out with Voice editing, try <strong>the</strong>se parameters first.<br />
Selected Element display/<br />
Four-Element display<br />
In <strong>the</strong> Element Edit mode, you can use two types of display.<br />
One type of display lets you edit parameters for <strong>the</strong><br />
currently selected Element and <strong>the</strong> o<strong>the</strong>r type of display<br />
lets you view parameters for four Elements. You can switch<br />
between <strong>the</strong>se two types by pressing <strong>the</strong> [SF5] button.<br />
When <strong>the</strong> display for four Elements is shown, you can<br />
switch between <strong>the</strong> displays for Elements 1 – 4 and 5 – 8<br />
by using <strong>the</strong> left and right cursor buttons.<br />
The display indicating <strong>the</strong> settings of<br />
<strong>the</strong> current Element<br />
The display indicating <strong>the</strong> settings of<br />
four Elements<br />
MOTIF <strong>XS</strong> Owner’s <strong>Manual</strong><br />
SF5<br />
This icon indicates that you can call up<br />
<strong>the</strong> display for ano<strong>the</strong>r four Elements.<br />
5<br />
Setting <strong>the</strong> Waveform and Note range<br />
of <strong>the</strong> Element—[F1] Oscillator<br />
1<br />
2<br />
4<br />
5<br />
6<br />
7<br />
8<br />
9<br />
n Depending on <strong>the</strong> selected parameter, <strong>the</strong> LIST icon is shown<br />
at <strong>the</strong> tab menu corresponding to <strong>the</strong> [SF6] button. In this<br />
condition, you can call up <strong>the</strong> list by pressing <strong>the</strong> [SF6] LIST<br />
button, <strong>the</strong>n select <strong>the</strong> desired item from <strong>the</strong> list. For details,<br />
see page 82.<br />
1 Element Switch*<br />
Determines whe<strong>the</strong>r <strong>the</strong> currently selected Element is on or<br />
off. When this is set to off, <strong>the</strong> currently edited Element will<br />
not sound.<br />
Settings: off (inactive), on (active)<br />
2 XA Control (Expanded Articulation Control)<br />
3<br />
)<br />
!<br />
@<br />
#<br />
Expanded Articulation (XA) is a special feature of <strong>the</strong><br />
MOTIF <strong>XS</strong> that provides greater performance flexibility and<br />
realism (see box on next page). This parameter determines<br />
how <strong>the</strong> XA feature of <strong>the</strong> Element works. Try setting this<br />
parameter referring to <strong>the</strong> four types of <strong>the</strong> XA Mode<br />
described below. You can realize <strong>the</strong> desired sound<br />
depending on your performance articulation by assigning<br />
<strong>the</strong> same Element Group to <strong>the</strong> Elements having <strong>the</strong> same<br />
type of <strong>the</strong> XA mode.<br />
Settings: normal, legato, key off sound, wave cycle, wave random, all<br />
AF off, AF 1 on, AF 2 on<br />
normal<br />
When this is selected, <strong>the</strong> Element will sound normally each time you<br />
press <strong>the</strong> note.<br />
legato<br />
When this is selected and <strong>the</strong> Mono mode is selected, an alternate<br />
Element (different from <strong>the</strong> one used when XA mode is set to “normal”)<br />
will be played when you play <strong>the</strong> keyboard in legato fashion (playing<br />
<strong>the</strong> next note of a single-note line or melody before releasing <strong>the</strong><br />
previous note).
key off sound<br />
When this is selected, <strong>the</strong> Element will sound each time you release <strong>the</strong><br />
note.<br />
wave cycle<br />
When this is selected for multiple Elements, each Element sounds<br />
alternately according to its numerical order each time you play a note.<br />
(In o<strong>the</strong>r words, playing <strong>the</strong> first note will sound Element 1, <strong>the</strong> second<br />
note Element 2, and so on.)<br />
wave random<br />
When this is selected for multiple Elements, each Element will sound<br />
randomly each time you press <strong>the</strong> note.<br />
all AF off<br />
When this is selected, <strong>the</strong> Element will sound when both of <strong>the</strong><br />
ASSIGNABLE FUNCTION buttons are turned off.<br />
AF 1 on<br />
When this is selected, <strong>the</strong> Element will sound when <strong>the</strong> ASSIGNABLE<br />
FUNCTION [1] button is turned on.<br />
AF 2 on<br />
When this is selected, <strong>the</strong> Element will sound when <strong>the</strong> ASSIGNABLE<br />
FUNCTION [2] button is turned on.<br />
Expanded Articulation (XA) features<br />
Expanded Articulation (XA) is a newly designed,<br />
sophisticated tone generation system that allows you to more<br />
effectively recreate realistic sound and natural performance<br />
techniques—such as legato and staccato—often used on<br />
acoustic instruments but up to now unavailable or difficult to<br />
realize on electronic keyboards. It also provides o<strong>the</strong>r unique<br />
modes for random and alternate sound changes as you play.<br />
Realistic legato performance<br />
Specify an Element or Elements to be sounded when playing<br />
legato.<br />
→ Set <strong>the</strong> XA control parameter for <strong>the</strong> desired Elements to<br />
"legato."<br />
Au<strong>the</strong>ntic note release sound<br />
Specify an Element or Elements to be sounded upon<br />
releasing a note. For example, this could be used to recreate<br />
<strong>the</strong> characteristic pluck sound on a harpsichord when a note<br />
is released.<br />
→ Set <strong>the</strong> XA control parameter for <strong>the</strong> desired Elements to<br />
"key off sound."<br />
Different sounds for each note played<br />
Specify different Elements to be sounded in order or<br />
randomly.<br />
→ Set <strong>the</strong> XA control parameter for <strong>the</strong> desired Elements to<br />
"wave cycle" or "wave random."<br />
Switching among different sounds to recreate <strong>the</strong><br />
natural performance on an acoustic instrument<br />
Specify which Elements will be sounded according to <strong>the</strong> on/<br />
off status of <strong>the</strong> ASSIGNABLE FUNCTION buttons. For<br />
example, this could be used on an acoustic guitar Voice to<br />
switch between playing normally and playing high<br />
harmonics.<br />
→ Set <strong>the</strong> XA control parameter for <strong>the</strong> desired Elements to<br />
"all AF off," "AF 1 on," or "AF 2 on."<br />
New sounds and new styles of playing<br />
The highly versatile functions above can be applied<br />
effectively not only to acoustic sounds but also to syn<strong>the</strong>sizer<br />
and electronic Voices as well. The XA feature opens up<br />
enormous potential for realizing au<strong>the</strong>ntic sounds,<br />
performing expressively and <strong>com</strong>ing up with creative new<br />
styles of playing.<br />
3 Element Group<br />
Editing a Normal Voice<br />
Determines <strong>the</strong> group of <strong>the</strong> XA mode so that <strong>the</strong> Elements<br />
of <strong>the</strong> same group are called up in order or randomly.<br />
Assign <strong>the</strong> same group number to <strong>the</strong> Elements having <strong>the</strong><br />
same type of XA mode.<br />
The setting here is not available when <strong>the</strong> XA mode<br />
parameters of all Elements are set to “normal.”<br />
Settings: 1 – 8<br />
4 Wave Bank (Waveform Bank)*<br />
Determines <strong>the</strong> Waveform Bank assigned to <strong>the</strong> Element,<br />
Preset or User. User Waveforms can be created based on<br />
<strong>the</strong> samples recorded in <strong>the</strong> Sampling mode.<br />
Settings: PRE (preset waveform), USR (user waveform)<br />
n For details about Waveform, refer to <strong>the</strong> explanation of <strong>the</strong><br />
Sampling mode on page 161.<br />
5 Wave Category*<br />
6 Wave Number*<br />
Determines <strong>the</strong> Waveform assigned to <strong>the</strong> Element by<br />
selecting <strong>the</strong> Waveform Category and Number. For a<br />
<strong>com</strong>plete list of Waveforms in <strong>the</strong> Preset Bank, refer to <strong>the</strong><br />
Waveform List in <strong>the</strong> separate Data List booklet.<br />
7 Key On Delay<br />
Determines <strong>the</strong> time (delay) between <strong>the</strong> moment you<br />
press a note on <strong>the</strong> keyboard and <strong>the</strong> point at which <strong>the</strong><br />
sound is actually played. The higher <strong>the</strong> value, <strong>the</strong> longer<br />
<strong>the</strong> delay time.<br />
Settings: 0 – 127<br />
8 Delay Tempo Sync<br />
Determines whe<strong>the</strong>r or not <strong>the</strong> Key On Delay above is<br />
synchronized to <strong>the</strong> tempo of <strong>the</strong> Arpeggio or sequencer<br />
(Song or Pattern).<br />
Settings: off (not synchronized), on (synchronized)<br />
9 Delay Tempo<br />
Determines <strong>the</strong> timing of <strong>the</strong> Key On Delay when <strong>the</strong> Delay<br />
Tempo Sync is set to on.<br />
Settings: 16th, 8th/3 (eighth-note triplets), 16th. (dotted sixteenth<br />
note), 8th (eighth note), 4th/3 (quarter-note triplets), 8th.<br />
(dotted 8th note), 4th (quarter notes), 2nd/3 (half-note<br />
triplets), 4th. (dotted quarter notes), 2nd (half notes), whole/<br />
3 (whole-note triplets), 2nd. (dotted half note), 4thx4<br />
(quarter-note quadruplets; four quarter notes to <strong>the</strong> beat),<br />
4thx5 (quarter-note quintuplets; five quarter notes to <strong>the</strong><br />
beat), 4thx6 (quarter-note sextuplets; six quarter notes to <strong>the</strong><br />
beat), 4thx7 (quarter-note septuplets; seven quarter notes to<br />
<strong>the</strong> beat), 4thx8 (quarter-note octuplets; eight quarter notes<br />
to <strong>the</strong> beat)<br />
Voice mode<br />
Performance<br />
mode<br />
Sampling<br />
mode 1<br />
Song mode<br />
Pattern mode<br />
Mixing mode<br />
Sampling<br />
mode 2<br />
Master mode<br />
Utility mode<br />
File mode<br />
MOTIF <strong>XS</strong> Owner’s <strong>Manual</strong> 113<br />
Reference
Reference<br />
114<br />
Editing a Normal Voice<br />
Voice mode Performance Sampling Song mode Pattern mode Mixing mode Sampling Master mode Utility mode File mode<br />
mode mode 1<br />
mode 2<br />
) Vel Cross Fade (Velocity Cross Fade)<br />
This determines how gradually <strong>the</strong> sound of an Element<br />
decreases in volume in proportion to <strong>the</strong> distance of<br />
velocity changes outside <strong>the</strong> Velocity Limit setting ()). A<br />
setting of 0 produces no sound outside <strong>the</strong> Velocity Limit.<br />
The higher <strong>the</strong> value, <strong>the</strong> more gradual <strong>the</strong> level<br />
decreases. The practical application of this parameter is to<br />
create natural-sounding velocity cross fades, in which<br />
different Elements (Waveforms) change gradually<br />
depending on how strongly or softly you play.<br />
Settings: 0 – 127<br />
! Velocity Limit<br />
Determines <strong>the</strong> minimum and maximum values of <strong>the</strong><br />
velocity range within which each Element will respond.<br />
Each Element will only sound for notes played within its<br />
specified velocity range. For example, this lets you have<br />
one Element sound when you play softly and have a<br />
different one sound when you play strongly. If you specify<br />
<strong>the</strong> maximum value first and <strong>the</strong> minimum value second,<br />
for example “93 to 34,” <strong>the</strong>n <strong>the</strong> velocity range covered will<br />
be “1 to 34” and “93 to 127.”<br />
Settings: 1 – 127<br />
@ Note Limit<br />
Determines <strong>the</strong> lowest and highest notes of <strong>the</strong> keyboard<br />
range for each Element. The selected Element will sound<br />
only when you play notes within this range. If you specify<br />
<strong>the</strong> highest note first and <strong>the</strong> lowest note second, for<br />
example “C5 to C4,” <strong>the</strong>n <strong>the</strong> note range covered will be “C<br />
-2 to C4” and “C5 to G8.”<br />
Settings: C -2 – G8<br />
n You can also set <strong>the</strong> Key directly from <strong>the</strong> keyboard, by<br />
holding down <strong>the</strong> [SF6] INFO button and pressing <strong>the</strong> desired<br />
key. For details, see page 82.<br />
# Ins Effect Output (Insertion Effect Output)<br />
Determines which Insertion Effect (A or B) is used to<br />
process each individual element. The “thru” setting lets you<br />
bypass <strong>the</strong> Insertion Effects for <strong>the</strong> specific key. This<br />
parameter is <strong>the</strong> same as Element Out 1 – 8 on <strong>the</strong><br />
Connect display (page 107) in Voice Common Edit. Making<br />
a setting here automatically changes <strong>the</strong> setting of that<br />
parameter as well. When INSERTION CONNECT (2) is set<br />
to “Ins L,” <strong>the</strong> signal from each Element is output to <strong>the</strong><br />
Insertion L regardless of <strong>the</strong> setting here.<br />
Settings: thru (through), ins A (Insertion A), ins B (Insertion B)<br />
MOTIF <strong>XS</strong> Owner’s <strong>Manual</strong><br />
Pitch Settings—[F2] Pitch<br />
Tuning and Pitch Scaling—[SF1] Tune<br />
1<br />
2<br />
3<br />
4<br />
5<br />
1 Coarse (Coarse Tuning)<br />
Determines <strong>the</strong> pitch of each Element in semitones.<br />
Settings: -48 semi – +0 semi – +48 semi<br />
2 Fine (Fine Tuning)<br />
Determines <strong>the</strong> pitch of each Element in cents.<br />
Settings: -64 cents – +0 cents – +63 cents<br />
3 Pitch Velocity Sens (Pitch Velocity Sensitivity)<br />
Determines how <strong>the</strong> pitch of <strong>the</strong> Element responds to<br />
velocity. Positive settings will cause <strong>the</strong> pitch to rise <strong>the</strong><br />
harder you play <strong>the</strong> keyboard and negative settings will<br />
cause it to fall. A setting of 0 results in no change in pitch.<br />
Settings: -64 – +0 – +63<br />
4 Fine Scaling Sens (Fine Scaling Sensitivity)<br />
Determines <strong>the</strong> degree to which <strong>the</strong> notes (specifically,<br />
<strong>the</strong>ir position or octave range) affect <strong>the</strong> pitch in fine tuning<br />
(set above) of <strong>the</strong> selected Element, assuming C3 as <strong>the</strong><br />
basic pitch. A positive setting will cause <strong>the</strong> pitch of lower<br />
notes to change lower and that of higher notes to change<br />
higher. Negative values will have <strong>the</strong> opposite effect.<br />
Settings: -64 – +0 – +63<br />
5 Random<br />
6<br />
7<br />
This lets you randomly vary <strong>the</strong> pitch of <strong>the</strong> Element for<br />
each note you play. The higher <strong>the</strong> value, <strong>the</strong> greater <strong>the</strong><br />
pitch variation. A value of “0” results in no pitch change.<br />
Settings: 0 – 127
6 Pitch Key Follow<br />
Determines <strong>the</strong> sensitivity of <strong>the</strong> Key Follow effect (<strong>the</strong><br />
pitch interval of adjacent notes), assuming <strong>the</strong> pitch of <strong>the</strong><br />
Center Key (7) as standard. At +100% (<strong>the</strong> normal<br />
setting), adjacent notes are pitched one semitone (100<br />
cents) apart. At 0%, all notes are <strong>the</strong> same pitch specified<br />
as <strong>the</strong> Center Key. For negative values, <strong>the</strong> settings are<br />
reversed.<br />
Settings: -200% – +0% – +200%<br />
n This parameter is useful for creating alternate tunings, or for<br />
use with sounds that do not need to be spaced in semitones,<br />
such as pitched drum sounds in a Normal Voice.<br />
7 Center Key<br />
Determines <strong>the</strong> central note or pitch for <strong>the</strong> Pitch Key<br />
Follow. The note number set here is <strong>the</strong> same pitch as<br />
normal regardless of <strong>the</strong> Pitch Key Follow setting.<br />
Settings: C -2 – G8<br />
n You can also set <strong>the</strong> note directly from <strong>the</strong> Keyboard, by<br />
holding down <strong>the</strong> [SF6] button and pressing <strong>the</strong> desired key.<br />
See “Basic Operation” on page 82.<br />
Pitch Key Follow and Center Key<br />
Pitch EG Settings—[SF2] PEG (Pitch EG)<br />
From this display you can set <strong>the</strong> Pitch EG parameters.<br />
Using <strong>the</strong> PEG, you can control <strong>the</strong> transition in pitch from<br />
<strong>the</strong> moment <strong>the</strong> sound starts to <strong>the</strong> moment it stops.<br />
!<br />
@<br />
#<br />
1~5<br />
6~)<br />
When Pitch Key Follow is set to 100<br />
Large<br />
Lower range<br />
Amount of<br />
pitch change<br />
+<br />
–<br />
Small<br />
Center Key Higher range<br />
$<br />
%<br />
^<br />
&<br />
Pitch<br />
0<br />
6<br />
Hold Level<br />
1<br />
Hold<br />
Time<br />
Editing a Normal Voice<br />
Time<br />
The Time parameters let you set <strong>the</strong> time between <strong>the</strong><br />
adjoining points of <strong>the</strong> level parameters below. A higher<br />
value results in a longer time until reaching <strong>the</strong> next level.<br />
Settings: 0 – 127<br />
7<br />
Attack Level<br />
2<br />
Attack<br />
Time<br />
1 Hold Time<br />
Determines <strong>the</strong> time between <strong>the</strong> moment you press a note<br />
on <strong>the</strong> keyboard and <strong>the</strong> moment <strong>the</strong> envelope starts to<br />
rise.<br />
2 Attack Time<br />
Determines <strong>the</strong> speed of attack from <strong>the</strong> initial pitch (Hold<br />
Level) to <strong>the</strong> normal pitch of <strong>the</strong> Voice after <strong>the</strong> hold time<br />
has elapsed.<br />
3 Decay 1 Time<br />
Determines how fast <strong>the</strong> envelope falls from <strong>the</strong> normal<br />
pitch (Attack Level) of <strong>the</strong> Voice to <strong>the</strong> pitch specified as<br />
<strong>the</strong> Decay 1 Level.<br />
4 Decay 2 Time<br />
Determines how fast <strong>the</strong> envelope falls from <strong>the</strong> pitch<br />
specified as <strong>the</strong> Decay1 Level to <strong>the</strong> pitch specified as <strong>the</strong><br />
Decay2 Level.<br />
5 Release Time<br />
Determines how fast <strong>the</strong> envelope falls from <strong>the</strong> pitch<br />
specified as <strong>the</strong> Decay2 Level to <strong>the</strong> pitch specified as <strong>the</strong><br />
Release Level when <strong>the</strong> note is released.<br />
Level<br />
The Level parameters let you set <strong>the</strong> amount of <strong>the</strong> pitch<br />
deviation based on <strong>the</strong> standard pitch specified at <strong>the</strong><br />
Coarse Tuning and Fine Tuning in <strong>the</strong> Tune display<br />
(page 114) at each envelope point.<br />
Settings: -128 – +0 – +127<br />
6 Hold Level<br />
3<br />
Decay1<br />
Time<br />
8<br />
Decay1<br />
Level<br />
4<br />
Decay2<br />
Time<br />
9<br />
Decay2<br />
Level<br />
5<br />
Release<br />
Time<br />
)<br />
Release<br />
Level<br />
Pressing <strong>the</strong> key (Key on) Releasing <strong>the</strong> key (Key off)<br />
Determines <strong>the</strong> initial pitch at <strong>the</strong> moment <strong>the</strong> note is<br />
pressed.<br />
Time<br />
Voice mode<br />
Performance<br />
mode<br />
Sampling<br />
mode 1<br />
Song mode<br />
Pattern mode<br />
Mixing mode<br />
Sampling<br />
mode 2<br />
Master mode<br />
Utility mode<br />
File mode<br />
MOTIF <strong>XS</strong> Owner’s <strong>Manual</strong> 115<br />
Reference
Reference<br />
116<br />
Editing a Normal Voice<br />
Voice mode Performance Sampling Song mode Pattern mode Mixing mode Sampling Master mode Utility mode File mode<br />
mode mode 1<br />
mode 2<br />
7 Attack Level<br />
Determines <strong>the</strong> normal pitch of <strong>the</strong> pressed note.<br />
8 Decay 1 Level<br />
Determines <strong>the</strong> level which <strong>the</strong> pitch of sound reaches from<br />
<strong>the</strong> Attack Level after <strong>the</strong> Decay1 time elapses.<br />
9 Decay 2 Level<br />
Determines <strong>the</strong> sustain-level pitch which will be maintained<br />
while a note is held.<br />
) Release Level<br />
Determines <strong>the</strong> final pitch reached after <strong>the</strong> note is<br />
released.<br />
! EG Depth<br />
Determines <strong>the</strong> range over which <strong>the</strong> pitch envelope<br />
changes. A setting of 0 will cause <strong>the</strong> pitch not to change.<br />
The far<strong>the</strong>r from 0 <strong>the</strong> value is, <strong>the</strong> larger <strong>the</strong> pitch range.<br />
For negative values, <strong>the</strong> pitch change is reversed.<br />
Settings: -64 – +0 – +63<br />
@ EG Depth Vel Sens<br />
(EG Depth Velocity Sensitivity)<br />
Determines how <strong>the</strong> pitch range of <strong>the</strong> Element responds<br />
to velocity. When this is set to a positive value, high<br />
velocities cause <strong>the</strong> pitch range to expand and low<br />
velocities cause it to contract, as shown below. When this<br />
is set to a negative value, high velocities cause <strong>the</strong> pitch<br />
range to contract and low velocities cause it to expand.<br />
When this is set to 0, <strong>the</strong> pitch envelope does not change<br />
no matter what <strong>the</strong> velocity.<br />
Settings: -64 – +0 – +63<br />
High Velocity<br />
Large range<br />
# EG Depth Vel Curve (EG Depth Velocity Curve)<br />
The five curves determine how <strong>the</strong> pitch range will be<br />
generated according to <strong>the</strong> velocity (strength) with which<br />
you play notes on <strong>the</strong> keyboard. The horizontal axis of <strong>the</strong><br />
graph is <strong>the</strong> velocity, and <strong>the</strong> vertical axis is <strong>the</strong> pitch<br />
range.<br />
Pitch Change<br />
Settings: Curve 0 – 4<br />
High<br />
Low<br />
Low<br />
MOTIF <strong>XS</strong> Owner’s <strong>Manual</strong><br />
Velocity<br />
High<br />
Low Velocity<br />
Small range<br />
$ EG Time Velocity Sens<br />
(EG Time Velocity Sensitivity)<br />
Determines how <strong>the</strong> PEG transition time (speed) responds<br />
to velocity, or <strong>the</strong> strength with which <strong>the</strong> note is pressed.<br />
When this is set to a positive value, high velocities result in<br />
a fast PEG transition speed while low velocities result in a<br />
slow speed, as shown below. When this is set to a negative<br />
value, high velocities result in a slow PEG transition speed<br />
while low velocities result in a fast speed. When this is set<br />
to 0, <strong>the</strong> PEG transition speed does not change no matter<br />
what <strong>the</strong> velocity.<br />
Settings: -64 – +0 – +63<br />
High Velocity<br />
Fast pitch transition<br />
% EG Time Segment<br />
Determines <strong>the</strong> part of <strong>the</strong> Pitch EG which <strong>the</strong> EG Time<br />
Velocity Sensitivity ($) affects.<br />
Settings: attack, atk+dcy, decay, atk+rls, all<br />
attack<br />
The EG Time Velocity Sensitivity affects <strong>the</strong> Attack Time and Hold Time.<br />
atk+dcy (attack+decay)<br />
The EG Time Velocity Sensitivity affects <strong>the</strong> Attack Time, Decay1 Time,<br />
and Hold Time.<br />
decay<br />
The EG Time Velocity Sensitivity affects <strong>the</strong> Decay 1/2 Time.<br />
atk+rls (attack+release)<br />
The EG Time Velocity Sensitivity affects <strong>the</strong> Attack Time, Release Time,<br />
and Hold Time.<br />
all<br />
This EG Time Velocity Sensitivity affects all <strong>the</strong> Pitch EG Time<br />
parameters.<br />
^ EG Time Key Follow<br />
Low Velocity<br />
Slow pitch transition<br />
Determines <strong>the</strong> degree to which <strong>the</strong> notes (specifically,<br />
<strong>the</strong>ir position or octave range) affect <strong>the</strong> pitch EG times of<br />
<strong>the</strong> selected Element. When this is set to a positive value,<br />
high notes result in a high pitch EG transition speed while<br />
low notes result in a slow speed. When this is set to a<br />
negative value, high notes result in a slow pitch EG<br />
transition speed while low notes result in a high speed.<br />
When this is set to 0, <strong>the</strong> pitch EG transition speed does<br />
not change no matter what <strong>the</strong> pressed note.<br />
Settings: -64 – +0 – +63
& Center Key<br />
Determines <strong>the</strong> central note or pitch for <strong>the</strong> EG Time Key<br />
Follow (^). When <strong>the</strong> Center Key note is played, <strong>the</strong> PEG<br />
behaves according to its actual settings.<br />
Settings: C -2 – G8<br />
EG Time Key Follow and Center Key<br />
Positive value<br />
Negative value<br />
n You can also set <strong>the</strong> note directly from <strong>the</strong> Keyboard, by<br />
holding down <strong>the</strong> [SF6] button and pressing <strong>the</strong> desired key.<br />
See “Basic Operation” on page 82.<br />
Adjust <strong>the</strong> brightness using <strong>the</strong><br />
Filter—[F3] Filter<br />
Selecting a Filter Type—[SF1] Type<br />
From this display you can select a Filter Type for <strong>the</strong><br />
current Element. The tonal characteristics of <strong>the</strong> Voice and<br />
Filter functions differ depending on which Filter type is<br />
selected here.<br />
1<br />
2<br />
3<br />
4<br />
5<br />
6<br />
1 Type*<br />
Lower range<br />
Faster<br />
speed<br />
Slower speed<br />
Center key<br />
+63<br />
+30<br />
Determines <strong>the</strong> Filter Type for <strong>the</strong> current Element.<br />
Settings: LPF24D, LPF24A, LPF18, LPF18s, LPF12, LPF6, HPF24D,<br />
HPF12, BPF12D, BPFw, BPF6, BEF12, BEF6, Dual LPF, Dual<br />
HPF, Dual BPF, Dual BEF, LPF12+BPF6, thru<br />
-40<br />
Higher range<br />
7<br />
8<br />
9<br />
)<br />
!<br />
@<br />
About Filter Types<br />
Editing a Normal Voice<br />
LPF (Low Pass Filter)<br />
This is a Filter type that only passes signals below <strong>the</strong> Cutoff<br />
Frequency. The sound can be brightened by raising <strong>the</strong> cutoff<br />
frequency of <strong>the</strong> filter. On <strong>the</strong> o<strong>the</strong>r hand, <strong>the</strong> sound can be<br />
darkened by lowering <strong>the</strong> cutoff frequency of <strong>the</strong> filter. You can<br />
produce a distinctive “peaky” sound by raising <strong>the</strong> Resonance<br />
to boost <strong>the</strong> signal level in <strong>the</strong> area of <strong>the</strong> Cutoff Frequency.<br />
This filter type is most popular and useful for producing classic<br />
syn<strong>the</strong>sizer sounds.<br />
LPF24D<br />
A dynamic 24 dB/oct low-pass filter with a characteristic digital sound.<br />
Compared to <strong>the</strong> LPF24A type (below), this filter can produce a more<br />
pronounced resonance effect.<br />
Level<br />
LPF24A<br />
A digital dynamic low-pass filter with characteristics similar to a 4-pole<br />
analog syn<strong>the</strong>sizer filter.<br />
LPF18<br />
3-pole 18 dB/oct low-pass filter.<br />
LPF18s<br />
3-pole 18 dB/oct low-pass filter. This filter has a smoo<strong>the</strong>r cutoff slope<br />
than <strong>the</strong> LPF18 type.<br />
HPF (High Pass Filter)<br />
This is a Filter type that only passes signals above <strong>the</strong> Cutoff<br />
Frequency. You can <strong>the</strong>n use <strong>the</strong> Resonance to add fur<strong>the</strong>r<br />
character to <strong>the</strong> sound.<br />
HPF24D<br />
A dynamic 24 dB/oct high-pass filter with a characteristic digital sound.<br />
This filter can produce a pronounced resonance effect.<br />
Level<br />
HPF12<br />
12 dB/oct dynamic high-pass filter.<br />
BPF (Band Pass Filter)<br />
This Filter type is a <strong>com</strong>bination of a LPF and HPF. When this<br />
Filter Type is selected, you can set <strong>the</strong> Cutoff Frequency<br />
around which <strong>the</strong> audio signal is passed.<br />
BPF12D<br />
The <strong>com</strong>bination of a -12 dB/oct HPF and LPF with a characteristic<br />
digital sound.<br />
Level<br />
These frequencies are<br />
“passed” by <strong>the</strong> filter.<br />
Cutoff range<br />
Resonance (4)<br />
Cutoff Frequency (2)<br />
Cutoff Frequency (2)<br />
Cutoff range<br />
Resonance (4)<br />
These frequencies are<br />
“passed” by <strong>the</strong> filter.<br />
Frequency<br />
Frequency<br />
Cutoff range Cutoff range<br />
Resonance (4)<br />
Range passed<br />
Frequency<br />
Voice mode<br />
Performance<br />
mode<br />
Sampling<br />
mode 1<br />
Song mode<br />
Pattern mode<br />
Mixing mode<br />
Sampling<br />
mode 2<br />
Master mode<br />
Utility mode<br />
File mode<br />
MOTIF <strong>XS</strong> Owner’s <strong>Manual</strong> 117<br />
Reference
Reference<br />
118<br />
Editing a Normal Voice<br />
Voice mode Performance Sampling Song mode Pattern mode Mixing mode Sampling Master mode Utility mode File mode<br />
mode mode 1<br />
mode 2<br />
BPF6<br />
The <strong>com</strong>bination of a -6 dB/oct HPF and LPF.<br />
Level<br />
BPFw<br />
A 12 dB/oct BPF that <strong>com</strong>bines HPF and LPF filters to allow wider<br />
bandwidth settings.<br />
Level<br />
Cutoff range Cutoff range<br />
Resonance (4)<br />
BEF (Band Elimination Filter)<br />
When this Filter Type is selected, you can set <strong>the</strong> Cutoff<br />
Frequency around which <strong>the</strong> audio signal is muted or<br />
eliminated. The Band Elimination Filter has an opposite<br />
effect on <strong>the</strong> sound <strong>com</strong>pared to <strong>the</strong> Band Pass Filter.<br />
BEF12<br />
BEF6<br />
Dual Type Filter<br />
This type is a <strong>com</strong>bination of two same filter types. You can<br />
edit <strong>the</strong> distance between <strong>the</strong> two Cutoff Frequencies.<br />
Dual LPF<br />
Two 12 dB/oct low-pass filters connected in parallel.<br />
Dual HPF<br />
Two -12 dB/oct high-pass filters connected in parallel.<br />
Dual BPF<br />
Two -6 dB/oct band-pass filters connected in parallel.<br />
MOTIF <strong>XS</strong> Owner’s <strong>Manual</strong><br />
Range passed<br />
Frequency<br />
Cutoff range Width (4)<br />
Cutoff range<br />
Range passed<br />
Level<br />
Level<br />
Cutoff<br />
Frequency<br />
Cutoff<br />
Frequency<br />
Range passed Cutoff range<br />
Range passed<br />
Cutoff Frequency<br />
Distance (9)<br />
Cutoff<br />
Frequency<br />
Frequency<br />
Range passed<br />
Frequency<br />
Frequency<br />
Cutoff Frequency (2) Cutoff Frequency<br />
Only <strong>the</strong> lower cutoff frequency is set<br />
directly on <strong>the</strong> display.<br />
Cutoff range<br />
Dual BEF<br />
Two -6 dB/oct band-elimination filters connected in parallel.<br />
Level<br />
Range passed<br />
Combination Type Filter<br />
This type is a <strong>com</strong>bination of two different filter types. You can<br />
edit <strong>the</strong> distance between <strong>the</strong> two Cutoff Frequencies.<br />
LPF12+HPF12<br />
A <strong>com</strong>bination of a -12 dB/oct low-pass filter and high-pass filter. When<br />
this Filter Type is selected, HPF Cutoff ()) and HPF Key Follow<br />
Sensitivity (!) can be set. Only <strong>the</strong> LPF graph is shown on <strong>the</strong> display.<br />
LPF6+HPF6<br />
A <strong>com</strong>bination of a -6 dB/oct low-pass filter and high-pass filter. When<br />
this Filter Type is selected, HPF Cutoff ()) and HPF Key Follow<br />
Sensitivity (!) can be set. Only <strong>the</strong> LPF graph is shown on <strong>the</strong> display.<br />
LPF12+BPF6<br />
A <strong>com</strong>bination of a low-pass filter and band-pass filter. You can edit <strong>the</strong><br />
distance between <strong>the</strong> two Cutoff Frequencies.<br />
Level<br />
Range passed<br />
2 Cutoff*<br />
Frequency<br />
Cutoff Frequency (2) Cutoff Frequency<br />
Determines <strong>the</strong> Cutoff Frequency for <strong>the</strong> Filter, or <strong>the</strong><br />
central frequency around which <strong>the</strong> Filter is applied. The<br />
tonal characteristics of <strong>the</strong> Voice and function of <strong>the</strong> Cutoff<br />
Frequency differ depending on which Filter type is<br />
selected. Set this parameter while confirming <strong>the</strong> Filter<br />
graph shown on <strong>the</strong> display.<br />
Settings: 0 – 255<br />
3 Cutoff Velocity Sens<br />
(Cutoff Velocity Sensitivity)<br />
Determines how <strong>the</strong> Cutoff Frequency (2) responds to<br />
velocity, or <strong>the</strong> strength with which you play notes. For<br />
positive settings, <strong>the</strong> more strongly you play <strong>the</strong> keyboard,<br />
<strong>the</strong> higher <strong>the</strong> cutoff frequency be<strong>com</strong>es. A setting of 0 will<br />
cause <strong>the</strong> Cutoff Frequency not to change no matter what<br />
velocity. Negative settings will cause <strong>the</strong> Cutoff Frequency<br />
to rise <strong>the</strong> more softly you play <strong>the</strong> keyboard.<br />
Settings: -200% – 0% – +200%<br />
Distance (9)<br />
Only <strong>the</strong> lower cutoff frequency is set<br />
directly on <strong>the</strong> display.<br />
Cutoff range<br />
Distance (9)<br />
Cutoff range<br />
Frequency<br />
Cutoff Frequency (2) Cutoff Frequency<br />
Only <strong>the</strong> lower cutoff frequency is set<br />
directly on <strong>the</strong> display.
4 Resonance*/ Width<br />
This parameter’s function varies according to <strong>the</strong> selected<br />
Filter Type. If <strong>the</strong> selected filter is an LPF, HPF, BPF<br />
(excluding <strong>the</strong> BPFw), or BEF, this parameter is used to set<br />
<strong>the</strong> Resonance. For <strong>the</strong> BPFw, it is used to adjust <strong>the</strong><br />
frequency bandwidth<br />
Resonance is used to set <strong>the</strong> amount of Resonance<br />
(harmonic emphasis) applied to <strong>the</strong> signal at <strong>the</strong> cutoff<br />
frequency. This can be used in <strong>com</strong>bination with <strong>the</strong> cutoff<br />
frequency parameter to add fur<strong>the</strong>r character to <strong>the</strong> sound.<br />
The Width parameter is used to adjust <strong>the</strong> width of <strong>the</strong> band<br />
of signal frequencies passed by <strong>the</strong> filter with <strong>the</strong> BPFw.<br />
When <strong>the</strong> Filter Type is set to “LPF6” or “thru,” this<br />
parameter is not available.<br />
Settings: 0 – 127<br />
5 Resonance Velocity Sens<br />
(Resonance Velocity Sensitivity)<br />
Determines <strong>the</strong> degree to which resonance responds to<br />
velocity, or <strong>the</strong> strength with which you play notes. For<br />
positive values, <strong>the</strong> higher <strong>the</strong> velocity, <strong>the</strong> greater <strong>the</strong><br />
resonance. A setting of 0 results in no change of <strong>the</strong><br />
Resonance value. For negative values, <strong>the</strong> lower <strong>the</strong><br />
velocity, <strong>the</strong> greater <strong>the</strong> resonance.<br />
Settings: -64 – +0 – +63<br />
6 Gain<br />
Determines <strong>the</strong> Gain of <strong>the</strong> signal sent to <strong>the</strong> filter. The<br />
lower <strong>the</strong> value, <strong>the</strong> lower <strong>the</strong> Gain. The tonal<br />
characteristics generated by <strong>the</strong> filter differ depending on<br />
<strong>the</strong> value set here.<br />
Settings: 0 – 255<br />
7 Cutoff Key Follow<br />
Determines <strong>the</strong> degree to which <strong>the</strong> notes (specifically,<br />
<strong>the</strong>ir position or octave range) affect <strong>the</strong> Cutoff Frequency<br />
(set above) of <strong>the</strong> selected Element, assuming C3 as <strong>the</strong><br />
basic pitch. A positive setting will lower <strong>the</strong> Cutoff<br />
frequency for lower notes and raise it for higher notes. A<br />
negative setting will have <strong>the</strong> opposite effect.<br />
Settings: -200% – 0% – +200%<br />
8 Center Key (Indication only)<br />
This indicates that <strong>the</strong> central note for Cutoff Key Follow<br />
(7) above is C3. Keep in mind that this is for display<br />
purposes only; <strong>the</strong> value cannot be changed.<br />
Cutoff Key Follow and Center Key<br />
When Cutoff Key Follow is set to 100<br />
Large<br />
Amount of cutoff<br />
frequency change<br />
Lower range<br />
+<br />
–<br />
Small<br />
Center Key = C3 Higher range<br />
9 Distance<br />
Editing a Normal Voice<br />
Determines <strong>the</strong> distance between <strong>the</strong> two Cutoff<br />
frequencies, for <strong>the</strong> Dual Filter types (which feature two<br />
identical filters <strong>com</strong>bined in parallel), and <strong>the</strong> LPF12 +<br />
BPF6 type. When any of o<strong>the</strong>r filter types is selected, this<br />
parameter is not available.<br />
Settings: -128 – +0 – +127<br />
) HPF Cutoff (High Pass Filter Cutoff Frequency)<br />
Determines <strong>the</strong> central frequency for <strong>the</strong> Key Follow<br />
parameter (below) of <strong>the</strong> HPF. When a filter type “LPF12” or<br />
“LPF6” is selected, this parameter is available.<br />
Settings: 0 – 255<br />
! HPF Key Follow (High Pass Filter Key Follow)<br />
Determines <strong>the</strong> degree to which <strong>the</strong> notes (specifically,<br />
<strong>the</strong>ir position or octave range) affect <strong>the</strong> Cutoff Frequency<br />
(set above) of <strong>the</strong> HPF. A positive setting will lower <strong>the</strong><br />
Cutoff frequency for lower notes and raise it for higher<br />
notes. A negative setting will have <strong>the</strong> opposite effect.<br />
When a filter type “LPF12” or “LPF6” is selected, this<br />
parameter is available.<br />
Settings: -200% – 0% – +200%<br />
@ Center Key<br />
This indicates that <strong>the</strong> central note for High Pass Filter Key<br />
Follow (!) above is C3. Keep in mind that this is for display<br />
purposes only; <strong>the</strong> value cannot be changed.<br />
Filter EG Settings—[SF2] FEG (Filter EG)<br />
From this display you can set <strong>the</strong> Filter EG parameters.<br />
Using <strong>the</strong> FEG, you can control <strong>the</strong> change in tone from <strong>the</strong><br />
moment <strong>the</strong> sound starts to <strong>the</strong> moment it stops.<br />
!<br />
@<br />
#<br />
1~5<br />
6~)<br />
$<br />
%<br />
^<br />
&<br />
Voice mode<br />
Performance<br />
mode<br />
Sampling<br />
mode 1<br />
Song mode<br />
Pattern mode<br />
Mixing mode<br />
Sampling<br />
mode 2<br />
Master mode<br />
Utility mode<br />
File mode<br />
MOTIF <strong>XS</strong> Owner’s <strong>Manual</strong> 119<br />
Reference
Reference<br />
120<br />
Editing a Normal Voice<br />
Voice mode Performance Sampling Song mode Pattern mode Mixing mode Sampling Master mode Utility mode File mode<br />
mode mode 1<br />
mode 2<br />
Pitch<br />
0<br />
Time<br />
The Time parameters let you set <strong>the</strong> time between <strong>the</strong><br />
adjoining points of <strong>the</strong> level parameters below. A higher<br />
value results in a longer time until reaching <strong>the</strong> next level.<br />
Settings: 0 – 127<br />
1 Hold Time<br />
Determines <strong>the</strong> time between <strong>the</strong> moment you press a note<br />
on <strong>the</strong> keyboard and <strong>the</strong> moment <strong>the</strong> envelope starts to rise.<br />
2 Attack Time<br />
Determines <strong>the</strong> speed of attack from <strong>the</strong> initial cutoff<br />
frequency (Hold Level) to <strong>the</strong> maximum level of <strong>the</strong> Voice<br />
after <strong>the</strong> hold time has elapsed.<br />
3 Decay 1 Time<br />
Determines how fast <strong>the</strong> envelope falls from <strong>the</strong> maximum<br />
cutoff frequency (Attack Level) to <strong>the</strong> cutoff frequency<br />
specified as <strong>the</strong> Decay 1 Level.<br />
4 Decay 2 Time<br />
Determines how fast <strong>the</strong> envelope falls from <strong>the</strong> cutoff<br />
frequency specified as <strong>the</strong> Decay1 Level to <strong>the</strong> cutoff<br />
frequency specified as <strong>the</strong> Decay2 Level.<br />
5 Release Time<br />
Determines how fast <strong>the</strong> envelope falls from <strong>the</strong> cutoff<br />
frequency specified as <strong>the</strong> Decay2 Level to <strong>the</strong> cutoff<br />
frequency specified as <strong>the</strong> Release Level when <strong>the</strong> note is<br />
released.<br />
Level<br />
6<br />
Hold Level<br />
1<br />
Hold<br />
Time<br />
7<br />
Attack Level<br />
2<br />
Attack<br />
Time<br />
The Level parameters let you set <strong>the</strong> amount of <strong>the</strong> filter<br />
change at each point based on <strong>the</strong> cutoff frequency<br />
specified in <strong>the</strong> Filter Type display (page 117).<br />
Settings: -128 – +0 – +127<br />
6 Hold Level<br />
Determines <strong>the</strong> initial cutoff frequency at <strong>the</strong> moment <strong>the</strong><br />
note is pressed.<br />
7 Attack Level<br />
3<br />
Decay1<br />
Time<br />
8<br />
Decay1<br />
Level<br />
Determines <strong>the</strong> maximum cutoff frequency which <strong>the</strong><br />
envelope reaches after a note is pressed.<br />
MOTIF <strong>XS</strong> Owner’s <strong>Manual</strong><br />
4<br />
Decay2<br />
Time<br />
9<br />
Decay2<br />
Level<br />
5<br />
Release<br />
Time<br />
)<br />
Release<br />
Level<br />
Pressing <strong>the</strong> key (Key on) Releasing <strong>the</strong> key (Key off)<br />
Time<br />
8 Decay 1 Level<br />
Determines <strong>the</strong> level which <strong>the</strong> cutoff frequency reaches<br />
from <strong>the</strong> Attack Level after <strong>the</strong> Decay1 time elapses.<br />
9 Decay 2 Level<br />
Determines <strong>the</strong> cutoff frequency which will be maintained<br />
while a note is held.<br />
) Release Level<br />
Determines <strong>the</strong> final cutoff frequency reached after <strong>the</strong><br />
note is released.<br />
! EG Depth<br />
Determines <strong>the</strong> range over which <strong>the</strong> cutoff frequency<br />
envelope changes. A setting of 0 will cause <strong>the</strong> cutoff<br />
frequency not to change. The far<strong>the</strong>r from 0 <strong>the</strong> value is,<br />
<strong>the</strong> larger <strong>the</strong> range of <strong>the</strong> cutoff frequency. For negative<br />
values, <strong>the</strong> change of <strong>the</strong> cutoff frequency is reversed.<br />
Settings: -64 – +0 – +63<br />
@ EG Depth Vel Sens<br />
(EG Depth Velocity Sensitivity)<br />
Determines how <strong>the</strong> range of <strong>the</strong> cutoff frequency<br />
responds to velocity. When this is set to a positive value,<br />
high velocities cause <strong>the</strong> Filter EG range to expand and<br />
low velocities cause it to contract, as shown below. When<br />
this is set to a negative value, high velocities cause <strong>the</strong><br />
Filter EG range to contract and low velocities cause it to<br />
expand. When this is set to 0, <strong>the</strong> Filter EG range does not<br />
change no matter what <strong>the</strong> velocity.<br />
Settings: -64 – +0 – +63<br />
High Velocity<br />
Large range<br />
# EG Depth Vel Sens Curve<br />
(EG Depth Velocity Sensitivity Curve)<br />
The five curves determine how <strong>the</strong> FEG transition range<br />
changes according to <strong>the</strong> velocity (strength) with which<br />
you play notes on <strong>the</strong> keyboard. The selected curve is<br />
indicated by <strong>the</strong> graphic on <strong>the</strong> display. The horizontal axis<br />
of <strong>the</strong> graph is <strong>the</strong> velocity, and <strong>the</strong> vertical axis is <strong>the</strong><br />
Cutoff Frequency range. For example, <strong>the</strong> illustration below<br />
indicates that <strong>the</strong> middle range of velocities (around 64)<br />
causes <strong>the</strong> FEG transition range not to change and <strong>the</strong><br />
higher/lower range of velocities causes it to change more<br />
greatly.<br />
Settings: Curve 0 – 4<br />
High<br />
FEG transition<br />
range<br />
Low<br />
Low<br />
Velocity<br />
High<br />
Low Velocity<br />
Small range
$ EG Time Velocity Sens<br />
(EG Time Velocity Sensitivity)<br />
Determines how <strong>the</strong> FEG transition time (speed) responds<br />
to velocity, or <strong>the</strong> strength with which <strong>the</strong> note is pressed.<br />
When this is set to a positive value, high velocities result in<br />
a fast FEG transition speed while low velocities result in a<br />
slow speed, as shown below. When this is set to a negative<br />
value, high velocities result in a slow FEG transition speed<br />
while low velocities result in a fast speed. When this is set<br />
to 0, <strong>the</strong> pitch transition speed does not change no matter<br />
what <strong>the</strong> velocity.<br />
Settings: -64 – +0 – +63<br />
Playing hard<br />
(High velocity)<br />
Fast speed<br />
% EG Time Velocity Sens Segment<br />
(EG Time Velocity Sensitivity Segment)<br />
Determines <strong>the</strong> part of <strong>the</strong> Filter EG which <strong>the</strong> EG Time<br />
Velocity Sensitivity ($) affects.<br />
Settings: attack, atk+dcy, decay, atk+rls, all<br />
attack<br />
The EG Time Velocity Sensitivity affects <strong>the</strong> Attack Time and Hold Time.<br />
atk+dcy (attack+decay)<br />
The EG Time Velocity Sensitivity affects <strong>the</strong> Attack Time, Decay1 Time,<br />
and Hold Time.<br />
decay<br />
The EG Time Velocity Sensitivity affects <strong>the</strong> Decay 1/2 Time.<br />
atk+rls (attack+release)<br />
The EG Time Velocity Sensitivity affects <strong>the</strong> Attack Time, Release Time,<br />
and Hold Time.<br />
all<br />
The EG Time Velocity Sensitivity affects all <strong>the</strong> Filter EG Time<br />
parameters.<br />
^ EG Time Key Follow<br />
Determines <strong>the</strong> degree to which <strong>the</strong> notes (specifically,<br />
<strong>the</strong>ir position or octave range) affect <strong>the</strong> Filter EG times of<br />
<strong>the</strong> selected Element. When this is set to a positive value,<br />
high notes result in a fast Filter EG transition speed while<br />
low notes result in a slow speed. When this is set to a<br />
negative value, high velocities result in a slow Filter EG<br />
transition speed while low notes result in a fast speed.<br />
When this is set to 0, <strong>the</strong> Filter EG transition speed does not<br />
change no matter what note is pressed.<br />
Settings: -200% – 0% – +200%<br />
& Center Key<br />
Playing softly<br />
(Low velocity)<br />
Slow speed<br />
Determines <strong>the</strong> central note or pitch for <strong>the</strong> EG Time Key<br />
Follow (^). When <strong>the</strong> Center Key note is played, <strong>the</strong> FEG<br />
behaves according to its actual settings.<br />
Settings: C -2 – G8<br />
EG Time Key Follow and Center Key<br />
Positive value<br />
Negative value<br />
Editing a Normal Voice<br />
n You can also set <strong>the</strong> note directly from <strong>the</strong> Keyboard, by<br />
holding down <strong>the</strong> [SF6] button and pressing <strong>the</strong> desired key.<br />
See “Basic Operation” on page 82.<br />
Filter Scaling settings—[SF3] Scale<br />
Filter Scaling controls <strong>the</strong> filter cutoff frequency according<br />
to <strong>the</strong> positions of <strong>the</strong> notes on <strong>the</strong> keyboard. You can<br />
divide <strong>the</strong> entire keyboard by four break points, and assign<br />
different offset values of Cutoff Frequency to <strong>the</strong>m<br />
respectively.<br />
1~4<br />
5~8<br />
Lower range<br />
1 – 4 Break Point 1 – 4<br />
Determines <strong>the</strong> four Break Points by specifying <strong>the</strong> note<br />
numbers respectively.<br />
Settings: C -2 – G8<br />
n You can also set <strong>the</strong> Break Point directly from <strong>the</strong> keyboard, by<br />
holding down <strong>the</strong> [SF6] INFO button and pressing <strong>the</strong> desired<br />
key. See “Basic Operation” on page 82.<br />
n Break Point 1 to Break Point 4 will be automatically be<br />
arranged in ascending order across <strong>the</strong> keyboard.<br />
5 – 8 Offset 1 – 4<br />
Faster<br />
speed<br />
Slower speed<br />
Center key<br />
+63<br />
+30<br />
Determines <strong>the</strong> offset value to <strong>the</strong> Cutoff Frequency at each<br />
Break Point.<br />
Settings: -128 – +0 – +127<br />
n Regardless of <strong>the</strong> size of <strong>the</strong>se Offsets, <strong>the</strong> minimum and<br />
maximum Cutoff limits (values of 0 and 127, respectively)<br />
cannot be exceeded.<br />
n Any note played below <strong>the</strong> Break Point 1 note results in <strong>the</strong><br />
Break Point 1 Level setting. Likewise, any note played above<br />
<strong>the</strong> Break Point 4 note results in <strong>the</strong> Break Point 4 Level<br />
setting.<br />
-40<br />
Higher range<br />
Voice mode<br />
Performance<br />
mode<br />
Sampling<br />
mode 1<br />
Song mode<br />
Pattern mode<br />
Mixing mode<br />
Sampling<br />
mode 2<br />
Master mode<br />
Utility mode<br />
File mode<br />
MOTIF <strong>XS</strong> Owner’s <strong>Manual</strong> 121<br />
Reference
Reference<br />
122<br />
Editing a Normal Voice<br />
Voice mode Performance Sampling Song mode Pattern mode Mixing mode Sampling Master mode Utility mode File mode<br />
mode mode 1<br />
mode 2<br />
Setting example of Filter Scaling<br />
The best way to understand Filter Scaling is by example. For<br />
<strong>the</strong> settings shown in <strong>the</strong> example display below, <strong>the</strong> basic<br />
Cutoff frequency value is 64, and <strong>the</strong> various Offset values at<br />
<strong>the</strong> selected Break point settings change that basic value<br />
accordingly. The specific changes to <strong>the</strong> Cutoff frequency are<br />
shown in <strong>the</strong> diagram below. The Cutoff frequency changes in<br />
a linear fashion between successive Break Points as shown.<br />
1 2 3 4<br />
Break Point C#1 D#2 C3 A4<br />
Offset -4 +10 +17 +4<br />
Cutoff<br />
frequency<br />
Output Level settings—[F4] Amplitude<br />
1 Level*<br />
Determines <strong>the</strong> output level of <strong>the</strong> Element.<br />
Settings: 0 – 127<br />
60<br />
Break<br />
Point 1<br />
C#1<br />
74<br />
Break<br />
Point 2<br />
D#2<br />
Level and Pan settings—[SF1] Level/Pan<br />
2 Level Velocity Sens (Level Velocity Sensitivity)*<br />
Determines how <strong>the</strong> output level of <strong>the</strong> Element responds<br />
to velocity. Positive settings will cause <strong>the</strong> output level to<br />
rise <strong>the</strong> harder you play <strong>the</strong> keyboard. A setting of 0 will<br />
cause <strong>the</strong> output level not to change. Negative settings will<br />
cause <strong>the</strong> output level to rise <strong>the</strong> more softly you play <strong>the</strong><br />
keyboard.<br />
Settings: -64 – +0 – +63<br />
MOTIF <strong>XS</strong> Owner’s <strong>Manual</strong><br />
81<br />
Break<br />
Point 3<br />
C3<br />
68<br />
Break<br />
Point 4<br />
A4<br />
Note<br />
1<br />
5<br />
2<br />
6<br />
3<br />
7<br />
4 8<br />
9<br />
)<br />
3 Level Velocity Sens Offset<br />
(Level Velocity Sensitivity Offset)<br />
Raises or lowers <strong>the</strong> level specified at <strong>the</strong> Level Velocity<br />
Sensitivity (2). A setting of 64 results in <strong>the</strong> original values<br />
of <strong>the</strong> Level Velocity Sensitivity (2) being used. Settings<br />
above 64 will raise <strong>the</strong> level specified at <strong>the</strong> Level Velocity<br />
Sensitivity (2). Settings below 64 will reduce <strong>the</strong> level.<br />
Settings: 0 – 127<br />
4 Level Velocity Sens Curve<br />
(Level Velocity Sensitivity Curve)*<br />
The five curves determine how <strong>the</strong> actual velocity will be<br />
generated according to <strong>the</strong> velocity (strength) with which<br />
you play notes on <strong>the</strong> keyboard. The selected curve is<br />
indicated by <strong>the</strong> graphic on <strong>the</strong> display.<br />
Settings: Curve 0 – 4<br />
5 Level Key Follow<br />
Determines <strong>the</strong> degree to which <strong>the</strong> notes (specifically,<br />
<strong>the</strong>ir position or octave range) affect <strong>the</strong> amplitude level<br />
(set above) of <strong>the</strong> selected Element, assuming C3 as <strong>the</strong><br />
basic pitch. A positive setting will lower <strong>the</strong> output level for<br />
lower notes and raise it for higher notes. A negative setting<br />
will have <strong>the</strong> opposite effect.<br />
Settings: -200% – +0% – +200%<br />
6 Center Key (Indication only)<br />
This indicates that <strong>the</strong> central note for Level Key Follow (5)<br />
above is C3. Keep in mind that this is for display purposes<br />
only; <strong>the</strong> value cannot be changed.<br />
Level Key Follow and Center Key<br />
7 Pan*<br />
Volume<br />
High<br />
Low<br />
Soft<br />
Strong<br />
Playing strength (velocity)<br />
When Level Key Follow is set to 100<br />
Amount of<br />
AEG level change<br />
Lower range<br />
Adjusts <strong>the</strong> stereo pan position of <strong>the</strong> sound.<br />
Settings: L63 (far left) – C (center) – R63 (far right)<br />
+<br />
–<br />
Large<br />
Small<br />
Center Key = C3 Higher range
8 Alternate Pan<br />
Determines <strong>the</strong> amount by which <strong>the</strong> sound is panned<br />
alternately left and right for each note you press, assuming<br />
<strong>the</strong> pan position set above as center. Higher values<br />
increase <strong>the</strong> width of <strong>the</strong> Pan range.<br />
Settings: L64 – C – R63<br />
9 Random Pan<br />
Determines <strong>the</strong> amount by which <strong>the</strong> sound of <strong>the</strong> selected<br />
Element is panned randomly left and right for each note<br />
you press. The Pan setting (above) is used as <strong>the</strong> Center<br />
Pan position.<br />
Settings: 0 – 127<br />
) Scaling Pan<br />
Determines <strong>the</strong> degree to which <strong>the</strong> notes (specifically,<br />
<strong>the</strong>ir position or octave range) affect <strong>the</strong> Pan position (set<br />
above), left and right, of <strong>the</strong> selected Element. At note C3,<br />
<strong>the</strong> main Pan setting (above) is used for <strong>the</strong> basic Pan<br />
position. A positive setting will move <strong>the</strong> pan position<br />
leftward for lower notes and move it rightward for higher<br />
notes. A negative setting will have <strong>the</strong> opposite effect.<br />
Settings: -64 – +0 – +63<br />
Amplitude EG Settings—[SF2] AEG<br />
(Amplitude EG)<br />
From this display you can set <strong>the</strong> Amplitude EG<br />
parameters. Using <strong>the</strong> AEG, you can control <strong>the</strong> transition<br />
in volume from <strong>the</strong> moment <strong>the</strong> sound starts to <strong>the</strong> moment<br />
<strong>the</strong> sound stops.<br />
9<br />
)<br />
1~4<br />
5~8<br />
Level (Volume)<br />
5<br />
Initial<br />
Level<br />
0<br />
6<br />
Attack Level<br />
7<br />
Decay1<br />
Level<br />
1<br />
Attack<br />
Time<br />
2<br />
Decay1<br />
Time<br />
3<br />
Decay2<br />
Time<br />
8<br />
Decay2<br />
Level<br />
4<br />
Release<br />
Time<br />
Pressing <strong>the</strong> key (Key on) Releasing <strong>the</strong> key (Key off)<br />
!<br />
@<br />
#<br />
$<br />
Time<br />
Editing a Normal Voice<br />
Time*<br />
The Time parameters let you set <strong>the</strong> time between <strong>the</strong><br />
adjoining points of <strong>the</strong> level parameters below. A higher<br />
value results in a longer time until reaching <strong>the</strong> next level.<br />
Settings: 0 – 127<br />
1 Attack Time<br />
Determines how quickly <strong>the</strong> sound reaches its maximum<br />
level after <strong>the</strong> key is pressed.<br />
2 Decay 1 Time<br />
Determines how fast <strong>the</strong> envelope falls from <strong>the</strong> Attack<br />
Level to <strong>the</strong> Decay 1 Level.<br />
3 Decay 2 Time<br />
Determines how fast <strong>the</strong> envelope falls from <strong>the</strong> Decay1<br />
Level to <strong>the</strong> Decay2 Level (sustain level).<br />
4 Release Time<br />
Determines how quickly <strong>the</strong> sound decays to silence after<br />
<strong>the</strong> key is released.<br />
Level<br />
The Level parameters let you set <strong>the</strong> amount of <strong>the</strong><br />
transition at each point based on <strong>the</strong> level specified in <strong>the</strong><br />
Level/Pan display (page 122).<br />
Settings: 0 – 127<br />
5 Initial Level<br />
Determines <strong>the</strong> initial level at <strong>the</strong> moment <strong>the</strong> note is<br />
pressed.<br />
6 Attack Level<br />
Determines <strong>the</strong> maximum level which <strong>the</strong> envelope<br />
reaches after a note is pressed.<br />
7 Decay 1 Level<br />
Determines <strong>the</strong> level which <strong>the</strong> envelope reaches from <strong>the</strong><br />
Attack Level after <strong>the</strong> Decay1 time elapses.<br />
8 Decay 2 Level<br />
Determines <strong>the</strong> level which will be maintained while a note<br />
is held.<br />
9 Half Damper Switch<br />
When <strong>the</strong> Half Damper Switch is set to on, you can<br />
produce a “half-pedal” effect just as on a real acoustic<br />
piano by using <strong>the</strong> optional FC3 Foot Controller connected<br />
to <strong>the</strong> FOOT SWITCH SUSTAIN jack on <strong>the</strong> rear panel.<br />
Settings: on, off<br />
n When you wish to recreate a half-damper effect using <strong>the</strong><br />
optional FC3, set <strong>the</strong> Sustain Pedal parameter to “FC3 (half<br />
on)” in <strong>the</strong> Play Display (page 259) of <strong>the</strong> Utility mode. Note<br />
that this setting is not necessary when controlling <strong>the</strong> halfdamper<br />
by sending <strong>the</strong> Control Change messages from an<br />
external MIDI device to <strong>the</strong> instrument.<br />
Voice mode<br />
Performance<br />
mode<br />
Sampling<br />
mode 1<br />
Song mode<br />
Pattern mode<br />
Mixing mode<br />
Sampling<br />
mode 2<br />
Master mode<br />
Utility mode<br />
File mode<br />
MOTIF <strong>XS</strong> Owner’s <strong>Manual</strong> 123<br />
Reference
Reference<br />
124<br />
Editing a Normal Voice<br />
Voice mode Performance Sampling Song mode Pattern mode Mixing mode Sampling Master mode Utility mode File mode<br />
mode mode 1<br />
mode 2<br />
) Half Damper Time<br />
Determines how quickly <strong>the</strong> sound decays to silence after<br />
<strong>the</strong> key is released while holding down <strong>the</strong> Foot Controller<br />
FC3 with <strong>the</strong> Half Damper Switch parameter (9) turned on.<br />
After releasing <strong>the</strong> key, you can control <strong>the</strong> decay time of<br />
<strong>the</strong> sound via <strong>the</strong> Foot Controller position, with <strong>the</strong> Half<br />
Damper Time of <strong>the</strong> AEG being <strong>the</strong> maximum decay value<br />
and <strong>the</strong> Release Time of <strong>the</strong> AEG being <strong>the</strong> minimum<br />
decay value.<br />
When you release <strong>the</strong> pedal, <strong>the</strong> decay time after <strong>the</strong> key is<br />
released is equivalent to <strong>the</strong> AEG Release Time.<br />
You can create a piano-like effect by setting <strong>the</strong> Release<br />
Time to a small value and setting <strong>the</strong> Half Damper Time to<br />
a large value.<br />
The setting here is available only when <strong>the</strong> Half Damper<br />
Switch parameter (9) is set to on and you use <strong>the</strong> optional<br />
FC3 connected to <strong>the</strong> rear panel.<br />
Settings: 0 – 127<br />
! EG Time Velocity Sens<br />
(EG Time Velocity Sensitivity)<br />
Determines how <strong>the</strong> AEG transition time (speed) responds<br />
to velocity, or <strong>the</strong> strength with which <strong>the</strong> note is pressed.<br />
When this is set to a positive value, high velocities result in<br />
a fast AEG transition speed while low velocities result in a<br />
slow speed, as shown below. When this is set to a negative<br />
value, high velocities result in a slow AEG transition speed<br />
while low velocities result in a fast speed. When this is set<br />
to 0, <strong>the</strong> amplitude transition speed does not change no<br />
matter what <strong>the</strong> velocity.<br />
Settings: -64 – +0 – +63<br />
High Velocity<br />
Faster speed<br />
@ EG Time Velocity Sens Segment<br />
(EG Time Velocity Sensitivity Segment)<br />
Determines <strong>the</strong> part of <strong>the</strong> Amplitude EG which <strong>the</strong> EG<br />
Time Velocity Sensitivity (!) affects.<br />
Settings: attack, atk+dcy, decay, atk+rls, all<br />
attack<br />
The EG Time Velocity Sensitivity affects <strong>the</strong> Attack Time.<br />
atk+dcy (attack+decay)<br />
The EG Time Velocity Sensitivity affects <strong>the</strong> Attack Time and Decay1<br />
Time.<br />
decay<br />
The EG Time Velocity Sensitivity affects <strong>the</strong> Decay Time.<br />
atk+rls (attack+release)<br />
The EG Time Velocity Sensitivity affects <strong>the</strong> Attack Time and Release<br />
Time.<br />
all<br />
The EG Time Velocity Sensitivity affects all <strong>the</strong> Amplitude EG Time<br />
parameters.<br />
# EG Time Key Follow<br />
Determines <strong>the</strong> degree to which <strong>the</strong> notes (specifically,<br />
<strong>the</strong>ir position or octave range) affect <strong>the</strong> Amplitude EG<br />
times of <strong>the</strong> selected Element. When this is set to a positive<br />
value, high notes result in a fast Amplitude EG transition<br />
MOTIF <strong>XS</strong> Owner’s <strong>Manual</strong><br />
Low Velocity<br />
Slower speed<br />
speed while low notes result in a slow speed. When this is<br />
set to a negative value, high velocities result in a slow<br />
Amplitude EG transition speed while low notes result in a<br />
fast speed. When this is set to 0, <strong>the</strong> Amplitude EG<br />
transition speed does not change no matter what <strong>the</strong><br />
pressed note.<br />
Settings: -200% – 0% – +200%<br />
$ Center Key<br />
Determines <strong>the</strong> central note for <strong>the</strong> EG Time Key Follow<br />
(#). When <strong>the</strong> Center Key note is played, <strong>the</strong> AEG<br />
behaves according to its actual settings.<br />
Settings: C -2 – G8<br />
n You can also set <strong>the</strong> Key directly from <strong>the</strong> keyboard, by<br />
holding down <strong>the</strong> [SF6] KBD button and pressing <strong>the</strong> desired<br />
key. For details, see page 82.<br />
EG Time Key Follow and Center Key<br />
Positive value<br />
Negative value<br />
Amplitude Scaling settings—[SF3] Scale<br />
Amplitude Scaling controls <strong>the</strong> amplitude output level<br />
according to <strong>the</strong> positions of <strong>the</strong> notes on <strong>the</strong> keyboard.<br />
You can divide <strong>the</strong> entire keyboard by four break points,<br />
and assign different offset values of amplitude to <strong>the</strong>m<br />
respectively.<br />
1~4<br />
5~8<br />
Lower range<br />
Faster<br />
speed<br />
Slower speed<br />
Center key<br />
1 – 4 Break Point 1 – 4<br />
+63<br />
+30<br />
Determines <strong>the</strong> four Break Points by specifying <strong>the</strong> note<br />
numbers respectively.<br />
Settings: C -2 – G8<br />
n You can also set <strong>the</strong> Break Point directly from <strong>the</strong> Keyboard,<br />
by holding down <strong>the</strong> [SF6] KBD button and pressing <strong>the</strong><br />
desired key. See “Basic Operation” on page 82.<br />
n Break Point 1 to Break Point 4 will be automatically be<br />
arranged in ascending order across <strong>the</strong> keyboard.<br />
-40<br />
Higher range
5 – 8 Offset 1 – 4<br />
Determines <strong>the</strong> offset value to <strong>the</strong> level at each Break Point.<br />
Settings: -128 – +0 – +127<br />
Setting example of Amplitude Scaling<br />
The best way to understand Amplitude Scaling is by example.<br />
For <strong>the</strong> settings shown in <strong>the</strong> example display below, <strong>the</strong> basic<br />
Amplitude (volume) value for <strong>the</strong> selected Element is 80, and<br />
<strong>the</strong> various Offset values at <strong>the</strong> selected Break point settings<br />
change that basic value accordingly. The specific changes to<br />
<strong>the</strong> Amplitude are shown in <strong>the</strong> diagram below. The Amplitude<br />
changes in a linear fashion between successive Break Points<br />
as shown.<br />
1 2 3 4<br />
Break Point C1 C2 C3 C4<br />
Offset -4 +10 +17 +4<br />
Amplitude<br />
Modulating <strong>the</strong> Voice—[F5] Elm<br />
LFO (Element LFO)<br />
This display gives you a <strong>com</strong>prehensive set of controls<br />
over <strong>the</strong> LFO for each individual Element. The LFO can be<br />
used to create vibrato, wah, tremolo and o<strong>the</strong>r special<br />
effects, by applying it to <strong>the</strong> pitch, filter and amplitude<br />
parameters.<br />
1<br />
2<br />
3<br />
4<br />
1 Wave<br />
76<br />
Break<br />
Point 1<br />
C1<br />
Selects <strong>the</strong> Wave and determines how <strong>the</strong> LFO waveform<br />
modulates <strong>the</strong> sound.<br />
Settings: saw, triangle, square<br />
2 Key On Reset<br />
90<br />
Break<br />
Point 2<br />
C2<br />
Determines whe<strong>the</strong>r or not <strong>the</strong> LFO is reset each time a<br />
note is played.<br />
Settings: off, on<br />
97<br />
Break<br />
Point 3<br />
C3<br />
84<br />
Break<br />
Point 4<br />
C4<br />
Note<br />
5<br />
6<br />
7<br />
8<br />
Editing a Normal Voice<br />
off<br />
The LFO cycles freely with no key synchronization. Pressing a key<br />
starts <strong>the</strong> LFO wave at whatever phase <strong>the</strong> LFO happens to be at that<br />
point.<br />
on<br />
The LFO resets with each note you play and starts a wave at <strong>the</strong> phase<br />
specified by <strong>the</strong> Phase parameter (above).<br />
3 Delay<br />
Determines <strong>the</strong> delay time between <strong>the</strong> moment you press<br />
note on <strong>the</strong> keyboard and <strong>the</strong> moment <strong>the</strong> LFO <strong>com</strong>es into<br />
effect. A higher value results in a longer delay time.<br />
Settings: 0 – 127<br />
4 Fade In Time<br />
Determines <strong>the</strong> amount of time for <strong>the</strong> LFO effect to fade in<br />
after <strong>the</strong> Delay time has elapsed. A higher value results in a<br />
slower fade-in. When set to “0,” <strong>the</strong> LFO effect will not fade<br />
in and reach <strong>the</strong> maximum level immediately after <strong>the</strong><br />
Delay time has elapsed.<br />
Settings: 0 – 127<br />
5 Speed<br />
Determines <strong>the</strong> speed of <strong>the</strong> LFO Wave. The higher <strong>the</strong><br />
value, <strong>the</strong> faster <strong>the</strong> LFO speed.<br />
Settings: 0 – 63<br />
6 P Mod (Pitch Modulation Depth)<br />
Determines <strong>the</strong> amount (depth) by which <strong>the</strong> LFO wave<br />
varies (modulates) <strong>the</strong> pitch of <strong>the</strong> sound. The higher <strong>the</strong><br />
setting, <strong>the</strong> greater <strong>the</strong> depth of control.<br />
Settings: 0 – 127<br />
7 F Mod (Filter Modulation Depth)<br />
Determines <strong>the</strong> amount (depth) by which <strong>the</strong> LFO wave<br />
varies (modulates) <strong>the</strong> Filter Cutoff frequency. The higher<br />
<strong>the</strong> setting, <strong>the</strong> greater <strong>the</strong> depth of control.<br />
Settings: 0 – 127<br />
8 A Mod (Amplitude Modulation Depth)<br />
Determines <strong>the</strong> amount (depth) by which <strong>the</strong> LFO wave<br />
varies (modulates) <strong>the</strong> amplitude or volume of <strong>the</strong> sound.<br />
The higher <strong>the</strong> setting, <strong>the</strong> greater <strong>the</strong> depth of control.<br />
Settings: 0 – 127<br />
Voice mode<br />
Performance<br />
mode<br />
Sampling<br />
mode 1<br />
Song mode<br />
Pattern mode<br />
Mixing mode<br />
Sampling<br />
mode 2<br />
Master mode<br />
Utility mode<br />
File mode<br />
MOTIF <strong>XS</strong> Owner’s <strong>Manual</strong> 125<br />
Reference
Reference<br />
126<br />
Editing a Normal Voice<br />
Voice mode Performance Sampling Song mode Pattern mode Mixing mode Sampling Master mode Utility mode File mode<br />
mode mode 1<br />
mode 2<br />
Equalizer (EQ) Settings—[F6] EQ<br />
From this display, you can set <strong>the</strong> EQ parameters for each<br />
Element.<br />
1 Type<br />
Determines <strong>the</strong> EQ Type. The number of parameters and<br />
values available differs depending on <strong>the</strong> selected EQ<br />
type.<br />
Settings:<br />
2 Band, PEQ<br />
See below.<br />
Boost 6, Boost 12, Boost 18<br />
Boosts <strong>the</strong> entire band of <strong>the</strong> selected Element by +6dB, +12dB, and<br />
+18dB respectively.<br />
thru<br />
If you select this, <strong>the</strong> equalizers are bypassed and <strong>the</strong> entire signal is<br />
unaffected.<br />
When <strong>the</strong> EQ Type is set to “2 Band”<br />
This is a “shelving” equalizer, which <strong>com</strong>bines separate<br />
high and low frequency bands.<br />
1 EQ Type<br />
23<br />
45<br />
2 Low Frequency<br />
Determines <strong>the</strong> standard frequency of <strong>the</strong> lower EQ band.<br />
Settings: 50.1 Hz – 2.00 kHz<br />
3 High Frequency<br />
Determines <strong>the</strong> standard frequency of <strong>the</strong> higher EQ band.<br />
Settings: 503.8 Hz – 10.1 kHz<br />
4 Low Gain<br />
Determines <strong>the</strong> amount by which signals below <strong>the</strong> Low<br />
Frequency (2) will be boosted/attenuated.<br />
Settings: -12.00 dB – +0.00 dB – +12.00 dB<br />
5 High Gain<br />
Determines <strong>the</strong> amount by which signals above <strong>the</strong> High<br />
Frequency (3) will be boosted/attenuated.<br />
Settings: -12.00 dB – +0.00 dB – +12.00 dB<br />
MOTIF <strong>XS</strong> Owner’s <strong>Manual</strong><br />
When <strong>the</strong> EQ Type is set to “PEQ”<br />
The Parametric EQ for <strong>the</strong> single band is used to attenuate<br />
or boost signal levels (gain) around <strong>the</strong> Frequency. This<br />
type features 32 different “Q” settings, which determine <strong>the</strong><br />
frequency band width of <strong>the</strong> equalizer.<br />
1 EQ Type<br />
2 Low Frequency<br />
Determines <strong>the</strong> center frequency.<br />
Settings: 139.7 Hz – 12.9 kHz<br />
4 Low Gain<br />
Determines <strong>the</strong> amount by which signals below <strong>the</strong> Low<br />
Frequency (2) will be boosted/attenuated.<br />
Settings: -12.00 dB – +0.00 dB – +12.00 dB<br />
6 Q<br />
2<br />
4<br />
6<br />
Determines <strong>the</strong> Q (bandwidth) for <strong>the</strong> band. The lower <strong>the</strong><br />
setting, <strong>the</strong> greater <strong>the</strong> bandwidth. The higher <strong>the</strong> setting,<br />
<strong>the</strong> smaller <strong>the</strong> bandwidth.<br />
Settings: 0.7 – 10.3
Editing a Drum Voice<br />
“Editing” refers to <strong>the</strong> process of creating a Voice by changing <strong>the</strong> parameters that make up <strong>the</strong> Voice. This can be done in<br />
Voice Edit, a sub mode within <strong>the</strong> Voice mode. In this section, we’ll show you how to edit a Drum Voice. To enter <strong>the</strong> Drum<br />
Voice Edit mode, press <strong>the</strong> [VOICE] button to enter <strong>the</strong> Voice mode, select a Drum Voice, <strong>the</strong>n press <strong>the</strong> [EDIT] button.<br />
Common Edit and Key Edit<br />
Each Drum Voice can consist of up to 73 Drum Keys,<br />
assigned to notes spread across <strong>the</strong> keyboard (C0 to C6).<br />
There are two types of Drum Voice Edit displays: those for<br />
Common Edit to edit <strong>the</strong> settings <strong>com</strong>mon to all keys, and<br />
those for Key Edit to edit individual keys.<br />
Common Edit<br />
Lets you edit <strong>the</strong><br />
parameters <strong>com</strong>mon to<br />
all Keys of <strong>the</strong> selected<br />
Drum Voice.<br />
Drum Voice Edit<br />
Editing Drum Voices<br />
Key Edit C0 – C6<br />
Lets you edit <strong>the</strong><br />
parameters of <strong>the</strong><br />
individual 73 keys that<br />
make up a Drum Voice.<br />
1 Press <strong>the</strong> [VOICE] button to enter <strong>the</strong> Voice<br />
Play mode.<br />
Select a Drum Voice to be edited.<br />
2 Press <strong>the</strong> [EDIT] button to enter <strong>the</strong> Voice Edit<br />
mode.<br />
3 Call up <strong>the</strong> desired Edit display, Common Edit<br />
or Key Edit.<br />
To call up <strong>the</strong> Common Edit display, press <strong>the</strong><br />
[COMMON EDIT] button. To call up <strong>the</strong> Key Edit<br />
display, press <strong>the</strong> Number button [1]. In <strong>the</strong> Drum Key<br />
Edit mode, press <strong>the</strong> Key to which your desired drum<br />
instrument sound is assigned.<br />
COMMON EDIT<br />
Common Edit display<br />
1 2 3 4 5 6 7<br />
8<br />
Key Edit display<br />
PART SELECT ARP ON/OFF<br />
Selecting a Drum Key<br />
4 Call up <strong>the</strong> desired display.<br />
To find <strong>the</strong> desired display, note <strong>the</strong> tab menu items<br />
corresponding to <strong>the</strong> [F1] – [F6] buttons and [SF1] –<br />
[SF5] buttons. Each tab menu of <strong>the</strong> [F1] – [F6] buttons<br />
contains sub menus which correspond to <strong>the</strong> [SF1] –<br />
[SF5] buttons at <strong>the</strong> bottom of <strong>the</strong> display.<br />
n By pressing <strong>the</strong> [SF6] button, you can use various<br />
functions such as <strong>the</strong> Information display, Character input<br />
(page 82), Number button function (page 81), and List<br />
display/selection (page 82). The function called up via <strong>the</strong><br />
[SF6] button differs depending on <strong>the</strong> selected parameter<br />
where <strong>the</strong> cursor is located.<br />
5 Move <strong>the</strong> cursor to <strong>the</strong> desired parameter.<br />
6 Edit <strong>the</strong> value by using <strong>the</strong> [INC/YES], [DEC/<br />
NO] buttons and <strong>the</strong> data dial.<br />
7 Repeat steps 3 – 6 as desired.<br />
8 Enter <strong>the</strong> desired name for <strong>the</strong> edited Voice.<br />
Use <strong>the</strong> Name display (page 98) of <strong>the</strong> Voice Common<br />
Edit mode.<br />
9 Store <strong>the</strong> edited Voice.<br />
Press <strong>the</strong> [STORE] button to call up <strong>the</strong> Store window<br />
(page 97) <strong>the</strong>n store <strong>the</strong> edited Voice.<br />
Voice mode<br />
Performance<br />
mode<br />
Sampling<br />
mode 1<br />
Song mode<br />
Pattern mode<br />
Mixing mode<br />
Sampling<br />
mode 2<br />
Master mode<br />
Utility mode<br />
File mode<br />
MOTIF <strong>XS</strong> Owner’s <strong>Manual</strong> 127<br />
Reference
Reference<br />
128<br />
Editing a Drum Voice<br />
Voice mode Performance Sampling Song mode Pattern mode Mixing mode Sampling Master mode Utility mode File mode<br />
mode mode 1<br />
mode 2<br />
CAUTION<br />
The edited Voice will be lost when selecting <strong>the</strong> different Voice<br />
or turning <strong>the</strong> power off. Make sure to store <strong>the</strong> Voice data to<br />
<strong>the</strong> internal memory by pressing <strong>the</strong> [STORE] button before<br />
selecting a different Voice or turning <strong>the</strong> power off.<br />
n If desired, save <strong>the</strong> edited and stored Voices to a USB<br />
storage device connected to <strong>the</strong> USB TO DEVICE<br />
connector or a <strong>com</strong>puter connected to <strong>the</strong> network to<br />
Common Edit parameters<br />
MOTIF <strong>XS</strong> Owner’s <strong>Manual</strong><br />
which <strong>the</strong> MOTIF <strong>XS</strong> is also connected. Keep in mind that<br />
edited Voice data is stored to internal User memory (Flash<br />
ROM) and is maintained even when turning <strong>the</strong> power off.<br />
As such it is not necessary to save <strong>the</strong> data to an external<br />
device; however, we still re<strong>com</strong>mend that you save or<br />
archive all important data to an external device. Refer to<br />
page 278 for details.<br />
n O<strong>the</strong>r convenient functions are also available in <strong>the</strong> Drum<br />
Voice Edit mode. For details, see page 97.<br />
[VOICE] ➞ Drum Voice selection ➞ [EDIT] ➞ [COMMON EDIT]<br />
The Common Edit lets you edit <strong>the</strong> parameters <strong>com</strong>mon to all Drum Keys of <strong>the</strong> selected Drum Voice.<br />
General Settings for <strong>the</strong> selected<br />
Voice—[F1] General<br />
n The Common Edit parameters of <strong>the</strong> Drum Voice are basically<br />
<strong>the</strong> same as those of <strong>the</strong> Normal Voice. However, some<br />
parameters having <strong>the</strong> same name as those of <strong>the</strong> Normal<br />
Voice are not available for <strong>the</strong> Drum Voice.<br />
Naming <strong>the</strong> edited Voice—[SF1] Name<br />
This is <strong>the</strong> same as in Normal Voice Common Edit. See<br />
page 98.<br />
Play Mode Settings such as Micro Tuning<br />
and Mono/Poly—[SF2] Play Mode<br />
This is <strong>the</strong> same as in Normal Voice Common Edit. See<br />
page 98.<br />
O<strong>the</strong>r settings—[SF3] O<strong>the</strong>r<br />
This is <strong>the</strong> same as in Normal Voice Common Edit. See<br />
page 100.<br />
Arpeggio settings—[F2] ARP Main<br />
(Arpeggio Main)<br />
This is <strong>the</strong> same as in Normal Voice Common Edit. See<br />
page 101.<br />
Arpeggio settings—[F3] ARP O<strong>the</strong>r<br />
(Arpeggio O<strong>the</strong>r)<br />
By changing <strong>the</strong> timing and velocity of <strong>the</strong> notes, you can<br />
change <strong>the</strong> rhythmic “feel” of <strong>the</strong> Arpeggio playback.<br />
This is <strong>the</strong> same as in Normal Voice Common Edit. See<br />
page 102.<br />
Controller settings—[F4] Ctrl Set<br />
(Controller Set)<br />
This is <strong>the</strong> same as in Normal Voice Common Edit. See<br />
page 104. Please note that <strong>the</strong> Element Switch parameter<br />
is not available in Drum Voice Common edit.<br />
Effect settings—[F6] Effect<br />
Effect Connection Settings—[SF1]<br />
Connect<br />
This display gives you <strong>com</strong>prehensive control over <strong>the</strong><br />
effects. The functions on this display are basically same as<br />
in Normal Voice Common Edit (page 107). The different<br />
point is that <strong>the</strong> Insertion Effect Out parameter is set not for<br />
each Element but for each Drum Key. In addition to that,<br />
three more parameters ($ – ^) are available.
$<br />
1<br />
%<br />
7<br />
8<br />
1 Out (Insertion Effect Out)<br />
Determines which Insertion Effect (A or B) is used to<br />
process each individual Drum Key. Parameters can be set<br />
for each Drum Key. When INSERTION CONNECT (2) is<br />
set to “ins L,” <strong>the</strong> signal from each Drum Key is output to<br />
<strong>the</strong> Insertion L regardless of <strong>the</strong> setting here.<br />
Settings: thru (through), Ins A (Insertion A), Ins B (Insertion B)<br />
Parameters 2 – # are same as <strong>the</strong> ones on <strong>the</strong> Connect<br />
display (page 107) in <strong>the</strong> Normal Voice Edit mode.<br />
$ Key<br />
Determines <strong>the</strong> Drum Key to be edited. The Insertion Effect<br />
Out (1), Key Reverb Send (%) and Key Chorus Send (^)<br />
can be set for each Drum Key.<br />
Settings: C0 – C6<br />
Key Edit parameters<br />
% REV SEND (Key Reverb Send)<br />
Editing a Drum Voice<br />
Determines <strong>the</strong> level of <strong>the</strong> Drum key sound (<strong>the</strong> bypassed<br />
signal) that is sent to Reverb effect. The setting here is<br />
available only when <strong>the</strong> Insertion Effect Out parameter (1)<br />
is set to “thru.”<br />
Settings: 0 – 127<br />
n When <strong>the</strong> Insertion Effect Out parameter (1) is set to “Ins A”<br />
or “Ins B,” you can determine <strong>the</strong> level of <strong>the</strong> Drum Key sound<br />
(output from Insertion Effect A or B) that is sent to <strong>the</strong> Reverb<br />
effect by setting <strong>the</strong> value of <strong>the</strong> Insertion Reverb Send<br />
parameter indicated only in this case.<br />
^ CHO SEND (Key Chorus Send)<br />
Determines <strong>the</strong> level of <strong>the</strong> Drum key sound (<strong>the</strong> bypassed<br />
signal) that is sent to Chorus effect. The setting here is<br />
available only when <strong>the</strong> Insertion Effect Out parameter (1)<br />
is set to “thru.”<br />
Settings: 0 – 127<br />
n When <strong>the</strong> Insertion Effect Out parameter (1) is set to “Ins A”<br />
or “Ins B,” you can determine <strong>the</strong> level of <strong>the</strong> Drum Key sound<br />
(output from Insertion Effect A or B) that is sent to <strong>the</strong> Chorus<br />
effect by setting <strong>the</strong> value of <strong>the</strong> Insertion Chorus Send<br />
parameter indicated only in this case.<br />
This is <strong>the</strong> same as in Normal Voice Common Edit. See<br />
page 109.<br />
[VOICE] ➞ Drum Voice selection ➞ [EDIT] ➞ Key selection<br />
If you wish to edit <strong>the</strong> sounds that make up a Voice and <strong>the</strong> basic parameters that determine <strong>the</strong> sound, such as Oscillator,<br />
Pitch, Filter, Amplitude, and EG (Envelope Generator), call up <strong>the</strong> Key Edit display.<br />
About <strong>the</strong> asterisk (*) marks<br />
For users who are new to Voice editing and may be confused by <strong>the</strong> large amount of parameters, <strong>the</strong> most basic and easy-to-understand<br />
parameters are conveniently marked with asterisks in this section. If you are just starting out with Voice editing, try <strong>the</strong>se parameters first.<br />
Setting <strong>the</strong> wave and note range of<br />
<strong>the</strong> Key—[F1] Oscillator<br />
This display lets you set <strong>the</strong> Waveform and Note range of<br />
<strong>the</strong> selected Key.<br />
1<br />
2<br />
3<br />
4<br />
5<br />
6<br />
7<br />
8<br />
^<br />
9<br />
2<br />
5<br />
6<br />
! #<br />
)<br />
@<br />
3<br />
4<br />
9<br />
)<br />
!<br />
@<br />
#<br />
$<br />
%<br />
^<br />
Effect Parameter settings—[SF2] Ins A<br />
– [SF5] Chorus<br />
n Depending on <strong>the</strong> selected parameter, <strong>the</strong> LIST icon is shown<br />
at <strong>the</strong> tab menu corresponding to <strong>the</strong> [SF6] button. In this<br />
condition, you can call up <strong>the</strong> list by pressing <strong>the</strong> [SF6] LIST<br />
button, <strong>the</strong>n select <strong>the</strong> desired item from <strong>the</strong> list. For details,<br />
see page 82.<br />
1 Key*<br />
Determines <strong>the</strong> Drum Key to be edited. You can select <strong>the</strong><br />
desired percussion instrument by pressing <strong>the</strong> note.<br />
Settings: C0 – C6<br />
2 Element Switch*<br />
Determines whe<strong>the</strong>r <strong>the</strong> currently selected Key is used or<br />
not. When this is set to off, <strong>the</strong> currently edited Key will not<br />
sound.<br />
Settings: off (inactive), on (active)<br />
MOTIF <strong>XS</strong> Owner’s <strong>Manual</strong><br />
Voice mode<br />
Performance<br />
mode<br />
Sampling<br />
mode 1<br />
Song mode<br />
Pattern mode<br />
Mixing mode<br />
Sampling<br />
mode 2<br />
Master mode<br />
Utility mode<br />
File mode<br />
129<br />
Reference
Reference<br />
130<br />
Editing a Drum Voice<br />
Voice mode Performance Sampling Song mode Pattern mode Mixing mode Sampling Master mode Utility mode File mode<br />
mode mode 1<br />
mode 2<br />
3 Wave Bank (Waveform Bank)*<br />
Determines <strong>the</strong> Waveform Bank assigned to <strong>the</strong> Drum Key,<br />
Preset or User. User Waveforms can be created based on<br />
<strong>the</strong> samples recorded in <strong>the</strong> Sampling mode.<br />
Settings: PRE (preset waveform), USR (user waveform)<br />
n For details about Waveform, refer to <strong>the</strong> explanation of <strong>the</strong><br />
Sampling Mode on page 161.<br />
4 Wave Category (Waveform Category)*<br />
5 Wave Number (Waveform Number)*<br />
Determines <strong>the</strong> Waveform assigned to <strong>the</strong> Drum Key by<br />
selecting <strong>the</strong> Waveform Category and Number. For a<br />
<strong>com</strong>plete list of Waveforms in <strong>the</strong> Preset Bank, refer to <strong>the</strong><br />
Waveform List in <strong>the</strong> separate Data List booklet.<br />
6 Assign Mode*<br />
When this is set to “single,” double playback of <strong>the</strong> same<br />
note is prevented. This is useful when two or more<br />
instances of <strong>the</strong> same note are received nearly<br />
simultaneously, or without a corresponding note off<br />
message. To allow playback of each instance of <strong>the</strong> same<br />
note, set this to “multi.” In general, you should probably set<br />
this to “multi”—especially for tambourine and cymbal<br />
sounds that you would want to ring out to <strong>the</strong>ir full decay,<br />
when playing <strong>the</strong>m multiple times in succession. Please<br />
keep in mind that <strong>the</strong> “multi” setting consumes <strong>the</strong> overall<br />
polyphony and it may cause sounds to be cut off.<br />
Settings: single, multi<br />
single<br />
When this is set to “single” and double playback of <strong>the</strong> same note are<br />
transmitted to <strong>the</strong> internal tone generator, <strong>the</strong> first note will be stopped<br />
<strong>the</strong>n <strong>the</strong> next note will be sounded.<br />
multi<br />
When this is set to “multi” and double playback of <strong>the</strong> same note are<br />
transmitted to <strong>the</strong> internal tone generator, all <strong>the</strong> notes are sounded<br />
simultaneously.<br />
7 Receive Note Off<br />
Determines whe<strong>the</strong>r or not <strong>the</strong> selected Drum Key<br />
responds to MIDI Note Off messages. This should be set to<br />
on when <strong>the</strong> selected Drum Key has a sustained, nondecaying<br />
sound (such as a snare roll), so that you can stop<br />
<strong>the</strong> sound by releasing <strong>the</strong> note.<br />
Settings: off, on<br />
8 Alternate Group*<br />
Determines <strong>the</strong> Alternate Group to which <strong>the</strong> key is<br />
assigned. In a real drum kit, some drum sounds cannot<br />
physically be played simultaneously, such as open and<br />
closed hi-hats. You can prevent keys from playing back<br />
simultaneously by assigning <strong>the</strong>m to <strong>the</strong> same Alternate<br />
Group. Up to 127 Alternate Groups can be defined. You<br />
can also select “off” here if you wish to allow <strong>the</strong><br />
simultaneous playback of sounds.<br />
Settings: off, 1 – 127<br />
MOTIF <strong>XS</strong> Owner’s <strong>Manual</strong><br />
9 Ins Effect Output (Insertion Effect Output)<br />
Determines which Insertion Effect (A or B) is used to<br />
process each individual Drum Key. This parameter is same<br />
as <strong>the</strong> Ins Effect Output in <strong>the</strong> Connect display (page 107)<br />
in Voice Common Edit. Making a setting here automatically<br />
changes <strong>the</strong> setting of that parameter as well.<br />
When INSERTION CONNECT (2) is set to “ins L” in <strong>the</strong><br />
Connect display, Insertion L is used to process each<br />
individual Drum Key, even if “ins A” or “ins B” is selected.<br />
Settings: thru (through), ins A (Insertion Effect A), ins B (Insertion<br />
Effect B)<br />
) Reverb Send*<br />
Determines <strong>the</strong> level of <strong>the</strong> Drum Key sound (<strong>the</strong> bypassed<br />
signal) that is sent to Reverb effect. This is available only<br />
when Insertion Effect Output (above) is set to “thru.” The<br />
setting made here will be applied to <strong>the</strong> same parameters<br />
in <strong>the</strong> Connect display (page 107) of <strong>the</strong> Voice Common<br />
Edit.<br />
Settings: 0 – 127<br />
! Chorus Send*<br />
Determines <strong>the</strong> level of <strong>the</strong> Drum Key sound (<strong>the</strong> bypassed<br />
signal) that is sent to Chorus effect. This is available only<br />
when Insertion Effect Output (above) is set to “thru.” The<br />
setting made here will be applied to <strong>the</strong> same parameters<br />
in <strong>the</strong> Connect display (page 107) of <strong>the</strong> Voice Common<br />
Edit.<br />
Settings: 0 – 127<br />
@ Output Select<br />
Determines <strong>the</strong> specific output(s) for <strong>the</strong> individual Drum<br />
key signal. You can assign each individual Drum Key<br />
sound to be output from a specific hardware output jack on<br />
<strong>the</strong> rear panel. This parameter is useful when you wish to<br />
apply a connected external effect to a specific drum<br />
instrument. The setting here is available only when <strong>the</strong><br />
Insertion Effect Output parameter (9) is set to “thru.”<br />
Settings: See <strong>the</strong> table below.<br />
LCD Output jacks Stereo/Mono<br />
L&R OUTPUT L and R Stereo<br />
asL&R ASSIGNABLE OUTPUT L and R Stereo<br />
m1&2 mLAN OUTPUT 1 and 2 Stereo (1: L, 2: R)<br />
m3&4 mLAN OUTPUT 3 and 4 Stereo (3: L, 4: R)<br />
m5&6 mLAN OUTPUT 5 and 6 Stereo (5: L, 6: R)<br />
m7&8 mLAN OUTPUT 7 and 8 Stereo (7: L, 8: R)<br />
m9&10 mLAN OUTPUT 9 and 10 Stereo (9: L, 10: R)<br />
m11&12 mLAN OUTPUT 11 and 12 Stereo (11: L, 12: R)<br />
m13&14 mLAN OUTPUT 13 and 14 Stereo (13: L, 14: R)<br />
asL ASSIGNABLE OUTPUT L Mono<br />
asR ASSIGNABLE OUTPUT R Mono<br />
m1 mLAN OUTPUT 1 Mono<br />
: : :<br />
m14 mLAN OUTPUT 14 Mono<br />
n The mLAN settings (m1 – m14) are available only for <strong>the</strong><br />
MOTIF <strong>XS</strong>8. The mLAN settings are available for MOTIF <strong>XS</strong>6/7<br />
only when an optional mLAN16E2 has been installed.
# Coarse (Pitch Coarse Tuning)*<br />
Determines <strong>the</strong> pitch of each Drum Key in semitones.<br />
Settings: -48 semi – +0 semi – +48 semi<br />
$ Fine (Pitch Fine Tuning)*<br />
Determines <strong>the</strong> pitch of each Drum Key in cent.<br />
Settings: -64 cent – +0 cent – +63 cent<br />
% Pitch Velocity Sens (Pitch Velocity Sensitivity)<br />
Determines how <strong>the</strong> pitch of <strong>the</strong> Drum Key responds to<br />
velocity. Positive settings will cause <strong>the</strong> pitch to rise <strong>the</strong><br />
harder you play <strong>the</strong> keyboard. A setting of 0 will cause <strong>the</strong><br />
pitch not to change. Negative settings will cause <strong>the</strong> pitch<br />
to rise <strong>the</strong> more softly you play <strong>the</strong> keyboard.<br />
Settings: -64 – +0 – +63<br />
^ [SF5] PageHold<br />
Normally in <strong>the</strong> Drum Voice Edit mode, pressing a note on<br />
<strong>the</strong> keyboard alternates <strong>the</strong> key (instrument) being edited<br />
automatically. When <strong>the</strong> [SF5] PageHold button is turned<br />
on, <strong>the</strong> key (instrument) being edited is maintained even if<br />
you press any o<strong>the</strong>r note on <strong>the</strong> keyboard. This allows you<br />
to edit a certain key while adjusting <strong>the</strong> level balance<br />
between <strong>the</strong> key being edited and <strong>the</strong> o<strong>the</strong>r keys.<br />
Adjust <strong>the</strong> brightness using <strong>the</strong><br />
Filter—[F3] Filter<br />
Each Drum Key has its own independent low pass filter<br />
and high pass filter. You can adjust <strong>the</strong> tonal characteristics<br />
of each drum sound by setting <strong>the</strong> Cutoff Frequency and<br />
Resonance.<br />
Key<br />
1<br />
2<br />
3<br />
4<br />
1 Cutoff*<br />
Raises or lowers <strong>the</strong> cutoff frequency of <strong>the</strong> low pass filter<br />
to adjust <strong>the</strong> tone brilliance. The sound can be brightened<br />
by raising <strong>the</strong> cutoff frequency, and darkened or muffled by<br />
lowering it.<br />
Settings: 0 – 255<br />
Editing a Drum Voice<br />
2 Cutoff Velocity Sens<br />
(Cutoff Velocity Sensitivity)*<br />
Determines how <strong>the</strong> Cutoff Frequency responds to velocity,<br />
or <strong>the</strong> strength with which you play notes. Positive settings<br />
will cause <strong>the</strong> Cutoff Frequency to rise <strong>the</strong> harder you play<br />
<strong>the</strong> keyboard. A setting of 0 will cause <strong>the</strong> Cutoff<br />
Frequency not to change depending on velocity. Negative<br />
settings will cause <strong>the</strong> Cutoff Frequency to rise <strong>the</strong> more<br />
softly you play <strong>the</strong> keyboard.<br />
Settings: -200% – +0% – +200%<br />
3 Resonance*<br />
Determines <strong>the</strong> emphasis given to <strong>the</strong> Cutoff Frequency to<br />
add fur<strong>the</strong>r character to <strong>the</strong> sound. Higher values result in<br />
a more pronounced effect.<br />
Settings: 0 – 127<br />
4 HPF Cutoff (High Pass Filter Cutoff Frequency)*<br />
Determines <strong>the</strong> Cutoff Frequency of <strong>the</strong> High Pass Filter.<br />
Settings: 0 – 255<br />
Amplitude settings—[F4] Amplitude<br />
From <strong>the</strong> following displays, you can set various<br />
parameters for <strong>the</strong> selected Drum Key, such as Volume,<br />
Pan, and Amplitude EG.<br />
1 3<br />
2<br />
45<br />
1 Level*<br />
Determines <strong>the</strong> output level of <strong>the</strong> Drum Key.<br />
Settings: 0 – 127<br />
2 Velocity Sens (Velocity Sensitivity)*<br />
Determines how <strong>the</strong> output level of <strong>the</strong> Drum Key responds<br />
to velocity. Positive settings will cause <strong>the</strong> output level to<br />
rise <strong>the</strong> harder you play <strong>the</strong> keyboard. A setting of 0 will<br />
cause <strong>the</strong> output level not to change. Negative settings will<br />
cause <strong>the</strong> output level to rise <strong>the</strong> more softly you play <strong>the</strong><br />
keyboard.<br />
Settings: -64 – +0 – +63<br />
3 Pan*<br />
6 7 9<br />
8<br />
Adjusts <strong>the</strong> stereo pan position of <strong>the</strong> sound.<br />
Settings: L63 (far left) – C (center) – R63 (far right)<br />
Voice mode<br />
Performance<br />
mode<br />
Sampling<br />
mode 1<br />
Song mode<br />
Pattern mode<br />
Mixing mode<br />
Sampling<br />
mode 2<br />
Master mode<br />
Utility mode<br />
File mode<br />
MOTIF <strong>XS</strong> Owner’s <strong>Manual</strong> 131<br />
Reference
Reference<br />
132<br />
Editing a Drum Voice<br />
Voice mode Performance Sampling Song mode Pattern mode Mixing mode Sampling Master mode Utility mode File mode<br />
mode mode 1<br />
mode 2<br />
4 Alternate Pan<br />
Determines <strong>the</strong> amount by which <strong>the</strong> sound is panned<br />
alternately left and right for each note you press, assuming<br />
<strong>the</strong> pan position set above as center. Higher values<br />
increase <strong>the</strong> width of <strong>the</strong> Pan range.<br />
Settings: L64 – C – R63<br />
5 Random Pan<br />
Determines <strong>the</strong> amount by which <strong>the</strong> sound of <strong>the</strong> selected<br />
Drum Key is panned randomly left and right for each note<br />
you press. The Pan setting (above) is used as <strong>the</strong> Center<br />
Pan position.<br />
Settings: 0 – 127<br />
Amplitude EG<br />
Using <strong>the</strong> AEG, you can control <strong>the</strong> transition in volume<br />
from <strong>the</strong> moment <strong>the</strong> sound starts to <strong>the</strong> moment it stops.<br />
Level<br />
(Volume)<br />
Time*<br />
The Time parameters let you set <strong>the</strong> time between <strong>the</strong><br />
adjoining points of <strong>the</strong> level parameters below. A higher<br />
value results in a longer time until reaching <strong>the</strong> next level.<br />
Settings: 0 – 127 (0 – 126, hold for Decay 2 Time)<br />
6 Attack Time<br />
Determines how long it takes for <strong>the</strong> sound to reach full<br />
volume (Attack Level) when a note is pressed.<br />
7 Decay 1 Time<br />
Determines how long it takes for <strong>the</strong> sound to fall from <strong>the</strong><br />
Attack Level to <strong>the</strong> Decay1 Level after <strong>the</strong> note is pressed.<br />
8 Decay 2 Time<br />
Determines how quickly <strong>the</strong> sound decays from <strong>the</strong><br />
Decay1 Level to silence after <strong>the</strong> note is released.<br />
Level*<br />
The Level parameter lets you set <strong>the</strong> AEG level.<br />
Settings: 0 – 127<br />
9 Decay 1 Level<br />
0<br />
Attack<br />
Time<br />
6<br />
Attack<br />
Level<br />
Decay1<br />
Time<br />
7<br />
Determines <strong>the</strong> level which <strong>the</strong> AEG level reaches from <strong>the</strong><br />
Attack Level after <strong>the</strong> Decay1 time elapses.<br />
MOTIF <strong>XS</strong> Owner’s <strong>Manual</strong><br />
9<br />
Decay1<br />
Level<br />
Decay2<br />
Time<br />
8<br />
Time<br />
Pressing <strong>the</strong> key (Key on) Releasing <strong>the</strong> key (Key off)<br />
Equalizer (EQ) Settings—[F6] EQ<br />
From this display, you can set <strong>the</strong> EQ parameters for each<br />
Drum Key.<br />
This is <strong>the</strong> same as in Normal Voice Common Edit. See<br />
page 126.
Voice Job—Convenient Functions<br />
The Voice Job mode features some convenient data organization and initialization tools, for use when creating Voices and<br />
archiving <strong>the</strong>m.<br />
Voice Job—Basic Operation<br />
1 In <strong>the</strong> Voice mode, press <strong>the</strong> [JOB] button to<br />
enter <strong>the</strong> Voice Job mode.<br />
2 Press one of <strong>the</strong> [F1] to [F4] buttons to call up<br />
<strong>the</strong> desired Job display.<br />
3 Move <strong>the</strong> cursor to <strong>the</strong> desired parameter, <strong>the</strong>n<br />
set <strong>the</strong> value.<br />
Set <strong>the</strong> parameters for executing <strong>the</strong> Job.<br />
4 Press <strong>the</strong> [ENTER] button. (The display<br />
prompts you for confirmation.)<br />
To cancel <strong>the</strong> Job, press <strong>the</strong> [DEC/NO] button.<br />
5 Press <strong>the</strong> [INC/YES] button to execute <strong>the</strong> Job.<br />
After <strong>the</strong> Job has been <strong>com</strong>pleted, a “Completed”<br />
message appears and operation returns to <strong>the</strong> original<br />
display.<br />
6 Press <strong>the</strong> [VOICE] button to return to <strong>the</strong> Voice<br />
Play mode.<br />
CAUTION<br />
Even if you execute <strong>the</strong> Job, selecting a different Voice or<br />
turning <strong>the</strong> power off without storing will erase <strong>the</strong> Voice data.<br />
Make sure to store <strong>the</strong> Voice data to internal memory by<br />
pressing <strong>the</strong> [STORE] button before selecting a different Voice<br />
or turning <strong>the</strong> power off.<br />
Initializing <strong>the</strong> Voice—[F1] Init<br />
(Initialize)<br />
This function lets you reset (initialize) all Voice parameters<br />
to <strong>the</strong>ir default settings. You can also selectively initialize<br />
certain parameters, such as Common settings, settings for<br />
each Element/Drum Key, and so on.<br />
This function is very useful when creating a <strong>com</strong>pletely new<br />
Voice from scratch.<br />
The parameters available for initializing will vary depending<br />
on <strong>the</strong> type of Voice currently selected (Normal/Drum).<br />
When a Normal Voice is selected:<br />
1<br />
2<br />
3<br />
4<br />
1 All Parameters<br />
If you place a checkmark here, all <strong>the</strong> parameters of <strong>the</strong><br />
selected Voice will be initialized.)<br />
2 Common Parameters<br />
If you place a checkmark here, all <strong>the</strong> Common Edit<br />
parameters of <strong>the</strong> selected Voice will be initialized.<br />
3 Element Parameters 1 – 8<br />
If you place a checkmark here, all <strong>the</strong> Element Edit<br />
parameters of <strong>the</strong> selected Element will be initialized.<br />
4 Initialize <strong>the</strong> settings of <strong>the</strong> waveforms<br />
assigned to <strong>the</strong> selected Elements.<br />
If you place a checkmark here, all <strong>the</strong> Waveform settings of<br />
<strong>the</strong> selected Element will be initialized.<br />
Voice mode<br />
Performance<br />
mode<br />
Sampling<br />
mode 1<br />
Song mode<br />
Pattern mode<br />
Mixing mode<br />
Sampling<br />
mode 2<br />
Master mode<br />
Utility mode<br />
File mode<br />
MOTIF <strong>XS</strong> Owner’s <strong>Manual</strong> 133<br />
Reference
Reference<br />
134<br />
Voice Job—Convenient Functions<br />
Voice mode Performance Sampling Song mode Pattern mode Mixing mode Sampling Master mode Utility mode File mode<br />
mode mode 1<br />
mode 2<br />
When a Drum Voice is selected:<br />
1<br />
2<br />
5<br />
6<br />
7<br />
5 Key Parameters<br />
If you place a checkmark here, all <strong>the</strong> Key Edit parameters<br />
of <strong>the</strong> selected Key will be initialized.<br />
6 Drum Key<br />
Determines <strong>the</strong> Drum Key to be initialized.<br />
Settings: C0 – C6<br />
7 Initialize <strong>the</strong> settings of <strong>the</strong> waveform assigned<br />
to <strong>the</strong> selected Key.<br />
If you place a checkmark here, all <strong>the</strong> Waveform settings of<br />
<strong>the</strong> selected Drum Key will be initialized.<br />
Edit Recall—[F2] Recall<br />
If you are editing a Voice but you have not stored it before<br />
switching to ano<strong>the</strong>r Voice, <strong>the</strong> edits you have made will be<br />
cleared. If this happens, you can use <strong>the</strong> Recall function to<br />
restore <strong>the</strong> Voice with your latest edits intact.<br />
Copying ano<strong>the</strong>r Voice Element to<br />
<strong>the</strong> current one—[F3] Copy<br />
From this window you can copy Common and Element/<br />
Drum Key parameter settings from any Voice to <strong>the</strong> Voice<br />
you are editing. This is useful if you are creating a Voice<br />
and wish to use some parameter settings from ano<strong>the</strong>r<br />
Voice. When Current Voice (2) is set to on, you can copy<br />
<strong>the</strong> parameter settings from an Element to a different<br />
Element of <strong>the</strong> same Voice.<br />
1<br />
2<br />
3<br />
4<br />
MOTIF <strong>XS</strong> Owner’s <strong>Manual</strong><br />
1 Voice as source<br />
Determines <strong>the</strong> Bank and <strong>the</strong> Voice number to be copied.<br />
The available parameters will vary depending on <strong>the</strong> type<br />
of Voice currently selected (Normal/Drum). This parameter<br />
cannot be set when <strong>the</strong> Current Voice (2) is turned on.<br />
2 Current Voice<br />
When this is set to on, <strong>the</strong> currently selected Voice (<strong>the</strong> one<br />
you are editing now) is selected as source. Accordingly,<br />
you can copy <strong>the</strong> parameter settings from an Element to<br />
<strong>the</strong> different Element of <strong>the</strong> same Voice.<br />
3 Data type of <strong>the</strong> source Voice<br />
Determines <strong>the</strong> source data type including <strong>the</strong> Element<br />
number or Drum Key. The available parameters will vary<br />
depending on <strong>the</strong> type of Voice currently selected (Normal/<br />
Drum).<br />
Settings: <strong>com</strong>mon, element 1 – 8 (Normal Voice), key C9 – C6 (Drum<br />
Voice)<br />
4 Data type of <strong>the</strong> destination Voice<br />
Determines <strong>the</strong> destination data type including <strong>the</strong> Element<br />
number or Drum Key. The available parameters will vary<br />
depending on <strong>the</strong> type of Voice currently selected (Normal/<br />
Drum).<br />
When <strong>the</strong> data type of <strong>the</strong> source Voice (above) is set to<br />
“<strong>com</strong>mon,” this parameter will be fixed to “<strong>com</strong>mon.”<br />
Settings: <strong>com</strong>mon, element 1 – 8 (Normal Voice), key C9 – C6 (Drum<br />
Voice)<br />
Transmitting <strong>the</strong> Voice data via MIDI<br />
(Bulk Dump)—[F4] Bulk (Bulk Dump)<br />
This function lets you send your edited parameter settings<br />
for <strong>the</strong> currently selected Voice to a <strong>com</strong>puter or ano<strong>the</strong>r<br />
MIDI device for data archiving. To execute <strong>the</strong> Bulk Dump<br />
operation, press <strong>the</strong> [ENTER] button.<br />
n In order to execute Bulk Dump, you will need to set <strong>the</strong> correct<br />
MIDI Device Number. For details, see page 268.<br />
n The Bulk Dump data includes only <strong>the</strong> MIDI messages and<br />
does not include <strong>the</strong> Waveforms.
Playing in <strong>the</strong> Performance Mode<br />
The Performance mode is used for selecting, playing, and editing <strong>the</strong> desired Performance. Performances can be made up<br />
of a maximum of four Parts (Voices), selected from <strong>the</strong> internal tone generator Parts 1 – 4. The Performance Play mode is <strong>the</strong><br />
main ‘portal’ by which you enter <strong>the</strong> Performance mode, and it is here where you select and play a Performance. Some of<br />
<strong>the</strong> Performance settings can also be edited in this mode. To call up <strong>the</strong> Performance Play display and enter <strong>the</strong><br />
Performance mode, simply press <strong>the</strong> [PERFORM] button.<br />
Selecting a Performance<br />
The MOTIF <strong>XS</strong> contains 128 Performances in each of <strong>the</strong><br />
User Banks 1 – 3.<br />
Selecting a Performance is done in basically <strong>the</strong> same way<br />
as selecting a Voice (see page 88). As in <strong>the</strong> Voice Play<br />
mode, you can use <strong>the</strong> Category Search (page 24) and<br />
Favorite Category (page 88) functions in <strong>the</strong> Performance<br />
Play mode. Note that <strong>the</strong> Category function in <strong>the</strong><br />
Performance mode does not allow you to use <strong>the</strong> Bank/<br />
Group/Number buttons.<br />
Switching a Part on/off<br />
The Performance Play mode lets you turn <strong>the</strong> four Parts of<br />
<strong>the</strong> current Performance on or off as desired. You can<br />
enable this by pressing <strong>the</strong> [PERFORM] button to enter <strong>the</strong><br />
Performance Play mode.<br />
Turning specific Parts on/off (Mute<br />
function)<br />
You can turn individual Parts on/off by using <strong>the</strong> Mute<br />
function.<br />
1 2 3 4 5 6 7<br />
8<br />
PART SELECT ARP ON/OFF<br />
9 10 11 12 13 14 15 16<br />
PART MUTE ARP HOLD<br />
2<br />
1 Press <strong>the</strong> [PERFORMANCE CONTROL] button.<br />
The PERFORMANCE CONTROL lamp lights, indicating<br />
that each Part can be turned on/off.<br />
2 Press any of <strong>the</strong> Number buttons [9] – [12].<br />
The lamp of <strong>the</strong> pressed button will be turned off and<br />
<strong>the</strong> corresponding Part will be muted.<br />
Press <strong>the</strong> same button again to turn <strong>the</strong> lamp on and<br />
disengage <strong>the</strong> mute function for that Part.<br />
You can turn multiple Parts on/off by pressing <strong>the</strong>ir<br />
buttons.<br />
1<br />
PERFORMANCE<br />
CONTROL<br />
TRACK<br />
MUTE SOLO<br />
n Parts can also be muted by using <strong>the</strong> [MUTE] and [PART<br />
SELECT] buttons. Press <strong>the</strong> [MUTE] button (<strong>the</strong> lamp<br />
lights), <strong>the</strong>n use <strong>the</strong> appropriate Number buttons [1] – [4]<br />
to mute and unmute <strong>the</strong> desired Part.<br />
Soloing a specific Part<br />
The Solo function is <strong>the</strong> opposite of Mute, and lets you<br />
instantly solo a specific Part and mute all o<strong>the</strong>rs.<br />
2<br />
1 2 3 4 5 6 7<br />
8<br />
PART SELECT ARP ON/OFF<br />
9 10 11 12 13 14 15 16<br />
PART MUTE ARP HOLD<br />
1 Press <strong>the</strong> [SOLO] button.<br />
The SOLO lamp lights, indicating that Solo is enabled.<br />
2 Press any of <strong>the</strong> Number buttons [1] – [4].<br />
The lamp of <strong>the</strong> pressed button will flash and only <strong>the</strong><br />
corresponding Part will be sounded.<br />
Press any o<strong>the</strong>r Number button to change <strong>the</strong> solo Part.<br />
Using <strong>the</strong> Arpeggio Function<br />
The Arpeggio function lets you trigger rhythm patterns, riffs<br />
and phrases using <strong>the</strong> current Voice by simply playing<br />
notes on <strong>the</strong> keyboard. In <strong>the</strong> Performance mode, each of<br />
four Arpeggio types is assigned to each of four Parts. This<br />
means four Arpeggio types can be played back<br />
simultaneously. Try selecting different Performances and<br />
check out <strong>the</strong> various Arpeggio types.<br />
n For details about Arpeggio, see page 62.<br />
PERFORMANCE<br />
CONTROL<br />
Using <strong>the</strong> Arpeggio Function in <strong>the</strong><br />
Performance mode<br />
TRACK<br />
MUTE SOLO<br />
Since <strong>the</strong> preset Performances already have <strong>the</strong>ir own<br />
Arpeggio types pre-assigned, you can play <strong>the</strong> Arpeggio<br />
by selecting <strong>the</strong> desired Performance, turning on <strong>the</strong><br />
[ARPEGGIO ON/OFF] button, <strong>the</strong>n pressing any note.<br />
Instructions on using Arpeggio are basically <strong>the</strong> same as in<br />
<strong>the</strong> Voice mode.<br />
1<br />
Voice mode<br />
Performance<br />
mode<br />
Sampling<br />
mode 1<br />
Song mode<br />
Pattern mode<br />
Mixing mode<br />
Sampling<br />
mode 2<br />
Master mode<br />
Utility mode<br />
File mode<br />
MOTIF <strong>XS</strong> Owner’s <strong>Manual</strong> 135<br />
Reference
Reference<br />
Voice mode Performance Sampling Song mode Pattern mode Mixing mode Sampling Master mode Utility mode File mode<br />
mode mode 1<br />
mode 2<br />
136<br />
Playing in <strong>the</strong> Performance Mode<br />
Turning Arpeggio playback on/off for<br />
each Part<br />
You can turn Arpeggio playback on or off for each Part of<br />
<strong>the</strong> Performance as described below.<br />
1 Press <strong>the</strong> [PERFORMANCE CONTROL] button.<br />
The [PERFORMANCE CONTROL] lamp lights,<br />
indicating that Arpeggio playback for each Part can be<br />
turned on/off.<br />
2 Pressing each of <strong>the</strong> [5] – [8] buttons toggles<br />
<strong>the</strong> Arpeggio playback on and off for each Part.<br />
If any of <strong>the</strong> [5] – [8] lamps is turned off, <strong>the</strong> Arpeggio<br />
playback of <strong>the</strong> corresponding Part is muted.<br />
Turning <strong>the</strong> Arpeggio Hold parameter<br />
on/off for each Part<br />
You can turn <strong>the</strong> Arpeggio Hold parameter (page 154) on<br />
or off for each Part of <strong>the</strong> Performance as described below.<br />
When <strong>the</strong> Arpeggio Hold parameter is set to “on,” <strong>the</strong><br />
Arpeggio playback continues even if <strong>the</strong> note is released.<br />
1 Press <strong>the</strong> [PERFORMANCE CONTROL] button.<br />
The [PERFORMANCE CONTROL] lamp lights,<br />
indicating that Arpeggio Hold for each Part can be<br />
turned on/off.<br />
2 Pressing each of <strong>the</strong> [13] – [16] buttons toggles<br />
<strong>the</strong> Arpeggio Hold parameter on and off for<br />
each Part.<br />
If any of <strong>the</strong> [13] – [16] lamps is turned on, <strong>the</strong><br />
Arpeggio Hold parameter of <strong>the</strong> corresponding Part is<br />
turned on.<br />
n When <strong>the</strong> Arpeggio Hold parameter is set to “sync-off” in<br />
<strong>the</strong> Arpeggio Main display (page 154), pressing each of<br />
<strong>the</strong> [13] – [16] buttons switches <strong>the</strong> Arpeggio Hold setting<br />
between on and sync-off.<br />
MOTIF <strong>XS</strong> Owner’s <strong>Manual</strong><br />
2<br />
1 2 3 4 5 6 7<br />
8<br />
PART SELECT ARP ON/OFF<br />
9 10 11 12 13 14 15 16<br />
PART MUTE ARP HOLD<br />
1 2 3 4 5 6 7<br />
8<br />
PART SELECT ARP ON/OFF<br />
9 10 11 12 13 14 15 16<br />
PART MUTE ARP HOLD<br />
2<br />
1<br />
PERFORMANCE<br />
CONTROL<br />
TRACK<br />
MUTE SOLO<br />
1<br />
PERFORMANCE<br />
CONTROL<br />
TRACK<br />
MUTE SOLO<br />
Using Knobs<br />
One of <strong>the</strong> more powerful performance features of <strong>the</strong><br />
MOTIF <strong>XS</strong> is its extensive set of real-time controls—<br />
especially <strong>the</strong> Knobs and Control Sliders. These let you<br />
adjust a variety of parameters for <strong>the</strong> current Performance,<br />
such as effect depth, attack/release characteristics, tonal<br />
color, and o<strong>the</strong>rs. These real-time controls can be used to<br />
change <strong>the</strong> sound as you play or to quickly edit and<br />
customize <strong>the</strong> Performance. One of six functions can be<br />
assigned to each knob, alternatively selected via <strong>the</strong><br />
[SELECTED PART CONTROL] button and <strong>the</strong> [MULTI PART<br />
CONTROL] button.<br />
SELECTED PART<br />
CONTROL<br />
1<br />
MULTI PART<br />
CONTROL<br />
TONE 1<br />
TONE 2<br />
ARP FX<br />
REVERB<br />
CHORUS<br />
PAN<br />
CUTOFF RESONANCE<br />
EQ LOW EQ MID F<br />
SWING<br />
QUANTIZE<br />
VALUE<br />
ATTACK DECAY<br />
EQ MID EQ MID Q<br />
QUANTIZE<br />
STRENGTH GATE TIME<br />
1 Select <strong>the</strong> function setting to be assigned to<br />
<strong>the</strong> Knobs.<br />
Press <strong>the</strong> [SELECTED PART CONTROL] button or<br />
[MULTI PART CONTROL] button several times to select<br />
<strong>the</strong> function setting to be assigned to <strong>the</strong> Knobs. Each<br />
time ei<strong>the</strong>r button is pressed, <strong>the</strong> lamp lights<br />
alternatively in descending order, TONE 1 → TONE 2 →<br />
ARP FX (when pressing [SELECTED PART CONTROL])<br />
or REVERB → CHORUS → PAN (when pressing [MULTI<br />
PART CONTROL]). The functions assigned to <strong>the</strong><br />
Knobs are changed according to <strong>the</strong> lamp status.<br />
n To check which functions are currently assigned to <strong>the</strong><br />
Knobs, call up <strong>the</strong> Control Function window by pressing<br />
<strong>the</strong> [SELECTED PART CONTROL] button or [MULTI PART<br />
CONTROL] button.<br />
n Holding down <strong>the</strong> [SELECTED PART CONTROL] button<br />
for a few seconds will alternate <strong>the</strong> lit lamp from <strong>the</strong><br />
current one to TONE 1. Likewise, holding down <strong>the</strong> [MULTI<br />
PART CONTROL] button for a few seconds will alternate<br />
<strong>the</strong> lit lamp from <strong>the</strong> current one to REVERB.<br />
n A red point on <strong>the</strong> Knob or Slider graphic indicates <strong>the</strong><br />
current value to which <strong>the</strong> Knob or Slider is set. Moving<br />
<strong>the</strong> Knob or Slider has no effect on <strong>the</strong> sound until this<br />
point is reached. Once you move <strong>the</strong> Knob or Slider past<br />
this point, <strong>the</strong> red point disappears and moving <strong>the</strong> Knob<br />
or Control Slider affects <strong>the</strong> sound.<br />
2<br />
Red point (indicating <strong>the</strong> current value)<br />
SU<br />
EQ<br />
VEL
2 Change tonal color.<br />
Moving <strong>the</strong> Knobs changes various aspects of <strong>the</strong><br />
Voice’s sound in real time—while you play.<br />
When one of <strong>the</strong> TONE 1, TONE 2 or ARP FX lamps are<br />
lit, <strong>the</strong> eight Knobs are used to control <strong>the</strong><br />
corresponding functions as printed on <strong>the</strong> panel (<strong>the</strong><br />
same as in <strong>the</strong> Voice mode). For details, see page 90.<br />
When one of <strong>the</strong> REVERB, CHORUS or PAN lamps are<br />
lit, <strong>the</strong> following functions are assigned to <strong>the</strong> four<br />
leftmost Knobs.<br />
Active lamp Functions of <strong>the</strong> left four knobs<br />
REVERB Adjusts <strong>the</strong> reverb depth for Parts 1 – 4<br />
CHORUS Adjusts <strong>the</strong> chorus depth for Parts 1 – 4<br />
PAN Adjusts <strong>the</strong> pan position for Parts 1 – 4<br />
n If <strong>the</strong> [E] (Edit) indicator appears at <strong>the</strong> top right of <strong>the</strong><br />
display when you adjust <strong>the</strong> Knobs, <strong>the</strong> current<br />
Performance can be stored (page 142) as a new User<br />
Performance.<br />
Changing a Part to be controlled<br />
You can change a Part to be controlled by Knob<br />
operations via any of <strong>the</strong> following instruction.<br />
1 Turn <strong>the</strong> [PERFORMANCE CONTROL] lamp on<br />
by pressing <strong>the</strong> [SELECTED PART CONTROL]<br />
button to call up <strong>the</strong> Control Function window.<br />
2 Select <strong>the</strong> desired Part by pressing <strong>the</strong> [1] – [4]<br />
buttons and [COMMON EDIT] button.<br />
By pressing <strong>the</strong> [COMMON EDIT] button, Knob<br />
operations will be applied to all four Parts. By<br />
pressing <strong>the</strong> one of <strong>the</strong> [1] – [4] buttons, Knob<br />
operations will be applied only to <strong>the</strong> selected Part.<br />
Note that controlling <strong>the</strong> knobs printed “ASSIGN 1”<br />
and “ASSIGN 2” of “TONE 1” will always affect <strong>the</strong><br />
sound of all Parts.<br />
n Note that <strong>the</strong> Control Function window cannot be<br />
called up even if you press <strong>the</strong> [SELECTED PART<br />
CONTROL] button in <strong>the</strong> Performance Play display.<br />
If you wish to change a Part in <strong>the</strong> Performance Play<br />
display, press <strong>the</strong> [PERFORMANCE CONTROL]<br />
button (<strong>the</strong> lamp lights), <strong>the</strong>n press one of <strong>the</strong> [1] –<br />
[4] and [COMMON EDIT] buttons.<br />
Using Sliders<br />
The far left four sliders adjust <strong>the</strong> volume for each of four<br />
Parts. Each of <strong>the</strong> Control Sliders 1 – 4 corresponds to <strong>the</strong><br />
same numbered Part. The status of <strong>the</strong> sliders is shown on<br />
<strong>the</strong> display.<br />
Playing in <strong>the</strong> Performance Mode<br />
The Performance Play display<br />
You can call up <strong>the</strong> Performance Play display by pressing<br />
<strong>the</strong> [PERFORM] button.<br />
4<br />
7<br />
9<br />
1 2 3 5 6<br />
! @ # $ %<br />
1 Performance Bank<br />
2 Performance Number (Group/Number)<br />
Indicates <strong>the</strong> Bank and Number of <strong>the</strong> selected<br />
Performance. A Bank is a memory location that includes<br />
data of 128 different Performances. Three Banks (User 1 –<br />
3) are provided. Each Performance within a Bank is<br />
assigned to a Performance Number of 001 to 128.<br />
Performance Numbers 001 to 128 are converted to <strong>the</strong><br />
format (shown in paren<strong>the</strong>ses) of Banks A to H and<br />
Numbers 1 to 16 (for <strong>the</strong> Bank). This format corresponds to<br />
<strong>the</strong> Group buttons [A] – [H] and <strong>the</strong> Number buttons [1] –<br />
[16]. The Performance Numbers and <strong>the</strong> corresponding<br />
Group/Numbers are listed below.<br />
Group/Number Performance Number<br />
A01 – 16 001 – 016<br />
B01 – 16 017 – 032<br />
C01 – 16 033 – 048<br />
D01 – 16 049 – 064<br />
E01 – 16 065 – 080<br />
F01 – 16 081 – 096<br />
G01 – 16 097 – 112<br />
H01 – 16 113 – 128<br />
3 Category (Main Category )<br />
Indicates <strong>the</strong> Category of <strong>the</strong> selected Performance.<br />
“Category,” consisting of Main Category and Sub<br />
Category, is a keyword that indicates <strong>the</strong> instrument<br />
characteristics or <strong>the</strong> type of sound. Each Performance<br />
can be registered to a Main Category and its Sub<br />
Category. The Category settings can be edited in <strong>the</strong><br />
General display (page 143) of <strong>the</strong> Performance Common<br />
Edit mode.<br />
4 Performance name<br />
Indicates <strong>the</strong> name of <strong>the</strong> current Performance.<br />
5 Transmit Ch (MIDI Transmit Channel)<br />
Indicates <strong>the</strong> Keyboard MIDI transmit channel. For<br />
information about how to set <strong>the</strong> value, see page 91.<br />
8<br />
)<br />
Voice mode<br />
Performance<br />
mode<br />
Sampling<br />
mode 1<br />
Song mode<br />
Pattern mode<br />
Mixing mode<br />
Sampling<br />
mode 2<br />
Master mode<br />
Utility mode<br />
File mode<br />
MOTIF <strong>XS</strong> Owner’s <strong>Manual</strong> 137<br />
Reference
Reference<br />
Voice mode Performance Sampling Song mode Pattern mode Mixing mode Sampling Master mode Utility mode File mode<br />
mode mode 1<br />
mode 2<br />
138<br />
Playing in <strong>the</strong> Performance Mode<br />
6 Octave<br />
Indicates Keyboard Octave setting set via <strong>the</strong> OCTAVE<br />
buttons. This parameter determines how much higher or<br />
lower <strong>the</strong> pitch of each key is <strong>com</strong>pared to normal pitch.<br />
7 Control Function<br />
Indicates <strong>the</strong> status of <strong>the</strong> Knobs and Control Sliders on <strong>the</strong><br />
panel. This is same as <strong>the</strong> Control Function window<br />
(page 136).<br />
8 Voice name<br />
Indicates <strong>the</strong> names of <strong>the</strong> Voices assigned to Parts 1 – 4.<br />
9 [SF1] ARP1 – [SF5] ARP5 (Arpeggio 1 – 5)<br />
The Arpeggio types are assigned to <strong>the</strong> buttons with <strong>the</strong><br />
8th note icon on <strong>the</strong> display tab. You can call <strong>the</strong>m up by<br />
pressing <strong>the</strong>se buttons any time during your keyboard<br />
performance. Assigning Arpeggio types to <strong>the</strong> buttons can<br />
be done from <strong>the</strong> Arpeggio display (page 139).<br />
) [SF6] INFO (Information)<br />
Pressing this button calls up <strong>the</strong> Information window of <strong>the</strong><br />
current Performance.<br />
! [F1] Play<br />
Pressing this button returns from <strong>the</strong> previous display to <strong>the</strong><br />
Performance Play display.<br />
@ [F2] Voice<br />
Pressing this button calls up <strong>the</strong> display (page 138) that<br />
lets you select a Voice for each Part and specify <strong>the</strong> note<br />
range it can be played from.<br />
# [F3] EG (Envelope Generator)<br />
Pressing this button calls up <strong>the</strong> display (page 139) that<br />
contains <strong>the</strong> basic EG settings.<br />
$ [F4] Arpeggio<br />
Pressing this button calls up <strong>the</strong> display (page 139) that<br />
lets you set <strong>the</strong> Arpeggio related parameters.<br />
% [F6] Effect<br />
Pressing this button calls up <strong>the</strong> Effect setup display<br />
(page 149) of <strong>the</strong> Performance Common Edit.<br />
The [E] Indicator<br />
When changing <strong>the</strong> value of <strong>the</strong> parameter in <strong>the</strong><br />
Performance Play or Edit mode, <strong>the</strong> [E] (Edit Indicator) will<br />
appear on <strong>the</strong> top right corner of <strong>the</strong> LCD display. This<br />
gives a quick confirmation that <strong>the</strong> current Performance<br />
has been modified but not yet stored. To store <strong>the</strong> current<br />
edited status, follow <strong>the</strong> instructions on page 142.<br />
MOTIF <strong>XS</strong> Owner’s <strong>Manual</strong><br />
Edit Indicator<br />
Performance information—[SF6]<br />
INFO (Information)<br />
This display indicates <strong>the</strong> information of <strong>the</strong> current<br />
Performance. Settings cannot be changed here.<br />
1<br />
2<br />
3<br />
4<br />
5<br />
6<br />
1 Bank<br />
Indicates <strong>the</strong> Bank of <strong>the</strong> selected Performance program.<br />
The values in paren<strong>the</strong>ses indicates <strong>the</strong> Bank Select MSB<br />
and LSB which can be used to select <strong>the</strong> current Voice via<br />
MIDI.<br />
2 Program (Performance number)<br />
To each Performance within a Bank, a Number of 001 to<br />
128 is assigned. The values in paren<strong>the</strong>ses indicates<br />
Group and Number.<br />
3 Category<br />
Indicates <strong>the</strong> Category of <strong>the</strong> selected Performance.<br />
4 Name<br />
Indicates <strong>the</strong> name of <strong>the</strong> current Performance.<br />
5 Part 1 – 4<br />
Indicates <strong>the</strong> Bank, Number, Main Category 1/2, and name<br />
of <strong>the</strong> Voice which is assigned to each Part.<br />
6 Effects<br />
Indicates Reverb and Chorus settings of <strong>the</strong> selected<br />
Performance.<br />
Parameters for <strong>the</strong> Voice assigned<br />
to each Part—[F2] Voice<br />
This display lets you specify <strong>the</strong> Voice and its note range of<br />
each Part. The setting made here will be applied to <strong>the</strong><br />
same parameters in <strong>the</strong> Voice display (page 151) of Part<br />
Edit.
5<br />
1 PART (Part Switch)<br />
Determines whe<strong>the</strong>r <strong>the</strong> Part is used (on) or not used (off).<br />
2 Voice Bank<br />
3 Voice Number<br />
4 Voice Name<br />
Determines <strong>the</strong> Voice Bank and Number for each Part. The<br />
two category names of <strong>the</strong> selected Voice are shown at <strong>the</strong><br />
Voice name column.<br />
5 NOTE LIMIT LO-HI<br />
Determines <strong>the</strong> lowest and highest notes in <strong>the</strong> Part’s note<br />
range. You can also create a lower and an upper range for<br />
<strong>the</strong> Voice, with a note range “hole” in <strong>the</strong> middle, by<br />
specifying <strong>the</strong> highest note first. For example, setting a<br />
Note Limit of “C5 – C4” lets you play <strong>the</strong> Voice from two<br />
separate ranges: C -2 to C4 and C5 to G8. Notes played<br />
between C4 and C5 do not play <strong>the</strong> selected Voice.<br />
Settings: C -2 – G8<br />
n You can also set <strong>the</strong> Key directly from <strong>the</strong> keyboard, by<br />
holding down <strong>the</strong> [SF6] KBD button and pressing <strong>the</strong> desired<br />
key. For details, see page 82.<br />
Changing <strong>the</strong> tonal characteristics—<br />
[F3] EG (Envelope Generator)<br />
This display lets you set <strong>the</strong> EG (Envelope Generator) and<br />
Filter. The settings made here will be applied to <strong>the</strong> same<br />
parameters in <strong>the</strong> EG display (page 157) of Part Edit as<br />
offset.<br />
1<br />
2<br />
3<br />
1 2 3 4<br />
1 AEG (Amplitude EG)<br />
Playing in <strong>the</strong> Performance Mode<br />
Determines <strong>the</strong> transition in volume from <strong>the</strong> moment a key<br />
is pressed to <strong>the</strong> moment at which it is released. The AEG<br />
consists of four parameters: Attack time, Decay time,<br />
Sustain level, and Release time. For details, see page 94.<br />
Settings: -64 – +0 – +63<br />
2 FEG (Filter EG)<br />
Determines <strong>the</strong> transition in tonal brilliance from <strong>the</strong><br />
moment a key is pressed to <strong>the</strong> moment at which it is<br />
released. The FEG consists of four parameters: Attack<br />
time, Decay time, Release time, and Depth. For details, see<br />
page 94.<br />
Settings: -64 – +0 – +63<br />
3 Filter<br />
You can produce a relatively bright or darker sound by<br />
reducing or enhancing <strong>the</strong> harmonics. There are two<br />
parameters: Cutoff (Cutoff Frequency) and Reso<br />
(Resonance). For details, see page 94.<br />
Settings: -64 – +0 – +63<br />
Arpeggio settings—[F4] Arpeggio<br />
This display determines <strong>the</strong> basic settings of <strong>the</strong> Arpeggio.<br />
There are two types of parameters: Common parameters<br />
(Common Switch, Tempo and Sync Quantize Value<br />
indicated at <strong>the</strong> top of <strong>the</strong> display) and Part parameters<br />
(o<strong>the</strong>rs). As for <strong>the</strong> Part parameters, five different Arpeggio<br />
types can be assigned to each of <strong>the</strong> four Parts, and are<br />
selectable with <strong>the</strong> [SF1] – [SF5] buttons. Press <strong>the</strong><br />
appropriate [SF1] – [SF5] button to call up <strong>the</strong> desired<br />
Arpeggio/Part <strong>com</strong>bination. Arpeggio related settings on<br />
<strong>the</strong> display are automatically assigned to <strong>the</strong><br />
corresponding [SF1] – [SF5] buttons. The settings made<br />
here will be applied to <strong>the</strong> same parameters in <strong>the</strong> General<br />
O<strong>the</strong>r display (page 145) of Common Edit, <strong>the</strong> Arpeggio<br />
Main display (page 154) and <strong>the</strong> Arpeggio O<strong>the</strong>r display<br />
(page 156) of Part Edit.<br />
1<br />
2<br />
7<br />
4 5<br />
8<br />
1 Common Switch<br />
9 )<br />
Determines whe<strong>the</strong>r Arpeggio is on or off. When calling up<br />
<strong>the</strong> Performance for which this parameter is set to on, <strong>the</strong><br />
[ARPEGGIO ON/OFF] button on <strong>the</strong> panel will be turned on<br />
automatically.<br />
Settings: on, off<br />
3<br />
6<br />
Voice mode<br />
Performance<br />
mode<br />
Sampling<br />
mode 1<br />
Song mode<br />
Pattern mode<br />
Mixing mode<br />
Sampling<br />
mode 2<br />
Master mode<br />
Utility mode<br />
File mode<br />
MOTIF <strong>XS</strong> Owner’s <strong>Manual</strong> 139<br />
Reference
Reference<br />
Voice mode Performance Sampling Song mode Pattern mode Mixing mode Sampling Master mode Utility mode File mode<br />
mode mode 1<br />
mode 2<br />
140<br />
Playing in <strong>the</strong> Performance Mode<br />
2 Tempo<br />
Determines <strong>the</strong> Arpeggio Tempo. For details, refer to <strong>the</strong><br />
Arpeggio Main display (page 154) of Part Edit.<br />
3 Sync Quantize Value<br />
Determines <strong>the</strong> actual timing at which <strong>the</strong> next Arpeggio<br />
playback starts when you trigger it while <strong>the</strong> Arpeggio of a<br />
certain Part is played back. When set to “off,” <strong>the</strong> next<br />
Arpeggio starts as soon as you trigger it. Note that <strong>the</strong><br />
number shown at right of each value indicates <strong>the</strong><br />
resolution in clocks.<br />
Settings: off, 2 60 (32nd note), 63 80 (16th note triplet), 6 120<br />
(16th note), 83 160 (8th note triplet), 8 240 (8th note),<br />
43 320 (1/4 note triplet), 4 480 (1/4 note)<br />
4 SW (Switch)<br />
Determines whe<strong>the</strong>r Arpeggio is on or off for each Part.<br />
n When <strong>the</strong> [PERFORMANCE CONTROL] button is pressed so<br />
that its lamp is turned on, <strong>the</strong> Number buttons [5] – [8] can be<br />
used to turn <strong>the</strong> Arpeggio playback of Parts 1 – 4 on or off.<br />
5 HOLD<br />
This is <strong>the</strong> same as in <strong>the</strong> Arpeggio Main display<br />
(page 154) of Part Edit.<br />
6 Voice Bank/Voice Number/Voice Name<br />
(Indication only)<br />
Indicates <strong>the</strong> Bank, Number, and name of <strong>the</strong> Voice which<br />
is assigned to each Part. You can set <strong>the</strong>m on <strong>the</strong> [F2]<br />
Voice display. Setting <strong>the</strong> Voice with ARP (7) to “on” in <strong>the</strong><br />
Arpeggio Main display of <strong>the</strong> Performance Part Edit mode<br />
automatically selects <strong>the</strong> Voice matching <strong>the</strong> currently<br />
selected Arpeggio Type.<br />
7 BANK<br />
8 CATEGORY<br />
9 SUB CATEGORY<br />
) TYPE<br />
These are <strong>the</strong> same as in <strong>the</strong> Arpeggio Main display<br />
(page 154) of Part Edit.<br />
Recording your keyboard performance<br />
in <strong>the</strong> Performance mode<br />
MOTIF <strong>XS</strong> Owner’s <strong>Manual</strong><br />
[PERFORM] ➞ [I] (Record)<br />
You can record your keyboard performance in <strong>the</strong><br />
Performance mode to a Song or Pattern. Knob operations<br />
(with <strong>the</strong> exception of some parameters described on<br />
page 61), controller operations and Arpeggio playback as<br />
well as your keyboard playing in <strong>the</strong> Performance mode<br />
can be recorded to <strong>the</strong> specified track as MIDI events.<br />
CAUTION<br />
Performance recording overwrites all tracks of <strong>the</strong> destination Song<br />
or Pattern Section. Please check whe<strong>the</strong>r or not <strong>the</strong> destination Song<br />
or Pattern Section contains data before recording. You can check<br />
whe<strong>the</strong>r or not each track contains data at <strong>the</strong> track status line on <strong>the</strong><br />
display. Select a Song or Pattern Section containing no data as <strong>the</strong><br />
destination or save all <strong>the</strong> Song/Pattern data to <strong>the</strong> external USB<br />
memory storage device before recording.<br />
Performance Recording procedure<br />
Refer to page 31 in <strong>the</strong> Start Guide.<br />
1<br />
2<br />
3<br />
4<br />
5<br />
6<br />
7<br />
8<br />
!<br />
1 Sequencer Mode<br />
Determines to which destination (Song or Pattern) your<br />
Performance playing will be recorded.<br />
Settings: pattern, song<br />
2 Pattern number (Song number)<br />
Determines <strong>the</strong> Pattern or Song number as <strong>the</strong> destination<br />
for recording. The name of <strong>the</strong> selected Pattern or Song is<br />
indicated at <strong>the</strong> right of <strong>the</strong> number.<br />
3 Section<br />
Determines <strong>the</strong> Section as <strong>the</strong> destination for recording<br />
when <strong>the</strong> Sequencer Mode is set to “pattern.” Keep in mind<br />
that <strong>the</strong> data recorded to <strong>the</strong> selected destination Section<br />
will be overwritten and erased as soon as recording starts.<br />
4 Section Length<br />
Specifies <strong>the</strong> length of <strong>the</strong> Section when <strong>the</strong> Sequencer<br />
Mode is set to “pattern.”<br />
Settings: 001 – 256<br />
5 Time Signature (Meter)<br />
Determines <strong>the</strong> time signature.<br />
Settings: 1/16 – 16/16, 1/8 – 16/8, 1/4 – 8/4<br />
6 Tempo<br />
9<br />
)<br />
Determines <strong>the</strong> tempo for recording. While recording, <strong>the</strong><br />
Arpeggio is played back at <strong>the</strong> tempo set here.<br />
Settings: 5.0 – 300.0<br />
n When MIDI Sync (page 268) is set to “MIDI” or “auto,” “MIDI”<br />
or “auto” is displayed here and Tempo cannot be set.<br />
n When <strong>the</strong> Sequencer Mode (1) is set to “pattern,” <strong>the</strong> Tempo<br />
setting here will be recorded to <strong>the</strong> Pattern. Even if <strong>the</strong><br />
destination Pattern contains already recorded data, <strong>the</strong> Tempo<br />
value will be replaced by <strong>the</strong> newly recorded one. When <strong>the</strong><br />
Sequencer Mode (1) is set to “song,” <strong>the</strong> Tempo setting here<br />
will be recorded to <strong>the</strong> Tempo track of <strong>the</strong> destination Song, if<br />
<strong>the</strong> Tempo track contains no data.
7 Key On Start Switch<br />
When set to on, recording starts immediately when you<br />
press any note on <strong>the</strong> keyboard.<br />
Settings: on, off<br />
8 Copy Performance Parameters<br />
Determines whe<strong>the</strong>r or not <strong>the</strong> Performance parameter<br />
settings are copied to <strong>the</strong> Mixing of <strong>the</strong> destination Song or<br />
Pattern.<br />
Settings: on, off<br />
9 Measure (Indication only)<br />
Indicates <strong>the</strong> current location of <strong>the</strong> recording via Measure<br />
and Beat.<br />
) Track Status (Indication only)<br />
Editing a Performance<br />
Indicates whe<strong>the</strong>r each track of <strong>the</strong> selected Song or<br />
Pattern section contains sequence data or not.<br />
! [SF1] ARP1 – [SF5] ARP5 (Arpeggio 1 – 5)<br />
The Arpeggio types are assigned to <strong>the</strong> Sub Function<br />
buttons with <strong>the</strong> 8th note icon on <strong>the</strong> display tab. You can<br />
call <strong>the</strong>m up by pressing <strong>the</strong>se buttons any time while<br />
recording. The Arpeggio Type can be set in <strong>the</strong> Arpeggio<br />
display (page 139).<br />
The Performance Edit mode lets you create your own original Performances—containing up to four different Parts (Voices)—<br />
by editing <strong>the</strong> various parameters. To enter <strong>the</strong> Performance Edit mode, press <strong>the</strong> [PERFORM] button to enter <strong>the</strong><br />
Performance mode, <strong>the</strong>n press <strong>the</strong> [EDIT] button.<br />
Common Edit and Part Edit<br />
Each performance can contain a maximum of four Parts,<br />
There are two types of Performance Edit displays: those for<br />
Common Edit to edit <strong>the</strong> settings <strong>com</strong>mon to all four Parts,<br />
and those for editing individual Parts.<br />
Common Edit<br />
Lets you edit <strong>the</strong><br />
parameters <strong>com</strong>mon to<br />
all Parts of <strong>the</strong> selected<br />
Performance.<br />
Performance Edit<br />
Part Edit 1 – 4<br />
Lets you edit <strong>the</strong><br />
parameters of <strong>the</strong><br />
individual Parts that<br />
make up a Performance.<br />
Performance Edit Procedure<br />
1 Press <strong>the</strong> [PERFORM] button to enter <strong>the</strong><br />
Performance Play mode, <strong>the</strong>n select a<br />
Performance to be edited.<br />
2 Press <strong>the</strong> [EDIT] button to enter <strong>the</strong><br />
Performance Edit mode.<br />
3 Call up <strong>the</strong> desired Edit display, Common Edit<br />
or Part Edit.<br />
To call up <strong>the</strong> Common Edit display, press <strong>the</strong><br />
[COMMON EDIT] button. To call up <strong>the</strong> Part Edit<br />
display, press any of <strong>the</strong> Number buttons [1] – [4]. In<br />
<strong>the</strong> Part Edit mode, you can select <strong>the</strong> desired Part by<br />
using <strong>the</strong> Number buttons [1] – [4].<br />
COMMON EDIT<br />
Indicates this display is in <strong>the</strong> Common Edit mode.<br />
1 2 3 4 5 6 7<br />
8<br />
PART SELECT ARP ON/OFF<br />
Select a Part.<br />
Indicates this display is in <strong>the</strong> Part Edit mode.<br />
4 Call up <strong>the</strong> desired display.<br />
To find <strong>the</strong> desired display, note <strong>the</strong> tab menu items<br />
corresponding to <strong>the</strong> [F1] – [F6] buttons and [SF1] –<br />
[SF5] buttons. Each tab menu of <strong>the</strong> [F1] – [F6] buttons<br />
contains sub menus which correspond to <strong>the</strong> [SF1] –<br />
[SF5] buttons at <strong>the</strong> bottom of <strong>the</strong> display.<br />
Tab menus corresponding to<br />
<strong>the</strong> [F1] – [F6] buttons<br />
Tab menus corresponding to<br />
<strong>the</strong> [SF1] – [SF6] buttons<br />
5 Move <strong>the</strong> cursor to <strong>the</strong> desired parameter.<br />
Voice mode<br />
Performance<br />
mode<br />
Sampling<br />
mode 1<br />
Song mode<br />
Pattern mode<br />
Mixing mode<br />
Sampling<br />
mode 2<br />
Master mode<br />
Utility mode<br />
File mode<br />
MOTIF <strong>XS</strong> Owner’s <strong>Manual</strong> 141<br />
Reference
Reference<br />
142<br />
Editing a Performance<br />
Voice mode Performance Sampling Song mode Pattern mode Mixing mode Sampling Master mode Utility mode File mode<br />
mode mode 1<br />
mode 2<br />
6 Edit <strong>the</strong> value by using <strong>the</strong> [INC/YES], [DEC/<br />
NO] buttons and <strong>the</strong> data dial.<br />
7 Repeat steps 3 – 6 as desired.<br />
8 Enter <strong>the</strong> desired name for <strong>the</strong> edited<br />
Performance.<br />
Use <strong>the</strong> Name display (page 143) of <strong>the</strong> Performance<br />
Common Edit mode.<br />
9 Store <strong>the</strong> edited Performance.<br />
Press <strong>the</strong> [STORE] button to call up <strong>the</strong> Store window<br />
(page 142) <strong>the</strong>n store <strong>the</strong> edited Performance.<br />
CAUTION<br />
The edited Performance will be lost when selecting <strong>the</strong><br />
different Performance or turning <strong>the</strong> power off. Make sure to<br />
store <strong>the</strong> Performance data to <strong>the</strong> internal memory by pressing<br />
<strong>the</strong> [STORE] button before selecting a different Performance or<br />
turning <strong>the</strong> power off.<br />
n If desired, save <strong>the</strong> edited and stored Performances to a<br />
USB storage device connected to <strong>the</strong> USB TO DEVICE<br />
connector or a <strong>com</strong>puter connected to <strong>the</strong> network to<br />
which <strong>the</strong> MOTIF <strong>XS</strong> is also connected. Keep in mind that<br />
edited Performance data is stored to internal User<br />
memory (Flash ROM) and is stored even when turning <strong>the</strong><br />
power off. As such it is not necessary to save <strong>the</strong> data to<br />
an external device; however, we still re<strong>com</strong>mend that you<br />
save or archive all important data to an external device.<br />
Refer to page 278 for details.<br />
Convenient functions for editing<br />
Performances<br />
Turning specific Parts on/off (Mute<br />
function)<br />
This is <strong>the</strong> same as in <strong>the</strong> Performance Play mode<br />
(page 135).<br />
Soloing a specific Part<br />
This is <strong>the</strong> same in <strong>the</strong> Performance Play mode (page 135).<br />
The [E] Indicator<br />
This is <strong>the</strong> same as in <strong>the</strong> Performance Play mode. See<br />
page 138.<br />
MOTIF <strong>XS</strong> Owner’s <strong>Manual</strong><br />
Compare function<br />
The Compare function lets you switch between <strong>the</strong> justedited<br />
Performance and its original, unedited condition,<br />
allowing you to hear how your edits affect <strong>the</strong> sound.<br />
1 In <strong>the</strong> Performance Edit mode, press <strong>the</strong> [EDIT]<br />
button to call up <strong>the</strong> Compare mode.<br />
In <strong>the</strong> Performance Edit mode (with <strong>the</strong> [EDIT] lamp lit),<br />
press <strong>the</strong> [EDIT] button so that its lamp flashes. The [E]<br />
indicator at <strong>the</strong> top right of <strong>the</strong> screen will change to <strong>the</strong><br />
[C] indicator and <strong>the</strong> Performance settings prior to<br />
editing will temporarily be reinstated for <strong>com</strong>parison<br />
purposes. When <strong>the</strong> [E] indicator is shown in <strong>the</strong><br />
Performance Play mode, press <strong>the</strong> [EDIT] button to<br />
enter <strong>the</strong> Performance Edit mode <strong>the</strong>n press <strong>the</strong> [EDIT]<br />
button again to call up <strong>the</strong> Compare mode.<br />
Compare indicator (sound prior to editing)<br />
2 Press <strong>the</strong> [EDIT] button again to return to <strong>the</strong><br />
original status.<br />
When <strong>the</strong> [C] indicator is shown at <strong>the</strong> right top of <strong>the</strong><br />
display, press <strong>the</strong> [EDIT] button (<strong>the</strong> lamp lights<br />
continuously, and <strong>the</strong> [C] indicator changes back to <strong>the</strong><br />
[E] indicator).<br />
Compare <strong>the</strong> edited sound with <strong>the</strong> unedited sound as<br />
desired by repeating steps 1 and 2.<br />
Storing <strong>the</strong> created Performance<br />
1 Press <strong>the</strong> [STORE] button to call up <strong>the</strong><br />
Performance Store window.<br />
2 Set <strong>the</strong> destination for storing <strong>the</strong><br />
Performance.<br />
Select a Performance Bank and Number as destination<br />
by using <strong>the</strong> data dial, [INC/YES] and [DEC/NO]<br />
buttons.<br />
You can also use <strong>the</strong> [USER 1] – [USER 3], Group [A] –<br />
[H], and Number [1] – [16] buttons to specify <strong>the</strong><br />
destination.
3 Press <strong>the</strong> [ENTER] button. (The display<br />
prompts you for confirmation.)<br />
To cancel <strong>the</strong> Store operation, press <strong>the</strong> [DEC/NO]<br />
button.<br />
4 To execute <strong>the</strong> Store operation, press <strong>the</strong> [INC/<br />
YES] button.<br />
After <strong>the</strong> Performance has been stored, a “Completed”<br />
message appears and operation returns to <strong>the</strong><br />
Performance Play display.<br />
Common Edit parameters<br />
Editing a Performance<br />
When you execute <strong>the</strong> Store operation, <strong>the</strong> settings for <strong>the</strong><br />
destination memory will be overwritten. Important data should<br />
always be saved to a USB storage device connected to <strong>the</strong><br />
USB TO DEVICE terminal or to a <strong>com</strong>puter connected to <strong>the</strong><br />
same network as <strong>the</strong> MOTIF <strong>XS</strong>. For detailed instructions on<br />
saving, see page 278.<br />
[PERFORM] ➞ Performance selection ➞ [EDIT] ➞ [COMMON EDIT]<br />
Common Edit lets you edit <strong>the</strong> parameters <strong>com</strong>mon to all Parts of <strong>the</strong> selected Performance. This covers all parameters of<br />
<strong>the</strong> Common Edit.<br />
About <strong>the</strong> asterisk (*) marks<br />
For users who are new to editing and may be confused by <strong>the</strong> large amount of parameters, <strong>the</strong> most basic and easy-to-understand<br />
parameters are conveniently marked with asterisks in this section. If you are just starting out with editing a Performance, try <strong>the</strong>se<br />
parameters first.<br />
General Settings for <strong>the</strong> selected<br />
Performance—[F1] General<br />
Naming <strong>the</strong> edited Performance—[SF1]<br />
Name<br />
1<br />
2 3<br />
1 Name*<br />
Enter <strong>the</strong> desired name for <strong>the</strong> currently edited<br />
Performance. The Performance name can contain up to 10<br />
characters. You can call up <strong>the</strong> Character List by pressing<br />
<strong>the</strong> [SF6] CHAR button and enter <strong>the</strong> name. For detailed<br />
instructions on naming, refer to “Basic Operation” on<br />
page 82.<br />
2 Main Category*<br />
3 Sub Category*<br />
Determines <strong>the</strong> Main Category and Sub Category of <strong>the</strong><br />
Performance. “Category” can be used as a keyword<br />
representing <strong>the</strong> characteristic of <strong>the</strong> Performance. The<br />
appropriate setting makes it easy to find <strong>the</strong> desired<br />
Performance from a variety of Performances. The Main<br />
Category indicates <strong>the</strong> types of instruments and is divided<br />
into Sub Categories.<br />
Settings: See <strong>the</strong> following list.<br />
CAUTION<br />
Performance Category<br />
Main Sub<br />
Rock Rock / Pop Top40 Top40<br />
Clsic Classic Rock<br />
Hard Hard Rock<br />
Cntry Country<br />
Blues Blues<br />
Folk Folk<br />
Balad Ballad<br />
Film Film<br />
NoAsg No Assignment<br />
R&B R&B / Hip Hop HipHp Hip Hop<br />
Modrn Modern R&B<br />
Clsic Classic R&B<br />
Funk Funk<br />
NoAsg No Assignment<br />
Elect Electronic Tekno Techno<br />
Trnce Trance<br />
House Dance Pop / House<br />
D&B Breakbeats / D&B<br />
Chill Chillout / Ambient<br />
NoAsg No Assignment<br />
Jazz Jazz Swing Swing<br />
Modrn Modern Jazz<br />
Smoth Smooth Jazz<br />
JzFnk Jazz Funk<br />
Club Club Jazz<br />
NoAsg No Assignment<br />
World World Latin Latin<br />
Regae Reggae / Dancehall<br />
Ethno Ethnic / World<br />
NoAsg No Assignment<br />
SpLyr Splits & Layers Piano Piano<br />
Organ Organ<br />
Synth Synth<br />
Symph Symphonic<br />
Strng Strings<br />
MOTIF <strong>XS</strong> Owner’s <strong>Manual</strong><br />
Voice mode<br />
Performance<br />
mode<br />
Sampling<br />
mode 1<br />
Song mode<br />
Pattern mode<br />
Mixing mode<br />
Sampling<br />
mode 2<br />
Master mode<br />
Utility mode<br />
File mode<br />
143<br />
Reference
Reference<br />
144<br />
Editing a Performance<br />
Voice mode Performance Sampling Song mode Pattern mode Mixing mode Sampling Master mode Utility mode File mode<br />
mode mode 1<br />
mode 2<br />
SpLyr Splits & Layers WWind Woodwind<br />
Brass Brass<br />
Guitr Guitar<br />
Bass Bass<br />
Cperc Chromatic Percussion<br />
Pad Pad<br />
NoAsg No Assignment<br />
FX FX Seq Sequence<br />
Hard Hard<br />
Soft Soft<br />
S.EFX Sound Effect<br />
NoAsg No Assignment<br />
NoAsg No Assignment NoAsg No Assignment<br />
n You can call up <strong>the</strong> list and select <strong>the</strong> desired item by pressing<br />
<strong>the</strong> [SF6] LIST button. For details, see page 82.<br />
Portamento settings—[SF2] Porta<br />
1<br />
2<br />
3<br />
Main Sub<br />
1 Portamento Common*<br />
Determines whe<strong>the</strong>r or not Portamento is applied to <strong>the</strong><br />
current Performance. When this is set to on, Portamento is<br />
applied to <strong>the</strong> Part for which <strong>the</strong> Part Switch parameter is<br />
set to on.<br />
2 Portamento Part 1 – 4*<br />
Determines whe<strong>the</strong>r Portamento is applied to each Part or<br />
not.<br />
3 Portamento Time Offset*<br />
Determines <strong>the</strong> pitch transition time when Portamento is<br />
applied. You can adjust Portamento time for <strong>the</strong> Voice<br />
assigned to each Part as offset. Higher values result in a<br />
longer pitch change time.<br />
Settings: -64 – +63<br />
EQ settings for each Part—[SF3] Part EQ<br />
From this display, you can edit <strong>the</strong> value on <strong>the</strong> [F5] EQ<br />
display (page 158) as offset to change <strong>the</strong> tonal<br />
characteristic.<br />
This is a three-band (Low, Mid, High) parametric EQ. The<br />
High band and Low band are <strong>the</strong> shelving type. The<br />
Middle band is <strong>the</strong> peaking type.<br />
MOTIF <strong>XS</strong> Owner’s <strong>Manual</strong><br />
1 2 3<br />
4 5 6<br />
7<br />
Frequency<br />
Determines <strong>the</strong> center frequency. Frequencies around<br />
each of three points are attenuated/boosted by <strong>the</strong> Gain<br />
setting below. Higher values produce a higher frequency.<br />
Settings: -64 – +63<br />
1 Low Frequency<br />
Determines <strong>the</strong> center frequency of <strong>the</strong> lower EQ band.<br />
2 Mid Frequency<br />
Determines <strong>the</strong> center frequency of <strong>the</strong> middle EQ band.<br />
3 High Frequency<br />
Determines <strong>the</strong> center frequency of <strong>the</strong> higher EQ band.<br />
Gain<br />
Gain<br />
+<br />
0<br />
–<br />
3 bands<br />
Determines <strong>the</strong> level gain for each frequency (set above),<br />
or <strong>the</strong> amount <strong>the</strong> selected frequency band is attenuated or<br />
boosted.<br />
Settings: -64 – +63<br />
4 Low Gain<br />
Determines <strong>the</strong> amount by which signals below <strong>the</strong> Low<br />
Frequency (1) will be boosted/attenuated.<br />
5 Mid Gain<br />
4<br />
Determines <strong>the</strong> amount at which signals at <strong>the</strong> Mid<br />
Frequency (2) will be boosted/attenuated.<br />
6 High Gain<br />
Determines <strong>the</strong> amount by which signals above <strong>the</strong> High<br />
Frequency (3) will be boosted/attenuated.<br />
7 Q (Bandwidth)<br />
5<br />
1 2 3<br />
Low Middle High<br />
Determines <strong>the</strong> frequency bandwidth for each frequency<br />
band. The larger <strong>the</strong> setting, <strong>the</strong> greater <strong>the</strong> bandwidth.<br />
The lower <strong>the</strong> setting, <strong>the</strong> smaller <strong>the</strong> bandwidth.<br />
Settings: -64 – +63<br />
7<br />
6<br />
Frequency
O<strong>the</strong>r settings—[SF4] O<strong>the</strong>r<br />
From this display, you can set <strong>the</strong> control functions for <strong>the</strong><br />
Knobs, and <strong>the</strong> up/down range for <strong>the</strong> Pitch Bend wheel.<br />
1<br />
2<br />
3<br />
4<br />
5<br />
6<br />
1 Knob Control Assign<br />
Determines which lamp among <strong>the</strong> TONE 1, TONE 2, ARP<br />
FX, REVERB, CHORUS and PAN is turned on when<br />
selecting a Performance. This setting can be stored for<br />
each Performance.<br />
Settings: tone1, tone2, ARP FX, reverb, chorus, pan<br />
2 Assign 1 Value<br />
3 Assign 2 Value<br />
Indicates <strong>the</strong> level of <strong>the</strong> Knobs printed “ASSIGN1” and<br />
“ASSIGN2” at <strong>the</strong> time at which <strong>the</strong> Performance is<br />
selected with <strong>the</strong> TONE1 lamp turned on. The functions<br />
assigned to <strong>the</strong> Knobs are indicated at right of <strong>the</strong> values<br />
respectively.<br />
Settings: -64 – +0 – +63<br />
n The functions assigned to <strong>the</strong> ASSIGN 1/2 Knobs can be set in<br />
<strong>the</strong> Controller Set display (page 104).<br />
4 A. Function 1 Mode<br />
(Assignable Function 1 Mode)<br />
5 A. Function 2 Mode<br />
(Assignable Function 2 Mode)<br />
Determines whe<strong>the</strong>r <strong>the</strong> ASSIGNABLE FUNCTION [1] and<br />
[2] buttons functions as a latch type or momentary type.<br />
When set to “latch,” pressing <strong>the</strong> button alternates <strong>the</strong><br />
lamp status between on and off. When set to “momentary,”<br />
pressing/holding <strong>the</strong> button turns <strong>the</strong> lamp on and<br />
releasing <strong>the</strong> button turns <strong>the</strong> lamp off.<br />
Settings: momentary, latch<br />
6 Ribbon Mode (Ribbon Controller mode)<br />
Determines <strong>the</strong> behavior of <strong>the</strong> Ribbon Controller. When set<br />
to reset, releasing your finger from <strong>the</strong> Ribbon Controller<br />
automatically returns <strong>the</strong> value to <strong>the</strong> center. When set to<br />
hold, releasing your finger from <strong>the</strong> Ribbon Controller<br />
maintains <strong>the</strong> value at <strong>the</strong> last point of contact.<br />
Settings: hold, reset<br />
7 ARP Common Switch<br />
7<br />
8<br />
Determines whe<strong>the</strong>r Arpeggio is on or off. This parameter<br />
is <strong>the</strong> same as <strong>the</strong> Common Switch parameter in <strong>the</strong><br />
Arpeggio display (page 139) of <strong>the</strong> Performance Play<br />
mode.<br />
8 ARP Sync Quantize Value<br />
Editing a Performance<br />
This parameter is <strong>the</strong> same as <strong>the</strong> Sync Quantize Value<br />
parameter in <strong>the</strong> Arpeggio display (page 139) of <strong>the</strong><br />
Performance Play mode.<br />
Output Level and Master Effect<br />
settings—[F2] Level/MEF<br />
Output Level settings—[SF1] Level<br />
1<br />
2<br />
3<br />
4<br />
1 Volume*<br />
Determines <strong>the</strong> output level of <strong>the</strong> entire Performance. You<br />
can adjust <strong>the</strong> overall volume, keeping <strong>the</strong> balance<br />
between all Parts.<br />
Settings: 0 – 127<br />
2 Pan*<br />
Determines <strong>the</strong> stereo pan position of <strong>the</strong> Performance.<br />
You can also adjust this parameter using <strong>the</strong> PAN knob on<br />
<strong>the</strong> front panel.<br />
Settings: L63 (far left) – C (center) – R63 (far right)<br />
n Note that this Performance Pan parameter may have little or no<br />
audible effect if <strong>the</strong> Pan for a specific Part is set to <strong>the</strong> left<br />
position and <strong>the</strong> Pan for ano<strong>the</strong>r Part is set to <strong>the</strong> right position.<br />
3 Reverb Send*<br />
Adjusts <strong>the</strong> reverb send level. The higher <strong>the</strong> value <strong>the</strong><br />
deeper <strong>the</strong> reverb. You can also adjust this parameter<br />
using <strong>the</strong> knob on <strong>the</strong> front panel.<br />
Settings: 0 – 127<br />
4 Chorus Send*<br />
Adjusts <strong>the</strong> chorus send level. The higher <strong>the</strong> value <strong>the</strong><br />
deeper <strong>the</strong> chorus. You can also adjust this parameter<br />
using <strong>the</strong> knob on <strong>the</strong> front panel.<br />
Settings: 0 – 127<br />
n When Reverb Send/Chorus Send is set to “0” in <strong>the</strong><br />
Performance Part Edit mode, <strong>the</strong> setting here is not available.<br />
Voice mode<br />
Performance<br />
mode<br />
Sampling<br />
mode 1<br />
Song mode<br />
Pattern mode<br />
Mixing mode<br />
Sampling<br />
mode 2<br />
Master mode<br />
Utility mode<br />
File mode<br />
MOTIF <strong>XS</strong> Owner’s <strong>Manual</strong> 145<br />
Reference
Reference<br />
146<br />
Editing a Performance<br />
Voice mode Performance Sampling Song mode Pattern mode Mixing mode Sampling Master mode Utility mode File mode<br />
mode mode 1<br />
mode 2<br />
Master Effect settings—[SF2] MasterFX<br />
1 2 3<br />
n Depending on <strong>the</strong> selected parameter, <strong>the</strong> LIST icon is shown<br />
at <strong>the</strong> tab menu corresponding to <strong>the</strong> [SF6] button. In this<br />
condition, you can call up <strong>the</strong> list by pressing <strong>the</strong> [SF6] LIST<br />
button, <strong>the</strong>n select <strong>the</strong> desired item from <strong>the</strong> list. For details<br />
see page 82.<br />
1 Switch<br />
Determines whe<strong>the</strong>r Master Effect is applied or not to <strong>the</strong><br />
selected Performance. You can turn it on or off by pressing<br />
<strong>the</strong> [MASTER EFFECT] button on <strong>the</strong> front panel.<br />
Settings: on, off<br />
2 Type<br />
Selects an Effect Type. Details about <strong>the</strong> Effect types are<br />
described on page 70.<br />
Settings: See <strong>the</strong> Effect Type list in <strong>the</strong> separate Data List booklet.<br />
3 Preset<br />
You can set various parameters in order to change how <strong>the</strong><br />
sound is affected by <strong>the</strong> selected Effect type. This<br />
parameter lets you call up <strong>the</strong> pre-programmed settings of<br />
<strong>the</strong>se effect parameters.<br />
4 Effect Parameters<br />
The number of parameters and values available differs<br />
depending on <strong>the</strong> currently selected effect type. Refer to<br />
page 73 for details about <strong>the</strong> Effect parameters. Refer to<br />
<strong>the</strong> separate Data List booklet for information on <strong>the</strong><br />
parameters for each Effect type.<br />
Master EQ settings—[SF3] MasterEQ<br />
From this display you can apply five-band equalization to<br />
all Parts of <strong>the</strong> selected Performance.<br />
1<br />
2<br />
3<br />
4<br />
MOTIF <strong>XS</strong> Owner’s <strong>Manual</strong><br />
4<br />
Gain<br />
+<br />
0<br />
–<br />
1 Shape<br />
Enables you to select one of two equalizer shapes:<br />
shelving or peaking. This parameter is available for Low<br />
and High.<br />
Settings: shelv, peak<br />
shelv (Shelving type)<br />
This type of EQ shape lets you attenuate/boost <strong>the</strong> signal at<br />
frequencies above or below <strong>the</strong> specified Frequency setting.<br />
EQ Low<br />
+<br />
0<br />
–<br />
5 bands<br />
peak (Peaking type)<br />
This type of EQ shape lets you attenuate/boost <strong>the</strong> signal at <strong>the</strong><br />
specified Frequency setting.<br />
2 Frequency<br />
Determines <strong>the</strong> center frequency. Frequencies around this<br />
point are attenuated/boosted by <strong>the</strong> Gain setting below.<br />
Settings:<br />
Low<br />
When <strong>the</strong> Shape is set to “shelv”: 32Hz – 2.0kHz<br />
When <strong>the</strong> Shape is set to “peak”: 63Hz – 2.0kHz<br />
Lo-Mid, Mid, Hi-Mid<br />
100 Hz – 10.0 kHz<br />
High<br />
500 Hz – 16.0 kHz<br />
3 Gain<br />
Q (frequency bandwidth)<br />
Low Lo-Mid Mid Hi-Mid High<br />
+<br />
0<br />
–<br />
Gain<br />
Frequency<br />
EQ High<br />
Gain<br />
+<br />
Frequency<br />
Frequency<br />
–<br />
Frequency Frequency<br />
Determines <strong>the</strong> level gain for <strong>the</strong> Frequency (set above), or<br />
<strong>the</strong> amount <strong>the</strong> selected frequency band is attenuated or<br />
boosted.<br />
Settings: -12dB – +0dB – +12dB<br />
0<br />
Gain<br />
Frequency<br />
Frequency
4 Q (Bandwidth)<br />
This varies <strong>the</strong> signal level at <strong>the</strong> Frequency setting to<br />
create various frequency curve characteristics. The higher<br />
<strong>the</strong> setting <strong>the</strong> smaller <strong>the</strong> Q (Bandwidth). The lower <strong>the</strong><br />
setting, <strong>the</strong> greater <strong>the</strong> Q (Bandwidth).<br />
Settings: 0.1 – 12.0<br />
n When <strong>the</strong> Shape parameters (1) of <strong>the</strong> Low and High are set<br />
to “shelv,” <strong>the</strong> Q parameters (4) of <strong>the</strong> Low and High are not<br />
available.<br />
Controller settings—[F3] Ctrl Asgn<br />
(Controller Assign)<br />
You can assign MIDI Control Change Numbers to <strong>the</strong><br />
controllers and knobs on <strong>the</strong> front panel for <strong>the</strong> selected<br />
Performance. For example, you could use <strong>the</strong> ASSIGN 1<br />
and 2 knobs to control effect depth, while using <strong>the</strong> Foot<br />
Controller to control modulation. These control<br />
assignments are called “Controller Assign.” You can have<br />
independent Controller Assign settings for each<br />
Performance.<br />
1<br />
2<br />
3<br />
4<br />
5<br />
6<br />
+<br />
0<br />
–<br />
1 Ribbon Controller Control No.<br />
Determines <strong>the</strong> Controller Change number generated<br />
when you run your finger across <strong>the</strong> surface of <strong>the</strong> Ribbon<br />
Controller.<br />
Settings: 00 – 95<br />
2 Foot Controller 1 Control No.<br />
Foot Controller 2 Control No.<br />
Determines <strong>the</strong> Control Change number generated when<br />
you use <strong>the</strong> Foot Controller connected to <strong>the</strong> FOOT<br />
CONTROLLER jack.<br />
Settings: 00 – 95<br />
3 Foot Switch Control No.<br />
Frequency<br />
Determines <strong>the</strong> Control Change number generated when<br />
you use <strong>the</strong> Footswitch connected to <strong>the</strong> FOOT SWITCH<br />
ASSIGNABLE jack.<br />
Settings: 000 – 100<br />
0.1<br />
12.0<br />
Frequency<br />
Editing a Performance<br />
n When a Control Change number of 96 or higher is selected,<br />
<strong>the</strong> function indicated to <strong>the</strong> right of <strong>the</strong> number is enabled for<br />
control, but no MIDI Control Change number is actually<br />
assigned to <strong>the</strong> Footswitch.<br />
4 Assign 1 Control No.<br />
Assign 2 Control No.<br />
Determines <strong>the</strong> Control Change number generated when<br />
you control <strong>the</strong> ASSIGN1 knob and ASSIGN2 knob with <strong>the</strong><br />
TONE1 lamp turned on.<br />
Settings: 00 – 95<br />
5 A. Function 1 Control No.<br />
A. Function 2 Control No.<br />
Determines <strong>the</strong> Control Change numbers generated when<br />
you press <strong>the</strong> ASSIGNABLE FUNCTION buttons.<br />
Settings: 00 – 95<br />
6 Breath Controller Control No.<br />
Determines <strong>the</strong> Control Change number generated when<br />
you use a Breath Controller connected to <strong>the</strong> MIDI IN<br />
connector of this instrument.<br />
Settings: 00 – 95<br />
Audio In settings—[F4] Audio In<br />
You can set parameters related to audio input from <strong>the</strong> A/D<br />
INPUT connector and <strong>the</strong> mLAN connector.<br />
n The mLAN Input (m1 – 14) is available only for <strong>the</strong> MOTIF <strong>XS</strong>8.<br />
This is available for MOTIF <strong>XS</strong>6/7 only when an optional<br />
mLAN16E2 has been installed.<br />
Output Settings—[SF1] Output<br />
1<br />
2 3<br />
4<br />
6 5<br />
7<br />
1 Volume<br />
Determines <strong>the</strong> output level of <strong>the</strong> Audio Input Part.<br />
Settings: 0 – 127<br />
2 Pan<br />
Determines <strong>the</strong> stereo pan position of <strong>the</strong> Audio Input Part.<br />
Settings: L63 (far left) – C (center) – R63 (far right)<br />
3 Mono/Stereo<br />
Determines <strong>the</strong> signal configuration for <strong>the</strong> Audio Input Part,<br />
or how <strong>the</strong> signal or signals are routed (stereo or mono).<br />
Settings: L mono, R mono, L+R mono, stereo<br />
L mono<br />
Only <strong>the</strong> L channel of <strong>the</strong> audio input is used.<br />
Voice mode<br />
Performance<br />
mode<br />
Sampling<br />
mode 1<br />
Song mode<br />
Pattern mode<br />
Mixing mode<br />
Sampling<br />
mode 2<br />
Master mode<br />
Utility mode<br />
File mode<br />
MOTIF <strong>XS</strong> Owner’s <strong>Manual</strong> 147<br />
Reference
Reference<br />
148<br />
Editing a Performance<br />
Voice mode Performance Sampling Song mode Pattern mode Mixing mode Sampling Master mode Utility mode File mode<br />
mode mode 1<br />
mode 2<br />
R mono<br />
Only <strong>the</strong> R channel of <strong>the</strong> audio input is used.<br />
L+R mono<br />
The L and R channels of <strong>the</strong> audio input are mixed and processed in<br />
mono.<br />
stereo<br />
Both <strong>the</strong> L and R channels of <strong>the</strong> audio input are used.<br />
4 Output Select<br />
Determines <strong>the</strong> output jack assignment for <strong>the</strong> Audio Input<br />
Part.<br />
Settings: See <strong>the</strong> table below.<br />
LCD Output jacks Stereo/Mono<br />
L&R OUTPUT L and R Stereo<br />
asL&R ASSIGNABLE OUTPUT L and R Stereo<br />
m1&2 mLAN OUTPUT 1 and 2 Stereo (1: L, 2: R)<br />
m3&4 mLAN OUTPUT 3 and 4 Stereo (3: L, 4: R)<br />
m5&6 mLAN OUTPUT 5 and 6 Stereo (5: L, 6: R)<br />
m7&8 mLAN OUTPUT 7 and 8 Stereo (7: L, 8: R)<br />
m9&10 mLAN OUTPUT 9 and 10 Stereo (9: L, 10: R)<br />
m11&12 mLAN OUTPUT 11 and 12 Stereo (11: L, 12: R)<br />
m13&14 mLAN OUTPUT 13 and 14 Stereo (13: L, 14: R)<br />
asL ASSIGNABLE OUTPUT L Mono<br />
asR ASSIGNABLE OUTPUT R Mono<br />
m1 mLAN OUTPUT 1 Mono<br />
: : :<br />
m14 mLAN OUTPUT 14 Mono<br />
ins L<br />
(A/D input only)<br />
Internal Vocoder Module Mono<br />
n You can call up <strong>the</strong> list and select <strong>the</strong> desired item by pressing<br />
<strong>the</strong> [SF6] LIST button. For details, see page 82.<br />
5 Reverb Send<br />
Determines <strong>the</strong> Send level of <strong>the</strong> Audio Input Part signal<br />
sent to <strong>the</strong> Reverb effect. The higher <strong>the</strong> value, <strong>the</strong> deeper<br />
<strong>the</strong> reverb.<br />
Settings: 0 – 127<br />
6 Chorus Send<br />
Determines <strong>the</strong> Send level of <strong>the</strong> Audio Input Part signal<br />
sent to <strong>the</strong> Chorus effect. The higher <strong>the</strong> value, <strong>the</strong> deeper<br />
<strong>the</strong> Chorus.<br />
Settings: 0 – 127<br />
7 Dry Level<br />
Determines <strong>the</strong> level of <strong>the</strong> Audio Input Part which has not<br />
been processed with <strong>the</strong> System Effects (Reverb, Chorus).<br />
The higher <strong>the</strong> value, <strong>the</strong> shallower <strong>the</strong> Reverb and Chorus.<br />
Settings: 0 – 127<br />
MOTIF <strong>XS</strong> Owner’s <strong>Manual</strong><br />
Insertion Effect Connection of A/D Input<br />
—[SF2] Connect<br />
From this display, you can set <strong>the</strong> Insertion Effect Types<br />
applied to <strong>the</strong> Audio Input signal in <strong>the</strong> Performance mode.<br />
The System Effect can be set in <strong>the</strong> Effect display<br />
(page 149). Keep in mind that <strong>the</strong> Insertion Effect cannot<br />
be applied to <strong>the</strong> audio input signal via <strong>the</strong> mLAN<br />
connector.<br />
1<br />
1 INSERTION CONNECT (Insertion Connection)<br />
From this display you can set <strong>the</strong> effect routing for Insertion<br />
effects A and B. The setting changes are shown on <strong>the</strong><br />
diagram in <strong>the</strong> display, giving you a clear picture of how<br />
<strong>the</strong> signal is routed.<br />
Settings: Ins A F B, Ins B F A<br />
Ins A F B (A to B)<br />
Signals processed with <strong>the</strong> Insertion Effect A will be sent to <strong>the</strong><br />
Insertion Effect B and signals processed with <strong>the</strong> Insertion Effect B is<br />
sent to Reverb and Chorus.<br />
Ins B F A (B to A)<br />
Signals processed with <strong>the</strong> Insertion Effect B will be sent to <strong>the</strong><br />
Insertion Effect A and signals processed with <strong>the</strong> Insertion Effect B is<br />
sent to Reverb and Chorus.<br />
2 Insertion A (Insertion A Category/Type)*<br />
3 Insertion B (Insertion B Category/Type)*<br />
Determines <strong>the</strong> Effect type for Insertion A and B. From <strong>the</strong><br />
Category column, you can select one of <strong>the</strong> Effect<br />
Categories, each of which contains similar Effect types.<br />
From <strong>the</strong> Type column, you can select one of <strong>the</strong> Effect<br />
Types listed in <strong>the</strong> selected Category.<br />
Settings: Details about <strong>the</strong> Effect categories and types are described<br />
on page 70.<br />
n You can call up <strong>the</strong> list by pressing <strong>the</strong> [SF6] LIST button <strong>the</strong>n<br />
select <strong>the</strong> desired one from <strong>the</strong> list. For details, see page 82.<br />
2<br />
3
Effect Parameter settings—[SF3] Ins A,<br />
[SF4] Ins B<br />
1<br />
n Depending on <strong>the</strong> selected parameter, <strong>the</strong> LIST icon is shown<br />
at <strong>the</strong> tab menu corresponding to <strong>the</strong> [SF6] button. In this<br />
condition, you can call up <strong>the</strong> list by pressing <strong>the</strong> [SF6] LIST<br />
button, <strong>the</strong>n select <strong>the</strong> desired item from <strong>the</strong> list. For details<br />
see page 82.<br />
1 Category<br />
2 Type<br />
From <strong>the</strong> Category column, you can select one of <strong>the</strong> Effect<br />
Categories each of which contains similar Effect types.<br />
From <strong>the</strong> Type column, you can select one of <strong>the</strong> Effect<br />
Types listed in <strong>the</strong> selected Category.<br />
Settings: Details about <strong>the</strong> Effect categories and types are described<br />
on page 70.<br />
3 Preset<br />
You can set various parameters in order to change how <strong>the</strong><br />
sound is affected by <strong>the</strong> selected Effect type. This<br />
parameter lets you call up <strong>the</strong> pre-programmed settings of<br />
<strong>the</strong>se effect parameters.<br />
4 Effect Parameters<br />
The number of parameters and values available differs<br />
depending on <strong>the</strong> currently selected effect type. Refer to<br />
page 73 for details about <strong>the</strong> Effect parameters. Refer to<br />
<strong>the</strong> separate Data List booklet for information on <strong>the</strong><br />
parameters for each Effect type.<br />
2 3<br />
4<br />
Effect settings—[F5] Effect<br />
Editing a Performance<br />
From <strong>the</strong> following displays, you can set <strong>the</strong> Effect<br />
connection and values of o<strong>the</strong>r parameters. For details<br />
about <strong>the</strong> structure in <strong>the</strong> Performance mode, see page 69.<br />
Effect Connection settings—[SF1] Connect<br />
This display gives you at-a-glance, overall view of <strong>the</strong><br />
effect routing and <strong>com</strong>prehensive control over <strong>the</strong> effects.<br />
n Depending on <strong>the</strong> selected parameter, <strong>the</strong> LIST icon is shown<br />
at <strong>the</strong> tab menu corresponding to <strong>the</strong> [SF6] button. In this<br />
condition, you can call up <strong>the</strong> list by pressing <strong>the</strong> [SF6] LIST<br />
button, <strong>the</strong>n select <strong>the</strong> desired item from <strong>the</strong> list. For details<br />
see page 82.<br />
1 Chorus (Chorus Category/Type)<br />
Selects a Chorus Effect type after selecting a category.<br />
From <strong>the</strong> Category column, you can select one of <strong>the</strong> Effect<br />
categories, each of which contains similar Effect types.<br />
From <strong>the</strong> Type column, you can select one of <strong>the</strong> Effect<br />
types listed in <strong>the</strong> selected category.<br />
Settings: Details about <strong>the</strong> Effect categories and types are described<br />
on page 70.<br />
2 Reverb (Reverb Type)<br />
Determines <strong>the</strong> Reverb Effect type. It is not necessary to<br />
select a Category because <strong>the</strong>re is only one category in<br />
Reverb.<br />
Settings: Details about <strong>the</strong> Effect types are described on page 70.<br />
3 CHORUS TO REVERB<br />
Determines <strong>the</strong> Send level of <strong>the</strong> signal sent from <strong>the</strong><br />
Chorus Effect to <strong>the</strong> Reverb Effect. The higher <strong>the</strong> value,<br />
<strong>the</strong> deeper <strong>the</strong> Reverb that is applied to <strong>the</strong> Chorusprocessed<br />
signal.<br />
Settings: 0 – 127<br />
4 Chorus Return<br />
Determines <strong>the</strong> Return level of <strong>the</strong> Chorus Effect.<br />
Settings: 0 – 127<br />
5 Chorus Pan<br />
3<br />
1<br />
2<br />
Determines <strong>the</strong> pan position of <strong>the</strong> Chorus effect sound.<br />
Settings: L63 (far left) – C (center) – R63 (far right)<br />
4 5<br />
6<br />
7<br />
Voice mode<br />
Performance<br />
mode<br />
Sampling<br />
mode 1<br />
Song mode<br />
Pattern mode<br />
Mixing mode<br />
Sampling<br />
mode 2<br />
Master mode<br />
Utility mode<br />
File mode<br />
MOTIF <strong>XS</strong> Owner’s <strong>Manual</strong> 149<br />
Reference
Reference<br />
150<br />
Editing a Performance<br />
Voice mode Performance Sampling Song mode Pattern mode Mixing mode Sampling Master mode Utility mode File mode<br />
mode mode 1<br />
mode 2<br />
6 Reverb Return<br />
Determines <strong>the</strong> Return level of <strong>the</strong> Reverb Effect.<br />
Settings: 0 – 127<br />
7 Reverb Pan<br />
Determines <strong>the</strong> pan position of <strong>the</strong> Reverb effect sound.<br />
Settings: L63 (far left) – C (center) – R63 (far right)<br />
Setting <strong>the</strong> parts available for <strong>the</strong><br />
Insertion Effect—[SF2] InsSwitch<br />
In this display, you can select which Parts (from<br />
Performance Parts 1 – 4 and <strong>the</strong> A/D Input Part) will be<br />
assigned to <strong>the</strong> eight Insertion Effects.<br />
1<br />
1 Part 1 – 4, A/D<br />
Determines <strong>the</strong> Parts available for <strong>the</strong> Insertion Effect.<br />
When this switch is set to on, <strong>the</strong> Insertion Effect of <strong>the</strong><br />
Voice assigned to <strong>the</strong> Part is enabled. Make sure that this<br />
parameter is set to on for any Parts/Voices to which you<br />
need to apply Insertion Effects. The MOTIF <strong>XS</strong> features<br />
eight Insertion effect systems, letting you set this<br />
parameter to on for all five Parts.<br />
n For <strong>the</strong> A/D Input Part, <strong>the</strong> Insertion Effect type/parameter can<br />
be set from <strong>the</strong> Insertion A/B display in <strong>the</strong> Audio In parameter<br />
of <strong>the</strong> Performance Common Edit mode. For Parts 1 – 4, <strong>the</strong><br />
Insertion Effect type/parameter settings cannot be set in <strong>the</strong><br />
Performance Edit mode because <strong>the</strong>ir settings are included in<br />
<strong>the</strong> Voice assigned to each Part. If you wish to edit <strong>the</strong><br />
Insertion Effect settings for each Part, enter <strong>the</strong> Voice Edit<br />
mode, <strong>the</strong>n edit <strong>the</strong> Effect settings for <strong>the</strong> appropriate Voice.<br />
Reverb and Chorus Settings—[SF3]<br />
Reverb, [SF4] Chorus<br />
n Depending on <strong>the</strong> selected parameter, <strong>the</strong> LIST icon is shown<br />
at <strong>the</strong> tab menu corresponding to <strong>the</strong> [SF6] button. In this<br />
condition, you can call up <strong>the</strong> list by pressing <strong>the</strong> [SF6] LIST<br />
button, <strong>the</strong>n select <strong>the</strong> desired item from <strong>the</strong> list. For details<br />
see page 82.<br />
MOTIF <strong>XS</strong> Owner’s <strong>Manual</strong><br />
1<br />
2<br />
3<br />
1 Type<br />
From <strong>the</strong> Type column, you can select one of <strong>the</strong> Effect<br />
Types listed in <strong>the</strong> selected Category.<br />
Settings: Details about <strong>the</strong> Effect types are described on page 70.<br />
2 Preset<br />
You can set various parameters in order to change how <strong>the</strong><br />
sound is affected by <strong>the</strong> selected Effect type. This<br />
parameter lets you call up <strong>the</strong> pre-programmed settings of<br />
<strong>the</strong>se effect parameters.<br />
3 Effect Parameters<br />
The number of parameters and values available differs<br />
depending on <strong>the</strong> currently selected effect type. Refer to<br />
page 73 for details about <strong>the</strong> Effect parameters. Refer to<br />
<strong>the</strong> separate Data List booklet for information on <strong>the</strong><br />
parameters for each Effect type.
Part Edit parameters<br />
Editing a Performance<br />
[PERFORM] ➞ Performance selection ➞ [EDIT] ➞ Part selection<br />
In <strong>the</strong> Performance Part Edit mode, you can edit <strong>the</strong> parameters of <strong>the</strong> individual Parts such as Voice, Arpeggio, EG and EQ<br />
settings.<br />
About <strong>the</strong> asterisk (*) marks<br />
For users who are new to editing and may be confused by <strong>the</strong> large amount of parameters, <strong>the</strong> most basic and easy-to-understand<br />
parameters are conveniently marked with asterisks in this section. If you are just starting out with editing Performance Parts, try <strong>the</strong>se<br />
parameters first.<br />
Selected Part display/Four-Part display<br />
In <strong>the</strong> Performance Part Edit mode, you can use two types<br />
of display. One type of display lets you edit parameters for<br />
<strong>the</strong> currently selected Part and <strong>the</strong> o<strong>the</strong>r type of display<br />
lets you view parameters for four Parts. You can switch<br />
between <strong>the</strong>se two types by pressing <strong>the</strong> [SF5] button.<br />
Note that <strong>the</strong> display for four Parts is not available for <strong>the</strong><br />
[F2] ARP Main and <strong>the</strong> [F3] ARP O<strong>the</strong>r displays.<br />
Selecting a Part to be edited<br />
After pressing <strong>the</strong> [PERFORMANCE CONTROL] or<br />
[TRACK] button so that its lamp lights, press one of <strong>the</strong> [1]<br />
– [4] buttons to select a Part to be edited.<br />
COMMON EDIT<br />
The display for <strong>the</strong> currently selected Part<br />
n For details about useful functions such as Mute/Solo and Jobs,<br />
see pages 142 and 159.<br />
SF5<br />
The display for all four Parts of <strong>the</strong> current Performance<br />
1 2 3 4 5 6 7<br />
8<br />
PART SELECT ARP ON/OFF<br />
Selecting a Part<br />
5<br />
Setting <strong>the</strong> Wave and Note range of<br />
<strong>the</strong> Part—[F1] Voice<br />
Voice Settings for each Part—[SF1] Voice<br />
1<br />
2<br />
3<br />
4<br />
)<br />
!<br />
@<br />
#<br />
1 Part Switch*<br />
Determines whe<strong>the</strong>r <strong>the</strong> currently edited Part is on or off.<br />
When this is set to off, <strong>the</strong> currently edited Element will not<br />
sound.<br />
Settings: off (inactive), on (active)<br />
2 Bank*<br />
3 Number*<br />
Determines <strong>the</strong> Voice assigned to <strong>the</strong> current Part by<br />
specifying <strong>the</strong> Voice Bank and Number.<br />
n You can call up <strong>the</strong> list and select <strong>the</strong> desired item by pressing<br />
<strong>the</strong> [SF6] LIST button. For details, see page 82.<br />
4 Param. with Voice (Parameter with Voice)<br />
Determines whe<strong>the</strong>r or not <strong>the</strong> following parameter settings<br />
of <strong>the</strong> selected Voice are copied from <strong>the</strong> Voice to <strong>the</strong><br />
current Part when you change a Voice for <strong>the</strong> current Part<br />
individually.<br />
• Arpeggio settings<br />
• Filter Cutoff Frequency<br />
• Filter Resonance<br />
• Amplitude EG<br />
• Filter EG<br />
• Pitch Bend Range (Upper/Lower)<br />
• Note Shift<br />
n Regardless of <strong>the</strong> Parameter with Voice setting (4), <strong>the</strong><br />
settings of Mono/Poly ()), Portamento Part Switch (!),<br />
Portamento Time (@) and Portamento Mode (#) are not<br />
5<br />
6<br />
7<br />
8<br />
9<br />
$<br />
%<br />
MOTIF <strong>XS</strong> Owner’s <strong>Manual</strong><br />
Voice mode<br />
Performance<br />
mode<br />
Sampling<br />
mode 1<br />
Song mode<br />
Pattern mode<br />
Mixing mode<br />
Sampling<br />
mode 2<br />
Master mode<br />
Utility mode<br />
File mode<br />
151<br />
Reference
Reference<br />
152<br />
Editing a Performance<br />
Voice mode Performance Sampling Song mode Pattern mode Mixing mode Sampling Master mode Utility mode File mode<br />
mode mode 1<br />
mode 2<br />
copied when a Drum Voice is selected. However, <strong>the</strong>se<br />
parameters are copied when a Normal Voice is selected.<br />
Settings: off (not copied), on (copied)<br />
5 Volume*<br />
Determines <strong>the</strong> volume for each Part. Use this parameter to<br />
adjust <strong>the</strong> balance between <strong>the</strong> current Part and o<strong>the</strong>r<br />
Parts.<br />
Settings: 0 – 127<br />
6 Pan*<br />
Determines <strong>the</strong> stereo pan position for <strong>the</strong> Part.<br />
Settings: L63 (far left) – C (center) – R63 (far right)<br />
n Note that this Part Pan parameter may have little or no audible<br />
effect if <strong>the</strong> Pan for a specific Element is set to <strong>the</strong> left position<br />
and <strong>the</strong> Pan for ano<strong>the</strong>r Element is set to <strong>the</strong> right position.<br />
7 Voice Element Pan<br />
Determines whe<strong>the</strong>r <strong>the</strong> individual pan settings for each<br />
Voice (made in <strong>the</strong> Voice Element Edit mode) are applied<br />
or not. When this is set to “off,” <strong>the</strong> basic pan position for<br />
<strong>the</strong> selected Part is set to center.<br />
Settings: on, off<br />
8 Note Shift*<br />
Adjusts <strong>the</strong> pitch of <strong>the</strong> Part in semitones.<br />
Settings: -24 – +0 – +24<br />
9 Detune<br />
Adjusts <strong>the</strong> tuning of <strong>the</strong> Part in cent increments.<br />
Settings: -12.8 Hz – +0 Hz – +12.7 Hz<br />
) Mono/Poly*<br />
Determines <strong>the</strong> playback method of <strong>the</strong> Voice for each<br />
Part—monophonic (single note only) or polyphonic<br />
(multiple notes).<br />
Settings: mono, poly<br />
mono<br />
When set to “mono,” <strong>the</strong> selected Performance is played back<br />
monophonically (only a single note is played back simultaneously). For<br />
many instrument sounds (such as bass and synth lead), this allows a<br />
more natural and smooth sounding legato performance than when this<br />
parameter is set to “poly.”<br />
poly<br />
When set to “poly,” <strong>the</strong> selected Performance is played back<br />
polyphonically (multiple notes can be played back simultaneously or a<br />
chord is played back).<br />
! Portamento Part Sw*<br />
Determines whe<strong>the</strong>r Portamento is applied to <strong>the</strong> current<br />
Performance or not.<br />
Settings: off, on<br />
@ Portamento Time*<br />
Determines <strong>the</strong> pitch transition time. Higher values mean<br />
longer transition times.<br />
Settings: 0 – 127<br />
MOTIF <strong>XS</strong> Owner’s <strong>Manual</strong><br />
# Portamento Mode<br />
Determines how Portamento is applied to your keyboard<br />
performance.<br />
Settings: fingered, fulltime<br />
fingered<br />
Portamento is only applied when you play legato (playing <strong>the</strong> next note<br />
before releasing <strong>the</strong> previous one).<br />
fulltime<br />
Portamento is applied to all notes.<br />
$ Velocity Limit<br />
Determines <strong>the</strong> minimum and maximum values of <strong>the</strong><br />
velocity range within which each Part will respond. Each<br />
Part will only sound for notes played within its specified<br />
velocity range. If you specify <strong>the</strong> maximum value first and<br />
<strong>the</strong> minimum value second, for example “93 to 34,” <strong>the</strong>re<br />
will be a velocity “hole” and <strong>the</strong> velocity range covered will<br />
be “1 to 34” and “93 to 127.”<br />
Settings: 1 – 127<br />
n You can also set <strong>the</strong> velocity from <strong>the</strong> keyboard by holding<br />
down <strong>the</strong> [SF6] KBD button and pressing any key with <strong>the</strong><br />
desired velocity (strength). For details, see page 82.<br />
% Note Limit<br />
Set <strong>the</strong> lowest and highest notes of <strong>the</strong> keyboard range for<br />
each Part. Each Part will only sound for notes played within<br />
its specified range. You can also create a lower and an<br />
upper range for <strong>the</strong> Element, with a note range “hole” in <strong>the</strong><br />
middle, by specifying <strong>the</strong> highest note first. For example,<br />
setting a Note Limit of “C5 – C4” lets you play <strong>the</strong> Element<br />
from two separate ranges: C -2 to C4 and C5 to G8. Notes<br />
played between C4 and C5 do not play <strong>the</strong> selected<br />
Element.<br />
Settings: C -2 – G8<br />
n You can also set <strong>the</strong> Key directly from <strong>the</strong> keyboard, by<br />
holding down <strong>the</strong> [SF6] KBD button and pressing <strong>the</strong> desired<br />
key. For details, see page 82.<br />
Output settings—[SF2] Output<br />
From this display, you can set <strong>the</strong> Reverb/Chorus depth<br />
and <strong>the</strong> Output jack assignment for each Part.<br />
1<br />
2<br />
3<br />
4<br />
5<br />
1 Reverb Send<br />
Determines <strong>the</strong> Send level of each Part signal sent to <strong>the</strong><br />
Reverb effect. The higher <strong>the</strong> value, <strong>the</strong> deeper <strong>the</strong> Reverb.<br />
Settings: 0 – 127<br />
2 Chorus Send<br />
Determines <strong>the</strong> Send level of each Part signal sent to <strong>the</strong><br />
Chorus effect. The higher <strong>the</strong> value, <strong>the</strong> deeper <strong>the</strong> Chorus.<br />
Settings: 0 – 127
3 Dry Level<br />
Determines <strong>the</strong> level of each Part which has not been<br />
processed with <strong>the</strong> System Effects (Reverb, Chorus). The<br />
higher <strong>the</strong> value, <strong>the</strong> shallower <strong>the</strong> Reverb and Chorus.<br />
Settings: 0 – 127<br />
4 Output Select<br />
Determines <strong>the</strong> specific output(s) for <strong>the</strong> individual Part.<br />
You can assign each individual Part’s Voice to be output<br />
from a specific hardware output jack on <strong>the</strong> rear panel.<br />
Settings: See <strong>the</strong> table below.<br />
LCD Output jacks Stereo/Mono<br />
L&R OUTPUT L and R Stereo<br />
asL&R ASSIGNABLE OUTPUT L and R Stereo<br />
m1&2 mLAN OUTPUT 1 and 2 Stereo (1: L, 2: R)<br />
m3&4 mLAN OUTPUT 3 and 4 Stereo (3: L, 4: R)<br />
m5&6 mLAN OUTPUT 5 and 6 Stereo (5: L, 6: R)<br />
m7&8 mLAN OUTPUT 7 and 8 Stereo (7: L, 8: R)<br />
m9&10 mLAN OUTPUT 9 and 10 Stereo (9: L, 10: R)<br />
m11&12 mLAN OUTPUT 11 and 12 Stereo (11: L, 12: R)<br />
m13&14 mLAN OUTPUT 13 and 14 Stereo (13: L, 14: R)<br />
asL ASSIGNABLE OUTPUT L Mono<br />
asR ASSIGNABLE OUTPUT R Mono<br />
m1 mLAN OUTPUT 1 Mono<br />
: : :<br />
m14 mLAN OUTPUT 14 Mono<br />
drum See below* See below*<br />
* About “drum” setting, see below.<br />
When “drum” is selected and <strong>the</strong> Normal Voice is assigned to <strong>the</strong><br />
edited Part, <strong>the</strong> sound will be output via <strong>the</strong> OUTPUT L and R jacks in<br />
stereo.<br />
When “drum” is selected and <strong>the</strong> Drum Voice is assigned to <strong>the</strong> edited<br />
Part, <strong>the</strong> sound will be output via <strong>the</strong> jacks set in <strong>the</strong> Drum Key Edit<br />
display as <strong>the</strong> Output Select parameter.<br />
n The mLAN settings (m1 – m14) are available only for <strong>the</strong><br />
MOTIF <strong>XS</strong>8. The mLAN settings are available for MOTIF <strong>XS</strong>6/7<br />
only when an optional mLAN16E2 has been installed.<br />
n You can call up <strong>the</strong> list and select one by pressing <strong>the</strong> [SF6]<br />
LIST button. For details, see page 82.<br />
5 Ins Effect Sw (Insertion Effect Switch)<br />
Determines whe<strong>the</strong>r or not <strong>the</strong> current Part is available for<br />
<strong>the</strong> Insertion Effect. When this parameter is set to on, <strong>the</strong><br />
Insertion Effect of <strong>the</strong> Voice assigned to <strong>the</strong> Part is<br />
enabled. You can set <strong>the</strong> Insertion Effect Switch parameter<br />
for all Parts (including <strong>the</strong> A/D Input part) from <strong>the</strong> Insertion<br />
Effect Switch display (page 150) in <strong>the</strong> Performance<br />
Common Edit mode.<br />
O<strong>the</strong>r Settings—[SF3] O<strong>the</strong>r<br />
1<br />
2<br />
3<br />
4<br />
Editing a Performance<br />
1 PB Range Upper (Pitch Bend Range Upper)<br />
2 PB Range Lower (Pitch Bend Range Lower)<br />
Determines <strong>the</strong> maximum Pitch Bend range in semitones.<br />
Setting <strong>the</strong> Upper parameter to +12 would result in a<br />
maximum pitch rise of one octave when <strong>the</strong> Pitch Bend<br />
wheel is moved upwards. A Lower setting of -12 would<br />
result in <strong>the</strong> pitch being lowered up to a maximum of one<br />
octave (12 semitones) when <strong>the</strong> Pitch Bend wheel is<br />
moved downwards.<br />
Settings: -48 – +0 – +24<br />
3 Vel Sens Depth (Velocity Sensitivity Depth)<br />
Determines <strong>the</strong> degree to which <strong>the</strong> resulting volume of <strong>the</strong><br />
tone generator responds to your playing strength. The<br />
higher <strong>the</strong> value, <strong>the</strong> more <strong>the</strong> volume changes in response<br />
to your playing strength (as shown below). When this is set<br />
to 0, <strong>the</strong> volume remains <strong>the</strong> same no matter how strongly<br />
or softly you play. This would be useful, for example, for<br />
au<strong>the</strong>ntic playing of an Organ Voice.<br />
Settings: 0 – 127<br />
4 Velocity Sens Depth Offset<br />
(Velocity Sensitivity Depth Offset)<br />
Determines <strong>the</strong> amount by which played velocities are<br />
adjusted for <strong>the</strong> actual resulting velocity effect.<br />
This lets you raise or lower all velocities by <strong>the</strong> same<br />
amount—allowing you to automatically <strong>com</strong>pensate for<br />
playing too strongly or too softly. If <strong>the</strong> result is 0 or less, <strong>the</strong><br />
value is set to 0. If <strong>the</strong> result is higher than 127, <strong>the</strong> value is<br />
set to 127.<br />
Settings: 0 – 127<br />
127<br />
Actual resulting velocity<br />
(affecting <strong>the</strong> tone<br />
generator)<br />
When Offset (below) is set to 64:<br />
Depth = 127<br />
0 127<br />
Velocity with which you play a note<br />
Depth = 64<br />
Depth = 32<br />
Depth = 0<br />
Voice mode<br />
Performance<br />
mode<br />
Sampling<br />
mode 1<br />
Song mode<br />
Pattern mode<br />
Mixing mode<br />
Sampling<br />
mode 2<br />
Master mode<br />
Utility mode<br />
File mode<br />
MOTIF <strong>XS</strong> Owner’s <strong>Manual</strong> 153<br />
Reference
Reference<br />
154<br />
Editing a Performance<br />
Voice mode Performance Sampling Song mode Pattern mode Mixing mode Sampling Master mode Utility mode File mode<br />
mode mode 1<br />
mode 2<br />
127<br />
Actual<br />
resulting<br />
velocity<br />
(affecting<br />
<strong>the</strong> tone<br />
generator)<br />
Arpeggio Settings—[F2] ARP Main<br />
(Arpeggio Main)<br />
This display determines <strong>the</strong> basic settings of <strong>the</strong> Arpeggio.<br />
The settings of parameters (! or more) shown at <strong>the</strong><br />
bottom of <strong>the</strong> display can be registered to <strong>the</strong> [SF1] – [SF5]<br />
buttons.<br />
n The Four-Part display cannot be called up from this display.<br />
n The KBD icon is shown on <strong>the</strong> tab corresponding to <strong>the</strong> [SF6]<br />
button depending on <strong>the</strong> selected parameter. In this condition,<br />
you can enter <strong>the</strong> note number or velocity by pressing <strong>the</strong><br />
appropriate note on <strong>the</strong> keyboard while holding <strong>the</strong> [SF6] KBD<br />
button. For details, see page 82.<br />
1 Switch*<br />
Determines whe<strong>the</strong>r Arpeggio for each Part is on or off.<br />
Settings: off, on<br />
2 Hold*<br />
0 64 127<br />
0 64 127<br />
Velocity with which you play a note Velocity with which you play a note<br />
127<br />
Actual<br />
resulting<br />
velocity<br />
(affecting<br />
<strong>the</strong> tone<br />
generator)<br />
1<br />
2<br />
3<br />
4<br />
5<br />
6<br />
@<br />
#<br />
$<br />
%<br />
!<br />
When Depth (above)<br />
= 64 and Offset =32<br />
When Depth (above)<br />
= 64 and Offset =64<br />
0<br />
64<br />
When this is set to “on,” <strong>the</strong> Arpeggio cycles automatically,<br />
even if you release your fingers from <strong>the</strong> keys, and it<br />
continues to cycle until <strong>the</strong> next key is pressed.<br />
Settings: sync-off (see below), off, on<br />
MOTIF <strong>XS</strong> Owner’s <strong>Manual</strong><br />
127<br />
Velocity with which you play a note<br />
127<br />
Actual<br />
resulting<br />
velocity<br />
(affecting<br />
<strong>the</strong> tone<br />
generator)<br />
When Depth (above)<br />
= 64 and Offset =96<br />
7<br />
8<br />
9<br />
)<br />
^<br />
&<br />
sync-off<br />
When set to “sync-off,” <strong>the</strong> Arpeggio playback continues to run silently,<br />
even when you release <strong>the</strong> keys. Pressing any key turns <strong>the</strong> Arpeggio<br />
playback on again.<br />
n For details about how to use <strong>the</strong> Arpeggio Type List in Data<br />
List 2 (separate online documentation), see page 63.<br />
3 Change Timing*<br />
Determines <strong>the</strong> actual timing at which <strong>the</strong> Arpeggio type is<br />
switched when you select ano<strong>the</strong>r type during Arpeggio<br />
playback. When set to “realtime,” <strong>the</strong> Arpeggio type is<br />
switched immediately. When set to “measure,” <strong>the</strong><br />
Arpeggio type is switched at <strong>the</strong> top of <strong>the</strong> next measure.<br />
Settings: realtime, measure<br />
4 Velocity Limit<br />
Determines <strong>the</strong> lowest and highest velocity which can<br />
trigger <strong>the</strong> Arpeggio playback. This lets you set <strong>the</strong> velocity<br />
range with which you press <strong>the</strong> note to trigger <strong>the</strong> Arpeggio<br />
playback. You can also create separate low and high<br />
trigger ranges for <strong>the</strong> Arpeggio playback, with a velocity<br />
“hole” in <strong>the</strong> middle, by specifying <strong>the</strong> maximum value first.<br />
For example, setting a Velocity Limit of 93 – 34 lets you play<br />
<strong>the</strong> Arpeggio from two separate velocity ranges: soft (1 –<br />
34) and hard (93 – 127). Notes played at middle velocities<br />
between 35 and 92 do not play <strong>the</strong> Arpeggio.<br />
Settings: 1 – 127<br />
n Please keep in mind that no sound is produced when <strong>the</strong> Key<br />
Mode is set to “sort” or “thru” and notes are played outside <strong>the</strong><br />
Note Limit setting here.<br />
5 Note Limit<br />
Determines <strong>the</strong> lowest and highest notes in <strong>the</strong> Arpeggio’s<br />
note range. Notes played in this range trigger <strong>the</strong><br />
Arpeggio. For example, setting a Note Limit of “C5 – C4”<br />
lets you trigger <strong>the</strong> Arpeggio by playing notes in <strong>the</strong> two<br />
ranges of C -2 to C4 and C5 to G8; notes played between<br />
C4 and C5 have no effect on <strong>the</strong> Arpeggio.<br />
Settings: C -2 – G8<br />
n Please keep in mind that no sound is produced when <strong>the</strong> Key<br />
Mode is set to “sort” or “thru” and notes are played outside <strong>the</strong><br />
Note Limit setting here.<br />
6 Voice with ARP<br />
To each type of <strong>the</strong> Arpeggio, <strong>the</strong> appropriate Voice is<br />
registered. This parameter determines whe<strong>the</strong>r or not <strong>the</strong><br />
appropriate Voice registered to each Arpeggio type is<br />
assigned to <strong>the</strong> edited Part. When set to “on,” <strong>the</strong> appropriate<br />
Voice is assigned to <strong>the</strong> edited Part in place of <strong>the</strong> currently<br />
assigned Voice. When set to “off,” <strong>the</strong> appropriate Voice is not<br />
assigned to <strong>the</strong> edited Part. The currently assigned Voice is<br />
maintained. The name of <strong>the</strong> Voice registered to <strong>the</strong> Arpeggio<br />
Type is shown at <strong>the</strong> right side.<br />
Settings: off (not copied), on (copied)<br />
7 Tempo*<br />
Determines <strong>the</strong> Arpeggio Tempo.<br />
Settings: 5.0 – 300.0
n If you are using this instrument with an external sequencer,<br />
MIDI <strong>com</strong>puter, or o<strong>the</strong>r MIDI device, and you want to<br />
synchronize it with that device, set <strong>the</strong> MIDI sync (5)<br />
parameter in <strong>the</strong> MIDI display (page 267) of <strong>the</strong> Utility mode to<br />
“MIDI” or “auto.” In this case, <strong>the</strong> Tempo parameter here<br />
indicates “MIDI” or “auto” and cannot be changed.<br />
8 Key Mode<br />
Determines how <strong>the</strong> Arpeggio plays back when playing <strong>the</strong><br />
keyboard.<br />
Settings: sort, thru, direct, sort+direct, thru+direct<br />
sort<br />
When you play specific notes (for example, <strong>the</strong> notes of a chord), <strong>the</strong><br />
same sequence plays, no matter what order you play <strong>the</strong> notes.<br />
thru<br />
When you play specific notes (for example, <strong>the</strong> notes of a chord), <strong>the</strong><br />
resulting sequence differs depending on <strong>the</strong> order of <strong>the</strong> notes.<br />
direct<br />
Note events of <strong>the</strong> Arpeggio sequence do not play; only <strong>the</strong> notes you<br />
play on <strong>the</strong> keyboard are heard. When <strong>the</strong> Arpeggio plays back, <strong>the</strong><br />
events such as Pan and Brightness are applied to <strong>the</strong> sound of your<br />
keyboard performance. Use this setting when <strong>the</strong> Arpeggio types<br />
includes non-note data or when <strong>the</strong> Category type “Ctrl” is selected.<br />
sort+direct<br />
The Arpeggio is played back according to <strong>the</strong> “sort” setting here, and<br />
<strong>the</strong> note pressed is also sounded.<br />
thru+direct<br />
The Arpeggio is played back according to <strong>the</strong> “thru” setting here, and<br />
<strong>the</strong> note pressed is also sounded.<br />
n Some Arpeggio types belonging to <strong>the</strong> “Cntr” Category may<br />
not have note events (page 65). When such an Arpeggio type<br />
is selected and <strong>the</strong> Key Mode is set to “sort” or “thru,” no<br />
sound is produced even if you press a note on <strong>the</strong> keyboard.<br />
9 Velocity Mode<br />
Adjusts <strong>the</strong> velocity of <strong>the</strong> Arpeggio notes.<br />
Settings: original, thru<br />
original<br />
The Arpeggio plays back at <strong>the</strong> preset velocities included in <strong>the</strong><br />
Arpeggio sequence data.<br />
thru<br />
The Arpeggio plays back according to <strong>the</strong> velocity of your playing. For<br />
example, if you play <strong>the</strong> notes strongly, <strong>the</strong> playback volume of <strong>the</strong><br />
Arpeggio increases.<br />
) Output Octave Shift<br />
Specifies <strong>the</strong> maximum Arpeggio range in octaves.<br />
Settings: -10 – +10<br />
! [SF1] ARP1 – [SF5] ARP5 (Arpeggio 1 – 5)<br />
buttons<br />
The six parameters Bank (@) through Gate Time Rate (&)<br />
at <strong>the</strong> lower half Part of <strong>the</strong> display, can be edited in each<br />
of <strong>the</strong> [SF1] ARP1 through [SF5] ARP5 displays. You can<br />
set <strong>the</strong> parameters in <strong>the</strong> lower half of <strong>the</strong> display for each<br />
of <strong>the</strong> five Arpeggio settings by pressing one of <strong>the</strong> [SF1] –<br />
[SF5] buttons. The 8th note icon shown in <strong>the</strong> tab menu<br />
indicates any Arpeggio Type (o<strong>the</strong>r than “off”) is selected<br />
in <strong>the</strong> display corresponding to <strong>the</strong> Sub Function button.<br />
Settings: [SF1] – [SF5] (Sub Function) buttons<br />
@ Bank*<br />
Editing a Performance<br />
Determines <strong>the</strong> Arpeggio Bank containing <strong>the</strong> desired<br />
Arpeggio type. Select “PRE” if you wish to select a preset<br />
Arpeggio Type. Select “USR” if you wish to select an<br />
Arpeggio Type you originally created and stored.<br />
Settings: PRE, USR<br />
n For detailed instructions on creating your original Arpeggio<br />
type, see page 66.<br />
# Category*<br />
$ Sub Category*<br />
Determines <strong>the</strong> Arpeggio Category and Sub Category<br />
including <strong>the</strong> desired Arpeggio type. These parameters are<br />
available when “PRE” is selected as <strong>the</strong> Bank.<br />
Settings: Refer to <strong>the</strong> Arpeggio Category List on page 62.<br />
n You can call up <strong>the</strong> list by pressing <strong>the</strong> [SF6] LIST button <strong>the</strong>n<br />
select <strong>the</strong> desired item from <strong>the</strong> list.<br />
n For details about how to use <strong>the</strong> Arpeggio Type List in Data<br />
List 2 (separate online documentation), see page 63.<br />
% Type*<br />
Determines <strong>the</strong> desired Arpeggio Type number from <strong>the</strong><br />
specified Category. The name of <strong>the</strong> selected Arpeggio<br />
Type is shown at right of <strong>the</strong> specified number on <strong>the</strong><br />
display. Refer to <strong>the</strong> Arpeggio Type List in Data List 2<br />
(separate online documentation), described on page 6.<br />
^ Velocity Rate<br />
Determines <strong>the</strong> offset value by which <strong>the</strong> Arpeggio notes<br />
will be shifted from <strong>the</strong>ir original velocities. If <strong>the</strong> resultant<br />
velocity value is less than zero it will be set to 1, and if <strong>the</strong><br />
resultant velocity is greater than 128 it will be set to 127.<br />
This parameter can be changed via <strong>the</strong> Knob directly.<br />
Settings: -100% – +0% – +100%<br />
& Gate Time Rate<br />
Determines <strong>the</strong> Gate Time (length) of <strong>the</strong> Arpeggio notes.<br />
The Gate Time cannot be decreased beyond its normal<br />
minimum of 1; any values outside that range will<br />
automatically be limited to <strong>the</strong> minimum.<br />
This parameter can be changed via <strong>the</strong> Knob directly.<br />
Settings: -100% – +0% – +100%<br />
Voice mode<br />
Performance<br />
mode<br />
Sampling<br />
mode 1<br />
Song mode<br />
Pattern mode<br />
Mixing mode<br />
Sampling<br />
mode 2<br />
Master mode<br />
Utility mode<br />
File mode<br />
MOTIF <strong>XS</strong> Owner’s <strong>Manual</strong> 155<br />
Reference
Reference<br />
156<br />
Editing a Performance<br />
Voice mode Performance Sampling Song mode Pattern mode Mixing mode Sampling Master mode Utility mode File mode<br />
mode mode 1<br />
mode 2<br />
Arpeggio settings—[F3] ARP O<strong>the</strong>r<br />
(Arpeggio O<strong>the</strong>r)<br />
By changing <strong>the</strong> timing and velocity of <strong>the</strong> notes, you can<br />
change <strong>the</strong> rhythmic “feel” of <strong>the</strong> Arpeggio playback.<br />
1<br />
2<br />
3<br />
4<br />
5<br />
6<br />
7<br />
%<br />
^<br />
n The Four-Part display cannot be called up from this display.<br />
1 Unit Multiply<br />
Adjusts <strong>the</strong> Arpeggio playback time based on tempo. By<br />
using this parameter, you can create a different Arpeggio<br />
type from <strong>the</strong> original one. For example, if you set a value<br />
of 200%, <strong>the</strong> playback time will be doubled (tempo is<br />
halved). On <strong>the</strong> o<strong>the</strong>r hand, if you set a value of 50%, <strong>the</strong><br />
playback time will be halved and <strong>the</strong> tempo doubled.<br />
Normal playback time is 100%. This parameter can be<br />
changed via <strong>the</strong> Knob directly.<br />
Settings: 50%, 66%, 75%, 100%, 133%, 150%, 200%<br />
2 Quantize Value*<br />
Determines to what beats <strong>the</strong> note data in <strong>the</strong> Arpeggio<br />
sequence data will be aligned, or determines to what beats<br />
in <strong>the</strong> Arpeggio sequence data <strong>the</strong> swing is applied. This<br />
parameter can be changed via <strong>the</strong> Knob directly. The<br />
number shown at right of each value indicates <strong>the</strong> length<br />
assumes that <strong>the</strong> quarter-note resolution is 480.<br />
Settings: 2 60 (32nd note), 63 80 (16th note triplet), 6 120 (16th<br />
note), 83 160 (8th note triplet), 8 240 (8th note), 43 320<br />
(1/4 note triplet), 4 480 (1/4 note)<br />
3 Quantize Strength<br />
Sets <strong>the</strong> “strength” by which note events are pulled toward<br />
<strong>the</strong> nearest quantize beats. A setting of 100% produces<br />
exact timing set via <strong>the</strong> Quantize Value parameter above. A<br />
setting of 0% results in no quantization. A setting of 50%<br />
results in <strong>the</strong> note events being pulled halfway between 0%<br />
and 100%. This parameter can be changed via <strong>the</strong> Knob<br />
directly.<br />
Settings: 0% – 100%<br />
4 Swing*<br />
Delays notes on even-numbered beats (backbeats) to<br />
produce a swing feel. Settings above 1 delay <strong>the</strong> Arpeggio<br />
notes, whereas settings below 1 advance <strong>the</strong>m. A setting<br />
of 0 produces exact timing set via <strong>the</strong> Quantize Value,<br />
resulting in no swing. Judicious use of this setting lets you<br />
create swing rhythms and triplet feels, such as shuffle and<br />
MOTIF <strong>XS</strong> Owner’s <strong>Manual</strong><br />
8<br />
9<br />
)<br />
!<br />
@<br />
#<br />
$<br />
bounce. This parameter can be changed via <strong>the</strong> Knob<br />
directly.<br />
Settings: -120 – +120<br />
5 Velocity Rate<br />
Determines how much <strong>the</strong> velocity of <strong>the</strong> Arpeggio<br />
playback is offset from <strong>the</strong> original value. For example, a<br />
setting of 100% means <strong>the</strong> original values are used.<br />
Settings below 100% will reduce <strong>the</strong> velocities of <strong>the</strong><br />
Arpeggio notes, whereas settings above 100% will<br />
increase <strong>the</strong> velocities. If <strong>the</strong> resultant velocity value is less<br />
than zero it will be set to 1, and if <strong>the</strong> resultant velocity is<br />
greater than 128 it will be set to 127. This parameter can be<br />
changed via <strong>the</strong> Knob directly.<br />
Settings: 0% – 200%<br />
6 Gate Time Rate<br />
Determines how much <strong>the</strong> Gate Time (length) of <strong>the</strong><br />
Arpeggio notes is offset from <strong>the</strong> original value. For<br />
example, a setting of 100% means <strong>the</strong> original values are<br />
used. Settings below 100% will reduce <strong>the</strong> velocities of <strong>the</strong><br />
Arpeggio notes, whereas settings above 100% will<br />
increase <strong>the</strong> velocities. The Gate Time cannot be<br />
decreased beyond its normal minimum of 1; any values<br />
outside that range will automatically be limited to <strong>the</strong><br />
minimum. This parameter can be changed via <strong>the</strong> Knob<br />
directly.<br />
Settings: 0% – 200%<br />
7 Octave Range<br />
Specifies <strong>the</strong> maximum Arpeggio range in octaves.<br />
Positive value settings increase <strong>the</strong> octave range of <strong>the</strong><br />
Arpeggio playback upward, whereas negative value<br />
settings increase it downward.<br />
This parameter can be changed via <strong>the</strong> Knob directly.<br />
Settings: -3 – +0 – +3<br />
8 Loop<br />
When this is set to “on,” <strong>the</strong> Arpeggio cycles while notes<br />
are held. When this is set to “off,” <strong>the</strong> Arpeggio plays only<br />
once even if notes are held.<br />
Settings: off, on<br />
9 Trigger Mode<br />
When this is set to “gate,” pressing <strong>the</strong> note starts<br />
Arpeggio playback and releasing <strong>the</strong> note stops it. When<br />
this is set to “toggle,” pressing <strong>the</strong> note starts/stops<br />
Arpeggio playback and releasing <strong>the</strong> note does not affect<br />
Arpeggio playback. Normally, this parameter should be set<br />
to “gate.”<br />
Settings: gate, toggle<br />
n The Trigger Mode “toggle” setting over<strong>com</strong>es <strong>the</strong> Hold “on”<br />
setting in <strong>the</strong> Arpeggio Main display (page 154). In o<strong>the</strong>r<br />
words, even when <strong>the</strong> Hold parameter is set to “on,” pressing<br />
<strong>the</strong> note start/stops Arpeggio playback when <strong>the</strong> Trigger Mode<br />
is set to “toggle.”
) Accent Vel Threshold<br />
(Accent Velocity Threshold)<br />
Some preset Arpeggio types include <strong>the</strong> special sequence<br />
data called “Accent Phrase,” which will be played back<br />
only when <strong>the</strong> velocities higher than a specified value are<br />
received. This parameter determined <strong>the</strong> minimum velocity<br />
that will trigger <strong>the</strong> Accent Phrase.<br />
Settings: off, 1 – 127<br />
! Accent Start Quantize<br />
Determines <strong>the</strong> start timing of <strong>the</strong> Accent Phrase when <strong>the</strong><br />
Velocity specified in Accent Vel Threshold above is<br />
received. When set to off, <strong>the</strong> Accent Phrase starts as soon<br />
as <strong>the</strong> Velocity is received. When set to on, <strong>the</strong> Accent<br />
Phrase starts on <strong>the</strong> beat specified for each Arpeggio type<br />
after <strong>the</strong> Velocity is received.<br />
Settings: off, on<br />
@ Random SFX<br />
Some Arpeggio types feature <strong>the</strong> Random SFX function<br />
which will trigger <strong>the</strong> special sound such as fret noise of<br />
<strong>the</strong> guitar when <strong>the</strong> note is released. This parameter<br />
determines whe<strong>the</strong>r <strong>the</strong> Random SFX is active or not.<br />
Settings: off, on<br />
# Random SFX Velocity Offset<br />
Determines <strong>the</strong> offset value by which <strong>the</strong> Random SFX<br />
notes will be shifted from <strong>the</strong>ir original velocities. If <strong>the</strong><br />
resultant velocity value is less than zero it will be set to 1,<br />
and if <strong>the</strong> resultant velocity is greater than 128 it will be set<br />
to 127.<br />
Settings: -64 – +0 – +63<br />
$ Random SFX Key On Control<br />
When this is set to “on,” <strong>the</strong> Random SFX special sound is<br />
played with <strong>the</strong> pre-programmed velocity. When this is set<br />
to “off,” <strong>the</strong> Random SFX special sound is played with <strong>the</strong><br />
velocity generated when <strong>the</strong> note is pressed.<br />
Settings: off, on<br />
% MIDI Out Switch (MIDI Output Switch)<br />
When this is set to on, Arpeggio playback data is output<br />
from <strong>the</strong> MIDI terminal.<br />
Settings: off (not output), on (output)<br />
^ MIDI Out Channel (MIDI Output Channel)<br />
Determines <strong>the</strong> MIDI transmit channel for Arpeggio<br />
playback data. When this is set to “kbd,” Arpeggio<br />
playback data is output via <strong>the</strong> MIDI transmit channel<br />
(page 137) set in <strong>the</strong> Performance Play mode.<br />
Settings: 1 – 16, kbd (Keyboard Channel)<br />
EG Settings—[F4] EG<br />
Editing a Performance<br />
You can control <strong>the</strong> sound transition from <strong>the</strong> moment a key<br />
is pressed to <strong>the</strong> moment at which it is released. You can<br />
also adjust <strong>the</strong> tone brilliance by setting <strong>the</strong> Cutoff<br />
Frequency and Resonance.<br />
1<br />
2<br />
3<br />
1 AEG (Amplitude EG)<br />
Determines <strong>the</strong> AEG (Amplitude Envelope Generator)<br />
parameters for each Part. The following parameters can be<br />
used to control <strong>the</strong> change in volume from <strong>the</strong> moment a<br />
note is pressed on <strong>the</strong> keyboard to <strong>the</strong> moment <strong>the</strong> sound<br />
stops. The setting made here will be applied to <strong>the</strong> AEG<br />
parameters (page 123) of each Voice as offset.<br />
Attack (Attack Time)<br />
Determines <strong>the</strong> speed of attack from <strong>the</strong> time a key is played<br />
until <strong>the</strong> maximum initial level of <strong>the</strong> EG is reached.<br />
Decay (Decay Time)<br />
Determines how fast <strong>the</strong> volume falls from maximum attack<br />
level to <strong>the</strong> sustain level.<br />
Sustain (Sustain Level)<br />
Determines <strong>the</strong> sustain level at which <strong>the</strong> volume will continue<br />
while a note is held, after <strong>the</strong> initial attack and decay.<br />
Release (Release Time)<br />
Determines how quickly <strong>the</strong> sound decays to silence after <strong>the</strong><br />
key is released.<br />
Settings: -64 – +0 – +63<br />
n When a Drum Voice is selected, Sustain Level and<br />
Release Time are not available.<br />
2 FEG (Filter EG)<br />
Determines <strong>the</strong> FEG (Filter Envelope Generator)<br />
parameters for each Part. Using <strong>the</strong> FEG, you can control<br />
<strong>the</strong> transition in tonal color (Cutoff Frequency) from <strong>the</strong><br />
moment <strong>the</strong> sound starts to <strong>the</strong> moment it stops. The<br />
setting made here will be applied to <strong>the</strong> FEG parameters<br />
(page 119) of each Voice as offset.<br />
Attack (Attack Time)<br />
Determines <strong>the</strong> speed of filter variation from <strong>the</strong> time a note is<br />
played until <strong>the</strong> maximum initial level of <strong>the</strong> Cutoff Frequency<br />
is reached.<br />
Decay (Decay Time)<br />
Determines how fast <strong>the</strong> Cutoff Frequency falls from maximum<br />
attack level to <strong>the</strong> sustain level.<br />
Voice mode<br />
Performance<br />
mode<br />
Sampling<br />
mode 1<br />
Song mode<br />
Pattern mode<br />
Mixing mode<br />
Sampling<br />
mode 2<br />
Master mode<br />
Utility mode<br />
File mode<br />
MOTIF <strong>XS</strong> Owner’s <strong>Manual</strong> 157<br />
Reference
Reference<br />
158<br />
Editing a Performance<br />
Voice mode Performance Sampling Song mode Pattern mode Mixing mode Sampling Master mode Utility mode File mode<br />
mode mode 1<br />
mode 2<br />
Release (Release Time)<br />
Determines how fast <strong>the</strong> Cutoff Frequency falls from <strong>the</strong><br />
sustain level to zero when a note is released.<br />
Depth<br />
Determines <strong>the</strong> range over which <strong>the</strong> cutoff frequency of <strong>the</strong><br />
Filter EG changes. A setting of 0 will cause <strong>the</strong> cutoff<br />
frequency not to change. The far<strong>the</strong>r from 0 <strong>the</strong> value is, <strong>the</strong><br />
larger <strong>the</strong> range of <strong>the</strong> cutoff frequency. For negative values,<br />
<strong>the</strong> change of <strong>the</strong> cutoff frequency is reversed.<br />
Settings: -64 – +0 – +63<br />
n When a Drum Voice is selected, not all of <strong>the</strong> parameters<br />
are available. Unavailable parameters are blank and<br />
cannot be edited.<br />
3 Filter<br />
Determines <strong>the</strong> Cutoff Frequency and Resonance for <strong>the</strong><br />
Filter to change <strong>the</strong> Performance sound. The setting made<br />
here will be added to <strong>the</strong> same parameters (page 117) of<br />
each Voice as offset.<br />
Cutoff<br />
Determines <strong>the</strong> cutoff frequency for <strong>the</strong> Filter. The frequency<br />
set here is <strong>the</strong> center frequency at which <strong>the</strong> signals are<br />
affected when <strong>the</strong>y pass through each filter.<br />
Settings: -64 – +0 – +63<br />
Resonance/Width<br />
This parameter’s function varies according to <strong>the</strong> selected<br />
Filter Type. If <strong>the</strong> selected filter is an LPF, HPF, BPF (excluding<br />
<strong>the</strong> BPFw), or BEF, this parameter is used to set <strong>the</strong><br />
Resonance. If <strong>the</strong> selected filter is a BPFw, this parameter is<br />
used to adjust <strong>the</strong> frequency bandwidth.<br />
Resonance is used to set <strong>the</strong> amount of Resonance (harmonic<br />
emphasis) applied to <strong>the</strong> signal at <strong>the</strong> cutoff frequency. This<br />
can be used in <strong>com</strong>bination with <strong>the</strong> cutoff frequency<br />
parameter to add fur<strong>the</strong>r character to <strong>the</strong> sound.<br />
The Width parameter is used to adjust <strong>the</strong> width of <strong>the</strong> band of<br />
signal frequencies passed by <strong>the</strong> filter with <strong>the</strong> BPFw.<br />
Settings: -64 – +0 – +63<br />
Equalizer (EQ) Settings—[F5] EQ<br />
From this display you can apply 3-band parametric EQ to<br />
each individual Part, for fine adjustment of <strong>the</strong> sound. The<br />
EQ shapes for Low and High are fixed as shelving types.<br />
1<br />
2<br />
3<br />
MOTIF <strong>XS</strong> Owner’s <strong>Manual</strong><br />
1 Frequency<br />
Determines <strong>the</strong> center frequency. Frequencies around this<br />
point are attenuated/boosted by <strong>the</strong> Gain setting below.<br />
Higher values produce higher frequencies.<br />
Settings:<br />
Low<br />
50.1 Hz – 2.0 kHz<br />
Middle<br />
139.7 Hz – 10.1 kHz<br />
High<br />
503.8 Hz – 14.0 kHz<br />
2 Gain<br />
Determines <strong>the</strong> level gain for <strong>the</strong> Frequency (set above), or<br />
<strong>the</strong> amount <strong>the</strong> selected frequency band is attenuated or<br />
boosted.<br />
Settings: -12 dB – +0 dB – +12 dB<br />
3 Q (Bandwidth)<br />
This varies <strong>the</strong> signal level at <strong>the</strong> Frequency setting to<br />
create various frequency curve characteristics. The higher<br />
<strong>the</strong> setting <strong>the</strong> smaller <strong>the</strong> Q (Bandwidth). The lower <strong>the</strong><br />
setting, <strong>the</strong> greater <strong>the</strong> Q (Bandwidth).<br />
Settings: 0.7 – 10.3<br />
+<br />
0<br />
–<br />
Frequency<br />
Frequency<br />
MIDI Receive settings—[F6]<br />
RcvSwitch (Receive Switch)<br />
From this display you can set how each individual Part<br />
responds to various MIDI data, such as Control Change<br />
and Program Change messages. When <strong>the</strong> relevant<br />
parameter is set to “on,” <strong>the</strong> corresponding Part responds<br />
to <strong>the</strong> appropriate MIDI data. Each of <strong>the</strong> Controller names<br />
in this display indicates <strong>the</strong> MIDI data generated by using<br />
<strong>the</strong> corresponding Controller.<br />
n For Parts to which <strong>the</strong> Drum Voice is assigned, Sustain is not<br />
available.<br />
0.7<br />
10.3
Performance Job—Convenient Functions<br />
The Performance Job mode features some convenient data organization and initialization tools, for use when creating<br />
Performances and archiving <strong>the</strong>m. Press <strong>the</strong> [JOB] button in <strong>the</strong> Performance mode to enter <strong>the</strong> Performance Job mode.<br />
Performance Job—Basic Operation<br />
1 In <strong>the</strong> Performance mode, press <strong>the</strong> [JOB]<br />
button to enter Performance Job Mode.<br />
2 Select <strong>the</strong> desired Job menu by pressing <strong>the</strong><br />
appropriate button, [F1] – [F4].<br />
3 Move <strong>the</strong> cursor to <strong>the</strong> desired parameter, <strong>the</strong>n<br />
set <strong>the</strong> value.<br />
4 Press <strong>the</strong> [ENTER] button. (The display<br />
prompts you for confirmation.)<br />
To cancel <strong>the</strong> Job, press <strong>the</strong> [DEC/NO] button.<br />
5 Press <strong>the</strong> [INC/YES] button to execute <strong>the</strong> Job.<br />
After <strong>the</strong> Job has been <strong>com</strong>pleted, a “Completed”<br />
message appears and operation returns to <strong>the</strong> original<br />
display.<br />
6 Press <strong>the</strong> [PERFORM] button to return to <strong>the</strong><br />
Performance Play mode.<br />
CAUTION<br />
Even if you execute <strong>the</strong> Job, selecting a different Performance<br />
or turning <strong>the</strong> power off without storing will erase <strong>the</strong><br />
Performance data. Make sure to store <strong>the</strong> Performance data to<br />
internal memory by pressing <strong>the</strong> [STORE] button before<br />
selecting a different Performance or turning <strong>the</strong> power off.<br />
Initializing <strong>the</strong> Performance—[F1]<br />
Init (Initialize)<br />
This function lets you reset (initialize) all Performance<br />
parameters to <strong>the</strong>ir default settings. It also allows you to<br />
selectively initialize certain parameters, such as Common<br />
settings, settings for each Part, and so on.<br />
1<br />
2<br />
3<br />
1 All Parameters<br />
All settings for <strong>the</strong> selected Performance are initialized.<br />
When this is set to on, <strong>the</strong> cursor cannot be moved.<br />
2 Common Parameters<br />
Common parameter settings for <strong>the</strong> selected Performance<br />
are initialized.<br />
n The Insertion Effect Switch is a Part parameter. Therefore,<br />
checkmark <strong>the</strong> box of Part 1 – 4 described below if you wish to<br />
initialize <strong>the</strong> Insertion Effect Switch parameter settings.<br />
3 Part Parameters<br />
Part 1 – 4<br />
Parameter settings for Parts which are turned on are initialized.<br />
A/D (A/D Input)<br />
This is <strong>the</strong> Part input from <strong>the</strong> external audio equipment<br />
connected to <strong>the</strong> A/D INPUT jack. When this is checkmarked,<br />
parameter settings for <strong>the</strong> A/D Input Part (page 147) of<br />
Common Edit are initialized.<br />
mLAN<br />
This is <strong>the</strong> Part input from <strong>the</strong> external equipment connected<br />
to <strong>the</strong> mLAN jack via <strong>the</strong> IEEE1394 cable. When this is<br />
checkmarked, parameter settings for <strong>the</strong> mLAN Part<br />
(page 147) of <strong>the</strong> Common Edit are initialized.<br />
Edit Recall—[F2] Recall<br />
If you are editing a Performance but you have not stored it<br />
before switching to ano<strong>the</strong>r Performance, <strong>the</strong> edits you<br />
have made will be cleared. If this happens, you can use <strong>the</strong><br />
Recall function to restore <strong>the</strong> Performance with your latest<br />
edits intact.<br />
Voice mode<br />
Performance<br />
mode<br />
Sampling<br />
mode 1<br />
Song mode<br />
Pattern mode<br />
Mixing mode<br />
Sampling<br />
mode 2<br />
Master mode<br />
Utility mode<br />
File mode<br />
MOTIF <strong>XS</strong> Owner’s <strong>Manual</strong> 159<br />
Reference
Reference<br />
160<br />
Performance Job—Convenient Functions<br />
Voice mode Performance Sampling Song mode Pattern mode Mixing mode Sampling Master mode Utility mode File mode<br />
mode mode 1<br />
mode 2<br />
Performance Copy function—[F3]<br />
Copy<br />
Copying parameter settings from<br />
ano<strong>the</strong>r Performance—[SF1] Part<br />
This convenient operation lets you copy Common Edit and<br />
Part Edit settings of a certain Performance to <strong>the</strong> currently<br />
edited Performance. This is useful if you are creating a<br />
Performance and wish to use some parameter settings of<br />
ano<strong>the</strong>r Performance.<br />
1<br />
2<br />
3<br />
4<br />
1 Performance<br />
Determines <strong>the</strong> Bank and <strong>the</strong> Performance number to be<br />
copied. This parameter cannot be set when <strong>the</strong> Current<br />
Performance (below) is turned on.<br />
2 Current Performance<br />
When this is set to on, <strong>the</strong> currently selected Performance<br />
(<strong>the</strong> one you are editing now) is selected as source.<br />
Accordingly, you can copy <strong>the</strong> parameter settings from a<br />
Part to a different Part of <strong>the</strong> same Performance.<br />
3 Data type of <strong>the</strong> source<br />
Determines <strong>the</strong> source data type including <strong>the</strong> Part<br />
number. According to <strong>the</strong> setting here, <strong>the</strong> Data type of <strong>the</strong><br />
destination below will be automatically set to <strong>the</strong><br />
appropriate item.<br />
Settings: Common, Part 1 – 4, A/D, mLAN<br />
n The Insertion Effect Switch is a Part parameter. Therefore, <strong>the</strong><br />
Insertion Effect Switch parameter settings of <strong>the</strong> selected part<br />
are copied only when selecting one of <strong>the</strong> Parts 1 – 4.<br />
4 Data type of <strong>the</strong> destination<br />
Determines <strong>the</strong> destination data type including <strong>the</strong> Part<br />
number. When <strong>the</strong> data type of <strong>the</strong> source Voice (above) is<br />
set to “<strong>com</strong>mon,” this parameter will be fixed to “<strong>com</strong>mon.”<br />
Settings: Common, Part 1 – 4, A/D, mLAN<br />
MOTIF <strong>XS</strong> Owner’s <strong>Manual</strong><br />
Copying <strong>the</strong> Voice Effect settings—<br />
[SF2] Voice<br />
This convenient operation lets you copy Effect and Master<br />
EQ settings of a certain Voice assigned to a certain<br />
Performance to <strong>the</strong> currently edited Performance. This<br />
would <strong>com</strong>e in handy when a certain Performance has<br />
settings that you want to use in your Performance program.<br />
1<br />
2<br />
3<br />
4<br />
1 Performance<br />
Determines <strong>the</strong> Bank and <strong>the</strong> Performance number to be<br />
copied. This parameter cannot be set when <strong>the</strong> Current<br />
Performance (below) is turned on.<br />
2 Current Performance<br />
When this is set to on, <strong>the</strong> currently selected Performance<br />
(<strong>the</strong> one you are editing now) is selected as source.<br />
3 Source Part<br />
Determines <strong>the</strong> Part of <strong>the</strong> source Performance. The name<br />
of <strong>the</strong> Voice assigned to <strong>the</strong> selected Part is shown.<br />
4 Effect Unit Settings<br />
Determines which Effect units are copied. You can select<br />
Effect units to be copied from Reverb, Chorus, Master EQ<br />
and Master Effect.<br />
n Even when each of <strong>the</strong> Reverb and Chorus is set to “on,”<br />
executing <strong>the</strong> Job does not copy <strong>the</strong> Send Level from <strong>the</strong><br />
Voice to <strong>the</strong> Performance. If you want to apply <strong>the</strong> same depth<br />
of <strong>the</strong> Reverb and Chorus as in <strong>the</strong> Voice mode to <strong>the</strong> copied<br />
Voice, set <strong>the</strong> Reverb Send (1) and Chorus Send (2) in <strong>the</strong><br />
Voice Output display of <strong>the</strong> Performance Part Edit mode to <strong>the</strong><br />
same value manually as in <strong>the</strong> Voice Edit mode.<br />
Transmitting <strong>the</strong> Performance data<br />
via MIDI—[F4] Bulk (Bulk Dump)<br />
This function lets you send your edited parameter settings<br />
for <strong>the</strong> currently selected Performance to a <strong>com</strong>puter or<br />
ano<strong>the</strong>r MIDI device for data archiving. To execute <strong>the</strong> Bulk<br />
Dump operation, press <strong>the</strong> [ENTER] button.<br />
n In order to execute Bulk Dump, you’ll need to set <strong>the</strong> correct<br />
MIDI Device Number. For details, see page 268.<br />
n The Bulk Dump data includes only <strong>the</strong> MIDI messages and<br />
does not include <strong>the</strong> Waveforms.
Creating a Voice/Performance by Using <strong>the</strong> Sampling Function<br />
The MOTIF <strong>XS</strong> has a powerful Sampling function that lets you record audio signals—such as vocals from a microphone or<br />
electric guitar—and integrate <strong>the</strong> resulting Samples with <strong>the</strong> Voices and Performances of <strong>the</strong> instrument. When you enter <strong>the</strong><br />
Sampling mode from <strong>the</strong> Voice mode or Performance mode, you can create your own original Samples, edit <strong>the</strong>m, assign<br />
<strong>the</strong>m to a Waveform, and <strong>the</strong>n assign <strong>the</strong> original Waveform to a User Voice or Performance.<br />
This section covers <strong>the</strong> Sampling functions when entering <strong>the</strong> Sampling mode by pressing <strong>the</strong> [INTEGRATED SAMPLING]<br />
button in <strong>the</strong> Voice mode or <strong>the</strong> Performance mode.<br />
n You can also enter <strong>the</strong> Sampling mode by pressing <strong>the</strong> [INTEGRATED SAMPLING] button in <strong>the</strong> Song mode or <strong>the</strong> Pattern mode. Keep in<br />
mind that <strong>the</strong> Sampling functions differ depending on from which mode <strong>the</strong> Sampling mode is called up, <strong>the</strong> Voice/Performance mode or <strong>the</strong><br />
Song/Pattern mode. See page 242 for instructions on using <strong>the</strong> Sampling function in <strong>the</strong> Song mode/Pattern mode.<br />
The Sampling mode structure<br />
In this section, you’ll learn about <strong>the</strong> structure and organization of Samples, Key Banks and Waveforms, as well as <strong>the</strong>ir<br />
relationship to Voices and Performances.<br />
Sample<br />
A Sample is digital audio data, made by directly recording<br />
a signal, such as that of vocals or electric guitar, to <strong>the</strong><br />
MOTIF <strong>XS</strong>. Throughout this manual, <strong>the</strong> words “Sample”<br />
and “Wave” are sometimes used interchangeably;<br />
however, you should be careful to distinguish between<br />
“Wave” (raw audio data) and “Waveform” (collected audio<br />
data used to make up a Voice).<br />
Samples can be obtained into <strong>the</strong> instrument via <strong>the</strong><br />
following methods: Recording audio signal in <strong>the</strong> Sampling<br />
mode, loading a WAV file or AIFF file from <strong>the</strong> USB storage<br />
device connected to <strong>the</strong> MOTIF <strong>XS</strong> in <strong>the</strong> File mode, and<br />
loading a WAV file or AIFF file from <strong>the</strong> hard disk connected<br />
to <strong>the</strong> network to which <strong>the</strong> MOTIF <strong>XS</strong> is connected.<br />
Because <strong>the</strong> obtained Sample data will be lost by turning<br />
<strong>the</strong> power off, Samples residing in <strong>the</strong> MOTIF <strong>XS</strong> internal<br />
memory should be saved as digital data (in WAV or AIFF<br />
format) to a USB storage device or to a <strong>com</strong>puter<br />
connected via network to <strong>the</strong> MOTIF <strong>XS</strong>.<br />
Sample, Key Bank and Waveform<br />
Samples are assigned and stored to Waveforms on <strong>the</strong><br />
MOTIF <strong>XS</strong>. Before you can actually record a Sample or<br />
load a Sample from a USB storage device, you’ll need to<br />
specify a Waveform number as a destination. This<br />
Waveform <strong>the</strong>n serves as <strong>the</strong> “container” for <strong>the</strong> Sample.<br />
Each of <strong>the</strong> Waveforms can contain multiple Samples. To<br />
assign <strong>the</strong>se Samples to a different space or container, you<br />
can set <strong>the</strong> key range and velocity range for each Sample.<br />
With this setting, <strong>the</strong> different Sample is played back<br />
depending on <strong>the</strong> pressed note and its velocity. The note<br />
range and velocity range to which each of <strong>the</strong> Samples is<br />
assigned is called <strong>the</strong> Key Bank.<br />
Velocity Waveform<br />
127<br />
40<br />
Sample 1<br />
(Key Bank)<br />
Sample 2<br />
(Key Bank)<br />
Sample 3<br />
(Key Bank)<br />
Voices and Waveform<br />
Sample 4<br />
(Key Bank)<br />
Sample 5<br />
(Key Bank)<br />
D#2 A#2 G#2 F4<br />
Waveform<br />
Key Number<br />
(Note Number)<br />
You can play <strong>the</strong> Waveform by assigning it to a Voice <strong>the</strong>n<br />
playing <strong>the</strong> keyboard with that Voice. You can assign <strong>the</strong><br />
Waveform to an Element of <strong>the</strong> Voice in <strong>the</strong> Voice Element<br />
Edit mode (page 112). The Voice Edit mode lets you assign<br />
<strong>the</strong> Waveform you’ve created with <strong>the</strong> Sampling function to<br />
<strong>the</strong> edited Element, just as you would any of <strong>the</strong> 2670<br />
preset Waveforms included on <strong>the</strong> instrument.<br />
n Keep in mind that you can assign <strong>the</strong> User Voices created in<br />
<strong>the</strong> Sampling mode entered from <strong>the</strong> Voice/Performance mode<br />
to Mixing parts of <strong>the</strong> Song/Pattern. You can also assign <strong>the</strong><br />
Waveforms created in <strong>the</strong> Sampling mode entered from <strong>the</strong><br />
Song/Pattern mode to Elements of <strong>the</strong> Voice in <strong>the</strong> Voice Edit<br />
mode.<br />
Voice mode<br />
Performance<br />
mode<br />
Sampling<br />
mode 1<br />
Song mode<br />
Pattern mode<br />
Mixing mode<br />
Sampling<br />
mode 2<br />
Master mode<br />
Utility mode<br />
File mode<br />
MOTIF <strong>XS</strong> Owner’s <strong>Manual</strong> 161<br />
Reference
Reference<br />
162<br />
Creating a Voice/Performance by Using <strong>the</strong> Sampling Function<br />
Voice mode Performance Sampling Song mode Pattern mode Mixing mode Sampling Master mode Utility mode File mode<br />
mode mode 1<br />
mode 2<br />
Sampling Main display<br />
The Sampling Main display, <strong>the</strong> entrance of <strong>the</strong> Sampling mode, is called up when pressing <strong>the</strong> [INTEGRATED SAMPLING]<br />
button from <strong>the</strong> current mode.<br />
Pressing <strong>the</strong> [INTEGRATED SAMPLING] button in <strong>the</strong> Voice mode or Performance mode calls up <strong>the</strong> Sampling mode<br />
dedicated to creation of Samples (Waveforms) assigned to <strong>the</strong> Voice/Performance. Press <strong>the</strong> [EXIT] button to return to <strong>the</strong><br />
original mode, Voice or Performance.<br />
Selecting a Waveform and Key Bank—<br />
[INTEGRATED SAMPLING]<br />
The Sampling Main display lets you select <strong>the</strong> Waveform<br />
and its Key Bank <strong>the</strong>n hear <strong>the</strong> sound of <strong>the</strong> Sample<br />
assigned to <strong>the</strong> selected Key Bank.<br />
1<br />
2<br />
4<br />
5<br />
6<br />
7<br />
1 Waveform<br />
Determines <strong>the</strong> Waveform number. The name of <strong>the</strong><br />
selected Waveform is displayed.<br />
Settings: 0001 – 1024<br />
2 Key (Key Range) (Indication only)<br />
Indicates <strong>the</strong> Range of <strong>the</strong> Key Bank.<br />
3 Velocity (Velocity Range) (Indication only)<br />
Indicates <strong>the</strong> velocity range of <strong>the</strong> currently selected Key<br />
Bank.<br />
4 Sample Size (Indication only)<br />
Indicates <strong>the</strong> size of <strong>the</strong> Sample assigned to <strong>the</strong> selected<br />
Key Bank.<br />
5 Frequency (Indication only)<br />
Indicates <strong>the</strong> sampling frequency of <strong>the</strong> Sample assigned<br />
to <strong>the</strong> selected Key Bank.<br />
n The rate at which digital readings are taken is referred to as<br />
<strong>the</strong> sampling frequency. Higher sampling frequencies result in<br />
higher quality sound. 44.1kHz is <strong>the</strong> standard value as <strong>the</strong><br />
Sampling Frequency.<br />
6 Stereo/Mono (Indication only)<br />
Indicates whe<strong>the</strong>r <strong>the</strong> Sample assigned to <strong>the</strong> selected<br />
Key Bank is stereo or mono.<br />
MOTIF <strong>XS</strong> Owner’s <strong>Manual</strong><br />
8 ! )<br />
3<br />
9<br />
7 Recordable Time (Indication only)<br />
Indicates <strong>the</strong> available sampling time using <strong>the</strong> available<br />
memory. The time indicated here is calculated assuming a<br />
mono signal with a sampling frequency of 44.1 kHz. The<br />
graph illustration indicates <strong>the</strong> already used memory<br />
amount as a blue line.<br />
8 [SF1] Audition<br />
You can hear <strong>the</strong> Sample assigned to <strong>the</strong> selected Key<br />
Bank by holding this button. This lets you check how <strong>the</strong><br />
Sample will actually sound when played back.<br />
9 [SF6] KBD (Keyboard)<br />
You can also select <strong>the</strong> Key Bank belonging to <strong>the</strong> selected<br />
Waveform directly from <strong>the</strong> keyboard, by holding down <strong>the</strong><br />
[SF6] KBD button and pressing <strong>the</strong> desired key.<br />
) [F6] Rec (Record)<br />
Pressing this button to call up <strong>the</strong> Sampling Record Setup<br />
display. This display is used for setting up <strong>the</strong> instrument<br />
for Sampling. For details, see page 164.<br />
! [SF5] Keybank<br />
Pressing this button calls up <strong>the</strong> list of <strong>the</strong> Key Banks<br />
making up <strong>the</strong> Waveform. You can select <strong>the</strong> desired Key<br />
Bank from this list by using <strong>the</strong> data dial, cursor up/down<br />
button, [INC/YES] and [DEC/NO] button.<br />
4<br />
5<br />
6<br />
@ # 2 3<br />
Regarding <strong>the</strong> parameters 2 – 6, refer to <strong>the</strong> parameter<br />
having <strong>the</strong> same name in <strong>the</strong> Sampling Main display.<br />
@ Duplication symbol<br />
This symbol appears when <strong>the</strong> key range and velocity<br />
range overlaps <strong>the</strong> ones of <strong>the</strong> o<strong>the</strong>r Key Bank. For<br />
information on how <strong>the</strong> samples assigned to <strong>the</strong><br />
overlapped Key Banks are played back, see page 170.<br />
# Key Bank number (Indication only)<br />
Indicates <strong>the</strong> Key Bank number of <strong>the</strong> selected Waveform.
Sampling Record<br />
Creating a Voice/Performance by Using <strong>the</strong> Sampling Function<br />
[INTEGRATED SAMPLING] ➞ [F6] Rec<br />
The Sampling Record function lets you record sounds—such as vocals from a connected microphone, <strong>the</strong> signal from an<br />
electric guitar, or audio from an external CD or MP3 player—directly to <strong>the</strong> MOTIF <strong>XS</strong>, and store <strong>the</strong>m to <strong>the</strong> instrument as<br />
Samples. The Samples obtained via <strong>the</strong> Sampling function can be played back from <strong>the</strong> keyboard by assigning <strong>the</strong>m first to<br />
a Waveform, <strong>the</strong>n a Voice.<br />
Important<br />
In order to use <strong>the</strong> Sampling function, DIMM modules must be installed to <strong>the</strong> instrument. For details on installing DIMMs, see page 295.<br />
The recorded (edited) Sample data residing temporarily in DIMM is lost when <strong>the</strong> power is turned off. Make sure to prepare <strong>the</strong> USB storage<br />
device or a <strong>com</strong>puter connected to <strong>the</strong> same network as <strong>the</strong> MOTIF <strong>XS</strong> before using <strong>the</strong> Sampling function.<br />
Sampling Procedure<br />
In this section, you’ll learn how to create a Voice or<br />
Performance by using <strong>the</strong> Sampling function.<br />
1 Connect a microphone or o<strong>the</strong>r audio<br />
equipment to <strong>the</strong> MOTIF <strong>XS</strong>.<br />
For information about how to do this, see page 39.<br />
If you want to use <strong>the</strong> sound of <strong>the</strong> MOTIF <strong>XS</strong> as a<br />
recording source (with <strong>the</strong> Resampling function), this<br />
step is unnecessary.<br />
2 Enter <strong>the</strong> Voice mode or Performance mode.<br />
When entering <strong>the</strong> Performance mode, select a<br />
Performance to which <strong>the</strong> Sample will be assigned.<br />
3 Press <strong>the</strong> [INTEGRATED SAMPLING] button to<br />
enter <strong>the</strong> Sampling mode. (The indicator<br />
lights.)<br />
The Sampling Main display appears.<br />
4 Press <strong>the</strong> [F6] Rec button to call up <strong>the</strong> Record<br />
Setup display (page 164).<br />
Set <strong>the</strong> following parameters in <strong>the</strong> Setup display. The<br />
numbers in paren<strong>the</strong>ses below refer to <strong>the</strong> parameters<br />
in <strong>the</strong> Sample Record display on <strong>the</strong> next page.<br />
• The Input Source (2) determines <strong>the</strong> connector from<br />
which <strong>the</strong> audio source (microphone, audio equipment,<br />
etc.) is input.<br />
• The Waveform (6) determines <strong>the</strong> Waveform number.<br />
• The Voice ()) determines <strong>the</strong> Voice Bank and Number.<br />
• The Part (9) determines <strong>the</strong> Performance part to which<br />
<strong>the</strong> Voice is assigned when entering <strong>the</strong> Sampling mode<br />
from <strong>the</strong> Performance mode.<br />
• Set o<strong>the</strong>r parameters as necessary.<br />
5 Press <strong>the</strong> [F6] Standby button to call up <strong>the</strong><br />
Record Standby display (page 166).<br />
Set <strong>the</strong> following parameters on <strong>the</strong> Standby display.<br />
Numbers in <strong>the</strong> paren<strong>the</strong>ses are equivalent to <strong>the</strong><br />
numbers pointing parameters on <strong>the</strong> Standby display.<br />
• Set <strong>the</strong> Trigger Mode (8) to determine <strong>the</strong> method by<br />
which Sampling will be triggered. Normally, set this to<br />
“level.”<br />
• If you set <strong>the</strong> Trigger Mode (8) to “level,” you will also<br />
need to set <strong>the</strong> Trigger Level (7). Set this parameter so<br />
that <strong>the</strong> red triangle of <strong>the</strong> level meter (indicating <strong>the</strong><br />
Trigger Level) is slightly below <strong>the</strong> level at which <strong>the</strong><br />
sound is input.<br />
6 Adjust <strong>the</strong> input sound level for optimum level.<br />
Try to set <strong>the</strong> input level as high as possible without<br />
clipping for <strong>the</strong> best sound quality. Follow <strong>the</strong><br />
instructions below to adjust <strong>the</strong> input level.<br />
• When <strong>the</strong> Input Source is set to A/D Input, adjust <strong>the</strong><br />
input signal level by using <strong>the</strong> GAIN knob on <strong>the</strong> rear<br />
panel. If you cannot adjust <strong>the</strong> input level appropriately,<br />
change <strong>the</strong> Mic/Line setting (page 263) in <strong>the</strong> Utility<br />
mode.<br />
• When <strong>the</strong> Input Source is set to Resample, adjust <strong>the</strong><br />
input signal level by setting <strong>the</strong> Record Gain.<br />
• When <strong>the</strong> Input Source is set to mLAN, <strong>the</strong> input level<br />
cannot be adjusted.<br />
7 Turn <strong>the</strong> Confirm function on or off by pressing<br />
<strong>the</strong> [SF1] button.<br />
The Confirm tab turns green when set to on, and turns<br />
gray when set to off. When Confirm is turned on, you<br />
can easily listen back to your just-recorded Sample and<br />
conveniently re-record it if you are not satisfied with <strong>the</strong><br />
results.<br />
8 Press <strong>the</strong> [F5] Start button to start <strong>the</strong><br />
Sampling operation.<br />
When <strong>the</strong> Trigger Mode (8) is set to “manual,” pressing<br />
<strong>the</strong> button immediately starts Sampling (a RECORDING<br />
indication appears in <strong>the</strong> display).<br />
When <strong>the</strong> Trigger Mode (8) is set to “level,” pressing<br />
<strong>the</strong> button enables Sampling but does not start it (a<br />
WAITING indication appears in <strong>the</strong> display).<br />
9 Play <strong>the</strong> sound to be sampled.<br />
When <strong>the</strong> Trigger Mode (8) is set to “level” and an<br />
audio signal exceeding <strong>the</strong> specified Trigger Level (7)<br />
is input to <strong>the</strong> instrument, <strong>the</strong> RECORDING indication<br />
replaces <strong>the</strong> WAITING indication and Sampling starts.<br />
During Sampling, a graphic representation of <strong>the</strong><br />
recorded audio appears in <strong>the</strong> display.<br />
MOTIF <strong>XS</strong> Owner’s <strong>Manual</strong><br />
Voice mode<br />
Performance<br />
mode<br />
Sampling<br />
mode 1<br />
Song mode<br />
Pattern mode<br />
Mixing mode<br />
Sampling<br />
mode 2<br />
Master mode<br />
Utility mode<br />
File mode<br />
163<br />
Reference
Reference<br />
Voice mode Performance Sampling Song mode Pattern mode Mixing mode Sampling Master mode Utility mode File mode<br />
mode mode 1<br />
mode 2<br />
164<br />
Creating a Voice/Performance by Using <strong>the</strong> Sampling Function<br />
10 Press <strong>the</strong> [F6] Stop button to stop Sampling.<br />
If you set Confirm to on in step 7 above, <strong>the</strong> Sampling<br />
Finished display (page 167) appears. Press <strong>the</strong> [SF1]<br />
Audition button to hear <strong>the</strong> sampled sound. If you are<br />
satisfied with <strong>the</strong> results, press <strong>the</strong> [ENTER] button to<br />
store <strong>the</strong> sampled sound as a “Sample” and return to<br />
<strong>the</strong> Setup display. If you are not satisfied with <strong>the</strong><br />
results and you wish to try again, press <strong>the</strong> [EXIT]<br />
button to return to <strong>the</strong> Standby display and try<br />
Sampling from step 5 again.<br />
If you set Confirm to off in step 7 above, <strong>the</strong> sampled<br />
sound will be stored as a “Sample” automatically.<br />
n When you set Record Next (4) to “on” in step 4 above,<br />
<strong>the</strong> instrument returns to <strong>the</strong> STANDBY display after <strong>the</strong><br />
Sample data is fixed. In this case, you can leave <strong>the</strong><br />
Sampling Record mode by pressing <strong>the</strong> [EXIT] button.<br />
11 Save <strong>the</strong> created Waveform to a USB storage<br />
device.<br />
For detailed instructions on saving, see page 278.<br />
The recorded (edited) Sample data resides temporarily in<br />
DIMM (page 79). Any data in DIMM will be lost when turning<br />
<strong>the</strong> power off. You should always save any data residing in<br />
DIMM to a USB storage device or a <strong>com</strong>puter connected to<br />
<strong>the</strong> same network as <strong>the</strong> MOTIF <strong>XS</strong> before turning off <strong>the</strong><br />
power.<br />
Sampling Setup—[F6] Rec<br />
From this display you can set up various parameters for<br />
Sampling. Press <strong>the</strong> [F6] button from <strong>the</strong> Sampling Main<br />
display to call up this display. Press <strong>the</strong> [EXIT] button to go<br />
back to <strong>the</strong> Sampling Main display.<br />
1<br />
2<br />
3<br />
4<br />
5<br />
@<br />
CAUTION<br />
1 Recording Type<br />
Determines <strong>the</strong> Sampling type. Keep in mind that this<br />
parameter is fixed to “sample” when entering <strong>the</strong> Sampling<br />
mode from <strong>the</strong> Voice/Performance mode.<br />
MOTIF <strong>XS</strong> Owner’s <strong>Manual</strong><br />
6<br />
7<br />
8<br />
9<br />
)<br />
!<br />
#<br />
$<br />
2 Input Source<br />
Determines <strong>the</strong> input connector via which <strong>the</strong> signal to be<br />
sampled will be received.<br />
Settings: A/D Input, resample, mLAN<br />
A/D Input<br />
Analog audio from <strong>the</strong> A/D INPUT jacks is recognized as <strong>the</strong> recording<br />
source.<br />
resample<br />
Audio signal from <strong>the</strong> OUTPUT jacks of <strong>the</strong> MOTIF <strong>XS</strong> is received and<br />
recognized as <strong>the</strong> recording source.<br />
mLAN<br />
Audio signal from <strong>the</strong> mLAN connector (available for MOTIF <strong>XS</strong>8 and<br />
available for MOTIF <strong>XS</strong>6/7 only when <strong>the</strong> optional mLAN16E2 has been<br />
installed) is recognized as <strong>the</strong> recording source. The audio signal here<br />
is transmitted from <strong>the</strong> <strong>com</strong>puter via mLAN Ports 3 and 4.<br />
3 Stereo/Mono<br />
Determines whe<strong>the</strong>r <strong>the</strong> audio signal is recorded as mono<br />
Sample or stereo Sample.<br />
Settings: monoL, monoR, monoL+R, stereo<br />
monoL<br />
The L-channel signal will be recorded as a mono Sample.<br />
monoR<br />
The R-channel signal will be recorded as a mono Sample.<br />
monoL+R<br />
The L-channel and R-channel signals will be mixed and recorded as a<br />
mono Sample.<br />
stereo<br />
A stereo Sample will be recorded.<br />
4 Record Next<br />
When set to on, <strong>the</strong> next key is set as destination of<br />
Sampling automatically after <strong>the</strong> Sampling operation is<br />
finished (including assignment of <strong>the</strong> Sample to a Key<br />
Bank), and <strong>the</strong> Standby display appears. This parameter is<br />
useful when you wish to record multiple Samples in<br />
succession.<br />
When you wish to obtain Samples successively from a<br />
special CD containing various materials in each track, for<br />
example, you can set this parameter to on and set <strong>the</strong><br />
Trigger Mode to “level”—and conveniently have <strong>the</strong><br />
instrument record consecutive Samples automatically. To<br />
leave <strong>the</strong> Sampling Record mode, press <strong>the</strong> [EXIT] button.<br />
Settings: on, off<br />
n When both of <strong>the</strong> [SF1] Confirm and <strong>the</strong> Record Next are<br />
turned on before <strong>the</strong> Sampling starts, <strong>the</strong> FINISHED display<br />
appears as soon as <strong>the</strong> Sampling is finished. From <strong>the</strong><br />
FINISHED display, fix <strong>the</strong> Sample data by pressing <strong>the</strong><br />
[ENTER] button so that <strong>the</strong> instrument returns to <strong>the</strong> STANDBY<br />
display.<br />
n This parameter is useful when you wish to assign individual<br />
Samples to <strong>the</strong> keys one by one to create a Drum Voice by<br />
using <strong>the</strong> special CD containing sound of each drum<br />
instrument as source.<br />
n Keep in mind that <strong>the</strong> Record Next parameter may be fixed to<br />
“off” and cannot be changed. This occurs when you enter <strong>the</strong><br />
Sampling mode from <strong>the</strong> Voice mode/Performance mode, set<br />
<strong>the</strong> Voice to something o<strong>the</strong>r than “off,” and set <strong>the</strong> Source<br />
(above) to “resample.”
5 Frequency<br />
Specifies <strong>the</strong> sampling frequency. When <strong>the</strong> Input Source<br />
(2) is set to “mLAN,” this parameter is fixed to “44.1kHz.”<br />
Normally, this parameter should be set to “44.1kHz,” <strong>the</strong><br />
highest setting. If you wish to obtain a lo-fi sound, select a<br />
value o<strong>the</strong>r than 44.1 kHz. At settings o<strong>the</strong>r than 44.1 kHz,<br />
<strong>the</strong> sound monitored during recording may be different<br />
from <strong>the</strong> recorded sound, depending on <strong>the</strong> source signal.<br />
Settings: 44.1k (44.1 kHz), 22.0kLo (22.05 kHz Lo-Fi), 11.0kLo<br />
(11.025 kHz Lo-Fi), 5.5kLo (5.5125 kHz Lo-Fi)<br />
6 Waveform<br />
Determines <strong>the</strong> Waveform number as destination.<br />
Settings: 0001 – 1024<br />
CAUTION<br />
The Sampling operation overwrites any data previously existing at<br />
<strong>the</strong> destination Waveform number. Important data should always<br />
be saved to a USB storage device connected to <strong>the</strong> USB TO<br />
DEVICE terminal or to a <strong>com</strong>puter connected to <strong>the</strong> same network<br />
as <strong>the</strong> MOTIF <strong>XS</strong> (page 278).<br />
7 Keybank<br />
Determines <strong>the</strong> note number of <strong>the</strong> Key Bank as<br />
destination. The value set here can be changed in <strong>the</strong><br />
Sampling Edit mode (page 167).<br />
Settings: C -2 – G8<br />
n You can also set <strong>the</strong> Key directly from <strong>the</strong> keyboard, by<br />
holding down <strong>the</strong> [SF6] KBD button and pressing <strong>the</strong> desired<br />
key. For details, see page 82.<br />
8 Track<br />
This parameter is not available when entering <strong>the</strong> Sampling<br />
mode from <strong>the</strong> Voice/Performance mode.<br />
9 Part<br />
Determines <strong>the</strong> Performance Part to which <strong>the</strong> Voice ())<br />
created by Sampling is assigned. When set to off, <strong>the</strong><br />
obtained Sample is not assigned to <strong>the</strong> Performance part.<br />
This parameter is available when entering <strong>the</strong> Sampling<br />
mode from <strong>the</strong> Performance mode. When <strong>the</strong> Voice ()) is<br />
set to off, this parameter cannot be set even if entering <strong>the</strong><br />
Sampling mode from <strong>the</strong> Performance mode.<br />
Settings: off, 1 – 4<br />
) Voice<br />
Determines <strong>the</strong> voice to which <strong>the</strong> Waveform (6) created<br />
via <strong>the</strong> Sampling is assigned by specifying <strong>the</strong> Voice Bank<br />
and Number. Setting <strong>the</strong> Voice Bank to any of USER1 – 3<br />
assigns <strong>the</strong> Waveform (6) to <strong>the</strong> Element 1 of <strong>the</strong> new<br />
Normal Voice created via Sampling. Setting <strong>the</strong> Voice Bank<br />
to UDR assigns <strong>the</strong> Waveform (6) to <strong>the</strong> Drum Key (!) of<br />
<strong>the</strong> specified Drum Voice. When this is set to “off,” only a<br />
Waveform (6) is created; <strong>the</strong> Sample is not stored as a<br />
User Voice.<br />
Settings:<br />
Voice Bank: Off, USER1 – 3 (User 1 – 3), UDR (User Drum)<br />
Voice Number: 001 – 128<br />
Creating a Voice/Performance by Using <strong>the</strong> Sampling Function<br />
CAUTION<br />
When <strong>the</strong> Voice Bank is set to any of USER1 – 3, <strong>the</strong> Sampling<br />
operation overwrites any data already existing in <strong>the</strong> destination<br />
Voice number. Important data should always be saved to a USB<br />
storage device connected to <strong>the</strong> USB TO DEVICE terminal or to a<br />
<strong>com</strong>puter connected to <strong>the</strong> same network as <strong>the</strong> MOTIF <strong>XS</strong><br />
(page 278).<br />
! Drum Key<br />
Determines <strong>the</strong> Key to which <strong>the</strong> Waveform (6) is<br />
assigned when <strong>the</strong> Voice Bank ()) is set to “UDR.”<br />
Settings: C0 – C6<br />
@ Recordable Time (Indication only)<br />
Indicates <strong>the</strong> available Sampling time using <strong>the</strong> available<br />
memory. The time indicated here is calculated assuming a<br />
mono signal with a sampling frequency of 44.1 kHz. The<br />
amount of memory space currently being used is shown in<br />
<strong>the</strong> display as a blue line.<br />
# [SF6] INFO (Information)<br />
Indicates <strong>the</strong> amount of Sampling memory used.<br />
1<br />
2 3<br />
1 Used/Total (Indication only)<br />
Indicates <strong>the</strong> amount of memory being used and <strong>the</strong> total<br />
amount available.<br />
2 Recordable Size (Indication only)<br />
Indicates <strong>the</strong> amount of free memory.<br />
3 Recordable Time (Indication only)<br />
Indicates <strong>the</strong> available Sampling time using <strong>the</strong> available<br />
memory. The time indicated here is calculated assuming<br />
that <strong>the</strong> sampling frequency is 44.1 kHz with mono.<br />
$ [F6] Standby<br />
Pressing this button calls up <strong>the</strong> Sampling Record Standby<br />
display. This display is used for executing Sampling. For<br />
details, see page 166.<br />
Voice mode<br />
Performance<br />
mode<br />
Sampling<br />
mode 1<br />
Song mode<br />
Pattern mode<br />
Mixing mode<br />
Sampling<br />
mode 2<br />
Master mode<br />
Utility mode<br />
File mode<br />
MOTIF <strong>XS</strong> Owner’s <strong>Manual</strong> 165<br />
Reference
Reference<br />
Voice mode Performance Sampling Song mode Pattern mode Mixing mode Sampling Master mode Utility mode File mode<br />
mode mode 1<br />
mode 2<br />
166<br />
Creating a Voice/Performance by Using <strong>the</strong> Sampling Function<br />
Sampling Record—[F6] Standby<br />
This display is used for executing Sampling. Press <strong>the</strong> [F6]<br />
button from <strong>the</strong> Setup display to call up this display. Press<br />
<strong>the</strong> [EXIT] button to go back to <strong>the</strong> Setup display.<br />
1<br />
2<br />
4<br />
5<br />
9<br />
1 Waveform (Indication only)<br />
Indicates <strong>the</strong> number and name of <strong>the</strong> selected Waveform.<br />
2 Key (Key Range) (Indication only)<br />
Indicates <strong>the</strong> key range of <strong>the</strong> currently selected Key Bank.<br />
3 Velocity (Velocity Range) (Indication only)<br />
Indicates <strong>the</strong> velocity range of <strong>the</strong> currently selected Key<br />
Bank.<br />
4 Record Monitor<br />
Determines <strong>the</strong> output level of <strong>the</strong> monitor for <strong>the</strong> input<br />
signal while Sampling. The time indicated here is<br />
calculated assuming a mono signal with a sampling<br />
frequency of 44.1 kHz. This monitor signal is output from<br />
<strong>the</strong> PHONES jack or <strong>the</strong> OUTPUT R and L/MONO jacks.<br />
Settings: 0 – 127<br />
5 Record Gain<br />
This parameter is available only when <strong>the</strong> Input Source<br />
(page 164) is set to “resample” (recording <strong>the</strong> sound of <strong>the</strong><br />
MOTIF <strong>XS</strong> itself). This determines <strong>the</strong> recording gain when<br />
resampling. The higher <strong>the</strong> value, <strong>the</strong> greater <strong>the</strong> volume of<br />
<strong>the</strong> resampled sound. Before executing <strong>the</strong> Sampling<br />
operation, you can set <strong>the</strong> appropriate gain by checking<br />
<strong>the</strong> volume via <strong>the</strong> Level Meter ()) while playing <strong>the</strong><br />
keyboard.<br />
Settings: -12dB, -6dB, +0dB, +6dB, +12dB<br />
6 Key<br />
!<br />
3<br />
Indicates <strong>the</strong> Keybank (page 165) set in <strong>the</strong> Sampling<br />
Record Setup display. The Key Bank can be changed both<br />
here and in Sampling Edit (page 167) after <strong>the</strong> Sampling<br />
operation.<br />
Settings: C -2 – G8<br />
n You can also set <strong>the</strong> Key directly from <strong>the</strong> keyboard, by<br />
holding down <strong>the</strong> [SF6] KBD button and pressing <strong>the</strong> desired<br />
key. For details, see page 82.<br />
MOTIF <strong>XS</strong> Owner’s <strong>Manual</strong><br />
6<br />
7<br />
8<br />
@<br />
)<br />
7 Trigger Level<br />
When <strong>the</strong> Trigger Mode (8) is set to “level,” you’ll also<br />
need to set <strong>the</strong> Trigger Level. Sampling will begin as soon<br />
as an input signal exceeding <strong>the</strong> specified trigger level is<br />
received. The level set here will be indicated as a red<br />
triangle in <strong>the</strong> level meter. For best results, set this as low<br />
as possible to capture <strong>the</strong> entire signal, but not so low as to<br />
record unwanted noise.<br />
Settings: 000 – 127<br />
8 Trigger Mode<br />
Determines <strong>the</strong> method by which Sampling will be triggered.<br />
Settings: level, manual<br />
level<br />
Sampling starts as soon as an input signal exceeding <strong>the</strong> specified<br />
Trigger Level (7) is received.<br />
manual<br />
Sampling starts soon after you press <strong>the</strong> [F6] REC button. This setting<br />
lets you start Sampling at your desired timing regardless of <strong>the</strong> input<br />
level from audio source.<br />
9 Recordable Time (Indication only)<br />
Indicates <strong>the</strong> available Sampling time using <strong>the</strong> available<br />
memory. The time indicated here is calculated assuming a<br />
mono signal with a sampling frequency of 44.1 kHz. The<br />
amount of memory space currently being used is shown in<br />
<strong>the</strong> display as a blue line.<br />
) Level Meter<br />
This graph indicates <strong>the</strong> input level of <strong>the</strong> input source. Try<br />
to get <strong>the</strong> input level as high as possible without clipping<br />
for <strong>the</strong> best sound quality.<br />
n Follow <strong>the</strong> instructions below to adjust <strong>the</strong> input level.<br />
• When <strong>the</strong> Input Source is set to A/D Input, adjust <strong>the</strong> input<br />
signal level by using <strong>the</strong> GAIN knob on <strong>the</strong> rear panel. If you<br />
cannot adjust <strong>the</strong> input level appropriately, change <strong>the</strong> Mic/<br />
Line setting (page 263) in <strong>the</strong> Utility mode.<br />
• When <strong>the</strong> Input Source is set to Resample, adjust <strong>the</strong> input<br />
signal level by setting <strong>the</strong> Record Gain (5).<br />
• When <strong>the</strong> Input Source is set to mLAN, <strong>the</strong> input level<br />
cannot be adjusted.<br />
! [SF1] Confirm<br />
This determines whe<strong>the</strong>r you can confirm <strong>the</strong> recorded<br />
Sample (on) or not (off) after Sampling is finished. This is<br />
useful for conveniently recording again if you are not<br />
satisfied with <strong>the</strong> Sampling results. When this is turned off,<br />
<strong>the</strong> recorded sample is fixed as data as soon as <strong>the</strong><br />
Sampling is finished <strong>the</strong>n <strong>the</strong> instrument returns to <strong>the</strong><br />
Setup display (page 164). Please note that <strong>the</strong> instrument<br />
returns to <strong>the</strong> STANDBY display after <strong>the</strong> Sampling is<br />
finished when Record Next is turned on in <strong>the</strong> Setup<br />
display.<br />
@ [F5] Start<br />
Press this button to start Sampling.<br />
When <strong>the</strong> Trigger mode is set to “level,” pressing <strong>the</strong> [F5]<br />
Start button calls up <strong>the</strong> WAITING indication on <strong>the</strong> display.<br />
Actual Sampling does not start. When audio signal<br />
exceeding <strong>the</strong> specified Trigger Level (7) is input to <strong>the</strong><br />
instrument, <strong>the</strong> RECORDING indication replaces <strong>the</strong><br />
WAITING indication and Sampling starts.
When <strong>the</strong> Trigger Mode (8) is set to “manual,” pressing<br />
this button starts Sampling immediately.<br />
Sampling RECORDING display<br />
During Sampling, a graphic representation of <strong>the</strong> recorded<br />
audio appears in <strong>the</strong> display.<br />
[F6] Stop<br />
Press this button to stop Sampling. When Sampling is<br />
<strong>com</strong>plete, <strong>the</strong> FINISHED display appears.<br />
Sampling FINISHED display (when<br />
Confirm is set to on)<br />
When <strong>the</strong> [SF1] Confirm is turned on before Sampling<br />
starts, <strong>the</strong> FINISHED display below appears as soon as<br />
Sampling Edit<br />
Creating a Voice/Performance by Using <strong>the</strong> Sampling Function<br />
Sampling is finished. From this display, you can hear and<br />
confirm <strong>the</strong> Sample by pressing <strong>the</strong> [SF1] Audition button.<br />
If you are satisfied with <strong>the</strong> sound, press <strong>the</strong> [ENTER]<br />
button to fix <strong>the</strong> Sampling result as Sample data. If you are<br />
not satisfied with <strong>the</strong> Sampling result, press <strong>the</strong> [EXIT]<br />
button <strong>the</strong>n try again.<br />
When [SF1] Confirm is turned off before Sampling starts,<br />
<strong>the</strong> Sampling operation will automatically fix <strong>the</strong> Sample<br />
data and return to <strong>the</strong> Setup display (page 164).<br />
[SF1] Audition<br />
You can hear <strong>the</strong> recorded Sample by holding this button.<br />
This lets you check whe<strong>the</strong>r <strong>the</strong> Sampling has been<br />
executed appropriately or not.<br />
n When [SF1] Confirm (page 166) is turned off before <strong>the</strong><br />
Sampling starts, <strong>the</strong> Sampling operation will automatically fix<br />
<strong>the</strong> Sample data and return to <strong>the</strong> Setup display (page 164).<br />
Please note that <strong>the</strong> instrument returns to <strong>the</strong> STANDBY<br />
display after Sampling is finished when Record Next is turned<br />
on in <strong>the</strong> Setup display.<br />
[INTEGRATED SAMPLING] ➞ [EDIT]<br />
The Sampling Edit mode gives you <strong>com</strong>prehensive, detailed controls for editing <strong>the</strong> recorded Sample and changing <strong>the</strong><br />
Sample settings. Press <strong>the</strong> [EDIT] button from <strong>the</strong> Sampling Main display to call up <strong>the</strong> Sampling Edit display. Press <strong>the</strong><br />
[EXIT] button to go back to <strong>the</strong> Sampling Main display.<br />
Sampling Edit procedure<br />
1 Press <strong>the</strong> [INTEGRATED SAMPLING] button to<br />
enter <strong>the</strong> Sampling mode. (The indicator<br />
lights.)<br />
The Sampling Main display (page 162) appears.<br />
2 Select a Waveform and Key Bank.<br />
Select a Waveform and Key Bank to which <strong>the</strong> Sample<br />
to be edited is assigned.<br />
3 Press <strong>the</strong> [EDIT] button to enter <strong>the</strong> Sampling<br />
Edit mode.<br />
4 Press <strong>the</strong> [F1] Trim or [F2] Param (Parameter)<br />
button.<br />
Set <strong>the</strong> desired parameter in each display.<br />
5 Press <strong>the</strong> [SF1] Audition button to hear <strong>the</strong><br />
sound.<br />
Repeat steps 4 and 5 as desired.<br />
6 Press <strong>the</strong> [EXIT] button to go back to <strong>the</strong><br />
Sampling Main display.<br />
MOTIF <strong>XS</strong> Owner’s <strong>Manual</strong><br />
Voice mode<br />
Performance<br />
mode<br />
Sampling<br />
mode 1<br />
Song mode<br />
Pattern mode<br />
Mixing mode<br />
Sampling<br />
mode 2<br />
Master mode<br />
Utility mode<br />
File mode<br />
167<br />
Reference
Reference<br />
Voice mode Performance Sampling Song mode Pattern mode Mixing mode Sampling Master mode Utility mode File mode<br />
mode mode 1<br />
mode 2<br />
168<br />
Creating a Voice/Performance by Using <strong>the</strong> Sampling Function<br />
Hint 2 Set <strong>the</strong> Start Point to <strong>the</strong> 1st beat of <strong>the</strong> 1st<br />
A convenient Extract function lets you delete unneeded<br />
measure.<br />
portions of <strong>the</strong> Sample prior to <strong>the</strong> start point and after<br />
Press <strong>the</strong> [F1] Trim button to call up <strong>the</strong> Trim display<br />
<strong>the</strong> end point, allowing you to save memory for additional<br />
(page 168) <strong>the</strong>n set <strong>the</strong> Start Point (6).<br />
Sampling.<br />
1 Press <strong>the</strong> [F1] Trim button to call up <strong>the</strong> Trim<br />
3 Set <strong>the</strong> Loop Point to <strong>the</strong> value same as <strong>the</strong><br />
Start Point.<br />
display.<br />
Press <strong>the</strong> [SF2] button so that <strong>the</strong> LP=ST is shown.<br />
2 Press <strong>the</strong> [ENTER] button. (The display<br />
4 While holding <strong>the</strong> [SF1] Audition button, adjust<br />
prompts you for confirmation.)<br />
<strong>the</strong> End Point so that looped playback of <strong>the</strong><br />
If you wish to cancel <strong>the</strong> operation, press <strong>the</strong> [DEC/<br />
Sample is smooth and matches <strong>the</strong> beat timing.<br />
NO] button.<br />
3 Press <strong>the</strong> [INC/YES] button to execute Extract.<br />
5 Execute <strong>the</strong> Extract operation (page 177).<br />
n The data deleted via <strong>the</strong> Extract operation cannot be<br />
recovered. Before executing <strong>the</strong> Extract, you may want<br />
to back up this Sample by using <strong>the</strong> Copy Job<br />
(page 172).<br />
Tips for editing <strong>the</strong> Samples<br />
How to play <strong>the</strong> Sample (Play Mode settings)<br />
There are two methods for playing back <strong>the</strong> Sample: One<br />
shot and Loop. Loop lets you play <strong>the</strong> specified range of<br />
<strong>the</strong> Sample repeatedly in a loop. One Shot, on <strong>the</strong> o<strong>the</strong>r<br />
hand, lets you play <strong>the</strong> entire Sample only once.<br />
You’ll need to determine which type (Loop or One Shot) is<br />
used by setting <strong>the</strong> Play Mode parameter in <strong>the</strong><br />
Parameter display (page 170).<br />
Fine-tuning playback of One Shot Samples<br />
You can determine <strong>the</strong> playback range of <strong>the</strong> Sample by<br />
setting <strong>the</strong> Start Point (6) and End Point (8) in <strong>the</strong> Trim<br />
display (page 168). These parameters effectively let you<br />
mute unnecessary or unwanted audio from <strong>the</strong> beginning<br />
and end of your Sample. To cut sound at <strong>the</strong> end of<br />
playback, decrease <strong>the</strong> End Point value, moving it<br />
leftward on <strong>the</strong> wave display. Similarly, to cut sound at <strong>the</strong><br />
beginning of playback, increase <strong>the</strong> Start Point value,<br />
moving it rightward on <strong>the</strong> wave display. In general, you’ll<br />
want to set <strong>the</strong> Start Point so that <strong>the</strong> beginning of <strong>the</strong><br />
Sample plays back immediately when triggered. Use <strong>the</strong><br />
[SF1] Audition button to check playback of <strong>the</strong> Sample,<br />
that it sounds smooth and natural. After setting and<br />
confirming <strong>the</strong> Start/End Points, trim <strong>the</strong>m permanently<br />
from <strong>the</strong> Sample by using <strong>the</strong> Extract operation<br />
(page 177).<br />
Fine-tuning playback of Loop Samples<br />
Setting <strong>the</strong> Start and End Points in a Loop Sample is<br />
generally more crucial and painstaking than with One<br />
Shot Samples. The Start and End Points must be set<br />
accurately to ensure that <strong>the</strong> Loop plays back smoothly<br />
and continuously without stutters or glitches. You’ll also<br />
need to make sure (with rhythmic loops) that <strong>the</strong> Loop is<br />
in perfect rhythm and no beats are lost.<br />
1 Set <strong>the</strong> Play Mode to “loop.”<br />
Press <strong>the</strong> [F2] Param button to call up <strong>the</strong> Parameter<br />
display (page 170) <strong>the</strong>n set <strong>the</strong> Play Mode (6) to<br />
“loop.”<br />
MOTIF <strong>XS</strong> Owner’s <strong>Manual</strong><br />
How to set <strong>the</strong> tempo of <strong>the</strong> Sample<br />
If you do not know <strong>the</strong> tempo of <strong>the</strong> Sample containing<br />
<strong>the</strong> rhythm pattern, follow <strong>the</strong> instructions below.<br />
1 While holding <strong>the</strong> [SF1] Audition button, adjust<br />
<strong>the</strong> Start Point and End Point so that looped<br />
playback of <strong>the</strong> Sample is smooth and matches<br />
<strong>the</strong> beat timing.<br />
Make sure to also use <strong>the</strong> Extract operation to delete<br />
unnecessary parts from <strong>the</strong> Sample.<br />
2 Set <strong>the</strong> time signature and measure.<br />
Press <strong>the</strong> [F1] Trim button to call up <strong>the</strong> Trim display<br />
(below) <strong>the</strong>n set <strong>the</strong> time signature ()) and measure<br />
(!).<br />
3 Increase or decrease <strong>the</strong> Tempo (9) as<br />
necessary so that <strong>the</strong> End Point (8) be<strong>com</strong>es<br />
equivalent to <strong>the</strong> end point applied to <strong>the</strong><br />
original Sample.<br />
Set <strong>the</strong> Tempo (9) to a large value <strong>the</strong>n decrease it<br />
gradually so that <strong>the</strong> End Point (8) increases<br />
gradually. Once you reach a certain value, <strong>the</strong> End<br />
Point no longer increases, even when you decrease<br />
<strong>the</strong> Tempo. The resulting value is <strong>the</strong> End Point<br />
applied to <strong>the</strong> original Sample. The final Tempo value<br />
is <strong>the</strong> most appropriate tempo for Sample playback.<br />
Sample Playback settings—[F1] Trim<br />
This display lets you set <strong>the</strong> playback range and loop<br />
range of <strong>the</strong> Sample.<br />
3<br />
1<br />
2<br />
6<br />
7<br />
8<br />
@<br />
* # ( $ % ^ &<br />
4<br />
5<br />
9<br />
)<br />
!<br />
º
1 Waveform (Indication only)<br />
Indicates <strong>the</strong> number and name of <strong>the</strong> selected Waveform.<br />
2 Key (Key Range) (Indication only)<br />
Indicates <strong>the</strong> key range of <strong>the</strong> currently selected Key Bank.<br />
3 Velocity (Velocity Range) (Indication only)<br />
Indicates <strong>the</strong> velocity range of <strong>the</strong> currently selected Key<br />
Bank.<br />
4 Track (Indication only)<br />
Indicates <strong>the</strong> track of <strong>the</strong> current Song/Pattern. This is<br />
available only when entering <strong>the</strong> Sampling mode from <strong>the</strong><br />
Song/Pattern mode.<br />
5 Measure (Indication only)<br />
Indicates <strong>the</strong> measure number of <strong>the</strong> selected Song/<br />
Pattern. This is available only when entering <strong>the</strong> Sampling<br />
mode from <strong>the</strong> Song/Pattern mode.<br />
6 Start Point<br />
Determines <strong>the</strong> Start point for Sample playback. The part<br />
at <strong>the</strong> left side of this point will not be played back. When<br />
pressing <strong>the</strong> [SF2] button, <strong>the</strong> value of <strong>the</strong> Loop Point (7)<br />
is copied to <strong>the</strong> Start Point.<br />
Settings: 0000000 – End point<br />
7 Loop Point<br />
Determines <strong>the</strong> Loop point at which <strong>the</strong> loop playback starts.<br />
When <strong>the</strong> Play mode is set to “loop,” <strong>the</strong> Sample is played<br />
back between this Loop point and <strong>the</strong> End point (6).<br />
Settings: 0000000 – End point<br />
8 End Point<br />
Determines <strong>the</strong> End point for Sample playback. The part at<br />
<strong>the</strong> right side of this point will not be played back. The End<br />
Point (8) will be automatically determined so that <strong>the</strong> length<br />
between <strong>the</strong> Start Point and <strong>the</strong> End Point matches <strong>the</strong><br />
settings of <strong>the</strong> Tempo (9), Meter ()), and Measure (!).<br />
Settings: 0000000 – (depending on <strong>the</strong> Sample’s length)<br />
9 Tempo<br />
Determines <strong>the</strong> Tempo of Sample playback. Setting <strong>the</strong><br />
Tempo changes <strong>the</strong> End Point (8) so that <strong>the</strong> length<br />
between <strong>the</strong> Start Point and <strong>the</strong> End Point matches <strong>the</strong><br />
settings of <strong>the</strong> Meter and Measure.<br />
Settings: 5.0 – 300.0<br />
) Meter<br />
Determines <strong>the</strong> meter (time signature) of Sample playback.<br />
Setting <strong>the</strong> Meter changes <strong>the</strong> End Point (8) so that <strong>the</strong><br />
length between <strong>the</strong> Start Point and <strong>the</strong> End Point matches<br />
<strong>the</strong> settings of <strong>the</strong> Tempo and Measure.<br />
Settings: 1/16 – 16/16, 1/8 – 16/8, 1/4 – 8/4<br />
! Measure<br />
Determines <strong>the</strong> Sample length for playback based on<br />
measure and beat values, an intuitive and musically useful<br />
way to set Sample playback. Setting <strong>the</strong> Measure changes<br />
Creating a Voice/Performance by Using <strong>the</strong> Sampling Function<br />
<strong>the</strong> End Point (8) so that <strong>the</strong> length between <strong>the</strong> Start Point<br />
and <strong>the</strong> End Point matches <strong>the</strong> settings of <strong>the</strong> Tempo and<br />
Meter.<br />
Settings:<br />
Measure: 000 – 032<br />
Beat: 00 – 15 (Varies depending on <strong>the</strong> Meter setting.)<br />
n The Measure setting here indicates <strong>the</strong> length between <strong>the</strong><br />
Start Point and End Point of <strong>the</strong> sample. When you wish to play<br />
two measures beginning from <strong>the</strong> Start Point of <strong>the</strong> sample, set<br />
<strong>the</strong> Measure parameter to “002:00.”<br />
@ Recordable Time (Indication only)<br />
Indicates <strong>the</strong> available Sampling time using <strong>the</strong> available<br />
memory. The time indicated here is calculated assuming a<br />
mono signal with a sampling frequency of 44.1 kHz. The<br />
amount of memory space currently being used is shown in<br />
<strong>the</strong> display as a blue line.<br />
# [SF1] Audition<br />
You can hear <strong>the</strong> selected Sample by holding this button.<br />
This lets you check whe<strong>the</strong>r <strong>the</strong> Sample has been edited<br />
appropriately or not.<br />
$ [SF2] LP=ST<br />
When <strong>the</strong> menu indication here is “LP=ST,” <strong>the</strong> Start (Start<br />
Point) and <strong>the</strong> Loop (Loop Start Point) will share <strong>the</strong> same<br />
address, meaning that both of <strong>the</strong>m will be changed<br />
simultaneously, even if just one of <strong>the</strong>m is changed.<br />
Pressing <strong>the</strong> [SF2] button in this condition changes <strong>the</strong><br />
menu from “LP=ST” to “LP≠ST.” When <strong>the</strong> menu indication<br />
here is “LP≠ST,” <strong>the</strong> Start (Start Point) and <strong>the</strong> Loop (Loop<br />
Start Point) can be changed independently. When pressing<br />
<strong>the</strong> [SF2] button in this condition, <strong>the</strong> address value of <strong>the</strong><br />
Start will be copied to <strong>the</strong> one of <strong>the</strong> Loop, with <strong>the</strong> result<br />
that both of <strong>the</strong>m share <strong>the</strong> same address value. The menu<br />
indication also changes from “LP≠ST” to “LP=ST.”<br />
% [SF3] Display<br />
Pressing <strong>the</strong> [SF3] button adjusts <strong>the</strong> zoom level so that <strong>the</strong><br />
entire wave, including <strong>the</strong> Start Point and End Point, is<br />
shown on <strong>the</strong> display.<br />
^ [SF4] Zoom Out<br />
& [SF5] Zoom In<br />
Press <strong>the</strong> [SF4] and [SF5] buttons to zoom in and out of <strong>the</strong><br />
wave display.<br />
* [F1] Trim<br />
Pressing this button returns from <strong>the</strong> previous display to <strong>the</strong><br />
Trim display.<br />
( [F2] Param (Parameter)<br />
Pressing this button calls up <strong>the</strong> display that lets you set<br />
<strong>the</strong> Sample-related parameters and Key Bank range.<br />
º [SF6] NUM<br />
When “NUM” is shown in <strong>the</strong> tab, you can use <strong>the</strong> [F1] –<br />
[F6] buttons and <strong>the</strong> [SF1] – [SF5] buttons as <strong>the</strong> numeric<br />
key pads by pressing <strong>the</strong> [SF6] button.<br />
Voice mode<br />
Performance<br />
mode<br />
Sampling<br />
mode 1<br />
Song mode<br />
Pattern mode<br />
Mixing mode<br />
Sampling<br />
mode 2<br />
Master mode<br />
Utility mode<br />
File mode<br />
MOTIF <strong>XS</strong> Owner’s <strong>Manual</strong> 169<br />
Reference
Reference<br />
Voice mode Performance Sampling Song mode Pattern mode Mixing mode Sampling Master mode Utility mode File mode<br />
mode mode 1<br />
mode 2<br />
170<br />
Creating a Voice/Performance by Using <strong>the</strong> Sampling Function<br />
Sample Parameter settings—[F2]<br />
Param<br />
This display lets you set Sample-related parameters such<br />
as Key Range and Velocity Range.<br />
Parameters 1 – 3 are same as <strong>the</strong> ones on <strong>the</strong> Trim<br />
display (page 168).<br />
n The KBD icon is shown on <strong>the</strong> tab corresponding to <strong>the</strong> [SF6]<br />
button depending on <strong>the</strong> selected parameter. In this condition,<br />
you can enter <strong>the</strong> note number or velocity by pressing <strong>the</strong><br />
appropriate note on <strong>the</strong> keyboard while holding <strong>the</strong> [SF6] KBD<br />
button. For details, see page 82.<br />
4 Level<br />
Determines <strong>the</strong> output level of <strong>the</strong> selected Sample.<br />
Settings: -95.25 dB – +0.00 dB<br />
5 Pan<br />
Determines <strong>the</strong> stereo pan position of <strong>the</strong> sound.<br />
Settings: L64 (far left) – C (center) – R63 (far right)<br />
6 Play Mode<br />
Determines how <strong>the</strong> Sample is played back.<br />
Settings: loop, one shot, reverse<br />
loop<br />
1 2 3<br />
4<br />
5<br />
6<br />
7<br />
8<br />
!<br />
@<br />
Sample playback begins from <strong>the</strong> Start point, continues to <strong>the</strong> Loop<br />
point, <strong>the</strong>n repeats indefinitely between <strong>the</strong> Loop point and End point.<br />
This setting is useful for short rhythmic passages, riffs and beats that<br />
you want to play back repeatedly and continuously.<br />
one shot<br />
The Sample plays back one time from Start point to End point. This<br />
setting can be used for solos, sound effects and vocal passages that<br />
are used once without looping.<br />
reverse<br />
The Sample plays back one time in reverse from End point to Start<br />
point. This is useful for creating reversed cymbal sounds and o<strong>the</strong>r<br />
special effects.<br />
7 Coarse Tune<br />
Determines <strong>the</strong> coarse tuning for <strong>the</strong> pitch of <strong>the</strong> Sample in<br />
semitones.<br />
Settings: -64 – +0 – +63<br />
8 Fine Tune<br />
Determines <strong>the</strong> fine tuning for <strong>the</strong> pitch of <strong>the</strong> Sample in<br />
cents.<br />
Settings: -64 – +0 – +63<br />
MOTIF <strong>XS</strong> Owner’s <strong>Manual</strong><br />
9<br />
)<br />
9 Key Range<br />
Indicates <strong>the</strong> key range of <strong>the</strong> Key Bank to which <strong>the</strong><br />
selected Sample is assigned. By assigning different<br />
Samples from a single Waveform to separate key ranges,<br />
you can create a Voice that produces different sounds<br />
depending on what key you play.<br />
Settings: C -2 – G8<br />
) Velocity (Velocity Range)<br />
Indicates <strong>the</strong> velocity range of <strong>the</strong> Key Bank to which <strong>the</strong><br />
selected Sample is assigned. By assigning different<br />
Samples from a single Waveform to separate velocity<br />
ranges, you can create a Voice that produces different<br />
sounds depending on how strongly you play <strong>the</strong> keyboard.<br />
Settings: 1 – 127<br />
! Recordable Time (Indication only)<br />
Indicates <strong>the</strong> available Sampling time using <strong>the</strong> available<br />
memory. The time indicated here is calculated assuming a<br />
mono signal with a sampling frequency of 44.1 kHz. The<br />
amount of memory space currently being used is shown in<br />
<strong>the</strong> display as a blue line.<br />
@ [SF1] Audition<br />
You can hear <strong>the</strong> selected Sample by holding this button.<br />
This lets you check how <strong>the</strong> Sample will actually sound<br />
when played back.<br />
When different Key Banks overlap:<br />
When playing back a certain key with a certain velocity<br />
belonging to different Key Banks (in o<strong>the</strong>r words,<br />
different samples are assigned to this key and velocity),<br />
not all relevant samples may be played back and priority<br />
will be given to <strong>the</strong> two audio channels starting from <strong>the</strong><br />
sample(s) assigned to <strong>the</strong> Key Bank having a smaller<br />
number. When a stereo sample is assigned to <strong>the</strong> Key<br />
Bank of <strong>the</strong> smallest number, for example, only that<br />
sample will be played back. When a mono sample is<br />
assigned to <strong>the</strong> Key Bank of <strong>the</strong> smallest number and a<br />
different sample is assigned to <strong>the</strong> Key Bank of <strong>the</strong><br />
second smallest number, for 2nd example, only those<br />
two samples will be played back. When a mono sample<br />
is assigned to <strong>the</strong> Key Bank of <strong>the</strong> smallest number and a<br />
stereo sample is assigned to <strong>the</strong> Key Bank of <strong>the</strong> second<br />
smallest number, for 3rd example, only <strong>the</strong> mono sample<br />
will be played back. This rule applies to all modes of <strong>the</strong><br />
instrument.
Sampling Job<br />
Creating a Voice/Performance by Using <strong>the</strong> Sampling Function<br />
[INTEGRATED SAMPLING] ➞ [JOB]<br />
The Sampling Job mode lets you process and modify Samples you have recorded. 18 Sampling Jobs are available.<br />
Function Description<br />
[F1] Keybank Jobs related to Samples assigned to <strong>the</strong> specified Key Bank<br />
01: Copy This Job copies a specified Key Bank to ano<strong>the</strong>r Waveform. Also <strong>the</strong> Sample assigned to <strong>the</strong> Key<br />
Bank is copied.<br />
02: Delete This Job deletes <strong>the</strong> specified Key Bank and its Sample.<br />
03: Move This Job moves a specified Key Bank to ano<strong>the</strong>r Waveform. Also <strong>the</strong> Sample assigned to <strong>the</strong> Key<br />
Bank is moved.<br />
04: Normalize This Job maximizes (normalizes) <strong>the</strong> overall level of <strong>the</strong> specified Sample.<br />
05: Time-Stretch This Job lets you change <strong>the</strong> tempo of <strong>the</strong> Sample without changing <strong>the</strong> pitch.<br />
06: Convert Pitch This Job lets you change <strong>the</strong> pitch of <strong>the</strong> Sample without changing <strong>the</strong> tempo.<br />
07: Fade In/Out This Job lets you create a fade-in and fade-out for <strong>the</strong> Sample.<br />
08: Half Sampling Frequency This Job lets you halve <strong>the</strong> sampling frequency of <strong>the</strong> specified Sample.<br />
09: Stereo to Mono This Job lets you convert a stereo Sample to a mono Sample.<br />
10: Loop-Remix This Job lets you automatically cut <strong>the</strong> Sample into separate “slices” and randomly rearrange <strong>the</strong><br />
slices for special effects and unusual rhythmic variations.<br />
11: Slice This Job lets you divide <strong>the</strong> Sample into separate slices following <strong>the</strong> specified settings.<br />
When entering this Job from <strong>the</strong> Song/Pattern mode, note data for playing <strong>the</strong> slices in sequence<br />
is also created. Note data playback sounds just like <strong>the</strong> original Sample being played back.<br />
[F2] Waveform Waveform Jobs<br />
01: Copy This Job lets you copy <strong>the</strong> data of one Waveform to ano<strong>the</strong>r. The Key Banks and Samples<br />
included in <strong>the</strong> Waveform are also copied by this Job.<br />
02: Delete This Job lets you delete a specific Waveform from memory. The Key Banks and Samples included<br />
in <strong>the</strong> Waveform are also deleted.<br />
03: Extract This Job lets you delete all unnecessary Sample data (located ahead of <strong>the</strong> Start Point and<br />
located after <strong>the</strong> End Point).<br />
04: Transpose This Job lets you transpose <strong>the</strong> Key Bank setting of a specified Waveform in semitones.<br />
05: Rename This Job lets you edit <strong>the</strong> name of <strong>the</strong> specified Waveform.<br />
[F5] O<strong>the</strong>r O<strong>the</strong>r Jobs<br />
01: Optimize Memory This Job optimizes <strong>the</strong> memory (DRAM) for Sampling.<br />
02: Delete All This Job deletes all <strong>the</strong> Waveforms.<br />
Sample Job procedure<br />
1 Press <strong>the</strong> [JOB] button in <strong>the</strong> Sampling mode<br />
to enter <strong>the</strong> Sampling Job mode.<br />
2 Call up <strong>the</strong> desired Job group.<br />
Select <strong>the</strong> Job group by pressing one of <strong>the</strong> [F1]<br />
Keybank, [F2] Waveform, and [F3] O<strong>the</strong>r buttons.<br />
3 Call up <strong>the</strong> desired Job display.<br />
Move <strong>the</strong> cursor to <strong>the</strong> desired Job by using <strong>the</strong> data<br />
dial, [INC/DEC] and [DEC/NO] buttons or Cursor up/<br />
down button, <strong>the</strong>n press <strong>the</strong> [ENTER] button. The<br />
desired Job display appears. Press <strong>the</strong> [EXIT] button to<br />
go back to <strong>the</strong> Job menu display.<br />
4 Set <strong>the</strong> value of <strong>the</strong> desired parameters.<br />
Move <strong>the</strong> cursor to <strong>the</strong> desired parameter, <strong>the</strong>n set <strong>the</strong><br />
value by using <strong>the</strong> data dial, [INC/YES] and [DEC/NO]<br />
button.<br />
When “Apply” appears on <strong>the</strong> menu corresponding to<br />
<strong>the</strong> [SF4] button, go to step 5. When “Apply” does not<br />
appear, go to step 7.<br />
5 Press <strong>the</strong> [SF4] Apply button to execute <strong>the</strong> Job.<br />
At this time, <strong>the</strong> Sample has been modified temporarily<br />
and not fixed as data.<br />
6 Confirm <strong>the</strong> result of <strong>the</strong> Job operation.<br />
Press <strong>the</strong> [SF1] Audition button to hear <strong>the</strong> modified<br />
Sample. If you are satisfied with <strong>the</strong> result, go on to <strong>the</strong><br />
step 7. If you are not satisfied with <strong>the</strong> results and want<br />
to try again, press <strong>the</strong> [SF4] Apply button again to abort<br />
<strong>the</strong> Job operation and return <strong>the</strong> Sample to <strong>the</strong> original<br />
status. In this case, attempt <strong>the</strong> operation again from<br />
step 4.<br />
MOTIF <strong>XS</strong> Owner’s <strong>Manual</strong><br />
Voice mode<br />
Performance<br />
mode<br />
Sampling<br />
mode 1<br />
Song mode<br />
Pattern mode<br />
Mixing mode<br />
Sampling<br />
mode 2<br />
Master mode<br />
Utility mode<br />
File mode<br />
171<br />
Reference
Reference<br />
Voice mode Performance Sampling Song mode Pattern mode Mixing mode Sampling Master mode Utility mode File mode<br />
mode mode 1<br />
mode 2<br />
172<br />
Creating a Voice/Performance by Using <strong>the</strong> Sampling Function<br />
7 Press <strong>the</strong> [ENTER] button to fix <strong>the</strong> Job result<br />
as Sample data.<br />
CAUTION<br />
You cannot return <strong>the</strong> modified Sample to <strong>the</strong> original after<br />
fixing <strong>the</strong> Job result. Important data should always be saved to<br />
a USB storage device connected to <strong>the</strong> USB TO DEVICE<br />
terminal or to a <strong>com</strong>puter connected to <strong>the</strong> same network as<br />
<strong>the</strong> MOTIF <strong>XS</strong> (page 278).<br />
8 Press <strong>the</strong> [EXIT] button twice to go back to <strong>the</strong><br />
Sampling Main display.<br />
n If <strong>the</strong>re is no data in <strong>the</strong> specified Waveform and Key<br />
Bank, “No Data” will appear on <strong>the</strong> display and <strong>the</strong> job<br />
cannot be executed.<br />
n Some Jobs cannot be executed if <strong>the</strong>re is not enough<br />
memory space. The amount of <strong>the</strong> available memory<br />
space can be confirmed at <strong>the</strong> bottom of <strong>the</strong> Sampling<br />
Job display or in <strong>the</strong> Information display (page 165).<br />
CAUTION<br />
Even if <strong>the</strong> Job operation has been <strong>com</strong>pleted, <strong>the</strong> data will be<br />
lost when turning <strong>the</strong> power off. Make sure to save <strong>the</strong><br />
Waveform data to a USB storage device or to a <strong>com</strong>puter<br />
connected to <strong>the</strong> same network as <strong>the</strong> MOTIF <strong>XS</strong> in <strong>the</strong> File<br />
mode (page 278) after <strong>the</strong> Job operation.<br />
[F1] Keybank<br />
This display contains Jobs for editing Samples. The<br />
Sample to be edited can be specified via <strong>the</strong> Waveform<br />
number and Key Bank.<br />
The Key Bank Jobs provide <strong>the</strong> basic operations using <strong>the</strong><br />
[SF1] button and <strong>the</strong> [SF5] button.<br />
[SF1] Audition<br />
You can hear <strong>the</strong> Sample assigned to <strong>the</strong> selected<br />
Keybank by holding this button. This lets you check how<br />
<strong>the</strong> Sample will actually sound when played back.<br />
[SF5] Keybank<br />
Pressing this button calls up <strong>the</strong> Key Bank list, from which<br />
you can select <strong>the</strong> desired Key Bank. For details, see<br />
page 162.<br />
MOTIF <strong>XS</strong> Owner’s <strong>Manual</strong><br />
Available memory space<br />
Basic Operations in <strong>the</strong> Key Bank Jobs<br />
[SF6] KBD (Keyboard)<br />
This menu appears only when <strong>the</strong> cursor is located at <strong>the</strong><br />
Waveform. You can also select <strong>the</strong> Key Bank belonging to<br />
<strong>the</strong> selected Waveform directly from <strong>the</strong> keyboard, by<br />
holding down <strong>the</strong> [SF6] KBD button and pressing <strong>the</strong><br />
desired key.<br />
[SF6] INFO (Information)<br />
When “INFO” is shown at <strong>the</strong> tab menu corresponding to<br />
<strong>the</strong> [SF6] button, press [SF6] to call up <strong>the</strong> Information<br />
window indicating <strong>the</strong> memory status for Sampling. For<br />
details, see page 165.<br />
01: Copy<br />
This Job copies <strong>the</strong> data of a Sample contained in a<br />
specified Key Bank to ano<strong>the</strong>r Key Bank. Also <strong>the</strong> Sample<br />
assigned to <strong>the</strong> Key Bank is copied. This is useful if you are<br />
creating a Waveform and wish to use <strong>the</strong> Sample data from<br />
ano<strong>the</strong>r Waveform.<br />
1<br />
2<br />
1 Source Key Bank<br />
2 Destination Key Bank<br />
The source Key Bank is set by using <strong>the</strong> [SF5] Keybank<br />
button or [SF6] KBD button to select <strong>the</strong> key in <strong>the</strong><br />
waveform after selecting <strong>the</strong> Waveform number (0001 –<br />
1024). The source Key Bank is set by moving <strong>the</strong> cursor to<br />
<strong>the</strong> Key value and using <strong>the</strong> Data dial or [SF6] KBD button<br />
to select <strong>the</strong> desired key after selecting <strong>the</strong> Waveform<br />
number (0001 – 1024). The Velocity range values of <strong>the</strong><br />
destination Key Bank are automatically set to <strong>the</strong> same as<br />
those of <strong>the</strong> source Key Bank.<br />
n You can hear <strong>the</strong> sample assigned to <strong>the</strong> source Key Bank by<br />
pressing <strong>the</strong> [SF1] Audition button.
02: Delete<br />
This Job deletes <strong>the</strong> specified Key Bank and its Sample.<br />
By deleting unnecessary Samples, you can increase <strong>the</strong><br />
available memory space.<br />
1<br />
1 Key Bank to be deleted<br />
Determines <strong>the</strong> Key Bank to be deleted by setting <strong>the</strong><br />
Waveform number (0001 – 1024). The Key range and<br />
Velocity range of <strong>the</strong> Key Bank to which <strong>the</strong> selected<br />
Waveform is assigned are automatically shown below <strong>the</strong><br />
Waveform number.<br />
03: Move<br />
This Job moves a specified Key Bank to ano<strong>the</strong>r<br />
Waveform. Also <strong>the</strong> Sample assigned to <strong>the</strong> Key Bank is<br />
moved.<br />
1<br />
2<br />
1 Source Key Bank<br />
2 Destination Key Bank<br />
Determines <strong>the</strong> Key Banks of source and destination<br />
respectively by setting <strong>the</strong> Waveform number (0001 –<br />
1024). Setting <strong>the</strong> source Waveform number calls up one of<br />
<strong>the</strong> Key Banks (<strong>the</strong> Key range and Velocity range) which<br />
can be changed by pressing <strong>the</strong> [SF5] Keybank button<br />
and [SF6] KBD button. The Key range and Velocity range<br />
of <strong>the</strong> destination Key Bank are automatically set to <strong>the</strong><br />
same values as those of <strong>the</strong> source Key Bank.<br />
n You can hear <strong>the</strong> sample assigned to <strong>the</strong> source Key Bank by<br />
pressing <strong>the</strong> [SF1] Audition button.<br />
Creating a Voice/Performance by Using <strong>the</strong> Sampling Function<br />
04: Normalize<br />
This Job maximizes (normalizes) <strong>the</strong> overall level of <strong>the</strong><br />
specified Sample. This is useful for bringing up <strong>the</strong> volume<br />
of a Sample that was inadvertently recorded at a low level.<br />
1<br />
2<br />
1 Key Bank<br />
Determines <strong>the</strong> Key Bank to which <strong>the</strong> desired Sample is<br />
assigned by specifying <strong>the</strong> Waveform number (0001 –<br />
1024). The Key range and Velocity range of <strong>the</strong> Key Bank<br />
to which <strong>the</strong> selected Waveform is assigned are<br />
automatically shown below <strong>the</strong> Waveform number.<br />
2 Ratio<br />
Determines <strong>the</strong> post-normalization Sample level. A setting<br />
of 100% maximizes <strong>the</strong> level so that <strong>the</strong> highest peak level<br />
in <strong>the</strong> Sample is just below clipping (maximum digital<br />
signal level). Settings higher than 100% will raise <strong>the</strong><br />
Sample level above <strong>the</strong> maximum, producing deliberate<br />
clipping. Normally, set this to 100% or less.<br />
Settings: 1% – 800%<br />
CAUTION<br />
The Job execution is divided into two stages: temporary data<br />
conversion via <strong>the</strong> [SF4] Apply button and actual data entry via <strong>the</strong><br />
[ENTER] button. The Job result will be lost if you call up a different<br />
display without finalizing <strong>the</strong> data via <strong>the</strong> [ENTER] button.<br />
05: Time-Stretch<br />
This Job lets you change <strong>the</strong> length of <strong>the</strong> Sample without<br />
changing <strong>the</strong> pitch. By using this Job, you can synchronize<br />
Sample playback with Song/Pattern playback, since<br />
changing <strong>the</strong> Sample length also changes <strong>the</strong> tempo of<br />
Sample playback<br />
1<br />
2<br />
3<br />
Voice mode<br />
Performance<br />
mode<br />
Sampling<br />
mode 1<br />
Song mode<br />
Pattern mode<br />
Mixing mode<br />
Sampling<br />
mode 2<br />
Master mode<br />
Utility mode<br />
File mode<br />
MOTIF <strong>XS</strong> Owner’s <strong>Manual</strong> 173<br />
Reference
Reference<br />
Voice mode Performance Sampling Song mode Pattern mode Mixing mode Sampling Master mode Utility mode File mode<br />
mode mode 1<br />
mode 2<br />
174<br />
Creating a Voice/Performance by Using <strong>the</strong> Sampling Function<br />
1 Key Bank<br />
Determines <strong>the</strong> Key Bank to which <strong>the</strong> desired Sample is<br />
assigned by specifying <strong>the</strong> Waveform number (0001 –<br />
1024). The Key range and Velocity range of <strong>the</strong> Key Bank<br />
to which <strong>the</strong> selected Waveform is assigned are<br />
automatically shown below <strong>the</strong> Waveform number.<br />
2 Ratio<br />
Determines <strong>the</strong> length of <strong>the</strong> post-process Sample as a<br />
ratio of <strong>the</strong> length of <strong>the</strong> original Sample (100%). The<br />
tempo change can be calculated as follows.<br />
Ratio value = (original tempo/modified tempo) x 100.<br />
Settings: 25% – 400%<br />
3 Accuracy<br />
Determines <strong>the</strong> quality of <strong>the</strong> resulting Sample by<br />
specifying which aspect of <strong>the</strong> original is to be<br />
emphasized: sound quality or rhythmic feel.<br />
Settings: sound4 – sound1, normal, rhythm1 – rhythm 2<br />
sound4 – sound1<br />
These settings place emphasis on sound quality, with <strong>the</strong> “sound4”<br />
setting producing <strong>the</strong> highest sound quality.<br />
normal<br />
Produces an optimum balance of sound quality and rhythmic feel.<br />
rhythm1 – rhythm2<br />
These settings place emphasis on rhythmic feel, with <strong>the</strong> “rhythm2”<br />
setting producing <strong>the</strong> most accurate rhythmic feel.<br />
CAUTION<br />
The Job execution is divided into two stages: temporary data<br />
conversion via <strong>the</strong> [SF4] Apply button and actual data entry via <strong>the</strong><br />
[ENTER] button. The Job result will be lost if you call up a different<br />
display without finalizing <strong>the</strong> data via <strong>the</strong> [ENTER] button.<br />
06: Convert Pitch<br />
This Job lets you change <strong>the</strong> pitch of <strong>the</strong> Sample without<br />
changing <strong>the</strong> tempo.<br />
1<br />
2<br />
3<br />
1 Key Bank<br />
Determines <strong>the</strong> Key Bank to which <strong>the</strong> desired Sample is<br />
assigned by specifying <strong>the</strong> Waveform number (0001 –<br />
1024). The Key range and Velocity range of <strong>the</strong> Key Bank<br />
to which <strong>the</strong> selected Waveform is assigned are<br />
automatically shown below <strong>the</strong> Waveform number.<br />
MOTIF <strong>XS</strong> Owner’s <strong>Manual</strong><br />
2 Pitch<br />
Determines <strong>the</strong> amount and direction of pitch shift in<br />
semitone increments.<br />
Settings: -12 – +0 – +12<br />
3 Fine<br />
Determines <strong>the</strong> amount and direction of pitch shift in cent<br />
increments (1 cent = 1/100th of a semitone). 1 cent is<br />
equivalent to 1/100th of a semitone.<br />
Settings: -50 – +0 – +50<br />
CAUTION<br />
The Job execution is divided into two stages: temporary data<br />
conversion via <strong>the</strong> [SF4] Apply button and actual data entry via <strong>the</strong><br />
[ENTER] button. The Job result will be lost if you call up a different<br />
display without finalizing <strong>the</strong> data via <strong>the</strong> [ENTER] button.<br />
07: Fade In/Out<br />
This Job lets you create a fade-in and fade-out for <strong>the</strong><br />
Sample.<br />
1<br />
2<br />
3<br />
1 Key Bank<br />
Determines <strong>the</strong> Key Bank to which <strong>the</strong> desired Sample is<br />
assigned by specifying <strong>the</strong> Waveform number (0001 –<br />
1024). The Key range and Velocity range of <strong>the</strong> Key Bank<br />
to which <strong>the</strong> selected Waveform is assigned are<br />
automatically shown below <strong>the</strong> Waveform number.<br />
2 Fade Type<br />
Determines <strong>the</strong> type of level fade: fade-in or fade-out.<br />
Settings: fade in, fade out<br />
3 Length<br />
Determines <strong>the</strong> length of <strong>the</strong> fade-in or fade-out. When a<br />
fade-in is selected, this parameter specifies <strong>the</strong> length of<br />
<strong>the</strong> fade starting at <strong>the</strong> specified Start point. When a fadeout<br />
is selected, this parameter specifies <strong>the</strong> length of <strong>the</strong><br />
fade starting at <strong>the</strong> beginning of <strong>the</strong> fade and ending at <strong>the</strong><br />
specified End point.<br />
A Length setting of 4410 is roughly equivalent to 0.1<br />
seconds when <strong>the</strong> Frequency is set to 44.1 kHz in <strong>the</strong><br />
Setup display (page 164) of <strong>the</strong> Sampling mode.<br />
Settings: 0000000 – End point
Length<br />
Start point<br />
CAUTION<br />
The Job execution is divided into two stages: temporary data<br />
conversion via <strong>the</strong> [SF4] Apply button and actual data entry via <strong>the</strong><br />
[ENTER] button. The Job result will be lost if you call up a different<br />
display without finalizing <strong>the</strong> data via <strong>the</strong> [ENTER] button.<br />
08: Half Sampling Frequency<br />
This Job lets you halve <strong>the</strong> sampling frequency of <strong>the</strong><br />
specified Sample. This can be used to convert hi-fi<br />
Samples to a lo-fi sound, and reduce <strong>the</strong> Sample size by<br />
half to conserve memory.<br />
1<br />
1 Key Bank<br />
Determines <strong>the</strong> Key Bank to which <strong>the</strong> desired Sample is<br />
assigned by specifying <strong>the</strong> Waveform number (0001 –<br />
1024). The Key range and Velocity range of <strong>the</strong> Key Bank<br />
to which <strong>the</strong> selected Waveform is assigned are<br />
automatically shown below <strong>the</strong> Waveform number.<br />
CAUTION<br />
Length<br />
End point<br />
Fade-in<br />
Fade-out<br />
The Job execution is divided into two stages: temporary data<br />
conversion via <strong>the</strong> [SF4] Apply button and actual data entry via <strong>the</strong><br />
[ENTER] button. The Job result will be lost if you call up a different<br />
display without finalizing <strong>the</strong> data via <strong>the</strong> [ENTER] button.<br />
Creating a Voice/Performance by Using <strong>the</strong> Sampling Function<br />
09: Stereo to Mono<br />
This Job lets you convert a stereo Sample to a mono<br />
Sample.<br />
1<br />
2<br />
1 Key Bank<br />
Determines <strong>the</strong> Key Bank to which <strong>the</strong> desired Sample is<br />
assigned by specifying <strong>the</strong> Waveform number (0001 –<br />
1024). The Key range and Velocity range of <strong>the</strong> Key Bank<br />
to which <strong>the</strong> selected Waveform is assigned are<br />
automatically shown below <strong>the</strong> Waveform number.<br />
2 Type<br />
Determines which channel, or both channels, of <strong>the</strong> stereo<br />
Sample will be converted to a mono Sample.<br />
Settings: L+R>mono, L>mono, R>mono<br />
L+R>mono<br />
The left and right channels of a stereo Sample are mixed and<br />
converted to a mono Sample.<br />
L>mono<br />
The left channel of a stereo Sample is converted to a mono Sample.<br />
R>mono<br />
The right channel of a stereo Sample is converted to a mono Sample.<br />
CAUTION<br />
The Job execution is divided into two stages: temporary data<br />
conversion via <strong>the</strong> [SF4] Apply button and actual data entry via <strong>the</strong><br />
[ENTER] button. The Job result will be lost if you call up a different<br />
display without finalizing <strong>the</strong> data via <strong>the</strong> [ENTER] button.<br />
10: Loop-Remix<br />
This Job lets you automatically cut <strong>the</strong> Sample into<br />
separate “slices” and randomly rearrange <strong>the</strong> slices for<br />
special effects and unusual rhythmic variations.<br />
1<br />
2<br />
3<br />
Voice mode<br />
Performance<br />
mode<br />
Sampling<br />
mode 1<br />
Song mode<br />
Pattern mode<br />
Mixing mode<br />
Sampling<br />
mode 2<br />
Master mode<br />
Utility mode<br />
File mode<br />
MOTIF <strong>XS</strong> Owner’s <strong>Manual</strong> 175<br />
Reference
Reference<br />
Voice mode Performance Sampling Song mode Pattern mode Mixing mode Sampling Master mode Utility mode File mode<br />
mode mode 1<br />
mode 2<br />
176<br />
Creating a Voice/Performance by Using <strong>the</strong> Sampling Function<br />
1 Key Bank<br />
Determines <strong>the</strong> Key Bank to which <strong>the</strong> desired Sample is<br />
assigned by specifying <strong>the</strong> Waveform number (0001 –<br />
1024). The Key range and Velocity range of <strong>the</strong> Key Bank<br />
to which <strong>the</strong> selected Waveform is assigned are<br />
automatically shown below <strong>the</strong> Waveform number.<br />
2 Type<br />
Determines <strong>the</strong> degree to which <strong>the</strong> looped portion of <strong>the</strong><br />
Sample will be sliced.<br />
Settings: 1 – 4<br />
3 Variation<br />
Determines how <strong>the</strong> original Sample is varied by this Job.<br />
Settings: normal1 – 2, reverse1 – 2<br />
normal1 – 2<br />
These settings slice and rearrange <strong>the</strong> Sample data, without<br />
performing any o<strong>the</strong>r audio changes.<br />
reverse1 – 2<br />
In addition to slicing and rearranging, <strong>the</strong>se settings reverse <strong>the</strong><br />
playback of some of <strong>the</strong> slices.<br />
CAUTION<br />
The Job execution is divided into two stages: temporary data<br />
conversion via <strong>the</strong> [SF4] Apply button and actual data entry via <strong>the</strong><br />
[ENTER] button. The Job result will be lost if you call up a different<br />
display without finalizing <strong>the</strong> data via <strong>the</strong> [ENTER] button.<br />
11: Slice<br />
This Job lets you divide <strong>the</strong> Sample into separate “slices,”<br />
<strong>the</strong> number of which is determined by <strong>the</strong> note length (with<br />
Measure, Meter, and Sub Divide). Sliced Samples are<br />
assigned to each of keys in ascending order from <strong>the</strong> Key<br />
Bank specified at <strong>the</strong> Lowest Key (7) parameter. When<br />
entering this Job from <strong>the</strong> Song/Pattern mode, note data for<br />
playing <strong>the</strong> slices in sequence is also created. Playing<br />
back <strong>the</strong> note data and <strong>the</strong> slices in order results in <strong>the</strong><br />
same sound as <strong>the</strong> original “un-sliced” Sample.<br />
1<br />
1 Key Bank<br />
Determines <strong>the</strong> Key Bank to which <strong>the</strong> desired Sample is<br />
assigned by specifying <strong>the</strong> Waveform number (0001 –<br />
1024). The Key range and Velocity range of <strong>the</strong> Key Bank<br />
to which <strong>the</strong> selected Waveform is assigned are<br />
automatically shown below <strong>the</strong> Waveform number.<br />
MOTIF <strong>XS</strong> Owner’s <strong>Manual</strong><br />
2<br />
3<br />
4<br />
5<br />
6<br />
7<br />
8<br />
7 Lowest Key<br />
Specifies <strong>the</strong> lowest key number from which <strong>the</strong> sliced<br />
Samples are assigned in order.<br />
Settings: C -2 – G8<br />
n In <strong>the</strong> Record Slice display of <strong>the</strong> Sampling Record mode<br />
(page 248), this parameter is fixed to “C1” for <strong>the</strong> MOTIF <strong>XS</strong>6,<br />
“E0” for <strong>the</strong> MOTIF <strong>XS</strong>7, and “A -1” for <strong>the</strong> MOTIF <strong>XS</strong>8, and<br />
cannot be set.<br />
2 Type (Slice Type)<br />
3 Measure<br />
4 Meter<br />
5 Sub Divide<br />
6 Sens<br />
8 Tempo<br />
With <strong>the</strong> exception of <strong>the</strong> Lowest Key parameter, all<br />
parameters and settings are <strong>the</strong> same as in <strong>the</strong> Record<br />
Slice display of <strong>the</strong> Sampling Record mode (page 248)<br />
which appears after Sampling is <strong>com</strong>pleted with <strong>the</strong> Type<br />
set to “slice+seq.”<br />
CAUTION<br />
The Job execution is divided into two stages: temporary data<br />
conversion via <strong>the</strong> [SF4] Apply button and actual data entry via <strong>the</strong><br />
[ENTER] button. The Job result will be lost if you call up a different<br />
display without finalizing <strong>the</strong> data via <strong>the</strong> [ENTER] button.<br />
[F2] Waveform Jobs<br />
This display contains Jobs for editing Waveforms.<br />
01: Copy<br />
This Job lets you copy <strong>the</strong> data of one Waveform to<br />
ano<strong>the</strong>r. The Key Banks and Samples included in <strong>the</strong><br />
Waveform are also copied by this Job.<br />
1<br />
2<br />
1 Waveform as source<br />
2 Waveform as destination<br />
Determines <strong>the</strong> copy source and destination Waveform<br />
numbers.<br />
CAUTION<br />
This operation overwrites any data previously existing at <strong>the</strong><br />
destination Waveform number.
02: Delete<br />
This Job lets you delete a specific Waveform from memory.<br />
The Key Banks and Samples included in <strong>the</strong> Waveform are<br />
also deleted.<br />
Waveform<br />
Determines <strong>the</strong> Waveform number to be deleted.<br />
03: Extract<br />
This Job lets you delete all unnecessary parts of <strong>the</strong><br />
Sample (located ahead of <strong>the</strong> Start Point and located after<br />
<strong>the</strong> End Point).<br />
Start point End point<br />
Waveform<br />
Determines <strong>the</strong> Waveform number to be extracted.<br />
04: Transpose<br />
This Job lets you transpose <strong>the</strong> Key Bank setting of a<br />
specified Waveform in semitones or in octaves.<br />
1<br />
2<br />
3<br />
1 Waveform<br />
Determines <strong>the</strong> Waveform number to which this Job is<br />
applied.<br />
2 Octave<br />
Determines <strong>the</strong> amount in octaves by which <strong>the</strong> Key Bank is<br />
transposed. When you want to transpose by less than one<br />
octave, set this to “0” and use <strong>the</strong> Note parameter below.<br />
Settings: -3 – +0 – +3<br />
3 Note<br />
Extract<br />
Start point End point<br />
Determines <strong>the</strong> amount in semitones by which <strong>the</strong> Key Bank is<br />
transposed. When you want to transpose by exact octaves,<br />
set this to “0” and use <strong>the</strong> Octave parameter above.<br />
Settings: -11 – +0 – +11<br />
Creating a Voice/Performance by Using <strong>the</strong> Sampling Function<br />
05: Rename<br />
This Job lets you assign a name to <strong>the</strong> selected Waveform.<br />
1<br />
2<br />
1 Waveform<br />
Determines <strong>the</strong> Waveform number to which this Job is<br />
applied.<br />
2 Name<br />
Determines <strong>the</strong> Waveform name which can contain up to<br />
10 characters. For detailed instructions on naming, refer to<br />
“Basic Operation” on page 82.<br />
[F5] O<strong>the</strong>r Jobs<br />
01: Optimize Memory<br />
This Job optimizes <strong>the</strong> memory (DIMM) for Sampling.<br />
Optimization consolidates areas of used and unused<br />
(available) memory to create <strong>the</strong> largest possible area of<br />
contiguous available memory. In some cases, <strong>the</strong> amount<br />
of remaining memory will be increased when you execute<br />
<strong>the</strong> Optimize Memory Job.<br />
02: Delete All<br />
This Job deletes all <strong>the</strong> user Waveforms. The Key Banks<br />
and Samples included in <strong>the</strong> Waveform are also deleted.<br />
Voice mode<br />
Performance<br />
mode<br />
Sampling<br />
mode 1<br />
Song mode<br />
Pattern mode<br />
Mixing mode<br />
Sampling<br />
mode 2<br />
Master mode<br />
Utility mode<br />
File mode<br />
MOTIF <strong>XS</strong> Owner’s <strong>Manual</strong> 177<br />
Reference
Reference<br />
Voice mode Performance Sampling Song mode Pattern mode Mixing mode Sampling Master mode Utility mode File mode<br />
mode mode 1<br />
mode 2<br />
178<br />
MOTIF <strong>XS</strong> Owner’s <strong>Manual</strong><br />
Song Playback<br />
The Song mode lets you record, edit and play your own original Songs. The Song Play mode is <strong>the</strong> main ‘portal’ by which<br />
you enter <strong>the</strong> Song mode, and it is here where you select and play a Song. Some of <strong>the</strong> Song settings—such as <strong>the</strong> rhythmic<br />
feel—can also be edited in this mode. To call up <strong>the</strong> Song Play display and enter <strong>the</strong> Song mode, simply press <strong>the</strong> [SONG]<br />
button.<br />
n From <strong>the</strong> Track View display in <strong>the</strong> Song Play mode, you can select <strong>the</strong> Voice of <strong>the</strong> Mixing Part corresponding to <strong>the</strong> current Track by<br />
pressing <strong>the</strong> [CATEGORY SEARCH] button.<br />
Song Playback Procedure<br />
1 Press <strong>the</strong> [SONG] button to enter <strong>the</strong> Song<br />
Play mode.<br />
This operation calls up <strong>the</strong> Track View display in <strong>the</strong><br />
Song Play mode.<br />
Song number Song name<br />
2 Select a Song.<br />
Move <strong>the</strong> cursor to <strong>the</strong> Song number, <strong>the</strong>n select <strong>the</strong><br />
desired Song by using <strong>the</strong> data dial, [INC/YES] and<br />
[DEC/NO] buttons. The name of <strong>the</strong> selected Song is<br />
displayed.<br />
n If you press <strong>the</strong> [PROGRAM] button so that its lamp lights,<br />
you can select <strong>the</strong> desired Song by using <strong>the</strong> Group [A] –<br />
[D] buttons and <strong>the</strong> Number [1] – [6] buttons. Song<br />
numbers and <strong>the</strong> corresponding buttons are as follows.<br />
Button Combinations Song number<br />
[A]+[1] – [16] 01 – 16<br />
[B]+[1] – [16] 17 – 32<br />
[C]+[1] – [16] 33 – 48<br />
[D]+[1] – [16] 49 – 64<br />
3 Press <strong>the</strong> [F] (Play) button to start <strong>the</strong> selected<br />
Song.<br />
When playback of <strong>the</strong> selected Song is finished, <strong>the</strong><br />
Song automatically stops.<br />
SEQ TRANSPORT<br />
LOCATE 1 2<br />
Press <strong>the</strong> [J] (Stop) button to stop playback of <strong>the</strong><br />
Song. Press <strong>the</strong> [F] (Play) again to resume playback<br />
from that point.<br />
Playback types<br />
Playback from <strong>the</strong> middle of <strong>the</strong> Song<br />
To start playback of <strong>the</strong> Song from midway through <strong>the</strong><br />
Song, set <strong>the</strong> desired location by using <strong>the</strong> controls below,<br />
<strong>the</strong>n press <strong>the</strong> [F] (Play) button. These operations can be<br />
also executed during playback.<br />
Forward Press <strong>the</strong> [H] (Forward) button.<br />
Fast forward Hold <strong>the</strong> [H] (Forward) button.<br />
Rewind Press <strong>the</strong> [G] (Rewind) button.<br />
Fast Rewind Hold <strong>the</strong> [G] (Rewind) button.<br />
Move to <strong>the</strong> top of <strong>the</strong> Song Press <strong>the</strong> [P] button.<br />
Move to location 1 While holding <strong>the</strong> [P] button, press<br />
<strong>the</strong> [G] (Rewind) button.<br />
Move to location 2 While holding <strong>the</strong> [P] button, press<br />
<strong>the</strong> [H] (Forward) button.<br />
When <strong>the</strong> Song is not played back properly:<br />
Keep in mind that starting a Song from somewhere in <strong>the</strong><br />
middle may cause playback problems, such as <strong>the</strong> wrong<br />
sound, incorrect pitch or unexpected volume changes.<br />
This may occur because <strong>the</strong> MIDI events recorded at <strong>the</strong><br />
start <strong>the</strong> Song have not been recognized by <strong>the</strong> tone<br />
generator section, since playback has started at a different<br />
point in <strong>the</strong> Song, with different MIDI events. To prevent this<br />
from happening, set <strong>the</strong> Song Event Chase parameter (4)<br />
to “PC+PB+Ctrl” or “all” in <strong>the</strong> O<strong>the</strong>r display (page 271) of<br />
Sequencer Setup (called up via <strong>the</strong> [SEQ SETUP] button).<br />
With this setting, <strong>the</strong> Song will be played back properly<br />
even when starting playback from <strong>the</strong> middle of <strong>the</strong> Song.<br />
Assigning specific measure numbers to<br />
Locations 1 and 2<br />
To assign specific measure numbers to locations 1 and 2,<br />
select <strong>the</strong> desired measure number <strong>the</strong>n press <strong>the</strong> [G]/<br />
[H] (Rewind/Forward) button while holding <strong>the</strong> [STORE]<br />
button. The setting here will be shown at <strong>the</strong> top of <strong>the</strong><br />
display.<br />
Location 1 Location 2<br />
From this display, you can change <strong>the</strong> Song playback<br />
position by following <strong>the</strong> operations below.
Fast Forward/Rewind<br />
1 Move <strong>the</strong> cursor to Measure.<br />
2 Move forward or backward through <strong>the</strong><br />
measures by using <strong>the</strong> [INC/YES], [DEC/NO]<br />
buttons and <strong>the</strong> data dial.<br />
Moving to a desired location in <strong>the</strong> Song<br />
1 Move <strong>the</strong> cursor to Measure.<br />
2 Press <strong>the</strong> [SF6] NUM button so that <strong>the</strong> [SF1] –<br />
[SF5] and [F1] – [F6] buttons function as<br />
number buttons.<br />
3 Enter <strong>the</strong> destination measure by using <strong>the</strong><br />
[SF1] – [SF5] and [F1] – [F5] buttons.<br />
The measure number you input will appear at <strong>the</strong> top of<br />
<strong>the</strong> display.<br />
4 Press <strong>the</strong> [ENTER] button to actually move <strong>the</strong><br />
Song playback position to <strong>the</strong> destination set<br />
above.<br />
Track mute/solo<br />
To mute a track<br />
SF1 SF2 SF3 SF4 SF5 SF6<br />
1 2 3 4 5<br />
F1 F2 F3 F4 F5 F6<br />
6 7 8 9 0 -<br />
The [SF1] – [SF5] and [F1] – [F6] buttons function as number buttons.<br />
Shows <strong>the</strong> measure number to be entered.<br />
1 2 3 4 5 6 7<br />
8<br />
PART SELECT ARP ON/OFF<br />
9 10 11 12 13 14 15 16<br />
PART MUTE ARP HOLD<br />
2<br />
PERFORMANCE<br />
CONTROL<br />
1 Press <strong>the</strong> [MUTE] button so that its indicator<br />
lights.<br />
2 Press any of <strong>the</strong> Number buttons [1] to [16]<br />
corresponding to <strong>the</strong> track you want to mute.<br />
When pressing any of <strong>the</strong> Number buttons [1] – [16],<br />
<strong>the</strong> lamp of <strong>the</strong> pressed button will be turned off and<br />
<strong>the</strong> corresponding track will be muted. Pressing <strong>the</strong><br />
same Number button again enables output of <strong>the</strong><br />
playback sound.<br />
1<br />
TRACK<br />
MUTE SOLO<br />
To solo a track<br />
1 2 3 4 5 6 7<br />
8<br />
PART SELECT ARP ON/OFF<br />
9 10 11 12 13 14 15 16<br />
PART MUTE ARP HOLD<br />
2<br />
Song Playback<br />
1 Press <strong>the</strong> [SOLO] button so that its indicator<br />
lights.<br />
2 Press any of <strong>the</strong> Number buttons [1] to [16]<br />
corresponding to <strong>the</strong> track you want to solo.<br />
When pressing any of <strong>the</strong> Number buttons [1] – [16],<br />
<strong>the</strong> lamp of <strong>the</strong> pressed button will flash and only <strong>the</strong><br />
corresponding track will be sounded. Pressing <strong>the</strong><br />
different Number button changes <strong>the</strong> soloed track.<br />
Change <strong>the</strong> tempo<br />
1 Move <strong>the</strong> cursor to Tempo.<br />
2 Edit <strong>the</strong> Tempo value by using <strong>the</strong> [INC/YES],<br />
[DEC/NO] buttons and <strong>the</strong> data dial.<br />
Assigning various settings related to<br />
Song playback (Song Scene)<br />
You can assign five different “snapshots” of important<br />
Song-related parameters such as transpose, tempo, track<br />
mute status, and <strong>the</strong> basic Song Mixing setup to <strong>the</strong> [SF1]<br />
– [SF5] buttons as Song Scenes. One of <strong>the</strong> convenient<br />
advantages of Song Scene is that it lets you instantly and<br />
automatically execute parameter settings that normally<br />
require many button presses or controller operations. Use it<br />
during Song recording or playback to make instantaneous<br />
setting changes.<br />
Song Scene parameters<br />
Tempo<br />
PERFORMANCE<br />
CONTROL<br />
TRACK<br />
MUTE SOLO<br />
Tempo Song Track View display<br />
Transpose<br />
mode (page 181)<br />
Play Effect settings for 16 tracks Play FX display<br />
(page 183)<br />
Volume settings for 16 Mixing Parts Mixing Part 1-16 display<br />
Pan settings for 16 Mixing Parts<br />
Reverb Send settings for 16 Mixing Parts<br />
Chorus Send settings for 16 Mixing Parts<br />
mode (page 231)<br />
Cutoff Frequency settings for 16 Mixing<br />
EG display<br />
Parts<br />
Resonance settings for 16 Mixing Parts<br />
AEG Attack settings for 16 Mixing Parts<br />
AEG Release settings for 16 Mixing Parts<br />
(page 235)<br />
1<br />
Voice mode<br />
Performance<br />
mode<br />
Sampling<br />
mode 1<br />
Song mode<br />
Pattern mode<br />
Mixing mode<br />
Sampling<br />
mode 2<br />
Master mode<br />
Utility mode<br />
File mode<br />
MOTIF <strong>XS</strong> Owner’s <strong>Manual</strong> 179<br />
Reference
Reference<br />
Voice mode Performance Sampling Song mode Pattern mode Mixing mode Sampling Master mode Utility mode File mode<br />
mode mode 1<br />
mode 2<br />
180<br />
Song Playback<br />
Registering <strong>the</strong> Song Scene<br />
After making <strong>the</strong> desired settings for <strong>the</strong> Scene,<br />
simultaneously hold down <strong>the</strong> [STORE] button and press<br />
one of <strong>the</strong> [SF1] to [SF5] buttons. The 8th note icon is<br />
shown in <strong>the</strong> tab corresponding to <strong>the</strong> Sub Function button<br />
to which <strong>the</strong> Song Scene is registered. Press <strong>the</strong> [STORE]<br />
button to store <strong>the</strong> Song data including <strong>the</strong> Song Scene<br />
setting.<br />
CAUTION<br />
The Song Scene settings registered to <strong>the</strong> [SF1] – [SF5] buttons<br />
will be lost if you change <strong>the</strong> Song or turn <strong>the</strong> power off without<br />
executing <strong>the</strong> Store operation.<br />
Recalling <strong>the</strong> Song Scene<br />
You can recall <strong>the</strong> Song Scene by press one of <strong>the</strong> [SF1] to<br />
[SF5] buttons.<br />
Song Chain Playback<br />
Song Chain Playback allows you to put toge<strong>the</strong>r a play list<br />
of preset Songs, in any desired order, and have <strong>the</strong>m<br />
automatically play back in sequence. You can set <strong>the</strong> order<br />
of Song playback <strong>the</strong>n start <strong>the</strong> Chain Playback from <strong>the</strong><br />
Song Chain display.<br />
n For instructions on programming <strong>the</strong> Song Chain, refer to <strong>the</strong><br />
description about <strong>the</strong> Song Chain display (page 185).<br />
1 From <strong>the</strong> Track Vies display, press <strong>the</strong> [F4]<br />
button to call up <strong>the</strong> Song Chain display<br />
(page 185).<br />
Chain number Song number Song name<br />
2 Press <strong>the</strong> [F] (Play) button to start <strong>the</strong> Song<br />
Chain playback.<br />
The Songs are played back according to <strong>the</strong> order of<br />
<strong>the</strong> Chain.<br />
When an empty Song is assigned to <strong>the</strong> Chain number,<br />
one measure of silence is counted, followed by<br />
playback of <strong>the</strong> next Song.<br />
When a “skip” is assigned to <strong>the</strong> Chain number, <strong>the</strong><br />
assigned Song will be ignored or skipped <strong>the</strong>n next<br />
Song will start.<br />
When a “stop” is assigned to <strong>the</strong> Chain number,<br />
playback will be stopped at that Song. Press <strong>the</strong> [F]<br />
MOTIF <strong>XS</strong> Owner’s <strong>Manual</strong><br />
(Play) button to restart playback from <strong>the</strong> next Chain<br />
number.<br />
If an “end” is assigned to <strong>the</strong> Chain number, playback<br />
will stop at <strong>the</strong> end of <strong>the</strong> Song.<br />
3 If you wish to stop playback in <strong>the</strong> middle of a<br />
Song Chain, press <strong>the</strong> [J] (Stop) button.<br />
n The Song Chain can only be played back in <strong>the</strong> Song Chain<br />
display, and not from any o<strong>the</strong>r display.<br />
Knobs and Sliders<br />
By using <strong>the</strong> knobs on <strong>the</strong> front panel, you can adjust<br />
various parameters such as pan, effect, cutoff frequency<br />
and resonance for each part (track) of <strong>the</strong> Song. By using<br />
<strong>the</strong> sliders, you can change <strong>the</strong> volume of each Part (track)<br />
and adjust <strong>the</strong> relative balance among <strong>the</strong> Parts (tracks).<br />
Adjusting <strong>the</strong> Pan and Effect<br />
parameters for each Part<br />
Press <strong>the</strong> [MULTI PART CONTROL] button to call up <strong>the</strong><br />
Control Function window.<br />
Switching <strong>the</strong> Parts to be edited: 1 – 8 and 9 – 16<br />
When <strong>the</strong> Control Function window is shown after pressing<br />
<strong>the</strong> [MULTI PART CONTROL] button, each knob/slider<br />
controls each Part and you can change <strong>the</strong> target parts to<br />
be controlled between Parts 1 – 8 and 9 – 16. When <strong>the</strong><br />
target Parts are 9 – 16 (<strong>the</strong> display is for Parts 9 – 16),<br />
pressing any of <strong>the</strong> [1] – [8] buttons changes <strong>the</strong> target<br />
Parts from 9 – 16 to 1 – 8. When <strong>the</strong> target Parts are 1 – 8<br />
(<strong>the</strong> display is for Parts 1 – 8), pressing any of <strong>the</strong> [9] – [16]<br />
buttons changes <strong>the</strong> target Parts from 1 – 8 to 9 – 16.<br />
Knob Functions<br />
Pressing <strong>the</strong> [MULTI PART CONTROL] button turns on <strong>the</strong><br />
lamps in <strong>the</strong> descending order: REVERB → CHORUS →<br />
PAN. When <strong>the</strong> REVERB lamp is turned on, <strong>the</strong> knobs let<br />
you adjust <strong>the</strong> Reverb Send for each part. When <strong>the</strong><br />
CHORUS lamp is turned on, <strong>the</strong> knobs let you adjust <strong>the</strong><br />
Chorus Send for each part. When <strong>the</strong> PAN lamp is turned<br />
on, <strong>the</strong> knobs let you adjust <strong>the</strong> Pan for each part.<br />
n Holding down <strong>the</strong> [MULTI PART CONTROL] button for a few<br />
seconds will alternate <strong>the</strong> lit lamp from <strong>the</strong> current one to<br />
REVERB.
Adjusting <strong>the</strong> Cutoff Frequency and<br />
Resonance for each Part<br />
Press <strong>the</strong> [SELECTED PART CONTROL] button to call up<br />
<strong>the</strong> Control Function window.<br />
Selecting a target Part<br />
The functions assigned to <strong>the</strong> knobs are applied only to <strong>the</strong><br />
currently selected Part. To change <strong>the</strong> Part, call up <strong>the</strong><br />
Control Function window, <strong>the</strong>n press one of <strong>the</strong> [1] – [16]<br />
buttons.<br />
Knob Functions<br />
As listed below, various functions are assigned to Knobs 1<br />
– 8 depending on which lamp is turned on—<strong>the</strong> TONE 1,<br />
TONE 2, and ARP FX lamps which can be switched via <strong>the</strong><br />
[SELECTED PART CONTROL] button.<br />
Knob 1 Knob 2 Knob 3 Knob 4<br />
TONE 1 Cutoff Reso Attack Decay<br />
TONE 2 LowGain MidFreq MidGain MidQ<br />
ARP FX Swing Qt Val Qt Str GateT<br />
Knob 5 Knob 6 Knob 7 Knob 8<br />
TONE 1 Sustain Release Assign1 Assign2<br />
TONE 2 HighGain Pan Reverb Chorus<br />
ARP FX Velocity Octave UnitMlt Tempo<br />
n For details about each function, see page 90.<br />
Adjusting <strong>the</strong> volume of each Part<br />
The Sliders lets you adjust <strong>the</strong> volume for each Part.<br />
Switching <strong>the</strong> Parts to be edited: 1 – 8 and 9 – 16<br />
When <strong>the</strong> current part is any of 1 – 8, <strong>the</strong> eight sliders<br />
adjust <strong>the</strong> volume for Parts 1 – 8. When <strong>the</strong> current Part is<br />
any of 9 – 16, <strong>the</strong> eight sliders adjust <strong>the</strong> volume for Parts 9<br />
– 16. The Part can be selected by turning <strong>the</strong> [TRACK] on<br />
and pressing <strong>the</strong> desired Number button.<br />
Mixing Setup for each track<br />
Song Playback<br />
To edit <strong>the</strong> Mixing parameters such as Voice, volume and<br />
pan for each track, press <strong>the</strong> [MIXING] button to enter <strong>the</strong><br />
Mixing mode (page 229) <strong>the</strong>n edit <strong>the</strong>m for <strong>the</strong> Mixing Part<br />
corresponding to <strong>the</strong> desired track. Note that track 1 does<br />
not always correspond to <strong>the</strong> Mixing Part 1. As illustrated<br />
below, each track of <strong>the</strong> Song sequence data and each<br />
Mixing Part of <strong>the</strong> tone generator block are connected<br />
when <strong>the</strong> transmit channel (TxCH) equals <strong>the</strong> receive<br />
channel (RcvCH). In o<strong>the</strong>r words, <strong>the</strong> sequence data of<br />
each track plays <strong>the</strong> corresponding Parts (those having <strong>the</strong><br />
same MIDI channel assignment) in <strong>the</strong> tone generator<br />
block. The Transmit Channels of each track can be set in<br />
<strong>the</strong> Song Track display (page 184) of <strong>the</strong> Song Play mode<br />
while <strong>the</strong> Receive Channels of each Part can be set in <strong>the</strong><br />
Voice display (page 235) of <strong>the</strong> Mixing mode.<br />
Track View display—[F1] TrackView<br />
[SONG]<br />
This display always appears first when <strong>the</strong> Song mode is<br />
engaged.<br />
1<br />
9<br />
7<br />
8<br />
%<br />
Song<br />
Song Mixing<br />
TxCH<br />
RcvCH<br />
Track 1 2<br />
2 Part 1<br />
Track 2 2<br />
3 Part 2<br />
Track 3 3<br />
3 Part 3<br />
: :<br />
: :<br />
Track 16 16<br />
16 Part 16<br />
)<br />
!@4<br />
1 Song number, Song name<br />
Determines <strong>the</strong> Song to be played back.<br />
Settings:<br />
Song number: 01 – 64<br />
Song name: See <strong>the</strong> Note below.<br />
n You can edit <strong>the</strong> Song name by moving <strong>the</strong> cursor to <strong>the</strong><br />
corresponding location and pressing <strong>the</strong> [SF6] CHAR button.<br />
For details, see page 82.<br />
5<br />
2<br />
& * ( º ¡ <br />
3<br />
6<br />
#<br />
$<br />
^<br />
Voice mode<br />
Performance<br />
mode<br />
Sampling<br />
mode 1<br />
Song mode<br />
Pattern mode<br />
Mixing mode<br />
Sampling<br />
mode 2<br />
Master mode<br />
Utility mode<br />
File mode<br />
MOTIF <strong>XS</strong> Owner’s <strong>Manual</strong> 181<br />
Reference
Reference<br />
Voice mode Performance Sampling Song mode Pattern mode Mixing mode Sampling Master mode Utility mode File mode<br />
mode mode 1<br />
mode 2<br />
182<br />
Song Playback<br />
2 Location (Indication only)<br />
Indicates <strong>the</strong> measure number assigned to Location 1 and<br />
2. For detailed instructions on setting <strong>the</strong> Location, see<br />
page 178.<br />
3 Meas (Measure)<br />
Determines <strong>the</strong> location at which playback starts. This also<br />
indicates <strong>the</strong> current location of playback. For detailed<br />
instructions on setting <strong>the</strong> measure, see page 178.<br />
Settings:<br />
Measure: 001 – 999<br />
Beat, Clock: Indication only<br />
4 Trans (Transpose)<br />
Adjusts <strong>the</strong> tuning in semitone increments.<br />
Settings: -36 – +36<br />
5 Time signature (Meter)<br />
Determines <strong>the</strong> meter (time signature) of <strong>the</strong> Song. The<br />
setting here is applied to <strong>the</strong> specified Measure (3) and<br />
subsequent measures. This allows you to enter different<br />
time signatures in <strong>the</strong> middle of a song. When setting <strong>the</strong><br />
Measure (3) at which playback starts to a time signature<br />
o<strong>the</strong>r than that at <strong>the</strong> song beginning, for example, <strong>the</strong> time<br />
signature before <strong>the</strong> Measure (3) is maintained even if you<br />
change <strong>the</strong> time signature here.<br />
Settings: 1/16 – 16/16, 1/8 – 16/8, 1/4 – 8/4<br />
6 Tempo<br />
Determines <strong>the</strong> Song playback tempo.<br />
Settings: 5.0 – 300.0<br />
n If you are using this instrument with an external sequencer, a<br />
<strong>com</strong>puter, or o<strong>the</strong>r MIDI device, and you want to make <strong>the</strong><br />
Song tempo controlled by <strong>the</strong> external device(s), set <strong>the</strong> MIDI<br />
sync (5) parameter in <strong>the</strong> MIDI display (page 267) of <strong>the</strong><br />
Utility mode to “MIDI.” In that case, <strong>the</strong> Tempo parameter here<br />
indicates “MIDI” and cannot be changed.<br />
7 Track number (Indication only)<br />
Indicates <strong>the</strong> track number.<br />
8 Data status (Indication only)<br />
Indicates whe<strong>the</strong>r <strong>the</strong> data is recorded or not to each of<br />
tracks.<br />
Blank: Indicates <strong>the</strong> track is empty.<br />
M: Indicates <strong>the</strong> MIDI sequence data has been recorded. This<br />
is handled as a MIDI track.<br />
W: Indicates <strong>the</strong> sample data has been recorded in addition<br />
to MIDI sequence data. This is handled as an Audio track.<br />
n For Mixing Parts that correspond to Audio tracks, a<br />
Sample Voice is assigned. For Mixing Parts that<br />
correspond to MIDI tracks, a Voice o<strong>the</strong>r than a Sample<br />
Voice is assigned. For more information about Audio<br />
tracks and MIDI tracks, see page 61.<br />
MOTIF <strong>XS</strong> Owner’s <strong>Manual</strong><br />
Measure Beat Clock<br />
9 Mute/Solo (Indication only)<br />
Indicates <strong>the</strong> Mute/Solo status for each track. For detailed<br />
instructions on setting Mute/Solo, see page 179.<br />
Blank: Nei<strong>the</strong>r Mute nor Solo are assigned to this track.<br />
m: Indicates muted track.<br />
s: Indicates soloed track.<br />
) Voice Name<br />
Indicates <strong>the</strong> Voice name of <strong>the</strong> Mixing Part corresponding<br />
to each track.<br />
! Loop (Indication only)<br />
Determines whe<strong>the</strong>r or not Loop playback is set for each<br />
track. The track for which Loop is turned on plays<br />
repeatedly following <strong>the</strong> setup of <strong>the</strong> Track Loop display<br />
(page 185).<br />
Settings: Blank (Loop off), L (Loop on)<br />
@ Song Position Line<br />
Indicates <strong>the</strong> current location of <strong>the</strong> Song playback set at<br />
Measure above.<br />
# Measure number (Indication only)<br />
Indicates <strong>the</strong> measure number. By pressing <strong>the</strong> [F5] Zoom<br />
Out or [F6] Zoom In button, you can zoom in or zoom out<br />
over <strong>the</strong> interval between <strong>the</strong> adjacent measures.<br />
$ Sequence data bar<br />
Indicates whe<strong>the</strong>r data has been recorded or not to each<br />
of tracks. You can check <strong>the</strong> range over which <strong>the</strong> data is<br />
recorded for each track. For MIDI tracks, you can view all<br />
<strong>the</strong> timings at which MIDI events have been recorded.<br />
You can check <strong>the</strong> data status.<br />
% [SF1] Scene1 – [SF5] Scene5<br />
You can assign <strong>the</strong> settings of <strong>the</strong> Song-related parameters<br />
(Song Scene) and <strong>the</strong> Arpeggio-related parameters to<br />
<strong>the</strong>se buttons. You can also recall <strong>the</strong> settings by pressing<br />
<strong>the</strong>se buttons. For detailed instructions on registering<br />
Scenes, see page 179. For detailed instructions on setting<br />
<strong>the</strong> Arpeggio-related parameters, see page 189.<br />
n The Arpeggio is not available during Song playback. Pressing<br />
<strong>the</strong> [SF1] Scene 1 – [SF5] Scene 5 buttons during playback<br />
changes only <strong>the</strong> Song Scene.<br />
n After registering <strong>the</strong> Song Scene, <strong>the</strong> 8th note icon will appear<br />
on <strong>the</strong> tab corresponding to <strong>the</strong> pressed button. You can<br />
confirm whe<strong>the</strong>r <strong>the</strong> Arpeggio Type is assigned to that button<br />
in <strong>the</strong> Arpeggio display (page 189) of Song Record.<br />
^ [SF6] INFO (Information)<br />
You can view <strong>the</strong> amount of free and used sequencer<br />
memory. The sequencer memory covers <strong>the</strong> all Songs and<br />
Patterns recorded in <strong>the</strong> respective modes. When <strong>the</strong> used<br />
memory amount reaches <strong>the</strong> maximum capacity, no fur<strong>the</strong>r<br />
Songs or Patterns can be stored. If this occurs, use <strong>the</strong><br />
Clear Song Job (page 207) or Clear Pattern Job<br />
(page 228) to delete any unnecessary Songs or Patterns.
You can go back to <strong>the</strong> previous display by pressing <strong>the</strong><br />
[SF6] button or <strong>the</strong> [EXIT] button.<br />
& [F5] Zoom Out<br />
* [F6] Zoom In<br />
Changes <strong>the</strong> zoom level of Measure number (#) of <strong>the</strong><br />
Track View display. Press <strong>the</strong> [F5] Zoom Out button to<br />
reduce <strong>the</strong> Zoom level so that a wider range can be<br />
displayed. Press <strong>the</strong> [F6] Zoom In button to raise <strong>the</strong> Zoom<br />
level so that a magnified view can be displayed.<br />
( [F1] TrackView<br />
Calls up <strong>the</strong> Track View display.<br />
º [F2] Play FX (Play Effect)<br />
Calls up <strong>the</strong> Play Effect display (below). By changing <strong>the</strong><br />
timing and velocity of <strong>the</strong> notes, you can change <strong>the</strong><br />
rhythmic “feel” of <strong>the</strong> Song playback.<br />
¡ [F3] Track<br />
Calls up <strong>the</strong> Song Track Output Channel display<br />
(page 184).<br />
[F4] Chain<br />
Calls up <strong>the</strong> Song Chain display (page 185). This display<br />
lets you play back multiple Songs sequentially.<br />
Changing <strong>the</strong> rhythmic “feel” of <strong>the</strong><br />
Song—[F2] Play FX (Play Effect)<br />
By changing <strong>the</strong> timing and velocity of <strong>the</strong> notes, you can<br />
change <strong>the</strong> rhythmic “feel” of Song playback. The Play<br />
Effect settings made here are only temporary and don't<br />
change <strong>the</strong> actual data in <strong>the</strong> Song. The Play Effect<br />
settings can be applied actually to <strong>the</strong> Song data by using<br />
<strong>the</strong> Normalize Play Effect Job.<br />
1<br />
2 3 4 5 6 7<br />
1 Track number (Indication only)<br />
Indicates <strong>the</strong> track number.<br />
2 Quantize<br />
Song Playback<br />
This lets you align <strong>the</strong> timing of <strong>the</strong> note events according<br />
to <strong>the</strong> specified note type. Here, set <strong>the</strong> two parameters for<br />
each track: Value and Str (Strength).<br />
Quantize Value<br />
Determines to what beats <strong>the</strong> note data in <strong>the</strong> Arpeggio<br />
sequence data will be aligned, or determines to what beats in<br />
<strong>the</strong> Arpeggio sequence data <strong>the</strong> swing is applied.<br />
Settings: off, 32nd note, 16th note triplet, 16th note, 8th note<br />
triplet, 8th note, 1/4 note triplet, 1/4 note<br />
Quantize Str (Quantize Strength)<br />
Sets <strong>the</strong> “strength” by which note events are pulled toward <strong>the</strong><br />
nearest quantize beats. A setting of 100% produces exact<br />
timing set via <strong>the</strong> Quantize Value parameter above. A setting<br />
of 0% results in no quantization. A setting of 50% result that<br />
<strong>the</strong> note events are pulled to <strong>the</strong> half point between <strong>the</strong> 0%<br />
and 100%.<br />
Settings: 0% – 100%<br />
When quarter-note quantization is applied to <strong>the</strong> original data:<br />
3 Swing<br />
1st beat<br />
Original timing<br />
Quantize strength<br />
= 100%<br />
Quantize strength<br />
= 50%<br />
Adjusts <strong>the</strong> timing, velocity, and gate time (<strong>the</strong> length of<br />
time a note sounds) of <strong>the</strong> even-numbered back-beat<br />
notes to enhance <strong>the</strong> swing feel. This parameter delays<br />
notes on even-numbered beats (backbeats) to produce a<br />
swing feel. For example, if <strong>the</strong> meter is 4/4 and <strong>the</strong><br />
quantize value is quarter notes, <strong>the</strong> 2nd and 4th beats of<br />
<strong>the</strong> measure will be delayed. When a triplet value is<br />
specified, <strong>the</strong> last note of each triplet is affected by <strong>the</strong><br />
Swing parameter.<br />
When <strong>the</strong> quarter-note swing is applied to <strong>the</strong> original data:<br />
1st beat<br />
Original timing<br />
Swing Rate = 66%<br />
Swing Rate = 75%<br />
2nd beat 3rd beat<br />
The notes will be moved fully to <strong>the</strong><br />
specified Quantize value.<br />
The notes will be moved to <strong>the</strong> halfway<br />
between <strong>the</strong> original value and <strong>the</strong><br />
specified Quantize value.<br />
2nd beat 3rd beat<br />
The notes at <strong>the</strong> 2nd beat will be moved<br />
to triplet timing.<br />
The notes at <strong>the</strong> 2nd beat will be moved<br />
to 8th note timing.<br />
Here, edit <strong>the</strong> Swing settings for each track by specifying<br />
<strong>the</strong> Swing Vel (Swing Velocity), Swing Gate, and Swing<br />
Rate. When <strong>the</strong> Quantize value is set to “off,” all <strong>the</strong> Swing<br />
parameters are not available.<br />
Voice mode<br />
Performance<br />
mode<br />
Sampling<br />
mode 1<br />
Song mode<br />
Pattern mode<br />
Mixing mode<br />
Sampling<br />
mode 2<br />
Master mode<br />
Utility mode<br />
File mode<br />
MOTIF <strong>XS</strong> Owner’s <strong>Manual</strong> 183<br />
Reference
Reference<br />
Voice mode Performance Sampling Song mode Pattern mode Mixing mode Sampling Master mode Utility mode File mode<br />
mode mode 1<br />
mode 2<br />
184<br />
Song Playback<br />
Swing Vel (Swing Velocity)<br />
Adjusts <strong>the</strong> velocity of <strong>the</strong> corresponding notes to accentuate<br />
<strong>the</strong> swing rhythmic feel. Settings below 100% reduce <strong>the</strong><br />
velocities of notes on even-numbered beats (backbeats), and<br />
settings above 100% increase <strong>the</strong> velocities proportionately. If<br />
<strong>the</strong> result is 0 or less, <strong>the</strong> value is set to 1. If <strong>the</strong> result is higher<br />
than 127, <strong>the</strong> value is set to 127.<br />
Settings: 0% – 100% – 200%<br />
Swing Gate (Swing Gate Time)<br />
Adjusts <strong>the</strong> gate time of <strong>the</strong> corresponding notes to<br />
accentuate <strong>the</strong> swing rhythmic feel. Settings below 100% will<br />
shorten <strong>the</strong> gate times of notes on even-numbered beats<br />
(backbeats), whereas settings above 100% will leng<strong>the</strong>n<br />
<strong>the</strong>m. If an adjusted gate time value is less than 1, <strong>the</strong> value is<br />
rounded off to 1.<br />
Settings: 0% – 100% – 200%<br />
Swing Rate<br />
Delays notes on even-numbered beats (backbeats) to<br />
produce a swing feel. Settings above 50% will delay notes to<br />
produce a more pronounced swing feel.<br />
Settings:<br />
Quantize Value Settings<br />
When <strong>the</strong> Quantize Value is set to off 0 – 0<br />
When <strong>the</strong> Quantize Value is set to 32nd note 0 – 30<br />
When <strong>the</strong> Quantize Value is set to 16th note triplet 0 – 40<br />
When <strong>the</strong> Quantize Value is set to 16th note 0 – 60<br />
When <strong>the</strong> Quantize Value is set to 8th note triplet 0 – 80<br />
When <strong>the</strong> Quantize Value is set to 8th note 0 – 120<br />
When <strong>the</strong> Quantize Value is set to 1/4 note triplet 0 – 160<br />
When <strong>the</strong> Quantize Value is set to 1/4 note 0 – 240<br />
4 Note Shift*<br />
Raises or lowers <strong>the</strong> pitch of all notes in <strong>the</strong> selected track<br />
in semitones.<br />
Settings: -99 – +0 – +99<br />
5 Clock Shift<br />
Shifts <strong>the</strong> timing of all notes in <strong>the</strong> selected track forward or<br />
backward in clock increments.<br />
Settings: -120 – +0 – +120<br />
6 Gate Time Rate<br />
Raises or lowers <strong>the</strong> gate time of all notes in <strong>the</strong> selected<br />
track. If an adjusted gate time value is less than 1, <strong>the</strong><br />
value is rounded off to 1.<br />
Settings: 0% – 100% – 200%<br />
7 Velocity<br />
Raises or lowers <strong>the</strong> velocity of all notes in <strong>the</strong> selected<br />
track. If <strong>the</strong> result is 0 or less, <strong>the</strong> value is set to 1. If <strong>the</strong><br />
result is higher than 127, <strong>the</strong> value is set to 127.<br />
Velocity Rate<br />
Alters <strong>the</strong> velocity of notes by <strong>the</strong> specified percentage.<br />
Settings: 0% – 100% – 200%<br />
Velocity Offset<br />
Increases or decreases <strong>the</strong> velocity of notes by <strong>the</strong> specified<br />
offset value.<br />
Settings: -99 – +0 – +99<br />
MOTIF <strong>XS</strong> Owner’s <strong>Manual</strong><br />
Output Channels and Loop settings<br />
for each track—[F3] Track<br />
This display lets you set <strong>the</strong> Output Channel and set <strong>the</strong><br />
Loop Playback related parameters for each track.<br />
Track Channel Settings—[SF1] Out<br />
(Output Channel)<br />
This display lets you set <strong>the</strong> MIDI Transmit Channel for<br />
each track.<br />
1<br />
1 Voice (Indication only)<br />
Indicates <strong>the</strong> Voice name of <strong>the</strong> Mixing Part corresponding<br />
to each track.<br />
n In <strong>the</strong> Part 1 – 16 display (page 231) of <strong>the</strong> Mixing mode, you<br />
can change <strong>the</strong> Voice of <strong>the</strong> Mixing Part corresponding to <strong>the</strong><br />
track.<br />
2 TxCh (Transmit Channel)<br />
Determines <strong>the</strong> MIDI transmit channel of <strong>the</strong> sequence<br />
data for each track. Tracks set to “off” will not sound. In <strong>the</strong><br />
Song mode, <strong>the</strong> MIDI data created by playing <strong>the</strong><br />
keyboard/knobs/wheels is sent to <strong>the</strong> tone generator block<br />
or <strong>the</strong> external MIDI devices via <strong>the</strong> MIDI output channel of<br />
<strong>the</strong> currently selected track.<br />
Settings: 1 – 16, off<br />
3 Int (Internal Switch)<br />
Determines whe<strong>the</strong>r musical performance data of each<br />
track is sent to <strong>the</strong> internal tone generator block or not.<br />
When set to “off,” <strong>the</strong> performance data will not be sent to<br />
<strong>the</strong> internal tone generator block.<br />
4 Ext (External Switch)<br />
2 3<br />
Determines whe<strong>the</strong>r performance data of each track is<br />
sent to <strong>the</strong> external MIDI device or not. When set to “off,”<br />
<strong>the</strong> performance data will not be sent to <strong>the</strong> external MIDI<br />
device.<br />
4
Loop Playback Settings—[SF2] Loop<br />
These allow you to set specific tracks for Loop Playback<br />
and determine what range of measures will be used for <strong>the</strong><br />
Loop.<br />
1<br />
2 3 4<br />
1 Voice (Indication only)<br />
Indicates <strong>the</strong> Voice name of <strong>the</strong> Mixing Part corresponding<br />
to each track.<br />
n In <strong>the</strong> Part 1 – 16 display (page 231) of <strong>the</strong> Mixing mode, you<br />
can change <strong>the</strong> Voice of <strong>the</strong> Mixing Part corresponding to <strong>the</strong><br />
track.<br />
2 Loop<br />
Determines whe<strong>the</strong>r or not <strong>the</strong> Loop Playback is active for<br />
each track. The track of which <strong>the</strong> Loop is turned on plays<br />
from Start (3) to End (4) repeatedly.<br />
Settings: Blank (Loop off), L (Loop on)<br />
3 Start (Start Point)<br />
4 End (End Point)<br />
Determines <strong>the</strong> range of <strong>the</strong> looped playback. The track of<br />
which <strong>the</strong> Loop is turned on plays from <strong>the</strong> Start Point to<br />
<strong>the</strong> End Point repeatedly.<br />
Settings: Measure : Beat<br />
Song Chain Playback—[F4] Chain<br />
(Song Chain)<br />
Song Chain Playback allows you to put toge<strong>the</strong>r a play list<br />
of preset Songs, in any desired order, and have <strong>the</strong>m<br />
automatically play back in sequence. From this display,<br />
you can program <strong>the</strong> order of <strong>the</strong> Song playback.<br />
1 2 3<br />
1 Chain Number (Indication only)<br />
Song Playback<br />
Indicates <strong>the</strong> order of <strong>the</strong> Song playback. Numbers 1 – 100<br />
are provided and you can view <strong>the</strong>se numbers by scrolling<br />
<strong>the</strong> display. The Song Chain will be played back in order<br />
from <strong>the</strong> Song assigned to 001.<br />
2 Song number<br />
3 Song name (Indication only)<br />
Determines <strong>the</strong> Song number to be played back in <strong>the</strong><br />
chain. The Song name is shown when you specify <strong>the</strong> Song<br />
number. If an empty Song is assigned to a certain Chain<br />
number, that number will be skipped after a one-measure<br />
count. In addition to Song numbers, “skip,” “end,” and<br />
“stop” <strong>com</strong>mands can be assigned to <strong>the</strong> Song Chain<br />
numbers.<br />
Settings: skip, end, stop, 01 – 64<br />
skip<br />
Skips (ignores) <strong>the</strong> selected chain number and continues playback<br />
from <strong>the</strong> next chain number.<br />
end<br />
Indicates <strong>the</strong> end mark of <strong>the</strong> Song Chain data.<br />
stop<br />
Stops Song Chain playback at that chain number. You can restart <strong>the</strong><br />
song chain playback from <strong>the</strong> next chain number by pressing <strong>the</strong> [F]<br />
(Play) button.<br />
Programming <strong>the</strong> Song Chain<br />
Follow <strong>the</strong> instructions below to program <strong>the</strong> Song Chain.<br />
Keep in mind that <strong>the</strong> Song Chain program will be stored<br />
automatically; it is not necessary to execute <strong>the</strong> Store<br />
operation.<br />
1 From <strong>the</strong> Track View display, press <strong>the</strong> [F4] button<br />
to call up <strong>the</strong> Song Chain display.<br />
2 Program <strong>the</strong> desired order of <strong>the</strong> Songs.<br />
Move <strong>the</strong> cursor to “001” by using <strong>the</strong> cursor buttons and<br />
select <strong>the</strong> desired Song by using <strong>the</strong> Data Dial, or <strong>the</strong><br />
[INC/YES] and [DEC/NO] buttons. In <strong>the</strong> same manner,<br />
assign o<strong>the</strong>r Songs to locations 002, 003, 004, and so on.<br />
3 Use “skip” if you want to delete <strong>the</strong> Song already<br />
assigned to <strong>the</strong> Chain number.<br />
Move <strong>the</strong> cursor to <strong>the</strong> Song number to be deleted, <strong>the</strong>n<br />
assign <strong>the</strong> “skip” <strong>com</strong>mand to that location by using <strong>the</strong><br />
data dial, or <strong>the</strong> [INC/YES] and [DEC/NO] buttons. The<br />
assigned Chain number will be ignored during playback.<br />
4 Assign “end” to <strong>the</strong> Chain number at which you<br />
wish to stop <strong>the</strong> Song Chain playback.<br />
When playback reaches a Chain number to which <strong>the</strong><br />
“end” <strong>com</strong>mand has been assigned, playback will stop.<br />
If you want to stop playback at a certain Chain number<br />
and restart from <strong>the</strong> next Chain number, assign <strong>the</strong> “stop”<br />
<strong>com</strong>mand to that Chain number.<br />
n The Song Chain will be stored as part of system data.<br />
n For details about Song Chain playback, see page 180.<br />
Voice mode<br />
Performance<br />
mode<br />
Sampling<br />
mode 1<br />
Song mode<br />
Pattern mode<br />
Mixing mode<br />
Sampling<br />
mode 2<br />
Master mode<br />
Utility mode<br />
File mode<br />
MOTIF <strong>XS</strong> Owner’s <strong>Manual</strong> 185<br />
Reference
Reference<br />
Voice mode Performance Sampling Song mode Pattern mode Mixing mode Sampling Master mode Utility mode File mode<br />
mode mode 1<br />
mode 2<br />
186<br />
MOTIF <strong>XS</strong> Owner’s <strong>Manual</strong><br />
Song Recording<br />
In <strong>the</strong> Song Record mode, you can use <strong>the</strong> sequencer to record your keyboard performance, track by track, to a selected<br />
Song. Press <strong>the</strong> [I] (Record) button from <strong>the</strong> Song Play mode to enter <strong>the</strong> Song Record mode.<br />
n Recording <strong>the</strong> audio data for a Song can be executed in <strong>the</strong> Sampling Record mode (page 244).<br />
Realtime Recording<br />
This method lets you record <strong>the</strong> performance data as it is<br />
played, allowing you to capture all <strong>the</strong> nuances of an actual<br />
keyboard performance. Recording can be carried out<br />
while monitoring playback of o<strong>the</strong>r already-recorded<br />
tracks. You can also transmit sequence data from an<br />
external MIDI instrument to <strong>the</strong> MOTIF <strong>XS</strong> and<br />
simultaneously record up to 16 tracks (page 190).<br />
The Realtime recording consists of three methods:<br />
Replace, Overdub, and Punch.<br />
Song Recording procedure<br />
Here in outline form is <strong>the</strong> process of recording a Song.<br />
1 Press <strong>the</strong> [SONG] button to enter <strong>the</strong> Song<br />
Play mode, <strong>the</strong>n select a Song to be recorded<br />
(page 178).<br />
Select an empty Song if you wish to create a new Song<br />
from scratch. If an empty Song is not found, delete any<br />
unnecessary Song(s) by using <strong>the</strong> Clear Song Job<br />
(page 207).<br />
2 Press <strong>the</strong> [I] (Record) button to call up <strong>the</strong><br />
Record Setup display (page 187).<br />
Prepare for recording by setting <strong>the</strong> time signature,<br />
tempo, track to be recorded, Voice, and recording<br />
method. If you wish to record using an Arpeggio, set<br />
<strong>the</strong> necessary parameters from <strong>the</strong> Arpeggio display<br />
(page 189).<br />
3 Record your keyboard performance.<br />
For details, see page 189.<br />
4 Edit <strong>the</strong> recorded Song using <strong>the</strong> Song Job<br />
(page 195) and Song Edit (page 192).<br />
5 Press <strong>the</strong> [STORE] button to store <strong>the</strong><br />
recorded Song to internal User Memory.<br />
CAUTION<br />
The recorded Song will be lost when selecting a different<br />
Song, calling up a different mode, or turning <strong>the</strong> power off.<br />
Make sure to store <strong>the</strong> Song data to internal memory by<br />
pressing <strong>the</strong> [STORE] button before selecting a different Song,<br />
calling up a different mode, or turning <strong>the</strong> power off.<br />
6 Save <strong>the</strong> created Song data to a USB storage<br />
device or to a connected <strong>com</strong>puter as desired<br />
(page 278).<br />
Song Store—[STORE]<br />
This section covers how to store <strong>the</strong> Songs you have<br />
recorded and edited. By executing <strong>the</strong> Store operation, <strong>the</strong><br />
Song data you have created will be maintained even if <strong>the</strong><br />
power has been turned off. Pressing <strong>the</strong> [STORE] button<br />
calls up <strong>the</strong> Song Store window.<br />
The following data will be stored by <strong>the</strong> Song Store<br />
operation.<br />
Sequence data<br />
MIDI data generated and recorded by your keyboard<br />
performance including <strong>the</strong> controller operations.<br />
Tone Generator data<br />
Mixing settings (Common Edit parameters and Part Edit<br />
parameters)<br />
n The Mixing Voices can be edited in <strong>the</strong> Mixing Voice Store<br />
window (page 240).<br />
To use Song Store:<br />
1 Call up <strong>the</strong> Song Store window.<br />
Pressing <strong>the</strong> [STORE] button calls up <strong>the</strong> Song Store<br />
window.<br />
2 Select a destination Song number.<br />
The name of <strong>the</strong> selected Song number is shown.<br />
CAUTION<br />
This operation overwrites any data already existing in <strong>the</strong><br />
destination Song.<br />
3 Press <strong>the</strong> [ENTER] button. (The display<br />
prompts you for confirmation.)<br />
Press <strong>the</strong> [DEC/NO] button to cancel <strong>the</strong> Store<br />
operation. Song Store is canceled, and operation<br />
returns to <strong>the</strong> previous display.<br />
4 Press <strong>the</strong> [INC/YES] button to execute <strong>the</strong><br />
Store operation.<br />
After <strong>the</strong> Song has been stored, a “Completed”<br />
message appears and operation returns to <strong>the</strong> Song<br />
Play display.<br />
n If <strong>the</strong>re is not enough memory space for <strong>the</strong> Song/Pattern,<br />
an alert message appears, and you will not able to store<br />
any additional Songs/Patterns. If this happens, delete<br />
unnecessary Patterns/Songs by using <strong>the</strong> Song/Pattern<br />
Job, <strong>the</strong>n try <strong>the</strong> Store operation again.
Preparing <strong>the</strong> Song Recording—<br />
[F1] Setup<br />
From this display you can set up various parameters for<br />
recording a Song.<br />
5<br />
6<br />
1 Song name (Indication only)<br />
Indicates <strong>the</strong> name of <strong>the</strong> currently selected Song. The<br />
Song can be selected in <strong>the</strong> Song Play display (page 178).<br />
2 Meas (Measure)<br />
Determines <strong>the</strong> location at which playback starts. This also<br />
indicates <strong>the</strong> current location of <strong>the</strong> recording.<br />
Settings:<br />
Measure: 001 – 999<br />
Beat, Clock: Indication only<br />
3 Time signature (Meter)<br />
Determines <strong>the</strong> meter (time signature) of <strong>the</strong> Song.<br />
Settings: 1/16 – 16/16, 1/8 – 16/8, 1/4 – 8/4<br />
4 Tempo<br />
Sets <strong>the</strong> tempo for recording in real time.<br />
Settings: 5.0 – 300.0<br />
7 8 9 3 1<br />
º ¡ ( £<br />
n The tempo value set here will be <strong>the</strong> tempo of <strong>the</strong> Song after<br />
recording.<br />
n If you are using this instrument with an external sequencer, a<br />
<strong>com</strong>puter, or o<strong>the</strong>r MIDI device, and you want to have <strong>the</strong><br />
Song recording tempo controlled by <strong>the</strong> external device(s), set<br />
<strong>the</strong> MIDI sync (5) parameter in <strong>the</strong> MIDI display (page 267) of<br />
<strong>the</strong> Utility mode to “MIDI.” In that case, <strong>the</strong> Tempo parameter<br />
here indicates “MIDI” and cannot be changed.<br />
5 Track number (Indication only)<br />
Indicates <strong>the</strong> track number.<br />
Measure Beat<br />
Clock<br />
2<br />
4<br />
)<br />
!<br />
@<br />
#<br />
$<br />
%<br />
^<br />
&<br />
*<br />
6 Track type (Indication only)<br />
Song Recording<br />
Indicates <strong>the</strong> track type: MIDI track or Audio track. For<br />
Mixing Parts that correspond to Audio tracks, a Sample<br />
Voice is assigned. For Mixing Parts that correspond to MIDI<br />
tracks, a Voice o<strong>the</strong>r than a Sample Voice is assigned. For<br />
Mixing Parts that correspond to empty tracks, no Voice is<br />
assigned.<br />
Settings: M (MIDI Track), W (Audio track), blank (no Voice is<br />
assigned)<br />
7 Mute/Solo (Indication only)<br />
Indicates <strong>the</strong> Mute/Solo status for each track. For detailed<br />
instructions on setting Mute/Solo, see page 179.<br />
Blank: Nei<strong>the</strong>r Mute nor Solo are assigned to this track.<br />
m: Indicates muted track.<br />
s: Indicates soloed track.<br />
8 Voice name (Indication only)<br />
Indicates <strong>the</strong> Voice name of <strong>the</strong> Mixing part corresponding<br />
to each track.<br />
9 REC TR (Record Track)<br />
Determines <strong>the</strong> track to be recorded. Move <strong>the</strong> cursor to<br />
<strong>the</strong> desired track or press any of <strong>the</strong> Number buttons [1] –<br />
[16] with <strong>the</strong> TRACK lamp turned on so that <strong>the</strong> red circle is<br />
shown in <strong>the</strong> corresponding column of <strong>the</strong> REC TR. To set<br />
all tracks to <strong>the</strong> Record Track, press <strong>the</strong> [F6] button (red<br />
circles are shown in all columns of REC TR).<br />
Settings: Scene Track, Tempo Track, 1 – 16, All Track<br />
Scene Track<br />
Records track mute on/off events and Song Scene changing timing<br />
events.<br />
Tempo Track<br />
Records tempo change information during playback.<br />
1 – 16<br />
Records your actual musical performance. Your keyboard<br />
performance will be recorded to <strong>the</strong> track selected here.<br />
All Track<br />
Simultaneous recording to all 16 sequence tracks. Multi-channel data<br />
from an external MIDI device can be recorded at once.<br />
) Record Type<br />
Determines a Recording method.<br />
Settings: replace, overdub, punch<br />
replace<br />
You can use this method when you want to overwrite an already<br />
recorded track with new data in real time. The original data will be<br />
erased.<br />
overdub<br />
You can use this method when you want to add more data to a track<br />
that already contains data. Previously recorded data will be<br />
maintained.<br />
punch<br />
You can use this method when you want to overwrite data to a<br />
specified range of a track that already contains data. You can overwrite<br />
<strong>the</strong> already recorded data from <strong>the</strong> starting point to <strong>the</strong> ending point<br />
(measure/beat) that was specified before recording.<br />
n When <strong>the</strong> Record Track (5) is set to “Tempo Track” or “Scene<br />
Track,” “overdub” cannot be selected here.<br />
Voice mode<br />
Performance<br />
mode<br />
Sampling<br />
mode 1<br />
Song mode<br />
Pattern mode<br />
Mixing mode<br />
Sampling<br />
mode 2<br />
Master mode<br />
Utility mode<br />
File mode<br />
MOTIF <strong>XS</strong> Owner’s <strong>Manual</strong> 187<br />
Reference
Reference<br />
188<br />
Song Recording<br />
Voice mode Performance Sampling Song mode Pattern mode Mixing mode Sampling Master mode Utility mode File mode<br />
mode mode 1<br />
mode 2<br />
! Punch In<br />
@ Punch Out<br />
When punch (Punch In/Out) is selected as <strong>the</strong> Record Type<br />
explained above, <strong>the</strong> recording start position (Punch In<br />
position) and finish position (Punch Out position) are<br />
specified here.<br />
Settings: 001 : 01 – 999 : 16<br />
# Record Part (Indication only)<br />
Indicates <strong>the</strong> Mixing Part corresponding to <strong>the</strong> Record<br />
Track.<br />
Settings: 01 – 16<br />
$ Quantize (Record Quantize)<br />
This convenient feature lets you automatically quantize <strong>the</strong><br />
notes in real time, as you record. Quantize aligns <strong>the</strong> timing<br />
of note events to <strong>the</strong> nearest beat. This parameter<br />
determines whe<strong>the</strong>r real-time Quantize is on or not, and <strong>the</strong><br />
resolution to which <strong>the</strong> notes will be aligned. The number<br />
shown at right of each value indicates <strong>the</strong> length assumes<br />
that <strong>the</strong> quarter-note resolution is 480.<br />
Settings: off, 2 60 (32nd note), 63 80 (16th note triplet), 6 120<br />
(16th note), 83 160 (8th note triplet), 8 240 (8th note),<br />
43 320 (1/4 note triplet), 4 480 (1/4 note)<br />
% Voice<br />
Determines <strong>the</strong> Voice for <strong>the</strong> recording track by specifying<br />
<strong>the</strong> Voice Bank and Voice number. The setting here is<br />
applied to <strong>the</strong> Voice setting for <strong>the</strong> Record Part (#). The<br />
name of <strong>the</strong> selected Voice is indicated in <strong>the</strong> next line.<br />
Settings:<br />
Voice Bank<br />
PRE1 – 8, USR1 – 3, GM, PDR (Preset Drum Voice), UDR (User Drum<br />
Voice), GMDR (GM Drum Voice), SMPL (Sample Voice)*, MIXV (Mixing<br />
Voice)**<br />
* The SMPL (Sample Voice) can be created by recording audio signal<br />
to a track in <strong>the</strong> Sampling mode. Here, you can select only a Sample<br />
Voice which is currently stored to <strong>the</strong> currently selected Song. For<br />
details, see page 242.<br />
** The MIXV (Mixing Voice) is edited and stored in <strong>the</strong> Mixing mode.<br />
Here, you can select only a Mixing Voice which is currently stored to<br />
<strong>the</strong> currently selected Song. For details, see page 230.<br />
Voice number: 001 – 128<br />
n You can call up <strong>the</strong> list and select <strong>the</strong> desired one by pressing<br />
<strong>the</strong> [SF6] LIST button. For details, see page 82.<br />
^ Volume<br />
Determines <strong>the</strong> volume for <strong>the</strong> recording track. The setting<br />
here is applied to <strong>the</strong> Volume setting for <strong>the</strong> Record Part (#).<br />
Settings: 0 – 127<br />
& Pan<br />
Determines <strong>the</strong> stereo pan position of <strong>the</strong> sound. The setting<br />
here is applied to <strong>the</strong> Pan setting for <strong>the</strong> Record Part (#).<br />
Settings: L63 – C – R63<br />
MOTIF <strong>XS</strong> Owner’s <strong>Manual</strong><br />
* Ins Effect Sw (Insertion Effect Switch)<br />
Determines whe<strong>the</strong>r <strong>the</strong> Insertion Effect assigned to <strong>the</strong><br />
Voice is used or not. The setting here is applied to <strong>the</strong><br />
Insertion Effect Switch setting for <strong>the</strong> Record Part (#).<br />
Settings: off, on<br />
n The MOTIF <strong>XS</strong> features eight Insertion Effects, letting you set<br />
this parameter to on for up to eight Parts. If eight Parts are<br />
already turned on, <strong>the</strong> parameter cannot be turned on for<br />
additional Parts. In this case, ano<strong>the</strong>r Part must be turned off.<br />
To do this, set <strong>the</strong> Insertion Effect Switch parameter for ano<strong>the</strong>r<br />
Part to “off” in <strong>the</strong> Part 1 – 16 display (page 231) of <strong>the</strong> Mixing<br />
mode.<br />
( [SF1] Scene1 – [SF5] Scene5<br />
Pressing <strong>the</strong>se buttons while recording changes <strong>the</strong> Song<br />
Scene and Arpeggio settings simultaneously. For details,<br />
see page 181.<br />
º [F1] Setup<br />
Pressing this button returns from <strong>the</strong> previous display to <strong>the</strong><br />
Record Setup display.<br />
¡ [F2] Arpeggio<br />
Calls up <strong>the</strong> Record Arpeggio display. From this display<br />
you can set various Arpeggio-related parameters for <strong>the</strong><br />
Song recording.<br />
[F5] Click<br />
Switches <strong>the</strong> metronome on/off. Pressing <strong>the</strong> [F5] button<br />
toggles <strong>the</strong> Click function on and off.<br />
n From <strong>the</strong> Click display (page 270) of <strong>the</strong> SEQ SETUP, you can<br />
make various settings for <strong>the</strong> metronome click, such as <strong>the</strong><br />
note resolution, volume, and lead-in count for recording.<br />
£ [F6] All Track<br />
Pressing this button sets all 16 tracks to <strong>the</strong> Record Track.<br />
For details, see page 187.
Arpeggio Settings—[F2] Arpeggio<br />
From this display you can set various Arpeggio-related<br />
parameters for <strong>the</strong> Song recording.<br />
1<br />
2<br />
3<br />
4<br />
5<br />
*<br />
!<br />
@<br />
#<br />
$<br />
)<br />
Parameters 1 – & are same as <strong>the</strong> ones in <strong>the</strong> Arpeggio<br />
Main display (page 101) in <strong>the</strong> Voice Common Edit mode.<br />
* Voice with ARP (Voice with Arpeggio)<br />
6<br />
7<br />
8<br />
9<br />
%<br />
^<br />
Each Arpeggio type is assigned a specific Voice best<br />
suited to <strong>the</strong> type. When an Arpeggio type has been<br />
assigned to a recorded track, this parameter determines<br />
whe<strong>the</strong>r or not <strong>the</strong> Voice assigned to <strong>the</strong> Arpeggio type will<br />
also be used for <strong>the</strong> recorded track. When set to “on,” <strong>the</strong><br />
appropriate Voice is assigned to <strong>the</strong> recorded track in<br />
place of <strong>the</strong> currently assigned Voice. When set to “off,” <strong>the</strong><br />
appropriate Voice is not assigned to <strong>the</strong> recorded track.<br />
The currently assigned Voice is maintained. The name of<br />
<strong>the</strong> Voice registered to <strong>the</strong> Arpeggio Type is shown at <strong>the</strong><br />
right side.<br />
Settings: off (not copied), on (copied)<br />
Calling up <strong>the</strong> Arpeggio Type by using <strong>the</strong><br />
[SF1] Scene 1 – [SF5] Scene 5 buttons<br />
The Arpeggio type set in <strong>the</strong> Arpeggio display of <strong>the</strong> Song<br />
Record can be called up toge<strong>the</strong>r with <strong>the</strong> Song Scene via<br />
<strong>the</strong> [SF1] Scene 1 – [SF5] Scene 5 buttons in <strong>the</strong> Setup<br />
display (page 187) and <strong>the</strong> Track View display (page 181).<br />
The 8th note icon at right of Scene1 – 5 in <strong>the</strong> tab indicates<br />
that <strong>the</strong> Song Scene is registered to <strong>the</strong> corresponding<br />
button. If <strong>the</strong> Arpeggio Type is set to “off” in <strong>the</strong> Arpeggio<br />
display of <strong>the</strong> Song Record, pressing <strong>the</strong> corresponding<br />
Sub Function button in <strong>the</strong> Setup display/Track View<br />
display will not change <strong>the</strong> Arpeggio type even if <strong>the</strong> 8th<br />
note icon is shown.<br />
Realtime Recording Procedure<br />
Song Recording<br />
This section explains how to record your performance<br />
using <strong>the</strong> Realtime Recording features. Please keep in<br />
mind that <strong>the</strong> procedure differs depending on <strong>the</strong> Record<br />
Type and Record Track set from <strong>the</strong> Record Setup display.<br />
Replace Recording<br />
[SONG] ➞ [I] (Record) ➞ Record track selection<br />
➞ Type=replace ➞ [F] (Play)<br />
By using this method, any previous data in <strong>the</strong> recorded<br />
track will be erased (overwritten) and replaced by <strong>the</strong> new<br />
data. The first recording is lost, and <strong>the</strong> new one takes its<br />
place. This is handy when you need to re-record <strong>the</strong> same<br />
Part several times.<br />
n If you accidentally overwrite important data when using<br />
Replace Recording, cancel <strong>the</strong> recording by using <strong>the</strong> Undo/<br />
Redo Job (page 196).<br />
Recording Procedure for individual tracks<br />
1 – 16<br />
This section covers how to record your keyboard<br />
performance data to tracks 1 – 16 with Replace Recording.<br />
1 Press <strong>the</strong> [SONG] button to call up <strong>the</strong> Song<br />
Play display (page 178), <strong>the</strong>n select a Song to<br />
be recorded.<br />
Select an empty Song if you wish to create a new Song<br />
from scratch.<br />
2 Press <strong>the</strong> [I] (Record) button to call up <strong>the</strong><br />
Record Setup display (page 187). From this<br />
display, set <strong>the</strong> Record track to one of 1 – 16<br />
<strong>the</strong>n set <strong>the</strong> Recording type to “replace.”<br />
If necessary, set various parameters such as tempo,<br />
time signature, measure, quantize, and voice.<br />
3 Press <strong>the</strong> [F5] Click button to turn <strong>the</strong> Click on<br />
when you wish to use <strong>the</strong> metronome.<br />
In <strong>the</strong> Click display (page 270) called up via <strong>the</strong> [SEQ<br />
SETUP] button, you can make various settings for <strong>the</strong><br />
metronome click, such as <strong>the</strong> note resolution, volume,<br />
and lead-in count for recording.<br />
4 Press <strong>the</strong> [F] (Play) button so that its indicator<br />
flashes, <strong>the</strong>n start recording after <strong>the</strong> count-in.<br />
Play <strong>the</strong> keyboard and/or controller to record.<br />
5 Press <strong>the</strong> [J] (Stop) button to stop recording<br />
and return to <strong>the</strong> Song Play display.<br />
Voice mode<br />
Performance<br />
mode<br />
Sampling<br />
mode 1<br />
Song mode<br />
Pattern mode<br />
Mixing mode<br />
Sampling<br />
mode 2<br />
Master mode<br />
Utility mode<br />
File mode<br />
MOTIF <strong>XS</strong> Owner’s <strong>Manual</strong> 189<br />
Reference
Reference<br />
190<br />
Song Recording<br />
Voice mode Performance Sampling Song mode Pattern mode Mixing mode Sampling Master mode Utility mode File mode<br />
mode mode 1<br />
mode 2<br />
Recording Procedure for multiple tracks<br />
(“All Track” setting)<br />
The sequence data transmitted from an external MIDI<br />
instrument can be recorded simultaneously up to 16<br />
tracks.<br />
1 Connect an external MIDI sequencer or a<br />
<strong>com</strong>puter to <strong>the</strong> MOTIF <strong>XS</strong> <strong>the</strong>n switch on <strong>the</strong><br />
power to <strong>the</strong> MOTIF <strong>XS</strong>.<br />
2 Set <strong>the</strong> MIDI related parameters in <strong>the</strong> Utility<br />
mode.<br />
Press <strong>the</strong> [UTILITY] button, [F5] Control button, <strong>the</strong>n<br />
[SF2] MIDI button to call up <strong>the</strong> MIDI Control display<br />
(page 267). From this display, set MIDI sync to “MIDI,”<br />
<strong>the</strong>n set <strong>the</strong> Sequencer Control to “in” or “in/out.”<br />
3 Press <strong>the</strong> [SEQ SETUP] button to call up <strong>the</strong><br />
[F1] Click display (page 270), <strong>the</strong>n set <strong>the</strong><br />
Recording Count parameter to “off.”<br />
4 Press <strong>the</strong> [SONG] button to call up <strong>the</strong> Song<br />
Play display (page 178), <strong>the</strong>n select a Song to<br />
be recorded.<br />
Select an empty Song if you wish to create a new Song<br />
from scratch.<br />
5 Press <strong>the</strong> [I] (Record) button to call up <strong>the</strong><br />
Record Setup display (page 187). From this<br />
display, set <strong>the</strong> Record track to “All Track” <strong>the</strong>n<br />
set <strong>the</strong> Recording type to “replace.” Set <strong>the</strong><br />
Time Signature to <strong>the</strong> same one as <strong>the</strong> original<br />
Song to be recorded, <strong>the</strong>n set Quantize to “off.”<br />
6 Start playback of <strong>the</strong> external MIDI sequencer<br />
or <strong>com</strong>puter application software.<br />
Recording begins automatically as soon as playback<br />
starts.<br />
7 Stop playback of <strong>the</strong> external MIDI sequencer<br />
or <strong>com</strong>puter application software.<br />
Recording stops automatically and operation returns to<br />
<strong>the</strong> Song Play display.<br />
Recording Procedure for <strong>the</strong> Tempo Track<br />
Here’s how to record <strong>the</strong> Tempo data to <strong>the</strong> Tempo track in<br />
real time.<br />
1 Press <strong>the</strong> [SONG] button to call up <strong>the</strong> Song<br />
Play display (page 178), <strong>the</strong>n select a Song to<br />
be recorded.<br />
MOTIF <strong>XS</strong> Owner’s <strong>Manual</strong><br />
2 Press <strong>the</strong> [I] (Record) button to call up <strong>the</strong><br />
Record Setup display (page 187). From this<br />
display, set <strong>the</strong> Record track to “Tempo Track”<br />
<strong>the</strong>n set <strong>the</strong> Recording type to “replace.”<br />
If necessary, set various parameters such as tempo,<br />
time signature, measure, quantize.<br />
3 Press <strong>the</strong> [F5] Click button to turn <strong>the</strong> Click on<br />
when you wish to use <strong>the</strong> metronome.<br />
In <strong>the</strong> Click display (page 270) called up via <strong>the</strong> [SEQ<br />
SETUP] button, you can make various settings for <strong>the</strong><br />
metronome click, such as <strong>the</strong> note resolution, volume,<br />
and lead-in count for recording.<br />
4 Press <strong>the</strong> [F] (Play) button so that its indicator<br />
flashes, <strong>the</strong>n start recording after <strong>the</strong> count-in.<br />
Enter <strong>the</strong> tempo at <strong>the</strong> desired timing during playback<br />
by using <strong>the</strong> [DEC/NO]/[INC/YES] buttons and <strong>the</strong> Data<br />
Dial.<br />
5 Press <strong>the</strong> [J] (Stop) button to stop recording<br />
and return to <strong>the</strong> Song Play display.<br />
n You can edit <strong>the</strong> tempo from <strong>the</strong> Song Edit display for <strong>the</strong><br />
Tempo track (page 192).<br />
Recording Procedure for <strong>the</strong> Scene Track<br />
Here’s how to record <strong>the</strong> Track Mute on/off events and<br />
Scene changing timing events to <strong>the</strong> Scene track in real<br />
time.<br />
1 Press <strong>the</strong> [SONG] button to call up <strong>the</strong> Song<br />
Play display (page 178), <strong>the</strong>n select a Song to<br />
be recorded.<br />
2 Press <strong>the</strong> [I] (Record) button to call up <strong>the</strong><br />
Record Setup display (page 187). From this<br />
display, set <strong>the</strong> Record track to “Scene Track”<br />
<strong>the</strong>n set <strong>the</strong> Recording type to “replace.”<br />
If necessary, set various parameters such as tempo,<br />
time signature, measure, quantize.<br />
3 Press <strong>the</strong> [F5] Click button to turn <strong>the</strong> Click on<br />
when you wish to use <strong>the</strong> metronome.<br />
In <strong>the</strong> Click display (page 270) called up via <strong>the</strong> [SEQ<br />
SETUP] button, you can make various settings for <strong>the</strong><br />
metronome click, such as <strong>the</strong> note resolution, volume,<br />
and lead-in count for recording.<br />
4 Press <strong>the</strong> [MUTE] button (<strong>the</strong> lamp lights).<br />
5 Press <strong>the</strong> [F] (Play) button so that its indicator<br />
flashes, <strong>the</strong>n start recording after <strong>the</strong> count-in.<br />
Press one of he [1] – [16] buttons or <strong>the</strong> [F1] Scene 1 –<br />
[F5] Scene 5 buttons at <strong>the</strong> desired timing.
6 Press <strong>the</strong> [J] (Stop) button to stop recording<br />
and return to <strong>the</strong> Song Play display.<br />
n You can edit <strong>the</strong> Track on/off and <strong>the</strong> Scene change<br />
events from <strong>the</strong> Song Edit display for <strong>the</strong> Tempo track<br />
(page 192).<br />
Rehearsal before recording<br />
To temporarily disengage <strong>the</strong> record mode and enter <strong>the</strong><br />
Rehearsal mode, simply press <strong>the</strong> [I] (Record) button<br />
during realtime recording. The [I] (Record) indicator<br />
flashes and playback will continue uninterrupted but no<br />
data will be recorded. This convenient Rehearsal mode<br />
feature lets you easily and temporarily disable recording in<br />
order to practice a Part or try out various ideas (while<br />
listening to <strong>the</strong> o<strong>the</strong>r tracks) without actually recording. To<br />
return to <strong>the</strong> record mode press <strong>the</strong> [I] (Record) button<br />
again so that <strong>the</strong> [I] (Record) indicator lights continuously.<br />
Overdub Recording<br />
[SONG] ➞ [I] (Record) ➞ Record track selection<br />
➞ Type=overdub ➞ [F] (Play)<br />
This method allows material to be added to existing<br />
material on a track. The first recording is kept, and <strong>the</strong> new<br />
one is added. This makes it easy to create Parts by<br />
recording <strong>the</strong>m a little at a time.<br />
The Overdub Recording procedure is almost same as <strong>the</strong><br />
Replace except that <strong>the</strong> Record type is set to “overdub.”<br />
n When <strong>the</strong> Record Track (5) is set to “Tempo Track” or “Scene<br />
Track,” “overdub” cannot be selected here.<br />
Re-recording a specific section of an<br />
already-recorded Song (Punch In/Out)<br />
[SONG] ➞ [I] (Record) ➞ Record track selection<br />
➞ Type=punch ➞ [F] (Play)<br />
Realtime recording can also be done between specified<br />
start (punch-in) and end (punch-out) points. This allows<br />
you to record a specified section of a previously-recorded<br />
track without having to re-record <strong>the</strong> entire track. Start<br />
recording with this method and playback begins. Actual<br />
recording will begin automatically when <strong>the</strong> punch-in point<br />
is reached and recording will be disengaged when <strong>the</strong><br />
punch-in point is reached.<br />
Recording start Punch In Punch Out Recording stop<br />
Playback only Playback only<br />
Replace Recording<br />
(Overwriting)<br />
Punch In/Out setup<br />
1 Press <strong>the</strong> [I] (Record) button to call up <strong>the</strong><br />
Record Setup display (page 187).<br />
2 Set <strong>the</strong> Recording type to “punch.”<br />
3 Move <strong>the</strong> cursor to <strong>the</strong> punch in and punch<br />
out, <strong>the</strong>n set <strong>the</strong>ir points respectively by<br />
entering measure and beat.<br />
Song Recording<br />
Except for setting <strong>the</strong> punch in and punch out, perform <strong>the</strong><br />
same procedure as <strong>the</strong> Replace Recording procedure.<br />
Voice mode<br />
Performance<br />
mode<br />
Sampling<br />
mode 1<br />
Song mode<br />
Pattern mode<br />
Mixing mode<br />
Sampling<br />
mode 2<br />
Master mode<br />
Utility mode<br />
File mode<br />
MOTIF <strong>XS</strong> Owner’s <strong>Manual</strong> 191<br />
Reference
Reference<br />
Voice mode Performance Sampling Song mode Pattern mode Mixing mode Sampling Master mode Utility mode File mode<br />
mode mode 1<br />
mode 2<br />
192<br />
MOTIF <strong>XS</strong> Owner’s <strong>Manual</strong><br />
Editing MIDI Events (Song Edit)<br />
The Song Edit mode lets you edit <strong>the</strong> already recorded Songs or insert <strong>the</strong> new data to <strong>the</strong> Songs. It can be used to correct<br />
mistakes as well as add dynamics or effects such as vibrato to refine and finish <strong>the</strong> Song. Press <strong>the</strong> [EDIT] button from <strong>the</strong><br />
Song Play mode to go to <strong>the</strong> Song Edit mode.<br />
n The Song Edit mode gives you <strong>com</strong>prehensive, detailed controls for editing <strong>the</strong> MIDI events of individual Song tracks. MIDI events are<br />
messages (such as note on/off, note number, program change number, etc.) that make up <strong>the</strong> data of a recorded track.<br />
Event List display and Insert Event<br />
window<br />
The Song Edit mode consists of <strong>the</strong> Event List display and<br />
<strong>the</strong> Insert Event window. The Event List display lets you<br />
correct or delete already inserted MIDI events and <strong>the</strong><br />
Insert Event window lets you insert new events to <strong>the</strong> Song.<br />
Press <strong>the</strong> [EDIT] button from <strong>the</strong> Song Play mode to go to<br />
<strong>the</strong> Event List display. Press <strong>the</strong> [F5] button to call up <strong>the</strong><br />
Insert Event window.<br />
Event List display<br />
EXIT<br />
Insert Event window<br />
Event List display<br />
The Event List display lets you correct or delete existing<br />
events.<br />
Insert Event window<br />
The Insert Event window lets you insert new events to <strong>the</strong><br />
Song.<br />
Pressing <strong>the</strong> [F5] button on <strong>the</strong> Event List display calls up<br />
<strong>the</strong> Insert Event window. To return back to <strong>the</strong> Event List<br />
display, press <strong>the</strong> [EXIT] button.<br />
F5<br />
Editing <strong>the</strong> recorded data<br />
This section shows how to correct or delete previously<br />
recorded events.<br />
1 Press <strong>the</strong> [EDIT] button from <strong>the</strong> Song Play<br />
display to call up <strong>the</strong> Event List display<br />
(page 193).<br />
2 Select <strong>the</strong> track to be edited.<br />
Pressing <strong>the</strong> [F4] Track Sel button switches <strong>the</strong><br />
Recording track among Tracks 1 – 16, <strong>the</strong> Scene track<br />
and <strong>the</strong> Tempo track. When “1 – 16 tracks” is selected,<br />
you can select <strong>the</strong> track to be edited by pressing any of<br />
<strong>the</strong> Number buttons [1] – [16].<br />
3 Move <strong>the</strong> cursor to <strong>the</strong> event or parameter to<br />
be edited.<br />
Use <strong>the</strong> [L]/[M] (Cursor Up/Down) button to move <strong>the</strong><br />
cursor to <strong>the</strong> desired timing. Press <strong>the</strong> [G] (Rewind)/<br />
[H] (Fast Forward) button to move <strong>the</strong> cursor by<br />
single measures. Use <strong>the</strong> [] (Cursor Left/Right)<br />
button to move <strong>the</strong> cursor to <strong>the</strong> parameter to be<br />
edited.<br />
n For details about each event and parameter, see page 76.<br />
n The Event List window may have an overwhelming<br />
number of events, and it may be difficult to find a specific<br />
desired event. To help narrow down your search, use <strong>the</strong><br />
View Filter function. This conveniently lets you specify<br />
which classes of events will be displayed and which will<br />
not, making it much easier and faster to find desired<br />
events. For information about <strong>the</strong> View Filter display, see<br />
page 194.<br />
4 Change <strong>the</strong> parameter settings or location of<br />
<strong>the</strong> event.<br />
Edit <strong>the</strong> value by using <strong>the</strong> [INC/YES], [DEC/NO]<br />
buttons and <strong>the</strong> data dial. The edited event will flash on<br />
<strong>the</strong> display.<br />
Change <strong>the</strong> event location by editing <strong>the</strong> MEAS<br />
(measure), BEAT, and CLOCK. Press <strong>the</strong> [F6] button to<br />
delete <strong>the</strong> event at <strong>the</strong> cursor location.<br />
n When “NUM” is indicated in <strong>the</strong> tab corresponding to <strong>the</strong><br />
[SF6] button, you can use <strong>the</strong> [F1] – [F6] buttons and <strong>the</strong><br />
[SF1] – [SF5] buttons as numeric key pads by pressing<br />
<strong>the</strong> [SF6] NUM button.<br />
n The note and velocity can be edited also by pressing <strong>the</strong><br />
desired note on <strong>the</strong> keyboard, even though <strong>the</strong> [KBD] icon<br />
is not shown.
5 After you’ve finished editing a parameter,<br />
press <strong>the</strong> [ENTER] button to confirm and enter<br />
<strong>the</strong> edit (<strong>the</strong> event will stop flashing).<br />
If <strong>the</strong> cursor is moved to a new event while <strong>the</strong> current<br />
event is still flashing, editing of <strong>the</strong> current event is<br />
cancelled.<br />
6 Press [EXIT] to go back to <strong>the</strong> Song Play mode.<br />
Inserting <strong>the</strong> New Event<br />
This section shows how to insert new events to <strong>the</strong> current<br />
Song.<br />
1 From <strong>the</strong> Event List display, press <strong>the</strong> [F5]<br />
Insert button to call up <strong>the</strong> Insert Event<br />
window.<br />
2 Specify <strong>the</strong> event type to be inserted, <strong>the</strong><br />
insertion point (measure, beat, and clock), and<br />
parameter value of <strong>the</strong> event.<br />
For details about each event and parameter, see<br />
page 76.<br />
Event type<br />
Insertion point Parameter<br />
3 Press <strong>the</strong> [F6] Set button to insert <strong>the</strong> specified<br />
event at <strong>the</strong> specified location.<br />
The Insert Event window remains open, allowing you to<br />
continue inserting new events. Press <strong>the</strong> [ENTER]<br />
button to actually insert <strong>the</strong> event and close <strong>the</strong> Insert<br />
Event window.<br />
4 Press <strong>the</strong> [EXIT] button to go back to <strong>the</strong> Event<br />
List display.<br />
Event List display<br />
Editing MIDI Events (Song Edit)<br />
In <strong>the</strong> Event List display, MIDI events (including mainly<br />
values such as note number, velocity, and control change<br />
value) are listed and can be edited.<br />
3<br />
n Depending on <strong>the</strong> selected parameter, <strong>the</strong> NUM icon is shown<br />
at <strong>the</strong> tab menu corresponding to <strong>the</strong> [SF6] button. In this<br />
condition, you can use <strong>the</strong> [SF1] – [SF5] and [F1] – [F5]<br />
buttons as number buttons by pressing <strong>the</strong> [SF6] NUM button.<br />
For details, see page 81.<br />
1 TR (Track) (Indication only)<br />
Indicates <strong>the</strong> selected track. You can change <strong>the</strong> track to<br />
be edited by using <strong>the</strong> [F4] Track Sel button and <strong>the</strong><br />
Number [1] – [16] buttons.<br />
Settings: Track 01 – 16, Scene, Tempo<br />
2 Measure (Indication only)<br />
Indicates <strong>the</strong> selected measure. You can change <strong>the</strong><br />
measure by using <strong>the</strong> [G] (Rewind) and <strong>the</strong> [H]<br />
(Forward) buttons.<br />
Settings:<br />
Measure: 001 – 999<br />
3 MEAS (Measure), BEAT, CLOCK<br />
Indicates <strong>the</strong> location of <strong>the</strong> corresponding event.<br />
Changing any of <strong>the</strong>se values changes <strong>the</strong> location of <strong>the</strong><br />
event accordingly.<br />
Settings:<br />
Measure: 001 – 999<br />
Beat: 1 – 16 (depends on meter)<br />
Clock: 000 – 479 (depends on meter)<br />
4 Event and Parameters<br />
Indicates <strong>the</strong> type of each event. For details about each<br />
event and parameter, see page 76.<br />
Settings:<br />
When TR is set to 01 – 16:<br />
Note<br />
PB (Pitch Bend)<br />
PC (Program Change)<br />
CC (Control Change)<br />
CAT (Channel Aftertouch)<br />
PAT (Polyphonic Aftertouch)<br />
RPN<br />
NRPN<br />
EXC (System Exclusive)<br />
CMM (Channel Mode Messages)<br />
1<br />
2<br />
5 6 7 8<br />
4<br />
Voice mode<br />
Performance<br />
mode<br />
Sampling<br />
mode 1<br />
Song mode<br />
Pattern mode<br />
Mixing mode<br />
Sampling<br />
mode 2<br />
Master mode<br />
Utility mode<br />
File mode<br />
MOTIF <strong>XS</strong> Owner’s <strong>Manual</strong> 193<br />
Reference
Reference<br />
194<br />
Editing MIDI Events (Song Edit)<br />
Voice mode Performance Sampling Song mode Pattern mode Mixing mode Sampling Master mode Utility mode File mode<br />
mode mode 1<br />
mode 2<br />
When TR is set to “scn” (Scene):<br />
Scene Memory<br />
Track Mute<br />
When TR is set to “tmp” (Tempo):<br />
Tempo Change<br />
5 [F3] ViewFilter<br />
Calls up <strong>the</strong> View Filter setting display (below).<br />
6 [F4] Track Sel (Track Select)<br />
You can switch between <strong>the</strong> display for tracks 1 – 16, <strong>the</strong><br />
Scene track, and <strong>the</strong> Tempo track by pressing this button.<br />
When any one of tracks 1 – 16 is selected, you can select a<br />
different track number by pressing <strong>the</strong> appropriate Number<br />
button [1] – [16].<br />
7 [F5] Insert<br />
Calls up <strong>the</strong> Insert Event window (page 193).<br />
8 [F6] Delete<br />
Deletes <strong>the</strong> currently selected event. This button is not<br />
available when <strong>the</strong> cursor is located at <strong>the</strong> top or bottom of<br />
<strong>the</strong> Song data.<br />
Changing <strong>the</strong> MIDI event view—[F3]<br />
View Filter<br />
MIDI song data generally has a large amount of recorded<br />
events, and <strong>the</strong> Event List window may be overcrowded<br />
with <strong>the</strong>m. Since it may be difficult to find a specific event,<br />
you can use <strong>the</strong> View Filter function to help narrow down<br />
your search. This conveniently lets you specify which<br />
classes of events will be displayed and which will not,<br />
making it much easier and faster to find desired events.<br />
From <strong>the</strong> Event List display, call up <strong>the</strong> View Filter display<br />
by pressing <strong>the</strong> [F3] View Filter button.<br />
1<br />
1 Event types<br />
Only <strong>the</strong> event which <strong>the</strong> checkbox is marked will be<br />
shown on <strong>the</strong> Event List display.<br />
Settings: Note, Pitch Bend, Program Change, Control Change*,<br />
Channel After Touch, Poly After Touch, RPN, NRPN, System<br />
Exclusive, Channel Mode Message<br />
* You can specify <strong>the</strong> Control Number (0 – 119, all).<br />
MOTIF <strong>XS</strong> Owner’s <strong>Manual</strong><br />
2 3<br />
2 [F5] Clear All<br />
Pressing this button removes <strong>the</strong> checkmarks of all events.<br />
If you wish to indicate specific events, it is a good idea to<br />
press <strong>the</strong> [F5] button to first remove <strong>the</strong> checkmarks of all<br />
events, <strong>the</strong>n enter <strong>the</strong> checkmarks of your desired events.<br />
3 [F6] Set All<br />
Pressing this button enters <strong>the</strong> checkmarks for all events,<br />
letting you view all recorded events.
Song Job<br />
The Song Job mode contains a <strong>com</strong>prehensive set of editing tools and data transform functions you can use to change <strong>the</strong><br />
sound of <strong>the</strong> Song. It also includes a variety of convenient operations, such as copying or erasing data. 30 Jobs are<br />
available.<br />
Function Description<br />
[F1] Undo/Redo Undo job cancels <strong>the</strong> changes made by <strong>the</strong> most recent operation, restoring <strong>the</strong> data to its previous state.<br />
Redo job cancel Undo and restores <strong>the</strong> changes.<br />
[F2] Note Note data Jobs<br />
01: Quantize Quantization is <strong>the</strong> process of adjusting <strong>the</strong> timing of note events by moving <strong>the</strong>m closer to <strong>the</strong> nearest<br />
exact beat. You can use this feature, for example, to improve <strong>the</strong> timing of a performance recorded in real<br />
time.<br />
02: Modify Velocity This Job alters <strong>the</strong> velocity values of <strong>the</strong> specified range of notes, letting you selectively boost or cut <strong>the</strong><br />
volume of those notes.<br />
03: Modify Gate Time This Job alters <strong>the</strong> gate times of <strong>the</strong> specified range of notes.<br />
04: Crescendo This Job lets you create a crescendo or decrescendo over <strong>the</strong> specified range of notes. (Crescendo is a<br />
gradual increase in volume, and decrescendo is a gradual decrease.)<br />
05: Transpose This Job changes <strong>the</strong> pitch of <strong>the</strong> notes in semitones.<br />
06: Glide This Job replaces all notes following <strong>the</strong> first note in <strong>the</strong> specified range with pitch bend data, producing<br />
smooth glides from note to note.<br />
07: Create Roll This Job creates a series of repeated notes (like a drum roll) in <strong>the</strong> specified range with <strong>the</strong> specified<br />
continuous changes in clock step and velocity. This is ideal for creating fast staccato rolls and special<br />
stuttering effects.<br />
08: Sort Chord This job sorts chord events (simultaneous note events) by order of pitch.<br />
09: Separate Chord This Job slightly separates notes in chords within <strong>the</strong> specified range, inserting a specified number of<br />
clocks between each note. Use this Job after <strong>the</strong> Chord Sort Job above, to create guitar-like upstroke or<br />
downstroke effects.<br />
[F3] Event Event Jobs<br />
01: Shift Clock This Job shifts all data events in <strong>the</strong> specified range forward or backward by <strong>the</strong> specified number of<br />
clocks.<br />
02: Copy Event This Job copies all data from a specified source range to a specified destination location.<br />
03: Erase Event This Job clears all specified events from <strong>the</strong> specified range, effectively producing a segment of silence.<br />
04: Extract Event This Job moves all instances of specified event data from a specified range of a track to <strong>the</strong> same range in<br />
a different track.<br />
05: Create Continuous Data This Job creates continuous pitch bend or control change data over <strong>the</strong> specified range.<br />
06: Thin Out This Job thins out <strong>the</strong> specified type of continuous data in <strong>the</strong> specified range—allowing you to free up<br />
memory space for o<strong>the</strong>r data or fur<strong>the</strong>r recording.<br />
07: Modify Control Data This Job lets you change <strong>the</strong> values of specified data such as Pitch Bend and Control Change in <strong>the</strong><br />
specified range.<br />
08: Beat Stretch This Job performs time-expansion or <strong>com</strong>pression over <strong>the</strong> selected range.<br />
[F4] Measure Measure Jobs<br />
01: Create Measure This Job creates empty measures at <strong>the</strong> specified location in all tracks.<br />
02: Delete Measure This Job deletes <strong>the</strong> specified measures.<br />
[F5] Track Track Jobs<br />
01: Copy Track This Job copies all data of <strong>the</strong> selected type from a specified source track to a specified destination track.<br />
02: Exchange Track This Job exchanges or “swaps” <strong>the</strong> specified type of data between two specified tracks in <strong>the</strong> current<br />
Song.<br />
03: Mix Track This job mixes all data from two selected tracks.<br />
04: Clear Track This Job deletes all data of <strong>the</strong> selected type from <strong>the</strong> selected track.<br />
05: Normalize Play Effect This job rewrites <strong>the</strong> data in <strong>the</strong> selected track so that it incorporates <strong>the</strong> current Play FX/Groove/MIDI Delay<br />
settings.<br />
06: Divide Drum Track This Job separates <strong>the</strong> note events in a drum performance assigned to a specified track, and places <strong>the</strong><br />
notes corresponding to different drum instruments in separate tracks (tracks 1 through 8).<br />
07: Put Track to Arpeggio This Job copies data in <strong>the</strong> specified measures of a track for creating Arpeggio data.<br />
08: Copy Phrase This Job copies <strong>the</strong> Phrase (created in <strong>the</strong> Pattern mode) to a specified track of <strong>the</strong> current Song.<br />
[F6] Song Song Jobs<br />
01: Copy Song This Job copies all data from a selected source Song to a selected destination Song.<br />
02: Split Song to Pattern This Job allows you to copy a Part of <strong>the</strong> current Song to a specific Pattern.<br />
03: Clear Song This job deletes all data from <strong>the</strong> selected Song or all Songs. It can also be used to delete all 64 Songs at<br />
<strong>the</strong> same time.<br />
Voice mode<br />
Performance<br />
mode<br />
Sampling<br />
mode 1<br />
Song mode<br />
Pattern mode<br />
Mixing mode<br />
Sampling<br />
mode 2<br />
Master mode<br />
Utility mode<br />
File mode<br />
MOTIF <strong>XS</strong> Owner’s <strong>Manual</strong> 195<br />
Reference
Reference<br />
196<br />
Song Job<br />
Voice mode Performance Sampling Song mode Pattern mode Mixing mode Sampling Master mode Utility mode File mode<br />
mode mode 1<br />
mode 2<br />
Song Job Procedure<br />
1 Press <strong>the</strong> [JOB] button to enter <strong>the</strong> Song Job<br />
mode.<br />
2 Select <strong>the</strong> desired Job menu by pressing one<br />
of <strong>the</strong> [F1] – [F6] buttons.<br />
3 Move <strong>the</strong> cursor to <strong>the</strong> desired Job by using<br />
<strong>the</strong> data dial, cursor buttons, [INC/DEC] and<br />
[DEC/NO] buttons, <strong>the</strong>n press <strong>the</strong> [ENTER]<br />
button to call up <strong>the</strong> Job display.<br />
4 Move <strong>the</strong> cursor to <strong>the</strong> desired parameter, <strong>the</strong>n<br />
set <strong>the</strong> value by using <strong>the</strong> data dial, [INC/YES]<br />
and [DEC/NO] buttons.<br />
5 After setting, press <strong>the</strong> [ENTER] button to<br />
execute <strong>the</strong> Job.<br />
“Completed” will appear when <strong>the</strong> Job is done.<br />
CAUTION<br />
In some Jobs, <strong>the</strong> operation overwrites any data previously<br />
existing in <strong>the</strong> destination memory. Important data should<br />
always be saved to a USB storage device connected to <strong>the</strong><br />
USB TO DEVICE terminal or to a <strong>com</strong>puter connected to <strong>the</strong><br />
same network as <strong>the</strong> MOTIF <strong>XS</strong> (page 278).<br />
6 Press <strong>the</strong> [EXIT] button twice to go back to <strong>the</strong><br />
Song Play display.<br />
n If <strong>the</strong>re is no data in <strong>the</strong> specified range, “No Data” will appear<br />
on <strong>the</strong> display and <strong>the</strong> Job cannot be executed. If you make a<br />
mistake or want to <strong>com</strong>pare <strong>the</strong> sound of <strong>the</strong> data before and<br />
after executing a Job, press <strong>the</strong> [F1] button to use <strong>the</strong> Undo/<br />
Redo function.<br />
CAUTION<br />
Even if a Job operation has been <strong>com</strong>pleted, selecting a different<br />
Song or turning <strong>the</strong> power off without storing will erase <strong>the</strong> Song<br />
data. Make sure to store <strong>the</strong> Song data to internal memory by<br />
pressing <strong>the</strong> [STORE] button before selecting a different Song or<br />
turning <strong>the</strong> power off.<br />
n In some Jobs, you need specify <strong>the</strong> range (start point and end<br />
point as illustrated below) to which <strong>the</strong> Job is applied. Keep in<br />
mind that <strong>the</strong> end point itself is not included in <strong>the</strong> range. The<br />
actual range to which <strong>the</strong> Job is applied is from <strong>the</strong> start point<br />
to <strong>the</strong> point that is one clock less than <strong>the</strong> end point. This rule<br />
applies to cases in which you specify only <strong>the</strong> Measure;<br />
however, <strong>the</strong> example illustration below shows specifying <strong>the</strong><br />
Measure, Beat and Clock.<br />
n Some of <strong>the</strong> Jobs which enable you to copy <strong>the</strong> Sample Voice<br />
from <strong>the</strong> source to <strong>the</strong> destination execute <strong>the</strong> actual copy<br />
operation only when <strong>the</strong> Bank Select and Program Change<br />
events which specify <strong>the</strong> Sample Voice are recorded in <strong>the</strong><br />
source Track.<br />
MOTIF <strong>XS</strong> Owner’s <strong>Manual</strong><br />
Start point End point<br />
[F1] Undo/Redo<br />
The Undo Job cancels <strong>the</strong> changes you made in your most<br />
recent recording session, editing session, or Job, restoring<br />
<strong>the</strong> data to its previous state. This allows you to recover<br />
from accidental data loss. Redo is available only after<br />
using Undo, and lets you restore <strong>the</strong> changes you made<br />
before undoing <strong>the</strong>m.<br />
1 2<br />
1 Indicates <strong>the</strong> operation to be affected by Undo or Redo.<br />
2 Indicates <strong>the</strong> Undo/Redo target. When <strong>the</strong> changes you<br />
made in your most recent operation cannot be a target<br />
of <strong>the</strong> Undo/Redo, “Impossible” is shown here.<br />
CAUTION<br />
Undo/Redo does not work with Mixing operations.<br />
CAUTION<br />
Even if you have stored Song data, you can recall <strong>the</strong> data which<br />
was lost via <strong>the</strong> most recent operation by executing Undo. Make<br />
sure to execute <strong>the</strong> Undo/Redo operation before changing <strong>the</strong><br />
song number or leaving <strong>the</strong> Song mode. This is because <strong>the</strong> Undo/<br />
Redo cannot be executed after changing <strong>the</strong> song number or<br />
leaving <strong>the</strong> Song mode.<br />
[F2] Note Jobs<br />
01: Quantize<br />
Quantization is <strong>the</strong> process of adjusting <strong>the</strong> timing of note<br />
events by moving <strong>the</strong>m closer to <strong>the</strong> nearest exact beat.<br />
You can use this feature, for example, to improve <strong>the</strong> timing<br />
of a performance recorded in real time.<br />
1<br />
2<br />
3<br />
4<br />
5<br />
1 Track and range<br />
Determines <strong>the</strong> track (01 – 16, all) and range (Measure :<br />
Beat : Clock) to which <strong>the</strong> Quantize is applied.
2 Quantize (Resolution)<br />
Determines <strong>the</strong> note timing to which <strong>the</strong> note data will be<br />
aligned. The number shown at right of each value indicates<br />
<strong>the</strong> length assumes that <strong>the</strong> quarter-note resolution is 480.<br />
Settings:<br />
2 60 1/32 note<br />
63 80 1/16 note triplets<br />
6 120 1/16 note<br />
83 160 1/8 note triplets<br />
8 240 1/8 note<br />
43 320 1/4 note triplets<br />
4 480 1/4 note<br />
6+63 200 1/16 note and 1/16 note triplets<br />
8+83 400 1/8 note and 1/8 note triplets<br />
n You can call up <strong>the</strong> list and select <strong>the</strong> desired one by pressing<br />
<strong>the</strong> [SF6] LIST button. For details, see page 82.<br />
3 Strength<br />
Sets <strong>the</strong> “strength” by which note events are pulled toward <strong>the</strong><br />
nearest quantize beats. A setting of 0% results in no change,<br />
whereas a setting of 100% moves note events exactly to <strong>the</strong><br />
quantize beats. A setting of 50% results in <strong>the</strong> note events<br />
being pulled halfway between 0% and 100%.<br />
Settings: 000% – 100%<br />
4 Swing Rate<br />
Delays notes on even-numbered beats (backbeats) to<br />
produce a swing feel. Judicious use of this setting lets you<br />
create swing rhythms and triplet feels, such as shuffle and<br />
bounce.<br />
The functions and settings of this parameter differ<br />
depending on <strong>the</strong> Quantize resolution setting.<br />
Settings: Depends on <strong>the</strong> Quantize (2) setting. Refer to <strong>the</strong> settings<br />
of <strong>the</strong> Swing parameter in <strong>the</strong> Play FX display (page 183).<br />
If <strong>the</strong> Quantize value is 1/4 note, 8th note, 16th note,<br />
32nd note:<br />
For example, if <strong>the</strong> meter is 4/4 and <strong>the</strong> quantize value is<br />
quarter notes, <strong>the</strong> 2nd and 4th beats of <strong>the</strong> measure will be<br />
delayed. A setting of 100% is equivalent to twice <strong>the</strong> length of<br />
<strong>the</strong> specified Quantize value. A setting of 50% produces exact<br />
timing and <strong>the</strong>refore no swing feel. Settings above 51% delays<br />
<strong>the</strong> note timing to increase <strong>the</strong> amount of swing. A setting of<br />
66% moves <strong>the</strong> notes to a triplet delay, with 75% being<br />
equivalent to a dotted-note delay.<br />
If <strong>the</strong> Quantize value is 1/4 note triplet, 8th note triplet,<br />
16th note triplet:<br />
When a triplet quantize value is used, <strong>the</strong> last note of each<br />
triplet is delayed. A setting of 100% is equivalent to twice <strong>the</strong><br />
length of <strong>the</strong> specified Quantize value. A setting of 66%<br />
produces exact timing and <strong>the</strong>refore no swing feel. Settings<br />
above 67% delays <strong>the</strong> note timing to increase <strong>the</strong> amount of<br />
swing. A setting of 75% moves <strong>the</strong> notes to a dotted-note<br />
delay, with 83% being equivalent to a sextuplet delay.<br />
If <strong>the</strong> Quantize value is 8th note + 8th note triplet, 16th<br />
note + 16th note triplet:<br />
Even-numbered beats will be delayed. A setting of 100% is<br />
equivalent to twice <strong>the</strong> length of a 8th note or 16th note. A<br />
setting of 50% produces exact timing and <strong>the</strong>refore no swing<br />
feel. Settings above 51% delays <strong>the</strong> note timing to increase<br />
<strong>the</strong> amount of swing. with 66% being equivalent to a triplet<br />
delay.<br />
Song Job<br />
n The Swing Rate is applied to notes which are located on<br />
even-numbered beats (backbeats) by setting <strong>the</strong> Strength<br />
to 100%. If <strong>the</strong> Strength is set to less than 100%, <strong>the</strong><br />
Swing Rate may delay notes not on even-numbered beats<br />
and produce an unexpected rhythm. To prevent this, you<br />
should set Strength to 100% when using <strong>the</strong> Swing Rate.<br />
5 Gate Time<br />
Determines <strong>the</strong> gate time (<strong>the</strong> length of time a note sounds)<br />
of <strong>the</strong> even-numbered backbeat notes to enhance <strong>the</strong><br />
swing feel. When a triplet quantize value is used, <strong>the</strong> gate<br />
time of <strong>the</strong> last note of each triplet is adjusted. When <strong>the</strong><br />
quantize value is 8th note + 8th note triplet or 16th note +<br />
16th note triplet, <strong>the</strong> gate time of <strong>the</strong> even-numbered 8th<br />
note or 16th note beats will be adjusted.<br />
Settings below 100% will shorten <strong>the</strong> gate times of notes on<br />
even-numbered beats (backbeats), whereas settings<br />
above 100% will leng<strong>the</strong>n <strong>the</strong>m. If an adjusted gate time<br />
value is less than 1, <strong>the</strong> value is rounded off to 1.<br />
Settings: 000% – 200%<br />
02: Modify Velocity<br />
This Job alters <strong>the</strong> velocity values of <strong>the</strong> specified range of<br />
notes, letting you selectively boost or cut <strong>the</strong> volume of<br />
those notes. Velocity changes are calculated as follows:<br />
Adjusted velocity = (original velocity x Rate) + Offset<br />
If <strong>the</strong> result is 0 or less, <strong>the</strong> value is set to 1. If <strong>the</strong> result is<br />
higher than 127, <strong>the</strong> value is set to 127.<br />
1<br />
2<br />
3<br />
4<br />
1 Track and range<br />
Determines <strong>the</strong> Song track (01 – 16, all) and range<br />
(Measure : Beat : Clock) over which <strong>the</strong> Job is applied.<br />
2 Set All<br />
Sets <strong>the</strong> velocities of all target notes to <strong>the</strong> same fixed<br />
value (1 to 127). When set to “off” <strong>the</strong> Set All parameter has<br />
no effect. When set to a value o<strong>the</strong>r than “off,” <strong>the</strong> Rate and<br />
Offset parameters below are unavailable and cannot be<br />
set.<br />
Settings: off, 001 – 127<br />
3 Rate<br />
Determines <strong>the</strong> percentage by which <strong>the</strong> target notes will<br />
be shifted from <strong>the</strong>ir original velocities. Settings below<br />
100% reduce <strong>the</strong> velocities, and settings above 100%<br />
increase <strong>the</strong> velocities proportionately. A setting of 100<br />
Voice mode<br />
Performance<br />
mode<br />
Sampling<br />
mode 1<br />
Song mode<br />
Pattern mode<br />
Mixing mode<br />
Sampling<br />
mode 2<br />
Master mode<br />
Utility mode<br />
File mode<br />
MOTIF <strong>XS</strong> Owner’s <strong>Manual</strong> 197<br />
Reference
Reference<br />
198<br />
Song Job<br />
Voice mode Performance Sampling Song mode Pattern mode Mixing mode Sampling Master mode Utility mode File mode<br />
mode mode 1<br />
mode 2<br />
produces no change. When <strong>the</strong> Set All parameter (above)<br />
is set to o<strong>the</strong>r than “off,” this parameter cannot be set.<br />
Settings: 000% – 200%<br />
4 Offset<br />
Determines <strong>the</strong> offset value by which <strong>the</strong> target notes will<br />
be shifted from <strong>the</strong>ir original velocities. Settings below 0<br />
reduce <strong>the</strong> velocities, and settings above 0 increase <strong>the</strong><br />
velocities. A setting of 0 produces no change. When <strong>the</strong><br />
Set All parameter (above) is set to o<strong>the</strong>r than “off,” this<br />
parameter cannot be set.<br />
Settings: -127 – +127<br />
03: Modify Gate Time<br />
This Job alters <strong>the</strong> gate times of <strong>the</strong> specified range of<br />
notes. Gate time changes are calculated as follows:<br />
Adjusted gate time = (original gate time x Rate) + Offset.<br />
If <strong>the</strong> result is 0 or less, <strong>the</strong> value is rounded off to 1.<br />
1<br />
2<br />
3<br />
4<br />
1 Track and range<br />
Determines <strong>the</strong> Song track (01 – 16, all) and range<br />
(Measure : Beat : Clock) over which <strong>the</strong> Job is applied.<br />
2 Set All<br />
Sets <strong>the</strong> gate times of all target notes to <strong>the</strong> same fixed<br />
value. When set to “off” <strong>the</strong> Set All parameter has no effect.<br />
When set to a value o<strong>the</strong>r than “off,” <strong>the</strong> Rate and Offset<br />
parameters below are unavailable and cannot be set.<br />
Settings: off, 0001 – 9999<br />
3 Rate<br />
Determines <strong>the</strong> percentage by which <strong>the</strong> gate time of <strong>the</strong><br />
target notes will be changed. Settings below 100% shorten<br />
<strong>the</strong> notes, and settings above 100% leng<strong>the</strong>n <strong>the</strong> notes<br />
proportionately. A setting of 100 produces no change.<br />
When <strong>the</strong> Set All parameter (above) is set to o<strong>the</strong>r than<br />
“off,” this parameter cannot be set.<br />
Settings: 000% – 200%<br />
4 Offset<br />
Adds a fixed value to <strong>the</strong> Rate-adjusted gate time values.<br />
Settings below 0 shorten <strong>the</strong> gate time, and settings above<br />
0 leng<strong>the</strong>n <strong>the</strong> gate time. A setting of 0 produces no<br />
change. When <strong>the</strong> Set All parameter (above) is set to o<strong>the</strong>r<br />
than “off,” this parameter cannot be set.<br />
Settings: -9999 – +9999<br />
MOTIF <strong>XS</strong> Owner’s <strong>Manual</strong><br />
04: Crescendo<br />
This Job lets you create a crescendo or decrescendo over<br />
<strong>the</strong> specified range of notes. Crescendo is a gradual<br />
increase in volume, and decrescendo is a gradual<br />
decrease.<br />
1<br />
2<br />
1 Track and range<br />
Determines <strong>the</strong> Song track (01 – 16, all) and range<br />
(Measure : Beat : Clock) over which <strong>the</strong> Job is applied.<br />
2 Velocity Range<br />
Determines <strong>the</strong> intensity of <strong>the</strong> crescendo or decrescendo.<br />
The velocity values of <strong>the</strong> notes in <strong>the</strong> specified range are<br />
gradually increased or decreased starting at <strong>the</strong> first note<br />
in <strong>the</strong> range. The velocity of <strong>the</strong> last note in <strong>the</strong> range<br />
be<strong>com</strong>es <strong>the</strong> original velocity of <strong>the</strong> note plus <strong>the</strong> Velocity<br />
Range value. If <strong>the</strong> resultant velocity is outside <strong>the</strong> 1 – 127<br />
range, it is set to 1 or 127 accordingly. Settings greater<br />
than 0 produce a crescendo, and settings less than 0<br />
produce a decrescendo. A setting of 0 produces no effect.<br />
Settings: -127 – +127<br />
n Executing this Job changes velocities of <strong>the</strong> note on events in<br />
<strong>the</strong> specified range to produce <strong>the</strong> crescendo/decrescendo.<br />
Note that this Job cannot apply <strong>the</strong> crescendo/decrescendo to<br />
long sustained note having a long gate time. If you wish to do<br />
this, use <strong>the</strong> “Create Continuous Data” Job with <strong>the</strong> Event Type<br />
set to “Control Change 11."<br />
05: Transpose<br />
Changes <strong>the</strong> pitch of <strong>the</strong> notes in semitones.<br />
1<br />
2<br />
3<br />
1 Track and range<br />
Determines <strong>the</strong> Song track (01 – 16, all) and range<br />
(Measure : Beat : Clock) over which <strong>the</strong> Job is applied.
2 Note<br />
Determines <strong>the</strong> range of notes for which Transpose is<br />
applied. You can also set <strong>the</strong> Note directly from <strong>the</strong><br />
Keyboard, by holding down <strong>the</strong> [SF6] button and pressing<br />
<strong>the</strong> desired key.<br />
Settings: C -2 – G8<br />
3 Transpose<br />
Sets <strong>the</strong> transpose value. A setting of +12 transposes up<br />
one octave, while a setting of -12 transposes down an<br />
octave. A setting of 0 produces no change.<br />
Settings: -127 – +127<br />
06: Glide<br />
This Job replaces all notes following <strong>the</strong> first note in <strong>the</strong><br />
specified range with pitch bend data, producing smooth<br />
glides from note to note.<br />
1<br />
2<br />
3<br />
1 Track and range<br />
Determines <strong>the</strong> Song track (01 – 16, all) and range<br />
(Measure : Beat : Clock) over which <strong>the</strong> Job is applied.<br />
2 Glide Time<br />
Determines <strong>the</strong> time of <strong>the</strong> glide. Higher values produce a<br />
longer and smooth glide between notes.<br />
Settings: 000 – 100<br />
3 PB (Pitch Bend) Range<br />
The Pitch Bend Range value indicates <strong>the</strong> maximum range<br />
of pitch controlled via <strong>the</strong> Pitch Bend event in semitones.<br />
This parameter determines <strong>the</strong> Pitch Bend range for <strong>the</strong><br />
Voice assigned to <strong>the</strong> Mixing Part corresponding to <strong>the</strong><br />
selected track. Executing <strong>the</strong> Job replaces <strong>the</strong> note events<br />
with <strong>the</strong> Pitch Bend events by following <strong>the</strong> Pitch Bend<br />
range specified here.<br />
Settings: 01 – 24<br />
n If <strong>the</strong> interval between adjoining notes is greater than <strong>the</strong> Pitch<br />
Bend range set here in <strong>the</strong> specified range, <strong>the</strong> corresponding<br />
notes will not be converted by executing this Job. If such a<br />
situation occurs, set <strong>the</strong> PB Range (3) to <strong>the</strong> value more than<br />
<strong>the</strong> interval. If <strong>the</strong>re is a one octave interval, for example, in <strong>the</strong><br />
specified range, set <strong>the</strong> PB Range to a value of 12 or higher.<br />
n Please note that <strong>the</strong> Song may not play back properly if you<br />
set <strong>the</strong> PB Range (3) to <strong>the</strong> value different from <strong>the</strong> one set via<br />
<strong>the</strong> Voice Edit mode. In order that <strong>the</strong> Song plays back<br />
properly, insert <strong>the</strong> MIDI event below to <strong>the</strong> corresponding<br />
track in <strong>the</strong> Song Edit display (page 193).<br />
RPN [000-000] xxx<br />
(Enter <strong>the</strong> Pitch Bend value to xxx.)<br />
07: Create Roll<br />
This Job creates a series of repeated notes (like a drum<br />
roll) in <strong>the</strong> specified range with <strong>the</strong> specified continuous<br />
changes in clock step and velocity. This is ideal for<br />
creating fast staccato rolls and special stuttering effects.<br />
This Job also allows you to program crescendo or<br />
decrescendo volume changes in <strong>the</strong> Roll data.<br />
1<br />
2<br />
3<br />
4<br />
5<br />
6<br />
1 Track and range<br />
Determines <strong>the</strong> Song track (01 – 16, all) and range<br />
(Measure : Beat : Clock) over which <strong>the</strong> Job is applied.<br />
2 Start Step<br />
3 End Step<br />
Song Job<br />
Determines <strong>the</strong> size of <strong>the</strong> step (i.e., <strong>the</strong> number of clocks)<br />
between each note in <strong>the</strong> roll. The smaller <strong>the</strong> value, <strong>the</strong><br />
finer <strong>the</strong> roll. Both <strong>the</strong> starting and ending clock values can<br />
be specified, making it easy to create rolls in which <strong>the</strong><br />
step size varies during <strong>the</strong> roll.<br />
Settings: 015 – 999<br />
n If you want to create a roll that goes from 64th – 32nd notes,<br />
set <strong>the</strong> Start and End step values to around 30 – 60,<br />
respectively.<br />
4 Note<br />
Determines <strong>the</strong> specific note (or instrument in Drum<br />
Voices) for <strong>the</strong> roll effect. You can also set <strong>the</strong> note directly<br />
from <strong>the</strong> Keyboard, by holding down <strong>the</strong> [SF6] button and<br />
pressing <strong>the</strong> desired key.<br />
Settings: C -2 – G8<br />
5 Start Velocity<br />
6 End Velocity<br />
Determines <strong>the</strong> velocity of <strong>the</strong> notes in <strong>the</strong> roll. Both <strong>the</strong><br />
starting and ending velocity values can be specified,<br />
making it easy to create rolls in which <strong>the</strong> velocity<br />
increases or decreases. This lets you create rolls that<br />
gradually increase or decrease in volume (crescendo/<br />
decrescendo).<br />
Settings: 001 – 127<br />
Voice mode<br />
Performance<br />
mode<br />
Sampling<br />
mode 1<br />
Song mode<br />
Pattern mode<br />
Mixing mode<br />
Sampling<br />
mode 2<br />
Master mode<br />
Utility mode<br />
File mode<br />
MOTIF <strong>XS</strong> Owner’s <strong>Manual</strong> 199<br />
Reference
Reference<br />
200<br />
Song Job<br />
Voice mode Performance Sampling Song mode Pattern mode Mixing mode Sampling Master mode Utility mode File mode<br />
mode mode 1<br />
mode 2<br />
08: Sort Chord<br />
This job sorts chord events (simultaneous note events) by<br />
order of pitch. The sort affects <strong>the</strong> order of <strong>the</strong> notes in <strong>the</strong><br />
Event List display (page 193), but does not change <strong>the</strong><br />
timing of <strong>the</strong> notes. When used to pre-process chords<br />
before using <strong>the</strong> Separate Chord Job (below), Chord Sort<br />
can be used to simulate <strong>the</strong> “stroke” or strumming sound of<br />
guitars and similar instruments.<br />
1<br />
2<br />
3<br />
1 Track and range<br />
Determines <strong>the</strong> Song track (01 – 16, all) and range<br />
(Measure : Beat : Clock) over which <strong>the</strong> Job is applied.<br />
2 Type<br />
Determines how <strong>the</strong> chord note data is sorted.<br />
Settings: up, down, up&down, down&up<br />
up<br />
The notes are sorted in ascending order. After executing this Job with<br />
this setting, execute <strong>the</strong> Separate Chord Job to create a guitar-like<br />
upstroke strum.<br />
down<br />
The notes are sorted in descending order. After executing this Job with<br />
this setting, execute <strong>the</strong> Separate Chord Job to create a guitar-like<br />
downstroke strum.<br />
up&down<br />
Sorts chord notes on downbeats in ascending order and chord notes<br />
on up beats in descending order, based on <strong>the</strong> Grid setting, below.<br />
After executing this Job with this setting, execute <strong>the</strong> Separate Chord<br />
Job to create a guitar-like upstroke and downstroke strum.<br />
down&up<br />
Sorts chord notes on downbeats in descending order and chord notes<br />
on up beats in ascending order. After executing this Job with this<br />
setting, execute <strong>the</strong> Separate Chord Job to create a guitar-like<br />
upstroke and downstroke strum.<br />
3 Grid<br />
Determines <strong>the</strong> type of note that serves as <strong>the</strong> basis for <strong>the</strong><br />
Chord Sort Job.<br />
Settings: 32nd note, 16th note triplet, 16th note, 8th note triplet, 8th<br />
note, 1/4 note triplet, 1/4 note<br />
n You can call up <strong>the</strong> list and select <strong>the</strong> desired item by pressing<br />
<strong>the</strong> [SF6] LIST button. For details, see page 82.<br />
09: Separate Chord<br />
This Job slightly separates notes in chords within <strong>the</strong><br />
specified range, inserting a specified number of clocks<br />
between each note. Use this Job after <strong>the</strong> Chord Sort Job<br />
above, to create guitar-like upstroke or downstroke effects.<br />
MOTIF <strong>XS</strong> Owner’s <strong>Manual</strong><br />
1<br />
2<br />
1 Track and range<br />
Determines <strong>the</strong> Song track (01 – 16, all) and range<br />
(Measure : Beat : Clock) over which <strong>the</strong> Job is applied.<br />
2 Clock<br />
Determines <strong>the</strong> number of clock cycles inserted between<br />
adjacent chord notes. Depending on <strong>the</strong> setting here, <strong>the</strong><br />
note event may overstep <strong>the</strong> next note or <strong>the</strong> range (set<br />
above). If such a situation occurs, <strong>the</strong> overstepping note<br />
events are moved to <strong>the</strong> point (clock) before <strong>the</strong> next note<br />
or within <strong>the</strong> range when executing <strong>the</strong> Job.<br />
Settings: 000 – 999<br />
[F3] Event Jobs<br />
01: Shift Clock<br />
This Job shifts all data events in <strong>the</strong> specified range<br />
forward or backward by <strong>the</strong> specified number of clocks.<br />
1<br />
2<br />
3<br />
1 Track and range<br />
Determines <strong>the</strong> Song track (01 – 16, tempo, scene, all) and<br />
range (Measure : Beat : Clock) over which <strong>the</strong> Job is<br />
applied.<br />
2 Clock<br />
Determines <strong>the</strong> amount by which <strong>the</strong> data will be delayed<br />
or advanced in measures, beats, and clocks.<br />
Settings: 001:1:000 – 999:4:479 (when <strong>the</strong> Meter is 4/4)<br />
n The available values of <strong>the</strong> beat and clock differ depending on<br />
<strong>the</strong> meter.
3 Direction<br />
Determines <strong>the</strong> direction in which <strong>the</strong> data will be shifted.<br />
Advance moves <strong>the</strong> data toward <strong>the</strong> beginning of <strong>the</strong><br />
sequence, while Delay shifts <strong>the</strong> data toward <strong>the</strong> end of <strong>the</strong><br />
sequence.<br />
Settings: Advance, Delay<br />
02: Copy Event<br />
This Job copies all data from a specified source range to a<br />
specified destination location.<br />
1<br />
3<br />
1 Track and range<br />
Determines <strong>the</strong> Song track (01 – 16, tempo, scene, all) and<br />
range (Measure : Beat : Clock) over which <strong>the</strong> Job is<br />
applied.<br />
2 Number of Times<br />
Determines <strong>the</strong> number of times <strong>the</strong> data is copied.<br />
Settings: x 01 – x 99<br />
3 Track and location<br />
Determines <strong>the</strong> destination track (01 – 16, tempo, scene,<br />
all) and range (Measure : Beat : Clock) of <strong>the</strong> destination.<br />
CAUTION<br />
When Copy Event is executed, any data already existing at <strong>the</strong><br />
Destination location will be overwritten.<br />
03: Erase Event<br />
This Job clears all specified events from <strong>the</strong> specified<br />
range, effectively producing a segment of silence.<br />
1<br />
2<br />
1 Track and range<br />
Determines <strong>the</strong> Song track (01 – 16, tempo, scene, all) and<br />
range (Measure : Beat : Clock) over which <strong>the</strong> Job is applied.<br />
2<br />
2 Event Type<br />
Song Job<br />
Determines <strong>the</strong> event type to be erased. All events are<br />
cleared when “all” is selected. Individual Control numbers<br />
can be specified when erasing CC & Ch.Mode events.<br />
Settings:<br />
When Track is set to one of 01 – 16:<br />
Note, Program Change, Pitch Bend, CC & Ch.Mode (Control Change<br />
and Channel Mode Message)*, Ch After Touch (Channel Aftertouch),<br />
Poly After Touch (Polyphonic Aftertouch), System Exclusive, all<br />
* You can specify <strong>the</strong> Control Number (000-127, all).<br />
When Track is set to “tempo”:<br />
Tempo Change<br />
When Track is set to “scene”:<br />
Scene Memory, Track Mute<br />
n You can call up <strong>the</strong> list and select <strong>the</strong> desired item by pressing<br />
<strong>the</strong> [SF6] LIST button. For details, see page 82.<br />
04: Extract Event<br />
This Job moves all instances of specified event data from a<br />
specified range of a track to <strong>the</strong> same range in a different<br />
track.<br />
1<br />
2<br />
3<br />
1 Track and range<br />
Determines <strong>the</strong> Song track (01 – 16) and range (Measure :<br />
Beat : Clock) over which <strong>the</strong> Job is applied.<br />
2 Event Type<br />
Determines <strong>the</strong> event type to be extracted. Specific Note<br />
Numbers and Control Numbers (of <strong>the</strong> Control Change and<br />
Channel Mode message) can also be specified as<br />
required.<br />
Settings: Note*, Program Change, Pitch Bend, CC & Ch.Mode<br />
(Control Change and Channel Mode Message)*, Ch After<br />
Touch (Channel Aftertouch), Poly After Touch (Polyphonic<br />
Aftertouch), System Exclusive<br />
* You can specify <strong>the</strong> Note Number (C -2 – G8, all) and<br />
Control Number (000 – 127, all) respectively.<br />
n When <strong>the</strong> Event Type is set to “Note,” you can also set <strong>the</strong> Key<br />
directly from <strong>the</strong> keyboard by holding down <strong>the</strong> [SF6] KBD<br />
button and pressing <strong>the</strong> desired key.<br />
3 Track<br />
Determines <strong>the</strong> destination track (01 – 16).<br />
CAUTION<br />
The original data in <strong>the</strong> source range specified above will be<br />
erased.<br />
Voice mode<br />
Performance<br />
mode<br />
Sampling<br />
mode 1<br />
Song mode<br />
Pattern mode<br />
Mixing mode<br />
Sampling<br />
mode 2<br />
Master mode<br />
Utility mode<br />
File mode<br />
MOTIF <strong>XS</strong> Owner’s <strong>Manual</strong> 201<br />
Reference
Reference<br />
202<br />
Song Job<br />
Voice mode Performance Sampling Song mode Pattern mode Mixing mode Sampling Master mode Utility mode File mode<br />
mode mode 1<br />
mode 2<br />
05: Create Continuous Data<br />
This Job creates continuous pitch bend or control change<br />
data over <strong>the</strong> specified range.<br />
1<br />
2<br />
3<br />
4<br />
5<br />
6<br />
1 Track and range<br />
Determines <strong>the</strong> Song track (01 – 16, tempo, all) and range<br />
(Measure : Beat : Clock) over which <strong>the</strong> Job is applied.<br />
2 Event Type<br />
Determines <strong>the</strong> event type to be created.<br />
Settings:<br />
When <strong>the</strong> Track is set to one of 01 – 16 and all:<br />
Pitch Bend, Control Change*, Ch. After Touch (Channel Aftertouch),<br />
System Exclusive<br />
*You can also specify <strong>the</strong> Control Number (0 – 119)<br />
When <strong>the</strong> Track is set to “tempo”:<br />
Tempo Change<br />
n You can produce accelerando/ritardando by applying this Job<br />
to <strong>the</strong> Tempo track. This is useful, for example, in slowing<br />
down <strong>the</strong> tempo in <strong>the</strong> Ending section of a Song.<br />
n When “System Exclusive” is selected, <strong>the</strong> continuous data of<br />
<strong>the</strong> Master Volume is created.<br />
n You can call up <strong>the</strong> list and select <strong>the</strong> desired one by pressing<br />
<strong>the</strong> [SF6] LIST button. For details, see page 82.<br />
3 Data Range<br />
Determines <strong>the</strong> lower and upper limits for <strong>the</strong> data range to<br />
be created.<br />
Settings: 0 – 127 (-8192 – +8191 when <strong>the</strong> Event Type is set to “Pitch<br />
Bend” and 5.0 – 300.0 when <strong>the</strong> Event Type is set to “Tempo<br />
Change.”)<br />
4 Clock<br />
Determines <strong>the</strong> number of clocks to be inserted between<br />
each created event.<br />
Settings: 001 – 999<br />
5 Curve<br />
Determines <strong>the</strong> curve of <strong>the</strong> continuous data. Refer to <strong>the</strong><br />
graph below for approximate curve shapes.<br />
Settings: -16 – +16<br />
Start point<br />
Curve = +16 Curve = 0 (linear) Curve = -16<br />
MOTIF <strong>XS</strong> Owner’s <strong>Manual</strong><br />
End point<br />
The distance specified by Clock<br />
6 Number of Times<br />
Determines <strong>the</strong> number of times <strong>the</strong> data creation is to be<br />
repeated. For example, if data is created in <strong>the</strong> range<br />
M001:1:000 – M003:1:000 and this parameter is set to 03,<br />
<strong>the</strong> same data will be created at M003:1:000 – M005:1:000<br />
and M005:1:000 – M007:1:000. This Job lets you insert<br />
continuous volume (expression) or filter cutoff variations to<br />
create tremolo or wah effects.<br />
Settings: x 01 – x 99<br />
06: Thin Out<br />
This Job thins out or selectively removes <strong>the</strong> specified type<br />
of continuous data in <strong>the</strong> specified range—allowing you to<br />
free up memory space for o<strong>the</strong>r data or fur<strong>the</strong>r recording.<br />
1<br />
2<br />
1 Track and range<br />
Determines <strong>the</strong> Song track (01 – 16, tempo, all) and range<br />
(Measure : Beat : Clock) over which <strong>the</strong> Job is applied.<br />
2 Event Type<br />
Determines <strong>the</strong> event type to be thinned. The Thin Out Job<br />
will not work on continuous data that has a clock interval of<br />
greater than 60 clocks per event.<br />
Settings:<br />
When <strong>the</strong> Track is set to one of 01 – 16 and all:<br />
Pitch Bend, CC & Ch. Mode (Control Change and Channel Mode<br />
Message)*, Ch. After Touch (Channel Aftertouch), Poly After Touch<br />
(Polyphonic Aftertouch)<br />
*You can also specify <strong>the</strong> Control Number (0 – 127, all)<br />
When <strong>the</strong> Track is set to “tempo”:<br />
Tempo Change
07: Modify Control Data<br />
This Job lets you change <strong>the</strong> values of specified data such<br />
as Pitch Bend and Control Change in <strong>the</strong> specified range.<br />
Data changes are calculated as follows:<br />
Modified value = (original value x Rate) + Offset.<br />
Any result lower than <strong>the</strong> minimum is set to <strong>the</strong> minimum;<br />
any result higher than <strong>the</strong> maximum is set to <strong>the</strong> maximum.<br />
1<br />
2<br />
3<br />
4<br />
5<br />
1 Track and range<br />
Determines <strong>the</strong> Song track (01 – 16, tempo, all) and range<br />
(Measure : Beat : Clock) over which <strong>the</strong> Job is applied.<br />
2 Event Type<br />
Determines <strong>the</strong> event type to be modified.<br />
Settings:<br />
When <strong>the</strong> Track is set to one of 01 – 16 and all:<br />
Pitch Bend, CC & Ch. Mode (Control Change and Channel Mode<br />
Message)*, Ch. After Touch (Channel Aftertouch), Poly After Touch<br />
(Polyphonic Aftertouch)<br />
*You can also specify <strong>the</strong> Control Number (0 – 127, all)<br />
When <strong>the</strong> Track is set to “tempo”:<br />
Tempo Change<br />
3 Set All<br />
Sets all target events to <strong>the</strong> same fixed value. When set to<br />
“off” <strong>the</strong> Set All parameter has no effect. When set to a<br />
value o<strong>the</strong>r than “off,” <strong>the</strong> Rate and Offset parameters are<br />
unavailable and cannot be set.<br />
Settings: off, 000 – 127 (off, -8192 - +8191 when <strong>the</strong> Event Type is set<br />
to “Pitch Bend” and off, 5.0 – 300.0 when <strong>the</strong> Event Type is<br />
set to “Tempo Change.”)<br />
4 Rate<br />
Determines <strong>the</strong> percentage by which <strong>the</strong> target events will<br />
be shifted from <strong>the</strong>ir original values. When <strong>the</strong> Set All<br />
parameter (above) is set to o<strong>the</strong>r than “off,” this parameter<br />
cannot be set.<br />
Settings: 000% – 200%<br />
5 Offset<br />
Adds a fixed value to <strong>the</strong> Rate-adjusted event values.<br />
When <strong>the</strong> Set All parameter (above) is set to o<strong>the</strong>r than<br />
“off,” this parameter cannot be set.<br />
Settings: -127 – +127 (-8192 – +8191 for pitch bend)<br />
08: Beat Stretch<br />
Song Job<br />
This Job performs time-expansion or <strong>com</strong>pression over <strong>the</strong><br />
selected range.<br />
1<br />
2<br />
1 Track and range<br />
Determines <strong>the</strong> Song track (01 – 16, tempo, all) and range<br />
(Measure : Beat : Clock) over which <strong>the</strong> Job is applied.<br />
2 Rate<br />
Determines <strong>the</strong> amount of time expansion or <strong>com</strong>pression<br />
as a percentage. Settings higher than 100% produce<br />
expansion, and settings below 100% produce<br />
<strong>com</strong>pression. A setting of 100 produces no change.<br />
Settings: 025% – 400%<br />
n Only <strong>the</strong> end point of <strong>the</strong> range will be shifted forward or<br />
backward by executing <strong>the</strong> Beat Stretch Job. The data outside<br />
<strong>the</strong> specified range will be maintained. When expanding <strong>the</strong><br />
data, <strong>the</strong> converted data may overlap <strong>the</strong> data outside <strong>the</strong><br />
range. When <strong>com</strong>pressing <strong>the</strong> data, an interval of silence will<br />
be created between <strong>the</strong> end of <strong>the</strong> <strong>com</strong>pressed data and <strong>the</strong><br />
start of <strong>the</strong> next data outside <strong>the</strong> range.<br />
[F4] Measure Jobs<br />
01: Create Measure<br />
This Job creates empty measures at <strong>the</strong> specified location<br />
in all tracks. When empty measures are inserted, measure<br />
and meter data following <strong>the</strong> insert point are moved<br />
forward accordingly. If <strong>the</strong> insert point is set after <strong>the</strong> last<br />
measure containing data, only <strong>the</strong> meter data at that point<br />
is set without actually inserting any measures.<br />
1<br />
2<br />
3<br />
Voice mode<br />
Performance<br />
mode<br />
Sampling<br />
mode 1<br />
Song mode<br />
Pattern mode<br />
Mixing mode<br />
Sampling<br />
mode 2<br />
Master mode<br />
Utility mode<br />
File mode<br />
MOTIF <strong>XS</strong> Owner’s <strong>Manual</strong> 203<br />
Reference
Reference<br />
204<br />
Song Job<br />
Voice mode Performance Sampling Song mode Pattern mode Mixing mode Sampling Master mode Utility mode File mode<br />
mode mode 1<br />
mode 2<br />
1 Insertion point<br />
Determines <strong>the</strong> insert point (measure number) at which <strong>the</strong><br />
newly created blank measures will be inserted.<br />
Settings: 001 – 999<br />
2 Number of measures to be inserted<br />
Determines <strong>the</strong> number of empty measures to be created<br />
and inserted.<br />
Settings: 01 – 99<br />
3 Meter of measures to be inserted<br />
Determines <strong>the</strong> meter or time signature of <strong>the</strong> measures to<br />
be created. You may find it convenient to use this<br />
parameter when you need to create a Song that<br />
incorporates meter changes.<br />
Settings: 1/16 – 16/16, 1/8 – 16/8, 1/4 – 8/4<br />
02: Delete Measure<br />
This Job deletes <strong>the</strong> specified measures. Measure and<br />
meter data following <strong>the</strong> deleted measures are moved<br />
backward accordingly.<br />
1<br />
Source data<br />
1 Delete range<br />
Specifies <strong>the</strong> range of measures to be deleted.<br />
Settings: 001 – 999<br />
001~004 005 ~ 016<br />
8 measures inserted at measure 5<br />
001~004 005 ~ 012 013 ~ 024<br />
Source data<br />
MOTIF <strong>XS</strong> Owner’s <strong>Manual</strong><br />
The inserted 8 measures<br />
001~004 005 ~ 012 013 ~ 024<br />
Measures M005 – M013 deleted<br />
001~004 005 ~ 016<br />
[F5] Track Jobs<br />
01: Copy Track<br />
This Job copies all data of <strong>the</strong> selected type from a<br />
specified source track to a specified destination track.<br />
1<br />
3<br />
1 Source Song and Track<br />
Determines <strong>the</strong> copy source Song and track (01 – 16).<br />
When <strong>the</strong> Current box is checked, <strong>the</strong> current Song is<br />
selected as Source.<br />
2 Data Type to be copied<br />
Determines <strong>the</strong> type(s) of data to be copied.<br />
Settings: Sequencer Event (all events in <strong>the</strong> track), Play Effect, Mix<br />
Part Parameter (all Mixing Part parameters), Sample Voice<br />
n When <strong>the</strong>re is no memory available in <strong>the</strong> destination Song for<br />
Sample Voice data, an alert message will appear on <strong>the</strong><br />
display and <strong>the</strong> Sample Voice data will not be copied even<br />
though <strong>the</strong> check box of <strong>the</strong> Sample is marked. If this occurs,<br />
use <strong>the</strong> Delete Job (page 241) in <strong>the</strong> Mixing Voice Job to<br />
delete any unused Sample Voices, <strong>the</strong>n try again.<br />
3 Destination Song and Track<br />
Determines <strong>the</strong> destination Song and track (01 – 16). When<br />
<strong>the</strong> Current box is checked, <strong>the</strong> current Song is selected as<br />
Destination.<br />
CAUTION<br />
The copy operation overwrites any data previously existing on <strong>the</strong><br />
destination track.<br />
CAUTION<br />
Undo/Redo cannot be used to undo/redo a Sample Voice copy<br />
operation.<br />
2
02: Exchange Track<br />
This Job exchanges or “swaps” <strong>the</strong> specified type of data<br />
between two specified tracks in <strong>the</strong> current Song.<br />
1<br />
2<br />
1<br />
1 Track<br />
Determines <strong>the</strong> tracks (01 – 16) to which <strong>the</strong> Job is applied.<br />
2 Data Type<br />
Determines <strong>the</strong> type(s) of data to be exchanged. Select <strong>the</strong><br />
desired type by checkmarking <strong>the</strong> appropriate box.<br />
Settings: Sequencer Event (all events in <strong>the</strong> track), Play Effect, Mix<br />
Part Parameters<br />
03: Mix Track<br />
This job mixes all data from two selected tracks (1 and<br />
2), and places <strong>the</strong> result in track 2. Keep in mind that<br />
applying this Job to tracks with Sample Voices does not<br />
mix <strong>the</strong> Sample Voices. The Sample Voice itself will not be<br />
mixed.<br />
1 2<br />
2<br />
04: Clear Track<br />
This Job deletes all data of <strong>the</strong> selected type from <strong>the</strong><br />
selected track.<br />
1<br />
2<br />
1 Track<br />
Determines <strong>the</strong> Song track (01 – 16, tempo, scene, all) to<br />
which <strong>the</strong> Job is applied.<br />
2 Data type to be cleared<br />
Song Job<br />
Determines <strong>the</strong> type(s) of data to be cleared. Select <strong>the</strong><br />
desired type by checkmarking <strong>the</strong> appropriate box.<br />
Settings: Sequencer Event (all events in <strong>the</strong> track), Play Effect, Mix<br />
Part Parameter (all Mixing Part parameters), Sample Voice<br />
CAUTION<br />
Undo/Redo cannot be used to undo/redo a Clear operation for<br />
tracks that contain sample data.<br />
n The Waveform on DIMM cannot be deleted via this Job even if<br />
<strong>the</strong> Sample Voice box is checked. If you want to actually<br />
delete <strong>the</strong> Waveform, use <strong>the</strong> Delete Job (page 177) in <strong>the</strong><br />
Sampling Job mode.<br />
05: Normalize Play Effect<br />
This job rewrites <strong>the</strong> data in <strong>the</strong> selected track so that it<br />
incorporates <strong>the</strong> current Play Effect settings.<br />
1<br />
1 Track<br />
Determines <strong>the</strong> Song track (01 – 16, all) to which <strong>the</strong> Job is<br />
applied.<br />
06: Divide Drum Track<br />
This Job separates <strong>the</strong> note events in a drum performance<br />
assigned to a specified track, and places <strong>the</strong> notes<br />
corresponding to different drum instruments in separate<br />
tracks (tracks 1 through 8). The division table below is<br />
designed assuming <strong>the</strong> GM Drum Voice is used. If you<br />
want to apply this Job to <strong>the</strong> sequence data using a Drum<br />
Voice o<strong>the</strong>r than a GM Voice, you should confirm <strong>the</strong><br />
arrangement of <strong>the</strong> drum/percussion instruments for each<br />
Drum Voice by using <strong>the</strong> separate Data List booklet.<br />
1<br />
Voice mode<br />
Performance<br />
mode<br />
Sampling<br />
mode 1<br />
Song mode<br />
Pattern mode<br />
Mixing mode<br />
Sampling<br />
mode 2<br />
Master mode<br />
Utility mode<br />
File mode<br />
MOTIF <strong>XS</strong> Owner’s <strong>Manual</strong> 205<br />
Reference
Reference<br />
206<br />
Song Job<br />
Voice mode Performance Sampling Song mode Pattern mode Mixing mode Sampling Master mode Utility mode File mode<br />
mode mode 1<br />
mode 2<br />
1 Track<br />
Determines <strong>the</strong> Song track (01 – 16) to which <strong>the</strong> Job is<br />
applied.<br />
Track 1 Bass Drum<br />
Track 2 Click, Bass Drum, Snare Drum, etc.<br />
Track 3 Snare Drum<br />
Track 4 Brush SD, Side Stick, Hand Clap, etc.<br />
Track 5 Hi Hat<br />
Track 6 Ride Cymbal<br />
Track 7 Tom, Crash/Splash/Chinese Cymbal<br />
Track 8 Percussion, etc.<br />
* The drum instruments of <strong>the</strong> different note numbers will be<br />
assigned to each of tracks, meaning that <strong>the</strong> Bass Drum of Track 1<br />
is different from <strong>the</strong> Bass Drum of Track 2, for example.<br />
CAUTION<br />
Executing <strong>the</strong> Divide Drum Track overwrites any data previously<br />
existing on <strong>the</strong> destination tracks 1 – 8. Important data should<br />
always be saved to a USB storage device connected to <strong>the</strong> USB TO<br />
DEVICE terminal or to a <strong>com</strong>puter connected to <strong>the</strong> same network<br />
as <strong>the</strong> MOTIF <strong>XS</strong> (page 278).<br />
07: Put Track to Arpeggio<br />
This Job copies data in <strong>the</strong> specified measures of a track<br />
for creating Arpeggio data. Up to 16 unique note numbers<br />
can be recorded to <strong>the</strong> Arpeggio track. If more than 16<br />
different note numbers have been recorded to <strong>the</strong> MIDI<br />
sequence data, <strong>the</strong> Convert operation reduces <strong>the</strong> notes in<br />
excess of <strong>the</strong> limit. Because of this, be careful to record<br />
only up to 16 different notes when you create an Arpeggio,<br />
especially when using all four tracks.<br />
1<br />
2<br />
5<br />
6<br />
1 Range<br />
Determines <strong>the</strong> range of measures to be copied to <strong>the</strong><br />
Arpeggio data.<br />
Settings: 001 – 999<br />
2 ARP Category (Arpeggio Category)<br />
Determines <strong>the</strong> Category setting (Main Category and Sub<br />
Category) for <strong>the</strong> created Arpeggio data. The Main<br />
Categories are listed on page 62.<br />
n You can call up <strong>the</strong> list and select <strong>the</strong> desired one by pressing<br />
<strong>the</strong> [SF6] LIST button. For details, see page 82.<br />
MOTIF <strong>XS</strong> Owner’s <strong>Manual</strong><br />
3<br />
4<br />
3 ARP No. (Arpeggio number/name)<br />
Determines <strong>the</strong> User Arpeggio number (001 – 256) and<br />
name as destination. The Arpeggio name can contain up to<br />
20 characters. You can call up <strong>the</strong> Character List display<br />
by pressing <strong>the</strong> [SF6] CHAR button and enter <strong>the</strong> name.<br />
For detailed instructions in naming, refer to “Basic<br />
Operation” on page 82.<br />
CAUTION<br />
Any previous Arpeggio data in this number will be overwritten.<br />
4 Original Notes Root<br />
Determines <strong>the</strong> root note when <strong>the</strong> Convert Type of any<br />
track is set to “org notes.”<br />
Settings: C -2 – G8<br />
n You can also set <strong>the</strong> Key directly from <strong>the</strong> keyboard, by<br />
holding down <strong>the</strong> [SF6] KBD button and pressing <strong>the</strong> desired<br />
key. For details, see page 82.<br />
5 Track<br />
Determines <strong>the</strong> track of <strong>the</strong> source Song for each Arpeggio<br />
track.<br />
6 Convert Type<br />
Determines how <strong>the</strong> MIDI sequence data (of Song tracks)<br />
will be converted to Arpeggio data from <strong>the</strong> three ways<br />
below. This parameter can be set for each track.<br />
Settings: normal, fixed, org notes<br />
normal<br />
The Arpeggio is played back using only <strong>the</strong> played note and its octave<br />
notes.<br />
fixed<br />
Playing any note(s) will trigger <strong>the</strong> same MIDI sequence data.<br />
org notes (original notes)<br />
Basically same as “fixed” with <strong>the</strong> exception that <strong>the</strong> Arpeggio<br />
playback notes differ according to <strong>the</strong> played chord.<br />
08: Copy Phrase<br />
This Job copies <strong>the</strong> Phrase (created in <strong>the</strong> Pattern mode)<br />
to a specified track of <strong>the</strong> current Song.<br />
1<br />
2<br />
3<br />
1 Source Pattern, Phrase<br />
Determines <strong>the</strong> source Pattern and Phrase number.<br />
2 Copy Sample Voice<br />
When this box is checkmarked, Sample Voices assigned to<br />
<strong>the</strong> source phrase (actually <strong>the</strong> corresponding Mixing Part)<br />
are copied to <strong>the</strong> destination track, and are assigned to <strong>the</strong>
corresponding Mixing Part of <strong>the</strong> current Song. This<br />
parameter has no effect when no Sample Voice is used by<br />
<strong>the</strong> selected phrase.<br />
3 Track, Measure<br />
Determines <strong>the</strong> destination Track (01 – 16) and Measure<br />
number (001 – 999) at which <strong>the</strong> copied Phrase starts.<br />
CAUTION<br />
This Job overwrites any data already existing in <strong>the</strong> destination<br />
track with <strong>the</strong> exception of <strong>the</strong> Mixing setup.<br />
[F6] Song Jobs<br />
01: Copy Song<br />
This Job copies all data from a selected source Song to a<br />
selected destination Song.<br />
1<br />
2<br />
1 Source Song<br />
2 Destination Song<br />
CAUTION<br />
This Job overwrites any data already existing in <strong>the</strong> destination<br />
Song.<br />
02: Split Song to Pattern<br />
This Job allows you to copy a Part of <strong>the</strong> current Song to a<br />
specific Pattern,<br />
1<br />
2<br />
3<br />
1 Range<br />
Determines <strong>the</strong> range of measures to be copied to a<br />
Pattern.<br />
Settings: 001 – 999<br />
2 Copy Sample Voice<br />
Song Job<br />
When this box is checkmarked, Sample Voices used by <strong>the</strong><br />
source Song are copied to <strong>the</strong> destination Pattern as<br />
Sample Voices, and are assigned to <strong>the</strong> Mixing Part<br />
corresponding to <strong>the</strong> destination track. This checkbox has<br />
no effect if no Sample Voices are assigned to <strong>the</strong> tracks in<br />
<strong>the</strong> source Song.<br />
3 Pattern, Section<br />
Determines <strong>the</strong> destination Pattern and Section (A – P).<br />
CAUTION<br />
This Job overwrites any data including <strong>the</strong> Mixing setup already<br />
existing in <strong>the</strong> destination Pattern and section.<br />
03: Clear Song<br />
This job deletes all data (including <strong>the</strong> Sample Voices and<br />
Mixing Voices) from <strong>the</strong> selected Song or all Songs. It can<br />
also be used to delete all 64 Songs at <strong>the</strong> same time.<br />
1<br />
1 Song<br />
Determines <strong>the</strong> Song number to be erased.<br />
n The Waveform on DIMM cannot be deleted via this Job even if<br />
<strong>the</strong> Sample Voice is used in <strong>the</strong> specified Song. If you want to<br />
actually delete <strong>the</strong> Waveform assigned to <strong>the</strong> Sample Voice<br />
used in <strong>the</strong> specified Song, use <strong>the</strong> Delete Job (page 177) in<br />
<strong>the</strong> Sampling Job mode.<br />
Voice mode<br />
Performance<br />
mode<br />
Sampling<br />
mode 1<br />
Song mode<br />
Pattern mode<br />
Mixing mode<br />
Sampling<br />
mode 2<br />
Master mode<br />
Utility mode<br />
File mode<br />
MOTIF <strong>XS</strong> Owner’s <strong>Manual</strong> 207<br />
Reference
Reference<br />
Voice mode Performance Sampling Song mode Pattern mode Mixing mode Sampling Master mode Utility mode File mode<br />
mode mode 1<br />
mode 2<br />
208<br />
MOTIF <strong>XS</strong> Owner’s <strong>Manual</strong><br />
Pattern Playback<br />
The Pattern mode lets you play, record, edit and play your own original rhythm patterns. The Pattern Play mode is <strong>the</strong> main<br />
‘portal’ by which you enter <strong>the</strong> Pattern mode, and it is here where you select and play a Pattern. You can also create your<br />
own Patterns by assembling Phrases—short rhythmic passages and ‘building blocks’—and create Pattern Chains in which<br />
Patterns can be <strong>com</strong>bined toge<strong>the</strong>r in custom order. To enter <strong>the</strong> Pattern Play mode, simply press <strong>the</strong> [PATTERN] button.<br />
n The word “Pattern” refers to a short rhythmic passage of several measures which is looped and played back indefinitely. A Pattern includes<br />
16 variations called “Sections.” You can use Sections by changing <strong>the</strong>m during playback. A Pattern consists of 16 tracks and can be created<br />
by assigning a Phrase to each track from <strong>the</strong> Patch display (page 212). For details about <strong>the</strong> Patterns, Sections and Phrases, see page 60.<br />
n From <strong>the</strong> Play display in <strong>the</strong> Pattern Play mode, you can select <strong>the</strong> Voice of <strong>the</strong> Mixing Part corresponding to <strong>the</strong> current Track by pressing<br />
<strong>the</strong> [CATEGORY SEARCH] button.<br />
Pattern Playback Procedure<br />
1 Press <strong>the</strong> [PATTERN] button to call up <strong>the</strong><br />
Pattern Play display (page 210).<br />
Section Pattern number, Pattern name<br />
2 Select a Pattern.<br />
Move <strong>the</strong> cursor to <strong>the</strong> Pattern number, <strong>the</strong>n select <strong>the</strong><br />
desired Pattern by using <strong>the</strong> data dial, [INC/YES] and<br />
[DEC/NO] button. The name of <strong>the</strong> selected Pattern is<br />
displayed. If you press <strong>the</strong> [PROGRAM] button so that<br />
its lamp lights, you can select <strong>the</strong> desired Pattern by<br />
using <strong>the</strong> Group [A] – [D] buttons and <strong>the</strong> Number [1] –<br />
[16] buttons. Pattern numbers and <strong>the</strong> corresponding<br />
buttons are as follows.<br />
Button Combinations Pattern Number<br />
[A]+[1] – [16] 01 – 16<br />
[B]+[1] – [16] 17 – 32<br />
[C]+[1] – [16] 33 – 48<br />
[D]+[1] – [16] 49 – 64<br />
3 Select a Section (A – P) of <strong>the</strong> selected Pattern.<br />
Move <strong>the</strong> cursor to <strong>the</strong> Section, <strong>the</strong>n select <strong>the</strong> desired<br />
Section by using <strong>the</strong> data dial, [INC/YES] and [DEC/<br />
NO] button. If you press <strong>the</strong> [TRACK] button so that its<br />
lamp lights, you can select <strong>the</strong> desired Section by<br />
using <strong>the</strong> SECTION [A] – [H] buttons for Sections A – H,<br />
[USER 1] – [USER DR] buttons and [ETHNIC] button for<br />
Sections I – P.<br />
SECTION<br />
I-P<br />
SECTION<br />
A-H<br />
PRE 1 PRE 2 PRE 3 PRE 4 PRE 5 PRE 6 PRE 7 PRE 8<br />
PIANO KEYBOARD ORGAN GUITAR BASS STRINGS BRASS<br />
USER 1 USER 2 USER 3 GM GM DR PRE DR USER DR<br />
SYN LEAD<br />
PADS/<br />
CHOIRS<br />
A B C D E F G H<br />
SUB CATEGORY<br />
4 Press <strong>the</strong> [F] (Play) button to start playback of<br />
<strong>the</strong> Pattern.<br />
Pattern playback continues repeatedly until you press<br />
<strong>the</strong> [J] (Stop) button. Press <strong>the</strong> [J] (Stop) button to<br />
stop playback of <strong>the</strong> Pattern. Press <strong>the</strong> [F] (Play)<br />
button again to resume playback from that point.<br />
Playback types<br />
SYN COMP CHROMATIC DRUM/<br />
PERCUSSION PERCUSSION<br />
SEQ TRANSPORT<br />
LOCATE 1 2<br />
SOUND<br />
EFX<br />
MUSICAL<br />
EFX<br />
Starting playback by pressing a note<br />
SAX/<br />
WOODWIND<br />
ETHNIC<br />
When <strong>the</strong> Keyboard Start function is set to on, Pattern<br />
playback begins as soon as you press a key on <strong>the</strong><br />
keyboard. Move <strong>the</strong> cursor to <strong>the</strong> Keyboard Start icon <strong>the</strong>n<br />
press <strong>the</strong> [INC/YES] button to enable Keyboard Start.<br />
In this status, press any key to start Pattern playback.<br />
Keyboard Start
Playback from <strong>the</strong> middle of <strong>the</strong> Pattern<br />
To start playback of <strong>the</strong> Pattern from midway through <strong>the</strong><br />
Pattern, set <strong>the</strong> desired location by using <strong>the</strong> controls<br />
below, <strong>the</strong>n press <strong>the</strong> [F] (Play) button. These operations<br />
can also be executed during playback.<br />
Forward Press <strong>the</strong> [H] (Forward) button.<br />
Fast forward Hold <strong>the</strong> [H] (Forward) button.<br />
Rewind Press <strong>the</strong> [G] (Rewind) button.<br />
Fast Rewind Hold <strong>the</strong> [G] (Rewind) button.<br />
Move to <strong>the</strong> top of <strong>the</strong> Pattern Press <strong>the</strong> [P] button.<br />
Fast Forward/Rewind<br />
This operation is <strong>the</strong> same as in <strong>the</strong> Song Play mode. See<br />
page 179.<br />
Jumping to a specific location in <strong>the</strong> Pattern<br />
This operation is <strong>the</strong> same as in <strong>the</strong> Song Play mode. See<br />
page 179.<br />
Changing <strong>the</strong> Section during playback<br />
To change Sections during playback, press <strong>the</strong> [TRACK]<br />
button (<strong>the</strong> lamp lights), <strong>the</strong>n use <strong>the</strong> SECTION [A] – [H]<br />
buttons, [USER1] – [USER DR] buttons and [ETHNIC]<br />
button. When selecting a different Section during Pattern<br />
playback, “NEXT” and <strong>the</strong> next Section name appear in <strong>the</strong><br />
Section column at <strong>the</strong> top of <strong>the</strong> display. After <strong>the</strong> current<br />
Section reaches <strong>the</strong> specified timing, <strong>the</strong> next Section<br />
starts. If you record rhythm patterns such as intro, melody<br />
A, fill-in, main <strong>the</strong>me, and ending to each of Sections, you<br />
can play an entire Song by selecting <strong>the</strong> appropriate<br />
Sections during playback.<br />
Current Section or Next Section is indicated here.<br />
Track mute/solo<br />
This operation is <strong>the</strong> same as in <strong>the</strong> Song Play mode. See<br />
page 179.<br />
Change <strong>the</strong> tempo<br />
This operation is <strong>the</strong> same as in <strong>the</strong> Song Play mode. See<br />
page 179.<br />
Assigning various settings related to<br />
Pattern playback (Pattern Scene)<br />
Pattern Playback<br />
From <strong>the</strong> Pattern Play display, you can assign five different<br />
“snapshots” of important Pattern-related parameters such<br />
as transpose, tempo, track mute/solo status, and <strong>the</strong> basic<br />
Mixing setup to <strong>the</strong> [SF1] – [SF5] buttons as Pattern<br />
Scenes. One of <strong>the</strong> convenient advantages of Pattern<br />
Scene is that it lets you instantly and automatically execute<br />
parameter settings that normally require many button<br />
presses or controller operations. Use it during Pattern<br />
recording or playback to make instantaneous setting<br />
changes. Pattern Scene parameters are same as <strong>the</strong> ones<br />
of Song Scene. See page 179.<br />
Registering <strong>the</strong> Pattern Scene<br />
After making <strong>the</strong> desired settings for <strong>the</strong> Scene,<br />
simultaneously hold down <strong>the</strong> [STORE] button and press<br />
one of <strong>the</strong> [SF1] to [SF5] buttons. The 8th note icon is shown<br />
in <strong>the</strong> tab corresponding to <strong>the</strong> Sub Function button to<br />
which <strong>the</strong> Pattern Scene is registered. Press <strong>the</strong> [STORE]<br />
button to store <strong>the</strong> Pattern data including <strong>the</strong> Pattern Scene<br />
setting.<br />
CAUTION<br />
The Pattern Scene settings registered to <strong>the</strong> [SF1] – [SF5] buttons<br />
will be lost if you change <strong>the</strong> Pattern or turn <strong>the</strong> power off without<br />
executing <strong>the</strong> Store operation.<br />
Recalling <strong>the</strong> Pattern Scene<br />
You can recall <strong>the</strong> Pattern Scene by press one of <strong>the</strong> [SF1]<br />
to [SF5] buttons.<br />
Pattern Chain Playback<br />
The Pattern Chain function lets you program Sections in<br />
your own custom order, and have <strong>the</strong>m change<br />
automatically during playback to create a seamless<br />
sequence of backing parts and ac<strong>com</strong>paniment for your<br />
live performance or recorded Song. The Chain Play display<br />
(page 213) is <strong>the</strong> ‘portal’ for entering <strong>the</strong> Pattern Chain<br />
function and lets you play back <strong>the</strong> programmed Pattern<br />
Chain. Press <strong>the</strong> [F5] Chain button from <strong>the</strong> Pattern Play<br />
mode to go to <strong>the</strong> Pattern Chain Play display.<br />
Pattern Chains can be created from <strong>the</strong> Chain Record<br />
display (page 214) and <strong>the</strong> Insert function (page 216) on<br />
<strong>the</strong> Chain Edit display. Pattern Chains can be edited in <strong>the</strong><br />
Chain Edit display (page 214).<br />
Voice mode<br />
Performance<br />
mode<br />
Sampling<br />
mode 1<br />
Song mode<br />
Pattern mode<br />
Mixing mode<br />
Sampling<br />
mode 2<br />
Master mode<br />
Utility mode<br />
File mode<br />
MOTIF <strong>XS</strong> Owner’s <strong>Manual</strong> 209<br />
Reference
Reference<br />
210<br />
Pattern Playback<br />
Voice mode Performance Sampling Song mode Pattern mode Mixing mode Sampling Master mode Utility mode File mode<br />
mode mode 1<br />
mode 2<br />
Mixing Setup for each track<br />
In <strong>the</strong> Pattern mode as well as in <strong>the</strong> Song mode, you can<br />
set <strong>the</strong> Mixing parameters such as Voice, volume and pan<br />
for each part (track). The structure and parameters are <strong>the</strong><br />
same as in <strong>the</strong> Song mode. See page 181.<br />
Knobs and Control Sliders<br />
By using <strong>the</strong> knobs and sliders on <strong>the</strong> front panel, you can<br />
adjust various parameters such as pan, effect, cutoff<br />
frequency and resonance for each Part (track) of <strong>the</strong><br />
Pattern. For more information, see page 180.<br />
Pattern Playback—[F1] Play<br />
This display always appears first when <strong>the</strong> Pattern mode is<br />
engaged. You can play <strong>the</strong> Pattern by specifying a Section<br />
after selecting a Pattern.<br />
1<br />
2<br />
9<br />
)<br />
%<br />
n Depending on <strong>the</strong> selected parameter, <strong>the</strong> NUM icon is shown<br />
at <strong>the</strong> tab menu corresponding to <strong>the</strong> [SF6] button. In this<br />
condition, you can use <strong>the</strong> [SF1] – [SF5] and [F1] – [F5]<br />
buttons as number buttons by pressing <strong>the</strong> [SF6] NUM button.<br />
For details, see page 81.<br />
1 Pattern number, Pattern name<br />
Determines <strong>the</strong> Pattern by specifying <strong>the</strong> number (01 – 64).<br />
The name of <strong>the</strong> selected Pattern is shown. You can<br />
change <strong>the</strong> Pattern name by moving <strong>the</strong> cursor here and<br />
pressing <strong>the</strong> [SF6] CHAR button.<br />
n For detailed instructions on naming, refer to “Basic Operation”<br />
on page 82.<br />
2 Section<br />
! @<br />
Selects a Section of <strong>the</strong> selected Pattern. A Pattern can<br />
include up to 16 variations called Sections, which can be<br />
changed in real time during playback. The Section can be<br />
selected via <strong>the</strong> [A] – [H] buttons (printed “SECTION A –<br />
H”) and <strong>the</strong> [USER1] – [ETHNIC] buttons (printed<br />
“SECTION I – P”). For details, see page 209.<br />
Settings: A – P<br />
MOTIF <strong>XS</strong> Owner’s <strong>Manual</strong><br />
5 6 3 7 4<br />
& * ( º ¡ <br />
8<br />
#<br />
$<br />
^<br />
3 Measure<br />
Determines <strong>the</strong> location at which playback starts. This also<br />
indicates <strong>the</strong> current location of playback. The Measure<br />
can be set via <strong>the</strong> SEQ TRANSPORT buttons. For details,<br />
see page 178.<br />
Settings:<br />
Measure: 001 – 256 (Available range of measure differs depending on<br />
<strong>the</strong> length below.)<br />
Beat: Indication only<br />
Measure Beat<br />
Length<br />
4 Length<br />
Determines <strong>the</strong> Pattern Length.<br />
Settings: 001 – 256<br />
5 Trans (Transpose)<br />
6 Time signature (Meter)<br />
7 Tempo<br />
These are <strong>the</strong> same as in <strong>the</strong> Song Play mode. See<br />
page 210.<br />
8 Keyboard Start<br />
When Keyboard Start is set to on, Pattern playback begins<br />
as soon as you press a key on of <strong>the</strong> keyboard.<br />
Settings: (on), (off)<br />
9 Track number (Indication only)<br />
Indicates <strong>the</strong> track number.<br />
) Track type (Indication only)<br />
Indicates <strong>the</strong> track type: MIDI track or Audio track. For<br />
Mixing Parts that correspond to Audio tracks, a Sample<br />
Voice is assigned. For Mixing Parts that correspond to MIDI<br />
tracks, a Voice o<strong>the</strong>r than a Sample Voice is assigned. For<br />
Mixing Parts that correspond to empty tracks, no Voice is<br />
assigned. For more about MIDI Tracks and Audio Tracks,<br />
see page 61.<br />
Settings: M (MIDI Track), W (Audio Track)<br />
! Mute/Solo (Indication only)<br />
Indicates <strong>the</strong> Mute/Solo status for each track. For detailed<br />
instructions on setting Mute/Solo, see page 179.<br />
Blank: Nei<strong>the</strong>r Mute nor Solo are not assigned to this track.<br />
m: Indicates muted track.<br />
s: Indicates soloed track.<br />
@ Voice (Voice Name)<br />
Indicates <strong>the</strong> Voice name of <strong>the</strong> Mixing Part corresponding<br />
to each track.<br />
# Section<br />
$ Data indicator<br />
Indicates whe<strong>the</strong>r <strong>the</strong> data is recorded or not to each track<br />
of Sections A – P. The data indicator is shown at <strong>the</strong> column<br />
of which <strong>the</strong> Section/Track contains recorded data.
% [SF1] Scene1 – [SF5] Scene5<br />
You can assign <strong>the</strong> settings of <strong>the</strong> Pattern-related<br />
parameters (Pattern Scene) and Arpeggio-related<br />
parameters to <strong>the</strong>se buttons. You can also recall <strong>the</strong>se<br />
settings by pressing <strong>the</strong>se buttons. For detailed<br />
instructions on registering Scenes, see page 179. For<br />
detailed instructions on setting <strong>the</strong> Arpeggio-related<br />
parameters, see page 189.<br />
n The Arpeggio is not available during Pattern playback.<br />
Pressing <strong>the</strong> [SF1] Scene 1 – [SF5] Scene 5 buttons during<br />
playback changes only <strong>the</strong> Pattern Scene.<br />
n After registering <strong>the</strong> Pattern Scene, <strong>the</strong> 8th note icon will<br />
appear on <strong>the</strong> tab corresponding to <strong>the</strong> pressed button. You<br />
can confirm whe<strong>the</strong>r or not <strong>the</strong> Arpeggio Type is assigned to<br />
that button in <strong>the</strong> Arpeggio display (page 189) of <strong>the</strong> Pattern<br />
Record.<br />
^ [SF6] INFO (Information)<br />
You can view <strong>the</strong> amount of free and used sequencer<br />
memory. The sequencer memory covers <strong>the</strong> all Songs and<br />
Patterns recorded in <strong>the</strong> respective modes. When <strong>the</strong> used<br />
memory amount reaches <strong>the</strong> maximum capacity, no fur<strong>the</strong>r<br />
Songs or Patterns can be stored. If this occurs, use <strong>the</strong><br />
Song Job or Pattern Job to delete any unnecessary Songs<br />
or Patterns. You can go back to <strong>the</strong> previous display by<br />
pressing <strong>the</strong> [SF6] button or <strong>the</strong> [EXIT] button.<br />
& [F1] Play<br />
Calls up <strong>the</strong> Play display.<br />
* [F2] Play FX (Play Effect)<br />
Calls up <strong>the</strong> Play Effect display.<br />
( [F3] Track<br />
Calls up <strong>the</strong> Track display.<br />
º [F4] Patch<br />
Calls up <strong>the</strong> Patch display (page 212).<br />
¡ [F5] Chain (Pattern Chain)<br />
Calls up <strong>the</strong> Pattern Chain display (page 213).<br />
[F6] Remix<br />
Calls up <strong>the</strong> Remix display (page 217). This menu is shown<br />
only when <strong>the</strong> cursor is located on <strong>the</strong> track containing<br />
data.<br />
Pattern Playback<br />
Changing <strong>the</strong> rhythmic “feel” of <strong>the</strong><br />
Pattern—[F2] Play FX (Play Effect)<br />
By changing <strong>the</strong> timing and velocity of <strong>the</strong> notes, you can<br />
change <strong>the</strong> rhythmic “feel” of Pattern playback. The Play<br />
Effect settings made here are only temporary and don’t<br />
change <strong>the</strong> actual data in <strong>the</strong> Pattern. The Play Effect<br />
settings can be applied actually to <strong>the</strong> Pattern data by<br />
using <strong>the</strong> Normalize Play Effect Job.<br />
The operation is same as in <strong>the</strong> Song Play mode. See<br />
page 183.<br />
Track Settings—[F3] Track<br />
This display lets you set <strong>the</strong> MIDI Transmit Channel for<br />
each track.<br />
Regarding parameters with no number, refer to <strong>the</strong> Play<br />
display (page 210).<br />
1 Pattern name (Indication only)<br />
Indicates <strong>the</strong> name of <strong>the</strong> current Pattern.<br />
2 Voice (Voice name) (Indication only)<br />
3 TxCh (Transmit Channel)<br />
4 Int (Internal Switch)<br />
5 Ext (External Switch)<br />
These are <strong>the</strong> same as in <strong>the</strong> Song Play mode. See<br />
page 184.<br />
1<br />
2 3 4 5<br />
Voice mode<br />
Performance<br />
mode<br />
Sampling<br />
mode 1<br />
Song mode<br />
Pattern mode<br />
Mixing mode<br />
Sampling<br />
mode 2<br />
Master mode<br />
Utility mode<br />
File mode<br />
MOTIF <strong>XS</strong> Owner’s <strong>Manual</strong> 211<br />
Reference
Reference<br />
212<br />
Pattern Playback<br />
Voice mode Performance Sampling Song mode Pattern mode Mixing mode Sampling Master mode Utility mode File mode<br />
mode mode 1<br />
mode 2<br />
Pattern Creating—[F4] Patch<br />
This display lets you assign a Phrase to each track to<br />
create a Pattern. 16 Sections named A – P can be created<br />
for each Pattern. You can assign a User Phrase created<br />
with <strong>the</strong> current Pattern selected. If you wish to use User<br />
phrases recorded to tracks of o<strong>the</strong>r Patterns, use <strong>the</strong><br />
Phrase Data Copy function, selected with <strong>the</strong> [SF5] button.<br />
Regarding parameters with no number, refer to <strong>the</strong> Play<br />
display (page 210).<br />
1 No. (Phrase Number)<br />
Determines <strong>the</strong> Phrase number to be assigned to a track.<br />
You can select one of <strong>the</strong> 256 User Phrases stored to <strong>the</strong><br />
selected Pattern. Please note that <strong>the</strong> User Phrases have<br />
no data by default. When set to “---,” <strong>the</strong> track be<strong>com</strong>es<br />
empty.<br />
Settings: --- (off), 001 – 256<br />
n The MOTIF <strong>XS</strong> features no Preset Phrase data.<br />
2 Phrase Name<br />
Indicates <strong>the</strong> name of <strong>the</strong> selected Phrase. You can<br />
change <strong>the</strong> Phrase name by moving <strong>the</strong> cursor here and<br />
pressing <strong>the</strong> [SF6] CHAR button.<br />
n For detailed instructions on naming, refer to “Basic Operation”<br />
on page 82.<br />
3 [SF4] Clear<br />
Pressing this button clears <strong>the</strong> Phrase assignment to <strong>the</strong><br />
currently selected track and leaves <strong>the</strong> track empty. Move<br />
<strong>the</strong> cursor to <strong>the</strong> Phrase (track) to be cleared <strong>the</strong>n press<br />
<strong>the</strong> [SF4] button.<br />
4 [SF5] Copy<br />
Pressing this button copies a Phrase in ano<strong>the</strong>r Pattern to<br />
<strong>the</strong> selected one <strong>the</strong>n assign it to <strong>the</strong> specified track. This<br />
is useful if you are creating a Pattern and wish to use <strong>the</strong><br />
Phrase data from ano<strong>the</strong>r Pattern.<br />
MOTIF <strong>XS</strong> Owner’s <strong>Manual</strong><br />
1 2 5<br />
3 4<br />
1<br />
2<br />
3<br />
1 Source phrase<br />
Determines <strong>the</strong> Pattern number and <strong>the</strong> Phrase number<br />
(001 – 256) to be copied.<br />
2 Copy Sample Voice<br />
When this box is checkmarked, Sample Voices assigned to<br />
<strong>the</strong> source phrase are copied to <strong>the</strong> destination phrase as<br />
Sample Voices, and are assigned to <strong>the</strong> corresponding<br />
tracks in <strong>the</strong> selected Pattern.<br />
3 Current Pattern Phrase and Track<br />
Determines <strong>the</strong> number (001 – 256) of <strong>the</strong> destination<br />
Phrase and track (1 – 16) to which <strong>the</strong> Phrase is assigned.<br />
CAUTION<br />
Any previous data in <strong>the</strong> copy destination will be overwritten.<br />
Important data should always be saved to a USB storage device<br />
connected to <strong>the</strong> USB TO DEVICE terminal or to a <strong>com</strong>puter<br />
connected to <strong>the</strong> same network as <strong>the</strong> MOTIF <strong>XS</strong> (page 278).<br />
CAUTION<br />
Undo/Redo cannot be used to undo/redo a Sample Voice copy<br />
operation.<br />
5 Length (Indication only)<br />
Indicates <strong>the</strong> length of each Phrase assigned to each<br />
track.<br />
Creating a Pattern<br />
1 Select a Pattern from <strong>the</strong> Play display (page 210).<br />
2 Press <strong>the</strong> [F4] button to call up <strong>the</strong> Patch<br />
display.<br />
3 Select a Section (A – P).<br />
Move <strong>the</strong> cursor to <strong>the</strong> Section, <strong>the</strong>n select <strong>the</strong> desired<br />
Section by using <strong>the</strong> data dial, [INC/YES] and [DEC/<br />
NO] button.<br />
4 Set <strong>the</strong> meter (time signature), tempo, and<br />
length of <strong>the</strong> Pattern.<br />
Move <strong>the</strong> cursor to <strong>the</strong> desired parameter (such as<br />
length, time signature or tempo), <strong>the</strong>n set <strong>the</strong> value by<br />
using <strong>the</strong> data dial, [INC/YES] and [DEC/NO] button.
5 Assign <strong>the</strong> desired Phrase to each track.<br />
Move <strong>the</strong> cursor to a track <strong>the</strong>n set a Phrase number by<br />
using <strong>the</strong> data dial, [INC/YES] and [DEC/NO] buttons.<br />
Phrase assignment can be executed also during<br />
Pattern playback.<br />
To confirm whe<strong>the</strong>r <strong>the</strong> Phrase is assigned properly or<br />
not, solo <strong>the</strong> track to which <strong>the</strong> Phrase is assigned by<br />
following <strong>the</strong> procedure below. Press <strong>the</strong> [SOLO] button<br />
so that its indicator lights and press any of <strong>the</strong> Number<br />
[1] – [16] buttons to select a track to which you<br />
assigned <strong>the</strong> Phrase.<br />
There are three methods that can be used to create a<br />
Phrase:<br />
• Recording <strong>the</strong> new phrase using <strong>the</strong> Pattern Record<br />
function (page 218)<br />
• Copying <strong>the</strong> Phrase from ano<strong>the</strong>r Pattern by using<br />
<strong>the</strong> [SF5] button.<br />
• Converting a Part of <strong>the</strong> Song data to a Phrase by<br />
using <strong>the</strong> Get Phrase from Song Job (page 225).<br />
6 Repeat steps 3 through 5 above to finalize an<br />
entire Pattern.<br />
Create Sections used for <strong>the</strong> intro, melody A, melody B,<br />
main <strong>the</strong>me and ending of <strong>the</strong> entire Song.<br />
n It is a good idea to use <strong>the</strong> Copy Pattern Job (page 227) if<br />
you wish to create a Section that is based on or sounds<br />
similar to an already existing Section.<br />
7 Press <strong>the</strong> [STORE] button to store <strong>the</strong> Pattern.<br />
For detailed instructions on storing a Pattern, see<br />
page 218.<br />
Pattern Chain—[F5] Chain (Pattern<br />
Chain)<br />
Pattern Chain allows you to string several different Sections<br />
toge<strong>the</strong>r to make a one <strong>com</strong>plete Song. For example,<br />
create a Section A for <strong>the</strong> intro, a Section B for <strong>the</strong> verse, a<br />
Section C for <strong>the</strong> chorus, and a Section D for <strong>the</strong> ending—<br />
and you have <strong>the</strong> basic blocks to build an original Song.<br />
The created Pattern Chain data can be converted to MIDI<br />
sequence data and stored to a Song. To call up <strong>the</strong> Pattern<br />
Chain display, press <strong>the</strong> [F5] Chain button from <strong>the</strong> Pattern<br />
Play mode.<br />
A Pattern Chain can be created for each Pattern, letting<br />
you call up a different, dedicated Pattern Chain each time<br />
you select a Pattern.<br />
The following events can be recorded to <strong>the</strong> Pattern Chain.<br />
• Playback order of Sections<br />
• Pattern track on/off—Solo and Mute<br />
•Tempo change<br />
• Time signature change<br />
Pattern Playback<br />
There are two methods to create a Pattern Chain:<br />
Recording playback of a Pattern in <strong>the</strong> Pattern Record<br />
display in real time, and programming <strong>the</strong> playback order<br />
of Sections one by one in <strong>the</strong> Pattern Chain Edit display.<br />
The Pattern Chain data recorded in real time can be edited<br />
in <strong>the</strong> Pattern Chain Edit display.<br />
Pattern Chain Playback—[F5] Chain<br />
The Pattern Chain display lets you play <strong>the</strong> Pattern Chain<br />
data you’ve created. Press <strong>the</strong> [F5] Chain button from <strong>the</strong><br />
Pattern Play mode to go to <strong>the</strong> Pattern Chain Play display.<br />
The operation in <strong>the</strong> Pattern Chain display is basically<br />
same as in <strong>the</strong> Pattern Play display with <strong>the</strong> exception that<br />
<strong>the</strong> Pattern number cannot be selected. For details on<br />
parameters which are not explained here, refer to <strong>the</strong><br />
Pattern Play display (page 210).<br />
n Depending on <strong>the</strong> selected parameter, <strong>the</strong> NUM icon is shown<br />
at <strong>the</strong> tab menu corresponding to <strong>the</strong> [SF6] button. In this<br />
condition, you can use <strong>the</strong> [SF1] – [SF5] and [F1] – [F5]<br />
buttons as number buttons by pressing <strong>the</strong> [SF6] NUM button.<br />
For details, see page 81.<br />
1 Section<br />
Indicates <strong>the</strong> currently played Section. “NEXT” will be<br />
shown here when playback is waiting for <strong>the</strong> timing of <strong>the</strong><br />
Section change.<br />
2 Trans (Transpose)<br />
Adjusts <strong>the</strong> pitch of <strong>the</strong> Pattern Chain playback in semitone<br />
increments.<br />
Settings: -36 – +0 – +36<br />
3 Time signature<br />
Indicates <strong>the</strong> time signature currently assigned to <strong>the</strong><br />
Pattern. During playback, <strong>the</strong> current time signature is<br />
shown here.<br />
4 Measure<br />
Indicates <strong>the</strong> measure number of <strong>the</strong> currently playing<br />
Pattern Chain. You can start playback from <strong>the</strong> middle of<br />
<strong>the</strong> Pattern Chain by specifying <strong>the</strong> measure here <strong>the</strong>n<br />
pressing <strong>the</strong> [F] (Play) button.<br />
Settings: 001 – 999<br />
1 2 3 4 5<br />
6<br />
Voice mode<br />
Performance<br />
mode<br />
Sampling<br />
mode 1<br />
Song mode<br />
Pattern mode<br />
Mixing mode<br />
Sampling<br />
mode 2<br />
Master mode<br />
Utility mode<br />
File mode<br />
MOTIF <strong>XS</strong> Owner’s <strong>Manual</strong> 213<br />
Reference
Reference<br />
214<br />
Pattern Playback<br />
Voice mode Performance Sampling Song mode Pattern mode Mixing mode Sampling Master mode Utility mode File mode<br />
mode mode 1<br />
mode 2<br />
5 Tempo<br />
Indicates <strong>the</strong> tempo currently assigned to <strong>the</strong> Pattern.<br />
During playback, <strong>the</strong> current tempo is shown here.<br />
Settings: 5.0 – 300.0<br />
6 Keyboard Start<br />
When Keyboard Start is set to on, Pattern Chain playback<br />
begins as soon as you press a key on of <strong>the</strong> keyboard.<br />
Settings: on, off<br />
Pattern Chain Playback Procedure<br />
To start Pattern Chain playback, call up <strong>the</strong> Pattern Chain<br />
display, <strong>the</strong>n press <strong>the</strong> [F] (Play) button. When <strong>the</strong> end of<br />
<strong>the</strong> Pattern Chain data is reached, playback automatically<br />
stops. You can also press <strong>the</strong> [J] (Stop) button during<br />
playback to stop playback of <strong>the</strong> Pattern Chain. Press <strong>the</strong><br />
[F] (Play) again to resume playback from that point.<br />
Depending on <strong>the</strong> particular Chain data, <strong>the</strong> Pattern plays<br />
back with automatic changes of <strong>the</strong> Section, track mute<br />
and tempo—all of which are indicated on <strong>the</strong> display in real<br />
time.<br />
n You can confirm <strong>the</strong> Pattern Chain data by calling up <strong>the</strong><br />
Pattern Chain Edit display.<br />
Pattern Chain Recording in Realtime—<br />
[I] Chain Record<br />
From <strong>the</strong> Pattern Chain Record display, you can record<br />
playback of <strong>the</strong> Pattern—along with any realtime changes<br />
you make. Press <strong>the</strong> [I] (Record) button from <strong>the</strong> Pattern<br />
Chain Play display to call up <strong>the</strong> Pattern Chain Record<br />
display. Press <strong>the</strong> [EXIT] button to go back to <strong>the</strong> Chain<br />
Play display.<br />
Events such as Section change, Track mute on/off and<br />
Tempo change can be recorded as Pattern Chain data.<br />
The Record Type is fixed to “replace” and cannot be<br />
changed. Accordingly, recording <strong>the</strong> events overwrites<br />
data in <strong>the</strong> already recorded range. You can also use <strong>the</strong><br />
Insert function (page 216) on <strong>the</strong> Chain Edit display to<br />
create <strong>the</strong> Pattern Chain data.<br />
MOTIF <strong>XS</strong> Owner’s <strong>Manual</strong><br />
1 3 4 5 6<br />
For details on parameters indicated with numbers above,<br />
refer to <strong>the</strong> Chain display (page 213). For details on all<br />
o<strong>the</strong>r parameters, refer to <strong>the</strong> Pattern Play display<br />
(page 210).<br />
Pattern Chain Recording Procedure<br />
1 Select a Pattern in <strong>the</strong> Chain Play display.<br />
This step is necessary because each Pattern has its<br />
own dedicated Pattern Chain data.<br />
2 Press <strong>the</strong> [I] (Record) button.<br />
The [I] (Record) indicator lights and <strong>the</strong> Chain Record<br />
display appears.<br />
3 Set up <strong>the</strong> parameters for <strong>the</strong> start of recording.<br />
Set <strong>the</strong> basic parameters for recording (e.g., Section,<br />
Recording Track mute setting, Time Signature, Tempo<br />
and so on). After setting, move <strong>the</strong> cursor to <strong>the</strong> Tempo.<br />
4 Set <strong>the</strong> measure at which recording starts.<br />
Normally, press <strong>the</strong> [P] (Top) button to set <strong>the</strong> top as<br />
recording start measure.<br />
5 Press <strong>the</strong> [F] (Play) button to start recording.<br />
To change Sections in realtime and record <strong>the</strong>m, press<br />
<strong>the</strong> [TRACK] button (<strong>the</strong> lamp lights), <strong>the</strong>n use <strong>the</strong> [A] –<br />
[H] buttons, [USER 1] – [USER DR] buttons and<br />
[ETHNIC] button. To make Track Mute on/off settings,<br />
press <strong>the</strong> [MUTE] button (<strong>the</strong> lamp lights), <strong>the</strong>n press<br />
<strong>the</strong> appropriate Number [1] – [16] buttons. The tempo<br />
can be changed by pressing <strong>the</strong> [DEC/NO]/[INC/YES]<br />
button, turning <strong>the</strong> data dial, or using <strong>the</strong> [SF1] – [SF5]<br />
and [F1] – [F5] buttons as numeric keys after pressing<br />
<strong>the</strong> [SF6] NUM button.<br />
6 Press <strong>the</strong> [J] (Stop) button to stop recording.<br />
7 Press <strong>the</strong> [STORE] button to store <strong>the</strong> recorded<br />
Chain data on <strong>the</strong> internal User Memory.<br />
n For more information on storing a Pattern, see page 218.<br />
Editing a Pattern Chain—[EDIT] Chain Edit<br />
This mode gives you <strong>com</strong>prehensive, detailed controls for<br />
editing <strong>the</strong> events of <strong>the</strong> recorded Pattern Chain. Events<br />
such as Section change, Track mute on/off, Tempo change<br />
and Meter can be recorded as Pattern Chain data. Press<br />
<strong>the</strong> [EDIT] button from <strong>the</strong> Chain Play display to call up <strong>the</strong><br />
Chain Edit display. Press <strong>the</strong> [EXIT] button to go back to<br />
<strong>the</strong> Chain Play display.
1 MEAS (Measure)<br />
2 BEAT<br />
3 CLOCK<br />
Indicates <strong>the</strong> location of <strong>the</strong> corresponding event.<br />
Changing any of <strong>the</strong>se values changes <strong>the</strong> location of <strong>the</strong><br />
event accordingly.<br />
Settings:<br />
MEAS (Measure): 001 – 256<br />
BEAT: 01 – 16 (The available range may change depending on <strong>the</strong><br />
Meter.)<br />
CLOCK: 000 – 479 (The available range may change depending on<br />
<strong>the</strong> Meter.)<br />
4 Event Type<br />
5 Setting Values<br />
The following events are available in <strong>the</strong> Pattern Chain mode.<br />
Section Change timing of Sections A – P and<br />
End event of <strong>the</strong> data.<br />
TrackMute The “m” indicates <strong>the</strong> corresponding<br />
track is muted.<br />
Tempo 005.0 – 300.0<br />
TimeSig (Time Signature) 1/16 – 16/16, 1/8 – 16/8, 1/4 – 8/4<br />
[SF1] View Filter<br />
This display lets you select <strong>the</strong> event types that appear on<br />
<strong>the</strong> Chain Edit display. This is particularly useful when<br />
many types of events are mixed toge<strong>the</strong>r, but you only want<br />
to display <strong>the</strong> events you intend to edit.<br />
1<br />
2<br />
3<br />
4<br />
1 2 3 4 5<br />
1 Time Signature<br />
2 Section<br />
3 Track Mute<br />
4 Tempo Change<br />
Only events with checked boxes will appear in <strong>the</strong> Chain<br />
Edit display. If <strong>the</strong> box is set to off, <strong>the</strong> corresponding event<br />
will disappear in <strong>the</strong> Chain Edit display.<br />
[SF2] Copy<br />
Pattern Playback<br />
The function of this display lets you copy events from a<br />
specified range to ano<strong>the</strong>r range.<br />
1<br />
2 3<br />
1 Source Range<br />
2 Destination Location (Top Measure)<br />
Determines <strong>the</strong> source range and <strong>the</strong> top measure of <strong>the</strong><br />
destination.<br />
Settings: 001 – 256<br />
3 Number of Times<br />
Determines <strong>the</strong> number of times <strong>the</strong> data is copied.<br />
Settings: 01 – 99<br />
[SF3] Song (Convert to Song)<br />
Converts <strong>the</strong> current Pattern chain to MIDI sequence data<br />
and copies <strong>the</strong> data to a specified Song. This function is<br />
useful for quickly creating backing and ac<strong>com</strong>paniment<br />
parts for Song data.<br />
1<br />
2<br />
3<br />
1 Destination Song<br />
Determines <strong>the</strong> destination Song by specifying <strong>the</strong> number<br />
(01 – 64). The name of <strong>the</strong> selected Song is displayed.<br />
2 Destination Location (Top Measure)<br />
Determines <strong>the</strong> beginning measure number of <strong>the</strong><br />
destination.<br />
Settings: 001 – 999<br />
3 Without Program Change<br />
When this box is checkmarked, <strong>the</strong> settings of <strong>the</strong> Mixing<br />
and Tempo are copied to <strong>the</strong> destination Song (1). The<br />
Tempo value is copied to <strong>the</strong> top measure (2) of <strong>the</strong><br />
destination Song. When <strong>the</strong> checkmark is removed, <strong>the</strong><br />
Voice settings in each Phrase are also copied to <strong>the</strong> top<br />
measure (2) of <strong>the</strong> destination Song as Program Change<br />
events.<br />
Voice mode<br />
Performance<br />
mode<br />
Sampling<br />
mode 1<br />
Song mode<br />
Pattern mode<br />
Mixing mode<br />
Sampling<br />
mode 2<br />
Master mode<br />
Utility mode<br />
File mode<br />
MOTIF <strong>XS</strong> Owner’s <strong>Manual</strong> 215<br />
Reference
Reference<br />
216<br />
Pattern Playback<br />
Voice mode Performance Sampling Song mode Pattern mode Mixing mode Sampling Master mode Utility mode File mode<br />
mode mode 1<br />
mode 2<br />
CAUTION<br />
This Job operation overwrites any data previously existing in <strong>the</strong><br />
destination Song and <strong>the</strong> Undo/Redo (page 223) Job cannot be<br />
used after executing this Job. Important data should always be<br />
saved to a USB storage device connected to <strong>the</strong> USB TO DEVICE<br />
terminal or to a <strong>com</strong>puter connected to <strong>the</strong> same network as <strong>the</strong><br />
MOTIF <strong>XS</strong> (page 278).<br />
[SF4] Insert<br />
From this display, you can insert a new event to <strong>the</strong> Pattern<br />
Chain. After setting <strong>the</strong> following parameters, press <strong>the</strong><br />
[F6] Set button or [ENTER] button to actually insert <strong>the</strong><br />
event.<br />
1<br />
2 3<br />
1 Event Type<br />
Determines <strong>the</strong> event type to be inserted.<br />
Settings: Time Signature, Section, end, Tempo Change, Track Mute<br />
end<br />
Indicates <strong>the</strong> end position of <strong>the</strong> Pattern Chain.<br />
2 Inserting location<br />
Specifies <strong>the</strong> location at which <strong>the</strong> new event will be<br />
inserted.<br />
Settings:<br />
MEAS (Measure): 001 – 999<br />
BEAT: 01 – 16 (depends on <strong>the</strong> meter)<br />
CLOCK: 000 – 479 (depends on <strong>the</strong> meter)<br />
3 Value of <strong>the</strong> selected event type<br />
Enters <strong>the</strong> value of <strong>the</strong> event to be inserted. The values<br />
available differ depending on <strong>the</strong> selected Event Type (1).<br />
Settings:<br />
Time Signature: 1/16 – 16/16, 1/8 – 16/8, 1/4 – 8/4<br />
Section: A – P, end (end of <strong>the</strong> data)<br />
Tempo Change: 005.0 – 300.0<br />
Track Mute: m (mute on), blank (mute off)<br />
[SF5] Delete<br />
Deletes <strong>the</strong> currently selected event. This button is not<br />
available when <strong>the</strong> cursor is located at <strong>the</strong> Time Signature<br />
event, Tempo Change or top/bottom of <strong>the</strong> data.<br />
Pattern Chain Edit Procedure<br />
1 Select a Pattern on <strong>the</strong> Chain Play display.<br />
This step is necessary because each Pattern has its<br />
own dedicated Pattern Chain data.<br />
2 Press <strong>the</strong> [EDIT] button to call up <strong>the</strong> Chain<br />
Edit display.<br />
MOTIF <strong>XS</strong> Owner’s <strong>Manual</strong><br />
3 Edit <strong>the</strong> already-recorded events.<br />
Move <strong>the</strong> cursor to each of parameters, <strong>the</strong>n set <strong>the</strong><br />
value by using <strong>the</strong> data dial, [INC/YES] and [DEC/NO]<br />
buttons. To make it easier to find desired parameters,<br />
use <strong>the</strong> View Filter display called up via <strong>the</strong> [SF1]<br />
button. You can use <strong>the</strong> Copy function called up via <strong>the</strong><br />
[SF2] button to copy <strong>the</strong> events from a specified range<br />
to ano<strong>the</strong>r range.<br />
If you wish to delete <strong>the</strong> event, move <strong>the</strong> cursor to <strong>the</strong><br />
event to be deleted <strong>the</strong>n press <strong>the</strong> [SF5] button.<br />
If you wish to insert a new event, press <strong>the</strong> [SF4] button<br />
to call up <strong>the</strong> Insert display. From this display, you can<br />
input <strong>the</strong> events one by one.<br />
4 Convert <strong>the</strong> created Pattern Chain data to a<br />
Song.<br />
By using <strong>the</strong> Convert To Song display called up via <strong>the</strong><br />
[SF3] button, you can convert <strong>the</strong> created Pattern<br />
Chain data to MIDI sequence data and copy <strong>the</strong><br />
converted data to a specified Song. This function is<br />
useful for quickly creating backing and ac<strong>com</strong>paniment<br />
parts for Song data.<br />
5 Store <strong>the</strong> created Pattern Chain data to internal<br />
User Memory.<br />
From <strong>the</strong> Store window called up via <strong>the</strong> [STORE]<br />
button, you can store <strong>the</strong> current Pattern including <strong>the</strong><br />
created Pattern Chain data to internal memory. After<br />
storing <strong>the</strong> Pattern data, <strong>the</strong> Pattern Chain included in<br />
<strong>the</strong> Pattern is maintained even if <strong>the</strong> power is turned off.<br />
Entering New Events<br />
1 From <strong>the</strong> Chain Edit display, press <strong>the</strong> [SF4]<br />
Insert button to call up <strong>the</strong> Insert window.<br />
2 Specify <strong>the</strong> event type to be inserted, <strong>the</strong><br />
insertion point (measure, beat, and clock), and<br />
parameter value of <strong>the</strong> event.<br />
3 Press <strong>the</strong> [F6] Set button to insert <strong>the</strong> specified<br />
event at <strong>the</strong> specified location.<br />
You can continue inserting new events since <strong>the</strong> Insert<br />
Event window remains open. Press <strong>the</strong> [ENTER] button<br />
to actually insert <strong>the</strong> event and close <strong>the</strong> Insert window.<br />
4 Press <strong>the</strong> [EXIT] button to go back to <strong>the</strong> Chain<br />
Play display.
Dividing <strong>the</strong> Pattern data to create a<br />
new Pattern—[F6] Remix<br />
The Remix function divides <strong>the</strong> MIDI data in a selected<br />
track into several pieces of a specified note length, and<br />
randomly rearranges a portion of <strong>the</strong> data, letting you<br />
easily create <strong>com</strong>pletely new and unique rhythm<br />
variations—all from a single Pattern.<br />
n When Remix is used on a track containing a sliced sample<br />
voice, <strong>the</strong> various segments of <strong>the</strong> sample are rearranged with<br />
varied timing. The sample voices can be created by executing<br />
<strong>the</strong> Sampling with <strong>the</strong> Sampling Type set to “slice+seq” or<br />
executing <strong>the</strong> Sample Slice Job.<br />
n The Remix display is available only when <strong>the</strong> cursor is located<br />
on <strong>the</strong> track containing data.<br />
1<br />
2<br />
2<br />
4<br />
5<br />
1 Type<br />
Determines how a single measure is divided. The dividing<br />
point and <strong>the</strong> amount differ depending on <strong>the</strong> Type setting<br />
here. The diagram of <strong>the</strong> selected Type will be shown. See<br />
below (4).<br />
Settings: 1 – 16<br />
2 Variation<br />
Determines how <strong>the</strong> segments divided by Type (1) will be<br />
rearranged. The division and rearrangement rules differ<br />
depending on <strong>the</strong> Variation setting.<br />
Settings: normal 01 – 16, reverse 01 – 16, break 01 – 16, pitch 01 –<br />
16, roll 01 – 16, fill 01 – 48<br />
normal 01 – 16<br />
The divided data is only rearranged. 16 variations are provided.<br />
reverse 01 – 16<br />
In addition to rearrangement of <strong>the</strong> divided data, some portions of <strong>the</strong><br />
data may be played in reverse. 16 variations are provided.<br />
break 01 – 16<br />
In addition to rearrangement of <strong>the</strong> divided data, some portions of <strong>the</strong><br />
data may be deleted to create breaks. 16 variations are provided.<br />
pitch 01 – 16<br />
In addition to rearrangement of <strong>the</strong> divided data, some portions of <strong>the</strong><br />
data may be pitch-shifted. 16 variations are provided.<br />
roll 01 – 16<br />
In addition to rearrangement of <strong>the</strong> divided data, some portions of <strong>the</strong><br />
data may be played with a roll effect. 16 variations are provided.<br />
fill 01 – 48<br />
In addition to rearrangement of <strong>the</strong> divided data, some portions of <strong>the</strong><br />
data may be played with fill-in. 48 variations are provided.<br />
3 Interval<br />
Determines <strong>the</strong> measure interval with which <strong>the</strong> Remix<br />
operation is executed. In o<strong>the</strong>r words, this parameter<br />
determines <strong>the</strong> measures to which Remix is applied. When<br />
6<br />
7<br />
Pattern Playback<br />
this parameter is set to “1,” Remix is applied to all<br />
measures. When set to “2,” Remix is applied to <strong>the</strong> data of<br />
<strong>the</strong> 2nd measure, 4th measure, 6th measure, and so on.<br />
When set to “3,” Remix is applied to <strong>the</strong> data of <strong>the</strong> 3rd<br />
measure, 6th measure, 9th measure, and so on.<br />
The measures to which Remix is applied are shown on <strong>the</strong><br />
display. See below (5).<br />
Settings: 1 – 8<br />
4 Type diagram<br />
Indicates <strong>the</strong> division point and <strong>the</strong> amount of division<br />
determined by Type (1). The diagram below indicates <strong>the</strong><br />
division points in 16th note resolution. When Type is set to<br />
“1,” for example, <strong>the</strong> data is divided at <strong>the</strong> upbeat before<br />
beat 4. When Type is set to “2,” <strong>the</strong> data is divided at three<br />
points: <strong>the</strong> upbeat before beat 2, <strong>the</strong> downbeat of beat 3,<br />
and <strong>the</strong> upbeat before beat 4.<br />
Type=1<br />
Type=2<br />
1st beat 2nd beat 3rd beat 4th beat<br />
5 Interval diagram<br />
Indicates <strong>the</strong> measures to which <strong>the</strong> Remix is applied.<br />
These measures are located at <strong>the</strong> same interval<br />
determined by <strong>the</strong> Interval (3) parameter. The example<br />
below results when setting <strong>the</strong> Interval (3) to “2.”<br />
6 [SF4] Cancel<br />
Pressing this button cancels <strong>the</strong> most recent Remix which<br />
has not been fixed yet. This button is not available after <strong>the</strong><br />
result of Remix is fixed or before Remix is executed.<br />
7 [SF5] Apply<br />
Pressing this button executes Remix. If you are not<br />
satisfied with <strong>the</strong> result after Remix is executed, press <strong>the</strong><br />
[SF4] button and try Remix again. If you are satisfied with<br />
<strong>the</strong> result, press <strong>the</strong> [ENTER] button to fix <strong>the</strong> remixed data.<br />
Remix Procedure<br />
1 Set <strong>the</strong> Type (1), Variation (2) and Interval (3).<br />
2 Press <strong>the</strong> [SF5] button to execute Remix.<br />
3 Confirm <strong>the</strong> result of <strong>the</strong> Remix operation.<br />
If you are not satisfied with <strong>the</strong> result of <strong>the</strong> Remix,<br />
press <strong>the</strong> [SF4] button <strong>the</strong>n try again.<br />
4 Press <strong>the</strong> [ENTER] button to fix <strong>the</strong> Remix<br />
result.<br />
5 Press <strong>the</strong> [STORE] button to store <strong>the</strong> Pattern<br />
to internal User Memory.<br />
Voice mode<br />
Performance<br />
mode<br />
Sampling<br />
mode 1<br />
Song mode<br />
Pattern mode<br />
Mixing mode<br />
Sampling<br />
mode 2<br />
Master mode<br />
Utility mode<br />
File mode<br />
MOTIF <strong>XS</strong> Owner’s <strong>Manual</strong> 217<br />
Reference
Reference<br />
Voice mode Performance Sampling Song mode Pattern mode Mixing mode Sampling Master mode Utility mode File mode<br />
mode mode 1<br />
mode 2<br />
218<br />
MOTIF <strong>XS</strong> Owner’s <strong>Manual</strong><br />
Pattern Recording<br />
In <strong>the</strong> Pattern Record mode, you can record your keyboard performance to create a Phrase as a basic material of <strong>the</strong><br />
Pattern data. The created Phrase is assigned to <strong>the</strong> specified track automatically. Press <strong>the</strong> [I] (Record) button from <strong>the</strong><br />
Pattern Play mode to enter <strong>the</strong> Pattern Record mode.<br />
n Recording of audio data can be done in <strong>the</strong> Sampling Record mode (page 242).<br />
Realtime Recording<br />
This method lets you record <strong>the</strong> performance data as it is<br />
played, allowing you to capture all <strong>the</strong> nuances of an actual<br />
keyboard performance. Recording can be done while<br />
monitoring playback of o<strong>the</strong>r already-recorded tracks.<br />
You can select one of two methods for Realtime recording:<br />
Replace and Overdub.<br />
Pattern Recording procedure<br />
Here in outline form is <strong>the</strong> process of recording a Pattern.<br />
1 Select a Pattern, <strong>the</strong>n select a Section to be<br />
recorded.<br />
Press <strong>the</strong> [PATTERN] button to go to <strong>the</strong> Pattern Play<br />
display (page 210), and select a Pattern, <strong>the</strong>n a Section<br />
to be recorded. Select an empty Pattern if you wish to<br />
create a new Pattern from scratch. If an empty Pattern<br />
is not available, delete an unnecessary Pattern by<br />
using <strong>the</strong> Clear Pattern Job (page 228).<br />
2 Press <strong>the</strong> [I] (Record) button to call up <strong>the</strong><br />
Record Setup display (page 219).<br />
3 Set recording-related parameters in <strong>the</strong> Record<br />
Setup display.<br />
Select <strong>the</strong> track to be recorded and <strong>the</strong> Recording<br />
method to prepare for Pattern Recording.<br />
When selecting a track to which no Phrase has been<br />
assigned, your keyboard performance will be recorded<br />
to an empty Phrase which will be assigned to <strong>the</strong><br />
recording track. When selecting a track that already<br />
has an assigned Phrase, that Phrase will be replaced<br />
by your recorded performance. If you wish to record<br />
using an Arpeggio, set <strong>the</strong> necessary parameters from<br />
<strong>the</strong> Arpeggio display (page 219).<br />
4 Record your keyboard performance in real time<br />
to create a Phrase.<br />
Press <strong>the</strong> [F] (Play) button to start recording. Press <strong>the</strong><br />
[J] (Stop) button to stop recording.<br />
5 Edit <strong>the</strong> recorded Phrase using <strong>the</strong> Pattern Job<br />
(page 222) and Pattern Edit (page 220).<br />
6 Store <strong>the</strong> Pattern (including <strong>the</strong> recorded<br />
Phrase) to internal User Memory.<br />
Press <strong>the</strong> [STORE] button to call up <strong>the</strong> Pattern Store<br />
window <strong>the</strong>n store <strong>the</strong> created Pattern.<br />
This ensures that <strong>the</strong> created Pattern will be retained<br />
even if <strong>the</strong> power is turned off.<br />
CAUTION<br />
The recorded Pattern will be lost when selecting a different<br />
Pattern, calling up a different mode, or turning <strong>the</strong> power off.<br />
Make sure to store <strong>the</strong> Pattern data to internal memory by<br />
pressing <strong>the</strong> [STORE] button before selecting a different<br />
Pattern, calling up a different mode, or turning <strong>the</strong> power off.<br />
7 Save <strong>the</strong> created Pattern data to a USB storage<br />
device or to a connected <strong>com</strong>puter as desired<br />
(page 278).<br />
Storing a Pattern—[STORE]<br />
(Pattern Store)<br />
This section covers how to store <strong>the</strong> Pattern you have<br />
recorded and edited. By executing <strong>the</strong> Store operation, <strong>the</strong><br />
Pattern data you have created will be retained even if <strong>the</strong><br />
power has been turned off. Pressing <strong>the</strong> [STORE] button<br />
calls up <strong>the</strong> Pattern Store window.<br />
The following data will be stored by Pattern Store.<br />
Sequence data<br />
Currently selected Pattern (Section A – P), Pattern Chain,<br />
Phrase 001 – 256<br />
Tone Generator data<br />
Mixing settings (Common Edit parameters and Part Edit<br />
parameters)<br />
n The Mixing Voices can be edited in <strong>the</strong> Mixing Voice Store<br />
window (page 240).<br />
The Pattern Store operation is <strong>the</strong> same as that of Voice<br />
Store (page 97) and Song Store (page 186).<br />
CAUTION<br />
This operation overwrites any data already existing in <strong>the</strong><br />
destination Pattern. Select a Pattern number containing no data or<br />
unnecessary data.<br />
n If <strong>the</strong>re is not enough memory space for <strong>the</strong> Song/Pattern, an<br />
alert message appears, and you will not able to store any<br />
additional Songs/Patterns. If this happens, delete<br />
unnecessary Patterns/Songs by using <strong>the</strong> Song/Pattern Job,<br />
<strong>the</strong>n try <strong>the</strong> Store operation again.
Preparing <strong>the</strong> Pattern Recording—<br />
[F1] Setup<br />
)<br />
8<br />
9<br />
¡<br />
1 Pattern name (Indication only)<br />
Indicates <strong>the</strong> name of <strong>the</strong> current Pattern. The Pattern can<br />
be selected in <strong>the</strong> Pattern Play display (page 210).<br />
2 Measure<br />
Determines <strong>the</strong> measure from which recording starts. This<br />
also indicates <strong>the</strong> current location of recording.<br />
Settings:<br />
Measure: 001 – 256<br />
Beat: Indication only<br />
Measure Beat<br />
Length<br />
3 Length<br />
Determines <strong>the</strong> Pattern Length. This also represents <strong>the</strong><br />
length of <strong>the</strong> Phrase created via Recording procedure.<br />
Settings: 001 – 256<br />
4 Section (Indication only)<br />
Indicates <strong>the</strong> Section to be recorded. The Section can be<br />
set from <strong>the</strong> Pattern Play display (page 210).<br />
5 Time signature (Meter)<br />
Specifies <strong>the</strong> meter (time signature) for <strong>the</strong> Pattern.<br />
Settings: 1/16 – 16/16, 1/8 – 16/8, 1/4 – 8/4<br />
6 Tempo<br />
This is <strong>the</strong> same as in <strong>the</strong> Song Record mode. See<br />
page 187.<br />
7 Keyboard Start<br />
4 ! @5 2 1<br />
When Keyboard Start is set to on, Pattern recording begins<br />
as soon as you press a key on of <strong>the</strong> keyboard.<br />
Settings: (on), (off)<br />
6<br />
£ ¢ ∞<br />
3<br />
7<br />
#<br />
$<br />
%<br />
^<br />
&<br />
*<br />
(<br />
º<br />
8 Track number (Indication only)<br />
9 Track type (Indication only)<br />
) Mute/Solo (Indication only)<br />
! Voice Name (Indication only)<br />
Pattern Recording<br />
These are <strong>the</strong> same as in <strong>the</strong> Song Record mode. See<br />
page 187.<br />
@ REC TR (Record Track)<br />
Determines <strong>the</strong> track to be recorded. Move <strong>the</strong> cursor to<br />
<strong>the</strong> desired track or press any of <strong>the</strong> Number buttons [1] –<br />
[16] with <strong>the</strong> TRACK lamp turned on so that <strong>the</strong> red circle is<br />
shown in <strong>the</strong> corresponding column of <strong>the</strong> REC TR.<br />
Settings: 1 – 16<br />
# Record Type<br />
Determines <strong>the</strong> Recording method.<br />
Settings: replace, overdub<br />
replace<br />
You can use this method when you want to overwrite an already<br />
recorded track with new data in real time. The original data will be<br />
erased.<br />
overdub<br />
You can use this method when you want to add more data to a track that<br />
already contains data. Previously recorded data will be maintained.<br />
$ Loop (Loop Recording)<br />
Determines whe<strong>the</strong>r <strong>the</strong> Recording is looped or not when<br />
executing Realtime recording. When set to on, <strong>the</strong> phrase<br />
will play repeatedly during real-time recording. This can be<br />
handy when recording drum Parts with <strong>the</strong> Recording type<br />
set to “overdub,” allowing you to add different instruments<br />
on each pass. When set to off, recording stops after one<br />
pass through <strong>the</strong> phrase.<br />
% Record Part<br />
^ Quantize (Record Quantize)<br />
& Voice<br />
* Volume<br />
( Pan<br />
º Ins Effect Sw (Insertion Effect Switch)<br />
These are <strong>the</strong> same as in <strong>the</strong> Song Record mode. See<br />
page 188.<br />
¡ [SF1] Scene1 – [SF5] Scene5<br />
You can change <strong>the</strong> settings of <strong>the</strong> Pattern-related<br />
parameters (Pattern Scene) and Arpeggio-related<br />
parameters by pressing <strong>the</strong>se buttons. For details, refer to<br />
<strong>the</strong> description of <strong>the</strong> same buttons in <strong>the</strong> Pattern Play<br />
mode on page 211.<br />
[F1] Setup<br />
Pressing this button returns from <strong>the</strong> previous display to <strong>the</strong><br />
Record Setup display.<br />
£ [F2] Arpeggio (Record Arpeggio)<br />
The operation is same as <strong>the</strong> one in <strong>the</strong> Record Arpeggio<br />
display (page 189) in <strong>the</strong> Song mode.<br />
Voice mode<br />
Performance<br />
mode<br />
Sampling<br />
mode 1<br />
Song mode<br />
Pattern mode<br />
Mixing mode<br />
Sampling<br />
mode 2<br />
Master mode<br />
Utility mode<br />
File mode<br />
MOTIF <strong>XS</strong> Owner’s <strong>Manual</strong> 219<br />
Reference
Reference<br />
220<br />
Editing MIDI Events (Pattern Edit)<br />
Voice mode Performance Sampling Song mode Pattern mode Mixing mode Sampling Master mode Utility mode File mode<br />
mode mode 1<br />
mode 2<br />
¢ [F4] Erase<br />
This menu appears as soon as Recording starts. During<br />
Pattern recording, pressing <strong>the</strong> key while holding <strong>the</strong> [F4]<br />
button erases all <strong>the</strong> note events of <strong>the</strong> pressed key. This is<br />
useful in loop recording since it allows you to quickly delete<br />
wrong notes played for a specific key.<br />
∞ [F5] Click<br />
This is <strong>the</strong> same as in <strong>the</strong> Song Record mode. See<br />
page 188.<br />
MOTIF <strong>XS</strong> Owner’s <strong>Manual</strong><br />
Realtime Recording Procedure<br />
This section explains how to record your performance<br />
using <strong>the</strong> Realtime Recording features. Please keep in<br />
mind that <strong>the</strong> procedure differs depending on <strong>the</strong> Record<br />
Type and Record Track set from <strong>the</strong> Record Setup display.<br />
The operation is same as <strong>the</strong> one in <strong>the</strong> Song Record<br />
display (page 189).<br />
Editing MIDI Events (Pattern Edit)<br />
The Pattern Edit mode lets you edit <strong>the</strong> already recorded Phrases or insert <strong>the</strong> new data to <strong>the</strong> Phrases. It can be used to<br />
correct mistakes as well as add dynamics or effects such as vibrato to refine and finish <strong>the</strong> Phrase.<br />
Press <strong>the</strong> [EDIT] button from <strong>the</strong> Pattern Play mode to go to <strong>the</strong> Pattern Edit mode.<br />
n The Pattern Edit mode gives you <strong>com</strong>prehensive, detailed controls for editing <strong>the</strong> MIDI events of individual Pattern tracks. MIDI events are<br />
messages (such as note on/off, note number, program change number, etc.) that make up <strong>the</strong> data of a recorded phrase.<br />
n Like <strong>the</strong> Song Edit mode, Pattern Edit consists of <strong>the</strong> Event List display and <strong>the</strong> Insert Event window. The Event List display lets you correct<br />
or delete already inserted MIDI events and <strong>the</strong> Insert Event window lets you insert new events to <strong>the</strong> Pattern. By using <strong>the</strong> Insert Event<br />
window, you can input <strong>the</strong> events one by one. The Event List display will always appear when <strong>the</strong> Pattern Edit mode is first called up.<br />
Editing <strong>the</strong> recorded data<br />
Here in outline form is <strong>the</strong> process of correcting or deleting<br />
already recorded events.<br />
1 Select a track to be edited in <strong>the</strong> Pattern Play<br />
display.<br />
If you wish to edit a certain phrase, press <strong>the</strong> [F4]<br />
button to call up <strong>the</strong> Patch display (page 212), <strong>the</strong>n<br />
select <strong>the</strong> desired Phrase.<br />
2 Press <strong>the</strong> [EDIT] button to enter <strong>the</strong> Pattern<br />
Edit mode.<br />
The Event List display (page 221) of <strong>the</strong> Pattern<br />
appears.<br />
n You can select <strong>the</strong> desired track with <strong>the</strong> Number buttons<br />
[1] – [16] by pressing <strong>the</strong> [TRACK] button (<strong>the</strong> lamp lights)<br />
after entering <strong>the</strong> Pattern Edit mode.<br />
3 Move <strong>the</strong> cursor to <strong>the</strong> event or parameter to<br />
be edited.<br />
Use <strong>the</strong> [L]/[M] (Cursor Up/Down) button to move <strong>the</strong><br />
cursor to <strong>the</strong> desired timing. Press <strong>the</strong> [G] (Rewind)/<br />
[H] (Fast Forward) button to move <strong>the</strong> cursor by<br />
single measures. Use <strong>the</strong> [] (Cursor Left/Right)<br />
button to move <strong>the</strong> cursor to <strong>the</strong> parameter to be<br />
edited.<br />
n For details about each event and parameter, see page 76.<br />
n Use <strong>the</strong> View Filter function (page 221) to help you quickly<br />
find desired events.<br />
4 Change <strong>the</strong> parameter settings or location of<br />
<strong>the</strong> event.<br />
Edit <strong>the</strong> value by using <strong>the</strong> [INC/YES], [DEC/NO]<br />
buttons and <strong>the</strong> data dial. The edited event will flash on<br />
<strong>the</strong> display.<br />
Change <strong>the</strong> event location by editing <strong>the</strong> MEAS<br />
(measure), BEAT, and CLOCK.<br />
Press <strong>the</strong> [F6] button to delete <strong>the</strong> event at <strong>the</strong> cursor<br />
location.<br />
5 After you’ve finished editing a parameter,<br />
press <strong>the</strong> [ENTER] button to confirm and enter<br />
<strong>the</strong> edit (<strong>the</strong> event will stop flashing).<br />
If <strong>the</strong> cursor is moved to a new event while <strong>the</strong> current<br />
event is still flashing, editing of <strong>the</strong> current event is<br />
cancelled.<br />
6 Press <strong>the</strong> [EXIT] button to go back to <strong>the</strong><br />
Pattern Play display.<br />
7 Press <strong>the</strong> [STORE] button to call up <strong>the</strong> Pattern<br />
Store window (page 218), <strong>the</strong>n store <strong>the</strong><br />
created Pattern.
Inserting <strong>the</strong> New Event<br />
This section shows how to insert new events to <strong>the</strong> current<br />
Song.<br />
1 From <strong>the</strong> Event List display, press <strong>the</strong> [F5]<br />
Insert button to call up <strong>the</strong> Insert Event<br />
window.<br />
Event type<br />
Insertion point Parameter<br />
2 Specify <strong>the</strong> event type to be inserted, <strong>the</strong><br />
insertion point (measure, beat, and clock), and<br />
parameter value of <strong>the</strong> event.<br />
When <strong>the</strong> cursor is located on <strong>the</strong> Event Type, you can<br />
call up <strong>the</strong> list of event types to be input by pressing <strong>the</strong><br />
[SF6] LIST button and select one from <strong>the</strong> list. For<br />
details about each event and parameter, see page 76.<br />
3 Press <strong>the</strong> [F6] Set button to insert <strong>the</strong> specified<br />
event at <strong>the</strong> specified location.<br />
The Insert Event window remains open, allowing you to<br />
continue inserting new events. Press <strong>the</strong> [ENTER]<br />
button to actually insert <strong>the</strong> event and close <strong>the</strong> Insert<br />
Event window.<br />
4 Press <strong>the</strong> [EXIT] button to go back to <strong>the</strong> Event<br />
List display.<br />
Event List display<br />
In <strong>the</strong> Event List display, MIDI events (including mainly<br />
values such as note number, velocity, and control change<br />
value) are listed and can be edited. Here you can edit or<br />
delete previously recorded events.<br />
This is <strong>the</strong> same as <strong>the</strong> Event List display in <strong>the</strong> Song Edit<br />
mode. For details, see page 193.<br />
Changing <strong>the</strong> MIDI event view—[F2]<br />
ViewFilter<br />
This is <strong>the</strong> same as <strong>the</strong> View Filter in <strong>the</strong> Song Edit mode.<br />
For details, see page 194.<br />
Editing MIDI Events (Pattern Edit)<br />
Voice mode<br />
Performance<br />
mode<br />
Sampling<br />
mode 1<br />
Song mode<br />
Pattern mode<br />
Mixing mode<br />
Sampling<br />
mode 2<br />
Master mode<br />
Utility mode<br />
File mode<br />
MOTIF <strong>XS</strong> Owner’s <strong>Manual</strong> 221<br />
Reference
Reference<br />
Voice mode Performance Sampling Song mode Pattern mode Mixing mode Sampling Master mode Utility mode File mode<br />
mode mode 1<br />
mode 2<br />
222<br />
MOTIF <strong>XS</strong> Owner’s <strong>Manual</strong><br />
Pattern Jobs<br />
The Pattern Job mode contains a <strong>com</strong>prehensive set of editing tools and data transform functions you can use to change<br />
<strong>the</strong> sound of <strong>the</strong> Pattern or Phrase. It also includes a variety of convenient operations, such as copying or erasing data. 36<br />
Pattern Jobs are available.<br />
Function Description<br />
[F1] Undo/Redo Undo Job cancels <strong>the</strong> changes made by <strong>the</strong> most recent operation, restoring <strong>the</strong> data to its previous state.<br />
Redo Job cancel Undo and restores <strong>the</strong> changes.<br />
[F2] Note Note data Jobs<br />
01: Quantize<br />
02: Modify Velocity<br />
03: Modify Gate Time<br />
04: Crescendo<br />
05: Transpose<br />
06: Glide<br />
07: Create Roll<br />
08: Sort Chord<br />
09: Separate Chord<br />
These are <strong>the</strong> same as in <strong>the</strong> Song Job mode. See page 195.<br />
[F3] Event Event Jobs<br />
01: Shift Clock<br />
02: Copy Event<br />
03: Erase Event<br />
04: Extract Event<br />
05: Create Continuous Data<br />
06: Thin Out<br />
07: Modify Control Data<br />
08: Beat Stretch<br />
These are <strong>the</strong> same as in <strong>the</strong> Song Job mode. See page 195.<br />
[F4] Phrase Phrase Jobs<br />
01: Copy Phrase This Job copies a selected Phrase to <strong>the</strong> designated destination Phrase.<br />
02: Exchange Phrase This Job exchanges <strong>the</strong> contents of two specified Phrases.<br />
03: Mix Phrase This Job mixes all data from two selected user Phrases.<br />
04: Append Phrase This Job appends one Phrase to <strong>the</strong> end of ano<strong>the</strong>r to create one longer Phrase.<br />
05: Split Phrase This Job splits a selected Phrase into two separate Phrases.<br />
06: Get Phrase from Song This Job copies a segment of sequence-track data from a Song into <strong>the</strong> designated destination Phrase.<br />
07: Put Phrase to Song This Job copies a selected user Phrase into a specified area of a selected Song.<br />
08: Clear Phrase This Job deletes all data from <strong>the</strong> selected Phrase.<br />
[F5] Track Track Jobs<br />
01: Copy Track This Job copies all data of <strong>the</strong> selected type from a specified source track to a specified destination track.<br />
02: Exchange Track This Job exchanges or “swaps” <strong>the</strong> specified type of data between two specified tracks in <strong>the</strong> current<br />
Song.<br />
03: Mix Track This Job mixes all data from two selected tracks.<br />
04: Clear Track This Job deletes all data of <strong>the</strong> selected type from <strong>the</strong> selected track.<br />
05: Normalize Play Effect This Job rewrites <strong>the</strong> data in <strong>the</strong> selected track so that it incorporates <strong>the</strong> current Play FX/Groove/MIDI<br />
Delay settings.<br />
06: Divide Drum Track This Job separates <strong>the</strong> note events in a drum performance assigned to a specified track, and places <strong>the</strong><br />
notes corresponding to different drum instruments in separate tracks (tracks 1 through 8).<br />
07: Put Track to Arpeggio This Job copies data in <strong>the</strong> specified measures of a track for creating Arpeggio data.<br />
[F6] Pattern Pattern Jobs<br />
01: Copy Pattern This Job copies all data from a selected source Pattern to a selected destination Pattern.<br />
02: Append Pattern This Job appends one Pattern to <strong>the</strong> end of ano<strong>the</strong>r to create one longer Pattern.<br />
03: Split Pattern This Job splits a selected Pattern into two separate Patterns.<br />
04: Clear Pattern This Job deletes all data from <strong>the</strong> selected Pattern, or from all Patterns.
Pattern Job Procedure<br />
1 From <strong>the</strong> Pattern Play display, press <strong>the</strong> [JOB]<br />
button to enter <strong>the</strong> Pattern Job mode.<br />
2 Select <strong>the</strong> desired Job menu by pressing one<br />
of <strong>the</strong> [F1] – [F6] buttons.<br />
3 Move <strong>the</strong> cursor to <strong>the</strong> desired Job by using<br />
<strong>the</strong> data dial, [INC/DEC] and [DEC/NO] buttons,<br />
<strong>the</strong>n press <strong>the</strong> [ENTER] button to call up <strong>the</strong><br />
Job display.<br />
4 Move <strong>the</strong> cursor to <strong>the</strong> desired parameter, <strong>the</strong>n<br />
set <strong>the</strong> value by using <strong>the</strong> data dial, [INC/YES]<br />
and [DEC/NO] buttons.<br />
5 After setting, press <strong>the</strong> [ENTER] button to<br />
execute <strong>the</strong> Job.<br />
“Completed” will appear when <strong>the</strong> Job is done.<br />
CAUTION<br />
In some Jobs, <strong>the</strong> operation overwrites any data previously<br />
existing in <strong>the</strong> destination memory. Important data should<br />
always be saved to a USB storage device connected to <strong>the</strong><br />
USB TO DEVICE terminal or to a <strong>com</strong>puter connected to <strong>the</strong><br />
same network as <strong>the</strong> MOTIF <strong>XS</strong> (page 278).<br />
6 Press <strong>the</strong> [EXIT] button twice to go back to <strong>the</strong><br />
Pattern Play display.<br />
n If <strong>the</strong>re is no data in <strong>the</strong> specified range, “No Data” will<br />
appear on <strong>the</strong> display and <strong>the</strong> Job cannot be executed.<br />
n If you make a mistake or want to <strong>com</strong>pare <strong>the</strong> sound of <strong>the</strong><br />
data before and after executing a Job, press <strong>the</strong> [F1]<br />
button to use <strong>the</strong> Undo/Redo function.<br />
CAUTION<br />
Even if a Job operation has been <strong>com</strong>pleted, selecting a<br />
different Pattern or turning <strong>the</strong> power off without storing will<br />
erase <strong>the</strong> Pattern data. Make sure to store <strong>the</strong> Pattern data to<br />
internal memory by pressing <strong>the</strong> [STORE] button before<br />
selecting a different Pattern or turning <strong>the</strong> power off.<br />
n Some of <strong>the</strong> Jobs which enable you to copy <strong>the</strong> Sample<br />
Voice from <strong>the</strong> source to <strong>the</strong> destination execute <strong>the</strong> actual<br />
copy operation only when <strong>the</strong> Bank Select and Program<br />
Change events which specify <strong>the</strong> Sample Voice are<br />
recorded in <strong>the</strong> source Track.<br />
[F1] Undo/Redo<br />
This is <strong>the</strong> same as in <strong>the</strong> Song Job mode. See page 196.<br />
[F2] Note Jobs<br />
The Note Jobs in <strong>the</strong> Pattern mode are basically same as in<br />
<strong>the</strong> Song Job mode. However, unlike in <strong>the</strong> Song Job<br />
Pattern Jobs<br />
mode, Pattern Note Jobs are applied to <strong>the</strong> Phrases (001 –<br />
256) and a selected range in <strong>the</strong> Phrase (measure : beat :<br />
clock).<br />
[F3] Event Jobs<br />
The Event Jobs in <strong>the</strong> Pattern mode are basically same as<br />
in <strong>the</strong> Song Job mode. However, unlike in <strong>the</strong> Song Job<br />
mode, Pattern Event Jobs are applied to <strong>the</strong> Phrases (001<br />
– 256) and a selected range in <strong>the</strong> Phrase (measure : beat<br />
: clock).<br />
n In “03: Erase Event Job,” “Tempo Change,” “Scene Memory,”<br />
or “Track Mute” cannot be selected as Event Types, unlike in<br />
<strong>the</strong> Song Erase Event Job.<br />
n In “05: Create Continuous Data Job” and “07: Modify Control<br />
Data Job,” “Tempo Change” cannot be selected as Event<br />
Types, unlike in <strong>the</strong> Song Job mode.<br />
[F4] Phrase Jobs<br />
01: Copy Phrase<br />
This Job copies a selected Phrase to <strong>the</strong> designated<br />
destination Phrase. Also <strong>the</strong> Sample Voices used in <strong>the</strong><br />
selected Phrase can be copied. This is useful if you are<br />
creating a Pattern and wish to use <strong>the</strong> Phrase data from<br />
ano<strong>the</strong>r Pattern.<br />
1<br />
3<br />
2<br />
1 Source Phrase<br />
2 Destination Phrase<br />
Determines <strong>the</strong> Pattern number (01 – 64) and Phrase<br />
number (001 – 256) of <strong>the</strong> source and destination<br />
respectively.<br />
3 Copy Sample Voice<br />
When this box is checkmarked, Sample Voices assigned to<br />
<strong>the</strong> source Phrase are copied to <strong>the</strong> destination Phrase as<br />
Sample Voices, and are assigned to <strong>the</strong> corresponding<br />
tracks in <strong>the</strong> selected Pattern. Make sure to set this<br />
parameter to on when coping <strong>the</strong> Phrase using <strong>the</strong> Sample<br />
Voice. When <strong>the</strong>re is no memory available in <strong>the</strong><br />
destination Pattern for Sample Voice data, an alert<br />
message will appear on <strong>the</strong> display and <strong>the</strong> Sample Voice<br />
data will not be copied. If this occurs, use Sample Job 02:<br />
Delete to delete any unused samples, <strong>the</strong>n try again.<br />
Voice mode<br />
Performance<br />
mode<br />
Sampling<br />
mode 1<br />
Song mode<br />
Pattern mode<br />
Mixing mode<br />
Sampling<br />
mode 2<br />
Master mode<br />
Utility mode<br />
File mode<br />
MOTIF <strong>XS</strong> Owner’s <strong>Manual</strong> 223<br />
Reference
Reference<br />
224<br />
Pattern Jobs<br />
Voice mode Performance Sampling Song mode Pattern mode Mixing mode Sampling Master mode Utility mode File mode<br />
mode mode 1<br />
mode 2<br />
CAUTION<br />
Any previous data in <strong>the</strong> copy destination will be overwritten.<br />
CAUTION<br />
Undo/Redo cannot be used to undo/redo a Sample Voice copy<br />
operation.<br />
02: Exchange Phrase<br />
This Job exchanges or “swaps” <strong>the</strong> contents of two<br />
specified Phrases. This is useful if you wish to exchange<br />
two Phrases each of which is assigned to a different<br />
Pattern.<br />
1 Phrase to be exchanged<br />
2 Phrase to be exchanged<br />
Determines <strong>the</strong> Pattern number (01 – 64) and Phrase<br />
number (001 – 256) to be exchanged respectively.<br />
n If this Job is applied to Phrases which use Sample Voices, <strong>the</strong><br />
Sample Voices will not be exchanged.<br />
03: Mix Phrase<br />
This Job mixes all data from two selected user Phrases—1<br />
and 2—and places <strong>the</strong> result in Phrase 2. This is useful if<br />
you wish to create a new Phrase by mixing two Phrases<br />
played, for example, by different drum instruments.<br />
1<br />
1<br />
2<br />
1 Original Phrase<br />
2 Original Phrase and Destination Phrase<br />
Determines <strong>the</strong> Pattern numbers (01 – 64) and Phrase<br />
numbers (001 – 256) to be mixed respectively. Executing<br />
<strong>the</strong> Job mixes all data from two selected user Phrases—1<br />
and 2—and places <strong>the</strong> result in Phrase 2.<br />
n Keep in mind that applying this Job to Phrases with Sample<br />
Voices does not mix <strong>the</strong> Sample Voices.<br />
MOTIF <strong>XS</strong> Owner’s <strong>Manual</strong><br />
2<br />
04: Append Phrase<br />
This Job appends one Phrase (1) to <strong>the</strong> end of ano<strong>the</strong>r<br />
(2) to create one longer Phrase.<br />
2<br />
1 Original Phrase<br />
2 Original Phrase and Destination Phrase<br />
Determines <strong>the</strong> Pattern numbers (01 – 64) and Phrase<br />
numbers (001 – 256) to be appended respectively.<br />
Executing <strong>the</strong> Job appends one Phrase (1) to <strong>the</strong> end of<br />
<strong>the</strong> Phrase (2).<br />
n If this Job is applied to Phrases which use Sample Voices, <strong>the</strong><br />
Sample Voices of <strong>the</strong> source Phrase (1) will not be appended.<br />
n If <strong>the</strong> Pattern length be<strong>com</strong>es greater than 256 measures as a<br />
result of <strong>the</strong> this Job, an error message will be displayed and<br />
<strong>the</strong> Job will be aborted.<br />
05: Split Phrase<br />
This Job splits a selected Phrase (1) into two separate<br />
Phrases (1 and 2). Phrase 1 is divided at <strong>the</strong> Split Point<br />
(3).<br />
1 3<br />
1 Original Phrase<br />
Determines <strong>the</strong> original Phrase to be split by selecting <strong>the</strong><br />
Pattern number (01 – 64) and Phrase number (001 – 256).<br />
Executing <strong>the</strong> Job leaves <strong>the</strong> part before <strong>the</strong> Split Point (3)<br />
of <strong>the</strong> original Phrase.<br />
2 Destination Phrase<br />
Determines <strong>the</strong> split destination Phrase by selecting <strong>the</strong><br />
Pattern number (off, 01 – 64) and Phrase number (off, 001 –<br />
256). Executing <strong>the</strong> Job copies <strong>the</strong> part after <strong>the</strong> Split Point<br />
to this split destination Phrase. When ei<strong>the</strong>r <strong>the</strong> Pattern or<br />
<strong>the</strong> Phrase is set to “off,” <strong>the</strong> part after <strong>the</strong> Split Point of <strong>the</strong><br />
original Phrase will be deleted.<br />
1<br />
2
CAUTION<br />
This Job overwrites any data already existing in <strong>the</strong> split<br />
destination Phrase (2).<br />
3 Split Point Measure<br />
Determines <strong>the</strong> measure (002 – 256) at which <strong>the</strong> Phrase<br />
will be split.<br />
06: Get Phrase from Song<br />
This Job copies a segment of sequence-track data from a<br />
Song into <strong>the</strong> designated destination Phrase. This Job is<br />
useful when you’ve found a drum or bass pattern in a Song<br />
and want to use it in <strong>the</strong> Pattern.<br />
1<br />
3<br />
2<br />
1 Source Song, Track and Measures<br />
Determines <strong>the</strong> source Song number (01 – 64), Track<br />
number (01 – 16) and measure range (001 – 999) of <strong>the</strong><br />
Song. If <strong>the</strong> specified measure range is more than 257, an<br />
alert message will appear on <strong>the</strong> display and <strong>the</strong> Job will<br />
be aborted. If this occurs, set <strong>the</strong> Measure again so that<br />
this range is within 256 measures.<br />
2 Destination Phrase<br />
Determines <strong>the</strong> destination Phrase by selecting <strong>the</strong> Phrase<br />
number (001 – 256). The destination Phrase can be<br />
specified among <strong>the</strong> Phrases of <strong>the</strong> current Pattern.<br />
CAUTION<br />
Any previous data in <strong>the</strong> copy destination will be overwritten.<br />
3 Copy Sample Voice<br />
When <strong>the</strong> Copy Sample box is checkmarked, Sample<br />
Voices used in <strong>the</strong> source data are copied to <strong>the</strong><br />
destination Phrase as Sample Voices, and are assigned to<br />
<strong>the</strong> destination Pattern track. Make sure to set this<br />
parameter to on when copying a track using a Sample<br />
Voice. When <strong>the</strong>re is no memory available in <strong>the</strong><br />
destination Pattern (current Pattern) for Sample Voice data,<br />
an alert message will appear on <strong>the</strong> display and <strong>the</strong><br />
Sample Voice data will not be copied. If this occurs, use<br />
Sample Job 02: Delete to delete any unused samples, <strong>the</strong>n<br />
try again.<br />
CAUTION<br />
Undo/Redo cannot be used to undo/redo a Sample Voice copy<br />
operation.<br />
07: Put Phrase to Song<br />
This Job copies a selected user Phrase into a specified<br />
area of a selected Song.<br />
1<br />
3<br />
2<br />
1 Source Phrase<br />
Pattern Jobs<br />
Determines <strong>the</strong> Phrase number (001 – 256) to be copied.<br />
2 Destination Song, Track and Measure<br />
Determines <strong>the</strong> destination Song number (01 – 64), Track<br />
number (01 – 16) and measure range (001 – 999).<br />
CAUTION<br />
The copy operation overwrites any data previously existing on <strong>the</strong><br />
destination track and measure range.<br />
3 Copy Sample Voice<br />
When <strong>the</strong> Copy Sample box is checkmarked, Sample<br />
Voices used by <strong>the</strong> source Phrase are copied to <strong>the</strong><br />
destination Song as Sample Voices, and are assigned to<br />
<strong>the</strong> destination Song track. Make sure to set this parameter<br />
to on when coping a Phrase using a Sample Voice. When<br />
<strong>the</strong>re is no memory available in <strong>the</strong> destination Song for<br />
Sample Voice data, an alert message will appear on <strong>the</strong><br />
display and <strong>the</strong> Sample Voice data will not be copied. If<br />
this occurs, use Sample Job 02: Delete to delete any<br />
unused samples, <strong>the</strong>n try again.<br />
CAUTION<br />
Undo/Redo cannot be used to undo/redo a Sample Voice copy<br />
operation.<br />
08: Clear Phrase<br />
This Job deletes all data from <strong>the</strong> selected Phrase.<br />
1<br />
2<br />
1 Phrase<br />
Determines <strong>the</strong> Phrase number (001 – 256) to be cleared.<br />
Voice mode<br />
Performance<br />
mode<br />
Sampling<br />
mode 1<br />
Song mode<br />
Pattern mode<br />
Mixing mode<br />
Sampling<br />
mode 2<br />
Master mode<br />
Utility mode<br />
File mode<br />
MOTIF <strong>XS</strong> Owner’s <strong>Manual</strong> 225<br />
Reference
Reference<br />
226<br />
Pattern Jobs<br />
Voice mode Performance Sampling Song mode Pattern mode Mixing mode Sampling Master mode Utility mode File mode<br />
mode mode 1<br />
mode 2<br />
2 Clear Sample Voice<br />
When <strong>the</strong> checkbox is checked, <strong>the</strong> Sample Voice used in<br />
<strong>the</strong> Phrase specified above will also be cleared.<br />
CAUTION<br />
Undo/Redo (page 196) cannot be used to undo/redo a Delete<br />
sample operation.<br />
[F5] Track Jobs<br />
01: Copy Track<br />
This Job copies all data of <strong>the</strong> selected type from a<br />
specified source track to a specified destination track. This<br />
is useful if you are creating a Pattern and wish to use <strong>the</strong><br />
track data from ano<strong>the</strong>r Pattern.<br />
1<br />
2<br />
1 Source Track<br />
2 Destination Track<br />
Determines <strong>the</strong> Pattern number (01 – 64), Section (A – P)<br />
and Track (01 – 16) of source and destination respectively.<br />
CAUTION<br />
Any previous data in <strong>the</strong> copy destination will be overwritten.<br />
3 Data Type to be copied<br />
Determines <strong>the</strong> type(s) of data to be copied.<br />
Settings: Sequencer Event (all events in <strong>the</strong> track), Play Effect, Mix<br />
Part Parameter (all Mixing Part parameters), Sample Voice<br />
n When <strong>the</strong>re is no memory available in <strong>the</strong> destination Pattern<br />
for Sample Voice data, an alert message will appear on <strong>the</strong><br />
display and <strong>the</strong> Sample Voice data will not be copied even<br />
though <strong>the</strong> check box of <strong>the</strong> Sample Voice is marked. If this<br />
occurs, use Sample Job 02: Delete to delete any unused<br />
samples, <strong>the</strong>n try again.<br />
CAUTION<br />
Undo/Redo (page 196) cannot be used to undo/redo a Delete<br />
sample operation.<br />
MOTIF <strong>XS</strong> Owner’s <strong>Manual</strong><br />
3<br />
02: Exchange Track<br />
This is <strong>the</strong> same as in <strong>the</strong> Song Job mode. See page 205.<br />
03: Mix Track<br />
This is <strong>the</strong> same as in <strong>the</strong> Song Job mode. See page 205.<br />
04: Clear Track<br />
This Job deletes all data of <strong>the</strong> selected type from <strong>the</strong><br />
selected track.<br />
1<br />
2<br />
1 Tracks<br />
Determines <strong>the</strong> track to be cleared by specifying <strong>the</strong><br />
Section (A – P, all) and Track (01 – 16, all).<br />
2 Data type to be cleared<br />
Determines <strong>the</strong> type(s) of data to be cleared. Select <strong>the</strong><br />
desired type by checkmarking <strong>the</strong> appropriate box.<br />
Settings: Sequencer Event (all events in <strong>the</strong> track), Play Effect, Mix<br />
Part Parameter (all Mixing Part parameters), Sample Voice<br />
CAUTION<br />
Undo/Redo cannot be used to undo/redo a Clear operation for<br />
tracks that contain sample data.<br />
05: Normalize Play Effect<br />
This is <strong>the</strong> same as in <strong>the</strong> Song Job mode. See page 205.<br />
06: Divide Drum Track<br />
This is <strong>the</strong> same as in <strong>the</strong> Song Job mode. See page 205.
07: Put Track to Arpeggio<br />
This Job copies data in <strong>the</strong> specified measures of a track<br />
for creating Arpeggio data. Up to 16 unique note numbers<br />
can be recorded to <strong>the</strong> Arpeggio track. If more than 16<br />
different note numbers have been recorded to <strong>the</strong> MIDI<br />
sequence data, <strong>the</strong> Convert operation reduces <strong>the</strong> notes in<br />
excess of <strong>the</strong> limit. Because of this, be careful to record<br />
only up to 16 different notes when you create an Arpeggio,<br />
especially when using all four tracks.<br />
1 Range<br />
Determines <strong>the</strong> range which will be converted to <strong>the</strong><br />
arpeggio data by specifying <strong>the</strong> Section (A – P) and<br />
Measure (001 – 256).<br />
O<strong>the</strong>r parameters are <strong>the</strong> same as in <strong>the</strong> Song Job mode.<br />
See page 206.<br />
[F6] Pattern Jobs<br />
01: Copy Pattern<br />
This Job copies all data from a selected source Pattern to a<br />
selected destination Pattern.<br />
1<br />
3<br />
2<br />
1<br />
1 Source Pattern<br />
2 Destination Pattern<br />
Determines <strong>the</strong> source and destination Pattern by selecting<br />
<strong>the</strong> Pattern number (01 – 64) and Section (A – P, all). If you<br />
set <strong>the</strong> source Section to “all,” <strong>the</strong> destination Section is<br />
also set to “all” automatically, with <strong>the</strong> result that all source<br />
Pattern data is copied to <strong>the</strong> destination.<br />
3 Copy Pattern Chain<br />
Pattern Jobs<br />
When this box is checkmarked, Pattern Chain data as well<br />
as Pattern data will be copied.<br />
02: Append Pattern<br />
This Job appends one Pattern (1) to <strong>the</strong> end of ano<strong>the</strong>r<br />
(2) to create one longer Pattern. Actually, <strong>the</strong> Phrases<br />
making up <strong>the</strong> source Pattern (1) will be appended to <strong>the</strong><br />
end of <strong>the</strong> Phrases making up <strong>the</strong> destination Pattern (2).<br />
This Job is useful if you wish to connect different Patterns<br />
toge<strong>the</strong>r.<br />
2<br />
1 Original Pattern<br />
2 Original Pattern and Destination Pattern<br />
Determines <strong>the</strong> two Patterns to be connected by selecting<br />
<strong>the</strong> Pattern numbers (01 – 64) and Sections (A – P)<br />
respectively. Executing <strong>the</strong> Job appends one Pattern (1)<br />
to <strong>the</strong> end of <strong>the</strong> o<strong>the</strong>r Pattern (2). The result of this Job<br />
will be overwritten to <strong>the</strong> destination Pattern (2).<br />
3 Keep Original Phrase<br />
When this box is checkmarked, <strong>the</strong> original destination<br />
Pattern data is retained in memory, along with <strong>the</strong> new<br />
appended Pattern data. When <strong>the</strong> Keep Original Phrase<br />
checkbox is checked, this Job requires twice <strong>the</strong> number<br />
of empty user Phrases as <strong>the</strong> number of tracks containing<br />
data in which to store <strong>the</strong> appended Phrase data. If <strong>the</strong><br />
required space is not available, an alert message will<br />
appear and <strong>the</strong> Job will be aborted. If this occurs use <strong>the</strong><br />
Clear Phrase Job to delete unused Phrases <strong>the</strong>n try again.<br />
If <strong>the</strong> box is not checkmarked, <strong>the</strong> original destination<br />
Pattern is erased and replaced with <strong>the</strong> newly created<br />
Phrases.<br />
n If this Job is applied to Patterns which use Sample Voices, <strong>the</strong><br />
Sample Voices of <strong>the</strong> source Phrase (1) will not be appended.<br />
n If <strong>the</strong> Pattern length be<strong>com</strong>es greater than 256 measures as a<br />
result of this Job, an error message will be displayed and <strong>the</strong><br />
Job will be aborted.<br />
1<br />
3<br />
Voice mode<br />
Performance<br />
mode<br />
Sampling<br />
mode 1<br />
Song mode<br />
Pattern mode<br />
Mixing mode<br />
Sampling<br />
mode 2<br />
Master mode<br />
Utility mode<br />
File mode<br />
MOTIF <strong>XS</strong> Owner’s <strong>Manual</strong> 227<br />
Reference
Reference<br />
228<br />
Pattern Jobs<br />
Voice mode Performance Sampling Song mode Pattern mode Mixing mode Sampling Master mode Utility mode File mode<br />
mode mode 1<br />
mode 2<br />
03: Split Pattern<br />
This Job splits a selected Pattern (1) into two separate<br />
Patterns (1 and 2). The Pattern 1 is divided at <strong>the</strong> Split<br />
Point (3). Actually, <strong>the</strong> Phrases making up <strong>the</strong> source<br />
Pattern (1) will be divided and <strong>the</strong> divided Phrases after<br />
<strong>the</strong> Split Point will be assigned to <strong>the</strong> tracks of <strong>the</strong><br />
destination Pattern.<br />
1 3 5 4<br />
1 Original Pattern<br />
Determines <strong>the</strong> original Pattern to be split by selecting <strong>the</strong><br />
Pattern number (01 – 64) and Section (A – P). Executing<br />
<strong>the</strong> Job leaves <strong>the</strong> part before <strong>the</strong> Split Point in <strong>the</strong> original<br />
Phrase.<br />
2 Destination Pattern<br />
Determines <strong>the</strong> split destination Pattern by selecting <strong>the</strong><br />
Pattern number (01 – 64) and Section (off, A – P).<br />
Executing <strong>the</strong> Job moves <strong>the</strong> part after <strong>the</strong> Split Point to<br />
this split destination Pattern. When ei<strong>the</strong>r of <strong>the</strong> Pattern<br />
number or Section is set to “off,” <strong>the</strong> part after <strong>the</strong> Split<br />
Point (3) of <strong>the</strong> original pattern (1) will be deleted.<br />
CAUTION<br />
This Job overwrites any data already existing in <strong>the</strong> split<br />
destination Pattern (2).<br />
3 Splitpoint Measure<br />
Specifies <strong>the</strong> measure at which <strong>the</strong> Pattern will be split.<br />
Settings: 002 – 256<br />
4 Keep Original Phrase<br />
When this box is checkmarked, <strong>the</strong> Phrase of <strong>the</strong> original<br />
Pattern is retained in memory and <strong>the</strong> results of <strong>the</strong> Split<br />
Job are written to empty Phrases. When <strong>the</strong> Keep Original<br />
Phrase checkbox is checked, this Job requires twice <strong>the</strong><br />
number of empty user Phrases as <strong>the</strong> number of tracks<br />
containing data in which to store <strong>the</strong> appended Phrase<br />
data. If <strong>the</strong> required space is not available, an alert<br />
message will appear and <strong>the</strong> Job will be aborted. If this<br />
occurs, use <strong>the</strong> Clear Phrase Job to delete unused<br />
Phrases and try again.<br />
When this box is not checkmarked, <strong>the</strong> Phrases making up<br />
<strong>the</strong> original Pattern are erased and replaced with <strong>the</strong> newly<br />
created Phrases.<br />
MOTIF <strong>XS</strong> Owner’s <strong>Manual</strong><br />
2<br />
5 Copy Sample Voice<br />
When this box is checkmarked, Sample Voices (if included<br />
in <strong>the</strong> original Pattern) are copied to <strong>the</strong> destination<br />
Pattern.<br />
04: Clear Pattern<br />
This Job clears specified Pattern. You can also clear only<br />
<strong>the</strong> specified Section of <strong>the</strong> selected Pattern.<br />
1<br />
2<br />
1 Pattern (Pattern and Section) to be cleared<br />
Determines <strong>the</strong> Pattern to be cleared. When <strong>the</strong> Pattern is<br />
set to “all,” all <strong>the</strong> Pattern data will be cleared. When <strong>the</strong><br />
Section is set to “all,” all data from <strong>the</strong> selected Pattern will<br />
be cleared.<br />
2 Clear Pattern Chain<br />
When <strong>the</strong> checkbox is checked, <strong>the</strong> Pattern Chain data will<br />
also be cleared. When <strong>the</strong> checkbox is not checked, <strong>the</strong><br />
Pattern Chain data will not be cleared.<br />
n The Waveform on DIMM cannot be deleted via this Job even if<br />
<strong>the</strong> Sample Voice is used in <strong>the</strong> specified Section. If you want<br />
to actually delete <strong>the</strong> Waveform assigned to <strong>the</strong> Sample Voice<br />
used in <strong>the</strong> specified Section, use <strong>the</strong> Delete Job (page 177)<br />
in <strong>the</strong> Sampling Job mode.
Multi-timbral Tone Generator Settings<br />
for Song/Pattern Playback (Mixing mode)<br />
The setting of <strong>the</strong> tone generator block for Song/Pattern playback is referred to as Mixing. The Mixing mode lets you change<br />
<strong>the</strong> Voice and effect settings for each Part.<br />
To enter <strong>the</strong> Mixing mode, press <strong>the</strong> [MIXING] button in <strong>the</strong> Song mode or Pattern mode.<br />
n The Mixing mode cannot be called up from <strong>the</strong> Voice mode, Performance mode, or Master mode.<br />
The Mixing mode structure<br />
This section explains in detail about <strong>the</strong> Mixing mode and what you can do in <strong>the</strong> Mixing mode.<br />
About Mixing<br />
In <strong>the</strong> Song/Pattern mode, <strong>the</strong> internal tone generator block<br />
functions as <strong>the</strong> multi-timbral tone generator in order to<br />
receive and handle MIDI sequence data consisting of<br />
multiple channels. The settings for <strong>the</strong> multi-timbral tone<br />
generator are collectively referred to as a “Mixing.” A<br />
Mixing program is provided for each Song or Pattern.<br />
Selecting a different Song/Pattern calls up <strong>the</strong> different<br />
Mixing program.<br />
Common Edit and Part Edit<br />
The Mixing Edit mode consists of two sub modes: Common<br />
Edit and Part Edit. Common Edit lets you edit <strong>the</strong> global<br />
settings <strong>com</strong>mon to all Parts, such as <strong>the</strong> Master Effect, <strong>the</strong><br />
Master EQ, and <strong>the</strong> Controller settings. Part Edit lets you<br />
adjust various parameters for each of 16 Parts according<br />
to <strong>the</strong> corresponding Song/Pattern track.<br />
Common Edit<br />
Mixing Edit<br />
Part Edit<br />
Part 1<br />
Part 1 – 16<br />
Effect and EQ structure in <strong>the</strong><br />
Mixing mode<br />
In <strong>the</strong> Mixing mode, two EQ blocks and three Effect blocks<br />
are available.<br />
The two EQ blocks in <strong>the</strong> Mixing mode are Part EQ and<br />
Master EQ. Part EQ is applied to each of <strong>the</strong> Mixing Parts<br />
and can be set in <strong>the</strong> EQ display (page 236) of Part Edit. In<br />
addition, <strong>the</strong> Part EQ parameters can be adjusted at <strong>the</strong><br />
same time for all parts in <strong>the</strong> Part EQ display (page 233) of<br />
Common Edit. On <strong>the</strong> o<strong>the</strong>r hand, Master EQ is applied to<br />
<strong>the</strong> overall sound (all <strong>the</strong> Mixing Parts) and can be set in<br />
<strong>the</strong> Master EQ display (page 234) of Common Edit.<br />
The Effect blocks in <strong>the</strong> Mixing mode are Reverb, Chorus,<br />
and Master Effect. Reverb and Chorus are applied to <strong>the</strong><br />
overall sound and <strong>the</strong> related parameters can be set in <strong>the</strong><br />
Reverb/Chorus display (page 235) of Common Edit. The<br />
depth (send level) of <strong>the</strong> Reverb/Chorus can be set for<br />
each Part in <strong>the</strong> Connect display (page 234) of Part Edit.<br />
On <strong>the</strong> o<strong>the</strong>r hand, Master Effect is applied to <strong>the</strong> overall<br />
sound (all <strong>the</strong> Mixing Parts) and can be set in <strong>the</strong> Master<br />
Effect display (page 234) of Common Edit.<br />
Part 1<br />
Part EQ<br />
Mixing Edit<br />
Part Edit Common Edit<br />
Insertion Effect<br />
Switch<br />
Part 1 – Part 16<br />
A/D Input Part<br />
Insertion Effect Switch<br />
Insertion Effect Settings<br />
Part EQ Offset<br />
Reverb Effect<br />
Chorus Effect<br />
Master Effect<br />
Master EQ<br />
Voice mode<br />
Performance<br />
mode<br />
Sampling<br />
mode 1<br />
Song mode<br />
Pattern mode<br />
Mixing mode<br />
Sampling<br />
mode 2<br />
Master mode<br />
Utility mode<br />
File mode<br />
MOTIF <strong>XS</strong> Owner’s <strong>Manual</strong> 229<br />
Reference
Reference<br />
230<br />
Multi-timbral Tone Generator Settings for Song/Pattern Playback (Mixing mode)<br />
Voice mode Performance Sampling Song mode Pattern mode Mixing mode Sampling Master mode Utility mode File mode<br />
mode mode 1<br />
mode 2<br />
Insertion Effect in <strong>the</strong> Mixing mode<br />
In addition to <strong>the</strong> three Effect blocks above, special<br />
Insertion Effects are available in <strong>the</strong> Mixing mode. Keep in<br />
mind that Insertion Effects cannot be applied to all 16 parts<br />
simultaneously. The MOTIF <strong>XS</strong> features eight Insertion<br />
Effects, allowing you to independently process up to eight<br />
Parts from among <strong>the</strong> 1 – 16 parts and <strong>the</strong> A/D Input part.<br />
You can specify <strong>the</strong> parts to which <strong>the</strong> Insertion Effect is<br />
applied by setting <strong>the</strong> Insertion Effect Switch parameter in<br />
<strong>the</strong> 1 – 16 display (page 231) and <strong>the</strong> Audio Part display<br />
(page 232) of <strong>the</strong> Mixing Play mode.<br />
The most <strong>com</strong>mon use for Insertion Effects is in applying<br />
<strong>com</strong>pression or dynamics processing to an individual Part,<br />
or applying a special effect that is only to be used on one<br />
Part, such as distortion or rotary speaker.<br />
The Insertion Effect parameters can be set in <strong>the</strong> following<br />
displays.<br />
Part 1-16:<br />
The Insertion Effect parameters for each of <strong>the</strong> Parts 1 – 16<br />
can be set by editing <strong>the</strong> Voice assigned to each Part in <strong>the</strong><br />
Connect display and Insertion A/B display of Mixing Voice<br />
Edit (page 239). The edited voice can be stored (page 240)<br />
as a Mixing Voice or User Voice.<br />
A/D Input Part:<br />
The Insertion Effect parameters for <strong>the</strong> A/D Input Part can be<br />
set in <strong>the</strong> Insertion A/B display (page 234) of Common Edit.<br />
Mixing Voices<br />
Up to 16 Normal Voices can be stored for each Song/<br />
Pattern Mixing. This type of Voice is called a Mixing Voice.<br />
Normally, <strong>the</strong> Voice stored in <strong>the</strong> Voice mode is assigned to<br />
each Mixing Part. In this method, <strong>the</strong> sound of <strong>the</strong> Song/<br />
Pattern you created may be changed unexpectedly if you<br />
edit or delete <strong>the</strong> Voice used for <strong>the</strong> Song/Pattern Mixing.<br />
Mixing Voices are provided to prevent <strong>the</strong>se accidental<br />
sound changes. To use this feature, call up a Voice from<br />
User Banks 1 – 3, store <strong>the</strong> selected Voice to <strong>the</strong> Mixing<br />
Voice Bank, assign it to <strong>the</strong> desired Part, <strong>the</strong>n edit <strong>the</strong><br />
Mixing as needed. In addition, make sure to store <strong>the</strong> Voice<br />
as a Mixing Voice after editing <strong>the</strong> Voice in <strong>the</strong> Mixing<br />
mode.<br />
Up to 16 Mixing Voices are provided for each Mixing<br />
program, or in o<strong>the</strong>r words, for each Song/Pattern.<br />
Selecting a different Song/Pattern calls up a different<br />
Mixing belonging to <strong>the</strong> new selected Song/Pattern.<br />
If you wish to use a Mixing Voice of a certain Song/Pattern<br />
for ano<strong>the</strong>r Song/Pattern, execute <strong>the</strong> copy operation<br />
(page 241) in <strong>the</strong> Mixing Voice Job mode.<br />
MOTIF <strong>XS</strong> Owner’s <strong>Manual</strong><br />
Mixing<br />
Part 1 – 16<br />
Voice<br />
Select Store<br />
Mixing Voice<br />
1 – 16<br />
Note that up to 256 Mixing Voices can be stored for all<br />
Songs and Patterns. Accordingly, <strong>the</strong> Mixing Voice memory<br />
will be<strong>com</strong>e full and additional Voices cannot be stored if<br />
you’ve stored 16 different Voices for 16 different Songs.<br />
If such a situation occurs, use <strong>the</strong> Delete Job (page 241) to<br />
delete any unnecessary Mixing Voices in <strong>the</strong> Mixing Voice<br />
Job mode.<br />
n You can confirm <strong>the</strong> amount of currently unused (available)<br />
memory via <strong>the</strong> Mixing Voice Information window (page 240).<br />
Mixing Setup Procedure<br />
Select Voice memory<br />
Preset Bank PRE1 – 8<br />
User Bank USR1 – 3<br />
etc.<br />
1 In <strong>the</strong> Song or Pattern mode, select a Song or<br />
Pattern to be edited.<br />
2 Press <strong>the</strong> [MIXING] button to enter <strong>the</strong> Mixing<br />
mode.<br />
The Part 1 – 16 display (page 231) of <strong>the</strong> Mixing Play<br />
appears.<br />
3 Select a Voice and set o<strong>the</strong>r parameters such<br />
as volume and pan for each Part from <strong>the</strong> Part<br />
1 – 16 display or <strong>the</strong> Audio Part display.<br />
4 Set <strong>the</strong> parameters <strong>com</strong>mon to all Parts or<br />
those exclusive for each Part.<br />
If you wish to edit parameters <strong>com</strong>mon to all parts such<br />
as Master Effect, Master EQ and Controller settings,<br />
press <strong>the</strong> [EDIT] button from <strong>the</strong> Mixing Play display,<br />
<strong>the</strong>n press <strong>the</strong> [COMMON EDIT] button to enter <strong>the</strong><br />
Common Edit display (page 233).<br />
If you wish to edit more detailed Mixing Part<br />
parameters, enter <strong>the</strong> Part Edit mode (page 235) by<br />
pressing <strong>the</strong> [EDIT] button, <strong>the</strong>n press <strong>the</strong> desired one<br />
of <strong>the</strong> Number buttons [1] – [16]. If you wish to edit<br />
parameters for <strong>the</strong> Audio Part, press <strong>the</strong> [EDIT] button<br />
from <strong>the</strong> Mixing Play mode and press <strong>the</strong> [COMMON<br />
EDIT] button <strong>the</strong>n [F4] button to call up <strong>the</strong> Audio In<br />
display (page 234).
5 Edit <strong>the</strong> Voice assigned to <strong>the</strong> Part as desired.<br />
If you wish to edit a Voice assigned to each Part, press<br />
<strong>the</strong> [F6] button in <strong>the</strong> Mixing Play display to call up <strong>the</strong><br />
Mixing Voice Edit display (page 239).<br />
The Mixing Voice Common Edit mode (page 241) can<br />
be called up by pressing <strong>the</strong> [COMMON EDIT] button.<br />
The Mixing Voice Element Edit mode (page 241) can be<br />
called up by pressing one of <strong>the</strong> Number buttons [1] –<br />
[8].<br />
6 Store <strong>the</strong> edited voice as a Mixing Voice as<br />
desired.<br />
In <strong>the</strong> Mixing Voice Edit mode, press <strong>the</strong> [STORE]<br />
button to call up <strong>the</strong> Mixing Voice Store window<br />
(page 240).<br />
7 Store <strong>the</strong> edited Mixing program to <strong>the</strong> Song/<br />
Pattern.<br />
In <strong>the</strong> Song Play mode, press <strong>the</strong> [STORE] button to<br />
call up <strong>the</strong> Song Store window or Pattern Store window.<br />
For detailed instructions on storing, see page 186.<br />
8 Press <strong>the</strong> [SONG] or [PATTERN] button to exit<br />
from <strong>the</strong> Mixing mode to <strong>the</strong> previous mode.<br />
Mixing Play mode<br />
Multi-timbral Tone Generator Settings for Song/Pattern Playback (Mixing mode)<br />
Mixing mode structure<br />
The Mixing mode structure is as follows:<br />
[MIXING] Mixing Play (page 231)<br />
[EDIT] Mixing Edit (page 233)<br />
[COMMON EDIT] Common Edit (page 233)<br />
[1] – [16] Part Edit (page 235)<br />
[JOB] Mixing Job (page 236)<br />
[STORE] Song Store (page 186)/<br />
Pattern Store (page 218)<br />
[F6] Mixing Voice Edit (page 239)<br />
[COMMON EDIT]<br />
Mixing Voice Common Edit (page 241)<br />
[1] – [16]<br />
Mixing Voice Element Edit (page 241)<br />
[JOB]<br />
Mixing Voice Job (page 240)<br />
[STORE]<br />
Mixing Voice Store (page 240)<br />
The Mixing Play display will appear when pressing <strong>the</strong> [MIXING] button in <strong>the</strong> Song mode or Pattern mode. Here you can<br />
edit <strong>the</strong> Mixing parameters which are important for creating a Song/Pattern.<br />
Part Settings on <strong>the</strong> Mixer display—<br />
[F1] Part1 – 16<br />
Here you can edit <strong>the</strong> main parameters for each Mixing<br />
Part. The basic parameters for creating a Song are<br />
ga<strong>the</strong>red on this display from <strong>the</strong> Voice display (page 235)<br />
and <strong>the</strong> Output display (page 235) in <strong>the</strong> Mixing Part Edit<br />
mode. The settings made here are automatically applied to<br />
<strong>the</strong> corresponding parameters in <strong>the</strong> displays in <strong>the</strong> Mixing<br />
Part Edit mode, and vice versa.<br />
1<br />
3<br />
4<br />
5<br />
6<br />
7<br />
8<br />
9<br />
)<br />
! @ # $<br />
2<br />
1 Part (Indication only)<br />
Indicates <strong>the</strong> Part numbers. When <strong>the</strong> [TRACK] lamp is<br />
turned on, <strong>the</strong> Part can be selected via <strong>the</strong> Number buttons<br />
[1] – [16].<br />
2 Mute/Solo/Edit (Indication only)<br />
Indicates <strong>the</strong> status of each Part. When <strong>the</strong> [MUTE] lamp is<br />
turned on, <strong>the</strong> Mute on/off status for each Part can be<br />
switched via <strong>the</strong> Number buttons [1] – [16]. When <strong>the</strong><br />
[SOLO] lamp is turned on, <strong>the</strong> Solo Part can be selected<br />
via <strong>the</strong> Number buttons [1] – [16].<br />
Settings: m (Mute), s (Solo), E (Edit Indicator)<br />
Edit Indicator<br />
Indicates that <strong>the</strong> Mixing Voice for <strong>the</strong> Part is modified but not stored<br />
yet.<br />
3 Category (Indication only)<br />
Indicates <strong>the</strong> two main categories of <strong>the</strong> current Voice.<br />
When <strong>the</strong> [CATEGORY SEARCH] lamp is turned on, you<br />
can select <strong>the</strong> desired Voice by using <strong>the</strong> Category Search<br />
function (page 24). The name of <strong>the</strong> selected Voice is<br />
shown at <strong>the</strong> top right of <strong>the</strong> display.<br />
MOTIF <strong>XS</strong> Owner’s <strong>Manual</strong><br />
Voice mode<br />
Performance<br />
mode<br />
Sampling<br />
mode 1<br />
Song mode<br />
Pattern mode<br />
Mixing mode<br />
Sampling<br />
mode 2<br />
Master mode<br />
Utility mode<br />
File mode<br />
231<br />
Reference
Reference<br />
232<br />
Multi-timbral Tone Generator Settings for Song/Pattern Playback (Mixing mode)<br />
Voice mode Performance Sampling Song mode Pattern mode Mixing mode Sampling Master mode Utility mode File mode<br />
mode mode 1<br />
mode 2<br />
4 Bank<br />
5 Number<br />
These determine <strong>the</strong> selected Voice. Press <strong>the</strong><br />
[PROGRAM] button (<strong>the</strong> lamp lights), <strong>the</strong>n <strong>the</strong> desired<br />
Voice by using <strong>the</strong> [PRE 1] – [USER DR] buttons, [A] – [H]<br />
buttons and <strong>the</strong> [1] – [16] buttons. The name of <strong>the</strong><br />
selected Voice is shown at <strong>the</strong> right top of <strong>the</strong> display.<br />
Settings:<br />
Number: 1 – 128<br />
Bank: PR1 – 8 (Preset 1 – 8), US1 – 3 (User 1 – 3), GM, GD (GM Drum),<br />
PD (Preset Drum), UD (User Drum), SP (Sample Voice), MV (Mixing<br />
Voice)<br />
6 Rev Send (Reverb Send)<br />
Adjusts <strong>the</strong> Reverb send level for each Part. The higher <strong>the</strong><br />
value, more pronounced <strong>the</strong> Reverb effect.<br />
Settings: 0 – 127<br />
7 Cho Send (Chorus Send)<br />
Adjusts <strong>the</strong> Chorus send level for each Part. The higher <strong>the</strong><br />
value, more pronounced <strong>the</strong> Chorus effect.<br />
Settings: 0 – 127<br />
8 Pan<br />
Determines <strong>the</strong> position in <strong>the</strong> stereo field for each Part.<br />
Settings: L63 (far left) – C (center) – R63 (far right)<br />
9 Ins FX Sw (Insertion Effect Switch)<br />
Determines <strong>the</strong> Parts available for <strong>the</strong> Insertion Effect.<br />
When this switch is set to on, <strong>the</strong> Insertion Effect of <strong>the</strong><br />
Voice assigned to <strong>the</strong> Part enabled. Make sure that this<br />
parameter is set to on for any Parts/Voices to which you<br />
need to apply Insertion Effects.<br />
The MOTIF <strong>XS</strong> features eight Insertion effect systems,<br />
letting you set this parameter to on for up to eight Parts. If<br />
eight Parts are already turned on, <strong>the</strong> parameter cannot be<br />
turned on for additional Parts. In this case, <strong>the</strong> switch for<br />
ano<strong>the</strong>r Part must be turned off before you can turn <strong>the</strong><br />
switch for <strong>the</strong> desired Part on. Please note that <strong>the</strong><br />
Insertion Effects are available simultaneously for up to<br />
eight Parts including <strong>the</strong> A/D Input Part.<br />
Settings: B (on), A (off)<br />
) Volume<br />
Determines <strong>the</strong> output level of <strong>the</strong> Part.<br />
Settings: 0 – 127<br />
! [F1] Part 1 – 16<br />
Calls up this display from <strong>the</strong> Audio Mixer display.<br />
@ [F2] Audio (Audio Part)<br />
Calls up <strong>the</strong> Audio Part display for setting <strong>the</strong> Audio Input.<br />
# [F5] Effect<br />
Calls up <strong>the</strong> Effect display (page 234) in <strong>the</strong> Common Edit<br />
mode.<br />
MOTIF <strong>XS</strong> Owner’s <strong>Manual</strong><br />
$ [F6] Vce Edit (Mixing Voice Edit)<br />
Enters <strong>the</strong> Mixing Voice Edit mode, letting you edit <strong>the</strong><br />
Voice assigned to <strong>the</strong> current Part. If <strong>the</strong> Drum Voice or<br />
Sample Voice is assigned to <strong>the</strong> current Part, this button<br />
does not appear and <strong>the</strong> Mixing Voice is not available.<br />
Audio Input settings—[F2] Audio<br />
From this display you can set parameters related to audio<br />
input from <strong>the</strong> [A/D INPUT] connector and <strong>the</strong> mLAN<br />
connector (available for <strong>the</strong> MOTIF <strong>XS</strong>8 and available for<br />
<strong>the</strong> MOTIF <strong>XS</strong>6/7 with <strong>the</strong> mLAN16E2 installed). The basic<br />
parameters for creating a Song are ga<strong>the</strong>red on this<br />
display from <strong>the</strong> Audio In display (page 234) in <strong>the</strong> Mixing<br />
Common Edit mode. The settings made here will be<br />
applied to <strong>the</strong> same parameters on <strong>the</strong> displays in <strong>the</strong><br />
Mixing Common Edit mode, and vice versa.<br />
1<br />
2<br />
3<br />
4<br />
5<br />
6<br />
1 Part (Indication only)<br />
Indicates <strong>the</strong> Part numbers.<br />
AD (A/D Input Part)<br />
Lets you set parameters related to audio input from <strong>the</strong> A/D<br />
INPUT connector.<br />
mL (mLAN)<br />
Lets you set parameters related to audio input from <strong>the</strong> mLAN<br />
connector (available for <strong>the</strong> MOTIF <strong>XS</strong>8 and available for <strong>the</strong><br />
MOTIF <strong>XS</strong>6/7 with <strong>the</strong> mLAN16E2 installed). The audio signal<br />
here is transmitted from <strong>the</strong> <strong>com</strong>puter via mLAN Ports 3 and 4.<br />
The settings made here are automatically applied to <strong>the</strong><br />
corresponding parameters in <strong>the</strong> Part 1 – 16 display<br />
(page 231).<br />
2 Rev Send (Reverb Send)<br />
3 Cho Send (Chorus Send)<br />
4 Pan<br />
5 Ins FX Sw (Insertion Effect Switch)*<br />
6 Volume<br />
* Available for <strong>the</strong> A/D Input Part only
Mixing Edit<br />
Multi-timbral Tone Generator Settings for Song/Pattern Playback (Mixing mode)<br />
The Mixing Edit mode lets you control typical mixer settings such as volume balance, pan position and effects, allowing you<br />
to fine tune <strong>the</strong> Song/Pattern data. Mixing Edit consists of Part Edit and Common Edit.<br />
Useful functions for editing Mixing<br />
Turning specific Parts on/off (Mute<br />
function)<br />
You can turn individual Parts on/off by using <strong>the</strong> Mute<br />
function.<br />
1 2 3 4 5 6 7<br />
8<br />
PART SELECT ARP ON/OFF<br />
9 10 11 12 13 14 15 16<br />
PART MUTE ARP HOLD<br />
2<br />
1 Press <strong>the</strong> [MUTE] button.<br />
The [MUTE] lamp lights, indicating that each Part can<br />
be turned on/off.<br />
2 Press any of <strong>the</strong> Number buttons [1] – [16].<br />
The lamp of <strong>the</strong> pressed button will be turned off and<br />
<strong>the</strong> corresponding Part will be muted.<br />
Press <strong>the</strong> same button again to turn <strong>the</strong> lamp on and<br />
disengage <strong>the</strong> mute function for that Part. You can turn<br />
multiple Parts on/off by pressing <strong>the</strong>ir buttons.<br />
Soloing a specific Part<br />
The Solo function is <strong>the</strong> opposite of Mute, and lets you<br />
instantly solo a specific Part and mute all o<strong>the</strong>rs.<br />
1 2 3 4 5 6 7<br />
8<br />
PART SELECT ARP ON/OFF<br />
9 10 11 12 13 14 15 16<br />
PART MUTE ARP HOLD<br />
2<br />
PERFORMANCE<br />
CONTROL<br />
1 Press <strong>the</strong> [SOLO] button.<br />
The [SOLO] lamp lights, indicating that <strong>the</strong> specific Part<br />
can be soloed.<br />
2 Press any of <strong>the</strong> Number buttons [1] – [16].<br />
The lamp of <strong>the</strong> pressed button will be turned on and<br />
only <strong>the</strong> corresponding Part will be sounded.<br />
Press any o<strong>the</strong>r number button to change <strong>the</strong> solo Part.<br />
1<br />
TRACK<br />
MUTE SOLO<br />
PERFORMANCE<br />
CONTROL<br />
TRACK<br />
MUTE SOLO<br />
1<br />
The [E] Indicator<br />
When changing <strong>the</strong> value of <strong>the</strong> parameter in <strong>the</strong> Mixing<br />
Play or Edit mode, <strong>the</strong> [E] (Edit Indicator) will appear on <strong>the</strong><br />
top right corner of <strong>the</strong> LCD display. This gives a quick<br />
confirmation that <strong>the</strong> current Mixing has been modified but<br />
not yet stored. To store <strong>the</strong> current edited status, follow <strong>the</strong><br />
instructions on page 97.<br />
Compare function<br />
The Compare function lets you switch between <strong>the</strong> justedited<br />
Mixing and its original, unedited condition, allowing<br />
you to hear how your edits affect <strong>the</strong> sound. For<br />
instructions on using Compare, refer to <strong>the</strong> same function<br />
in <strong>the</strong> Voice mode on page 97.<br />
Storing <strong>the</strong> created Mixing<br />
The created mixing setup can be stored as part of <strong>the</strong> data<br />
of a Song or Pattern. For instructions on storing a Song/<br />
Pattern, see pages 186 and 218.<br />
Common Edit parameters<br />
[SONG]/[PATTERN] ➞ [MIXING] ➞ [EDIT] ➞<br />
[COMMON EDIT]<br />
The Common Edit mode lets you edit <strong>the</strong> parameters<br />
<strong>com</strong>mon to all Mixing Parts.<br />
Controller settings—[F1] General<br />
Edit Indicator<br />
Determines <strong>the</strong> function for <strong>the</strong> Knobs and ASSIGNABLE<br />
FUNCTION buttons for each Song/Pattern.<br />
The function is <strong>the</strong> same as <strong>the</strong> one in <strong>the</strong> O<strong>the</strong>r display<br />
(page 145) in <strong>the</strong> Performance Common Edit mode.<br />
MOTIF <strong>XS</strong> Owner’s <strong>Manual</strong><br />
Voice mode<br />
Performance<br />
mode<br />
Sampling<br />
mode 1<br />
Song mode<br />
Pattern mode<br />
Mixing mode<br />
Sampling<br />
mode 2<br />
Master mode<br />
Utility mode<br />
File mode<br />
233<br />
Reference
Reference<br />
234<br />
Multi-timbral Tone Generator Settings for Song/Pattern Playback (Mixing mode)<br />
Voice mode Performance Sampling Song mode Pattern mode Mixing mode Sampling Master mode Utility mode File mode<br />
mode mode 1<br />
mode 2<br />
Master Effect and Master EQ settings—<br />
[F2] MasterFX (Master Effect)<br />
[SF2] MasterFX (Master Effect)<br />
This display lets you set <strong>the</strong> type and parameters of <strong>the</strong><br />
Master Effect.<br />
The function is <strong>the</strong> same as <strong>the</strong> one in <strong>the</strong> Master Effect<br />
display (page 146) in <strong>the</strong> Performance Common Edit mode.<br />
[SF3] MasterEQ<br />
From this display you can apply five-band equalization to<br />
all Parts of <strong>the</strong> selected Mixing.<br />
The function is <strong>the</strong> same as <strong>the</strong> one in <strong>the</strong> Master EQ<br />
display (page 146) in <strong>the</strong> Performance Common Edit mode.<br />
Controller Settings—[F3] Ctrl Asgn<br />
(Controller Assign)<br />
The controllers and knobs on <strong>the</strong> front panel can be used<br />
to change and adjust a variety of parameters—in real time,<br />
and simultaneously. For example, you could use <strong>the</strong><br />
ASSIGN 1 and 2 knobs to control effect depth, while using<br />
<strong>the</strong> Foot Controller to control modulation. These control<br />
assignments are called “Controller Assign.” You can set<br />
different Control Set assignments for each Mixing.<br />
The function is same as <strong>the</strong> one on <strong>the</strong> Controller Assign<br />
display (page 147) in <strong>the</strong> Performance Common Edit<br />
mode.<br />
Audio Input Part Settings—[F4] Audio In<br />
You can set parameters related to audio input from <strong>the</strong> A/D<br />
INPUT connector and <strong>the</strong> mLAN connector.<br />
The mLAN Input is available only for <strong>the</strong> MOTIF <strong>XS</strong>8. This is<br />
available for MOTIF <strong>XS</strong>6/7 only when an optional<br />
mLAN16E2 has been installed.<br />
[SF1] Output<br />
From this display you can set <strong>the</strong> Send level of <strong>the</strong> Audio<br />
Input Part signal sent to <strong>the</strong> Reverb/Chorus effect and <strong>the</strong><br />
output jack assignment for <strong>the</strong> Audio Input Part.<br />
The function of this display is <strong>the</strong> same as <strong>the</strong> one in <strong>the</strong><br />
Output display (page 147) in <strong>the</strong> Performance Common<br />
Edit mode.<br />
[SF2] Connect<br />
Determines <strong>the</strong> effect routing for Insertion Effects A and B.<br />
The setting changes are shown on <strong>the</strong> diagram in <strong>the</strong> display,<br />
giving you a clear picture of how <strong>the</strong> signal is routed.<br />
The function of this display is <strong>the</strong> same as <strong>the</strong> one in <strong>the</strong><br />
Insertion Effect Connection display (page 148) in <strong>the</strong><br />
Performance Common Edit mode.<br />
MOTIF <strong>XS</strong> Owner’s <strong>Manual</strong><br />
[SF3] Ins A (Insertion Effect A)<br />
[SF4] Ins B (Insertion Effect B)<br />
From this display, you can also set <strong>the</strong> type and its<br />
parameters of <strong>the</strong> Insertion Effect.<br />
The function of this display is <strong>the</strong> same as <strong>the</strong> one in <strong>the</strong><br />
Insertion Effect A/Insertion Effect B display (page 149) in<br />
<strong>the</strong> Performance Common Edit mode.<br />
Effect Settings—[F5] Effect<br />
From <strong>the</strong> following displays, you can set <strong>the</strong> Effect<br />
connection and values of o<strong>the</strong>r parameters. For details<br />
about <strong>the</strong> Effect structure in <strong>the</strong> Mixing mode, see page 70.<br />
[SF1] Connect<br />
From this display, you can set <strong>the</strong> Return level of <strong>the</strong><br />
Reverb/Chorus effect, Effect Pan, and Chorus to Send<br />
Level.<br />
The function of this display is <strong>the</strong> same as <strong>the</strong> one in <strong>the</strong><br />
Connection display (page 149) in <strong>the</strong> Performance<br />
Common Edit mode.<br />
[SF2] Ins Switch (Insertion Effect Switch)<br />
In this display, you can select which Parts (from Mixing<br />
Parts 1 – 16 and <strong>the</strong> Audio Input Part) will be assigned to<br />
<strong>the</strong> eight Insertion Effects.<br />
1<br />
1 Part 1 – 16, A/D<br />
Determines <strong>the</strong> Parts available for <strong>the</strong> Insertion Effect.<br />
When this switch is set to on, <strong>the</strong> Insertion Effect of <strong>the</strong><br />
Voice assigned to <strong>the</strong> Part is enabled. Make sure that this<br />
parameter is set to on for any Parts/Voices to which you<br />
need to apply Insertion Effects.<br />
The MOTIF <strong>XS</strong> features eight Insertion effect systems,<br />
letting you set this parameter to on for up to eight Parts. If<br />
eight Parts are already turned on, <strong>the</strong> parameter cannot be<br />
turned on for additional Parts. In this case, <strong>the</strong> switch for<br />
ano<strong>the</strong>r Part must be turned off before you can turn <strong>the</strong><br />
switch for <strong>the</strong> desired Part on.<br />
n For <strong>the</strong> Audio Input Part, <strong>the</strong> Insertion Effect type/parameter<br />
can be set on <strong>the</strong> Insertion A/B display (page 234) in <strong>the</strong><br />
Mixing Common Edit mode. For Parts 1 – 16, <strong>the</strong> Insertion<br />
Effect type/parameter settings cannot be set in <strong>the</strong> Mixing Edit<br />
mode because <strong>the</strong>ir settings are included in <strong>the</strong> Voice<br />
assigned to each Part. If you wish to edit <strong>the</strong> Insertion Effect<br />
settings for each Part, enter <strong>the</strong> Mixing Voice Edit mode, <strong>the</strong>n<br />
edit <strong>the</strong> Effect settings for <strong>the</strong> Voice.
[SF3] Reverb<br />
[SF4] Chorus<br />
From <strong>the</strong> Type column on <strong>the</strong>se displays, you can select <strong>the</strong><br />
Reverb/Chorus type. From <strong>the</strong> Preset column, you can select<br />
one of <strong>the</strong> templates that call up <strong>the</strong> pre-programmed settings<br />
of various parameters of <strong>the</strong> selected Reverb/Chorus type.<br />
From <strong>the</strong>se displays, you can also set each parameter of <strong>the</strong><br />
selected Effect type individually and manually.<br />
The function of <strong>the</strong>se displays is <strong>the</strong> same as those of <strong>the</strong><br />
Reverb display and Chorus display (page 150) in <strong>the</strong><br />
Performance Common Edit mode.<br />
Part Edit parameters<br />
[SONG]/[PATTERN] ➞ [MIXING] ➞ [EDIT] ➞<br />
[1] – [16] Part selection<br />
In <strong>the</strong> Part Edit mode, you can edit <strong>the</strong> parameters of <strong>the</strong><br />
individual Parts such as Voice, Arpeggio, EG and EQ settings.<br />
Selected Part display/Four-Part display<br />
Just as with <strong>the</strong> Performance Part Edit mode, you can use two<br />
types of display in <strong>the</strong> Mixing Part Edit mode. One type of<br />
display lets you edit parameters for <strong>the</strong> currently selected Part<br />
and <strong>the</strong> o<strong>the</strong>r type of display lets you view parameters for four<br />
Parts. You can switch between <strong>the</strong>se two types by pressing <strong>the</strong><br />
[SF5] button. Note that <strong>the</strong> display for four Parts is not available<br />
for <strong>the</strong> [F2] ARP Main and <strong>the</strong> [F3] ARP O<strong>the</strong>r displays.<br />
Selecting a Part to be edited<br />
Press one of <strong>the</strong> [1] – [16] buttons to select a Part to be edited.<br />
n For details about useful functions such as Mute and Solo, see<br />
page 233.<br />
Part Basic Settings—[F1] Voice<br />
[SF1] Voice<br />
This display lets you specify <strong>the</strong> MIDI receive channel for <strong>the</strong><br />
current Part as well as <strong>the</strong> Voice. The o<strong>the</strong>r parameters except<br />
for Receive Channel (1) are <strong>the</strong> same as those in <strong>the</strong> Voice<br />
display (page 151) in <strong>the</strong> Performance Part Edit mode.<br />
1<br />
Multi-timbral Tone Generator Settings for Song/Pattern Playback (Mixing mode)<br />
1 Receive Channel<br />
Determines <strong>the</strong> MIDI receive channel for <strong>the</strong> selected Part.<br />
Since MIDI data may be <strong>com</strong>ing from many channels at<br />
once, you should set this to match <strong>the</strong> particular channel<br />
over which <strong>the</strong> desired controlling data is being sent<br />
Settings: 01 – 16, off<br />
[SF2] Output<br />
From this display, you can set <strong>the</strong> Reverb/Chorus depth<br />
and <strong>the</strong> Output jack assignment for each Part. The function<br />
of this display is <strong>the</strong> same as <strong>the</strong> one in <strong>the</strong> Output display<br />
(page 152) in <strong>the</strong> Performance Part Edit mode.<br />
[SF3] O<strong>the</strong>r<br />
From this display, you can set parameters related to pitch<br />
bend and velocity. The function of this display is <strong>the</strong> same<br />
as <strong>the</strong> one in <strong>the</strong> O<strong>the</strong>r display (page 153) in <strong>the</strong><br />
Performance Part Edit mode.<br />
Arpeggio Basic Settings—[F2] ARP<br />
Main (Arpeggio Main)<br />
This display determines <strong>the</strong> basic settings of <strong>the</strong> Arpeggio.<br />
The settings of parameters shown at <strong>the</strong> bottom of <strong>the</strong><br />
display can be registered to <strong>the</strong> [SF1] – [SF5] buttons.<br />
The function is <strong>the</strong> same as <strong>the</strong> one in <strong>the</strong> Arpeggio Main<br />
display (page 154) in <strong>the</strong> Performance Part Edit mode.<br />
Changing rhythmic feel of <strong>the</strong> Arpeggio—<br />
[F3] ARP O<strong>the</strong>r (Arpeggio O<strong>the</strong>r)<br />
By changing <strong>the</strong> timing and velocity of <strong>the</strong> notes, you can<br />
change <strong>the</strong> rhythmic “feel” of <strong>the</strong> Arpeggio playback.<br />
The function of this display is <strong>the</strong> same as <strong>the</strong> one in <strong>the</strong><br />
Arpeggio O<strong>the</strong>r display (page 156) in <strong>the</strong> Performance<br />
Part Edit mode.<br />
EG Settings—[F4] EG (Envelope<br />
Generator)<br />
These settings let you control <strong>the</strong> sound transition from <strong>the</strong><br />
moment a key is pressed to <strong>the</strong> moment at which it is<br />
released. You can also adjust <strong>the</strong> tone brilliance by setting<br />
<strong>the</strong> Cutoff Frequency and Resonance.<br />
The function of this display is <strong>the</strong> same as <strong>the</strong> one in <strong>the</strong><br />
EG display page 157) in <strong>the</strong> Performance Part Edit mode.<br />
Voice mode<br />
Performance<br />
mode<br />
Sampling<br />
mode 1<br />
Song mode<br />
Pattern mode<br />
Mixing mode<br />
Sampling<br />
mode 2<br />
Master mode<br />
Utility mode<br />
File mode<br />
MOTIF <strong>XS</strong> Owner’s <strong>Manual</strong> 235<br />
Reference
Reference<br />
236<br />
Multi-timbral Tone Generator Settings for Song/Pattern Playback (Mixing mode)<br />
Voice mode Performance Sampling Song mode Pattern mode Mixing mode Sampling Master mode Utility mode File mode<br />
mode mode 1<br />
mode 2<br />
Equalizer (EQ) Settings—[F5] EQ<br />
(Equalizer)<br />
You can apply 3-band parametric EQ to each Part to adjust<br />
<strong>the</strong> sound.<br />
The function is <strong>the</strong> same as <strong>the</strong> one in <strong>the</strong> EQ display<br />
(page 158) in <strong>the</strong> Performance Part Edit mode.<br />
Mixing Job—Convenient functions<br />
MOTIF <strong>XS</strong> Owner’s <strong>Manual</strong><br />
From this display you can set how each individual Part<br />
responds to various MIDI data, such as Control Change<br />
and Program Change messages. When <strong>the</strong> relevant<br />
parameter is set to “on,” <strong>the</strong> corresponding Part responds<br />
to <strong>the</strong> appropriate MIDI data.<br />
The function is <strong>the</strong> same as <strong>the</strong> one in <strong>the</strong> Receive Switch<br />
display (page 158) in <strong>the</strong> Performance Part Edit mode. In<br />
addition to <strong>the</strong> parameters which can be set in <strong>the</strong><br />
Performance Part Edit mode, <strong>the</strong> Program Change and<br />
Bank Select can be set in this display of <strong>the</strong> Mixing mode.<br />
The Mixing Job mode features some convenient data organization and initialization tools, for use when creating<br />
Performances and archiving <strong>the</strong>m. To enter <strong>the</strong> Mixing Job mode, press <strong>the</strong> [JOB] button in <strong>the</strong> Mixing mode. Press <strong>the</strong><br />
[EXIT] button to return to <strong>the</strong> Mixing Play mode.<br />
Mixing Job Procedure<br />
1 In <strong>the</strong> Mixing mode or Mixing Edit mode, press<br />
<strong>the</strong> [JOB] button to enter <strong>the</strong> Mixing Job mode.<br />
2 Call up <strong>the</strong> desired Mixing Job menu by<br />
pressing <strong>the</strong> appropriate button ([F1] – [F6]).<br />
3 Set <strong>the</strong> parameters for executing <strong>the</strong> Job.<br />
4 Press <strong>the</strong> [ENTER] button. (The display<br />
prompts you for confirmation.)<br />
To cancel <strong>the</strong> Job, press <strong>the</strong> [DEC/NO] button.<br />
5 Press <strong>the</strong> [INC/YES] button to execute <strong>the</strong> Job.<br />
After <strong>the</strong> Job has been <strong>com</strong>pleted, a “Completed”<br />
message appears and operation returns to <strong>the</strong> original<br />
display.<br />
6 Press <strong>the</strong> [MIXING] button to return to <strong>the</strong><br />
Mixing Play mode.<br />
CAUTION<br />
Even if you execute <strong>the</strong> Job, selecting a different Song/Pattern or<br />
turning <strong>the</strong> power off without storing will erase <strong>the</strong> Mixing data.<br />
Make sure to store <strong>the</strong> Song/Pattern data (including <strong>the</strong> Mixing) to<br />
internal memory by pressing <strong>the</strong> [STORE] button before selecting<br />
a different Song/Pattern or turning <strong>the</strong> power off.<br />
Initializing <strong>the</strong> Mixing—[F1] Init<br />
This function lets you reset (initialize) all Mixing parameters<br />
to <strong>the</strong>ir default settings. It also allows you to selectively<br />
initialize certain parameters, such as Common settings,<br />
settings for each Part, and so on.<br />
MIDI Receive Settings—[F6] RcvSwitch<br />
(Receive Switch)<br />
1<br />
4<br />
2<br />
3<br />
1 All Parameters<br />
All settings for <strong>the</strong> selected Mixing are initialized. When this<br />
is set to on, <strong>the</strong> Common parameters (2) and Part<br />
parameters (3) cannot be set.<br />
2 Common Parameters<br />
Common parameter settings for <strong>the</strong> selected Mixing are<br />
initialized.<br />
n The Insertion Effect Switch is a Part parameter. Therefore,<br />
checkmark <strong>the</strong> desired boxes of Parts 1 – 16 (described<br />
below) if you wish to initialize <strong>the</strong> Insertion Effect Switch<br />
parameter settings.<br />
3 Part Parameters<br />
Part 1 – 16<br />
Mixing Part Edit settings (page 235) for Parts which are turned<br />
on are initialized.<br />
A/D (A/D Input)<br />
This Part is input from <strong>the</strong> external audio equipment<br />
connected to <strong>the</strong> A/D INPUT jack. Parameter settings for <strong>the</strong> A/<br />
D input Part (page 234) of Common Edit are initialized.<br />
mLAN<br />
This Part is input from <strong>the</strong> external audio equipment<br />
connected to <strong>the</strong> mLAN jack. When this is checkmarked,<br />
parameter settings for <strong>the</strong> mLAN Part (page 234) of Common<br />
Edit are initialized.<br />
n The “mL” setting is available only for <strong>the</strong> MOTIF <strong>XS</strong>8. This<br />
is available for MOTIF <strong>XS</strong>6/7 only when an optional<br />
mLAN16E2 has been installed.
4 Initialize selected Parts to GM<br />
When this box is checked, executing <strong>the</strong> Job resets <strong>the</strong><br />
selected Parts to standard GM tone generator settings.<br />
When <strong>the</strong> checkbox of All Parameters (1) is marked, all<br />
parameters will be reset to <strong>the</strong> GM settings. When <strong>the</strong><br />
checkbox of All Parameters (1) is not marked, checked<br />
parameters (from Common, 1 – 16, AD and mLAN) will be<br />
reset to <strong>the</strong> GM settings.<br />
[F2] Recall<br />
If you are editing a Song/Pattern Mixing program and<br />
select a different Song/Pattern without storing <strong>the</strong> one<br />
you’re editing, all <strong>the</strong> edits you’ve made will be erased. If<br />
this happens, you can use Recall function to restore <strong>the</strong><br />
Mixing with your latest edits intact.<br />
Copying parameter settings from ano<strong>the</strong>r<br />
Mixing, Voice and Performance—[F3] Copy<br />
Copying parameter settings from ano<strong>the</strong>r<br />
Mixing (Copy Part)—[SF1] Part<br />
This convenient operation lets you copy Common Edit and<br />
Part Edit settings of a certain Mixing to <strong>the</strong> currently edited<br />
Mixing. This is useful if you are creating a Mixing and wish<br />
to use some parameter settings from ano<strong>the</strong>r Mixing.<br />
1<br />
2<br />
3<br />
Source setup<br />
1 In <strong>the</strong> Song mode: Song number<br />
In <strong>the</strong> Pattern mode: Pattern number<br />
Determines <strong>the</strong> source Mixing by selecting <strong>the</strong> Song<br />
number (Pattern number while in <strong>the</strong> Pattern mode). The<br />
name of <strong>the</strong> selected Song or Pattern is indicated at right.<br />
To select <strong>the</strong> current Mixing as source, enter <strong>the</strong><br />
checkmark in <strong>the</strong> Current Mix checkbox.<br />
2 Data type<br />
Determines <strong>the</strong> source data type.<br />
Settings: Common, Part1 – 16, A/D, mLAN<br />
n The Insertion Effect Switch is a Part parameter. Therefore, <strong>the</strong><br />
Insertion Effect Switch parameter settings are copied only<br />
when selecting one of <strong>the</strong> Parts 1 – 16.<br />
Multi-timbral Tone Generator Settings for Song/Pattern Playback (Mixing mode)<br />
Destination setup<br />
3 Currently edited Part<br />
Determines <strong>the</strong> destination Part of <strong>the</strong> currently edited Mixing.<br />
Settings: Common, Part1 – 16, A/D, mLAN<br />
Copying <strong>the</strong> Voice Common Edit settings to<br />
<strong>the</strong> Mixing (Copy Voice)—[SF2] Voice<br />
This Job lets you copy <strong>the</strong> Common Edit effect settings of<br />
<strong>the</strong> Voice assigned to <strong>the</strong> specified Part to <strong>the</strong> current<br />
Mixing. This would <strong>com</strong>e in handy when a certain Voice<br />
has effect settings that you want to use in your Mixing<br />
program.<br />
1<br />
2<br />
3<br />
1 In <strong>the</strong> Song mode: Song number<br />
In <strong>the</strong> Pattern mode: Pattern number, Section<br />
Determines <strong>the</strong> Bank and <strong>the</strong> Mixing program number to<br />
be copied. The name of <strong>the</strong> selected Song or Pattern is<br />
indicated at right. If you wish to select <strong>the</strong> current Mixing as<br />
source, enter <strong>the</strong> checkmark in <strong>the</strong> Current Mix check box.<br />
2 Part number<br />
Selects <strong>the</strong> Part (01 – 16) to which <strong>the</strong> source Voice is<br />
assigned. The name of <strong>the</strong> selected Song or Pattern is<br />
indicated at right.<br />
3 Data type<br />
Determines <strong>the</strong> source data type. By checking <strong>the</strong><br />
appropriate box, <strong>the</strong> corresponding data settings are<br />
copied from <strong>the</strong> source Voice to <strong>the</strong> destination Mixing. The<br />
o<strong>the</strong>r parameter settings are not copied from <strong>the</strong> Voice to<br />
<strong>the</strong> current Mixing.<br />
Copying <strong>the</strong> Performance Edit settings to <strong>the</strong><br />
Mixing Edit (Copy Performance)—[SF3] Perf<br />
This Job lets you copy <strong>the</strong> settings of <strong>the</strong> Performance Edit<br />
to <strong>the</strong> current Mixing. This would <strong>com</strong>e in handy when a<br />
certain Performance has settings that you want to use in<br />
your Mixing program.<br />
1<br />
2<br />
3<br />
Voice mode<br />
Performance<br />
mode<br />
Sampling<br />
mode 1<br />
Song mode<br />
Pattern mode<br />
Mixing mode<br />
Sampling<br />
mode 2<br />
Master mode<br />
Utility mode<br />
File mode<br />
MOTIF <strong>XS</strong> Owner’s <strong>Manual</strong> 237<br />
Reference
Reference<br />
238<br />
Multi-timbral Tone Generator Settings for Song/Pattern Playback (Mixing mode)<br />
Voice mode Performance Sampling Song mode Pattern mode Mixing mode Sampling Master mode Utility mode File mode<br />
mode mode 1<br />
mode 2<br />
1 Bank, Performance number<br />
Determines <strong>the</strong> Bank and <strong>the</strong> Performance number to be<br />
copied. The name of <strong>the</strong> selected Performance is shown at<br />
right.<br />
2 Data type<br />
Determines whe<strong>the</strong>r or not <strong>the</strong> settings of <strong>the</strong> listed<br />
parameters are copied. By checking <strong>the</strong> box of <strong>the</strong><br />
Insertion Effect Switch, <strong>the</strong> Insertion Effect Switch settings<br />
are copied from Performance Parts 1 – 4 to <strong>the</strong> Mixing<br />
Parts set as Destination Parts (3). If <strong>the</strong> boxes of <strong>the</strong> o<strong>the</strong>r<br />
parameters are checkmarked, <strong>the</strong> settings of <strong>the</strong> checked<br />
parameters are copied from <strong>the</strong> Performance Common<br />
mode to <strong>the</strong> Mixing Common mode. All o<strong>the</strong>r parameter<br />
settings in <strong>the</strong> Common Edit and Part Edit modes will be<br />
copied from <strong>the</strong> Performance to <strong>the</strong> current Mixing.<br />
3 Destination Parts<br />
Determines <strong>the</strong> four parts of <strong>the</strong> current Mixing as<br />
destination.<br />
Settings: 1 – 4, 5 – 8, 9 – 12, 13 – 16<br />
Transmitting <strong>the</strong> Mixing Settings to an<br />
external MIDI device (Bulk Dump)—[F4] Bulk<br />
This function lets you send specified parameter settings for<br />
<strong>the</strong> currently edited Mixing to a <strong>com</strong>puter or ano<strong>the</strong>r MIDI<br />
device for data archiving. To execute <strong>the</strong> Bulk Dump, press<br />
<strong>the</strong> [ENTER] button.<br />
n The Bulk Dump data includes only <strong>the</strong> MIDI messages and<br />
does not include <strong>the</strong> Waveforms.<br />
n In order to execute Bulk Dump, you’ll need to set <strong>the</strong> correct<br />
MIDI Device Number. For details, see page 268.<br />
Mixing Template—[F5] Template<br />
Storing/Recalling <strong>the</strong> Mixing to/from <strong>the</strong><br />
Template—[SF1] Mix<br />
This Job lets you store your edited Mixing program to User<br />
memory as a Mixing Template and recall it. 32 Mixing<br />
Templates can be stored. 32 Mixing Templates can be<br />
used both in <strong>the</strong> Song mode and <strong>the</strong> Pattern mode.<br />
1 2<br />
MOTIF <strong>XS</strong> Owner’s <strong>Manual</strong><br />
1 Template<br />
Determines <strong>the</strong> Mixing Template to be stored or recalled.<br />
Pressing <strong>the</strong> [SF5] button to store <strong>the</strong> current Mixing while<br />
pressing <strong>the</strong> [SF4] button to recall <strong>the</strong> Mixing Template<br />
stored to User Memory.<br />
Settings: 01 – 32<br />
2 Mixing Template name<br />
Enters <strong>the</strong> name of <strong>the</strong> Mixing Template. For detailed<br />
instructions on naming, see page 82.<br />
Copying <strong>the</strong> Performance Edit settings to a<br />
Mixing (Template Performance)—[SF2] Perf<br />
This Job lets you copy <strong>the</strong> settings of <strong>the</strong> Performance Edit<br />
settings to <strong>the</strong> current Mixing. This would <strong>com</strong>e in handy<br />
when a certain Performance has settings that you want to<br />
use in your Mixing program.<br />
1<br />
2<br />
1 Bank, Performance number<br />
Determines <strong>the</strong> Bank (USR 1 – 3) and <strong>the</strong> Performance<br />
number (001 – 128) to be copied. The name of <strong>the</strong><br />
selected Performance is indicated at right.<br />
n The difference between <strong>the</strong> Copy Performance and <strong>the</strong><br />
Template Performance is <strong>the</strong> MIDI receive channel set via <strong>the</strong><br />
Job execution. All <strong>the</strong> Mixing parts set via <strong>the</strong> Copy<br />
Performance have <strong>the</strong> same MIDI channel whereas all <strong>the</strong><br />
Mixing parts set via <strong>the</strong> Template Performance have different<br />
MIDI channels. This means that a Mixing setup created via <strong>the</strong><br />
Template Performance can be used as a multi-timbral tone<br />
generator.<br />
2 Destination Parts<br />
Determines <strong>the</strong> four parts of <strong>the</strong> current MIxing as<br />
destination.<br />
Settings: 1 – 4, 5 – 8, 9 – 12, 13 – 16
Mixing Voice Edit<br />
Multi-timbral Tone Generator Settings for Song/Pattern Playback (Mixing mode)<br />
Mixing Voices are Normal Voices that have been specially edited for and saved to specific Song/Pattern Mixings. Up to 16<br />
Mixing Voices can be stored to each Song/Pattern Mixing. In this mode, you can edit <strong>the</strong> Voices assigned to Mixing Parts 1 –<br />
16 respectively and store <strong>the</strong>m as Mixing Voices. Mixing Voice Jobs are also available, providing convenient tools for<br />
organizing your created Mixing Voices.<br />
Keep in mind that Drum Voices cannot be edited in <strong>the</strong> Mixing Voice Edit mode.<br />
Press <strong>the</strong> [F6] Vce Edit button to enter <strong>the</strong> Mixing Voice Edit mode.<br />
n For more information about Mixing Voices, see page 230.<br />
Editing Mixing Voices<br />
1 Press <strong>the</strong> [MIXING] button in <strong>the</strong> Song mode or<br />
Pattern mode to call up <strong>the</strong> Mixing Play display<br />
(page 231) in <strong>the</strong> Mixing mode.<br />
Voice Category Voice name<br />
Voice Number<br />
Voice Bank<br />
[F6] button<br />
2 Move <strong>the</strong> cursor to <strong>the</strong> Part to which <strong>the</strong><br />
desired Voice is assigned.<br />
The name of <strong>the</strong> selected Voice is shown at right top of<br />
<strong>the</strong> display. You can also select <strong>the</strong> Voice here. To do<br />
this, press <strong>the</strong> [PROGRAM] button (<strong>the</strong> lamp lights),<br />
<strong>the</strong>n select <strong>the</strong> desired Voice by using <strong>the</strong> Bank buttons<br />
[PRE 1] – [GM], Group buttons [A] – [H] and <strong>the</strong><br />
Number buttons [1] – [16].<br />
n Keep in mind that Drum Voices cannot be edited in <strong>the</strong><br />
Mixing Voice Edit mode.<br />
3 Press <strong>the</strong> [F6] Vce Edit button to enter <strong>the</strong><br />
Mixing Voice Edit mode.<br />
4 Call up <strong>the</strong> Common Edit display or Element<br />
Edit display.<br />
To call up <strong>the</strong> Common Edit display, press <strong>the</strong><br />
[COMMON EDIT] button. To edit more global<br />
parameters related to <strong>the</strong> overall Voice and how it’s<br />
processed, such as Arpeggio, Controller, and Effects,<br />
call up <strong>the</strong> Common Edit display.<br />
To call up <strong>the</strong> Element Edit display, press one of <strong>the</strong><br />
Number buttons [1] – [8] to select <strong>the</strong> Element to be<br />
edited. If you wish to edit <strong>the</strong> sounds that make up a<br />
Voice and <strong>the</strong> basic parameters that determine <strong>the</strong><br />
sound, such as Oscillator, Pitch, Filter, Amplitude, and<br />
EG (Envelope Generator), call up <strong>the</strong> Element Edit<br />
display.<br />
COMMON EDIT<br />
Common Edit display<br />
1 2 3 4 5 6 7<br />
8<br />
Element Edit display<br />
PART SELECT ARP ON/OFF<br />
5 Call up <strong>the</strong> Edit display including <strong>the</strong><br />
parameters you wish to edit by pressing <strong>the</strong><br />
[F1] – [F6] buttons and [SF1] – [SF5] buttons.<br />
Both Common Edit and Element Edit consist of several<br />
displays. To find a desired display, note <strong>the</strong> tab menu<br />
corresponding to <strong>the</strong> [F1] – [F5] buttons and [SF1] –<br />
[SF5] buttons.<br />
6 Move <strong>the</strong> cursor to <strong>the</strong> desired parameter.<br />
7 Edit <strong>the</strong> value by using <strong>the</strong> [INC/YES], [DEC/<br />
NO] buttons and <strong>the</strong> data dial.<br />
8 Edit <strong>the</strong> Mixing Voice by repeating steps 4 – 7<br />
as desired.<br />
9 Enter a name for <strong>the</strong> Mixing Voice from <strong>the</strong><br />
Name display (page 98) of <strong>the</strong> Common Edit.<br />
For detailed instructions on naming, see page 82.<br />
10 If you wish to store <strong>the</strong> edited Voice, press <strong>the</strong><br />
[STORE] button to call up <strong>the</strong> Store window<br />
(page 233).<br />
For detailed instructions on storing, see page 186.<br />
11 Press <strong>the</strong> [EXIT] or [MIXING] button to return<br />
to <strong>the</strong> Mixing Play mode.<br />
MOTIF <strong>XS</strong> Owner’s <strong>Manual</strong><br />
Voice mode<br />
Performance<br />
mode<br />
Sampling<br />
mode 1<br />
Song mode<br />
Pattern mode<br />
Mixing mode<br />
Sampling<br />
mode 2<br />
Master mode<br />
Utility mode<br />
File mode<br />
239<br />
Reference
Reference<br />
240<br />
Multi-timbral Tone Generator Settings for Song/Pattern Playback (Mixing mode)<br />
Voice mode Performance Sampling Song mode Pattern mode Mixing mode Sampling Master mode Utility mode File mode<br />
mode mode 1<br />
mode 2<br />
Useful functions in <strong>the</strong> Mixing Voice<br />
Edit mode<br />
Switching an Element on/off<br />
This is <strong>the</strong> same as in <strong>the</strong> Voice Element Edit mode<br />
(page 97).<br />
Soloing an Element to be edited<br />
This is <strong>the</strong> same as in <strong>the</strong> Voice Element Edit mode<br />
(page 97).<br />
The [E] Indicator<br />
This is <strong>the</strong> same as in <strong>the</strong> Voice Element Edit mode<br />
(page 97).<br />
Compare function<br />
This is <strong>the</strong> same as in <strong>the</strong> Voice Element Edit mode<br />
(page 97).<br />
Mixing Voice Information—[SF6] INFO<br />
This window indicates <strong>the</strong> information of <strong>the</strong> current Mixing<br />
Voice. You can call up this display by pressing <strong>the</strong> [SF6]<br />
INFO button in <strong>the</strong> Mixing Voice Edit mode. Keep in mind<br />
that <strong>the</strong> Information window can be called up only when<br />
<strong>the</strong> [SF6] tab menu indicates “INFO.”<br />
Press any of <strong>the</strong> panel buttons to return to <strong>the</strong> original<br />
status.<br />
Storing <strong>the</strong> created Mixing Voice<br />
MOTIF <strong>XS</strong> Owner’s <strong>Manual</strong><br />
[MIXING] ➞ [F6] Vce Edit ➞ [STORE]<br />
1 When <strong>the</strong> [E] indicator is shown on <strong>the</strong> display<br />
in <strong>the</strong> Mixing Voice Edit mode, press <strong>the</strong><br />
[STORE] button.<br />
The Mixing Voice Store window appears.<br />
2 Specify <strong>the</strong> destination for storing <strong>the</strong> Mixing<br />
Voice.<br />
Select a Mixing Voice (MIXV) number as destination by<br />
using <strong>the</strong> data dial, [INC/YES] and [DEC/NO] buttons.<br />
You can store <strong>the</strong> Voice edited in <strong>the</strong> Mixing Voice Edit<br />
mode also as a User Normal Voice by setting <strong>the</strong> Voice<br />
Bank to “USR1,” “USR2,” and “USR3.”<br />
3 Press <strong>the</strong> [ENTER] button.<br />
The display prompts you for confirmation. To cancel <strong>the</strong><br />
Store operation, press <strong>the</strong> [DEC/NO] button.<br />
4 Press <strong>the</strong> [INC/YES] button to execute <strong>the</strong><br />
Store operation.<br />
After <strong>the</strong> Mixing Voice has been stored, a “Completed”<br />
message appears and operation returns to <strong>the</strong> original<br />
display.<br />
CAUTION<br />
When you execute <strong>the</strong> Store operation, <strong>the</strong> settings for <strong>the</strong><br />
destination memory will be overwritten. Important data should<br />
always be backed up to a separate USB storage device or to a<br />
<strong>com</strong>puter connected via network to <strong>the</strong> MOTIF <strong>XS</strong>. For detailed<br />
instructions on saving, see page 278.<br />
Mixing Voice Job<br />
[MIXING] ➞ [F6] Vce Edit ➞ [JOB]<br />
The Mixing Voice Job mode provides convenient tools for<br />
organizing your created Mixing Voices.<br />
Mixing Voice Job Procedure<br />
1 Press <strong>the</strong> [JOB] button in <strong>the</strong> Mixing Voice Edit<br />
mode to enter <strong>the</strong> Mixing Voice Job mode.<br />
2 Call up <strong>the</strong> desired Mixing Voice Job by<br />
pressing <strong>the</strong> appropriate button ([F2] – [F4]).<br />
3 Set <strong>the</strong> parameters for executing <strong>the</strong> Job.<br />
Move <strong>the</strong> cursor to <strong>the</strong> desired parameter, <strong>the</strong>n set <strong>the</strong><br />
value.<br />
4 Press <strong>the</strong> [ENTER] button. (The display<br />
prompts you for confirmation.)<br />
To cancel <strong>the</strong> Job, press <strong>the</strong> [DEC/NO] button.<br />
5 Press <strong>the</strong> [INC/YES] button to execute <strong>the</strong> Job.<br />
After <strong>the</strong> Job has been <strong>com</strong>pleted, a “Completed”<br />
message appears and operation returns to <strong>the</strong> original<br />
display.<br />
CAUTION<br />
Even if a Job operation has been <strong>com</strong>pleted, selecting a<br />
different Voice or turning <strong>the</strong> power off without storing will<br />
erase <strong>the</strong> Voice data. Make sure to store <strong>the</strong> Voice data to<br />
internal memory by pressing <strong>the</strong> [STORE] button before<br />
selecting a different Voice or turning <strong>the</strong> power off.<br />
6 Press <strong>the</strong> [EXIT] button to return to <strong>the</strong> Mixing<br />
Voice Edit mode.
Recalling <strong>the</strong> unedited sound—[F2]<br />
Recall<br />
If you are editing a Mixing Voice but have not stored it<br />
before switching to ano<strong>the</strong>r Mixing Voice, <strong>the</strong> edits you<br />
have made will be cleared. If this happens, you can use <strong>the</strong><br />
Recall function to restore <strong>the</strong> Mixing Voice with your latest<br />
edits intact.<br />
Copying ano<strong>the</strong>r Mixing Voice Element<br />
to <strong>the</strong> current one—[F3] Copy<br />
This Job lets you copy <strong>the</strong> Mixing Voice stored to a<br />
specified Song/Pattern to ano<strong>the</strong>r Song/Pattern.<br />
1<br />
2<br />
1 Source Mixing Voice<br />
Determines <strong>the</strong> source Mixing Voice by selecting Song or<br />
Pattern (01 – 64) <strong>the</strong>n specifying <strong>the</strong> number (01 – 16, all).<br />
The main category 1/main category 2 and name of <strong>the</strong><br />
selected Mixing Voice is indicated in <strong>the</strong> lower line.<br />
2 Destination Mixing Voice<br />
Determines <strong>the</strong> destination Mixing Voice. Same as above.<br />
Deleting a Mixing Voice—[F3] Delete<br />
This Job deletes an unnecessary Mixing Voice. Note that<br />
up to 256 Mixing Voices can be stored for all Songs and<br />
Patterns. Accordingly, <strong>the</strong> Mixing Voice memory will<br />
be<strong>com</strong>e full and additional Voices cannot be stored if<br />
you’ve stored 16 different Voices for 16 different Songs. If<br />
this occurs, use this Job to delete any unused Mixing<br />
Voices.<br />
1<br />
Multi-timbral Tone Generator Settings for Song/Pattern Playback (Mixing mode)<br />
1 Mixing Voice to be deleted<br />
Determines <strong>the</strong> Mixing Voice to be erased.<br />
Settings:<br />
Song/Pattern: song, pattern<br />
Song/Pattern number: 01 – 64<br />
Mixing Voice number: 01 – 16, all<br />
Common Edit parameters<br />
[MIXING] ➞ [F6] Vce Edit ➞ [COMMON EDIT]<br />
This is <strong>the</strong> same as in <strong>the</strong> Normal Voice Common Edit<br />
mode. See page 98. However, some parameters having<br />
<strong>the</strong> same name as those in <strong>the</strong> Voice Common Edit mode<br />
are not available in <strong>the</strong> Mixing Voice Edit mode.<br />
Element Edit parameters<br />
[MIXING] ➞ [F6] Vce Edit ➞ Element selection<br />
from [1] – [8]<br />
This is <strong>the</strong> same as in <strong>the</strong> Normal Voice Element Edit mode.<br />
See page 112.<br />
Voice mode<br />
Performance<br />
mode<br />
Sampling<br />
mode 1<br />
Song mode<br />
Pattern mode<br />
Mixing mode<br />
Sampling<br />
mode 2<br />
Master mode<br />
Utility mode<br />
File mode<br />
MOTIF <strong>XS</strong> Owner’s <strong>Manual</strong> 241<br />
Reference
Reference<br />
Voice mode Performance Sampling Song mode Pattern mode Mixing mode Sampling Master mode Utility mode File mode<br />
mode mode 1<br />
mode 2<br />
242<br />
Audio Recording to Song/Pattern (Sampling mode)<br />
In addition to its use in <strong>the</strong> Voice and Performance modes, <strong>the</strong> Sampling mode can also be entered from <strong>the</strong> Song and<br />
Pattern modes. This lets you record audio (such as vocals, electric guitar, or audio from an external device), and use it<br />
directly on a Song/Pattern track as a Sample Voice. This section covers <strong>the</strong> Sampling functions when entering <strong>the</strong> Sampling<br />
mode by pressing <strong>the</strong> [INTEGRATED SAMPLING] button in <strong>the</strong> Song mode or <strong>the</strong> Pattern mode.<br />
n You can also enter <strong>the</strong> Sampling mode by pressing <strong>the</strong> [INTEGRATED SAMPLING] button in <strong>the</strong> Voice mode or <strong>the</strong> Performance mode. Keep<br />
in mind that <strong>the</strong> Sampling functions differ depending on from which mode <strong>the</strong> Sampling mode is called up, <strong>the</strong> Voice/Performance mode or<br />
<strong>the</strong> Song/Pattern mode. See page 161 for instructions on using <strong>the</strong> Sampling function in <strong>the</strong> Voice mode/Performance mode.<br />
The Sampling mode structure<br />
In this section, you’ll learn about <strong>the</strong> structure and organization of Samples when recording audio to a Song/Pattern, as well<br />
as <strong>the</strong> relationship between Samples, Sample Voices, and Mixings.<br />
n For details about Samples, Waveforms, and Key Banks, see page 161.<br />
Audio Recording to Song/Pattern<br />
Because Songs and Patterns on <strong>the</strong> MOTIF <strong>XS</strong> handle only<br />
MIDI data, audio signal cannot be recorded directly to a<br />
track even by executing <strong>the</strong> Sampling operation.<br />
Audio data you’ve recorded to a track via <strong>the</strong> Sampling<br />
operation will be stored as a Sample Voice to a Song/<br />
Pattern. The stored Sample Voice will automatically be<br />
assigned to <strong>the</strong> Mixing Part corresponding to <strong>the</strong> recorded<br />
track. In addition, <strong>the</strong> MIDI data for triggering <strong>the</strong> Sample<br />
Voice will be recorded to <strong>the</strong> track. During playback, <strong>the</strong><br />
MIDI data of <strong>the</strong> track will trigger <strong>the</strong> Sample Voice.<br />
Consequently, <strong>the</strong> resulting track effectively functions as an<br />
Audio track.<br />
Recording<br />
Audio<br />
recording<br />
Sequencer block<br />
Sequence data<br />
(Song, Pattern)<br />
Track 1<br />
Track 2<br />
Track 3<br />
Track 16<br />
Audio data<br />
Sample Voice<br />
MIDI data<br />
Audio data<br />
MIDI data for triggering <strong>the</strong> Sample Voice<br />
MOTIF <strong>XS</strong> Owner’s <strong>Manual</strong><br />
Tone Generator block<br />
Mixing<br />
Part 1: Voice 1<br />
Part 2: Voice 2<br />
Part 3: Sample Voice<br />
Part 16: Voice 16<br />
Assigning<br />
Sample Voice<br />
Audio data is recorded to a Sample Voice which is to be assigned to a<br />
Song/Pattern, and note on/off events for triggering <strong>the</strong> recorded audio<br />
signal are recorded to Track 3.<br />
About Slice<br />
The Slice function is an important operation of Sampling in<br />
<strong>the</strong> Song/Pattern modes, since it allows you to easily divide<br />
<strong>the</strong> audio into smaller parts which can <strong>the</strong>n be triggered<br />
and controlled in many musically useful ways.<br />
Slice actually performs two operations on a Sample<br />
simultaneously.<br />
First, Slice creates a Sample Voice by dividing <strong>the</strong> original<br />
Sample into smaller Samples of a specific note value (such<br />
as 8th notes or 16th notes) depending on <strong>the</strong> rhythm, <strong>the</strong>n<br />
assigns <strong>the</strong> Samples to Key Banks. The created Sample<br />
Voice is automatically assigned to <strong>the</strong> Mixing part<br />
corresponding to <strong>the</strong> recorded Track.<br />
Second, <strong>the</strong> Slice function creates sequence data<br />
consisting of note events to which <strong>the</strong> sliced Samples are<br />
assigned in order. The note events in <strong>the</strong> created sequence<br />
data are arranged according to <strong>the</strong> Key Bank assignment<br />
chromatically, with each gate time of <strong>the</strong> note events<br />
matching <strong>the</strong> original Sample’s rhythm (e.g., 8th notes or<br />
16th notes).<br />
The end result is that you can hear <strong>the</strong> same sound from<br />
both of <strong>the</strong> original Sample and <strong>the</strong> sliced Sample. If this<br />
were <strong>the</strong> only result, Slice wouldn’t be of much use.<br />
However, once a Sample is ‘sliced’ in this way, it can be<br />
changed and played back in many convenient and<br />
creative ways.<br />
Firstly, you can change <strong>the</strong> tempo of <strong>the</strong> Sample in real<br />
time. While <strong>the</strong> MOTIF <strong>XS</strong> features a Time Stretch Job for<br />
changing <strong>the</strong> tempo of <strong>the</strong> Sample, this Job cannot be<br />
used in real time during your keyboard performance<br />
because it takes some time to convert <strong>the</strong> Sample data. On<br />
<strong>the</strong> o<strong>the</strong>r hand, by using sliced Samples, you can change<br />
<strong>the</strong> speed of Sample playback by changing <strong>the</strong> tempo<br />
value of <strong>the</strong> Song/Pattern in real time.
The second benefit is that you can quickly and easily<br />
create variations of <strong>the</strong> original Sample by changing <strong>the</strong><br />
playback of <strong>the</strong> sliced Samples.<br />
For example, you could change <strong>the</strong> velocities and timing<br />
points of <strong>the</strong> note events to which <strong>the</strong> sliced Samples are<br />
assigned. This lets you create accents in <strong>the</strong> playback or<br />
change <strong>the</strong> rhythm of <strong>the</strong> Sample to a swing feel, for<br />
example. Fur<strong>the</strong>rmore, you can change <strong>the</strong> actual order of<br />
<strong>the</strong> Sample slices (as note events), making it exceptionally<br />
easy to <strong>com</strong>e up with new and unusual sound variations.<br />
Sampling Main display<br />
Audio Recording to Song/Pattern (Sampling mode)<br />
The Sampling Main display, <strong>the</strong> entrance of <strong>the</strong> Sampling mode, is called up when entering <strong>the</strong> Sampling mode from <strong>the</strong><br />
current mode. Pressing <strong>the</strong> [INTEGRATED SAMPLING] button in <strong>the</strong> Song mode or Pattern mode calls up <strong>the</strong> Sampling<br />
mode dedicated to creation of Sample Voices assigned to a Song/Pattern track. Press <strong>the</strong> [EXIT] button to return to <strong>the</strong><br />
original mode, Song or Pattern.<br />
n This section covers <strong>the</strong> Sampling mode called up from <strong>the</strong> Song/Pattern mode. See page 162 for instructions on using <strong>the</strong> Sampling function<br />
in <strong>the</strong> Voice mode/Performance mode.<br />
Selecting a Waveform and Key Bank—<br />
[INTEGRATED SAMPLING]<br />
The Sampling Main display lets you select <strong>the</strong> Waveform<br />
and its Key Bank and hear <strong>the</strong> sound of <strong>the</strong> Sample<br />
assigned to <strong>the</strong> selected Key Bank.<br />
1<br />
2<br />
4<br />
5<br />
6<br />
7<br />
8<br />
9<br />
3<br />
1 2 3<br />
Example 1<br />
Example 2<br />
The parameters 1 – 7 and <strong>the</strong> [SF1], [SF5], [SF6], and<br />
[F6] buttons are same as in <strong>the</strong> Sampling mode called up<br />
from <strong>the</strong> Voice mode/Performance mode. See page 162.<br />
8 Track (Indication only)<br />
Sliced, assigned Samples<br />
Indicates <strong>the</strong> track number of <strong>the</strong> currently selected Song/<br />
Pattern.<br />
9 Measure (Indication only)<br />
4 5 6 7 8<br />
C D E F G A B<br />
Phrase order to be played<br />
1, 2, 3, 4, 5, 6, 7, 8<br />
1, 3, 1, 4, 5, 8, 3, 6<br />
You can produce melodic or rhythmic variations simply by<br />
changing <strong>the</strong> sequence of <strong>the</strong> note events.<br />
Indicates <strong>the</strong> measure number of <strong>the</strong> currently selected<br />
Song/Pattern.<br />
n Keep in mind that you can assign <strong>the</strong> User Voices created in<br />
<strong>the</strong> Sampling mode entered from <strong>the</strong> Voice/Performance mode<br />
to Mixing parts of <strong>the</strong> Song/Pattern. You can also assign <strong>the</strong><br />
Waveforms created in <strong>the</strong> Sampling mode entered from <strong>the</strong><br />
Song/Pattern mode to Elements of <strong>the</strong> Voice in <strong>the</strong> Voice Edit<br />
mode.<br />
MOTIF <strong>XS</strong> Owner’s <strong>Manual</strong><br />
Voice mode<br />
Performance<br />
mode<br />
Sampling<br />
mode 1<br />
Song mode<br />
Pattern mode<br />
Mixing mode<br />
Sampling<br />
mode 2<br />
Master mode<br />
Utility mode<br />
File mode<br />
243<br />
Reference
Reference<br />
244<br />
Audio Recording to Song/Pattern (Sampling mode)<br />
Voice mode Performance Sampling Song mode Pattern mode Mixing mode Sampling Master mode Utility mode File mode<br />
mode mode 1<br />
mode 2<br />
Sampling Record<br />
[INTEGRATED SAMPLING] ➞ [F6] Rec<br />
The Sampling Record function lets you record sounds—such as vocals from a connected microphone, <strong>the</strong> signal from an<br />
electric guitar, or audio from an external CD or MP3 player—and store <strong>the</strong> audio as a Sample Voice, which is used in <strong>the</strong><br />
tracks of a Song/Pattern. See page 39 for instructions on using <strong>the</strong> Sampling function in <strong>the</strong> Song mode/Pattern mode.<br />
n This section covers <strong>the</strong> Sampling mode called up from <strong>the</strong> Song/Pattern mode. See page 163 for instructions on using <strong>the</strong> Sampling function<br />
in <strong>the</strong> Voice mode/Performance mode.<br />
Important<br />
In order to use <strong>the</strong> Sampling function, DIMM modules must be installed to <strong>the</strong> instrument. For details on installing DIMMs, see page 295.<br />
The recorded (edited) Sample data residing temporarily in DIMM is lost when <strong>the</strong> power is turned off. Make sure to prepare <strong>the</strong> USB storage<br />
device or a <strong>com</strong>puter connected to <strong>the</strong> same network as <strong>the</strong> MOTIF <strong>XS</strong> before using <strong>the</strong> Sampling function.<br />
Sampling Setup—[F6] Rec<br />
From this display you can set up various parameters for<br />
Sampling. Press <strong>the</strong> [F6] button from <strong>the</strong> Sampling main<br />
display to call up this display. Press <strong>the</strong> [EXIT] button to go<br />
back to <strong>the</strong> Sampling Main display.<br />
After setting up, press <strong>the</strong> [F6] Standby button to call up<br />
<strong>the</strong> Record Standby display (page 245).<br />
1<br />
2<br />
3<br />
4<br />
5<br />
@<br />
1 Recording Type<br />
Determines <strong>the</strong> recording method. The Sampling<br />
procedure and created Sample data differ depending on<br />
<strong>the</strong> setting here.<br />
Settings: slice+seq, sample, sample+note<br />
slice+seq<br />
The recorded Sample is automatically divided into “slices” to be stored<br />
as a Sample Voice <strong>the</strong>n <strong>the</strong>se slices are assigned to successive notes<br />
on <strong>the</strong> keyboard. These notes are <strong>the</strong>n automatically arranged in MIDI<br />
sequence data (to <strong>the</strong> specified track) for playback. For example, if a<br />
1-measure drum pattern is sampled and a 8th note size is specified,<br />
<strong>the</strong> recorded measure will be sliced into (approximately) eight Samples<br />
which will be assigned to <strong>the</strong> eight consecutive notes on <strong>the</strong> keyboard.<br />
sample<br />
The recorded audio signal is just stored as a Sample Voice. This<br />
setting produces no MIDI sequence data resulting that <strong>the</strong> recorded<br />
Sample is not played back even when playing back <strong>the</strong> Song/Pattern.<br />
sample+note<br />
In addition to sample data, <strong>the</strong> appropriate note data for playing <strong>the</strong><br />
sample is created and recorded to <strong>the</strong> specified Track (8).<br />
2 Input Source<br />
Determines <strong>the</strong> input connector via which <strong>the</strong> signal to be<br />
sampled will be received. Refer to <strong>the</strong> description of <strong>the</strong><br />
same-named parameter on page 164.<br />
MOTIF <strong>XS</strong> Owner’s <strong>Manual</strong><br />
6<br />
7<br />
8<br />
9<br />
)<br />
!<br />
#<br />
3 Stereo/Mono<br />
Determines whe<strong>the</strong>r new Samples will be recorded as<br />
stereo or mono Samples. Refer to <strong>the</strong> description of <strong>the</strong><br />
same-named parameter on page 164.<br />
4 Record Next<br />
This is available when <strong>the</strong> Recording Type in <strong>the</strong> Setup<br />
display is set to “sample.” Refer to <strong>the</strong> description of <strong>the</strong><br />
same-named parameter on page 164.<br />
5 Frequency<br />
Specifies <strong>the</strong> sampling frequency. Refer to <strong>the</strong> description<br />
of <strong>the</strong> same-named parameter on page 165.<br />
6 Waveform<br />
Determines <strong>the</strong> Waveform number as destination.<br />
Settings: 0001 – 1024<br />
CAUTION<br />
This operation overwrites any data previously existing at <strong>the</strong><br />
destination Waveform number. Important data should always be<br />
saved to a USB storage device connected to <strong>the</strong> USB TO DEVICE<br />
terminal or to a <strong>com</strong>puter connected to <strong>the</strong> same network as <strong>the</strong><br />
MOTIF <strong>XS</strong> (page 278).<br />
7 Keybank<br />
Determines <strong>the</strong> note number of <strong>the</strong> Key Bank as<br />
destination. The value set here can be changed in <strong>the</strong><br />
Sampling Edit mode (page 250). Keep in mind that this<br />
parameter cannot be set when <strong>the</strong> Recording Type is set to<br />
“slice+seq.”<br />
Settings: C -2 – G8<br />
n When <strong>the</strong> Recording Type is set to “slice+seq,” sliced<br />
Samples will be assigned to <strong>the</strong> notes in order chromatically,<br />
starting with C1 (MOTIF <strong>XS</strong>6), E0 (MOTIF <strong>XS</strong>7) and A -1<br />
(MOTIF <strong>XS</strong>8) respectively.<br />
n You can also set <strong>the</strong> Key directly from <strong>the</strong> keyboard, by<br />
holding down <strong>the</strong> [SF6] KBD button and pressing <strong>the</strong> desired<br />
key. For details, see page 82.<br />
8 Track<br />
Determines <strong>the</strong> track number to which <strong>the</strong> recorded<br />
Sample is assigned. After recording is finished, <strong>the</strong> created<br />
Sample Voice is to be assigned to <strong>the</strong> Mixing part<br />
corresponding to <strong>the</strong> Track specified here. When <strong>the</strong><br />
Recording Type is set to “slice+seq” or “sample+note,”
<strong>the</strong> note data for playing back <strong>the</strong> Sample Voice will be<br />
created in <strong>the</strong> Track specified here.<br />
Settings: 01 – 16<br />
9 Part<br />
This parameter is not available when entering <strong>the</strong> Sampling<br />
mode from <strong>the</strong> Song mode/Pattern mode.<br />
) Voice<br />
This parameter is not available when entering <strong>the</strong> Sampling<br />
mode from <strong>the</strong> Song mode/Pattern mode.<br />
! Drum Key<br />
This parameter is not available when entering <strong>the</strong> Sampling<br />
mode from <strong>the</strong> Song mode/Pattern mode.<br />
@ Recordable Time (Indication only)<br />
Indicates <strong>the</strong> available Sampling time using <strong>the</strong> available<br />
memory. The time indicated here is calculated assuming a<br />
mono signal with a sampling frequency of 44.1 kHz. The<br />
amount of memory space currently being used is shown in<br />
<strong>the</strong> display as a blue line.<br />
# [F6] Standby<br />
Pressing this button to call up <strong>the</strong> Sampling Standby<br />
display.<br />
This display is used for executing <strong>the</strong> Sampling. For<br />
details, see page 245.<br />
Sampling Standby and Start—[F6]<br />
Standby<br />
This display is used for starting Sampling. Press <strong>the</strong> [F6]<br />
button from <strong>the</strong> Setup display to call up this display. Press<br />
<strong>the</strong> [EXIT] button to go back to <strong>the</strong> Setup display.<br />
After setting <strong>the</strong> parameters as necessary, press <strong>the</strong> [F5]<br />
Start button to start <strong>the</strong> Sampling procedure. Note that <strong>the</strong><br />
actual Sampling start timing differs depending on <strong>the</strong><br />
Trigger Mode setting.<br />
When <strong>the</strong> Trigger Mode ()) is set to “level”:<br />
Even if you press <strong>the</strong> [F5] Start button, <strong>the</strong> WAITING<br />
indication just appears on <strong>the</strong> display and actual Sampling<br />
does not start. When audio signal exceeding <strong>the</strong> specified<br />
Trigger Level (9) is input, <strong>the</strong> RECORDING indication<br />
replaces <strong>the</strong> WAITING indication and Sampling starts.<br />
When <strong>the</strong> Trigger Mode ()) is set to “meas”:<br />
Even if you press <strong>the</strong> [F5] Start button, <strong>the</strong> WAITING<br />
indication just appears on <strong>the</strong> display and actual Sampling<br />
does not start. Set <strong>the</strong> Measure (5) at which <strong>the</strong> Song/<br />
Pattern playback starts, input a measure number larger<br />
than <strong>the</strong> Measure value (5) to <strong>the</strong> Punch In/Out parameter<br />
(!), <strong>the</strong>n press <strong>the</strong> [F] (Play) button to start playback.<br />
After starting playback, actual sampling will begin at <strong>the</strong><br />
Audio Recording to Song/Pattern (Sampling mode)<br />
specified Punch In measure, and end at <strong>the</strong> specified<br />
Punch Out measure.<br />
When <strong>the</strong> Trigger Mode ()) is set to “manual”:<br />
Actual Sampling (Recording) starts when you press <strong>the</strong><br />
[F5] Start button.<br />
1<br />
2<br />
6<br />
7<br />
#<br />
1 Waveform (Indication only)<br />
Indicates <strong>the</strong> number and name of <strong>the</strong> selected Waveform.<br />
2 Key Range (Indication only)<br />
Indicates <strong>the</strong> key range of <strong>the</strong> currently selected Key Bank.<br />
3 Velocity (Velocity Range) (Indication only)<br />
Indicates <strong>the</strong> velocity range of <strong>the</strong> currently selected Key<br />
Bank.<br />
4 Track (Indication only)<br />
Indicates <strong>the</strong> track number to which <strong>the</strong> recorded Sample<br />
is assigned.<br />
5 Measure<br />
Indicates <strong>the</strong> measure number of <strong>the</strong> currently selected<br />
Song/Pattern. You can change <strong>the</strong> measure number by<br />
using <strong>the</strong> [G]/[H] (Reverse/Fast Forward) buttons.<br />
Settings:<br />
When entering <strong>the</strong> Sampling mode from <strong>the</strong> Song mode: 001 – 999<br />
When entering <strong>the</strong> Sampling mode from <strong>the</strong> Pattern mode: 001 – 256<br />
6 Record Monitor<br />
Determines <strong>the</strong> output level of <strong>the</strong> monitor for <strong>the</strong> input<br />
signal. This monitor signal is output from <strong>the</strong> PHONES jack<br />
or <strong>the</strong> OUTPUT R and L/MONO jacks.<br />
Settings: 0 – 127<br />
7 Record Gain<br />
8<br />
9<br />
)<br />
!<br />
This parameter is available only when <strong>the</strong> Input Source<br />
(page 244) is set to “resample.” Determines <strong>the</strong> recording<br />
gain when resampling. The higher <strong>the</strong> value, <strong>the</strong> greater<br />
<strong>the</strong> volume of <strong>the</strong> resampled sound. Before executing <strong>the</strong><br />
Sampling (Recording) operation, you can set <strong>the</strong><br />
appropriate gain by checking <strong>the</strong> volume via <strong>the</strong> Level<br />
Meter (@) while playing <strong>the</strong> keyboard.<br />
Settings: -12dB, -6dB, +0dB, +6dB, +12dB<br />
3<br />
$ %<br />
4<br />
5<br />
@<br />
Voice mode<br />
Performance<br />
mode<br />
Sampling<br />
mode 1<br />
Song mode<br />
Pattern mode<br />
Mixing mode<br />
Sampling<br />
mode 2<br />
Master mode<br />
Utility mode<br />
File mode<br />
MOTIF <strong>XS</strong> Owner’s <strong>Manual</strong> 245<br />
Reference
Reference<br />
246<br />
Audio Recording to Song/Pattern (Sampling mode)<br />
Voice mode Performance Sampling Song mode Pattern mode Mixing mode Sampling Master mode Utility mode File mode<br />
mode mode 1<br />
mode 2<br />
8 Key<br />
Indicates <strong>the</strong> Key Bank (page 244) set in <strong>the</strong> Sampling<br />
Record Setup display. The Key Bank can be changed both<br />
here and in Sampling Edit (page 250) after <strong>the</strong> Recording<br />
is finished.<br />
Settings: C -2 – G8<br />
n You can also set <strong>the</strong> Key directly from <strong>the</strong> keyboard, by<br />
holding down <strong>the</strong> [SF6] KBD button and pressing <strong>the</strong> desired<br />
key. For details, see page 82.<br />
9 Trigger Level<br />
When <strong>the</strong> Trigger Mode ()) is set to “level,” you’ll also<br />
need to set <strong>the</strong> Trigger Level. Sampling (Recording) will<br />
begin as soon as an input signal exceeding <strong>the</strong> specified<br />
trigger level is received. The level set here will be indicated<br />
as a red triangle in <strong>the</strong> level meter. For best results, set this<br />
as low as possible to capture <strong>the</strong> entire signal, but not so<br />
low as to record unwanted noise.<br />
Settings: 000 – 127<br />
) Trigger Mode<br />
Determines <strong>the</strong> method by which Sampling will be<br />
triggered.<br />
Settings: level, meas, manual<br />
level<br />
Sampling starts as soon as an input signal exceeding <strong>the</strong> specified<br />
trigger level (9) is received.<br />
meas (measure)<br />
This should be set toge<strong>the</strong>r with <strong>the</strong> Punch In/Out measure (!). After<br />
<strong>the</strong> [F6] Start button is pressed, actual sampling will begin at <strong>the</strong><br />
specified Punch In measure, and end at <strong>the</strong> specified Punch Out<br />
measure. Sampling will also stop when <strong>the</strong> Song/Pattern is stopped by<br />
pressing <strong>the</strong> [J] (Stop) button. This method lets you recording <strong>the</strong><br />
audio signal while monitoring <strong>the</strong> sound of o<strong>the</strong>r Tracks.<br />
manual<br />
Sampling starts soon after you press <strong>the</strong> [F6] REC button. This setting<br />
lets you start Sampling at <strong>the</strong> desired timing regardless of <strong>the</strong> input<br />
level from audio source.<br />
! Punch In/Out<br />
This parameter is available only when <strong>the</strong> Trigger Mode<br />
()) is set to “meas.” The Punch In value determines <strong>the</strong><br />
measure number at which sampling starts automatically<br />
while <strong>the</strong> Punch Out value determines <strong>the</strong> measure number<br />
at which sampling stops automatically.<br />
Settings: 001 – 999 (Song mode), 001 – 256 (Pattern mode)<br />
@ Level Meter<br />
# Recordable Time (Indication only)<br />
Refer to <strong>the</strong> description of <strong>the</strong> same-named parameter on<br />
page 165.<br />
$ [SF1] Confirm<br />
This is available when Recording Type in <strong>the</strong> Setup display<br />
(page 244) is set to “sample” or “sample+note.”<br />
% [F5] Start<br />
Press this button to start Sampling.<br />
MOTIF <strong>XS</strong> Owner’s <strong>Manual</strong><br />
Sampling RECORDING display<br />
During Sampling, a graphic representation of <strong>the</strong> recorded<br />
audio appears in <strong>the</strong> display.<br />
[F6] Stop<br />
Press this button to stop Sampling (Recording).<br />
In each of <strong>the</strong> following cases, <strong>the</strong> “FINISHED” display<br />
appears after Sampling is finished.<br />
• When Recording Type (page 244) is set to “sample” or<br />
“sample+note” and [SF1] Confirm is turned on<br />
• When Recording Type (page 244) to “slice+seq”<br />
From <strong>the</strong> FINISHED display, you can listen to <strong>the</strong> justrecorded<br />
Sample by pressing <strong>the</strong> [SF1] button. See below<br />
for details.<br />
Sampling FINISHED display<br />
When [F2] Confirm is turned on before <strong>the</strong> Sampling starts,<br />
<strong>the</strong> FINISHED display below appears as soon as <strong>the</strong><br />
Sampling is finished. From this display, you can hear and<br />
confirm <strong>the</strong> Sample by pressing <strong>the</strong> [SF1] Audition button.<br />
If you are satisfied with <strong>the</strong> sound, press <strong>the</strong> [ENTER]<br />
button to fix <strong>the</strong> Sampling result as Sample data. If you are<br />
not satisfied with <strong>the</strong> Sampling result, press <strong>the</strong> [EXIT]<br />
button <strong>the</strong>n try again.<br />
When [F2] Confirm is turned off before Sampling starts, <strong>the</strong><br />
Sampling operation will automatically fix <strong>the</strong> Sample data<br />
and return to <strong>the</strong> Setup display (page 244).<br />
[SF1] Audition<br />
You can hear <strong>the</strong> recorded Sample by holding this button.<br />
This lets you hear precisely how <strong>the</strong> Sample is played back.
n When Recording Type (page 244) is set to “sample” or<br />
“sample+note” and [SF1] Confirm is turned off, stopping<br />
Recording will automatically fix <strong>the</strong> just-recorded Sample data<br />
and <strong>the</strong> instrument will return to <strong>the</strong> Setup display (page 244).<br />
Please note that <strong>the</strong> instrument returns to <strong>the</strong> STANDBY<br />
display as soon as Sampling is finished if Record Next is<br />
turned on in <strong>the</strong> Setup display before <strong>the</strong> Sampling operation.<br />
n When Recording Type (page 244) is set to “slice+seq,”<br />
stopping Recording calls up <strong>the</strong> Record Trim display<br />
(page 247).<br />
Trimming <strong>the</strong> Sample—Record Trim<br />
display<br />
When Recording Type (page 244) is set to “slice+seq,”<br />
stopping Recording (and subsequently fixing <strong>the</strong> sampled<br />
data when Confirm is turned on) calls up this display. From<br />
this display, you can delete unwanted portions of <strong>the</strong><br />
Sample, located ahead of <strong>the</strong> Start point and located after<br />
<strong>the</strong> End point). Press <strong>the</strong> [EXIT] button to go back to <strong>the</strong><br />
Setup display.<br />
The procedure in <strong>the</strong> Record Trim display is as follows.<br />
1 Set <strong>the</strong> Start Point to <strong>the</strong> point at which <strong>the</strong><br />
actual sound of <strong>the</strong> recorded Sample starts.<br />
You can use <strong>the</strong> [SF1] Audition button to listen to <strong>the</strong><br />
Sample and [SF4] Zoom Out/[SF5] Zoom In button to<br />
view <strong>the</strong> wave of <strong>the</strong> Sample.<br />
n By pressing <strong>the</strong> [SF6] NUM button, you can use <strong>the</strong> [SF1]<br />
– [SF5] and [F1] – [F6] buttons as number buttons.<br />
Pressing <strong>the</strong> [EXIT] button return <strong>the</strong>ir buttons to <strong>the</strong><br />
original status. For details, see page 81.<br />
2 Set <strong>the</strong> Tempo (9), Meter ()), and Measure (!)<br />
for Sample playback.<br />
The End Point (8) will be automatically changed so<br />
that <strong>the</strong> length between <strong>the</strong> Start Point and <strong>the</strong> End<br />
Point matches <strong>the</strong> settings here.<br />
3 Set <strong>the</strong> Loop Point (7) as necessary.<br />
When <strong>the</strong> menu indication of <strong>the</strong> [SF2] button is<br />
“LP=ST,” <strong>the</strong> Start (Start Point) and <strong>the</strong> Loop (Loop Start<br />
Point) will share <strong>the</strong> same address, meaning that both<br />
of <strong>the</strong>m will be changed simultaneously, even if just one<br />
of <strong>the</strong>m is changed. Pressing <strong>the</strong> [SF2] button in this<br />
condition changes <strong>the</strong> menu from “LP=ST” to “LP≠ST.”<br />
When <strong>the</strong> menu indication here is “LP≠ST,” <strong>the</strong> Start<br />
(Start Point) and <strong>the</strong> Loop (Loop Start Point) can be<br />
changed independently. When pressing <strong>the</strong> [SF2]<br />
button in this condition, <strong>the</strong> address value of <strong>the</strong> Start<br />
will be copied to <strong>the</strong> one of <strong>the</strong> Loop, with <strong>the</strong> result that<br />
both of <strong>the</strong>m share <strong>the</strong> same address value. The menu<br />
indication of <strong>the</strong> [SF2] button also changes from<br />
“LP≠ST” to “LP=ST.”<br />
4 Press <strong>the</strong> [ENTER] button. (The display<br />
prompts you for confirmation.)<br />
Audio Recording to Song/Pattern (Sampling mode)<br />
If you wish to cancel <strong>the</strong> operation, press <strong>the</strong> [DEC/NO]<br />
button.<br />
5 Press <strong>the</strong> [INC/YES] button to execute <strong>the</strong><br />
Extract operation to delete unwanted portions<br />
of <strong>the</strong> Sample.<br />
6 Press <strong>the</strong> [F6] Slice button to call up <strong>the</strong> Slice<br />
display.<br />
The data deleted via <strong>the</strong> Extract operation cannot be<br />
recovered. If you have accidentally deleted a necessary<br />
portion of <strong>the</strong> Sample, press <strong>the</strong> [EXIT] button to return to <strong>the</strong><br />
Setup display, <strong>the</strong>n execute <strong>the</strong> Sampling operation again.<br />
1<br />
2<br />
6<br />
7<br />
8<br />
@<br />
Parameters 1 – 5 are <strong>the</strong> same as <strong>the</strong> ones in <strong>the</strong><br />
Standby display (page 245).<br />
6 Start Point<br />
Determines <strong>the</strong> Start point for Sample playback. The part<br />
at <strong>the</strong> left side of this point will not be played back.<br />
Settings: 0000000 – End point<br />
7 Loop Point<br />
Determines <strong>the</strong> Loop point at which <strong>the</strong> loop playback starts.<br />
When <strong>the</strong> Play mode is set to “loop,” <strong>the</strong> Sample is played<br />
back between this Loop point and <strong>the</strong> End point (6).<br />
Settings: 0000000 – End point<br />
8 End Point<br />
Determines <strong>the</strong> End point for Sample playback. The part at<br />
<strong>the</strong> right side of this point will not be played back. The End<br />
Point will be automatically determined so that <strong>the</strong> length<br />
between <strong>the</strong> Start Point and <strong>the</strong> End Point matches <strong>the</strong><br />
settings of <strong>the</strong> Tempo (9), Meter ((), and Measure (!).<br />
Settings: 0000000 – (depending on <strong>the</strong> Sample’s length)<br />
9 Tempo<br />
CAUTION<br />
Determines <strong>the</strong> Tempo of Sample playback. Setting <strong>the</strong><br />
Tempo changes <strong>the</strong> End Point (8) so that <strong>the</strong> length<br />
between <strong>the</strong> Start Point and <strong>the</strong> End Point matches <strong>the</strong><br />
settings of <strong>the</strong> Meter and Measure.<br />
Settings: 5.0 – 300.0<br />
3<br />
# $ % ^ & *<br />
4<br />
5<br />
9<br />
)<br />
!<br />
(<br />
Voice mode<br />
Performance<br />
mode<br />
Sampling<br />
mode 1<br />
Song mode<br />
Pattern mode<br />
Mixing mode<br />
Sampling<br />
mode 2<br />
Master mode<br />
Utility mode<br />
File mode<br />
MOTIF <strong>XS</strong> Owner’s <strong>Manual</strong> 247<br />
Reference
Reference<br />
248<br />
Audio Recording to Song/Pattern (Sampling mode)<br />
Voice mode Performance Sampling Song mode Pattern mode Mixing mode Sampling Master mode Utility mode File mode<br />
mode mode 1<br />
mode 2<br />
) Meter<br />
Determines <strong>the</strong> meter (time signature) of Sample playback.<br />
Setting <strong>the</strong> Meter changes <strong>the</strong> End Point (8) so that <strong>the</strong><br />
length between <strong>the</strong> Start Point and <strong>the</strong> End Point matches<br />
<strong>the</strong> settings of <strong>the</strong> Tempo and Measure.<br />
Settings: 1/16 – 16/16, 1/8 – 16/8, 1/4 – 8/4<br />
! Measure<br />
Determines <strong>the</strong> amount of measures for Sample playback.<br />
Setting <strong>the</strong> Measure changes <strong>the</strong> End Point (8) so that <strong>the</strong><br />
length between <strong>the</strong> Start Point and <strong>the</strong> End Point matches<br />
<strong>the</strong> settings of <strong>the</strong> Tempo and Meter.<br />
Settings:<br />
Measure: 000 – 032<br />
Beat: 00 – 15 (Varies depending on <strong>the</strong> Meter setting.)<br />
@ Recordable Time (Indication only)<br />
Indicates <strong>the</strong> available Sampling time using <strong>the</strong> available<br />
memory. The time indicated here is calculated assuming a<br />
mono signal with a sampling frequency of 44.1 kHz. The<br />
amount of memory space currently being used is shown in<br />
<strong>the</strong> display as a blue line.<br />
# [SF1] Audition<br />
You can hear <strong>the</strong> selected Sample by holding this button.<br />
This lets you hear precisely how <strong>the</strong> Sample is played<br />
back.<br />
$ [SF2] LP=ST<br />
When <strong>the</strong> menu indication here is “LP=ST,” <strong>the</strong> Start (Start<br />
Point) and <strong>the</strong> Loop (Loop Start Point) will share <strong>the</strong> same<br />
address, meaning that both of <strong>the</strong>m will be changed<br />
simultaneously, even if just one of <strong>the</strong>m is changed.<br />
Pressing <strong>the</strong> [SF2] button in this condition changes <strong>the</strong><br />
menu from “LP=ST” to “LP≠ST.” When <strong>the</strong> menu indication<br />
here is “LP≠ST,” <strong>the</strong> Start (Start Point) and <strong>the</strong> Loop (Loop<br />
Start Point) can be changed independently. When pressing<br />
<strong>the</strong> [SF2] button in this condition, <strong>the</strong> address value of <strong>the</strong><br />
Start will be copied to <strong>the</strong> one of <strong>the</strong> Loop, with <strong>the</strong> result<br />
that both of <strong>the</strong>m share <strong>the</strong> same address value. The menu<br />
indication also changes from “LP≠ST” to “LP=ST.”<br />
% [SF3] Display<br />
Pressing <strong>the</strong> [SF3] button adjusts <strong>the</strong> zoom level so that <strong>the</strong><br />
entire wave, including <strong>the</strong> Start Point and End Point, is<br />
shown on <strong>the</strong> display.<br />
^ [SF4] Zoom Out<br />
& [SF5] Zoom In<br />
Press <strong>the</strong>se buttons to zoom in and out of <strong>the</strong> wave<br />
indication of <strong>the</strong> Sample in <strong>the</strong> display.<br />
* [F6] Slice<br />
Pressing this button calls up <strong>the</strong> Record Slice display.<br />
( [SF6] NUM<br />
When “NUM” is shown in <strong>the</strong> tab, you can use <strong>the</strong> [F1] –<br />
[F6] buttons and <strong>the</strong> [SF1] – [SF5] buttons as numeric keys<br />
by pressing <strong>the</strong> [SF6] button.<br />
MOTIF <strong>XS</strong> Owner’s <strong>Manual</strong><br />
Slicing <strong>the</strong> Sample—Record Slice<br />
display<br />
When <strong>the</strong> Recording Type (page 244) is set to “slice+seq,”<br />
you can call up this display by pressing <strong>the</strong> [F6] Slice<br />
button in <strong>the</strong> Record Slice display. From this display, you<br />
can divide <strong>the</strong> recorded Sample into several slices<br />
according to <strong>the</strong> rhythm of <strong>the</strong> original Sample. By<br />
executing <strong>the</strong> Slice operation, <strong>the</strong> recorded Sample is first<br />
divided into “slices” to be stored as a Sample Voice, <strong>the</strong>n<br />
<strong>the</strong>se slices are assigned to successive notes on <strong>the</strong><br />
keyboard. These notes are <strong>the</strong>n automatically arranged in<br />
MIDI sequence data (to <strong>the</strong> specified track) for playback.<br />
The procedure on <strong>the</strong> Record Slice display is as follows.<br />
1 Select a Slice Type (6).<br />
2 Set <strong>the</strong> amount of Measures (7) for Sample<br />
playback.<br />
3 Set <strong>the</strong> Meter (8), Sub Divide (9), and<br />
Sensitivity ()).<br />
4 Press <strong>the</strong> [SF4] Apply button to execute Slice.<br />
The Apply indication color will change from green to<br />
gray. At this time, <strong>the</strong> Sample has been modified<br />
temporarily and is not fixed as data.<br />
5 Confirm <strong>the</strong> result of <strong>the</strong> Slice operation.<br />
Press <strong>the</strong> [SF1] Audition button to hear <strong>the</strong> modified<br />
Sample. If you are satisfied with <strong>the</strong> result, go on to <strong>the</strong><br />
step 6. If you are not satisfied with <strong>the</strong> results and want<br />
to try again, press <strong>the</strong> [SF4] Apply button again to abort<br />
<strong>the</strong> Slice operation and return <strong>the</strong> Sample to <strong>the</strong> original<br />
status. The Apply indication color returns to green. In<br />
this case, attempt <strong>the</strong> operation again from step 1.<br />
6 Press <strong>the</strong> [ENTER] button to fix <strong>the</strong> Slice result<br />
as Sample data.<br />
The instrument returns to <strong>the</strong> Setup display.<br />
7 Press <strong>the</strong> [EXIT] button a number of times to<br />
go back to <strong>the</strong> Song mode or Pattern mode.<br />
Listen to <strong>the</strong> recorded track having <strong>the</strong> sliced Sample.<br />
8 Before turning <strong>the</strong> power off, store <strong>the</strong> Song or<br />
Pattern data to internal memory <strong>the</strong>n save <strong>the</strong><br />
created Waveform to a USB storage device or<br />
to a <strong>com</strong>puter connected via network to <strong>the</strong><br />
MOTIF <strong>XS</strong>.<br />
For information about how to store and save, see pages<br />
186 and 278.
1<br />
2<br />
6<br />
7<br />
8<br />
@<br />
Parameters 1 – 5 are <strong>the</strong> same as <strong>the</strong> ones in <strong>the</strong><br />
Standby display (page 245).<br />
6 Type<br />
Select <strong>the</strong> type that best suits <strong>the</strong> original phrase. Specifies<br />
how <strong>the</strong> Sample is sliced, and to some extent determines<br />
<strong>the</strong> resulting sound quality.<br />
Settings: beat1 – 3, phrase1 – 4, quick<br />
beat1 – 3<br />
This slice type is suited for percussive phrases such as drums or bass<br />
with a fast attack and short decay. Three variations are provided.<br />
Phrase1 – 4<br />
Ideal for phrases containing cymbals or o<strong>the</strong>r instruments with a long<br />
decay. Four variations are provided.<br />
quick<br />
Regardless of <strong>the</strong> phrase content, <strong>the</strong> Sample is divided at <strong>the</strong><br />
specified note sub-divisions. The number of slices per measure is<br />
calculated by multiplying <strong>the</strong> top number of <strong>the</strong> Meter (time signature)<br />
parameter by <strong>the</strong> bottom number of <strong>the</strong> Sub Divide parameter.<br />
n For helpful hints on getting <strong>the</strong> Slice Type parameter to work<br />
for different Samples, see “Tips for using <strong>the</strong> Slice Types”<br />
below.<br />
n You can call up <strong>the</strong> list and select <strong>the</strong> desired item by pressing<br />
<strong>the</strong> [SF6] LIST button. For details, see page 82.<br />
7 Measure<br />
Determines <strong>the</strong> amount of measures for Sample playback.<br />
When <strong>the</strong> Slice operation is executed, sequence data<br />
corresponding to <strong>the</strong> specified number of measures is<br />
created.<br />
The sequence data is created from <strong>the</strong> beginning of <strong>the</strong><br />
current measure at which Sampling is started.<br />
Settings: 1 – 8<br />
8 Meter<br />
Specifies <strong>the</strong> meter (time signature) of <strong>the</strong> Sample. The<br />
setting here is <strong>the</strong> basic slice unit.<br />
Settings: 1/16 – 16/16, 1/8 – 16/8, 1/4 – 8/4<br />
9 Sub Divide<br />
The Meter parameter sets <strong>the</strong> basic slice unit, and Sub<br />
Divide specifies even finer resolution for phrases<br />
containing regions with shorter notes. For a one-measure<br />
phrase including quarter notes and eighth notes, for<br />
example, <strong>the</strong> Meter should be set to 4/4 and Sub Divide to<br />
3<br />
# $<br />
4<br />
5<br />
9<br />
)<br />
!<br />
Audio Recording to Song/Pattern (Sampling mode)<br />
1/2. This parameter has no effect when <strong>the</strong> Slice Type<br />
parameter is set to beat 1 – 2.<br />
Settings:<br />
When Meter is set to 1 – 8/4: quarter note (1/1), 8th note (1/2), 4th<br />
note triplet (1/3), 16th note (1/4), 8th note triplet (1/6), 32nd note 1/8),<br />
16th note triplet (1/12)<br />
When Meter is set to 1 – 16/8: 8th note (1/1), 16th note (1/2), 8th note<br />
triplet (1/3), 32nd note (1/4), 16th note triplet (1/6)<br />
When Meter is set to 1 – 16/16: 16th note (1/1), 32nd note (1/2), 16th<br />
note triplet (1/3)<br />
n The maximum slice resolution for stereo Samples is 64 slices,<br />
and for mono Samples 128 slices.<br />
) Sens (Sensitivity)<br />
Fur<strong>the</strong>r adjusts <strong>the</strong> sub-divisions specified by <strong>the</strong> Sub<br />
Divide parameter. Higher values result in higher resolution,<br />
allowing even finer notes and smaller sounds to be<br />
detected and sliced. Use <strong>the</strong> Audition function (press<br />
[SF1]) to hear <strong>the</strong> results, and if you’re not satisfied with<br />
<strong>the</strong>m, change <strong>the</strong> setting and try again.<br />
This parameter has no effect when <strong>the</strong> “quick” slice type is<br />
selected.<br />
Settings: 1 – 5<br />
! Tempo<br />
Determines <strong>the</strong> Tempo with which <strong>the</strong> sliced Samples are<br />
to be played back via <strong>the</strong> [SF1] Audition button. The value<br />
set here is applied to <strong>the</strong> tempo of Song/Pattern playback.<br />
Settings: 005 – 300<br />
@ Recordable Time (Indication only)<br />
Indicates <strong>the</strong> available Sampling time using <strong>the</strong> available<br />
memory. The time indicated here is calculated assuming a<br />
mono signal with a sampling frequency of 44.1 kHz. The<br />
amount of memory space currently being used is shown in<br />
<strong>the</strong> display as a blue line.<br />
# [SF4] Apply<br />
When this tab menu is displayed in green, Sampling<br />
(Recording) has already finished and <strong>the</strong> Slice operation<br />
has not been executed yet. In such a situation, pressing<br />
this button executes <strong>the</strong> Slice and changes <strong>the</strong> tab menu<br />
color to gray.<br />
When this tab menu is displayed in gray, both <strong>the</strong> Sampling<br />
(Recording) and <strong>the</strong> Slice operations have been executed.<br />
In this status, pressing this button returns to <strong>the</strong> beforeslice<br />
status with <strong>the</strong> “Apply” color in green.<br />
$ [F6] Trim<br />
Pressing this button calls up <strong>the</strong> Record Trim display<br />
(page 247), allowing you to delete unwanted portions of<br />
<strong>the</strong> Sample.<br />
Voice mode<br />
Performance<br />
mode<br />
Sampling<br />
mode 1<br />
Song mode<br />
Pattern mode<br />
Mixing mode<br />
Sampling<br />
mode 2<br />
Master mode<br />
Utility mode<br />
File mode<br />
MOTIF <strong>XS</strong> Owner’s <strong>Manual</strong> 249<br />
Reference
Reference<br />
250<br />
Audio Recording to Song/Pattern (Sampling mode)<br />
Voice mode Performance Sampling Song mode Pattern mode Mixing mode Sampling Master mode Utility mode File mode<br />
mode mode 1<br />
mode 2<br />
Tips for using <strong>the</strong> Slice Types Wave Memory Required for Slice<br />
Operations<br />
Slicing percussive phrases having short decays<br />
First, try slicing using “beat1.” If <strong>the</strong> result has a weak<br />
attack or <strong>the</strong> release portions of <strong>the</strong> phrase seem to<br />
overlap, try again using “beat2.” Try adjusting <strong>the</strong> envelope<br />
sensitivity for finer control.<br />
If after using “beat1” <strong>the</strong> attack portions overlap or <strong>the</strong><br />
overall rhythmic feel is degraded, try again using “beat3.”<br />
Make final adjustments with <strong>the</strong> Envelope Sensitivity<br />
parameter.<br />
Slicing phrases having long decays<br />
First, try slicing using “phrase1.” If <strong>the</strong> result has a weak<br />
attack or <strong>the</strong> release portions of <strong>the</strong> phrase seem to<br />
overlap, try again using “phrase2.” Make final adjustments<br />
with <strong>the</strong> Envelope Sensitivity parameter.<br />
If after using “phrase1” <strong>the</strong> points between <strong>the</strong> slices<br />
sounds rough and <strong>the</strong> overall feel is choppy, try again<br />
using “phrase3” or “phrase4” and set Sub Divide to a finer<br />
resolution. Make final adjustments with <strong>the</strong> Envelope<br />
Sensitivity parameter. The “phrase3” setting is generally<br />
best for sustained strings or brass type sounds with no<br />
vibrato—in o<strong>the</strong>r words, <strong>the</strong> pitch remains constant. It can<br />
also produce echo-like effects when applied to percussive<br />
phrases with short decay.<br />
If after using “phrase1” <strong>the</strong> points between <strong>the</strong> slices<br />
sounds rough and <strong>the</strong> overall feel is choppy, try again<br />
using “phrase4” and set Sub Divide to a finer resolution.<br />
Make final adjustments with <strong>the</strong> Envelope Sensitivity<br />
parameter. The “phrase4” setting is generally best for<br />
sustained strings or brass type sounds with vibrato, as well<br />
as vocal phrases.<br />
Sampling Edit<br />
MOTIF <strong>XS</strong> Owner’s <strong>Manual</strong><br />
Individual wave data slices created through Slice<br />
operations require approximately 1.5 times <strong>the</strong> original<br />
memory because a tail section is automatically added and<br />
fade-in and fade-out sections are automatically created at<br />
<strong>the</strong> beginning and end of <strong>the</strong> wave data. This helps to<br />
maintain maximum sound quality when <strong>the</strong> tempo is<br />
increased, and results in smoo<strong>the</strong>r connections between<br />
slices (no tail section is created when <strong>the</strong> “quick” slice type<br />
is selected).<br />
A memory work area is required for <strong>the</strong> processing<br />
calculations carried out for each Slice operation, as well as<br />
sufficient memory to hold <strong>the</strong> <strong>com</strong>pleted waveforms. When<br />
<strong>the</strong> sampling frequency is 44.1 kHz, <strong>the</strong> approximate<br />
amount of memory (expressed in kilobytes) required for<br />
each Slice type is listed below.<br />
For mono Samples N = 5.5, and for stereo Samples N = 8.<br />
Also, <strong>the</strong> number of slices is doubled for stereo Samples.<br />
[INTEGRATED SAMPLING] ➞ [EDIT]<br />
The Sampling Edit mode gives you <strong>com</strong>prehensive, detailed controls for editing <strong>the</strong> recorded Sample and changing <strong>the</strong><br />
Sample settings. Press <strong>the</strong> [EDIT] button from <strong>the</strong> Sampling Main display to call up <strong>the</strong> Sampling Edit display. Press <strong>the</strong><br />
[EXIT] button to go back to <strong>the</strong> Sampling Main display.<br />
Same as in <strong>the</strong> Sampling mode called up from <strong>the</strong> Voice mode/Performance mode. For information about Sampling Edit, see<br />
page 167.<br />
Sampling Job<br />
beat 1 Original wave size X N + (0.3 X number of slices)<br />
beat 2 Original wave size X N + (0.2 X number of slices)<br />
beat 3 Original wave size X N + (0.3 X number of slices)<br />
phrase 1 Original wave size X N + (5.8 X number of slices)<br />
phrase 2 Original wave size X N + (1.4 X number of slices)<br />
phrase 3 Original wave size X N + (0.4 X number of slices)<br />
phrase 4 Original wave size X N + (1.4 X number of slices)<br />
quick Original wave size X N + (0.7 X number of slices)<br />
[INTEGRATED SAMPLING] ➞ [JOB]<br />
The Sampling Job mode lets you process and modify Samples you have recorded. 18 Sampling Jobs are available.<br />
Same as in <strong>the</strong> Sampling mode called up from <strong>the</strong> Voice mode/Performance mode. For information about <strong>the</strong> Sampling<br />
Jobs, see page 171.
Using as a Master Keyboard (Master mode)<br />
This syn<strong>the</strong>sizer is loaded with such a wealth of different features, functions and operations, you may find it difficult to locate<br />
and call up <strong>the</strong> particular feature you need. This is where <strong>the</strong> Master function <strong>com</strong>es in handy. You can use it to memorize <strong>the</strong><br />
operations you use most often in each mode, and call <strong>the</strong>m up instantly anytime you need <strong>the</strong>m with a single button press.<br />
The MOTIF <strong>XS</strong> has space for a total of 128 of your own User Master settings.<br />
Press <strong>the</strong> [MASTER] button to enter <strong>the</strong> Master Play mode.<br />
Master Play mode<br />
To enter <strong>the</strong> Master Play mode and call up <strong>the</strong> Master Play display, press <strong>the</strong> [MASTER] button from <strong>the</strong> current mode.<br />
Selecting a Master Program<br />
The MOTIF <strong>XS</strong> features 128 specially programmed<br />
Masters, stored to internal User Memory (Flash ROM). The<br />
Bank consists of eight Groups (A to H), each of which<br />
contains 16 Master programs. To call up <strong>the</strong> desired<br />
Master program, select <strong>the</strong> appropriate Group and<br />
Number.<br />
Playing <strong>the</strong> Keyboard in <strong>the</strong> Master<br />
Play mode—[MASTER]<br />
In <strong>the</strong> Master Play mode, you can select a Master program<br />
and play <strong>the</strong> keyboard according to <strong>the</strong> settings of <strong>the</strong><br />
selected Master program. Changing <strong>the</strong> Master number<br />
lets you call up one of <strong>the</strong> modes and various settings such<br />
as tone generator settings (multi-timbral or single) and<br />
MIDI settings.<br />
1<br />
2<br />
6<br />
7<br />
3 4 5<br />
1 Master Number (Group/Number)<br />
Indicates <strong>the</strong> selected Master number.<br />
n Master numbers 001 to 128 are converted to <strong>the</strong> format<br />
(shown in <strong>the</strong> paren<strong>the</strong>ses) related to Banks A to H and<br />
Program Numbers 1 to 16 (for <strong>the</strong> Bank). This format is related<br />
to <strong>the</strong> Group buttons [A] – [H] and <strong>the</strong> Number buttons [1] –<br />
[16]. The Master numbers and <strong>the</strong> corresponding Group/<br />
Numbers are listed below.<br />
2 Master name (Indication only)<br />
Indicates <strong>the</strong> name of <strong>the</strong> current Master.<br />
3 Mode (Indication only)<br />
Indicates <strong>the</strong> mode memorized to <strong>the</strong> current Master. One<br />
<strong>the</strong> modes (Voice, Performance, Pattern or Song) is<br />
indicated here.<br />
4 Program number (Indication only)<br />
Determines <strong>the</strong> Program number (Voice number,<br />
Performance number, Song number, or Pattern number)<br />
that is called up when <strong>the</strong> Master is selected. The program<br />
type differs depending on <strong>the</strong> memorized mode.<br />
5 Octave<br />
Group/Number Program Number<br />
A01 – 16 001 – 016<br />
B01 – 16 017 – 032<br />
C01 – 16 033 – 048<br />
D01 – 16 049 – 064<br />
E01 – 16 065 – 080<br />
F01 – 16 081 – 096<br />
G01 – 16 097 – 112<br />
H01 – 16 113 – 128<br />
When <strong>the</strong> Voice mode is memorized: Voice Bank/Number<br />
When <strong>the</strong> Performance mode is<br />
memorized:<br />
Performance Bank/<br />
Number<br />
When <strong>the</strong> Song mode is memorized: Song Number<br />
When <strong>the</strong> Pattern mode is memorized: Pattern Number<br />
Indicates <strong>the</strong> Keyboard Octave setting set via <strong>the</strong> OCTAVE<br />
buttons. This parameter determines how much higher or<br />
lower <strong>the</strong> pitch of each key is <strong>com</strong>pared to normal pitch.<br />
Voice mode<br />
Performance<br />
mode<br />
Sampling<br />
mode 1<br />
Song mode<br />
Pattern mode<br />
Mixing mode<br />
Sampling<br />
mode 2<br />
Master mode<br />
Utility mode<br />
File mode<br />
MOTIF <strong>XS</strong> Owner’s <strong>Manual</strong> 251<br />
Reference
Reference<br />
Voice mode Performance Sampling Song mode Pattern mode Mixing mode Sampling Master mode Utility mode File mode<br />
mode mode 1<br />
mode 2<br />
252<br />
Using as a Master Keyboard (Master mode)<br />
6 Knobs 1 – 8<br />
Indicates <strong>the</strong> parameters to which respective Knobs 1 – 8<br />
are assigned and <strong>the</strong>ir current values. Pressing <strong>the</strong><br />
[SELECTED PART CONTROL] button repeatedly switches<br />
among <strong>the</strong> parameter sets (indicated by <strong>the</strong> lamps). For<br />
information about <strong>the</strong> parameters, see below.<br />
When <strong>the</strong> Voice mode is memorized: See page 89.<br />
When <strong>the</strong> Performance mode is<br />
memorized:<br />
See page 136.<br />
When <strong>the</strong> Song mode is memorized: See page 180.<br />
When <strong>the</strong> Pattern mode is memorized: See page 210.<br />
7 Control Sliders 1 – 8<br />
Indicates <strong>the</strong> levels of respective Control Sliders 1 – 8. The<br />
target to be adjusted by <strong>the</strong> Control Sliders differs<br />
depending on <strong>the</strong> mode memorized to <strong>the</strong> current Master.<br />
When <strong>the</strong> Voice mode is memorized: Volume for Elements 1 – 8<br />
When <strong>the</strong> Performance mode is<br />
memorized:<br />
Volume for Parts 1 – 4<br />
When <strong>the</strong> Song mode is memorized:<br />
When <strong>the</strong> Pattern mode is memorized:<br />
Volume for Parts 1 – 16<br />
[SF1] ARP1 – [SF5] ARP5 (Arpeggio 1 – 5)<br />
When <strong>the</strong> memorized mode is Voice or Performance, a<br />
different Arpeggio type is assigned to each of <strong>the</strong> [SF1]<br />
ARP1 – [SF5] ARP5 buttons according to <strong>the</strong> Voice or<br />
Performance number. The Arpeggio types are assigned to<br />
<strong>the</strong> buttons with <strong>the</strong> 8th note icon on <strong>the</strong> display tab. You<br />
can call <strong>the</strong>m up by pressing <strong>the</strong>se buttons any time during<br />
your keyboard performance.<br />
[SF1] Scene1 – [SF5] Scene5<br />
When <strong>the</strong> memorized mode is Song or Pattern, a different<br />
Scene setting is assigned to each of <strong>the</strong> [SF1] – [SF5]<br />
buttons according to <strong>the</strong> Song or Pattern number.<br />
[SF6] INFO (Information)<br />
Press this button to call up <strong>the</strong> information window of <strong>the</strong><br />
current Master.<br />
MOTIF <strong>XS</strong> Owner’s <strong>Manual</strong><br />
Master Information—[SF6] INFO<br />
(Information)<br />
This window indicates <strong>the</strong> information of <strong>the</strong> current Master.<br />
Settings cannot be changed here.<br />
1<br />
2<br />
3<br />
4<br />
5<br />
1 Master Name<br />
Indicates <strong>the</strong> name of <strong>the</strong> current Master.<br />
2 Mode<br />
Indicates <strong>the</strong> mode memorized to <strong>the</strong> current Master. One<br />
of <strong>the</strong> modes (Voice, Performance, Pattern or Song) is<br />
indicated here.<br />
3 Program<br />
Indicates <strong>the</strong> number and name of <strong>the</strong> program (Voice,<br />
Performance, Song, or Pattern) that is called up when <strong>the</strong><br />
Master is selected. The program differs depending on <strong>the</strong><br />
memorized mode.<br />
When <strong>the</strong> Voice mode is<br />
memorized:<br />
When <strong>the</strong> Performance mode is<br />
memorized:<br />
When <strong>the</strong> Song mode is<br />
memorized:<br />
When <strong>the</strong> Pattern mode is<br />
memorized:<br />
4 Zone Switch<br />
Determines whe<strong>the</strong>r or not <strong>the</strong> keyboard will be divided<br />
into (up to) eight independent areas (called “Zones”). For<br />
details about Zones, see page 253.<br />
5 Transmit Channel<br />
Voice Bank, Number, Category,<br />
Name<br />
Performance Bank, Number,<br />
Category, Name<br />
Song number, Song name<br />
Pattern number, Pattern name<br />
Indicates <strong>the</strong> MIDI transmit channel of each Zone (when<br />
<strong>the</strong> Zone Switch is set to on).
Master Edit<br />
Using as a Master Keyboard (Master mode)<br />
The Master Edit mode lets you create your own original Master programs—containing up to eight different Zones (keyboard<br />
areas)—by editing <strong>the</strong> various parameters. To enter <strong>the</strong> Master Edit mode, press <strong>the</strong> [EDIT] button in <strong>the</strong> Master Play mode.<br />
Press <strong>the</strong> [EXIT] button to return to <strong>the</strong> original display.<br />
Common Edit and Zone Edit<br />
In <strong>the</strong> Master mode, you can divide <strong>the</strong> keyboard into (up<br />
to) eight independent areas (called “Zones”). Different<br />
MIDI channels and different functions of <strong>the</strong> Knobs and<br />
Control Sliders can be assigned to each Zone. This makes<br />
it possible to control several Parts of <strong>the</strong> multi-timbral tone<br />
generator simultaneously by a single keyboard or to control<br />
Voices of an external MIDI instrument over several different<br />
channels in addition to <strong>the</strong> internal Voices of this<br />
syn<strong>the</strong>sizer itself—letting you use <strong>the</strong> MOTIF <strong>XS</strong> to<br />
effectively do <strong>the</strong> work of several keyboards. You can set<br />
<strong>the</strong> parameters related to <strong>the</strong> eight Zones in <strong>the</strong> Master Edit<br />
mode and store <strong>the</strong> settings as a User Master.<br />
There are two types of Master Edit displays: those for<br />
editing parameters <strong>com</strong>mon to all eight Zones and those<br />
for editing individual Zones.<br />
Master Edit Procedure<br />
1 Press <strong>the</strong> [MASTER] button to enter <strong>the</strong> Master<br />
Play mode, <strong>the</strong>n select a Master.<br />
2 Press <strong>the</strong> [EDIT] button to enter <strong>the</strong> Master<br />
Edit mode.<br />
3 Set <strong>the</strong> Zone Switch parameter to “on” in <strong>the</strong><br />
O<strong>the</strong>r display as necessary.<br />
4 Call up <strong>the</strong> Common Edit display or Zone Edit<br />
display.<br />
To call up <strong>the</strong> Common Edit display, press <strong>the</strong><br />
[COMMON EDIT] button. You can specify <strong>the</strong> mode<br />
and program number called up when <strong>the</strong> Master is<br />
selected, and <strong>the</strong> Master name in <strong>the</strong> Common Edit<br />
mode.<br />
To call up <strong>the</strong> Zone Edit display, press one of <strong>the</strong><br />
Number buttons [1] – [8] to select <strong>the</strong> Zone to be<br />
edited. Here you can set various parameters such as<br />
<strong>the</strong> keyboard range and MIDI Transmit Channel for<br />
each Zone in <strong>the</strong> Zone Edit mode.<br />
COMMON EDIT<br />
Common Edit display<br />
1 2 3 4 5 6 7<br />
8<br />
Zone Edit display<br />
5 Call up <strong>the</strong> Edit display including <strong>the</strong><br />
parameters you wish to edit by pressing <strong>the</strong><br />
[F1] – [F5] buttons and [SF1] – [SF2] buttons.<br />
For information about <strong>the</strong> parameters, see pages 254<br />
and 255.<br />
6 Move <strong>the</strong> cursor to <strong>the</strong> desired parameter.<br />
7 Edit <strong>the</strong> value by using <strong>the</strong> [INC/YES], [DEC/<br />
NO] buttons and <strong>the</strong> data dial.<br />
8 Repeat steps 4 – 7 as desired.<br />
9 Enter a name for <strong>the</strong> Master in <strong>the</strong> Name<br />
display (page 254) of Common Edit.<br />
10 If you wish to store <strong>the</strong> edited Master, press<br />
<strong>the</strong> [STORE] button to call up <strong>the</strong> Store<br />
window (page 254).<br />
For detailed instructions on storing, see page 254.<br />
CAUTION<br />
PART SELECT ARP ON/OFF<br />
The edited Master will be lost when selecting a different<br />
Master, calling up a different mode, or turning <strong>the</strong> power off.<br />
Make sure to store <strong>the</strong> Master data to internal memory by<br />
pressing <strong>the</strong> [STORE] button before selecting a different<br />
Master, calling up a different mode, or turning <strong>the</strong> power off.<br />
n Save <strong>the</strong> edited and stored Master data to a USB storage<br />
device or to a <strong>com</strong>puter connected via network to <strong>the</strong><br />
MOTIF <strong>XS</strong> as necessary. Keep in mind that edited Master<br />
data is stored to internal User memory (Flash ROM) and is<br />
maintained even when power is turned off. Therefore it is<br />
not necessary to save <strong>the</strong> data to an external device;<br />
however, we still re<strong>com</strong>mend that you save or archive all<br />
important data to an external device. Refer to page 278<br />
for details.<br />
MOTIF <strong>XS</strong> Owner’s <strong>Manual</strong><br />
Voice mode<br />
Performance<br />
mode<br />
Sampling<br />
mode 1<br />
Song mode<br />
Pattern mode<br />
Mixing mode<br />
Sampling<br />
mode 2<br />
Master mode<br />
Utility mode<br />
File mode<br />
253<br />
Reference
Reference<br />
Voice mode Performance Sampling Song mode Pattern mode Mixing mode Sampling Master mode Utility mode File mode<br />
mode mode 1<br />
mode 2<br />
254<br />
Using as a Master Keyboard (Master mode)<br />
The [E] Indicator<br />
When changing <strong>the</strong> value of <strong>the</strong> parameter in <strong>the</strong> Master<br />
Edit mode, <strong>the</strong> [E] (Edit Indicator) will appear on <strong>the</strong> top<br />
right corner of <strong>the</strong> display. This gives a quick confirmation<br />
that <strong>the</strong> current Master has been modified but not yet<br />
stored. To store <strong>the</strong> current edited status, follow <strong>the</strong><br />
instructions below.<br />
Storing <strong>the</strong> created Master<br />
MOTIF <strong>XS</strong> Owner’s <strong>Manual</strong><br />
[MASTER] ➞ [STORE]<br />
1 Press <strong>the</strong> [STORE] button in <strong>the</strong> Master mode.<br />
The Master Store window appears.<br />
2 Specify <strong>the</strong> destination for storing <strong>the</strong> Master.<br />
Select a Master number as destination by using <strong>the</strong><br />
data dial, [INC/YES] and [DEC/NO] button.<br />
You can use <strong>the</strong> [USER 1] button, [A] – [H] buttons and<br />
[1] – [16] buttons to select a Master number.<br />
3 Press <strong>the</strong> [ENTER] button. (The display<br />
prompts you for confirmation.)<br />
To cancel <strong>the</strong> Store operation, press <strong>the</strong> [DEC/NO]<br />
button.<br />
4 Press <strong>the</strong> [INC/YES] button to execute <strong>the</strong><br />
Store operation.<br />
After <strong>the</strong> Master has been stored, a “Completed”<br />
message appears and operation returns to <strong>the</strong> Master<br />
Play display.<br />
CAUTION<br />
When you execute <strong>the</strong> Store operation, <strong>the</strong> settings for <strong>the</strong><br />
destination memory will be overwritten. Important data should<br />
always be backed up to a separate USB storage device or to a<br />
<strong>com</strong>puter connected via network to <strong>the</strong> MOTIF <strong>XS</strong>. For detailed<br />
instructions on saving, see page 278.<br />
Common Edit parameters<br />
[MASTER] ➞ [EDIT] ➞ [COMMON EDIT]<br />
Common Edit lets you edit <strong>the</strong> parameters <strong>com</strong>mon to all<br />
Zones of <strong>the</strong> selected Master.<br />
Naming <strong>the</strong> edited Master—[F1] Name<br />
From this display, you can name <strong>the</strong> edited Master. Press<br />
<strong>the</strong> [F1] button from <strong>the</strong> Common Edit display to call up this<br />
display. Press <strong>the</strong> [EXIT] button to return to <strong>the</strong> original<br />
display. For detailed instructions on naming, refer to “Basic<br />
Operation” on page 82.<br />
O<strong>the</strong>r Parameter Settings—[F2] O<strong>the</strong>r<br />
From this display you can set basic parameters for <strong>the</strong><br />
Master, including <strong>the</strong> mode that is called up with <strong>the</strong> Master<br />
and <strong>the</strong> program number.<br />
1<br />
2<br />
3<br />
4<br />
1 Mode<br />
Determines <strong>the</strong> mode that is called up when <strong>the</strong> Master<br />
number is selected.<br />
Settings: voice, performance, pattern, song<br />
2 Memory<br />
Determines <strong>the</strong> Program number that is called up when <strong>the</strong><br />
Master is selected. The name of <strong>the</strong> selected Voice/<br />
Performance/Song/Pattern is shown.<br />
Settings: Differs depending on <strong>the</strong> Mode setting above.<br />
When <strong>the</strong> Mode is set to Voice:<br />
Voice Bank: PRE1 – 8, USR1 – 3, GM, GMDR, PDR, UDR<br />
Voice Number: 001 (A01) – 128 (H16)<br />
When <strong>the</strong> Mode is set to Performance:<br />
Performance Bank: USR1 – 3<br />
Performance Number: 001 (A01) – 128 (H16)<br />
When <strong>the</strong> Mode is set to Pattern:<br />
Pattern Number: 01 – 64<br />
When <strong>the</strong> Mode is set to Song:<br />
Song number: 01 – 64<br />
3 Zone Switch<br />
5<br />
Determines whe<strong>the</strong>r or not <strong>the</strong> keyboard will be divided<br />
into (up to) eight independent areas (called “Zones”). For<br />
details about Zones, see page 253.<br />
Settings: on, off
4 Knob Ctrl Assign (Knob Control Assign)<br />
From this display you can set which row of Knob functions<br />
will be lit and selected. When set to “zone,” selecting <strong>the</strong><br />
Master lights no lamp and automatically calls up <strong>the</strong> Knob/<br />
Slider functions specifically set for each respective Zone<br />
(page 257).<br />
Settings: Differs depending on <strong>the</strong> Mode setting above. Note that<br />
“zone” can be selected only when <strong>the</strong> Zone Switch (3) is<br />
set to “on.”<br />
When <strong>the</strong> Mode is set to Voice:<br />
tone 1, tone 2, ARP FX, zone<br />
When <strong>the</strong> Mode is set to Performance, Pattern or Song:<br />
tone 1, tone 2, ARP FX, reverb, chorus, pan, zone<br />
5 [F6] Get Name<br />
Pressing <strong>the</strong> [F6] button assigns <strong>the</strong> name of <strong>the</strong> currently<br />
selected Voice/Performance/Song/Pattern to <strong>the</strong> Master<br />
name.<br />
Zone Edit parameters<br />
[MASTER] ➞ [EDIT] ➞ [1] – [8]<br />
These parameters are for editing <strong>the</strong> individual Zones that<br />
make up a Master. To call up <strong>the</strong> Zone Edit display, press<br />
<strong>the</strong> [EDIT] button in <strong>the</strong> Master Play mode, <strong>the</strong>n press any<br />
of <strong>the</strong> Number buttons [1] – [8]. Press <strong>the</strong> [EXIT] button to<br />
return to <strong>the</strong> Master Play display.<br />
MIDI Transmit Channel/Switch Settings<br />
—[F1] Transmit<br />
From this display you can set how each Zone transmits<br />
MIDI messages when you play <strong>the</strong> keyboard.<br />
1<br />
2<br />
3<br />
1 Transmit Channel<br />
Determines <strong>the</strong> MIDI Transmit Channel for each Zone.<br />
Settings: 1 – 16<br />
2 Int Switch (Internal Switch)<br />
Determines whe<strong>the</strong>r or not MIDI data for each Zone is<br />
transmitted to <strong>the</strong> internal tone generator.<br />
n When <strong>the</strong> Local Control parameter is set to “off” on <strong>the</strong> MIDI<br />
display (page 267) in <strong>the</strong> Utility mode, MIDI data for each<br />
Zone will not be transmitted to <strong>the</strong> internal tone generator,<br />
even if <strong>the</strong> Int Switch parameter is set to “on.”<br />
3 Ext Switch (External Switch)<br />
Determines whe<strong>the</strong>r or not MIDI data for each Zone is<br />
transmitted to an external MIDI device.<br />
Using as a Master Keyboard (Master mode)<br />
Note Range Setting for each Zone—<br />
[F2] Note<br />
From this display you can set <strong>the</strong> pitch- and keyboardrelated<br />
parameters for each Zone—allowing you to set up<br />
Zone splits and determine <strong>the</strong> pitch range for each Zone.<br />
1<br />
2<br />
3<br />
4<br />
1 Octave<br />
Determines <strong>the</strong> amount in octaves by which <strong>the</strong> range of<br />
<strong>the</strong> Zone is shifted up or down. You can adjust <strong>the</strong> offset up<br />
or down over a maximum range of three octaves.<br />
Settings: -3 – +0 (Default) – +3<br />
2 Transpose<br />
Determines <strong>the</strong> amount in semitones by which <strong>the</strong> range of<br />
<strong>the</strong> Zone is shifted up or down.<br />
Settings: -11 – +0 (Default) – +11<br />
3 Note Limit Low<br />
4 Note Limit High<br />
Determines <strong>the</strong> lowest and highest notes of <strong>the</strong> range for<br />
each Zone.<br />
Settings: C -2 – G8<br />
n You can also set <strong>the</strong> note directly from <strong>the</strong> Keyboard, by<br />
holding down <strong>the</strong> [SF6] button and pressing <strong>the</strong> desired key.<br />
MIDI Transmit Switch Settings—[F3] Tx<br />
Switch (Transmit Switch)<br />
MIDI Transmit Switch for <strong>the</strong> Voice related<br />
messages—[SF1] Program<br />
From this display, you can determine whe<strong>the</strong>r or not MIDI<br />
messages controlling Voice selection for each Zone are<br />
transmitted to <strong>the</strong> internal/external tone generator.<br />
1<br />
2<br />
3<br />
4<br />
1 Int Bank Select (Internal Bank Select)<br />
Determines whe<strong>the</strong>r or not to transmit Bank Select MSB/<br />
LSB messages to <strong>the</strong> internal tone generator.<br />
Voice mode<br />
Performance<br />
mode<br />
Sampling<br />
mode 1<br />
Song mode<br />
Pattern mode<br />
Mixing mode<br />
Sampling<br />
mode 2<br />
Master mode<br />
Utility mode<br />
File mode<br />
MOTIF <strong>XS</strong> Owner’s <strong>Manual</strong> 255<br />
Reference
Reference<br />
Voice mode Performance Sampling Song mode Pattern mode Mixing mode Sampling Master mode Utility mode File mode<br />
mode mode 1<br />
mode 2<br />
256<br />
Using as a Master Keyboard (Master mode)<br />
2 Int Prog Change (Internal Program Change)<br />
Determines whe<strong>the</strong>r or not to transmit Program Change<br />
messages to <strong>the</strong> internal tone generator.<br />
3 Ext Bank Select (External Bank Select)<br />
Determines whe<strong>the</strong>r or not to transmit Bank Select MSB/<br />
LSB messages to <strong>the</strong> external tone generator via MIDI.<br />
4 Ext Prog Change (External Program Change)<br />
Determines whe<strong>the</strong>r or not to transmit Program Change<br />
messages to <strong>the</strong> external tone generator via MIDI.<br />
MIDI Transmit Switch for <strong>the</strong> O<strong>the</strong>r messages<br />
—[SF2] Control<br />
From this display, you can determine whe<strong>the</strong>r or not MIDI<br />
messages controlling non-Voice-related settings such as<br />
Control Change, Pitch Bend and Channel Aftertouch are<br />
transmitted to <strong>the</strong> internal/external tone generator.<br />
1<br />
2<br />
3<br />
4<br />
5<br />
6<br />
7<br />
8<br />
9<br />
)<br />
!<br />
@<br />
#<br />
$<br />
When you wish to transmit a certain MIDI message from a<br />
certain Zone to <strong>the</strong> internal/external tone generator,<br />
checkmark <strong>the</strong> corresponding box.<br />
1 Pitch Bend<br />
MIDI messages generated by using <strong>the</strong> Pitch Bend Wheel.<br />
2 Ch After Touch (Channel After Touch)<br />
MIDI messages generated by pressing and holding a note<br />
on <strong>the</strong> keyboard.<br />
3 Modulation Wheel<br />
MIDI messages generated by using <strong>the</strong> Modulation Wheel.<br />
4 Ribbon Controller<br />
MIDI messages generated by using <strong>the</strong> Ribbon Controller.<br />
5 Foot Controller 1<br />
6 Foot Controller 2<br />
MIDI messages generated by using <strong>the</strong> optional Foot<br />
Controller connected to <strong>the</strong> rear panel.<br />
7 Sustain<br />
MIDI messages generated by using <strong>the</strong> optional<br />
Footswitch connected to <strong>the</strong> SUSTAIN jack on <strong>the</strong> rear<br />
panel.<br />
MOTIF <strong>XS</strong> Owner’s <strong>Manual</strong><br />
8 Foot Switch<br />
MIDI messages generated by using <strong>the</strong> optional<br />
Footswitch connected to <strong>the</strong> ASSIGNABLE jack on <strong>the</strong> rear<br />
panel.<br />
9 Knob<br />
MIDI messages generated by using <strong>the</strong> Knobs.<br />
) Slider<br />
MIDI messages generated by using <strong>the</strong> Sliders.<br />
! A. Function 1 (Assignable Function 1)<br />
@ A. Function 2 (Assignable Function 2)<br />
MIDI messages generated by using <strong>the</strong> ASSIGNABLE<br />
FUNCTION buttons.<br />
# Volume/Express (Expression)<br />
MIDI Volume messages generated by using <strong>the</strong> Knobs and<br />
Sliders.<br />
$ Pan<br />
MIDI Pan messages generated by using <strong>the</strong> Knobs and<br />
Sliders.<br />
Default Settings for each Zone—[F4]<br />
Preset<br />
From this display you can make <strong>the</strong> Voice-related settings<br />
for each Zone which will be transmitted as MIDI messages<br />
automatically when <strong>the</strong> Master is selected.<br />
1<br />
2<br />
3<br />
4<br />
5<br />
1 Bank MSB (Bank Select MSB)<br />
2 Bank LSB (Bank Select LSB)<br />
3 Program Change<br />
6<br />
Determines <strong>the</strong> Voice-related settings for each Zone in <strong>the</strong><br />
selected Master. These MIDI messages are transmitted to<br />
an external/internal tone generator when <strong>the</strong> Master is<br />
selected.<br />
Settings:<br />
Bank MSB (Bank Select MSB): 000 – 127<br />
Bank LSB (Bank Select LSB): 000 – 127<br />
Program Change: 001 – 128
4 Volume<br />
Determines <strong>the</strong> Volume settings for each Zone in <strong>the</strong><br />
selected Master. The MIDI messages of <strong>the</strong> Volume are<br />
transmitted to an external/internal tone generator when <strong>the</strong><br />
Master is selected.<br />
Settings: 000 – 127<br />
5 Pan<br />
Determines <strong>the</strong> Pan settings for each Zone in <strong>the</strong> selected<br />
Master. The MIDI messages of <strong>the</strong> Pan are transmitted to<br />
an external/internal tone generator when <strong>the</strong> Master is<br />
selected.<br />
Settings: L64 – C – R63<br />
6 [F6] MIDI Send<br />
When set to “on,” changing <strong>the</strong> value in this display<br />
transmits <strong>the</strong> corresponding MIDI messages to an external/<br />
internal tone generator.<br />
Master Job<br />
Using as a Master Keyboard (Master mode)<br />
From this display, you can determine which Control<br />
Change numbers are transmitted to an external/internal<br />
tone generator when you use <strong>the</strong> Knobs and Sliders for<br />
each Zone.<br />
n This parameter is available only when <strong>the</strong> Knob Control Assign<br />
parameter is set to “zone” in <strong>the</strong> O<strong>the</strong>r display (page 254) of<br />
<strong>the</strong> Common Edit. In o<strong>the</strong>r words, this parameter is available<br />
only when all <strong>the</strong> lamps of <strong>the</strong> [SELECTED PART CONTROL]<br />
and [MULTI PART CONTROL] are turned off.<br />
1 Control Knob No.<br />
Determines which Control Change numbers are<br />
transmitted when you use <strong>the</strong> Knobs for each Zone. The<br />
function name is automatically shown below <strong>the</strong> number<br />
you select.<br />
Settings: 0 – 95<br />
2 Control Slider No.<br />
Determines which Control Change numbers are<br />
transmitted when you use <strong>the</strong> Control Sliders for each<br />
Zone. The function name is automatically shown below <strong>the</strong><br />
number you select.<br />
Settings: 0 – 95<br />
The Master Job mode features convenient data initialization and archiving tools. To enter <strong>the</strong> Master Job mode, press <strong>the</strong><br />
[JOB] button in <strong>the</strong> Master mode. Press <strong>the</strong> [EXIT] button to return to <strong>the</strong> original display.<br />
Master Job Procedure<br />
1 In <strong>the</strong> Master mode, press <strong>the</strong> [JOB] button to<br />
enter <strong>the</strong> Master Job mode.<br />
2 Select <strong>the</strong> Job you wish to execute by pressing<br />
<strong>the</strong> [F1] or [F4] button.<br />
3 Set <strong>the</strong> parameters for executing <strong>the</strong> Job.<br />
4 Press <strong>the</strong> [ENTER] button. (The display<br />
prompts you for confirmation.)<br />
To cancel <strong>the</strong> Job, press <strong>the</strong> [DEC/NO] button.<br />
Knob and Slider Settings—[F5] KnobSlider<br />
1<br />
2<br />
5 Press <strong>the</strong> [INC/YES] button to execute <strong>the</strong> Job.<br />
After <strong>the</strong> Job has been <strong>com</strong>pleted, a “Completed”<br />
message appears and operation returns to <strong>the</strong> original<br />
display.<br />
6 Press <strong>the</strong> [MASTER] button to return to <strong>the</strong><br />
Master Play display.<br />
MOTIF <strong>XS</strong> Owner’s <strong>Manual</strong><br />
Voice mode<br />
Performance<br />
mode<br />
Sampling<br />
mode 1<br />
Song mode<br />
Pattern mode<br />
Mixing mode<br />
Sampling<br />
mode 2<br />
Master mode<br />
Utility mode<br />
File mode<br />
257<br />
Reference
Reference<br />
Voice mode Performance Sampling Song mode Pattern mode Mixing mode Sampling Master mode Utility mode File mode<br />
mode mode 1<br />
mode 2<br />
258<br />
Using as a Master Keyboard (Master mode)<br />
Initializing <strong>the</strong> Master—[F1] Init<br />
This function lets you reset (initialize) all Master parameters<br />
to <strong>the</strong>ir default settings. It also allows you to selectively<br />
initialize certain parameters, such as Common settings and<br />
Zone settings.<br />
1<br />
2<br />
3<br />
4<br />
567<br />
1 All Parameters<br />
Determines whe<strong>the</strong>r or not all settings for <strong>the</strong> selected<br />
Master are initialized. When set to “on,” o<strong>the</strong>r parameters in<br />
this display cannot be set.<br />
Settings: B (on), A (off)<br />
2 Common<br />
Determines whe<strong>the</strong>r or not all Common parameter settings<br />
for <strong>the</strong> selected Master are initialized. When set to “on,”<br />
ZONE cannot be set.<br />
Settings: B (on), A (off)<br />
3 Zone<br />
Determines whe<strong>the</strong>r or not all Zone parameter settings for<br />
<strong>the</strong> selected Master are initialized. When set to “on,”<br />
executing <strong>the</strong> Job initializes all <strong>the</strong> parameter settings of<br />
Common Edit.<br />
Settings: B (on), A (off)<br />
4 Initialize Type<br />
Determines how <strong>the</strong> Zone parameter settings for <strong>the</strong><br />
selected Master are initialized. Three methods of Initializing<br />
are available.<br />
Settings: split, zone, layer<br />
split<br />
Sets <strong>the</strong> Zone 1 and Zone 2 to on, <strong>the</strong>n splits <strong>the</strong> keyboard range using<br />
Zone 1 and Zone 2. “Upper Ch” determines <strong>the</strong> MIDI transmit channel<br />
of <strong>the</strong> upper range of <strong>the</strong> keyboard, “Lower Ch” determines <strong>the</strong> MIDI<br />
transmit channel of <strong>the</strong> lower range of <strong>the</strong> keyboard, and “Split Point”<br />
determines <strong>the</strong> note (C -2 – G8) number which separates <strong>the</strong> upper<br />
range and lower range of <strong>the</strong> keyboard.<br />
zone<br />
Sets Zones 1 – 4 to on, Zones 5 – 8 to off, and <strong>the</strong> MIDI Transmit<br />
Channels to 1 – 8 respectively.<br />
layer<br />
Sets <strong>the</strong> Zone 1 and Zone 2 to on, <strong>the</strong>n lets you layer two Parts. “Upper<br />
Ch” and “Lower Ch” determine <strong>the</strong> MIDI transmit channels of <strong>the</strong> two<br />
Zones respectively.<br />
MOTIF <strong>XS</strong> Owner’s <strong>Manual</strong><br />
5 Upper Ch (Upper Channel)<br />
6 Lower Ch (Lower Channel)<br />
Determines <strong>the</strong> MIDI transmit channels of Zone 1 and Zone<br />
2 respectively when <strong>the</strong> Initialize Type is set to “layer” or<br />
“split.”<br />
Settings: 1 – 16<br />
7 Split Point<br />
Determines <strong>the</strong> Split Point that divides <strong>the</strong> keyboard into<br />
<strong>the</strong> Zone 1 and Zone 2 when <strong>the</strong> Initialize Type is set to<br />
“split.” By setting this parameter, <strong>the</strong> Note Limit High of<br />
Zone 1 is automatically set to <strong>the</strong> note one semitone lower<br />
than <strong>the</strong> Split Point set here and <strong>the</strong> Note Limit Low of Zone<br />
2 is automatically set to <strong>the</strong> note same as <strong>the</strong> Split Point set<br />
here.<br />
Settings: C -2 – G8<br />
n The Note Limit High and Note Limit Low parameters can be<br />
set in <strong>the</strong> Note display (page 255) of <strong>the</strong> Zone Edit.<br />
Transmitting <strong>the</strong> Master Settings to an<br />
external MIDI device (Bulk Dump)<br />
This function lets you send all your edited parameter<br />
settings for <strong>the</strong> currently selected Master to a <strong>com</strong>puter or<br />
ano<strong>the</strong>r MIDI device for data archiving. Press <strong>the</strong> [ENTER]<br />
button to execute <strong>the</strong> Bulk Dump.<br />
n The Bulk Dump data includes only <strong>the</strong> MIDI messages and<br />
does not include <strong>the</strong> Waveforms.<br />
n In order to execute Bulk Dump, you will need to set <strong>the</strong> correct<br />
MIDI Device Number. For details, see page 268.
System Settings (Utility mode, etc.)<br />
In <strong>the</strong> Utility mode, you can set parameters that apply to <strong>the</strong> entire system of <strong>the</strong> MOTIF <strong>XS</strong>. To enter <strong>the</strong> Utility mode, press<br />
<strong>the</strong> [UTILITY] button. Pressing <strong>the</strong> [EXIT] button returns to <strong>the</strong> original display. For system settings related to <strong>the</strong> sequencer<br />
in Song/Pattern/Arpeggio playback, call up <strong>the</strong> Sequencer Setup display by pressing <strong>the</strong> [SEQ SETUP] button in <strong>the</strong> Song/<br />
Pattern/Performance mode.<br />
Basic Procedure in <strong>the</strong> Utility mode<br />
1 Enter <strong>the</strong> Utility mode.<br />
Press <strong>the</strong> [UTILITY] button to enter <strong>the</strong> Utility mode.<br />
(The indicator lights.)<br />
2 Calls up <strong>the</strong> desired display.<br />
Note <strong>the</strong> tab menus of <strong>the</strong> [F1] – [F6] and [SF1] – [SF5]<br />
buttons to find <strong>the</strong> desired function, <strong>the</strong>n press <strong>the</strong><br />
relevant button to call up <strong>the</strong> desired display.<br />
3 Set <strong>the</strong> desired parameter.<br />
Move <strong>the</strong> cursor to each parameter, <strong>the</strong>n set <strong>the</strong> value<br />
by using <strong>the</strong> data dial, [INC/YES] and [DEC/NO] button.<br />
When “Press [ENTER] to set” is shown on <strong>the</strong> display, make<br />
sure to press <strong>the</strong> [ENTER] button before going to <strong>the</strong> next<br />
step. If you do not, <strong>the</strong> settings will not be stored, even if you<br />
press <strong>the</strong> [STORE] button in <strong>the</strong> next step.<br />
4 Press <strong>the</strong> [STORE] button to store <strong>the</strong> Utility<br />
setting and Sequencer Setup to internal<br />
memory.<br />
All Utility settings will be lost when <strong>the</strong> power is turned off<br />
without storing.<br />
n The parameter settings in <strong>the</strong> Utility displays and<br />
Sequencer Setup displays are treated and stored as a<br />
single unit. This means that when you execute <strong>the</strong> Store<br />
operation in <strong>the</strong> Utility mode, <strong>the</strong> settings in <strong>the</strong> Sequencer<br />
Setup displays are also stored, and vice versa.<br />
5 Press <strong>the</strong> [EXIT] button to exit from <strong>the</strong> Utility<br />
mode to <strong>the</strong> original mode.<br />
System Information—[SF6] INFO<br />
This display indicates <strong>the</strong> MIDI IN/OUT settings and<br />
Network settings. This display cannot be edited.<br />
1<br />
2<br />
CAUTION<br />
CAUTION<br />
1 MIDI IN/OUT (Indication only)<br />
Indicates <strong>the</strong> hardware terminal via which <strong>the</strong> MIDI data is<br />
input or output. The related parameters can be set in <strong>the</strong><br />
MIDI display (page 268).<br />
2 Network Information<br />
Indicates <strong>the</strong> network settings. The related parameters can<br />
be set in <strong>the</strong> Network display (page 260).<br />
General Settings—[F1] General<br />
Tone Generator and Keyboard settings<br />
—[SF1] Play<br />
1<br />
2<br />
3<br />
4<br />
5<br />
6<br />
Tone Generator<br />
From this section, you can make overall settings for <strong>the</strong><br />
internal tone generator. The settings here only affect <strong>the</strong><br />
internal tone generator block. The MIDI output will not be<br />
affected.<br />
1 Volume<br />
Determines <strong>the</strong> overall volume of <strong>the</strong> instrument.<br />
Settings: 0 – 127<br />
2 Note Shift<br />
Determines <strong>the</strong> amount (in semitones) by which <strong>the</strong> pitch of<br />
all notes is shifted.<br />
Settings: -24 semi – +0 semi – +24 semi<br />
3 Tune<br />
7<br />
8<br />
Determines <strong>the</strong> fine tuning of <strong>the</strong> overall sound. You can<br />
adjust <strong>the</strong> tuning in cent increments.<br />
Settings: -102.4 cents – +0 cents – +102.3 cents<br />
Voice mode<br />
Performance<br />
mode<br />
Sampling<br />
mode 1<br />
Song mode<br />
Pattern mode<br />
Mixing mode<br />
Sampling<br />
mode 2<br />
Master mode<br />
Utility mode<br />
File mode<br />
MOTIF <strong>XS</strong> Owner’s <strong>Manual</strong> 259<br />
Reference
Reference<br />
Voice mode Performance Sampling Song mode Pattern mode Mixing mode Sampling Master mode Utility mode File mode<br />
mode mode 1<br />
mode 2<br />
260<br />
System Settings (Utility mode, etc.)<br />
4 Sustain Pedal<br />
Determines which model of an optional Foot Controller<br />
connected to <strong>the</strong> FOOT SWITCH SUSTAIN jack is recognized.<br />
When you connect an optional FC3 (equipped with <strong>the</strong> halfdamper<br />
feature) for producing a “half-damper” effect (as on a<br />
real acoustic piano), set this parameter to “FC3 (half on)” and<br />
set <strong>the</strong> Half Damper Switch parameter to “on” in <strong>the</strong><br />
Amplitude EG display (page 123) of Voice Element Edit. If you<br />
don’t need or want to disable <strong>the</strong> half-damper feature and still<br />
use an FC3, set this parameter to “FC3 (half off).” When you<br />
connect an optional FC4 or FC5 (which is not equipped with<br />
<strong>the</strong> half-damper feature), set this parameter to “FC4” or “FC5.”<br />
Settings: FC3 (half on), FC3 (half off), FC4/5<br />
n Note that this setting is not necessary when controlling <strong>the</strong><br />
half-damper feature via Control Change messages from an<br />
external MIDI device to <strong>the</strong> instrument.<br />
Keyboard<br />
From this section, you can set <strong>the</strong> keyboard-related<br />
parameters. The settings here affect <strong>the</strong> MIDI messages<br />
generated by playing <strong>the</strong> keyboard.<br />
5 Octave<br />
Determines <strong>the</strong> amount in octaves by which <strong>the</strong> range of<br />
<strong>the</strong> keyboard is shifted up or down. This setting can be<br />
changed also by pressing any of <strong>the</strong> OCTAVE buttons.<br />
Settings: -3 – +0 – +3<br />
6 Transpose<br />
Determines <strong>the</strong> amount in semitones by which <strong>the</strong> range of<br />
<strong>the</strong> keyboard is shifted up or down.<br />
Settings: -11 semi – +0 semi – +11 semi<br />
n If you transpose beyond <strong>the</strong> note range limits (C -2 and G8),<br />
notes in <strong>the</strong> adjacent octaves will be used.<br />
7 Velocity Curve<br />
The five curves determine how <strong>the</strong> actual velocity will be<br />
generated and transmitted according to <strong>the</strong> velocity<br />
(strength) with which you play notes on <strong>the</strong> keyboard. The<br />
graph shown in <strong>the</strong> display indicates <strong>the</strong> velocity response<br />
curve. (The horizontal line represents <strong>the</strong> received velocity<br />
values (strength of your playing), while <strong>the</strong> vertical line<br />
represents <strong>the</strong> actual velocity values transmitted to <strong>the</strong><br />
internal/external tone generators.)<br />
Settings: normal, soft, hard, wide, fixed<br />
normal<br />
This linear “curve” produces one-to-one correspondence between <strong>the</strong><br />
strength of your keyboard playing (velocity) and <strong>the</strong> actual sound change.<br />
soft<br />
This curve provides increased response, especially for lower velocities.<br />
hard<br />
This curve effectively lessens <strong>the</strong> overall response <strong>com</strong>pared to <strong>the</strong><br />
“norm” curve.<br />
wide<br />
This setting provides opposite response curves for lower and higher<br />
velocities. It widens <strong>the</strong> apparent dynamic range of <strong>the</strong> controller,<br />
producing less sound change in <strong>the</strong> softer range and more change in <strong>the</strong><br />
higher range.<br />
fixed<br />
This setting produces <strong>the</strong> same amount of sound change (set in Fixed<br />
Velocity below), no matter what your playing strength.<br />
MOTIF <strong>XS</strong> Owner’s <strong>Manual</strong><br />
8 Fixed Velocity<br />
This parameter is available only when you select <strong>the</strong> “fixed”<br />
Velocity Curve above. The velocity of <strong>the</strong> note you play is<br />
fixed at <strong>the</strong> value set here.<br />
Settings: 1 – 127<br />
System Effect Bypass Settings—[SF2]<br />
FXBypass<br />
From this display you can select <strong>the</strong> specific effect(s) to be<br />
bypassed when <strong>the</strong> EFFECT BYPASS [SYSTEM] button is<br />
turned on. The bypassed effect is <strong>the</strong>n temporarily<br />
disabled.<br />
1<br />
2<br />
1 Reverb<br />
When this is set to on and <strong>the</strong> [SYSTEM] button is turned<br />
on, <strong>the</strong> Reverb effect is bypassed.<br />
2 Chorus<br />
When this is set to on and <strong>the</strong> [SYSTEM] button is turned<br />
on, <strong>the</strong> Chorus effect is bypassed.<br />
Network Settings—[SF3] Network<br />
From this display, you can set parameters for connecting<br />
<strong>the</strong> MOTIF <strong>XS</strong> to <strong>the</strong> network system via <strong>the</strong> ETHERNET<br />
connector. Make sure to press <strong>the</strong> [ENTER] button after<br />
setting in this display. If you do not, <strong>the</strong> settings will not be<br />
stored, even if you press <strong>the</strong> [STORE] button.<br />
1<br />
2<br />
3<br />
5<br />
6<br />
7<br />
8<br />
9<br />
1 Host Name<br />
%<br />
Determines <strong>the</strong> Host Name (NetBIOS name) of <strong>the</strong> MOTIF<br />
<strong>XS</strong>. This is used when accessing <strong>the</strong> MOTIF <strong>XS</strong> from a<br />
<strong>com</strong>puter connected to <strong>the</strong> network. Set a unique Host<br />
Name that will not conflict with any o<strong>the</strong>r <strong>com</strong>puter. In<br />
general, <strong>the</strong> default Host Name will suffice, so <strong>the</strong>re should<br />
be no need to change this. For detailed instructions on<br />
naming, see page 82.<br />
4<br />
)<br />
!<br />
@<br />
#<br />
$
2 Description<br />
Here, you can input a short summary or memo about your<br />
MOTIF <strong>XS</strong>. The description input here can be browsed<br />
from <strong>the</strong> o<strong>the</strong>r <strong>com</strong>puter connected to <strong>the</strong> network. This is<br />
useful when several MOTIF <strong>XS</strong>s are connected to <strong>the</strong> same<br />
network. In general, <strong>the</strong> default Description will suffice, so<br />
<strong>the</strong>re should be no need to change this. For detailed<br />
instructions on inputting a character, see page 82.<br />
3 DHCP Client<br />
Determines whe<strong>the</strong>r or not <strong>the</strong> MOTIF <strong>XS</strong> is handled as <strong>the</strong><br />
client device of <strong>the</strong> DHCP server. When this is set to “on,”<br />
<strong>the</strong> MOTIF <strong>XS</strong> is handled as a client device of <strong>the</strong> DHCP<br />
server. The DHCP (Dynamic Host Configuration Protocol) is<br />
a standard or protocol by which IP addresses and o<strong>the</strong>r<br />
low-level network configuration information can be<br />
dynamically and automatically assigned each time your<br />
MOTIF <strong>XS</strong> is connected to <strong>the</strong> network. If <strong>the</strong> DHCP server<br />
covers <strong>the</strong> network, set this parameter to “on.” If you wish<br />
to set a specific IP address or <strong>the</strong>re is no DHCP server, set<br />
this parameter to “off.”<br />
Settings: on, off<br />
4 File Server<br />
Determines whe<strong>the</strong>r <strong>the</strong> File Server function of <strong>the</strong> MOTIF<br />
<strong>XS</strong> is active or not. When this parameter is set to “on,” <strong>the</strong><br />
ano<strong>the</strong>r <strong>com</strong>puter on <strong>the</strong> same network can access files on<br />
<strong>the</strong> USB storage device connected to <strong>the</strong> USB TO DEVICE<br />
connector of <strong>the</strong> MOTIF <strong>XS</strong>.<br />
Settings: on, off<br />
n Make sure to set <strong>the</strong> Password (%) of this instrument before<br />
setting this parameter to “on.” If this is set to “on” before <strong>the</strong><br />
Password is set, “Password is unspecified” appears.<br />
5 IP Address<br />
Determines <strong>the</strong> IP Address, a string of numbers assigned<br />
to each <strong>com</strong>puter or your MOTIF <strong>XS</strong> connected to a<br />
network, indicating <strong>the</strong> device’s location on <strong>the</strong> network.<br />
When <strong>the</strong> MOTIF <strong>XS</strong> is connected to <strong>the</strong> network which <strong>the</strong><br />
DHCP server covers and <strong>the</strong> DHCP Client parameter<br />
above is set to “on,” this parameter is automatically set,<br />
and you will not need to input it manually. When <strong>the</strong> DHCP<br />
Client (3) is set to “off” and you do not know how to set this<br />
parameter, consult your network administrator or Internet<br />
provider.<br />
Settings: 0 – 255<br />
6 Subnet Mask<br />
Indicates <strong>the</strong> Subnet Mask, a setting used to divide a<br />
large-scale network into several smaller networks. When<br />
<strong>the</strong> MOTIF <strong>XS</strong> is connected to <strong>the</strong> network which <strong>the</strong> DHCP<br />
server covers and <strong>the</strong> DHCP Client parameter above is set<br />
to “on,” this parameter is automatically set resulting that<br />
you need not input here. When <strong>the</strong> DHCP Client (3) is set<br />
to “off” and you do not know how to set this parameter,<br />
consult your network administrator or Internet provider.<br />
Settings: 0 – 255<br />
7 Gateway<br />
System Settings (Utility mode, etc.)<br />
Determines <strong>the</strong> Gateway, a system which links different<br />
networks or systems, and makes possible data transfer<br />
and conversion despite differing <strong>com</strong>munications<br />
standards. When <strong>the</strong> MOTIF <strong>XS</strong> is connected to <strong>the</strong><br />
network which <strong>the</strong> DHCP server covers and <strong>the</strong> DHCP<br />
Client parameter above is set to “on,” this parameter is<br />
automatically set, and you will not need to input it manually.<br />
Settings: 0 – 255<br />
8 DNS1 (Domain Name Server1)<br />
9 DNS2 (Domain Name Server2)<br />
Determines <strong>the</strong> address for <strong>the</strong> Domain Name server. Up to<br />
two servers (primary DNS1 and secondary DNS2) can be<br />
set. When you do not use <strong>the</strong> Domain Name server, set<br />
both of <strong>the</strong> DNS1 and DNS2 to “0.0.0.0.” When you use<br />
only <strong>the</strong> DNS1, set <strong>the</strong> DNS2 to “0.0.0.0.” When <strong>the</strong> MOTIF<br />
<strong>XS</strong> is connected to <strong>the</strong> network which <strong>the</strong> DHCP server<br />
covers and <strong>the</strong> DHCP Client parameter above is set to<br />
“on,” this parameter is automatically set, and you will not<br />
need to input it manually.<br />
Settings: 0 – 255<br />
) Security<br />
Determines <strong>the</strong> certification type when ano<strong>the</strong>r <strong>com</strong>puter<br />
on <strong>the</strong> network accesses <strong>the</strong> MOTIF <strong>XS</strong>. If you wish to<br />
certificate <strong>the</strong> <strong>com</strong>puter by using <strong>the</strong> Account ($) and<br />
password, set this parameter to “workgroup.” If you wish to<br />
certificate <strong>the</strong> <strong>com</strong>puter by using <strong>the</strong> domain controller on<br />
<strong>the</strong> network, set this parameter to “domain.”<br />
Settings: domain, workgroup<br />
! Domain<br />
Enters <strong>the</strong> Domain name or Workgroup name. Input <strong>the</strong><br />
Domain name or Workgroup name to <strong>the</strong> same name as<br />
that of <strong>the</strong> online device you wish to use for accessing <strong>the</strong><br />
MOTIF <strong>XS</strong>. For detailed instructions on inputting<br />
characters, see page 82.<br />
@ WINS<br />
Determines <strong>the</strong> address for <strong>the</strong> WINS (Windows Internet<br />
Name Service) server. When <strong>the</strong> PDC Name (#) is set to<br />
<strong>the</strong> Host name (NetBIOS name), you will set <strong>the</strong> address of<br />
<strong>the</strong> WINS server. If you are not using <strong>the</strong> WINS server, set<br />
this parameter to “0.0.0.0.”<br />
Settings: 0 – 255<br />
# PDC Name (Primary Domain Controller Name)<br />
Determines <strong>the</strong> Host name (NetBIOS name) of <strong>the</strong> Domain<br />
Controller or IP address on <strong>the</strong> network. When <strong>the</strong> Security<br />
()) is set to “domain,” <strong>the</strong> certification will be executed by<br />
using <strong>the</strong> Domain Controller set here.<br />
$ File Server Account<br />
Determines <strong>the</strong> account name (user name) used when<br />
ano<strong>the</strong>r <strong>com</strong>puter on <strong>the</strong> network accesses <strong>the</strong> MOTIF <strong>XS</strong>.<br />
For detailed instructions on inputting characters, see<br />
page 82.<br />
n The account is not set by default. When no account is set, <strong>the</strong><br />
MOTIF <strong>XS</strong> can be accessed by <strong>the</strong> account named “nobody.”<br />
Voice mode<br />
Performance<br />
mode<br />
Sampling<br />
mode 1<br />
Song mode<br />
Pattern mode<br />
Mixing mode<br />
Sampling<br />
mode 2<br />
Master mode<br />
Utility mode<br />
File mode<br />
MOTIF <strong>XS</strong> Owner’s <strong>Manual</strong> 261<br />
Reference
Reference<br />
Voice mode Performance Sampling Song mode Pattern mode Mixing mode Sampling Master mode Utility mode File mode<br />
mode mode 1<br />
mode 2<br />
262<br />
System Settings (Utility mode, etc.)<br />
% [SF5] Password<br />
Pressing this button calls up <strong>the</strong> Password display that lets<br />
you set or change <strong>the</strong> password necessary for accessing<br />
<strong>the</strong> MOTIF <strong>XS</strong> from an online device connected to <strong>the</strong><br />
network. When shipped from <strong>the</strong> factory, <strong>the</strong> password is<br />
not set. Make sure to set <strong>the</strong> password if you wish to<br />
access <strong>the</strong> MOTIF <strong>XS</strong> from an external <strong>com</strong>puter via <strong>the</strong><br />
LAN network.<br />
Password Settings<br />
[SF3] ➞ [SF5] Password<br />
From this display, you can set <strong>the</strong> password of <strong>the</strong> MOTIF<br />
<strong>XS</strong>. By using <strong>the</strong> password set here, external online<br />
devices can access <strong>the</strong> File mode of <strong>the</strong> MOTIF <strong>XS</strong>.<br />
1<br />
2<br />
3<br />
1 Current Password<br />
This column is provided for inputting <strong>the</strong> current password.<br />
The password can be up to eight characters and no less<br />
than five characters. For detailed instructions on inputting<br />
characters, see page 82. “None” is shown when <strong>the</strong><br />
password is not set.<br />
2 New Password<br />
This column is provided for inputting <strong>the</strong> new password.<br />
The password can be up to eight characters and no less<br />
than five characters. For detailed instructions on inputting<br />
characters, see page 82.<br />
3 Confirm Password<br />
This column is provided for inputting <strong>the</strong> new password<br />
once again to confirm it. The password can be up to eight<br />
characters and no less than five characters. For detailed<br />
instructions on inputting characters, see page 82.<br />
Password Setting<br />
After inputting <strong>the</strong> Current Password, New Password and<br />
Confirm Password (New Password), press <strong>the</strong> [ENTER]<br />
button to set <strong>the</strong> New Password. If an error occurs, one of<br />
<strong>the</strong> following error messages will be shown on <strong>the</strong> display.<br />
Password is invalid.<br />
The password you input to “Current Password” is wrong. Input<br />
<strong>the</strong> correct password again.<br />
Confirmed password is invalid.<br />
The password you input to “Confirm Password” is not same as<br />
<strong>the</strong> password you input to “New Password.”<br />
Password is too short.<br />
The password you input to “New Password” is too short. Input<br />
<strong>the</strong> password again, using five or more characters.<br />
MOTIF <strong>XS</strong> Owner’s <strong>Manual</strong><br />
n If you forget <strong>the</strong> current password, execute <strong>the</strong> Factory Set<br />
Job (page 269) to reset <strong>the</strong> password setting, <strong>the</strong>n input <strong>the</strong><br />
new password again.<br />
Setting <strong>the</strong> default display when<br />
turning <strong>the</strong> power on—[SF4] Auto Load<br />
From this display, you can specify certain automatic tasks<br />
that <strong>the</strong> MOTIF <strong>XS</strong> will perform when power is turned on.<br />
1<br />
2<br />
1 Auto Load<br />
Determines whe<strong>the</strong>r <strong>the</strong> Auto Load function is on or off.<br />
When this is on, <strong>the</strong> instrument will automatically load <strong>the</strong><br />
specified files (from <strong>the</strong> USB storage device) to User<br />
memory—whenever <strong>the</strong> power is turned on. The file to be<br />
loaded is shown on this display. The file to be loaded can<br />
be specified via <strong>the</strong> [SF5] Get button.<br />
Settings: on, off<br />
2 Power On Mode<br />
3<br />
This determines <strong>the</strong> default power-on mode (and memory<br />
bank)—letting you select which condition is automatically<br />
called up when you turn <strong>the</strong> power on.<br />
Settings:<br />
performance<br />
When turning <strong>the</strong> power on next time, <strong>the</strong> Performance Play mode is<br />
entered and <strong>the</strong> first program number (USER: 001) is selected<br />
automatically.<br />
voice (USER1)<br />
When turning <strong>the</strong> power on next time, <strong>the</strong> Voice Play mode is entered<br />
and <strong>the</strong> first program number of User Voices (USR: 001) is selected<br />
automatically.<br />
voice (PRE1)<br />
When turning <strong>the</strong> power on next time, <strong>the</strong> Voice Play mode is entered<br />
and <strong>the</strong> first program number of Preset Voices (PRE: 001) is selected<br />
automatically.<br />
voice (GM)<br />
When turning <strong>the</strong> power on next time, <strong>the</strong> Voice Play mode is entered<br />
and <strong>the</strong> first program number of Preset GM Voices (GM: 001) is<br />
selected automatically.<br />
master<br />
When turning <strong>the</strong> power on next time, <strong>the</strong> Master Play mode is entered<br />
and <strong>the</strong> first program number (001) is selected automatically.<br />
n Make sure to store <strong>the</strong> Utility settings to <strong>the</strong> internal memory by<br />
pressing <strong>the</strong> [STORE] button before turning <strong>the</strong> power off.<br />
Please keep in mind that <strong>the</strong> Utility settings will be lost if you<br />
turn off <strong>the</strong> power without executing <strong>the</strong> Store operation.
3 [SF5] Select<br />
Pressing this button calls up <strong>the</strong> Select Auto Load File<br />
display. From this display you can specify <strong>the</strong> file (in <strong>the</strong><br />
external storage device) to be loaded automatically when<br />
turning <strong>the</strong> power on (when Auto Load is set to on).<br />
Specifying <strong>the</strong> Auto Load File<br />
[SF4] ➞ [SF5] Select<br />
From this display you can specify <strong>the</strong> file (in <strong>the</strong> external<br />
storage device) to be loaded automatically when turning <strong>the</strong><br />
power on (when Auto Load is set to on). Move <strong>the</strong> cursor to<br />
<strong>the</strong> desired file <strong>the</strong>n press <strong>the</strong> [ENTER] button to determine<br />
<strong>the</strong> Auto Load File.<br />
1<br />
2<br />
Upper Level<br />
Directory<br />
Parameters 1 – 4 are <strong>the</strong> same as <strong>the</strong> ones in <strong>the</strong> File<br />
window (page 275) of <strong>the</strong> File mode.<br />
Audio In/Out Settings—[F2] I/O<br />
(Input/Output)<br />
From this display you can set Audio In/Out parameters.<br />
1<br />
!<br />
3<br />
4<br />
1 Mic/Line<br />
2<br />
3<br />
4<br />
5<br />
6<br />
7<br />
8<br />
9<br />
)<br />
When using <strong>the</strong> A/D INPUT jacks, this determines <strong>the</strong> input<br />
source, microphone (mic) or line.<br />
Settings: mic, line<br />
mic<br />
Intended for low output equipment, such as a microphone, electric<br />
guitar or bass.<br />
line<br />
Intended for high output equipment, such as a keyboard, syn<strong>the</strong>sizer,<br />
or CD player.<br />
2 L&R Gain<br />
System Settings (Utility mode, etc.)<br />
Determines <strong>the</strong> output gain of <strong>the</strong> OUTPUT L/MONO and R<br />
jacks.<br />
Settings: 0dB, +6dB<br />
3 Assign L&R Gain<br />
Determines <strong>the</strong> output gain of <strong>the</strong> ASSIGNABLE OUTPUT L<br />
and R jacks.<br />
Settings: 0dB, +6dB<br />
4 – ) mLAN Gain<br />
Determines <strong>the</strong> output gain of <strong>the</strong> mLAN connector.<br />
Settings: 0dB, +6dB<br />
! mLAN Monitor Setup<br />
Determines <strong>the</strong> audio signal flow for monitoring <strong>the</strong> sound<br />
when using <strong>the</strong> MOTIF <strong>XS</strong> with DAW software installed on a<br />
<strong>com</strong>puter connected to <strong>the</strong> MOTIF <strong>XS</strong> via an IEEE1394<br />
cable.<br />
n You will need to properly set up <strong>the</strong> DAW software in addition<br />
to making <strong>the</strong> settings here. For details, see page 47.<br />
Settings: stand alone, with PC, with PC (DirectMonitor)<br />
stand alone<br />
This should be selected when you are using <strong>the</strong> MOTIF <strong>XS</strong> alone or are<br />
not using <strong>the</strong> DAW software even with a <strong>com</strong>puter connected to <strong>the</strong><br />
MOTIF <strong>XS</strong> via an IEEE1394 cable. When this is selected, <strong>the</strong> audio<br />
signal of <strong>the</strong> MOTIF <strong>XS</strong> will be output directly via <strong>the</strong> OUTPUT L/MONO<br />
and R jacks normally.<br />
with PC<br />
This should be selected when you are using <strong>the</strong> MOTIF <strong>XS</strong> as an audio<br />
device with <strong>the</strong> DAW software. When this is selected, <strong>the</strong> audio signal<br />
of <strong>the</strong> MOTIF <strong>XS</strong> will be output to <strong>the</strong> DAW software on a <strong>com</strong>puter via<br />
an IEEE1394 cable, merged and mixed with <strong>the</strong> DAW sound, returned<br />
back to <strong>the</strong> MOTIF <strong>XS</strong>, <strong>the</strong>n output via <strong>the</strong> OUTPUT L/MONO and R<br />
jacks. Selecting this allows you to apply VST Effects within <strong>the</strong> DAW<br />
software to <strong>the</strong> MOTIF <strong>XS</strong> sound.<br />
with PC (DirectMonitor)<br />
This should be selected when recording your keyboard performance to<br />
<strong>the</strong> DAW software on <strong>the</strong> <strong>com</strong>puter. The audio signal of <strong>the</strong> MOTIF <strong>XS</strong><br />
will be output directly via <strong>the</strong> OUTPUT L/MONO and R jacks with <strong>the</strong><br />
audio signal sent from <strong>the</strong> DAW software via an IEEE1394 cable. Keep<br />
in mind that <strong>the</strong> Rec Monitor of <strong>the</strong> DAW software should be set to “off”<br />
in order to prevent “double” sound from occurring.<br />
n When “with PC” is selected, <strong>the</strong>re may be a short delay<br />
between when you play <strong>the</strong> keyboard and when you hear <strong>the</strong><br />
resulting sound.<br />
n Set this parameter to “stand alone” when <strong>the</strong> MOTIF <strong>XS</strong> is not<br />
connected to an external device via an IEEE1394 cable.<br />
System Settings for <strong>the</strong> Voice<br />
mode—[F3] Voice<br />
From <strong>the</strong> following displays, you can set parameters<br />
related to <strong>the</strong> Master Effect, Master EQ, Audio Input part,<br />
Controller, and Micro Tuning in <strong>the</strong> Voice mode. These<br />
settings will be applied to all Voices. The following displays<br />
are available only when entering <strong>the</strong> Utility mode from <strong>the</strong><br />
Voice mode.<br />
Voice mode<br />
Performance<br />
mode<br />
Sampling<br />
mode 1<br />
Song mode<br />
Pattern mode<br />
Mixing mode<br />
Sampling<br />
mode 2<br />
Master mode<br />
Utility mode<br />
File mode<br />
MOTIF <strong>XS</strong> Owner’s <strong>Manual</strong> 263<br />
Reference
Reference<br />
Voice mode Performance Sampling Song mode Pattern mode Mixing mode Sampling Master mode Utility mode File mode<br />
mode mode 1<br />
mode 2<br />
264<br />
System Settings (Utility mode, etc.)<br />
Master Effect Settings—[SF1] MasterFX<br />
(Master Effect)<br />
This display lets you set Master Effect parameters in <strong>the</strong><br />
Voice mode. This display can be called up by pressing and<br />
holding <strong>the</strong> [MASTER EFFECT] button on <strong>the</strong> front panel in<br />
<strong>the</strong> Voice mode.<br />
1<br />
1 Switch<br />
Determines whe<strong>the</strong>r <strong>the</strong> Master Effect is applied or not to<br />
<strong>the</strong> Voice. When this is set to on, entering <strong>the</strong> Voice mode<br />
turns <strong>the</strong> [MASTER EFFECT] lamp on.<br />
Settings: on, off<br />
O<strong>the</strong>r parameters are same as <strong>the</strong> ones on <strong>the</strong> Master<br />
Effect display (page 146) in <strong>the</strong> Performance Common Edit<br />
mode.<br />
Master EQ settings—[SF2] MasterEQ<br />
This display lets you set Master EQ parameters in <strong>the</strong> Voice<br />
mode, allowing you to control EQ over five independent<br />
frequency bands. This EQ affects all Voices. This display is<br />
available only when entering <strong>the</strong> Utility mode from <strong>the</strong><br />
Voice mode.<br />
The function is same as <strong>the</strong> one on <strong>the</strong> Master EQ display<br />
(page 146) in <strong>the</strong> Performance Common Edit mode.<br />
MOTIF <strong>XS</strong> Owner’s <strong>Manual</strong><br />
Controller Settings—[SF3] Control<br />
From this display you can set parameters related to output<br />
of <strong>the</strong> Arpeggio MIDI data and <strong>the</strong> controller assignment in<br />
<strong>the</strong> Voice mode. The settings here affect all Voices. This<br />
display is available only when entering <strong>the</strong> Utility mode<br />
from <strong>the</strong> Voice mode.<br />
1<br />
2<br />
3<br />
1 ARP MIDI Out Switch<br />
When this is set to on, Arpeggio playback data is output<br />
from <strong>the</strong> MIDI terminal.<br />
Settings: on, off<br />
2 ARP Transmit Ch (Arpeggio Transmit Channel)<br />
Determines <strong>the</strong> MIDI transmit channel through which<br />
Arpeggio playback data will be sent (when <strong>the</strong> Switch<br />
parameter above is set to on).<br />
Settings: 1 – 16<br />
3 Controller Assign<br />
You can assign MIDI Control Change Numbers to <strong>the</strong><br />
controllers and knobs on <strong>the</strong> front panel. For example, you<br />
could use <strong>the</strong> ASSIGN 1 and 2 knobs to control effect<br />
depth, while using <strong>the</strong> Foot Controller to control<br />
modulation. These control assignments are called<br />
“Controller Assign.”<br />
The function is same as <strong>the</strong> one in <strong>the</strong> Controller Assign<br />
display (page 147) in <strong>the</strong> Performance Common Edit<br />
mode.
Creating your original Micro Tuning—<br />
[SF4] Tuning<br />
From this display, you can create your original Micro Tuning<br />
in <strong>the</strong> User Bank. You can copy a Micro Tuning to ano<strong>the</strong>r<br />
number, <strong>the</strong>n create new one based on it. This display is<br />
available only when entering <strong>the</strong> Utility mode from <strong>the</strong><br />
Voice mode.<br />
1<br />
2<br />
3<br />
1 Micro Tuning No.<br />
Determines <strong>the</strong> destination to which <strong>the</strong> created Micro<br />
Tuning setting is stored.<br />
Settings: 1 – 8<br />
2 Micro Tuning Name<br />
Enters <strong>the</strong> desired name for <strong>the</strong> Micro Tuning. For detailed<br />
instructions on naming, see page 82.<br />
3 Tuning Offset<br />
Lets you tune <strong>the</strong> individual notes of <strong>the</strong> keyboard in cents<br />
to create your original Micro Tuning.<br />
Settings: -99 – +0 – +99 cents<br />
[SF5] Copy<br />
From this display called up via this button, you can copy a<br />
Micro Tuning to ano<strong>the</strong>r number <strong>the</strong>n create a new Micro<br />
Tuning based on it.<br />
Micro Tuning Copy Procedure<br />
1 Select a Micro Tuning number as source.<br />
2 Press <strong>the</strong> [SF5] button to call up <strong>the</strong> Copy display.<br />
3 Select a Micro Tuning number as destination.<br />
4 Press <strong>the</strong> [ENTER] button to execute <strong>the</strong> Copy<br />
operation.<br />
System Settings (Utility mode, etc.)<br />
Audio Input Settings in <strong>the</strong> Voice<br />
mode—[F4] VoiceAudio<br />
You can set parameters related to audio input signal from<br />
<strong>the</strong> [A/D INPUT] connector and <strong>the</strong> mLAN connector in <strong>the</strong><br />
Voice mode. This display is available only when entering<br />
<strong>the</strong> Utility mode from <strong>the</strong> Voice mode.<br />
n The mLAN Input (m1 – m14) is available only for <strong>the</strong> MOTIF<br />
<strong>XS</strong>8. This is available for MOTIF <strong>XS</strong>6/7 only when an optional<br />
mLAN16E2 has been installed.<br />
Output Settings—[SF1] Output<br />
From this display you can set various parameters of <strong>the</strong><br />
Audio Input signal in <strong>the</strong> Voice mode, such as Output<br />
jacks, Volume, Pan, and Effect depth. This display is<br />
available only when entering <strong>the</strong> Utility mode from <strong>the</strong><br />
Voice mode.<br />
1<br />
2<br />
3<br />
4<br />
5<br />
6<br />
7<br />
1 Volume<br />
Determines <strong>the</strong> output level of <strong>the</strong> Audio Input Part.<br />
Settings: 0 – 127<br />
2 Pan<br />
Determines <strong>the</strong> stereo pan position of <strong>the</strong> Audio Input Part.<br />
Settings: L63 (far left) – C (center) – R63 (far right)<br />
3 Mono/Stereo<br />
Determines <strong>the</strong> signal configuration for <strong>the</strong> Audio Input Part,<br />
or how <strong>the</strong> signal or signals are routed (stereo or mono).<br />
Settings: stereo, L mono, R mono, L+R mono<br />
stereo<br />
Both <strong>the</strong> L and R channels of <strong>the</strong> audio input are used.<br />
L mono<br />
Only <strong>the</strong> L channel of <strong>the</strong> audio input is used.<br />
R mono<br />
Only <strong>the</strong> R channel of <strong>the</strong> audio input is used.<br />
L+R mono<br />
The L and R channels of <strong>the</strong> audio input are mixed and processed in<br />
mono.<br />
Voice mode<br />
Performance<br />
mode<br />
Sampling<br />
mode 1<br />
Song mode<br />
Pattern mode<br />
Mixing mode<br />
Sampling<br />
mode 2<br />
Master mode<br />
Utility mode<br />
File mode<br />
MOTIF <strong>XS</strong> Owner’s <strong>Manual</strong> 265<br />
Reference
Reference<br />
Voice mode Performance Sampling Song mode Pattern mode Mixing mode Sampling Master mode Utility mode File mode<br />
mode mode 1<br />
mode 2<br />
266<br />
System Settings (Utility mode, etc.)<br />
4 Output Select<br />
Determines <strong>the</strong> output jack assignment for <strong>the</strong> Audio Input<br />
Part.<br />
Settings: See <strong>the</strong> table below.<br />
LCD Output jacks Stereo/Mono<br />
L&R OUTPUT L and R Stereo<br />
asL&R ASSIGNABLE OUTPUT L and R Stereo<br />
m1&2 mLAN OUTPUT 1 and 2 Stereo (1: L, 2: R)<br />
m3&4 mLAN OUTPUT 3 and 4 Stereo (3: L, 4: R)<br />
m5&6 mLAN OUTPUT 5 and 6 Stereo (5: L, 6: R)<br />
m7&8 mLAN OUTPUT 7 and 8 Stereo (7: L, 8: R)<br />
m9&10 mLAN OUTPUT 9 and 10 Stereo (9: L, 10: R)<br />
m11&12 mLAN OUTPUT 11 and 12 Stereo (11: L, 12: R)<br />
m13&14 mLAN OUTPUT 13 and 14 Stereo (13: L, 14: R)<br />
asL ASSIGNABLE OUTPUT L Mono<br />
asR ASSIGNABLE OUTPUT R Mono<br />
m1 mLAN OUTPUT 1 Mono<br />
: : :<br />
m14 mLAN OUTPUT 14 Mono<br />
ins L<br />
(A/D Input<br />
only)<br />
Internal Vocoder module Mono<br />
n You can call up <strong>the</strong> list and select <strong>the</strong> desired item by pressing<br />
<strong>the</strong> [SF6] LIST button. For details, see page 82.<br />
5 Reverb Send<br />
Determines <strong>the</strong> Send level of <strong>the</strong> Audio Input Part signal<br />
sent to <strong>the</strong> Reverb effect. The higher <strong>the</strong> value, <strong>the</strong> more<br />
pronounced <strong>the</strong> Reverb.<br />
Settings: 0 – 127<br />
6 Chorus Send<br />
Determines <strong>the</strong> Send level of <strong>the</strong> Audio Input Part signal<br />
sent to <strong>the</strong> Chorus effect. The higher <strong>the</strong> value, <strong>the</strong> more<br />
pronounced <strong>the</strong> Chorus.<br />
Settings: 0 – 127<br />
7 Dry Level<br />
Determines <strong>the</strong> level of <strong>the</strong> Audio Input Part which has not<br />
been processed with <strong>the</strong> System Effects (Reverb, Chorus).<br />
The higher <strong>the</strong> value, <strong>the</strong> less pronounced <strong>the</strong> Reverb and<br />
Chorus.<br />
Settings: 0 – 127<br />
n The Reverb Send (5), Chorus Send (6), and Dry Level (7)<br />
parameters are not available when Output Select (4) is set to<br />
“insL.”<br />
MOTIF <strong>XS</strong> Owner’s <strong>Manual</strong><br />
Insertion Effect Connection Settings—<br />
[SF2] Connect<br />
From this display you can set <strong>the</strong> Insertion Effect<br />
connection of <strong>the</strong> Audio Input signal in <strong>the</strong> Voice mode.<br />
This display is available only when entering <strong>the</strong> Utility<br />
mode from <strong>the</strong> Voice mode.<br />
1<br />
1 INSERTION CONNECT (Insertion Connection)<br />
Determines <strong>the</strong> effect routing for Insertion effects A and B.<br />
The setting changes are shown on <strong>the</strong> diagram in <strong>the</strong><br />
display, giving you a clear picture of how <strong>the</strong> signal is<br />
routed.<br />
Settings: Ins A F B, Ins B F A<br />
Ins A F B<br />
Signals processed with Insertion Effect A will be sent to Insertion Effect<br />
B and signals processed with Insertion Effect B are sent to Reverb and<br />
Chorus.<br />
Ins B F A<br />
Signals processed with Insertion Effect B will be sent to Insertion Effect<br />
A and signals processed with Insertion Effect A are sent to Reverb and<br />
Chorus.<br />
2 Insertion A (Insertion A Category/Type)*<br />
3 Insertion B (Insertion B Category/Type)*<br />
Determines <strong>the</strong> Effect type for Insertion A and B. From <strong>the</strong><br />
Category column, you can select one of <strong>the</strong> Effect<br />
Categories, each of which contains similar Effect types.<br />
From <strong>the</strong> Type column, you can select one of <strong>the</strong> Effect<br />
Types listed in <strong>the</strong> selected Category.<br />
Settings: Details about <strong>the</strong> Effect categories and types are described<br />
on page 70.<br />
n You can call up <strong>the</strong> list and select <strong>the</strong> desired item by pressing<br />
<strong>the</strong> [SF6] LIST button. For details, see page 82.<br />
2<br />
3
Insertion Effect Type Settings—[SF3]<br />
Ins A, [SF4] Ins B<br />
From <strong>the</strong>se displays, you can set <strong>the</strong> Insertion Effect Types<br />
applied to <strong>the</strong> Audio Input signal in <strong>the</strong> Voice mode. These<br />
displays are available only when entering <strong>the</strong> Utility mode<br />
from <strong>the</strong> Voice mode.<br />
1 2 3<br />
n Depending on <strong>the</strong> selected parameter, <strong>the</strong> LIST icon is shown<br />
at <strong>the</strong> tab menu corresponding to <strong>the</strong> [SF6] button. In this<br />
condition, you can call up <strong>the</strong> list by pressing <strong>the</strong> [SF6] LIST<br />
button, <strong>the</strong>n select <strong>the</strong> desired item from <strong>the</strong> list. For details,<br />
see page 82.<br />
1 Category<br />
2 Type<br />
From <strong>the</strong> Category column, you can select one of <strong>the</strong> Effect<br />
Categories, each of which contains similar Effect types.<br />
From <strong>the</strong> Type column, you can select one of <strong>the</strong> Effect<br />
Types listed in <strong>the</strong> selected Category. Details about <strong>the</strong><br />
Effect categories are described on page 70.<br />
3 Preset<br />
This lets you call up pre-programmed settings for each<br />
Effect Type, designed to be used for specific applications<br />
and situations.<br />
4 Effect Parameters<br />
The number of parameters and values available differs<br />
depending on <strong>the</strong> currently selected effect type. Refer to<br />
page 73 for details about <strong>the</strong> Effect parameters. Refer to<br />
<strong>the</strong> separate Data List booklet for information on <strong>the</strong><br />
parameters for each Effect type.<br />
4<br />
System Settings (Utility mode, etc.)<br />
Remote Control and MIDI settings<br />
—[F5] Control<br />
From <strong>the</strong> following displays, you can set parameters<br />
related to <strong>the</strong> Remote Control function and MIDI settings.<br />
DAW Settings—[SF1] Remote<br />
Lets you specify <strong>the</strong> DAW application software to be<br />
controlled by <strong>the</strong> MOTIF <strong>XS</strong>. The MOTIF <strong>XS</strong> can control<br />
Cubase 4, Logic Pro 7.2, SONAR 5.2 and Digital Performer<br />
5.<br />
1 DAW Type<br />
Determines <strong>the</strong> DAW application software to be controlled<br />
by <strong>the</strong> MOTIF <strong>XS</strong>.<br />
Settings: Cubase, Logic, Sonar, Digital Performer<br />
n When <strong>the</strong> [REMOTE ON/OFF] lamp is turned on, simply<br />
selecting a DAW type calls up <strong>the</strong> Remote settings<br />
automatically.<br />
MIDI Settings—[SF2] MIDI<br />
From this display, you can set <strong>the</strong> MIDI related parameters.<br />
1<br />
2<br />
3<br />
4<br />
5<br />
6<br />
7<br />
8<br />
1<br />
1 Basic Receive Ch<br />
Determines <strong>the</strong> MIDI receive channel when this syn<strong>the</strong>sizer<br />
is set to single-timbre tone generator mode (Voice/<br />
Performance modes).<br />
Settings: 1 – 16, omni, off<br />
omni<br />
When this is selected, all channel messages are received.<br />
9<br />
)<br />
!<br />
@<br />
#<br />
$<br />
n In <strong>the</strong> multi-timbral tone generator mode (Song/Pattern<br />
modes), each Mixing Part receives MIDI data according to its<br />
assigned MIDI receive channel. This can be set in <strong>the</strong> Voice<br />
display (page 235) of <strong>the</strong> Mixing Part Edit mode.<br />
Voice mode<br />
Performance<br />
mode<br />
Sampling<br />
mode 1<br />
Song mode<br />
Pattern mode<br />
Mixing mode<br />
Sampling<br />
mode 2<br />
Master mode<br />
Utility mode<br />
File mode<br />
MOTIF <strong>XS</strong> Owner’s <strong>Manual</strong> 267<br />
Reference
Reference<br />
Voice mode Performance Sampling Song mode Pattern mode Mixing mode Sampling Master mode Utility mode File mode<br />
mode mode 1<br />
mode 2<br />
268<br />
System Settings (Utility mode, etc.)<br />
2 Keyboard Transmit Ch<br />
Determines <strong>the</strong> MIDI channel over which <strong>the</strong> instrument<br />
sends MIDI data (to an external sequencer, tone generator,<br />
or o<strong>the</strong>r device). This parameter is available in <strong>the</strong> singletimbre<br />
tone generator mode (Voice/Performance modes).<br />
Settings: 1 – 16, off<br />
n In <strong>the</strong> Song/Pattern mode, <strong>the</strong> MIDI data created by playing<br />
<strong>the</strong> keyboard/knobs/wheels is sent to <strong>the</strong> tone generator block<br />
or <strong>the</strong> external MIDI devices via <strong>the</strong> MIDI output channel of <strong>the</strong><br />
currently selected track. The Output Channels of each track<br />
can be set in <strong>the</strong> Output Channel display (page 184) of <strong>the</strong><br />
Song Play mode.<br />
3 Device Number<br />
Determines <strong>the</strong> device number used by this syn<strong>the</strong>sizer in<br />
receiving or transmitting data. This number must match <strong>the</strong><br />
Device Number of <strong>the</strong> external MIDI device when<br />
transmitting/receiving bulk data, parameter changes or<br />
o<strong>the</strong>r system exclusive messages.<br />
Settings: 1 – 16, all, off<br />
all<br />
When this is selected, system exclusive messages for all MIDI device<br />
numbers are received. When system exclusive messages such as bulk<br />
dump are transmitted from <strong>the</strong> MOTIF <strong>XS</strong> with this setting, <strong>the</strong> MOTIF<br />
<strong>XS</strong> is recognized as Device Number 1.<br />
off<br />
When this is selected, system exclusive messages such as bulk dump<br />
and parameter change cannot be transmitted or received. When you<br />
try execute transmission or reception of system exclusive messages,<br />
an error message appears.<br />
4 MIDI In/Out<br />
Determines which physical output/input terminal(s) will be<br />
used for transmitting/receiving MIDI data.<br />
Settings: MIDI, USB, mLAN (when <strong>the</strong> optional mLAN16E2 has been<br />
installed to <strong>the</strong> MOTIF <strong>XS</strong>6/7)<br />
n The three terminal types above cannot be used at <strong>the</strong> same<br />
time. Only one of <strong>the</strong>m can be used to transmit/receive MIDI<br />
data.<br />
5 MIDI Sync<br />
Determines whe<strong>the</strong>r Song/Pattern/Arpeggio playback will<br />
be synchronized to <strong>the</strong> instrument’s internal clock or an<br />
external MIDI clock.<br />
Settings: Internal, MIDI, auto, MTC<br />
internal<br />
Synchronization to internal clock. Use this setting when this syn<strong>the</strong>sizer<br />
is to be used alone or as <strong>the</strong> master clock source for o<strong>the</strong>r equipment.<br />
MIDI<br />
MIDI Synchronization to a MIDI clock received from an external MIDI<br />
instrument via MIDI.<br />
auto<br />
When MIDI clock is transmitted continuously from an external MIDI<br />
device or <strong>com</strong>puter, <strong>the</strong> internal clock of <strong>the</strong> MOTIF <strong>XS</strong> is not effective<br />
and <strong>the</strong> MOTIF <strong>XS</strong> is synchronized with <strong>the</strong> external clock. When MIDI<br />
clock is not transmitted from <strong>the</strong> external MIDI device or <strong>com</strong>puter, <strong>the</strong><br />
internal clock of <strong>the</strong> MOTIF <strong>XS</strong> continues to run in sync with <strong>the</strong> latest<br />
received tempo of <strong>the</strong> external MIDI device or <strong>com</strong>puter (DAW<br />
software). Note that <strong>the</strong> tempo cannot be changed on <strong>the</strong> MOTIF <strong>XS</strong><br />
when this value is selected. This setting is useful when you wish to<br />
alternate between external clock and internal clock.<br />
MTC (MIDI Time Code)<br />
Synchronization to an MTC signal received via MIDI. MMC signals are<br />
transmitted via MIDI. Use this setting when this syn<strong>the</strong>sizer is to be<br />
used as a MIDI slave, such as when synchronized to an MTC-capable<br />
MTR. The MTC Sync function is available only in <strong>the</strong> Song mode.<br />
MOTIF <strong>XS</strong> Owner’s <strong>Manual</strong><br />
n When this parameter is set to “MIDI,” make sure that <strong>the</strong><br />
external MIDI instrument connected to <strong>the</strong> MOTIF <strong>XS</strong> will<br />
transmit <strong>the</strong> MIDI clock to <strong>the</strong> MOTIF <strong>XS</strong>.<br />
n When MIDI Sync is set to “MTC,” Songs and Arpeggios cannot<br />
play back in <strong>the</strong> Song mode but Patterns and Arpeggios can<br />
play back in <strong>the</strong> Pattern mode.<br />
n MTC (MIDI Time Code) allows simultaneous synchronization of<br />
multiple audio devices via standard MIDI cables. It includes<br />
data corresponding to hours, minutes, seconds, and frames.<br />
The MOTIF <strong>XS</strong> does not transmit MTC.<br />
n MMC (MIDI Machine Control) allows remote control of<br />
multitrack recorders, MIDI sequencers, etc. An MMC<strong>com</strong>patible<br />
multitrack recorder, for example, will automatically<br />
respond to start, stop, fast forward, and fast reverse operations<br />
performed on <strong>the</strong> controlling sequencer, thus keeping<br />
playback of <strong>the</strong> sequencer and multitrack recorder aligned.<br />
6 Clock Out<br />
Determines whe<strong>the</strong>r MIDI clock (F8H) messages will be<br />
transmitted via MIDI.<br />
Settings: on, off<br />
7 Sequencer Control<br />
Determines whe<strong>the</strong>r Sequencer Control signals—start<br />
(FAH), continue (FBH), stop (FCH), and song position<br />
pointer (F2H)—will be received and/or transmitted via <strong>the</strong><br />
MIDI OUT/USB terminal.<br />
Settings: off, in, out, in/out<br />
off<br />
Not transmitted/recognized.<br />
in<br />
Recognized but not transmitted.<br />
out<br />
Transmitted but not recognized.<br />
in/out<br />
Transmitted/recognized.<br />
8 MTC Start Offset (MIDI Time Code Start Offset)<br />
Determines <strong>the</strong> specific time code point from which<br />
sequence playback starts, when MTC is received. This<br />
feature can be used to accurately align playback of this<br />
syn<strong>the</strong>sizer with an external MTC-<strong>com</strong>patible device.<br />
Settings: Hour: Minute: Second: Frame<br />
Hour: 00 – 23<br />
Minute: 00 – 59<br />
Second: 00 – 59<br />
Frame: 00 – 29<br />
9 Bank Select<br />
This switch enables or disables Bank Select messages,<br />
both in transmission and reception. When this is set to “on,”<br />
this syn<strong>the</strong>sizer responds to in<strong>com</strong>ing Bank Select<br />
messages, and it also transmits appropriate Bank Select<br />
messages (when using <strong>the</strong> panel). When this is set to “off,”<br />
Bank Select messages cannot be transmitted/received.<br />
Settings: off, on<br />
) Program Change<br />
This switch enables or disables Program Change<br />
messages, both in transmission and reception. When this<br />
is set to “on,” this syn<strong>the</strong>sizer responds to in<strong>com</strong>ing<br />
Program Change messages, and it also transmits<br />
appropriate Program Change messages (when using <strong>the</strong>
panel). When this is set to “off,” Program Change<br />
messages cannot be transmitted/received.<br />
Settings: off, on<br />
! Local Control<br />
This determines whe<strong>the</strong>r or not <strong>the</strong> tone generator of <strong>the</strong><br />
instrument responds to your keyboard playing. Normally,<br />
this should be set to “on”—since you’ll want to hear <strong>the</strong><br />
sound of <strong>the</strong> MOTIF <strong>XS</strong> as you play it. Even if this is set to<br />
“off,” <strong>the</strong> data will be transmitted via MIDI. Also, <strong>the</strong> internal<br />
tone generator block will respond to messages received<br />
via MIDI.<br />
Settings: off, on<br />
@ Receive Bulk<br />
Determines whe<strong>the</strong>r or not Bulk Dump data can be<br />
received.<br />
Settings: protect (not received), on (received)<br />
# Controller Reset<br />
Determines <strong>the</strong> status of <strong>the</strong> controllers (Modulation Wheel,<br />
Aftertouch, Foot Controller, Breath Controller, Knobs, etc.)<br />
when switching between voices. When this is set to “hold,”<br />
<strong>the</strong> controllers are kept at <strong>the</strong> current setting. When this is<br />
set to “reset,” <strong>the</strong> controllers are reset to <strong>the</strong> default states<br />
(below).<br />
Settings: hold, reset<br />
If you select “reset,” <strong>the</strong> controllers will be reset to <strong>the</strong> following states/<br />
positions:<br />
Pitch Bend Center<br />
Modulation WHeel Minimum<br />
Aftertouch Minimum<br />
Foot Controller Maximum<br />
Footswitch Off<br />
Ribbon Controller Center<br />
Breath Controller Maximum<br />
Assignable Function Off<br />
Expression Maximum<br />
Sustain Off<br />
$ Bulk Dump Interval<br />
Determines <strong>the</strong> interval time of <strong>the</strong> Bulk Dump transmission<br />
when <strong>the</strong> Bulk Dump function is used, <strong>the</strong> Bulk Request is<br />
received, or system exclusive messages recorded to a<br />
sequence track are played back. The Bulk Dump function<br />
lets you save <strong>the</strong> data in <strong>the</strong> Edit buffer (DRAM) or Flash<br />
ROM and transmit as Bulk data (system exclusive<br />
message) to an external MIDI instrument or sequence<br />
software on a <strong>com</strong>puter. This data can <strong>the</strong>n be sent back to<br />
<strong>the</strong> instrument, restoring all <strong>the</strong> settings you archived.<br />
Settings: 0 – 900 ms<br />
n When <strong>the</strong> Bulk Dump function is used or <strong>the</strong> Bulk Request is<br />
received, <strong>the</strong> maximum value of <strong>the</strong> interval time is fixed to<br />
30ms, meaning that <strong>the</strong> Bulk transmission is executed at an<br />
interval time of 30ms, even if this parameter is set to a value<br />
above 31ms. When system exclusive messages recorded to a<br />
track of a Song or Pattern are played back, value settings<br />
above 31ms will be available, meaning that <strong>the</strong> Bulk<br />
transmission is executed with <strong>the</strong> interval time as set here,<br />
regardless of <strong>the</strong> tempo setting of <strong>the</strong> Song or Pattern.<br />
System Settings (Utility mode, etc.)<br />
Resetting <strong>the</strong> User Memory to <strong>the</strong> Initial<br />
Factory Settings—[JOB] (Factory Set)<br />
In <strong>the</strong> Utility Job mode, you can restore this syn<strong>the</strong>sizer’s<br />
User memory (page 79) to <strong>the</strong> factory default settings<br />
(Factory Set). Please note that <strong>the</strong> setting of <strong>the</strong> Power On<br />
Auto Factory Set on this display will be stored automatically<br />
by executing <strong>the</strong> Factory Set.<br />
CAUTION<br />
When <strong>the</strong> factory settings are restored, all <strong>the</strong> Voice, Performance,<br />
Song, Pattern, and system settings in <strong>the</strong> Utility mode you created<br />
will be erased. Make sure you are not overwriting any important<br />
data. Be sure to save all important data to a USB storage device or<br />
to a <strong>com</strong>puter connected to <strong>the</strong> same network as <strong>the</strong> MOTIF <strong>XS</strong><br />
(page 278) before executing this procedure.<br />
1<br />
1 Power On Auto Factory Set<br />
When this parameter is set to “on,” turning <strong>the</strong> power on<br />
will restore <strong>the</strong> User memory to <strong>the</strong> factory default settings<br />
and load <strong>the</strong> demo songs and demo patterns. Normally,<br />
this should be set to “off.”<br />
Settings: on, off<br />
CAUTION<br />
When <strong>the</strong> Power On Auto Factory Set parameter is set to “on,”<br />
turning <strong>the</strong> power off erases all <strong>the</strong> User memory data such as<br />
Voice, Performance, Song, Pattern and Utility settings.<br />
For instructions on executing <strong>the</strong> Factory Set Job, see<br />
page 22.<br />
Sequencer Settings—[SEQ SETUP]<br />
In <strong>the</strong> Song mode, Pattern mode or Performance mode,<br />
pressing <strong>the</strong> [SEQ SETUP] button calls up <strong>the</strong> display for<br />
setting <strong>the</strong> overall sequencer parameters. After setting<br />
<strong>the</strong>se, press <strong>the</strong> [STORE] button to store <strong>the</strong> settings of<br />
both <strong>the</strong> Sequencer Setup parameters and <strong>the</strong> Utility<br />
parameters.<br />
CAUTION<br />
All Sequencer Setup settings will be lost if <strong>the</strong> power is turned off<br />
without storing.<br />
n In <strong>the</strong> Voice mode and Master mode with <strong>the</strong> Mode parameter<br />
(page 254) set to “Voice,” <strong>the</strong> [SEQ SETUP] button cannot be<br />
used.<br />
Voice mode<br />
Performance<br />
mode<br />
Sampling<br />
mode 1<br />
Song mode<br />
Pattern mode<br />
Mixing mode<br />
Sampling<br />
mode 2<br />
Master mode<br />
Utility mode<br />
File mode<br />
MOTIF <strong>XS</strong> Owner’s <strong>Manual</strong> 269<br />
Reference
Reference<br />
Voice mode Performance Sampling Song mode Pattern mode Mixing mode Sampling Master mode Utility mode File mode<br />
mode mode 1<br />
mode 2<br />
270<br />
System Settings (Utility mode, etc.)<br />
Metronome Settings—[F1] Click<br />
From this display you can set <strong>the</strong> parameters related to <strong>the</strong><br />
click sound (metronome) that is used during recording or<br />
playback in <strong>the</strong> Song/Pattern/Performance mode.<br />
n Since <strong>the</strong> click sound is created with <strong>the</strong> internal tone<br />
generator, using click playback affects <strong>the</strong> overall polyphony<br />
of this syn<strong>the</strong>sizer.<br />
1<br />
2<br />
3<br />
4<br />
5<br />
1 Mode<br />
Determines whe<strong>the</strong>r and when <strong>the</strong> metronome click will<br />
sound.<br />
Settings: off, rec, rec/play, always<br />
off<br />
The click will not sound.<br />
rec<br />
The click will sound during Song/Pattern/Performance recording only.<br />
rec/play<br />
The click will sound during recording and playback.<br />
always<br />
The click will always sound in <strong>the</strong> Song/Pattern mode.<br />
2 Beat<br />
Determines on which beats <strong>the</strong> metronome click will sound.<br />
Settings: a (16th notes), e (8th notes), q (quarter notes), (half<br />
notes), w (whole notes)<br />
3 Volume<br />
Determines <strong>the</strong> click sound volume.<br />
Settings: 0 – 127<br />
4 Type<br />
Determines <strong>the</strong> click sound type. Ten types are available,<br />
including conventional metronome and stick sounds.<br />
Settings: 1 – 10<br />
5 Recording Count<br />
Determines <strong>the</strong> number of count-in measures provided<br />
before recording actually starts after pressing <strong>the</strong> [F]<br />
(Play) button in <strong>the</strong> Record standby mode.<br />
Settings: off (Recording starts as soon as <strong>the</strong> [F] button is pressed),<br />
1 meas – 8 meas<br />
MOTIF <strong>XS</strong> Owner’s <strong>Manual</strong><br />
MIDI Filter Settings—[F2] MIDI Filter<br />
From this display you can set which MIDI events will be<br />
recognized/transmitted via MIDI. The settings made here<br />
apply only to Song/Pattern playback data; <strong>the</strong>y do not<br />
affect <strong>the</strong> MIDI events generated by your keyboard playing<br />
or panel operations and Arpeggio playback in <strong>the</strong> Voice<br />
and Performance modes. The Song/Pattern playback data<br />
will pass through <strong>the</strong> MIDI Filter before being sent to <strong>the</strong><br />
internal tone generator block as well as <strong>the</strong> MIDI OUT<br />
connector.<br />
MIDI messages transmitted from <strong>the</strong> external MIDI<br />
instrument will pass through <strong>the</strong> MIDI Filter before being<br />
recorded to <strong>the</strong> Song/Pattern track. They will be sent to <strong>the</strong><br />
internal tone generator without passing through <strong>the</strong> MIDI<br />
Filter.<br />
MIDI events to which <strong>the</strong> Filter is applied:<br />
Note, Program Change, Control Change, Pitch Bend,<br />
Channel After Touch, Polyphonic After Touch, System<br />
Exclusive, Channel Mode Message<br />
Settings: B (not transmitted/recognized), A (transmitted/recognized)<br />
Using <strong>the</strong> Quick Setup function—[F3]<br />
Quick (Quick Setup)<br />
From this display, you can instantly call up appropriate<br />
sequencer-related panel settings by selecting convenient<br />
preset setups, allowing you to simultaneously set a variety<br />
of important sequencer-related parameters.<br />
1<br />
Sequencer Block<br />
Tone Generator Block<br />
Keyboard/Controllers<br />
MIDI OUT<br />
2 3<br />
MIDI Filter<br />
MIDI IN<br />
n The Track INT Switch and Track EXT Switch parameters are<br />
not available when calling up <strong>the</strong> Quick Setup window from <strong>the</strong><br />
Performance mode.
1 Setup Number<br />
Determines <strong>the</strong> Setup number. The parameter settings of<br />
<strong>the</strong> selected Setup are indicated as new settings on <strong>the</strong><br />
right (3).<br />
Settings: 1 – 4<br />
1 Using internal<br />
Sequencer<br />
2 Recording internal<br />
sequencer to<br />
<strong>com</strong>puter<br />
3 Recording to<br />
<strong>com</strong>puter<br />
4 Recording Arpeggio<br />
to <strong>com</strong>puter<br />
2 Current settings<br />
Indicates <strong>the</strong> current settings of <strong>the</strong> related parameters.<br />
After selecting a Setup (1), indicated as new settings on<br />
<strong>the</strong> right (3), press <strong>the</strong> [ENTER] button to actually call up<br />
<strong>the</strong> selected Setup (1), which are <strong>the</strong>n indicated as <strong>the</strong><br />
current settings (2).<br />
3 New settings<br />
Indicates <strong>the</strong> parameter settings of <strong>the</strong> selected Setup<br />
above (1).<br />
From this display you can set parameters related to <strong>the</strong><br />
Song/Pattern mode, such as Pattern change timing.<br />
n The settings here do not affect <strong>the</strong> Performance mode.<br />
1 Quantize<br />
This setup is useful when you use <strong>the</strong><br />
internal sequencer function (Song or<br />
Pattern) by itself.<br />
This setup is useful when you transmit<br />
<strong>the</strong> Song or Pattern playback data to an<br />
external <strong>com</strong>puter and record it to an<br />
application software on <strong>the</strong> <strong>com</strong>puter.<br />
This setup is useful when you record<br />
your keyboard performance to an<br />
application software on <strong>the</strong> <strong>com</strong>puter.<br />
This setup is useful when you transmit<br />
<strong>the</strong> Arpeggio playback data to an<br />
external <strong>com</strong>puter and record it to an<br />
application software on <strong>the</strong> <strong>com</strong>puter.<br />
O<strong>the</strong>r Settings for <strong>the</strong> Song/Pattern—<br />
[F4] O<strong>the</strong>r<br />
1<br />
2<br />
3<br />
4<br />
Determines <strong>the</strong> quantize value for Section (Pattern)<br />
switching during playback when you change <strong>the</strong> Section.<br />
When set to “1,” Patterns (Sections) will always switch on<br />
<strong>the</strong> first beat of <strong>the</strong> next measure during playback after you<br />
change <strong>the</strong> Section. When set to “1/16,” Sections can be<br />
switched on any 16th beat during playback.<br />
Settings: 1 (1 measure), 1/2 (Half note), 1/4 (Quarter note), 1/8 (8th<br />
note), 1/16 (16th note)<br />
2 Tempo Hold<br />
System Settings (Utility mode, etc.)<br />
Determines whe<strong>the</strong>r or not <strong>the</strong> tempo setting will switch to <strong>the</strong><br />
tempo value stored with each Pattern when a new Pattern is<br />
selected during playback. When set to “on,” <strong>the</strong> tempo will be<br />
retained when Patterns are switched. When set to “off,” <strong>the</strong><br />
tempo will switch to that stored with <strong>the</strong> new Pattern when<br />
Patterns are switched. Normally, set this to “off.”<br />
Settings: on, off<br />
n The tempo setting data in <strong>the</strong> Pattern Chain is not affected by<br />
this parameter.<br />
3 Load Mixing<br />
Determines whe<strong>the</strong>r <strong>the</strong> Mixing settings are loaded (on) or<br />
not (off) when <strong>the</strong> Song/Pattern number is changed.<br />
Normally, set this to “on.”<br />
Settings: on, off<br />
n When <strong>the</strong> Load Mixing parameter is set to “off,” song changes<br />
via Song Chain playback do not change <strong>the</strong> Mixing setup.<br />
4 Song Event Chase<br />
Normally, if a Song or Pattern is played back from midpoint<br />
and/or fast-forward or rewind are used, certain data<br />
types (such as Program Change, Pitch Bend, and Control<br />
Change) may not play back as expected. Setting this to a<br />
specific event ensures <strong>the</strong> playback integrity of <strong>the</strong> event,<br />
even when fast forwarding or rewinding.<br />
Settings: off, PC (Program Change), PC+PB+Ctrl (Program Change +<br />
Pitch Bend + Control Change)<br />
n Keep in mind that settings o<strong>the</strong>r than “off” may result in slower<br />
operation—for example, a pause before starting playback, or<br />
slower rewind/fast-forward speed.<br />
n When this is set to “all,” an excessive amount of MIDI data<br />
may be generated, possibly resulting in a MIDI error on <strong>the</strong><br />
connected device.<br />
Voice mode<br />
Performance<br />
mode<br />
Sampling<br />
mode 1<br />
Song mode<br />
Pattern mode<br />
Mixing mode<br />
Sampling<br />
mode 2<br />
Master mode<br />
Utility mode<br />
File mode<br />
MOTIF <strong>XS</strong> Owner’s <strong>Manual</strong> 271<br />
Reference
Reference<br />
Voice mode Performance Sampling Song mode Pattern mode Mixing mode Sampling Master mode Utility mode File mode<br />
mode mode 1<br />
mode 2<br />
272<br />
MOTIF <strong>XS</strong> Owner’s <strong>Manual</strong><br />
File Management (File mode)<br />
The File mode provides tools for transferring data (such as Voice, Performance, Song, Pattern and Waveform) between <strong>the</strong><br />
MOTIF <strong>XS</strong> and external storage devices such as USB storage device and hard disk unit connected to <strong>the</strong> USB TO DEVICE<br />
connector. By mounting <strong>the</strong> hard disk drive of <strong>the</strong> <strong>com</strong>puter connected to <strong>the</strong> MOTIF <strong>XS</strong> via <strong>the</strong> network, you can also<br />
transfer data between <strong>the</strong> MOTIF <strong>XS</strong> and an online <strong>com</strong>puter.<br />
To enter <strong>the</strong> File mode, press <strong>the</strong> [FILE] button. The file types available differ depending on <strong>the</strong> mode selected before calling<br />
up <strong>the</strong> File mode.<br />
n When <strong>the</strong> MOTIF <strong>XS</strong> is connected to a network, <strong>the</strong> File mode can be used to access <strong>the</strong> drives of <strong>com</strong>puters on <strong>the</strong> network. To do this,<br />
make sure <strong>the</strong> MOTIF <strong>XS</strong> is properly connected to <strong>the</strong> network (page 86) and set <strong>the</strong> necessary parameters in <strong>the</strong> Network display<br />
(page 260) of <strong>the</strong> Utility mode.<br />
Terminology in <strong>the</strong> File mode<br />
File<br />
Just as with a <strong>com</strong>puter, various data types such as Voice,<br />
Performance, Song and Pattern created on <strong>the</strong> MOTIF <strong>XS</strong><br />
can be treated as a file and saved to an external USB<br />
storage device or <strong>the</strong> hard disk drive of a <strong>com</strong>puter<br />
connected to <strong>the</strong> network.<br />
File Name<br />
Just as with a <strong>com</strong>puter, you can assign <strong>the</strong> name to <strong>the</strong><br />
file in <strong>the</strong> File mode. The file name can contain up to 20<br />
alphabetical characters on <strong>the</strong> display of <strong>the</strong> MOTIF <strong>XS</strong>.<br />
Files having <strong>the</strong> same name cannot be saved in <strong>the</strong> same<br />
directory.<br />
Extension<br />
The three letters following <strong>the</strong> file name (after <strong>the</strong> period)<br />
such as “.mid” and “.wav” are referred to as a file<br />
“extension.” The extension indicates <strong>the</strong> type of file and<br />
cannot be changed by <strong>the</strong> panel operation of <strong>the</strong> MOTIF<br />
<strong>XS</strong>. The File mode of <strong>the</strong> MOTIF <strong>XS</strong> supports ten different<br />
extension types, according to <strong>the</strong> particular data. For<br />
details, see page 273.<br />
File size<br />
Refers to <strong>the</strong> memory amount of <strong>the</strong> file. The file size is<br />
determined by <strong>the</strong> amount of data saved to <strong>the</strong> file.<br />
Generally, <strong>the</strong> size of an audio file including <strong>the</strong> Waveforms<br />
is much larger than <strong>the</strong> size of a MIDI file. File sizes are<br />
indicated in conventional <strong>com</strong>puter terms by B (Byte), KB<br />
(Kilo Byte), MB (Mega Byte) and GB (Giga Byte). 1KB is<br />
equivalent to 1024 Byte, 1MB is equivalent to 1024KB, and<br />
1GB is equivalent to 1024MB.<br />
Device<br />
Refers to a memory storage unit (such as a hard disk) to<br />
which <strong>the</strong> file is saved. The MOTIF <strong>XS</strong> can handle and<br />
mount various types of USB storage devices connected to<br />
<strong>the</strong> USB TO DEVICE connector <strong>com</strong>puter drives<br />
connected via network to <strong>the</strong> MOTIF <strong>XS</strong>.<br />
Directory (Dir)<br />
This is an organizational feature on a data storage device<br />
(such as hard disk), allowing you to group data files<br />
toge<strong>the</strong>r according to type or application. Directories can<br />
be nested in hierarchical order for organizing data. The<br />
“directory” is equivalent to <strong>the</strong> “folder” used as a <strong>com</strong>puter<br />
term. The File mode of <strong>the</strong> MOTIF <strong>XS</strong> allows you to assign a<br />
name to a directory like a file. Please note that <strong>the</strong> directory<br />
name does not contain <strong>the</strong> extension.<br />
Changing <strong>the</strong> current directory (folder)<br />
Using <strong>the</strong> illustration below as an example, this shows you<br />
how to change <strong>the</strong> current directory. First, open <strong>the</strong> root<br />
directory to find directories A and B. Next, open <strong>the</strong><br />
directory A to find directories C and D. Finally, open <strong>the</strong><br />
directory C to find only <strong>the</strong> files saved in <strong>the</strong> directory C.<br />
This allows you to call up folders nested down in <strong>the</strong> lower<br />
levels of <strong>the</strong> folder hierarchy.<br />
To select a different directory higher up (for example,<br />
moving from directory C to directory B), first go to <strong>the</strong> next<br />
highest level (directory A). Next, go up one more level (to<br />
<strong>the</strong> root directory). Now that both A and B are available,<br />
open directory B. In this way you can move up or down<br />
through <strong>the</strong> folder hierarchy.<br />
Root Directory<br />
Directory A Directory B<br />
Directory C Directory D
n To go down from <strong>the</strong> current directory in <strong>the</strong> File window<br />
(page 275), move <strong>the</strong> cursor to <strong>the</strong> desired directory in <strong>the</strong><br />
Directory/File list <strong>the</strong>n press <strong>the</strong> [ENTER] button. To go up from<br />
<strong>the</strong> current directory, move <strong>the</strong> cursor to <strong>the</strong> top line in <strong>the</strong><br />
Directory/File list <strong>the</strong>n press <strong>the</strong> [ENTER] button.<br />
Path<br />
The location of <strong>the</strong> directories (folders) and files currently<br />
indicated at <strong>the</strong> “Dir” line on <strong>the</strong> display is referred to as a<br />
“path.” This indicates <strong>the</strong> current directory, what device it<br />
belongs to, and in which folder(s) it is contained. “Directory<br />
C” illustrated above is described as path “USB_HDD/A/C.”<br />
Mount<br />
Refers to <strong>the</strong> operation so that an external memory device<br />
be<strong>com</strong>es active for <strong>the</strong> instrument. The USB storage<br />
device is automatically mounted as soon as connected to<br />
<strong>the</strong> USB TO DEVICE connector on <strong>the</strong> rear panel of <strong>the</strong><br />
MOTIF <strong>XS</strong>. The hard disk drive of <strong>the</strong> <strong>com</strong>puter connected<br />
to <strong>the</strong> MOTIF <strong>XS</strong> via <strong>the</strong> network can be mounted in <strong>the</strong><br />
Mount display (page 277).<br />
Format<br />
The operation of initializing a storage device (such as a<br />
hard disk) is referred to as “format.” The File mode of <strong>the</strong><br />
MOTIF <strong>XS</strong> allows you to format <strong>the</strong> USB memory storage<br />
device connected to <strong>the</strong> USB TO DEVICE connector. The<br />
format operation erases all data from <strong>the</strong> target memory<br />
device and is irreversible.<br />
Save/Load<br />
“Save” means that <strong>the</strong> data created on <strong>the</strong> MOTIF <strong>XS</strong> is<br />
saved to <strong>the</strong> external memory device as a file, while “Store”<br />
means that <strong>the</strong> data created on <strong>the</strong> MOTIF <strong>XS</strong> is stored to<br />
internal memory. “Load” means that <strong>the</strong> file on <strong>the</strong> external<br />
memory device is loaded to internal memory.<br />
File Management (File mode)<br />
File types that can be handled by<br />
<strong>the</strong> MOTIF <strong>XS</strong><br />
The MOTIF <strong>XS</strong> supports various file types that can be<br />
saved and loaded. Refer to <strong>the</strong> following two lists.<br />
File types that can be saved<br />
Type<br />
File<br />
extension*<br />
* Automatically assigned to <strong>the</strong> saved file.<br />
File types that can be loaded<br />
Description<br />
All .X0A All data in this syn<strong>the</strong>sizer’s internal User<br />
Memory (Flash ROM) is treated as a single<br />
file, and can be saved to <strong>the</strong> USB storage<br />
device.<br />
All Voice .X0V All <strong>the</strong> User Voice data in this syn<strong>the</strong>sizer’s<br />
internal User Memory (Flash ROM) is<br />
treated as a single file, and can be saved<br />
to <strong>the</strong> USB storage device. Also <strong>the</strong><br />
Waveforms obtained via <strong>the</strong> Sampling<br />
function and assigned to any of <strong>the</strong> Voices<br />
are saved toge<strong>the</strong>r.<br />
All<br />
Arpeggio<br />
.X0G All <strong>the</strong> User Arpeggio data in this<br />
syn<strong>the</strong>sizer’s internal User Memory (Flash<br />
ROM) is treated as a single file, and can be<br />
saved to <strong>the</strong> USB storage device.<br />
All Song .X0S All <strong>the</strong> User Song data in this syn<strong>the</strong>sizer’s<br />
internal User Memory (Flash ROM) is<br />
treated as a single file, and can be saved<br />
to <strong>the</strong> USB storage device. The Song data<br />
includes Mixing settings, Mixing Voices<br />
and Sample Voices.<br />
All Pattern .X0P All <strong>the</strong> User Pattern data in this<br />
syn<strong>the</strong>sizer’s internal User Memory (Flash<br />
ROM) is treated as a single file, and can be<br />
saved to <strong>the</strong> USB storage device. The<br />
Pattern data includes Mixing settings,<br />
Mixing Voices and Sample Voices.<br />
SMF .MID Sequence track (1 – 16) and Tempo track<br />
data of Songs or Patterns created in <strong>the</strong><br />
Song/Pattern mode can be saved to <strong>the</strong><br />
USB storage device as Standard MIDI File<br />
(format 0) data.<br />
All<br />
Waveform<br />
.X0W Sample data created in <strong>the</strong> Sampling mode<br />
can be saved to <strong>the</strong> USB storage device as<br />
a WAV file (Windows audio format). The<br />
Waveform data includes all <strong>the</strong> Samples<br />
(waves).<br />
WAV .WAV A Sample created in <strong>the</strong> Sampling mode<br />
can be saved to <strong>the</strong> USB storage device as<br />
a WAV file (Windows audio format).<br />
AIFF .AIF A Sample created in <strong>the</strong> Sampling mode<br />
can be saved to <strong>the</strong> USB storage device as<br />
an AIFF file (Macintosh audio format).<br />
Type<br />
File<br />
extension*<br />
Description<br />
All .X0A Files of <strong>the</strong> “All” type saved to <strong>the</strong> USB<br />
storage device can be loaded and restored<br />
to <strong>the</strong> instrument. When <strong>the</strong> box at <strong>the</strong> left<br />
of “without System” is checkmarked, only<br />
<strong>the</strong> Utility mode settings will not be loaded.<br />
all without<br />
system<br />
.X0A Files of <strong>the</strong> “all” type saved to <strong>the</strong> USB<br />
storage device can be loaded and restored<br />
to <strong>the</strong> instrument, with <strong>the</strong> exception of <strong>the</strong><br />
Utility and Sequencer Setup settings.<br />
All Voice .X0V Files of <strong>the</strong> “All Voice” type saved to <strong>the</strong><br />
USB storage device can be loaded and<br />
restored to <strong>the</strong> instrument.<br />
Voice mode<br />
Performance<br />
mode<br />
Sampling<br />
mode 1<br />
Song mode<br />
Pattern mode<br />
Mixing mode<br />
Sampling<br />
mode 2<br />
Master mode<br />
Utility mode<br />
File mode<br />
MOTIF <strong>XS</strong> Owner’s <strong>Manual</strong> 273<br />
Reference
Reference<br />
274<br />
File Management (File mode)<br />
Voice mode Performance Sampling Song mode Pattern mode Mixing mode Sampling Master mode Utility mode File mode<br />
mode mode 1<br />
mode 2<br />
Type<br />
Voice .X0A<br />
.X0V<br />
* Assigned to <strong>the</strong> file which can be loaded.<br />
MOTIF <strong>XS</strong> Owner’s <strong>Manual</strong><br />
A specified Voice in a file that is saved to<br />
<strong>the</strong> USB storage device as “All” or “All<br />
Voice” type can be individually selected<br />
and loaded to <strong>the</strong> instrument. Please note<br />
that <strong>the</strong> file icons F of “X0A” and “X0V” are<br />
changed to G (as virtual folders) when this<br />
file type is selected (page 280).<br />
Performance .X0A A specified Performance in a file that is<br />
saved to <strong>the</strong> USB storage device as “All”<br />
type can be individually selected and<br />
loaded to <strong>the</strong> instrument. Please note that<br />
<strong>the</strong> file icon F of “X0A” is changed to G<br />
(as a virtual folder) when this file type is<br />
selected (page 282).<br />
All<br />
Arpeggio<br />
.X0G Files of <strong>the</strong> “All Arpeggio” type saved to <strong>the</strong><br />
USB storage device can be loaded and<br />
restored to <strong>the</strong> instrument.<br />
All Song .X0S Files of <strong>the</strong> “All Song” type saved to <strong>the</strong><br />
USB storage device can be loaded and<br />
restored to <strong>the</strong> instrument.<br />
Song .X0A<br />
.X0S<br />
.MID<br />
A specified Song in a file that is saved to<br />
<strong>the</strong> USB storage device as “All” or “All<br />
Song” type can be individually selected<br />
and loaded to <strong>the</strong> instrument. Please note<br />
that <strong>the</strong> file icons F of “X0A” and “X0S” are<br />
changed to G (as virtual folders) when this<br />
file type is selected (page 283).<br />
All Pattern .X0P Files of <strong>the</strong> “All Pattern” type saved to <strong>the</strong><br />
USB storage device can be loaded and<br />
restored to <strong>the</strong> instrument.<br />
Pattern .X0A<br />
.X0P<br />
.MID<br />
All<br />
Waveform<br />
Waveform .X0A<br />
.X0W<br />
A specified Song in a file that is saved to<br />
<strong>the</strong> USB storage device as “All” or “All<br />
Pattern” type can be individually selected<br />
and loaded to <strong>the</strong> instrument. Please note<br />
that <strong>the</strong> file icons F of “X0A” and “X0P” are<br />
changed to G (as virtual folders) when this<br />
file type is selected (page 283).<br />
.X0W Files of <strong>the</strong> “All” or “All Waveform” types<br />
saved to <strong>the</strong> USB storage device can be<br />
loaded and restored to <strong>the</strong> instrument.<br />
A specified Waveform in a file that is saved<br />
to <strong>the</strong> USB storage device as “All” or “All<br />
Waveform” type can be individually<br />
selected and loaded to <strong>the</strong> instrument.<br />
Please note that <strong>the</strong> file icons F of “X0A”<br />
and “X0W” are changed to G (as virtual<br />
folders) when this file type is selected<br />
(page 281).<br />
WAV .WAV WAV format files can be loaded to <strong>the</strong><br />
instrument. For details, see page 284.<br />
AIFF .AIF AIFF format files can be loaded to <strong>the</strong><br />
instrument. For details, see page 284.<br />
Sample<br />
Voice<br />
MOTIF <strong>XS</strong><br />
Editor<br />
File<br />
extension*<br />
.X0A<br />
.X0S<br />
.X0P<br />
Description<br />
A specified Sample Voice in a file that is<br />
saved to <strong>the</strong> USB storage device as “All” or<br />
“All Song” or “All Pattern” type can be<br />
individually selected and loaded to <strong>the</strong><br />
instrument. Please note that <strong>the</strong> file icons<br />
F of “X0A,” “X0S” and “X0P” are changed<br />
to G (as virtual folders) when this file type<br />
is selected (page 283). This file type is<br />
available only when entering <strong>the</strong> File mode<br />
from <strong>the</strong> Song mode/Pattern mode.<br />
.X0E The file (.X0E) created via <strong>the</strong> MOTIF <strong>XS</strong><br />
Editor software (available from <strong>the</strong> Yamaha<br />
site) on your <strong>com</strong>puter can be loaded to <strong>the</strong><br />
instrument. The file of this editor type<br />
includes all User Voices and Mixing data<br />
handled by <strong>the</strong> MOTIF <strong>XS</strong>. Note that only<br />
User Voice data can be loaded to <strong>the</strong><br />
MOTIF <strong>XS</strong>.<br />
Data Compatibility with <strong>the</strong> MOTIF ES6/MOTIF<br />
ES7/MOTIF ES8<br />
Among <strong>the</strong> data created on <strong>the</strong> MOTIF ES6/MOTIF ES7/<br />
MOTIF ES8, Voices, Performances, Waveforms, Sample<br />
Voices can be loaded to <strong>the</strong> MOTIF <strong>XS</strong>6/MOTIF <strong>XS</strong>7/MOTIF<br />
<strong>XS</strong>8.<br />
• “All” data of <strong>the</strong> MOTIF ES<br />
Files of <strong>the</strong> “All” type (extension: W7A) saved to <strong>the</strong> USB<br />
storage device connected to <strong>the</strong> MOTIF ES can be loaded<br />
to <strong>the</strong> MOTIF <strong>XS</strong>. To do this, set <strong>the</strong> Type to “All” in <strong>the</strong> [F1]<br />
File window of <strong>the</strong> MOTIF <strong>XS</strong>.<br />
• Voices<br />
A specified Voice in a file (extension: W7A, W7V) that is<br />
saved to <strong>the</strong> storage device as “All” or “All Voice” type on<br />
<strong>the</strong> MOTIF ES can be individually selected and loaded to<br />
<strong>the</strong> MOTIF <strong>XS</strong>. Set <strong>the</strong> Type in <strong>the</strong> [F1] File display to<br />
“Voice” and execute <strong>the</strong> Load procedure. All Voice data in<br />
a file (extension: W7A) that has been saved to <strong>the</strong> storage<br />
device as “All” type on <strong>the</strong> MOTIF ES can be selected and<br />
loaded to <strong>the</strong> MOTIF <strong>XS</strong>.<br />
Likewise, a file (extension: W7V) that is saved to <strong>the</strong> USB<br />
storage device as “All Voice” type on <strong>the</strong> MOTIF ES can be<br />
loaded to <strong>the</strong> MOTIF <strong>XS</strong>. Set <strong>the</strong> Type in <strong>the</strong> [F1] File<br />
display to “All Voice” and execute <strong>the</strong> Load procedure.<br />
In addition, Voice Editor files (extension: W7E) can be<br />
loaded to <strong>the</strong> MOTIF <strong>XS</strong>. Set <strong>the</strong> Type in <strong>the</strong> [F1] File<br />
display to “Voice Editor” and execute <strong>the</strong> Load procedure.<br />
n The Voices loaded to <strong>the</strong> MOTIF <strong>XS</strong> 6/7/8 may not produce <strong>the</strong><br />
exact same sound as those on <strong>the</strong> original MOTIF ES 6/7/8,<br />
since <strong>the</strong> contents of <strong>the</strong> preset Waveforms and <strong>the</strong> Effect<br />
structure are different between <strong>the</strong> two instrument series.<br />
• Performance<br />
A specified Performance in a file (extension: W7A) that is<br />
saved to <strong>the</strong> storage device as “All” type on <strong>the</strong> MOTIF ES<br />
can be individually selected and loaded to <strong>the</strong> MOTIF <strong>XS</strong>.<br />
Set <strong>the</strong> Type in <strong>the</strong> [F1] File display to “Performance” and<br />
execute <strong>the</strong> Load procedure.<br />
• Waveforms<br />
A specified Waveform in a file (extension: W7A, W7W) that<br />
is saved to <strong>the</strong> storage device as “All” or “All Waveform”<br />
type on <strong>the</strong> MOTIF ES can be individually selected and<br />
loaded to <strong>the</strong> MOTIF <strong>XS</strong>. Set <strong>the</strong> Type in <strong>the</strong> [F1] File<br />
display to “Waveform” and execute <strong>the</strong> Load procedure.<br />
Likewise, a file (extension: W7W) that is saved to <strong>the</strong><br />
storage device as “All Waveform” type on <strong>the</strong> MOTIF ES<br />
can be loaded to <strong>the</strong> MOTIF <strong>XS</strong>. Set <strong>the</strong> Type in <strong>the</strong> [F1]<br />
File display to “All Waveform” and execute <strong>the</strong> Load<br />
procedure.<br />
• Sample Voices<br />
A specified Sample Voice (extension: W7A, W7S, W7P) in a<br />
file that is saved to <strong>the</strong> storage device as “All” or “All Song”<br />
or “All Pattern” type on <strong>the</strong> MOTIF ES can be individually<br />
selected and loaded to <strong>the</strong> MOTIF <strong>XS</strong>. Set <strong>the</strong> Type in <strong>the</strong><br />
[F1] File display to “Sample Voice” and execute <strong>the</strong> Load<br />
procedure.
File Type Setting example when saving:<br />
Data to be saved File type<br />
All data All<br />
User Voice All Voice<br />
Performance All<br />
Songs When User Voices are used in <strong>the</strong><br />
Songs:<br />
All<br />
When no User Voices are used in<br />
any of <strong>the</strong> Songs:<br />
All Song<br />
When you wish to transfer a Song to<br />
an external MIDI sequencer or<br />
<strong>com</strong>puter:<br />
SMF<br />
Pattern When User Voices are used in <strong>the</strong><br />
Patterns:<br />
When User Voices are not used in<br />
all <strong>the</strong> Patterns:<br />
When you wish to transfer a Pattern<br />
to an external MIDI sequencer or<br />
<strong>com</strong>puter:<br />
Sampling<br />
data<br />
File Management—[F1] File<br />
The File window lets you use all file-related functions such<br />
as device selection, selecting a path, save, load, rename<br />
and delete.<br />
1<br />
2<br />
To upper level<br />
File<br />
3<br />
4<br />
5<br />
1 Device<br />
Here, you can select <strong>the</strong> desired device from <strong>the</strong> ones<br />
mounted (recognized) by <strong>the</strong> File mode. The device<br />
selected here is called “Current Device.” When selecting a<br />
device, <strong>the</strong> root directory of <strong>the</strong> selected device appears in<br />
<strong>the</strong> Dir column. The amount of used memory and total<br />
memory on <strong>the</strong> selected device appears at <strong>the</strong> top right of<br />
<strong>the</strong> display.<br />
n You can call up <strong>the</strong> list by pressing <strong>the</strong> [SF6] LIST button <strong>the</strong>n<br />
select <strong>the</strong> desired item from <strong>the</strong> list. For details, see page 82.<br />
All<br />
All Pattern<br />
SMF<br />
All waveforms All Waveform<br />
When you wish to transfer a Sample<br />
to a <strong>com</strong>puter:<br />
WAV, AIFF<br />
The amount of used memory/total memory<br />
! 6 @ 7 # 8 9 )<br />
2 Dir (Directory)<br />
File Management (File mode)<br />
Indicates <strong>the</strong> current directory with <strong>the</strong> path. The contents<br />
(files and folders) included in <strong>the</strong> current directory are<br />
listed in <strong>the</strong> Directory/File list box below. The current<br />
directory can be changed in <strong>the</strong> Directory/File list box<br />
below.<br />
3 Directory/File list<br />
Indicates <strong>the</strong> directories and files in <strong>the</strong> current Directory.<br />
In this box, <strong>the</strong> directories and files are listed in<br />
alphabetical order, with <strong>the</strong> exception of <strong>the</strong> top line which<br />
is provided for moving to <strong>the</strong> next highest directory. You<br />
can distinguish <strong>the</strong> directory and file by <strong>the</strong> indicator at left<br />
end of each line.<br />
D ..... Directory (Folder)<br />
F ...... File<br />
The directory name is shown on <strong>the</strong> Directory line while <strong>the</strong><br />
file name with <strong>the</strong> extension and file size are shown on <strong>the</strong><br />
File line.<br />
Moving between <strong>the</strong> directory levels<br />
To go down from <strong>the</strong> current directory, move <strong>the</strong> cursor to<br />
<strong>the</strong> desired directory in <strong>the</strong> Directory/File list <strong>the</strong>n press<br />
<strong>the</strong> [ENTER] button. To go up from <strong>the</strong> current directory,<br />
move <strong>the</strong> cursor to <strong>the</strong> top line in <strong>the</strong> Directory/File list<br />
<strong>the</strong>n press <strong>the</strong> [ENTER] button.<br />
4 Type<br />
Determines <strong>the</strong> data type to be saved or loaded. The<br />
available type differs depending on <strong>the</strong> mode selected<br />
before calling up <strong>the</strong> File mode. For details about <strong>the</strong> data<br />
types, see pages 273 and 274. You can call up <strong>the</strong> File<br />
Type List by pressing <strong>the</strong> [SF6] LIST button <strong>the</strong>n select <strong>the</strong><br />
desired one from <strong>the</strong> list. For details, see page 82.<br />
5 Memory location of <strong>the</strong> data type above<br />
Determines <strong>the</strong> memory location of <strong>the</strong> data type above<br />
such as Voice Bank/number, Performance Bank/Number,<br />
Song number and Pattern number. The available values<br />
differ depending on <strong>the</strong> Type setting above. For details<br />
about <strong>the</strong> source memory to be saved, see page 278. For<br />
details about <strong>the</strong> target memory to be loaded, see<br />
page 280.<br />
6 [SF1] Save<br />
Pressing this button executes <strong>the</strong> Save operation. For<br />
detailed instructions on saving, see page 278.<br />
7 [SF2] Load<br />
Pressing this button executes <strong>the</strong> Load operation. For<br />
detailed instructions on loading, see page 280.<br />
Voice mode<br />
Performance<br />
mode<br />
Sampling<br />
mode 1<br />
Song mode<br />
Pattern mode<br />
Mixing mode<br />
Sampling<br />
mode 2<br />
Master mode<br />
Utility mode<br />
File mode<br />
MOTIF <strong>XS</strong> Owner’s <strong>Manual</strong> 275<br />
Reference
Reference<br />
276<br />
File Management (File mode)<br />
Voice mode Performance Sampling Song mode Pattern mode Mixing mode Sampling Master mode Utility mode File mode<br />
mode mode 1<br />
mode 2<br />
8 [SF3] Rename<br />
Pressing this button calls up <strong>the</strong> window for entering <strong>the</strong><br />
new name of <strong>the</strong> selected file. The File name can contain<br />
up to 20 characters. For detailed instructions on naming,<br />
refer to “Basic Operation” on page 82.<br />
Follow <strong>the</strong> instructions below to change <strong>the</strong> name of <strong>the</strong><br />
file.<br />
1 Select a file to be renamed by moving <strong>the</strong> cursor in<br />
<strong>the</strong> Directory/File list.<br />
2 Press <strong>the</strong> [SF3] button to call up <strong>the</strong> Input Character<br />
window.<br />
3 Enter <strong>the</strong> new name of <strong>the</strong> selected file.<br />
4 Press <strong>the</strong> [ENTER] button to actually change <strong>the</strong><br />
name of <strong>the</strong> selected file.<br />
9 [SF4] Delete<br />
Pressing this button to call up <strong>the</strong> Delete window.<br />
Follow <strong>the</strong> instructions below to delete a file.<br />
1 Select a file to be deleted by moving <strong>the</strong> cursor in <strong>the</strong><br />
Directory/File list.<br />
2 Press <strong>the</strong> [SF4] button to call up <strong>the</strong> Delete window.<br />
3 Press <strong>the</strong> [ENTER] button to delete <strong>the</strong> selected file.<br />
) [SF5] New Dir (New Directory)<br />
Pressing this button creates a new directory in <strong>the</strong> current<br />
directory. The directory name can contain up to 10<br />
characters. For detailed instructions on naming, refer to<br />
“Basic Operation” on page 82.<br />
Follow <strong>the</strong> instructions below to create a new directory.<br />
1 Press <strong>the</strong> [SF5] button to call up <strong>the</strong> Input Character<br />
window.<br />
2 Enter <strong>the</strong> name of <strong>the</strong> new Directory.<br />
3 Press <strong>the</strong> [ENTER] button to actually enter <strong>the</strong> name<br />
of <strong>the</strong> newly created directory.<br />
! [F1] File<br />
Pressing this button calls up <strong>the</strong> File window from ano<strong>the</strong>r<br />
window in <strong>the</strong> File mode.<br />
@ [F2] Mount<br />
Pressing this button calls up <strong>the</strong> Mount window. For details,<br />
see page 277.<br />
# [F3] Format<br />
Pressing this button calls up <strong>the</strong> Format window. For<br />
details, see page 278.<br />
MOTIF <strong>XS</strong> Owner’s <strong>Manual</strong><br />
Basic Procedure in <strong>the</strong> File mode<br />
1 Press <strong>the</strong> [FILE] button to enter <strong>the</strong> File mode.<br />
The File window (page 275) appears.<br />
2 Mount <strong>the</strong> memory devices to which <strong>the</strong> file is<br />
saved or from which <strong>the</strong> file is loaded.<br />
The USB storage device is automatically mounted as<br />
soon as it is connected to <strong>the</strong> USB TO DEVICE<br />
connector on <strong>the</strong> rear panel. The hard disk drive of <strong>the</strong><br />
<strong>com</strong>puter connected to <strong>the</strong> MOTIF <strong>XS</strong> via <strong>the</strong> network<br />
can be mounted in <strong>the</strong> Mount display (page 277).<br />
3 Select <strong>the</strong> desired device.<br />
Select <strong>the</strong> desired device from <strong>the</strong> ones mounted in<br />
step 2.<br />
4 Move <strong>the</strong> path to <strong>the</strong> desired directory.<br />
Select <strong>the</strong> desired directory in <strong>the</strong> selected device. To<br />
go down from <strong>the</strong> current directory, move <strong>the</strong> cursor to<br />
<strong>the</strong> desired directory in <strong>the</strong> Directory/File list <strong>the</strong>n press<br />
<strong>the</strong> [ENTER] button. To go up from <strong>the</strong> current directory,<br />
move <strong>the</strong> cursor to <strong>the</strong> top line in <strong>the</strong> Directory/File list<br />
<strong>the</strong>n press <strong>the</strong> [ENTER] button. The Dir line indicates<br />
<strong>the</strong> current directory name with <strong>the</strong> path and <strong>the</strong> lower<br />
box lists <strong>the</strong> directories and files belonging to <strong>the</strong><br />
current directory.<br />
n If you wish to create a new directory and save <strong>the</strong> file<br />
<strong>the</strong>re, press <strong>the</strong> [SF5] New Dir button. For detailed<br />
instructions on creating a new directory, see <strong>the</strong> left<br />
column.<br />
5 Select <strong>the</strong> desired data type from <strong>the</strong> Type<br />
column (4).<br />
In <strong>the</strong> Directory/File list box, only files related to <strong>the</strong><br />
selected file type are listed.<br />
n Depending on <strong>the</strong> mode selected before calling up <strong>the</strong><br />
File mode, <strong>the</strong> available data types differ. If you cannot<br />
find <strong>the</strong> data type which you wish to handle, for example<br />
“voice,” press <strong>the</strong> [EXIT] button to exit from <strong>the</strong> File<br />
window, press <strong>the</strong> [VOICE] button to enter <strong>the</strong> Voice<br />
mode, <strong>the</strong>n press <strong>the</strong> [FILE] button to call up <strong>the</strong> File<br />
window again.<br />
6 Select <strong>the</strong> desired file by moving <strong>the</strong> cursor in<br />
<strong>the</strong> Directory/File list (3).<br />
This operation is not necessary when you execute Save<br />
or New Directory. When you wish to execute <strong>the</strong><br />
Rename or Delete operation, press <strong>the</strong> [SF3] Rename<br />
button or <strong>the</strong> [SF4] Delete button. For detailed<br />
instructions on renaming and deleting, see page 276<br />
and left column.
7 Select a memory location of <strong>the</strong> data type<br />
specified in step 5 as source or destination.<br />
When you wish to execute <strong>the</strong> Save or Load operation,<br />
press <strong>the</strong> [SF1] Save button or <strong>the</strong> [SF2] Load button.<br />
For detailed instructions on saving and loading, see<br />
pages 278 and 280.<br />
Online Device Mounting—[F2] Mount<br />
From this display, you can mount <strong>the</strong> shared directories on<br />
<strong>the</strong> hard disk drive of a <strong>com</strong>puter connected via network to<br />
<strong>the</strong> MOTIF <strong>XS</strong>.<br />
1<br />
2<br />
Mount<br />
Indicator<br />
1 Host<br />
From <strong>the</strong> <strong>com</strong>puters connected to <strong>the</strong> network, this<br />
parameter determines <strong>the</strong> host <strong>com</strong>puter containing <strong>the</strong><br />
device is to be mounted. Here, <strong>the</strong> <strong>com</strong>puter name set in<br />
your <strong>com</strong>puter is shown.<br />
You can call up <strong>the</strong> Device List by pressing <strong>the</strong> [SF6] LIST<br />
button <strong>the</strong>n select <strong>the</strong> desired item from <strong>the</strong> list. For details,<br />
see page 82. Here, <strong>the</strong> <strong>com</strong>puter name set in your<br />
<strong>com</strong>puter is shown.<br />
n If <strong>the</strong> desired <strong>com</strong>puter name is not shown in <strong>the</strong> Host (1)<br />
parameter, you can call up <strong>the</strong> Character List by pressing <strong>the</strong><br />
[SF5] CHAR button and enter <strong>the</strong> <strong>com</strong>puter name manually.<br />
For detailed instructions on naming, refer to “Basic Operation”<br />
on page 82.<br />
n Confirm <strong>the</strong> <strong>com</strong>puter name on your <strong>com</strong>puter. For details,<br />
refer to <strong>the</strong> owner’s manual of your <strong>com</strong>puter.<br />
2 Sharing Point<br />
Here, <strong>the</strong> shared directories of <strong>the</strong> host <strong>com</strong>puter set<br />
above are listed. You can also mount or unmount each of<br />
<strong>the</strong> shared directories.<br />
n Keep in mind that <strong>the</strong> names of <strong>the</strong> shared folders authorized<br />
on <strong>the</strong> <strong>com</strong>puter are shown here.<br />
Mounting/Unmounting a directory<br />
You can mount <strong>the</strong> shared directory by moving <strong>the</strong> cursor<br />
to <strong>the</strong> desired directory <strong>the</strong>n pressing <strong>the</strong> [ENTER]<br />
button. The mount indicator appears at <strong>the</strong> left side of <strong>the</strong><br />
name of <strong>the</strong> mounted directory. You can unmount <strong>the</strong><br />
shared directory by pressing <strong>the</strong> [ENTER] button again.<br />
The mount indicator disappears.<br />
Mount Procedure<br />
File Management (File mode)<br />
Follow <strong>the</strong> instructions below to mount <strong>the</strong> memory drive of<br />
<strong>the</strong> <strong>com</strong>puter connected to <strong>the</strong> network.<br />
1 Connect <strong>the</strong> MOTIF <strong>XS</strong> to <strong>the</strong> network.<br />
Network related parameters can be set in <strong>the</strong> Network<br />
display (page 260) in <strong>the</strong> Utility mode.<br />
2 Press <strong>the</strong> [FILE] button to enter <strong>the</strong> File mode,<br />
<strong>the</strong>n press <strong>the</strong> [F2] button to call up <strong>the</strong> Mount<br />
window.<br />
3 Select a host <strong>com</strong>puter at <strong>the</strong> Host column (1).<br />
If <strong>the</strong> desired <strong>com</strong>puter name is not shown in <strong>the</strong> Host<br />
(1) parameter, you can call up <strong>the</strong> Character List by<br />
pressing <strong>the</strong> [SF5] CHAR button and enter <strong>the</strong><br />
<strong>com</strong>puter name manually. For detailed instructions on<br />
naming, refer to “Basic Operation” on page 82.<br />
If you select a <strong>com</strong>puter which has not been accessed<br />
by <strong>the</strong> MOTIF <strong>XS</strong>, “Press [ENTER] to access” appears<br />
on <strong>the</strong> display. When pressing <strong>the</strong> [ENTER] button, <strong>the</strong><br />
display prompts you to enter <strong>the</strong> password as<br />
illustrated below. Here, enter <strong>the</strong> User Account of your<br />
<strong>com</strong>puter to <strong>the</strong> User Name box, enter <strong>the</strong> password of<br />
your <strong>com</strong>puter to <strong>the</strong> Password box, <strong>the</strong>n press <strong>the</strong><br />
[ENTER] button so that <strong>the</strong> access between <strong>the</strong> MOTIF<br />
<strong>XS</strong> and <strong>the</strong> <strong>com</strong>puter is established. The shared<br />
directories of <strong>the</strong> selected <strong>com</strong>puter are listed in <strong>the</strong><br />
Sharing Point box (2).<br />
n Once access between <strong>the</strong> MOTIF <strong>XS</strong> and <strong>the</strong> <strong>com</strong>puter<br />
has been established, <strong>the</strong> shared directories are<br />
automatically listed in <strong>the</strong> display simply by selecting a<br />
<strong>com</strong>puter from <strong>the</strong> Host column. If <strong>the</strong> power is turned off,<br />
<strong>the</strong> operations for establishing <strong>the</strong> access (entering <strong>the</strong><br />
User Account and Password) are necessary after turning<br />
<strong>the</strong> power on next time.<br />
n For details about how to confirm <strong>the</strong> User Account and<br />
Password of your <strong>com</strong>puter, refer to <strong>the</strong> owner’s manual of<br />
your <strong>com</strong>puter.<br />
n When a Password is not assigned to your <strong>com</strong>puter,<br />
simply pressing <strong>the</strong> [ENTER] button without inputting any<br />
characters establishes <strong>the</strong> access between <strong>the</strong> MOTIF <strong>XS</strong><br />
and your <strong>com</strong>puter.<br />
4 Mount <strong>the</strong> desired directories.<br />
In <strong>the</strong> Sharing Point box (2), you can mount <strong>the</strong> shared<br />
directory by moving <strong>the</strong> cursor to <strong>the</strong> desired directory,<br />
<strong>the</strong>n pressing <strong>the</strong> [ENTER] button. The mount indicator<br />
appears at <strong>the</strong> left side of <strong>the</strong> name of <strong>the</strong> mounted<br />
directory. You can unmount <strong>the</strong> shared directory by<br />
pressing <strong>the</strong> [ENTER] button again. The mount<br />
indicator disappears. The mounted directories can be<br />
selected in <strong>the</strong> File window (page 275).<br />
Voice mode<br />
Performance<br />
mode<br />
Sampling<br />
mode 1<br />
Song mode<br />
Pattern mode<br />
Mixing mode<br />
Sampling<br />
mode 2<br />
Master mode<br />
Utility mode<br />
File mode<br />
MOTIF <strong>XS</strong> Owner’s <strong>Manual</strong> 277<br />
Reference
Reference<br />
278<br />
File Management (File mode)<br />
Voice mode Performance Sampling Song mode Pattern mode Mixing mode Sampling Master mode Utility mode File mode<br />
mode mode 1<br />
mode 2<br />
Formatting a Device—[SF3] Format<br />
From this display, you can format memory storage devices<br />
such as a hard disk connected to <strong>the</strong> USB TO DEVICE<br />
connector.<br />
1<br />
2<br />
1 Device<br />
The connected and mounted devices are listed here,<br />
letting you select <strong>the</strong> device to be formatted. A device that<br />
requires formatting is indicated by “unknown device<br />
(usb***).” The three asterisks (***) in <strong>the</strong> indication denote<br />
<strong>the</strong> sequential serial numbers of <strong>the</strong> connected devices<br />
which need to be formatted. When several partitions are<br />
included in a single device, <strong>the</strong> partition number is<br />
indicated at <strong>the</strong> right of <strong>the</strong> serial number.<br />
2 Volume Label<br />
Determines <strong>the</strong> Volume Label of <strong>the</strong> selected device. The<br />
Volume Label is <strong>the</strong> name assigned to <strong>the</strong> device. The<br />
Volume Label can contain up to 11 characters. For detailed<br />
instructions on naming, refer to “Basic Operation” on<br />
page 82.<br />
Format Procedure<br />
1 Connect <strong>the</strong> device to be formatted to <strong>the</strong> USB<br />
TO DEVICE terminal.<br />
2 Select a device to be formatted from <strong>the</strong> Device<br />
list (1).<br />
3 Enter <strong>the</strong> Volume Label (2) as desired.<br />
4 Press <strong>the</strong> [ENTER] button. (The display<br />
prompts you for confirmation.)<br />
Press <strong>the</strong> [DEC/NO] button to cancel <strong>the</strong> Format.<br />
5 Press <strong>the</strong> [INC/YES] button to execute <strong>the</strong><br />
Format operation.<br />
CAUTION<br />
If you format <strong>the</strong> device, all <strong>the</strong> previously recorded data will be<br />
deleted. Make sure to check beforehand whe<strong>the</strong>r or not <strong>the</strong><br />
device contains important data. When checking <strong>the</strong> contents of<br />
<strong>the</strong> device in <strong>the</strong> [F1] File window, keep in mind that some files<br />
(which are not listed on pages 273 and 274) are not shown on<br />
<strong>the</strong> display of <strong>the</strong> MOTIF <strong>XS</strong>, even if <strong>the</strong> File Type is set to “all.”<br />
MOTIF <strong>XS</strong> Owner’s <strong>Manual</strong><br />
Saving a file<br />
The saving procedure differs depending on <strong>the</strong> file type to<br />
be saved and <strong>the</strong> mode selected before calling up <strong>the</strong> File<br />
window. This section explains <strong>the</strong> procedure relevant to<br />
following three cases.<br />
• Saving all user data or all data of a specific type<br />
• Saving <strong>the</strong> sample of a specific Voice<br />
• Saving a Song or a Pattern Section as a Standard MIDI<br />
File<br />
Saving all user data or all data of a<br />
specific type<br />
1 Select a device and directory as destination by<br />
following “Basic Procedure in <strong>the</strong> File mode”<br />
on page 276.<br />
n When you wish to save all 64 songs, press <strong>the</strong> [SONG]<br />
button to enter <strong>the</strong> Song mode <strong>the</strong>n press <strong>the</strong> [FILE]<br />
button to call up <strong>the</strong> File window. When you wish to save<br />
all 64 patterns, press <strong>the</strong> [PATTERN] button to enter <strong>the</strong><br />
Pattern mode <strong>the</strong>n press <strong>the</strong> [FILE] button to call up <strong>the</strong><br />
File window.<br />
n Follow <strong>the</strong> instructions below after selecting a Voice,<br />
Performance, Song or Pattern to which <strong>the</strong> Sample to be<br />
saved is assigned in each of <strong>the</strong> modes.<br />
2 Set <strong>the</strong> Type to <strong>the</strong> desired one of “all,” “all<br />
voice,” “all arpeggio,” “all waveform,” “editor,”<br />
“all song,” and “all pattern.”<br />
3 Press <strong>the</strong> [SF1] Save button to call up <strong>the</strong><br />
window for entering <strong>the</strong> file name.<br />
4 Enter <strong>the</strong> file name, press <strong>the</strong> [ENTER] button<br />
<strong>the</strong>n <strong>the</strong> [INC/YES] button to save <strong>the</strong> data of<br />
<strong>the</strong> specified type to <strong>the</strong> external memory<br />
device.<br />
The file name can contain up to 20 characters. For detailed<br />
instructions on naming, refer to “Basic Operation” on<br />
page 82.
Saving <strong>the</strong> sample of a specific Voice<br />
You can save <strong>the</strong> sample of a specific Voice to an external<br />
memory device as a WAV file or an AIFF file for storage or<br />
editing on a <strong>com</strong>puter. This method is available when<br />
entering <strong>the</strong> File mode from any mode. For details about<br />
file types that can be saved, see page 273.<br />
n When entering <strong>the</strong> File mode from <strong>the</strong> Performance mode/<br />
Song mode/Pattern mode and saving/loading <strong>the</strong> sample<br />
assigned to <strong>the</strong> Normal Voice, only <strong>the</strong> sample assigned to <strong>the</strong><br />
Element 1 is available.<br />
1 Select a device and directory as destination by<br />
following “Basic Procedure in <strong>the</strong> File mode”<br />
on page 276.<br />
2 Set <strong>the</strong> Type to “WAV” or “AIFF.”<br />
n Keep in mind that some parameter settings, such as Start<br />
Point, are not saved when saving <strong>the</strong> Sample of a specific<br />
Voice as WAV or AIFF format. This means that <strong>the</strong> WAV file<br />
or AIFF file saved in <strong>the</strong> File mode will be played back<br />
from <strong>the</strong> top (including <strong>the</strong> section before <strong>the</strong> Start Point)<br />
on an external device, such as a <strong>com</strong>puter.<br />
3 Select <strong>the</strong> source data.<br />
When entering <strong>the</strong> File mode from <strong>the</strong> Voice mode,<br />
select an Element (for a Normal Voice) and Key to<br />
which <strong>the</strong> Sample to be saved is assigned. When<br />
entering <strong>the</strong> File mode from <strong>the</strong> Performance/Song/<br />
Pattern mode, select a Part and Key to which <strong>the</strong> Voice<br />
including <strong>the</strong> Sample to be saved is assigned.<br />
n Preset Waveforms cannot be saved to an external storage<br />
device. If you select a Performance/Song/Pattern Part to<br />
which <strong>the</strong> preset Voice is assigned or you select a Normal<br />
Voice Element or Drum Voice Key to which <strong>the</strong> preset<br />
Waveform is assigned, an error message appears.<br />
n The available source data differs depending on <strong>the</strong> mode<br />
selected before entering <strong>the</strong> File mode. When entering <strong>the</strong><br />
File mode from <strong>the</strong> Voice mode, <strong>the</strong> available source data<br />
differs depending on <strong>the</strong> type of <strong>the</strong> already selected<br />
Voice: Normal Voice or Drum Voice. Make sure to select a<br />
Voice/Performance/ Song/Pattern to which <strong>the</strong> desired<br />
Sample is assigned before entering <strong>the</strong> File mode.<br />
File Management (File mode)<br />
4 Press <strong>the</strong> [SF1] Save button to call up <strong>the</strong><br />
window for selecting a Key Bank.<br />
Key Bank<br />
n For information about this window, refer to <strong>the</strong> explanation<br />
about <strong>the</strong> Keybank parameter in <strong>the</strong> Sampling Main<br />
display described on page 162.<br />
5 Select a Key Bank to which <strong>the</strong> sample is<br />
assigned by moving <strong>the</strong> cursor.<br />
Press <strong>the</strong> [SF1] Audition button to hear <strong>the</strong> sampled<br />
sound.<br />
6 Press <strong>the</strong> [ENTER] button to call up <strong>the</strong><br />
window for entering <strong>the</strong> file name.<br />
7 Enter <strong>the</strong> file name, press <strong>the</strong> [ENTER] button<br />
<strong>the</strong>n <strong>the</strong> [INC/YES] button to save <strong>the</strong> data to<br />
<strong>the</strong> external memory device.<br />
The file name can contain up to 20 characters. For<br />
detailed instructions on naming, refer to “Basic<br />
Operation” on page 82.<br />
Saving a Song or a Pattern Section as a<br />
Standard MIDI File<br />
You can save a Song or a Pattern Section as a Standard<br />
MIDI File in <strong>the</strong> File mode. The Standard MIDI File format is<br />
<strong>com</strong>mon and can be used on o<strong>the</strong>r MIDI sequencers and<br />
<strong>com</strong>puter music software. This method is available when<br />
entering <strong>the</strong> File mode from <strong>the</strong> Song mode/Pattern mode.<br />
1 Select a device and directory as destination by<br />
following “Basic Procedure in <strong>the</strong> File mode”<br />
on page 276.<br />
2 Set <strong>the</strong> Type to “SMF.”<br />
Voice mode<br />
Performance<br />
mode<br />
Sampling<br />
mode 1<br />
Song mode<br />
Pattern mode<br />
Mixing mode<br />
Sampling<br />
mode 2<br />
Master mode<br />
Utility mode<br />
File mode<br />
MOTIF <strong>XS</strong> Owner’s <strong>Manual</strong> 279<br />
Reference
Reference<br />
280<br />
File Management (File mode)<br />
Voice mode Performance Sampling Song mode Pattern mode Mixing mode Sampling Master mode Utility mode File mode<br />
mode mode 1<br />
mode 2<br />
3 Select <strong>the</strong> source data.<br />
n The available source memory differs depending on <strong>the</strong><br />
mode selected before entering <strong>the</strong> File mode. When you<br />
want to save a Song, enter <strong>the</strong> File mode from <strong>the</strong> Song<br />
mode. When you want to save a Pattern, enter <strong>the</strong> File<br />
mode from <strong>the</strong> Pattern mode.<br />
4 Press <strong>the</strong> [ENTER] button to call up <strong>the</strong><br />
window for entering <strong>the</strong> file name.<br />
5 Enter <strong>the</strong> file name, press <strong>the</strong> [ENTER] button<br />
<strong>the</strong>n <strong>the</strong> [INC/YES] button to save <strong>the</strong> data to<br />
<strong>the</strong> external memory device.<br />
The file name may contain up to 20 characters. For<br />
detailed instructions on naming, refer to “Basic<br />
Operation” on page 82.<br />
Loading a file<br />
The loading procedure differs depending on <strong>the</strong> file type to<br />
be loaded and <strong>the</strong> mode selected before calling up <strong>the</strong> File<br />
window. This section explains <strong>the</strong> procedure relevant to<br />
following eight cases.<br />
• Loading all user data or all data of a specific type (all<br />
voices, all songs, all patterns, etc.)<br />
• Loading a specific Voice from an “all” or “all voice” file<br />
• Loading a specific Waveform from an “all” or “all<br />
waveform” file<br />
• Loading a specific Performance from an “all” file<br />
• Loading a specific Song or Pattern from an “all” or “all<br />
song” or “all pattern” file<br />
• Loading a specific Sample Voice from an “all” or “all<br />
song” or “all pattern” file<br />
• Loading a WAV file or an AIFF file<br />
• Loading a SMF file (Standard MIDI file)<br />
Loading all user data or all data of a<br />
specific type<br />
MOTIF <strong>XS</strong> Owner’s <strong>Manual</strong><br />
1 Select a device and directory including <strong>the</strong><br />
source file by following “Basic Procedure in<br />
<strong>the</strong> File mode” on page 276.<br />
n When you wish to load all 64 Songs, press <strong>the</strong> [SONG]<br />
button to enter <strong>the</strong> Song mode <strong>the</strong>n press <strong>the</strong> [FILE]<br />
button to call up <strong>the</strong> File window. When you wish to load<br />
all 64 Patterns, press <strong>the</strong> [PATTERN] button to enter <strong>the</strong><br />
Pattern mode <strong>the</strong>n press <strong>the</strong> [FILE] button to call up <strong>the</strong><br />
File window.<br />
2 Set <strong>the</strong> Type to <strong>the</strong> desired one of “all,” “all<br />
without system,” “all voice,” “all arpeggio,” “all<br />
waveform,” “editor,” “all song,” and “all<br />
pattern.”<br />
Only available files according to <strong>the</strong> Type are listed in<br />
<strong>the</strong> Directory/File list box on <strong>the</strong> display.<br />
3 Select <strong>the</strong> file to be loaded.<br />
You can select any of <strong>the</strong> files listed in <strong>the</strong> Directory/File<br />
list box on <strong>the</strong> display.<br />
4 Press <strong>the</strong> [SF2] button (a prompt for<br />
confirmation appears).<br />
Press <strong>the</strong> [DEC/NO] button to cancel <strong>the</strong> Load<br />
operation.<br />
5 Press <strong>the</strong> [INC/YES] button to execute <strong>the</strong><br />
Load operation.<br />
CAUTION<br />
The Load operation overwrites any data previously existing in<br />
<strong>the</strong> destination internal memory. Important data should always<br />
be saved to a USB storage device connected to <strong>the</strong> USB TO<br />
DEVICE terminal or to a <strong>com</strong>puter connected to <strong>the</strong> same<br />
network as <strong>the</strong> MOTIF <strong>XS</strong> (page 278).<br />
Loading a specific Voice from an “all”<br />
or “all voice” file<br />
1 Select a device and directory as source by<br />
following “Basic Procedure in <strong>the</strong> File mode”<br />
on page 276.
2 Set <strong>the</strong> Type to “voice.”<br />
Only available files according to <strong>the</strong> Type are listed in<br />
<strong>the</strong> Directory/File list box on <strong>the</strong> display.<br />
n In this step, <strong>the</strong> Load menu corresponding to <strong>the</strong> [SF2]<br />
button is not shown in <strong>the</strong> display. The Load menu<br />
appears when selecting a Voice to be loaded in step 6.<br />
3 Specify <strong>the</strong> destination memory location in <strong>the</strong><br />
User memory.<br />
Select a Voice Bank and number as destination.<br />
n When entering <strong>the</strong> File mode from <strong>the</strong> Performance/Song/<br />
Pattern mode, set a Part to which <strong>the</strong> loaded Voice is to be<br />
assigned as well as a Voice Bank and number.<br />
n When loading a Drum Voice, select <strong>the</strong> User Drum Voice<br />
Bank (UDR) as <strong>the</strong> destination memory location (5).<br />
When loading a Normal Voice, select one of <strong>the</strong> User<br />
Normal Voice Banks (USR1 – 3) as <strong>the</strong> destination<br />
memory location (5). If <strong>the</strong> appropriate Voice Bank is not<br />
set, pressing <strong>the</strong> [SF2] Load button calls up an error<br />
message.<br />
4 Move <strong>the</strong> cursor to <strong>the</strong> file to be loaded.<br />
You can select any of <strong>the</strong> files listed in <strong>the</strong> Directory/File<br />
list box on <strong>the</strong> display.<br />
5 Press <strong>the</strong> [ENTER] button so that <strong>the</strong> Voices of<br />
<strong>the</strong> specified Bank are listed in <strong>the</strong> Directory/<br />
File list box.<br />
When <strong>the</strong> Normal Voice Bank is selected in step 3, you<br />
can change <strong>the</strong> Voice Bank as source by pressing one<br />
of <strong>the</strong> Bank buttons (USR1 – 3) on <strong>the</strong> front panel.<br />
Voice List<br />
6 Move <strong>the</strong> cursor to <strong>the</strong> desired Voice.<br />
The Load menu corresponding to <strong>the</strong> [SF2] button<br />
appears.<br />
7 Press <strong>the</strong> [SF2] button (a prompt for<br />
confirmation appears).<br />
Press <strong>the</strong> [DEC/NO] button to cancel <strong>the</strong> Load<br />
operation.<br />
8 Press <strong>the</strong> [INC/YES] button to execute <strong>the</strong><br />
Load operation.<br />
CAUTION<br />
File Management (File mode)<br />
The Load operation overwrites any data previously existing in<br />
<strong>the</strong> destination internal memory. Important data should always<br />
be saved to a USB storage device connected to <strong>the</strong> USB TO<br />
DEVICE terminal or to a <strong>com</strong>puter connected to <strong>the</strong> same<br />
network as <strong>the</strong> MOTIF <strong>XS</strong> (page 278).<br />
Loading a specific Waveform from an<br />
“all” or “all waveform” file<br />
1 Select a device and directory as source by<br />
following “Basic Procedure in <strong>the</strong> File mode”<br />
on page 276.<br />
2 Set <strong>the</strong> Type to “waveform.”<br />
Only available files according to <strong>the</strong> Type are listed in<br />
<strong>the</strong> Directory/File list box on <strong>the</strong> display.<br />
n In this step, <strong>the</strong> Load menu corresponding to <strong>the</strong> [SF2]<br />
button is not shown in <strong>the</strong> display. The Load menu appears<br />
when selecting a Waveform to be loaded in step 6.<br />
3 Specify <strong>the</strong> destination memory location in <strong>the</strong><br />
User memory.<br />
Select an Element (for a Normal Voice) to which <strong>the</strong><br />
Waveform (loaded to an empty number) is to be<br />
assigned.<br />
n When entering <strong>the</strong> File mode from <strong>the</strong> Performance/Song/<br />
Pattern mode, set a Part to which <strong>the</strong> Voice including <strong>the</strong><br />
loaded Waveform is to be assigned.<br />
n Please note that Waveforms cannot be loaded to a Drum<br />
Voice.<br />
4 Select <strong>the</strong> file to be loaded.<br />
You can select any of <strong>the</strong> files listed in <strong>the</strong> Directory/File<br />
list box on <strong>the</strong> display.<br />
Voice mode<br />
Performance<br />
mode<br />
Sampling<br />
mode 1<br />
Song mode<br />
Pattern mode<br />
Mixing mode<br />
Sampling<br />
mode 2<br />
Master mode<br />
Utility mode<br />
File mode<br />
MOTIF <strong>XS</strong> Owner’s <strong>Manual</strong> 281<br />
Reference
Reference<br />
282<br />
File Management (File mode)<br />
Voice mode Performance Sampling Song mode Pattern mode Mixing mode Sampling Master mode Utility mode File mode<br />
mode mode 1<br />
mode 2<br />
5 Press <strong>the</strong> [ENTER] button so that <strong>the</strong><br />
Waveforms in <strong>the</strong> selected file are listed on <strong>the</strong><br />
display.<br />
Waveforms<br />
6 Move <strong>the</strong> cursor to <strong>the</strong> desired Waveform.<br />
The Load menu corresponding to <strong>the</strong> [SF2] button<br />
appears.<br />
7 Press <strong>the</strong> [SF2] button (a prompt for<br />
confirmation appears).<br />
Press <strong>the</strong> [DEC/NO] button to cancel <strong>the</strong> Load<br />
operation.<br />
8 Press <strong>the</strong> [INC/YES] button to execute <strong>the</strong><br />
Load operation.<br />
CAUTION<br />
The Load operation overwrites any data previously existing in<br />
<strong>the</strong> destination internal memory. Important data should always<br />
be saved to a USB storage device connected to <strong>the</strong> USB TO<br />
DEVICE terminal or to a <strong>com</strong>puter connected to <strong>the</strong> same<br />
network as <strong>the</strong> MOTIF <strong>XS</strong> (page 278).<br />
Loading a specific Performance from an<br />
“all” file<br />
This method is available only when entering <strong>the</strong> File mode<br />
from <strong>the</strong> Performance mode.<br />
1 Select a device and directory as source by<br />
following “Basic Procedure in <strong>the</strong> File mode”<br />
on page 276.<br />
MOTIF <strong>XS</strong> Owner’s <strong>Manual</strong><br />
2 Set <strong>the</strong> Type to “performance.”<br />
Only available files according to <strong>the</strong> Type are listed in<br />
<strong>the</strong> Directory/File list box on <strong>the</strong> display.<br />
n In this step, <strong>the</strong> Load menu corresponding to <strong>the</strong> [SF2]<br />
button is not shown in <strong>the</strong> display. The Load menu<br />
appears when selecting a Performance to be loaded in<br />
step 6.<br />
3 Specify <strong>the</strong> destination memory location in <strong>the</strong><br />
User memory.<br />
Select a Performance Bank and number.<br />
n When <strong>the</strong> Performance number is set to “all,” all <strong>the</strong><br />
Performances in <strong>the</strong> selected Bank will be loaded.<br />
4 Select <strong>the</strong> file to be loaded.<br />
You can select any of <strong>the</strong> files listed in <strong>the</strong> Directory/File<br />
list box on <strong>the</strong> display.<br />
5 Press <strong>the</strong> [ENTER] button so that <strong>the</strong><br />
Performances in <strong>the</strong> selected Bank are listed<br />
on <strong>the</strong> display.<br />
You can change <strong>the</strong> Performance Bank as source by<br />
pressing <strong>the</strong> Bank buttons on <strong>the</strong> front panel.<br />
Performances<br />
6 Move <strong>the</strong> cursor to <strong>the</strong> desired Performance.<br />
The Load menu corresponding to <strong>the</strong> [SF2] button<br />
appears.<br />
7 Press <strong>the</strong> [SF2] button (a prompt for<br />
confirmation appears).<br />
Press <strong>the</strong> [DEC/NO] button to cancel <strong>the</strong> Load<br />
operation.<br />
8 Press <strong>the</strong> [INC/YES] button to execute <strong>the</strong><br />
Load operation.<br />
CAUTION<br />
The Load operation overwrites any data previously existing in<br />
<strong>the</strong> destination internal memory. Important data should always<br />
be saved to a USB storage device connected to <strong>the</strong> USB TO<br />
DEVICE terminal or to a <strong>com</strong>puter connected to <strong>the</strong> same<br />
network as <strong>the</strong> MOTIF <strong>XS</strong> (page 278).
Loading a specific Song or Pattern from an<br />
“all” or “all song” or “all pattern” file<br />
This method is available only when entering <strong>the</strong> File mode<br />
from <strong>the</strong> Song mode or Pattern mode.<br />
1 Select a device and directory as source by<br />
following “Basic Procedure in <strong>the</strong> File mode”<br />
on page 276.<br />
2 Set <strong>the</strong> Type to “song” or “pattern.”<br />
Only available files according to <strong>the</strong> Type are listed in<br />
<strong>the</strong> Directory/File list box on <strong>the</strong> display.<br />
n In this step, <strong>the</strong> Load menu corresponding to <strong>the</strong> [SF2]<br />
button is not shown in <strong>the</strong> display. The Load menu<br />
appears when selecting a Song or Pattern to be loaded in<br />
step 6.<br />
3 Specify <strong>the</strong> destination memory location in <strong>the</strong><br />
User memory.<br />
Select a Song number or Pattern number.<br />
4 Select <strong>the</strong> file to be loaded.<br />
You can select any of <strong>the</strong> files listed in <strong>the</strong> Directory/File<br />
list box on <strong>the</strong> display.<br />
5 Press <strong>the</strong> [ENTER] button so that <strong>the</strong> Songs or<br />
Patterns in <strong>the</strong> selected file are listed on <strong>the</strong><br />
display.<br />
Songs<br />
File Management (File mode)<br />
6 Move <strong>the</strong> cursor to <strong>the</strong> desired Song or<br />
Pattern.<br />
The Load menu corresponding to <strong>the</strong> [SF2] button<br />
appears.<br />
7 Press <strong>the</strong> [SF2] button (a prompt for<br />
confirmation appears).<br />
Press <strong>the</strong> [DEC/NO] button to cancel <strong>the</strong> Load<br />
operation.<br />
8 Press <strong>the</strong> [INC/YES] button to execute <strong>the</strong><br />
Load operation.<br />
CAUTION<br />
The Load operation overwrites any data previously existing in<br />
<strong>the</strong> destination internal memory. Important data should always<br />
be saved to a USB storage device connected to <strong>the</strong> USB TO<br />
DEVICE terminal or to a <strong>com</strong>puter connected to <strong>the</strong> same<br />
network as <strong>the</strong> MOTIF <strong>XS</strong> (page 278).<br />
Loading a specific Sample Voice from<br />
an “all” or “all song” or “all pattern” file<br />
This method is available only when entering <strong>the</strong> File mode<br />
from <strong>the</strong> Song mode or Pattern mode.<br />
1 Select a device and directory as source by<br />
following “Basic Procedure in <strong>the</strong> File mode”<br />
on page 276.<br />
2 Set <strong>the</strong> Type to “sample voice.”<br />
Only available files according to <strong>the</strong> Type are listed in<br />
<strong>the</strong> Directory/File list box on <strong>the</strong> display.<br />
n In this step, <strong>the</strong> Load menu corresponding to <strong>the</strong> [SF2]<br />
button is not shown in <strong>the</strong> display. The Load menu appears<br />
when selecting a Sample Voice to be loaded in step 7.<br />
3 Specify <strong>the</strong> destination memory location in <strong>the</strong><br />
User memory.<br />
Select a Part to which <strong>the</strong> loaded Sample Voice is to be<br />
assigned.<br />
n The Sample Voice is loaded to an empty number assigned<br />
to <strong>the</strong> Song or Pattern selected before entering <strong>the</strong> File<br />
mode.<br />
Voice mode<br />
Performance<br />
mode<br />
Sampling<br />
mode 1<br />
Song mode<br />
Pattern mode<br />
Mixing mode<br />
Sampling<br />
mode 2<br />
Master mode<br />
Utility mode<br />
File mode<br />
MOTIF <strong>XS</strong> Owner’s <strong>Manual</strong> 283<br />
Reference
Reference<br />
284<br />
File Management (File mode)<br />
Voice mode Performance Sampling Song mode Pattern mode Mixing mode Sampling Master mode Utility mode File mode<br />
mode mode 1<br />
mode 2<br />
4 Select <strong>the</strong> file to be loaded.<br />
You can select any of <strong>the</strong> files listed in <strong>the</strong> Directory/File<br />
list box on <strong>the</strong> display.<br />
5 Press <strong>the</strong> [ENTER] button so that <strong>the</strong> Songs or<br />
Patterns in <strong>the</strong> selected file are listed on <strong>the</strong><br />
display.<br />
Songs<br />
6 Press <strong>the</strong> [ENTER] button so that <strong>the</strong> Sample<br />
Voices in <strong>the</strong> selected Song or Pattern are<br />
listed on <strong>the</strong> display.<br />
7 Move <strong>the</strong> cursor to <strong>the</strong> desired Sample Voice.<br />
The Load menu corresponding to <strong>the</strong> [SF2] button<br />
appears.<br />
8 Press <strong>the</strong> [SF2] button (a prompt for<br />
confirmation appears).<br />
Press <strong>the</strong> [DEC/NO] button to cancel <strong>the</strong> Load<br />
operation.<br />
9 Press <strong>the</strong> [INC/YES] button to execute <strong>the</strong><br />
Load operation.<br />
CAUTION<br />
The Load operation overwrites any data previously existing in<br />
<strong>the</strong> destination internal memory. Important data should always<br />
be saved to a USB storage device connected to <strong>the</strong> USB TO<br />
DEVICE terminal or to a <strong>com</strong>puter connected to <strong>the</strong> same<br />
network as <strong>the</strong> MOTIF <strong>XS</strong> (page 278).<br />
MOTIF <strong>XS</strong> Owner’s <strong>Manual</strong><br />
Loading a WAV file or an AIFF file<br />
1 Select a device and directory as source by<br />
following “Basic Procedure in <strong>the</strong> File mode”<br />
on page 276.<br />
2 Set <strong>the</strong> Type to “WAV” or “AIFF.”<br />
Only available files according to <strong>the</strong> Type are listed in<br />
<strong>the</strong> Directory/File list box on <strong>the</strong> display.<br />
3 Specify <strong>the</strong> destination memory location in <strong>the</strong><br />
User memory.<br />
Select an Element (for a Normal Voice) or Key (for a<br />
Drum Voice) to which <strong>the</strong> WAV or AIFF file (loaded to an<br />
empty Waveform number) is to be assigned.<br />
n When entering <strong>the</strong> File mode from <strong>the</strong> Performance/Song/<br />
Pattern mode, set a Part to which <strong>the</strong> Voice including <strong>the</strong><br />
loaded WAV or AIFF file is to be assigned.<br />
4 Select <strong>the</strong> file to be loaded.<br />
You can select any of <strong>the</strong> files listed in <strong>the</strong> Directory/File<br />
list box on <strong>the</strong> display.<br />
5 Press <strong>the</strong> [SF2] button (a prompt for<br />
confirmation appears).<br />
Press <strong>the</strong> [DEC/NO] button to cancel <strong>the</strong> Load<br />
operation.<br />
6 Press <strong>the</strong> [INC/YES] button to execute <strong>the</strong><br />
Load operation.<br />
CAUTION<br />
The Load operation overwrites any data previously existing in<br />
<strong>the</strong> destination internal memory. Important data should always<br />
be saved to a USB storage device connected to <strong>the</strong> USB TO<br />
DEVICE terminal or to a <strong>com</strong>puter connected to <strong>the</strong> same<br />
network as <strong>the</strong> MOTIF <strong>XS</strong> (page 278).
Loading a SMF file (Standard MIDI file)<br />
This method is available only when entering <strong>the</strong> File mode<br />
from <strong>the</strong> Song mode or Pattern mode.<br />
1 Select a device and directory as source by<br />
following “Basic Procedure in <strong>the</strong> File mode”<br />
on page 276.<br />
2 Set <strong>the</strong> Type to “SMF.”<br />
Only available files according to <strong>the</strong> Type are listed in<br />
<strong>the</strong> Directory/File list box on <strong>the</strong> display.<br />
3 Specify <strong>the</strong> destination memory location in <strong>the</strong><br />
User memory.<br />
Select a Song number or Pattern Number/Section to<br />
which <strong>the</strong> Standard MIDI File is to be loaded.<br />
n When you want to load <strong>the</strong> SMF file to a Song, enter <strong>the</strong><br />
File mode from <strong>the</strong> Song mode. When you want to load <strong>the</strong><br />
SMF file to a Pattern, enter <strong>the</strong> File mode from <strong>the</strong> Pattern<br />
mode.<br />
4 Select <strong>the</strong> file to be loaded.<br />
You can select any of <strong>the</strong> files listed in <strong>the</strong> Directory/File<br />
list box on <strong>the</strong> display.<br />
5 Press <strong>the</strong> [SF2] button (a prompt for<br />
confirmation appears).<br />
Press <strong>the</strong> [DEC/NO] button to cancel <strong>the</strong> Load<br />
operation.<br />
6 Press <strong>the</strong> [INC/YES] button to execute <strong>the</strong><br />
Load operation.<br />
CAUTION<br />
The Load operation overwrites any data previously existing in<br />
<strong>the</strong> destination internal memory. Important data should always<br />
be saved to a USB storage device connected to <strong>the</strong> USB TO<br />
DEVICE terminal or to a <strong>com</strong>puter connected to <strong>the</strong> same<br />
network as <strong>the</strong> MOTIF <strong>XS</strong> (page 278).<br />
File Management (File mode)<br />
Voice mode<br />
Performance<br />
mode<br />
Sampling<br />
mode 1<br />
Song mode<br />
Pattern mode<br />
Mixing mode<br />
Sampling<br />
mode 2<br />
Master mode<br />
Utility mode<br />
File mode<br />
MOTIF <strong>XS</strong> Owner’s <strong>Manual</strong> 285<br />
Reference
Appendix<br />
286<br />
Appendix<br />
MOTIF <strong>XS</strong> Owner’s <strong>Manual</strong><br />
Display Messages<br />
LCD Indication Description<br />
Are you sure? Confirms whe<strong>the</strong>r you want to execute a specified operation or not.<br />
Arpeggio memory full. The internal memory for Arpeggio data is full, preventing storing <strong>the</strong> recorded sequence data as an<br />
Arpeggio.<br />
Bad disk or memory. The external storage device connected to this syn<strong>the</strong>sizer is unusable. Format <strong>the</strong> external storage<br />
device and try again.<br />
Bulk data protected. Bulk data cannot be received because of <strong>the</strong> setting in <strong>the</strong> Utility mode. For details, see page 268.<br />
Can’t access to <strong>the</strong> host The MOTIF <strong>XS</strong> cannot access a host <strong>com</strong>puter.<br />
Can’t execute to <strong>the</strong> Preset Wave. This message appears when you try to save <strong>the</strong> preset Waveform to an external storage device.<br />
Can’t undo.<br />
When certain Song/Pattern Jobs are executed, internal memory be<strong>com</strong>es too full for use of <strong>the</strong> Undo<br />
Are you sure?<br />
operation.<br />
Completed. The specified load, save, format, or o<strong>the</strong>r Job has been <strong>com</strong>pleted.<br />
Confirmed password is invalid. The new password cannot be registered because <strong>the</strong> confirmed password does not match <strong>the</strong> new<br />
password.<br />
Connecting to USB device... Recognizing <strong>the</strong> USB storage device connected to <strong>the</strong> USB TO DEVICE terminal.<br />
Copy protected. You have attempted to export or save a copy-protected digital audio source.<br />
Device number is off. Bulk data cannot be transmitted/received since <strong>the</strong> device number is off.<br />
Device number mismatch. Bulk data cannot be transmitted/received since <strong>the</strong> device numbers don’t match.<br />
Directory is not empty. You have attempted to delete a folder that contains data.<br />
Disk or memory is full. The external storage device is full and no more data can be saved. Use a new external storage device,<br />
or make space by erasing unwanted data from <strong>the</strong> storage device.<br />
Disk or memory is write-protected. The external storage device is write protected, or you have attempted to write to a read-only medium<br />
such as CD-ROM.<br />
Disk or memory read/write error. An error occurred while reading or writing to/from an external storage device.<br />
File already exists. A file having <strong>the</strong> same name as <strong>the</strong> one you are about to save already exists.<br />
File is not found. The specified file was not found on <strong>the</strong> external storage device during a load operation.<br />
File or directory path is too long. The file or directory you tried to access cannot be accessed because <strong>the</strong> amount of characters<br />
indicating <strong>the</strong> path is too long.<br />
Illegal bulk data. An error occurred while receiving <strong>the</strong> Bulk data or Bulk Request message.<br />
Illegal file name. The specified file name is invalid. Try entering a different name.<br />
Illegal file. The file specified for loading is unusable by this syn<strong>the</strong>sizer or cannot be loaded in <strong>the</strong> current mode.<br />
Illegal parameters. This message appears when trying to execute <strong>the</strong> Song Job or Pattern Job with invalid settings.<br />
Illegal sample data. The Sample file specified for loading is unusable by this syn<strong>the</strong>sizer.<br />
Keybank full The maximum overall number of Key Banks has been exceeded when executing Sampling related<br />
operations including Jobs and Load.<br />
MIDI buffer full. Failed to process <strong>the</strong> MIDI data because too much data was received at one time.<br />
MIDI checksum error. An error occurred when receiving bulk data.<br />
Mixing Voice full. The Mixing Voice cannot be stored because <strong>the</strong> number of Voices already stored has exceeded <strong>the</strong><br />
maximum capacity.<br />
mLAN identity ID check OK. The MOTIF <strong>XS</strong> has been connected to <strong>the</strong> <strong>com</strong>puter properly via an IEEE1394 cable.<br />
No data. When a Song/Pattern Job is executed, <strong>the</strong> selected track or range contains no data. Select an<br />
appropriate track or range. In addition, this message appears when a Job related to a Mixing Voice<br />
cannot be executed because <strong>the</strong> specified Mixing Voice is not available.<br />
No DIMM Memory installed. An appropriate pair of expansion DIMMs is not properly installed, or <strong>the</strong> pair is not properly matched.<br />
No sample data. This message appears when a Sample-related Job cannot be executed because <strong>the</strong> specified Sample<br />
is not available.<br />
Now collecting <strong>the</strong> information of <strong>the</strong><br />
network...<br />
This message appears while obtaining <strong>the</strong> network information.<br />
Now executing Factory set... Indicates this syn<strong>the</strong>sizer is restoring <strong>the</strong> factory-programmed settings.<br />
Now loading... Indicates that a file is being loaded.<br />
Now receiving MIDI bulk data... Indicates this syn<strong>the</strong>sizer is receiving MIDI bulk data.
Display Messages<br />
LCD Indication Description<br />
Now saving... Indicates that a file is being saved.<br />
Now scanning autoload file. Scanning for <strong>the</strong> files specified for Auto Load.<br />
Now transmitting MIDI bulk data... Indicates this syn<strong>the</strong>sizer is transmitting MIDI bulk data.<br />
Overwrite.<br />
A save operation will overwrite data on <strong>the</strong> external storage device as destination, and this message<br />
Are you sure?<br />
confirms whe<strong>the</strong>r it is OK to continue or not. Press [INC/YES] or [DEC/NO] as required.<br />
Password is invalid. The password you input does not match <strong>the</strong> already registered password,<br />
Password is too short. The password you input to “New Password” is too short. Input at least five characters as a password.<br />
Password is unspecified. This message appears when setting <strong>the</strong> File Server Switch parameter to “ON” though a password has<br />
not been registered.<br />
Phrase limit exceeded. The maximum number of Phrases (256) has been exceeded when recording, executing a Pattern Job,<br />
or editing.<br />
Please keep power on. The data is being written to Flash ROM. Never attempt to turn off <strong>the</strong> power while data is being written to<br />
Flash ROM. Turning <strong>the</strong> power off while this message is shown results in loss of all user data and may<br />
cause <strong>the</strong> system to freeze (due to corruption of data in <strong>the</strong> Flash ROM). This may also result in <strong>the</strong><br />
MOTIF <strong>XS</strong> being unable to properly start up <strong>the</strong> next time <strong>the</strong> power is turned on.<br />
Please select User Voice. This message appears when entering <strong>the</strong> File mode from <strong>the</strong> Performance mode and selecting a Part to<br />
which a preset Voice is assigned in <strong>the</strong> Waveform Load operation. Assign a User Voice to <strong>the</strong><br />
destination Part <strong>the</strong>n execute <strong>the</strong> Load operation.<br />
Please stop sequencer. The operation you have attempted to execute cannot be done during Song/Pattern playback.<br />
Sample frequency is too low. The sampling frequency is too low and <strong>the</strong> Frequency Convert Job cannot be executed.<br />
Sample is too long. The Sample size is too large and <strong>the</strong> Time Stretch Job cannot be executed.<br />
Sample is too short. The Sample length is too short and <strong>the</strong> Frequency Convert Job cannot be executed.<br />
Sample memory full. The Sample memory is full and fur<strong>the</strong>r Sampling operations, Jobs, or load operations cannot be<br />
executed.<br />
Sample Voice full The maximum overall number of Sample Voices has been exceeded when executing <strong>the</strong> Sampling<br />
related operations including <strong>the</strong> Job and Load.<br />
Scene stored. The Song Scene has been stored to one of <strong>the</strong> [SF1] – [SF5] buttons.<br />
Sequence memory full. The internal memory for Sequence data is full, preventing any fur<strong>the</strong>r operation (such as recording,<br />
editing, Job execution, MIDI reception/transmission, or loading from <strong>the</strong> external storage device). Try<br />
again after erasing unwanted Song, Pattern, or User Phrase data.<br />
The edited sequence data will be<br />
discarded.<br />
Are you sure?<br />
Indicates that <strong>the</strong> operation will delete <strong>the</strong> currently edited Song or Pattern.<br />
The received MIDI bulk data’s type is<br />
not <strong>com</strong>patible with <strong>the</strong> current mode/<br />
voice type.<br />
This message appears when MIDI bulk data is received in a different mode o<strong>the</strong>r than <strong>the</strong> currently<br />
selected mode. The bulk data is received in <strong>the</strong> same mode as <strong>the</strong> transmitting mode. This message<br />
also appears when <strong>the</strong> Voice type (Normal Voice/Drum Voice) of <strong>the</strong> destination Mixing Parts is different<br />
from <strong>the</strong> bulk-dump-transferred Voice type. The destination Parts assigned to <strong>the</strong> same Voice type as<br />
<strong>the</strong> bulk-dump-transferred Voice type are selected.<br />
This Performance uses User Voices. The Performance you have loaded includes User Voice data. Check whe<strong>the</strong>r <strong>the</strong> Voice you saved exists<br />
at <strong>the</strong> appropriate User voice bank.<br />
Too many Samples. The maximum overall number of samples (8192) has been exceeded.<br />
USB connection terminated.<br />
Press any button.<br />
A break in <strong>the</strong> connection with <strong>the</strong> USB storage device has occurred because of an abnormal electric<br />
current. Disconnect <strong>the</strong> USB storage device from <strong>the</strong> USB TO DEVICE connector, <strong>the</strong>n press any of <strong>the</strong><br />
panel buttons.<br />
Utility/Sequencer Setup settings stored. The settings in <strong>the</strong> Utility mode have been stored.<br />
Waveform full The maximum overall number of Waveforms has been exceeded when executing <strong>the</strong> Sampling related<br />
operations including Jobs and Load.<br />
When <strong>the</strong> checkbox is “on,” all user (Self-explanatory)<br />
data is initialized <strong>the</strong> next time <strong>the</strong><br />
power is turned on.<br />
MOTIF <strong>XS</strong> Owner’s <strong>Manual</strong> 287<br />
Appendix
Appendix<br />
288<br />
MOTIF <strong>XS</strong> Owner’s <strong>Manual</strong><br />
Troubleshooting<br />
No sound? Wrong sound? When a problem like this occurs, please check <strong>the</strong> following points before assuming that <strong>the</strong><br />
product is faulty. You may solve your problem by executing <strong>the</strong> Factory Set (page 22) after backing up your data to an<br />
external storage device. If <strong>the</strong> problem persists, consult your Yamaha dealer.<br />
No Sound.<br />
■ Are all eight sliders set to appropriate levels (o<strong>the</strong>r than zero or minimum)?<br />
■ Is <strong>the</strong> MOTIF <strong>XS</strong> properly connected to related external equipment (e.g., amplifier, speaker, headphone) via audio cables?<br />
Since <strong>the</strong> MOTIF <strong>XS</strong> has no built-in speakers, you will need an external audio system or a set of stereo headphones to properly<br />
monitor it.<br />
■ Check <strong>the</strong> Local Control parameter and <strong>the</strong> mLAN Monitor Setup parameter in <strong>the</strong> Utility mode.<br />
When <strong>the</strong> MOTIF <strong>XS</strong> is used as stand alone and <strong>the</strong> Local Control parameter is set to off or <strong>the</strong> mLAN Monitor Setup parameter is<br />
set to “with PC,” no sound is produced even if you play <strong>the</strong> keyboard.<br />
[UTILITY] → [F5] Control → [SF2] MIDI → Switch → Local Control (page 269)<br />
[UTILITY] → [F2] I/O → mLAN Monitor Setup (page 263)<br />
■ Is <strong>the</strong> power of this syn<strong>the</strong>sizer and any external equipment connected to this syn<strong>the</strong>sizer turned on?<br />
■ Have you made all <strong>the</strong> appropriate level settings—including <strong>the</strong> Master Volume on this syn<strong>the</strong>sizer and <strong>the</strong> volume settings on<br />
any connected external equipment?<br />
■ Is <strong>the</strong> Foot Controller pressed down (when it is connected to <strong>the</strong> FOOT CONTROLLER jack)?<br />
■ Are <strong>the</strong> MIDI volume or MIDI expression settings too low when using <strong>the</strong> external controller?<br />
■ Is this syn<strong>the</strong>sizer properly connected to related external equipment (e.g., amplifier or speaker) via audio cables?<br />
■ Are <strong>the</strong> effect and filter settings appropriate?<br />
If you are using <strong>the</strong> filter, try changing <strong>the</strong> cutoff frequency. Some cutoff settings may filter out all of <strong>the</strong> sound.<br />
[VOICE] → [EDIT] → [COMMON EDIT] → [F6] Effect (page 107)<br />
[PERFORM] → [EDIT] → [COMMON EDIT] → [F5] Effect (page 149)<br />
[SONG]/[PATTERN] → [MIXING] → [F5] Effect (page 234)<br />
[VOICE] → [EDIT] → Element/Key selection → [F3] Filter (page 117)<br />
[PERFORM] → [EDIT] → Part selection → [F4] EG → Filter (page 158)<br />
[SONG]/[PATTERN] → [MIXING] → [EDIT] → Part selection → [F4] EG → Filter (page 235)<br />
[PERFORM]/[SONG]/[PATTERN] → [SEQ SETUP] → [F2] MIDI Filter (page 270)<br />
■ Are <strong>the</strong> volume or expression settings too low?<br />
[UTILITY] → [F1] General → [SF1] Play → Volume (page 259)<br />
[VOICE] → [EDIT] → [COMMON EDIT] → [F1] General → [SF2] Play Mode → Volume (page 98)<br />
[VOICE] → [EDIT] → Element/Key selection → [F4] Amplitude → [SF1] Level/Pan → Level (page 122)<br />
[PERFORM] → [EDIT] → [COMMON EDIT] → [F2] Level/MEF → [SF1] Level → Volume (page 145)<br />
[PERFORM] → [EDIT] → Part selection → [F1] Voice → [SF1] Voice → Volume (page 152)<br />
[SONG]/[PATTERN] → [MIXING] → [F1] Part 1-16 → Volume (page 232)<br />
■ Are <strong>the</strong> parameter settings such as Element Switch, Part Switch, Note Limit and Velocity Limit appropriate?<br />
[VOICE] → [EDIT] → Element/Key selection → [F1] Oscillator (page 112)<br />
[PERFORM] → [F2] Voice (page 138)<br />
[PERFORM] → [EDIT] → Part selection → [F1] Voice → [SF1] Voice → Part Switch (page 151)<br />
■ When <strong>the</strong> Element to which “Legato” of <strong>the</strong> XA Control parameter is assigned does not sound, is <strong>the</strong> Mono/Poly parameter of <strong>the</strong><br />
Element set to “Mono”? Or, is a value o<strong>the</strong>r than “Legato” of <strong>the</strong> XA Control parameter assigned to ano<strong>the</strong>r Element within an<br />
Element Group?<br />
[VOICE] → [F2] Porta → Mono/Poly Mode = mono (page 93)<br />
[VOICE] → [EDIT] → Element selection → [F1] Oscillator → XA Control (page 112)<br />
[VOICE] → [EDIT] → Element selection → [F1] Oscillator → Element Group (page 113)<br />
■ When <strong>the</strong> Element to which “Key Off Sound” of <strong>the</strong> XA Control parameter is assigned does not sound, are you releasing <strong>the</strong> note<br />
after <strong>the</strong> AEG decays?<br />
The “Key Off Sound” Element will take over <strong>the</strong> AEG level of <strong>the</strong> previous Element if both <strong>the</strong> Elements belong to <strong>the</strong> same<br />
Element Group. To solve such a problem, release <strong>the</strong> note before <strong>the</strong> AEG level decays to minimum or set <strong>the</strong> “Key Off Sound”<br />
Element to <strong>the</strong> different Element Group from <strong>the</strong> previous Elements.<br />
[VOICE] → [EDIT] → Element selection → [F1] Oscillator → Element Group (page 113)
Troubleshooting<br />
■ When <strong>the</strong> Element to which “AF1 on,” “AF2 on,” or “all AF off” of <strong>the</strong> XA Control parameter is assigned does not sound, is <strong>the</strong><br />
corresponding ASSIGNABLE FUNCTION button pressed?<br />
■ Is “Vocoder” selected as <strong>the</strong> Insertion Effect Type of <strong>the</strong> Voice?<br />
If so, set <strong>the</strong> parameters related to <strong>the</strong> AD Part and A/D INPUT connector to <strong>the</strong> appropriate values <strong>the</strong>n play <strong>the</strong> keyboard while<br />
inputting your voice into <strong>the</strong> microphone connected to <strong>the</strong> MOTIF <strong>XS</strong>. Check whe<strong>the</strong>r or not <strong>the</strong> Gain Knob on <strong>the</strong> rear panel is set<br />
to <strong>the</strong> minimum position. For details, see page 39.<br />
[VOICE] → [EDIT] → [COMMON EDIT] → [F6] Effect → [SF1] Connect → INSERTION CONNECT (page 108)<br />
[VOICE] → [UTILITY] → [F4] Voice Audio → [SF1] Output → Output Select = InsL (page 266)<br />
[VOICE] → [UTILITY] → [F2] I/O → Input → Mic/Line = mic (page 263)<br />
■ When playing <strong>the</strong> keyboard in <strong>the</strong> Performance/Song/Pattern mode produces no sound, has a Voice been assigned to each Part?<br />
[PERFORM] → [F2] Voice (page 138)<br />
[SONG]/[PATTERN] → [MIXING] → [F1] Part 1-16 (page 231)<br />
■ When <strong>the</strong> Song/Pattern playback produces no sound, are <strong>the</strong> output channel of each track in <strong>the</strong> play mode and <strong>the</strong> receive<br />
channel of each Part in <strong>the</strong> Mixing mode set appropriately?<br />
[SONG] → [F3] Track → [SF1] Out (page 184)<br />
[PATTERN] → [F3] Track (page 211)<br />
[SONG]/[PATTERN] → [MIXING] → [EDIT] → Part selection → [F1] Voice → [SF1] Voice → Receive Channel (page 235)<br />
■ When <strong>the</strong> Song/Pattern playback produces no sound, are <strong>the</strong> Velocity Rate and Velocity Offset settings of <strong>the</strong> Play FX<br />
appropriate?<br />
[SONG]/[PATTERN] → [F2] Play FX → Velocity Offset (pages 184 and 211)<br />
Playback continues without stopping.<br />
■ When <strong>the</strong> [ARPEGGIO ON/OFF] button is turned on, press it so that its lamp is turned off.<br />
■ When in <strong>the</strong> Song mode or Pattern mode, press <strong>the</strong> [J] (Stop) button.<br />
■ When <strong>the</strong> click sound continues, check <strong>the</strong> following parameter setting. Set this parameter to something o<strong>the</strong>r than “always”<br />
because this setting always plays back <strong>the</strong> click sound regardless of <strong>the</strong> sequencer status.<br />
[PERFORM]/[SONG]/[PATTERN] → [SEQ SETUP] → [F1] Click → Mode (page 270)<br />
Distorted sound.<br />
■ Are <strong>the</strong> effect settings appropriate?<br />
Use of an effect at certain settings may produce distortion.<br />
[VOICE] → [EDIT] → [COMMON EDIT] → [F6] Effect (pages 107 and 128)<br />
[PERFORM] → [EDIT] → [COMMON EDIT] → [F5] Effect (page 149)<br />
[SONG]/[PATTERN] → [MIXING] → [F5] Effect (page 234)<br />
Use of <strong>the</strong> Master Effect at certain settings may produce distortion.<br />
[VOICE] → [UTILITY] → [F3] Voice → [SF1] Master FX (page 264)<br />
[PERFORM] → [EDIT] → [COMMON EDIT] → [F2] Level/MEF → [SF2] Master FX (page 146)<br />
[SONG]/[PATTERN] → [MIXING] → [EDIT] → [COMMON EDIT] → [F2] Master FX → [SF2] Master FX (page 234)<br />
■ Are <strong>the</strong> filter settings appropriate?<br />
Excessively high filter resonance settings can cause distortion.<br />
[VOICE] → [EDIT] → Element/Key selection → [F3] Filter (page 117)<br />
[PERFORM] → [EDIT] → Part selection → [F4] EG → Filter (page 158)<br />
[SONG]/[PATTERN] → [MIXING] → [EDIT] → Part selection → [F4] EG → Filter (page 235)<br />
■ Is any of <strong>the</strong> following volume parameters set so high that clipping is occurring?<br />
[UTILITY] → [F1] General → [SF1] Play → Volume (page 259)<br />
[VOICE] → [EDIT] → [COMMON EDIT] → [F1] General → [SF2] Play Mode → Volume (page 98)<br />
[PERFORM] → [EDIT] → [COMMON EDIT] → [F2] Level/MEF → [SF1] Level → Volume (page 145)<br />
[SONG]/[PATTERN] → [MIXING] → [F1] Part 1-16 → Volume (page 232)<br />
Sound is cut off.<br />
■ Is <strong>the</strong> entire sound (via your keyboard playback and Song/Pattern/Arpeggio playback) exceeding <strong>the</strong> maximum polyphony of <strong>the</strong><br />
MOTIF <strong>XS</strong>? (page 59)<br />
MOTIF <strong>XS</strong> Owner’s <strong>Manual</strong> 289<br />
Appendix
Appendix<br />
290<br />
Troubleshooting<br />
Only one note sounds at a time.<br />
■ When this situation occurs, <strong>the</strong> Mono/Poly parameter in <strong>the</strong> current mode is set to “mono.” If you wish to play chords, set this<br />
parameter to “poly.”<br />
[VOICE] → [F2] Porta → Mono/Poly Mode (page 93)<br />
[PERFORM] → [EDIT] → Part selection → [F1] Voice → [SF1] Voice → Mono/Poly (page 152)<br />
[SONG]/[PATTERN] → [MIXING] → [EDIT] → Part selection → [F1] Voice → [SF1] Voice → Mono/Poly (page 235)<br />
Pitch or intervals are wrong.<br />
■ Is <strong>the</strong> Master Tune parameter in <strong>the</strong> Utility mode set to a value o<strong>the</strong>r than “0”?<br />
[UTILITY] → [F1] General → [SF1] Play → Tune (page 259)<br />
■ Is <strong>the</strong> Note Shift parameter in <strong>the</strong> Utility mode set to a value o<strong>the</strong>r than “0”?<br />
[UTILITY] → [F1] General → [SF1] Play → Note Shift (page 259)<br />
■ When <strong>the</strong> voice produces a wrong pitch, is <strong>the</strong> appropriate tuning system selected from Micro Tuning parameter in <strong>the</strong> Voice Edit<br />
mode?<br />
[VOICE] → [EDIT] → [COMMON EDIT]→ [F1] General → [SF2] Play Mode → Bank, Tuning Number, Tuning Root (page 99)<br />
■ When <strong>the</strong> Voice produces a wrong pitch, is <strong>the</strong> LFO Pitch Modulation Depth in <strong>the</strong> Voice Edit mode set too high?<br />
[VOICE] → [EDIT] → Element/Key selection → [F5] Elm LFO → P Mod (page 125)<br />
■ When <strong>the</strong> Performance/Song/Pattern produces a wrong pitch, is <strong>the</strong> Note Shift parameter of each Part set to a value o<strong>the</strong>r than<br />
“0”?<br />
[PERFORM] → [EDIT] → Part selection → [F1] Voice → [SF1] Voice (page 151)<br />
[SONG]/[PATTERN] → [MIXING] → [EDIT] → Part selection → [F1] Voice → [SF1] Voice (page 235)<br />
■ When <strong>the</strong> Song/Pattern playback produces a wrong pitch, is <strong>the</strong> Note Shift parameter in <strong>the</strong> Play FX display set to a value o<strong>the</strong>r<br />
than “0”?<br />
[SONG]/[PATTERN] → [F2] Play FX → Note Shift (page 184)<br />
No effect is applied.<br />
■ Is <strong>the</strong> [EFFECT BYPASS] button turned off? (page 13)<br />
■ Have <strong>the</strong> REVERB and CHORUS knobs been turned fully counter-clockwise (to <strong>the</strong> minimum)?<br />
■ Have any or all of <strong>the</strong> Elements’ Insertion Effect Output parameters been set to “thru” in <strong>the</strong> effect setting display in <strong>the</strong> Voice Edit<br />
mode?<br />
[VOICE] → [EDIT] → [COMMON EDIT] → [F6] Effect → [SF1] Connect → Element Out 1-8 (page 108)<br />
■ Have any or all of <strong>the</strong> effect types been set to “thru” or “off”?<br />
■ When this occurs in <strong>the</strong> Performance mode/Song mode/Pattern mode, check whe<strong>the</strong>r <strong>the</strong> Insertion Switch (INS SW) parameters<br />
are set properly or not.<br />
[PERFORM] → [EDIT] → [COMMON EDIT] → [F5] Effect → [SF2] InsSwitch (page 150)<br />
[PERFORM] → [EDIT] → Part selection → [F1] Voice → [SF1] Voice (page 151)<br />
[SONG]/[PATTERN] → [MIXING] → [F1] Part 1-16 → Ins FX Sw (page 232)<br />
[SONG]/[PATTERN] → [MIXING] → [COMMON EDIT] → [F5] Effect → [SF2] Ins Switch (page 234)<br />
The Edit Indicator appears, even when parameters are not being edited.<br />
■ Keep in mind that even though <strong>the</strong> Edit mode is not active, simply moving a Knob/Slider or playing back <strong>the</strong> Song/Patter n<br />
changes <strong>the</strong> current Voice, Performance, or Mixing, causing <strong>the</strong> Edit Indicator to appear.<br />
Cannot start <strong>the</strong> Arpeggio.<br />
■ Check whe<strong>the</strong>r <strong>the</strong> [ARPEGGIO ON/OFF] button is turned on or off.<br />
■ Is <strong>the</strong> MIDI Sync parameter set to internal (using internal clock)?<br />
[UTILITY] → [F5] Control → [SF2] MIDI → MIDI Sync = internal (page 268)<br />
■ When <strong>the</strong> User Arpeggio type is selected, does <strong>the</strong> currently selected Arpeggio actually contain data?<br />
■ Are <strong>the</strong> Arpeggio related parameters such as Note Limit and Velocity Limit set appropriately?<br />
[VOICE] → [EDIT] → [COMMON EDIT] → [F2] ARP Main (page 101)<br />
[PERFORM] → [EDIT] → Part selection → [F2] ARP Main (page 154)<br />
[SONG]/[PATTERN] → [MIXING] → [EDIT] → Part selection → [F2] ARP Main (page 235)<br />
MOTIF <strong>XS</strong> Owner’s <strong>Manual</strong>
Troubleshooting<br />
■ When this situation occurs in <strong>the</strong> Performance/Song/Pattern mode, check <strong>the</strong> Arpeggio Switch parameter. If this parameter for<br />
<strong>the</strong> current Part is set to off, Arpeggio playback will not be triggered by your keyboard performance even if <strong>the</strong> [ARPEGGIO ON/<br />
OFF] button is turned on.<br />
[PERFORM] → [F4] Arpeggio → Common Switch (page 139)<br />
[PERFORM] → [EDIT] → Part selection → [F2] ARP Main → Switch (page 154)<br />
[SONG]/[PATTERN] → [MIXING] → [EDIT] → Part selection → [F2] ARP Main → Switch (page 235)<br />
Cannot stop <strong>the</strong> Arpeggio.<br />
■ When Arpeggio playback does not stop even if you release <strong>the</strong> key, set <strong>the</strong> Arpeggio Hold parameter to “off.”<br />
[VOICE] → [EDIT] → [COMMON EDIT] → [F2] ARP Main → Hold (page 101)<br />
[PERFORM] → [EDIT] → Part selection → [F2] ARP Main → Hold (page 154)<br />
[PERFORM] → [PERFORMANCE CONTROL] → Number buttons [13] – [16] (page 136)<br />
[SONG]/[PATTERN] → [MIXING] → [EDIT] → Part selection → [F2] ARP Main → Hold (page 235)<br />
The Voice assigned to <strong>the</strong> Performance produces different sound from <strong>the</strong> one in <strong>the</strong> Voice mode.<br />
■ This is normal because <strong>the</strong> Voice sound is determined by <strong>the</strong> parameter settings in <strong>the</strong> Performance mode. For <strong>the</strong> Performance<br />
Parts, you will need to apply basically <strong>the</strong> same parameter settings as those used in <strong>the</strong> Voice mode. Regarding <strong>the</strong> Effect<br />
settings except for <strong>the</strong> send level, you can copy <strong>the</strong> settings in <strong>the</strong> Voice mode to <strong>the</strong> Performance part in <strong>the</strong> following display.<br />
By executing this Job, you can ensure that <strong>the</strong> Voice will sound <strong>the</strong> same in <strong>the</strong> Performance mode as it does in <strong>the</strong> Voice mode.<br />
[PERFORM] → [JOB] → [F3] Copy → [SF2] Voice (page 160)<br />
[PERFORM] → [EDIT] → Part selection → [F1] Voice → [SF2] Output → Reverb Send/Chorus Send (page 152)<br />
The Song/Pattern cannot be started even when pressing <strong>the</strong> [F] (Play) button.<br />
■ Does <strong>the</strong> selected Song or Pattern (phrase) actually contain data?<br />
■ Is <strong>the</strong> Remote Control feature turned on?<br />
■ Is <strong>the</strong> MIDI Sync parameter set to internal (using internal clock)?<br />
[UTILITY] → [F5] Control → [SF2] MIDI → MIDI Sync = internal (page 268)<br />
Song/Pattern (Phrase) cannot be recorded.<br />
■ Is <strong>the</strong>re enough free memory for recording? (pages 182 and 211)<br />
The total MOTIF <strong>XS</strong> memory capacity determines <strong>the</strong> number of Songs/Patterns (phrases) that can be recorded. For example, if<br />
<strong>the</strong> memory contains Songs/Patterns (phrases) that use up a large amount of memory, <strong>the</strong> memory may be<strong>com</strong>e full even though<br />
<strong>the</strong> available Pattern or Song numbers are not all used.<br />
Cannot enter <strong>the</strong> Pattern Job mode/Pattern Mixing mode even when pressing <strong>the</strong> [JOB] button in <strong>the</strong><br />
Pattern mode.<br />
■ Check whe<strong>the</strong>r <strong>the</strong> MOTIF <strong>XS</strong> is in <strong>the</strong> Pattern Chain mode or not.<br />
If so, exit from <strong>the</strong> Pattern Chain mode, <strong>the</strong>n press <strong>the</strong> [JOB] button or [MIXING] button.<br />
The drum sound is wrong or unexpected when changing <strong>the</strong> transpose value in <strong>the</strong> Song/Pattern Play mode.<br />
■ This is normal. Changing <strong>the</strong> transpose setting while playing a Drum Voice will produce different sounds for <strong>the</strong> same keys played.<br />
Microphone does not work properly.<br />
■ Check whe<strong>the</strong>r <strong>the</strong> Mic/Line parameter is set to “mic” or not.<br />
[UTILITY] → [F2] I/O → Mic/Line = mic (page 263)<br />
■ Check whe<strong>the</strong>r <strong>the</strong> Gain Knob on <strong>the</strong> rear panel is set to minimum position or not.<br />
Cannot record samples.<br />
■ If you cannot enter <strong>the</strong> Sampling mode even though you’ve pressed <strong>the</strong> [INTEGRATED SAMPLING] button, check whe<strong>the</strong>r<br />
DIMMs have been installed or not. In order to enter <strong>the</strong> Sampling mode and record Samples, DIMM modules must be installed.<br />
■ Have you exceeded <strong>the</strong> maximum allowable number of samples (key banks)?<br />
■ Is <strong>the</strong>re enough sample memory available?<br />
■ Is <strong>the</strong> Sampling Source setting appropriate?<br />
■ Is <strong>the</strong> Trigger mode set appropriately?<br />
MOTIF <strong>XS</strong> Owner’s <strong>Manual</strong> 291<br />
Appendix
Appendix<br />
292<br />
Troubleshooting<br />
Data <strong>com</strong>munication via MIDI/USB/mLAN between <strong>the</strong> <strong>com</strong>puter and <strong>the</strong> MOTIF <strong>XS</strong> does not work properly.<br />
■ Check whe<strong>the</strong>r <strong>the</strong> Port settings on <strong>the</strong> <strong>com</strong>puter are appropriate or not.<br />
■ Check whe<strong>the</strong>r or not <strong>the</strong> MIDI IN/OUT parameter is set to <strong>the</strong> appropriate value.<br />
[UTILITY] → [F5] Control → [SF2] MIDI → MIDI In/Out (page 268)<br />
The MOTIF <strong>XS</strong> does not sound properly even when playing back <strong>the</strong> Song data on <strong>the</strong> <strong>com</strong>puter or <strong>the</strong><br />
MIDI instrument connected to <strong>the</strong> MOTIF <strong>XS</strong>.<br />
■ Make sure to set <strong>the</strong> MOTIF <strong>XS</strong> to <strong>the</strong> Song mode or Pattern mode. The Voice mode or Performance mode may not produce <strong>the</strong><br />
proper sound even when playing back <strong>the</strong> Song data on <strong>the</strong> MIDI instrument or <strong>the</strong> <strong>com</strong>puter connected to <strong>the</strong> MOTIF <strong>XS</strong>.<br />
Network connection does not work.<br />
■ If you’ve forgotten password for accessing <strong>the</strong> MOTIF <strong>XS</strong>, execute <strong>the</strong> Factory Set <strong>the</strong>n set <strong>the</strong> password again.<br />
[UTILITY] → [F1] General → [SF3] Network → [SF5] Password (page 262)<br />
■ When <strong>the</strong> DHCP server is connected to <strong>the</strong> network and <strong>the</strong> DHCP Client parameter is set to “on,” you need not set <strong>the</strong> IP<br />
address because it is automatically set. When <strong>the</strong> DHCP server is not connected to <strong>the</strong> network and you wish to set a specific IP<br />
address, set <strong>the</strong> DHCP Client parameter to “off,” <strong>the</strong>n set <strong>the</strong> IP address manually.<br />
[UTILITY] → [F1] General → [SF3] Network → DHCP Client (page 261)<br />
■ If <strong>the</strong> network settings do not be<strong>com</strong>e active even if you set <strong>the</strong> related parameters, make sure to press <strong>the</strong> [ENTER] button after<br />
setting. Then, you will need to press <strong>the</strong> [STORE] button to store <strong>the</strong> settings. If you do not store <strong>the</strong> network settings, <strong>the</strong>se will<br />
be erased after you turn off <strong>the</strong> power.<br />
[UTILITY] → [F1] General → [SF3] Network (page 260)<br />
■ The characters of a file or directory may be garbled when loading <strong>the</strong> file from <strong>the</strong> <strong>com</strong>puter drive to <strong>the</strong> MOTIF <strong>XS</strong>. If such a<br />
problem occurs, replace <strong>the</strong> garbled character with <strong>the</strong> correct one on <strong>the</strong> MOTIF <strong>XS</strong> display. Keep in mind that 2-byte character<br />
codes such as Kanji and Kana cannot be shown on <strong>the</strong> display of <strong>the</strong> MOTIF <strong>XS</strong>.<br />
■ When “Password is unspecified.” appears after setting <strong>the</strong> File Server parameter to “on,” make sure to set <strong>the</strong> Password before<br />
setting <strong>the</strong> File Server parameter to “on.” This is because <strong>the</strong> Security parameter has been set to “workgroup” and <strong>the</strong> Account<br />
and Password are necessary when <strong>the</strong> files are shared.<br />
[UTILITY] → [F1] General → [SF3] Network → [SF5] Password (page 262)<br />
MIDI bulk data transmission/reception does not work properly.<br />
■ Is <strong>the</strong> Receive Bulk parameter set to off?<br />
Set <strong>the</strong> Receive Bulk parameter to on.<br />
[UTILITY] → [F5] Control → [SF2] MIDI → Receive Bulk (page 269)<br />
■ When receiving <strong>the</strong> MIDI bulk data transmitted via <strong>the</strong> Bulk Dump function and recorded to <strong>the</strong> external MIDI device, you need to<br />
set <strong>the</strong> MIDI Device Number to <strong>the</strong> same value as when transmitting.<br />
[UTILITY] → [F5] Control → [SF2] MIDI → Device Number (page 268)<br />
■ When transmission does not work properly, is <strong>the</strong> device number of <strong>the</strong> MIDI instrument connected to <strong>the</strong> MOTIF <strong>XS</strong> set to match<br />
<strong>the</strong> Device Number Parameter in <strong>the</strong> Utility mode?<br />
[UTILITY] → [F5] Control → [SF2] MIDI → Device Number (page 268)<br />
Cannot save data to <strong>the</strong> external USB storage device.<br />
■ Is <strong>the</strong> USB storage device being used write protected? (Write-protect should be set to off for saving data.)<br />
■ Is <strong>the</strong> USB storage device being used properly formatted?<br />
Press <strong>the</strong> [FILE] button to enter <strong>the</strong> File mode, <strong>the</strong>n set <strong>the</strong> device to <strong>the</strong> USB storage device. Check <strong>the</strong> amount of currently<br />
available (unused) memory of <strong>the</strong> USB storage device indicated at <strong>the</strong> right top of <strong>the</strong> display.<br />
■ Is <strong>the</strong> USB storage device guaranteed by Yamaha?<br />
For details, see page 85.<br />
MOTIF <strong>XS</strong> Owner’s <strong>Manual</strong>
Available devices<br />
The following optional devices can be installed to <strong>the</strong><br />
MOTIF <strong>XS</strong>.<br />
Installation locations<br />
mLAN16E2<br />
MOTIF <strong>XS</strong>6<br />
MOTIF <strong>XS</strong>7<br />
DIMM<br />
POWER<br />
ON/ OFF<br />
mLAN16E2 DIMMs<br />
AC IN<br />
Rear cover for <strong>the</strong> mLAN16E2<br />
ETHERNET<br />
MOTIF <strong>XS</strong>6<br />
MOTIF <strong>XS</strong>7<br />
MOTIF <strong>XS</strong>8<br />
USB<br />
TO HOST TO DEVICE<br />
LCD CONTRAST<br />
Rear cover for <strong>the</strong> mLAN16E2<br />
Installing Optional Hardware<br />
MIDI<br />
FOOT SWITCH FOOT CONTROLLER ASSIGNABLE OUTPUT OUTPUT<br />
DIGITAL OUT<br />
THRU<br />
OUT IN ASSIGNABLE SUSTAIN 2 1<br />
R L R L/MONO<br />
PH ONES<br />
Bottom cover for <strong>the</strong> DIMM<br />
Bottom cover for <strong>the</strong> DIMM<br />
Bottom cover for <strong>the</strong> DIMM<br />
A/D INPUT<br />
GAIN<br />
R L<br />
Installation Precautions<br />
Before installing <strong>the</strong> optional hardware, make sure you<br />
have a Philips screwdriver and ample space to work.<br />
WARNING<br />
• Before beginning installation, switch off <strong>the</strong> power to <strong>the</strong><br />
instrument and connected peripherals, and unplug <strong>the</strong>m from<br />
<strong>the</strong> power outlet. Installation or removal of any devices should<br />
be started ONLY after <strong>the</strong> instrument (and <strong>the</strong> optional<br />
hardware) returns to normal room temperature. Then remove all<br />
cables connecting <strong>the</strong> instrument to o<strong>the</strong>r devices. (Leaving <strong>the</strong><br />
power cord connected while working can result in electric<br />
shock. Leaving o<strong>the</strong>r cables connected can interfere with work.)<br />
• Be careful not to drop any screws inside <strong>the</strong> instrument during<br />
installation. (This can be prevented by keeping <strong>the</strong> optional<br />
units and cover away from <strong>the</strong> instrument while attaching). If this<br />
does happen, be sure to remove <strong>the</strong> screw(s) from inside <strong>the</strong><br />
unit before turning <strong>the</strong> power on. Loose screws inside <strong>the</strong><br />
instrument can cause improper operation or serious damage. If<br />
you are unable to retrieve a dropped screw, consult your<br />
Yamaha dealer for advice.<br />
• Install <strong>the</strong> optional units carefully as described in <strong>the</strong> procedure<br />
below. Improper installation can cause shorts which may result<br />
in irreparable damage and pose a fire hazard.<br />
• Do not disassemble, modify, or apply excessive force to board<br />
areas and connectors on optional units. Bending or tampering<br />
with boards and connectors may lead to electric shock, fire, or<br />
equipment failures.<br />
CAUTION<br />
• It is re<strong>com</strong>mended that you wear gloves to protect your hands<br />
from metallic projections on optional units and o<strong>the</strong>r<br />
<strong>com</strong>ponents. Touching leads or connectors with bare hands<br />
may cause finger cuts, and may also result in poor electrical<br />
contact or electrostatic damage.<br />
• Be careful of static electricity. Static electricity discharge can<br />
damage <strong>the</strong> IC chips on <strong>the</strong> mLAN16E2. Before you handle <strong>the</strong><br />
optional mLAN16E2, to reduce <strong>the</strong> possibility of static electricity,<br />
touch unpainted metal parts or a ground wire on <strong>the</strong> devices<br />
that are grounded.<br />
• Handle <strong>the</strong> optical units with care. Dropping or subjecting <strong>the</strong>m<br />
to any kind of shock may cause damage or result in a<br />
malfunction.<br />
• Do not touch <strong>the</strong> exposed metal parts in <strong>the</strong> circuit board.<br />
Touching <strong>the</strong>se parts may result in a faulty contact.<br />
• Be careful not to misplace any of <strong>the</strong> screws.<br />
• Do not use any screws o<strong>the</strong>r than what are installed on <strong>the</strong><br />
instrument. Use of incorrect screws can cause damage.<br />
MOTIF <strong>XS</strong> Owner’s <strong>Manual</strong> 293<br />
Appendix
Appendix<br />
294<br />
Installing Optional Hardware<br />
mLAN16E2<br />
The optionally available mLAN expansion board<br />
(mLAN16E2) can be installed to <strong>the</strong> MOTIF <strong>XS</strong>6 and MOTIF<br />
<strong>XS</strong>7. The MOTIF <strong>XS</strong>8 is equipped with two mLAN<br />
connectors equivalent to <strong>the</strong> mLAN16E2 by default.<br />
Installing <strong>the</strong> mLAN16E2<br />
1 Turn <strong>the</strong> power of <strong>the</strong> MOTIF <strong>XS</strong> off, and<br />
disconnect <strong>the</strong> AC power cord. Also, make<br />
sure to disconnect <strong>the</strong> MOTIF <strong>XS</strong> from any<br />
connected external devices.<br />
2 Remove <strong>the</strong> cover for <strong>the</strong> mLAN16E2 from <strong>the</strong><br />
rear panel.<br />
With <strong>the</strong> rear panel of this syn<strong>the</strong>sizer facing you,<br />
remove <strong>the</strong> two screws from <strong>the</strong> cover.<br />
Important<br />
Keep <strong>the</strong> removed screws in a safe place. They will be used<br />
when installing <strong>the</strong> mLAN16E2. Be careful not to misplace<br />
<strong>the</strong>m. Keep <strong>the</strong> cover and fixing screws in a safe place for<br />
future use.<br />
CAUTION<br />
After removing <strong>the</strong> cover, you will see <strong>the</strong> metal fittings at <strong>the</strong><br />
bottom of <strong>the</strong> opening. To avoid cutting or scraping your<br />
fingers, be careful not to touch <strong>the</strong>m when installing <strong>the</strong><br />
mLAN16E2.<br />
3 Insert <strong>the</strong> mLAN16E2 along <strong>the</strong> guide rails.<br />
Push <strong>the</strong> mLAN16E2 all <strong>the</strong> way into <strong>the</strong> slot so that <strong>the</strong><br />
connector at <strong>the</strong> end of <strong>the</strong> mLAN16E2 is correctly<br />
inserted into <strong>the</strong> connector inside <strong>the</strong> slot.<br />
Guide rails<br />
MOTIF <strong>XS</strong> Owner’s <strong>Manual</strong><br />
4 Replace <strong>the</strong> cover with <strong>the</strong> two screws you<br />
removed in step 2 above.<br />
CAUTION<br />
Malfunctions or incorrect operation may occur if <strong>the</strong><br />
mLAN16E2 is not properly fastened.
Optional DIMM Installation<br />
This section explains how to install DIMM memory modules<br />
to <strong>the</strong> MOTIF <strong>XS</strong>.<br />
Compatible DIMMs<br />
The MOTIF <strong>XS</strong> does not necessarily support all<br />
<strong>com</strong>mercially available DIMMs. Yamaha cannot guarantee<br />
operation of DIMMs that you purchase. Before purchasing<br />
DIMMs, please consult your Yamaha dealer, or an<br />
authorized Yamaha distributor (see list at end of <strong>the</strong><br />
Owner’s <strong>Manual</strong>) for advice, or see <strong>the</strong> following website:<br />
http://www.yamahasynth.<strong>com</strong>/<br />
DIMM Type and DIMM Configuration<br />
•Yamaha re<strong>com</strong>mends that you purchase DIMMs that<br />
conform to <strong>the</strong> JEDEC* standard. Please be aware,<br />
however, that conformance to this standard does not<br />
constitute a guarantee that <strong>the</strong> DIMMs will operate<br />
correctly on <strong>the</strong> MOTIF <strong>XS</strong>.<br />
*JEDEC (Joint Electron Device Engineering Council) sets<br />
standards for terminal configurations within electronic devices.<br />
• Use only 168-pin DIMMs of 64, 128, 256 or 512 MB<br />
capacity (synchronized DRAM; PC100 or PC133).<br />
• When installing DIMMs, make sure to install <strong>the</strong>m in a<br />
matched pair of <strong>the</strong> same capacity. You cannot install<br />
only one module and leave <strong>the</strong> second memory socket<br />
open. Also make sure each DIMM in <strong>the</strong> pair is of <strong>the</strong><br />
same manufacturer and <strong>the</strong> same type. DIMMs of<br />
different makers and configurations may not work<br />
toge<strong>the</strong>r.<br />
• When purchasing DIMMs, make sure that <strong>the</strong> DIMM<br />
design does not utilize more than 18 memory chips per<br />
module. (DIMMs <strong>com</strong>prised of more than 18 chips do not<br />
operate correctly on <strong>the</strong> MOTIF <strong>XS</strong>.)<br />
64MB x 2 = 128MB 128MB x 2 = 256MB<br />
256MB x 2 = 512MB 512MB x 2 = 1GB<br />
DIMM Installation<br />
Installing Optional Hardware<br />
1 Turn <strong>the</strong> power of <strong>the</strong> MOTIF <strong>XS</strong> off, and<br />
disconnect <strong>the</strong> AC power cord. Also, make<br />
sure to disconnect <strong>the</strong> MOTIF <strong>XS</strong> from any<br />
connected external devices.<br />
2 Turn over <strong>the</strong> MOTIF <strong>XS</strong> so that <strong>the</strong> keyboard<br />
faces down, giving you direct access to <strong>the</strong><br />
underside of <strong>the</strong> instrument.<br />
To protect <strong>the</strong> Knobs, Wheels and Sliders from<br />
damage, place <strong>the</strong> keyboard so <strong>the</strong> four corners are<br />
supported by something that provides sufficient<br />
support like magazines or cushions. Place supports at<br />
all four corners, taking care not to touch <strong>the</strong> Knobs,<br />
Wheels and Sliders.<br />
View of <strong>the</strong> keyboard from <strong>the</strong> bottom<br />
Since <strong>the</strong> instrument—particularly <strong>the</strong> MOTIF <strong>XS</strong>8—is very<br />
heavy, this procedure should not be done alone, but by two or<br />
three people.<br />
3 Remove <strong>the</strong> cover from <strong>the</strong> bottom.<br />
With <strong>the</strong> rear panel of <strong>the</strong> MOTIF <strong>XS</strong> facing you, remove<br />
<strong>the</strong> screws from <strong>the</strong> cover by using <strong>the</strong> Phillips<br />
screwdriver. After removing <strong>the</strong> screws, slide <strong>the</strong> cover<br />
away to remove it.<br />
Important<br />
Keep <strong>the</strong> removed screws in a safe place. They will be used<br />
when re-attaching <strong>the</strong> cover to <strong>the</strong> instrument after installing<br />
<strong>the</strong> DIMMs.<br />
↑ Rear side<br />
Place supports at all four corners, taking care<br />
not to touch <strong>the</strong> Knobs, Wheels and Sliders.<br />
CAUTION<br />
Bottom<br />
MOTIF <strong>XS</strong> Owner’s <strong>Manual</strong> 295<br />
Appendix
Appendix<br />
296<br />
Installing Optional Hardware<br />
4 Insert <strong>the</strong> two DIMMs into <strong>the</strong> DIMM sockets.<br />
Location for DIMM installation<br />
DIMM sockets<br />
Installing <strong>the</strong> DIMM modules to <strong>the</strong> sockets<br />
Make sure that <strong>the</strong> DIMM module is aligned correctly before<br />
you install it.<br />
Notch for alignment<br />
Ejector lever<br />
4-1 Press <strong>the</strong> ejector levers to <strong>the</strong> outside of <strong>the</strong><br />
socket.<br />
4-2 Insert <strong>the</strong> DIMM vertically in <strong>the</strong> socket.<br />
Press <strong>the</strong> DIMM in firmly until it “snaps” or locks in<br />
place.<br />
Confirm whe<strong>the</strong>r or not both <strong>the</strong> levers are firmly<br />
locked.<br />
MOTIF <strong>XS</strong> Owner’s <strong>Manual</strong><br />
5 Re-install <strong>the</strong> cover you removed in step 3, in<br />
reverse order.<br />
6 Check that <strong>the</strong> installed DIMMs are functioning<br />
properly.<br />
Set <strong>the</strong> MOTIF <strong>XS</strong> right-side up, and connect <strong>the</strong> power<br />
cord to <strong>the</strong> rear-panel AC IN jack and an AC outlet. Turn<br />
on <strong>the</strong> power, go to <strong>the</strong> Sampling display by pressing<br />
<strong>the</strong> [INTEGRATED SAMPLING] button, and press <strong>the</strong><br />
[F6] Rec button <strong>the</strong>n [SF6] INFO button (page 165). If<br />
<strong>the</strong> DIMMs have been installed properly, <strong>the</strong><br />
appropriate available memory size is indicated in <strong>the</strong><br />
display.<br />
n NOTE If <strong>the</strong> DIMMs have not been installed properly, <strong>the</strong><br />
MOTIF <strong>XS</strong> may freeze when you press <strong>the</strong> [INTEGRATED<br />
SAMPLING] button. If this occurs, turn <strong>the</strong> power off,<br />
perform <strong>the</strong> instructions above again, and make sure to<br />
install <strong>the</strong> DIMMs firmly in step 4.<br />
Removing DIMMs<br />
1 Press <strong>the</strong> ejector lever until <strong>the</strong> DIMM unlocks.<br />
2 Pull <strong>the</strong> DIMM vertically out of <strong>the</strong> socket.
Keyboards MOTIF <strong>XS</strong>8<br />
MOTIF <strong>XS</strong>7<br />
MOTIF <strong>XS</strong>6<br />
Tone Generator<br />
block<br />
Specifications<br />
88 keys, Balanced Hammer Effect Keyboard (Initial Touch/Aftertouch)<br />
76 keys, FSX Keyboard (Initial Touch/Aftertouch)<br />
61 keys, FSX Keyboard (Initial Touch/Aftertouch)<br />
Tone Generator AWM2, with Expanded Articulation<br />
Polyphony 128 notes<br />
Multi Timbral 16 Parts (internal), Audio Input Parts (A/D, mLAN*)<br />
Capacity<br />
*1 stereo Part<br />
Wave 355MB (when converted to 16-bit linear format), 2,670 waveforms<br />
Voice Preset: 1,024 Normal Voices + 64 Drum Kits<br />
GM: 128 Normal Voices + 1 Drum Kit<br />
User: 128 x 3 (selected and copied from Preset bank), Normal Voice + 32 Drum Kits<br />
Performance User: 128 x 3 (up to 4 Parts)<br />
Filter 18 types<br />
Effect System Reverb x 9 types, Chorus x 22 types, Insertion (A, B) x 53 types x 8 Parts (up to 16 units),<br />
Vocoder x 1 (uses both Insertion Effect A and B blocks), Master Effect x 9 types<br />
(Preset settings for parameters of each effect type are provided as templates; total 320)<br />
Master EQ (5 bands), Part EQ (3 bands, stereo)<br />
Sampling block Samples Up to 1,024 Waveforms (Multi Samples)<br />
Up to 128 Key Banks per Waveform<br />
Up to 4,096 Key Banks<br />
Sampling Sources Analog input L/R, Stereo output (Resampling)<br />
mLAN (available on <strong>the</strong> MOTIF <strong>XS</strong>6 and 7 when <strong>the</strong> mLAN16E2 has been installed)<br />
A/D Conversion 24-bit, 64x oversampling<br />
D/A Conversion 24-bit,128x oversampling<br />
Sample Data Bits 16<br />
Sampling Frequency 44.1kHz, 22.05kHz, 11.025kHz, 5.5125kHz (Stereo/Mono)<br />
Sampling Frequency via mLAN (when <strong>the</strong> mLAN16E2 has been installed): 44.1kHz (fixed)<br />
Sampling Memory Optionally installed, expandable to 1GB (512MB DIMM x 2 slots)<br />
*DIMMs are not installed to <strong>the</strong> instrument when shipped from <strong>the</strong> factory.<br />
Sample Length Mono: 32 MB<br />
Stereo: 64 MB<br />
Sampling Time 44.1kHz: 6 min. 20 sec.<br />
22.05kHz: 12 min. 40 sec.<br />
11.025kHz: 25 min. 20 sec.<br />
5.0125kHz: 55 min. 40 sec.<br />
*Mono/Stereo<br />
Sample Format Original format, WAV, AIFF<br />
Sequencer block Note Capacity Approx. 130,000 notes<br />
Note Resolution 480 ppq (parts per quarter note)<br />
Maximum Polyphony 124 notes<br />
Tempo (BPM) 5 – 300<br />
Recording type Real time replace<br />
Real time overdub (with <strong>the</strong> exception of <strong>the</strong> Pattern Chain)<br />
Real time punch in/out (Song only)<br />
Tracks Pattern: 16 Phrase tracks<br />
Pattern Chain: Pattern track, Tempo track, Scene track<br />
Song: 16 sequence tracks (Loop on/off can be set for each track), Tempo track, Scene<br />
track<br />
Patterns 64 Patterns (x 16 sections), Measures: 256 maximum<br />
Mixing Voices: 16 Voices per Pattern and up to 256 Voices for all Patterns<br />
Mixing Templates: 32 for all Songs and Patterns<br />
Phrases User Phrases: 256 per Pattern<br />
Songs 64 Songs<br />
Mixing Voices: 16 Voices per Song and up to 256 Voices for all Songs<br />
Mixing Templates: 32 for all Songs and Patterns<br />
Arpeggio Preset: 6,633 types<br />
User: 256 types<br />
*MIDI Sync, MIDI transmit/receive channel, Velocity Limit, and Note Limit can be set.<br />
MOTIF <strong>XS</strong> Owner’s <strong>Manual</strong> 297<br />
Appendix
Appendix<br />
298<br />
Specifications<br />
Sequencer block Scene Memory 5 per Song<br />
Sequence Format Original format, SMF format 0, 1 (Format 1 load only)<br />
O<strong>the</strong>rs Master User: 128<br />
*8 Zones (Master keyboard settings), Assignable Knob/Slider settings, Program Change Table<br />
Sequence Software<br />
<strong>com</strong>patible with <strong>the</strong><br />
For Windows<br />
Remote Control<br />
function<br />
® : Cubase 4, SONAR 5.2<br />
For Macintosh ® : Cubase 4, Logic 7.2, Digital Performer 5.1<br />
*Functions to be controlled differ depending on <strong>the</strong> software.<br />
*Specifications and descriptions in this owner's manual are for information purposes only. Yamaha Corp. reserves <strong>the</strong> right to change or modify products or<br />
specifications at any time without prior notice. Since specifications, equipment or options may not be <strong>the</strong> same in every locale, please check with your Yamaha<br />
dealer.<br />
MOTIF <strong>XS</strong> Owner’s <strong>Manual</strong><br />
Controllers Pitch Bend wheel, Modulation wheel, Ribbon Controller, Assignable Control Sliders x 8,<br />
Assignable Knobs x 8, Assignable Function buttons x 2, Data dial<br />
Display 320 x 240 dot, 5.7 inch graphic color backlit LCD<br />
Connectors OUTPUT L/MONO, R (standard phone jack)<br />
ASSIGNABLE OUTPUT L, R (standard phone jack)<br />
A/D INPUT L, R (standard phone jack)<br />
DIGITAL OUT<br />
PHONES (standard stereo phone jack)<br />
FOOT CONTROLLER 1, 2<br />
FOOT SWITCH x 2 (SUSTAIN, ASSIGNABLE)<br />
MIDI IN/OUT/THRU<br />
USB (TO HOST, TO DEVICE)<br />
AC IN<br />
ETHERNET<br />
mLAN (MOTIF <strong>XS</strong>8 only)<br />
Power Consumption 30W<br />
Dimensions, Weight MOTIF <strong>XS</strong>8: 1,457 (W) x 466 (D) x 168 (H) mm, 28.6 kg<br />
MOTIF <strong>XS</strong>7: 1,252 (W) x 391 (D) x 122 (H) mm, 17.0 kg<br />
MOTIF <strong>XS</strong>6: 1,045 (W) x 391 (D) x 122 (H) mm, 14.8 kg<br />
Accessories AC Power cord, Media (disc) x 1, Owner’s <strong>Manual</strong> (this book), Data List
Symbols<br />
.AIF ..........................................................273, 274<br />
.MID .........................................................273, 274<br />
.WAV ........................................................273, 274<br />
.X0A .........................................................273, 274<br />
.X0E .................................................................274<br />
.X0G ........................................................273, 274<br />
.X0P .........................................................273, 274<br />
.X0S .........................................................273, 274<br />
.X0V .........................................................273, 274<br />
.X0W ........................................................273, 274<br />
Numerics<br />
1/4 Shift .............................................................99<br />
1/4 tone .............................................................99<br />
1/8 tone .............................................................99<br />
1st-on ..............................................................106<br />
2 Band .............................................................126<br />
A<br />
A Mod ..............................................................125<br />
A. Function 1/2 ................................................256<br />
A. Function 1/2 Control No. .............................147<br />
A. Function 1/2 Mode ..............................100, 145<br />
A/D ..................................................................234<br />
A/D INPUT jacks ..........................................18, 40<br />
AC IN (AC Power Cord Socket) ..................16, 19<br />
Accent Phrase ...................................................64<br />
Accent Start Quantize .............................103, 157<br />
Accent Vel Threshold ..............................103, 157<br />
Accuracy .........................................................174<br />
AEG (Amplitude EG) .................94, 123, 139, 157<br />
AF1/2 ...........................................................25, 92<br />
Aftertouch ..........................................................78<br />
AI driver .............................................................44<br />
AIFF .................................................................273<br />
All ....................................................................273<br />
All Arpeggio ............................................273, 274<br />
All Parameters .........................133, 159, 236, 258<br />
All Pattern ................................................273, 274<br />
All Song ...................................................273, 274<br />
All Sound Off .....................................................78<br />
All Track ..................................................188, 190<br />
All Voice ..........................................................273<br />
All Waveform ...........................................273, 274<br />
all without system ............................................273<br />
Alternate Group ...............................................130<br />
Alternate Pan ...........................................123, 132<br />
Amplitude ..........................................57, 122, 131<br />
Amplitude EG ..................................................132<br />
Append Pattern ...............................................227<br />
Append Phrase ...............................................224<br />
Apply .......................................................217, 249<br />
Arabic 1/2/3 .......................................................99<br />
ARP Category ..................................................206<br />
ARP Common Switch ......................................145<br />
ARP FX ......................................90, 100, 145, 181<br />
ARP Main .................................101, 128, 154, 235<br />
ARP MIDI Out Switch ......................................264<br />
ARP No. ...........................................................206<br />
ARP O<strong>the</strong>r ...............................102, 128, 156, 235<br />
ARP Sync Quantize Value ...............................145<br />
ARP Transmit Ch .............................................264<br />
ARP1 – ARP5 .......92, 95, 102, 138, 141, 155, 252<br />
Arpeggio .............93, 95, 138, 139, 188, 189, 219<br />
Hold on/off ...............................................136<br />
Performance ............................................135<br />
play ............................................................24<br />
playback on/off ........................................136<br />
Arpeggio Block .................................................62<br />
Index<br />
Arpeggio Category ........................................... 62<br />
[ARPEGGIO ON/OFF] button ............................ 13<br />
Arpeggio playback<br />
Pattern ....................................................... 66<br />
Performance .............................................. 66<br />
Voice Play .................................................. 65<br />
Arpeggio Sub Category .................................... 62<br />
Arpeggio Switch ............................................... 39<br />
Arpeggio Type<br />
create ........................................................ 66<br />
Drum Voice ................................................ 65<br />
name .......................................................... 62<br />
non-note events ......................................... 65<br />
Normal Voice ............................................. 64<br />
AS1/2 .......................................................... 25, 92<br />
ASSIGN 1/2 ....................................................... 90<br />
Assign 1/2 Control No. .................................... 147<br />
Assign 1/2 Value ..................................... 100, 145<br />
Assign L&R Gain ............................................ 263<br />
Assign Mode ................................................... 130<br />
Assign Settings ................................................. 92<br />
ASSIGNABLE FUNCTION [1] / [2] buttons . 12, 67<br />
ASSIGNABLE OUT L and R jacks .................... 18<br />
ATTACK ............................................................ 90<br />
Attack Level .................................... 116, 120, 123<br />
Attack Time ............................. 115, 120, 123, 132<br />
Audio .............................................................. 232<br />
Audio channel ................................................... 46<br />
Audio In .................................................. 147, 234<br />
Audio In/Out .................................................... 263<br />
Audio Input block ............................................. 59<br />
Audio Recording ............................................. 242<br />
Audio track ....................................................... 61<br />
Audition ........... 162, 167, 169, 170, 172, 246, 248<br />
Auto Load ....................................................... 262<br />
B<br />
Band Elimination Filter .................................... 118<br />
Band Pass Filter .............................................. 117<br />
BANK .............................................................. 140<br />
Bank ...... 93, 95, 99, 102, 138, 151, 155, 232, 238<br />
Bank buttons ..................................................... 14<br />
Bank LSB ........................................................ 256<br />
Bank MSB ....................................................... 256<br />
Bank Select ..................................................... 268<br />
Basic Receive Ch ........................................... 267<br />
BEAT ....................................................... 193, 215<br />
Beat ................................ 182, 187, 210, 219, 270<br />
Beat Stretch .................................................... 203<br />
beat1 – 3 ......................................................... 249<br />
BEF (Band Elimination Filter) .......................... 118<br />
BEF12 ............................................................. 118<br />
BEF6 ............................................................... 118<br />
Boost 12 .......................................................... 126<br />
Boost 18 .......................................................... 126<br />
Boost 6 ............................................................ 126<br />
BPF (Band Pass Filter) .................................... 117<br />
BPF1 – 10 Gain ............................................... 110<br />
BPF12D ........................................................... 117<br />
BPF6 ............................................................... 118<br />
BPFw ............................................................... 118<br />
Break 1 – 16 .................................................... 217<br />
Break Point 1 – 4 ..................................... 121, 124<br />
Breath ............................................................. 104<br />
Breath Controller Control No. .......................... 147<br />
Brightness ......................................................... 77<br />
Bulk ......................................... 134, 160, 238, 258<br />
Bulk Dump Interval ......................................... 269<br />
C<br />
Cancel .............................................................217<br />
CAT (Channel Aftertouch) .........................78, 193<br />
CATEGORY .....................................................140<br />
Category .............92, 95, 102, 109, 137, 138, 149,<br />
........................................................155, 231, 267<br />
Category Search ...............................................24<br />
[CATEGORY SEARCH] button ..........................15<br />
Center Key ..............115, 117, 119, 121, 122, 124<br />
Ch After Touch ................................................256<br />
Chain .......................................183, 185, 211, 213<br />
Chain Edit ........................................................214<br />
Chain Number .................................................185<br />
Chain Record ..................................................214<br />
Change Timing ........................................101, 154<br />
Channel Aftertouch (CAT) .................................78<br />
Channel number ................................................52<br />
CHAR ................................................................82<br />
character input ..................................................82<br />
CHO SEND ......................................................129<br />
Cho Send ........................................................232<br />
CHORUS ...........................................................90<br />
Chorus ...............71, 109, 129, 149, 150, 235, 260<br />
Chorus Category/Type ............................108, 149<br />
Chorus Pan ..............................................108, 149<br />
Chorus Return .........................................108, 149<br />
Chorus Send ...........108, 130, 145, 148, 152, 266<br />
CHORUS TO REVERB .............................108, 149<br />
Clear ................................................................212<br />
Clear All ...........................................................194<br />
Clear Pattern ...................................................228<br />
Clear Pattern Chain .........................................228<br />
Clear Phrase ....................................................225<br />
Clear Sample Voice .........................................226<br />
Clear Song ......................................................207<br />
Clear Track ..............................................205, 226<br />
Click ................................................188, 220, 270<br />
CLOCK ....................................................193, 215<br />
Clock .......................................................200, 202<br />
Clock Out ........................................................268<br />
Clock Shift .......................................................184<br />
Coarse .....................................................114, 131<br />
Coarse Tune ....................................................170<br />
Com LFO .........................................................105<br />
Combination Type Filter ..................................118<br />
Common ..........................................................258<br />
Common Edit .....................96, 127, 141, 229, 253<br />
Master ......................................................254<br />
Mixing .......................................................233<br />
Mixing Voice .............................................241<br />
Performance .............................................143<br />
Voice ..................................................98, 128<br />
[COMMON EDIT] button ...................................15<br />
Common Parameters ......................133, 159, 236<br />
Common Switch ..............................................139<br />
Compare function ......................97, 142, 233, 240<br />
Compressor .......................................................72<br />
Confirm ....................................................166, 246<br />
Confirm Password ...........................................262<br />
Connect ...................107, 128, 148, 149, 234, 266<br />
Connection<br />
external MIDI instruments ..........................83<br />
LAN ............................................................86<br />
MTR ............................................................84<br />
USB storage device ...................................85<br />
Control .............................................256, 264, 267<br />
Control Change (CC) ........................................77<br />
Control Depth ..................................................106<br />
Control Dest ....................................................106<br />
Control Function ........................................92, 138<br />
Control Knob No. .............................................257<br />
Control Slider No. ............................................257<br />
MOTIF <strong>XS</strong> Owner’s <strong>Manual</strong> 299<br />
Appendix
Appendix<br />
300<br />
Index<br />
Control Sliders .............................13, 68, 137, 180<br />
function .......................................................91<br />
Control Sliders 1 – 8 ........................................252<br />
Controller Assign .............................................264<br />
Controller Block .................................................67<br />
Controller Reset ...............................................269<br />
Controller Set ...................................................104<br />
Convert Pitch ...................................................174<br />
Convert to Song ...............................................215<br />
Convert Type ...................................................206<br />
Copy 134, 160, 172, 176, 212, 215, 237, 241, 265<br />
Copy Event ......................................................201<br />
Copy Part .........................................................237<br />
Copy Pattern ....................................................227<br />
Copy Pattern Chain .........................................227<br />
Copy Performance ..........................................237<br />
Copy Performance Parameters .......................141<br />
Copy Phrase ............................................206, 223<br />
Copy Sample Voice .206, 207, 212, 223, 225, 228<br />
Copy Song .......................................................207<br />
Copy Track ..............................................204, 226<br />
Copy Voice ......................................................237<br />
Create Continuous Data ..................................202<br />
Create Measure ...............................................203<br />
Create Roll .......................................................199<br />
Crescendo .......................................................198<br />
Ctrl Asgn ..................................................147, 234<br />
Ctrl Set .....................................................104, 128<br />
Cubase ................................................49, 52, 267<br />
Current Password ............................................262<br />
Current Pattern Phrase ....................................212<br />
Current Performance .......................................160<br />
Current settings ...............................................271<br />
Current Voice ...................................................134<br />
Currently edited Part .......................................237<br />
Cursor buttons .............................................14, 81<br />
Curve ...............................................................202<br />
CUTOFF .............................................................90<br />
Cutoff .......................................................118, 131<br />
Cutoff Key Follow .............................................119<br />
Cutoff Velocity Sens ................................118, 131<br />
Cycle ...............................................................107<br />
D<br />
Data Decrement ................................................77<br />
Data dial ......................................................14, 81<br />
Data Entry LSB ..................................................77<br />
Data Entry MSB .................................................77<br />
Data Increment ..................................................77<br />
Data indicator ..................................................210<br />
Data Range .....................................................202<br />
Data status ......................................................182<br />
Data Type ........................................205, 237, 238<br />
Data type of <strong>the</strong> destination ............................160<br />
Data type of <strong>the</strong> destination Voice ..................134<br />
Data type of <strong>the</strong> source ...................................160<br />
Data type of <strong>the</strong> source Voice .........................134<br />
Data type to be cleared ...........................205, 226<br />
Data Type to be copied ...........................204, 226<br />
DAW (digital audio workstation) ........................47<br />
DAW Settings ..................................................267<br />
DAW Type .......................................................267<br />
[DEC/NO] button .........................................14, 81<br />
DECAY ...............................................................90<br />
Decay 1 Level ..........................116, 120, 123, 132<br />
Decay 1 Time ..........................115, 120, 123, 132<br />
Decay 2 Level ..................................116, 120, 123<br />
Decay 2 Time ..........................115, 120, 123, 132<br />
Delay .................................................71, 106, 125<br />
Delay Tempo ...................................................113<br />
Delay Tempo Sync ..........................................113<br />
Delete ..............................173, 177, 194, 241, 276<br />
Delete All .........................................................177<br />
Delete Measure ...............................................204<br />
Delete range ....................................................204<br />
Demo data .........................................................21<br />
MOTIF <strong>XS</strong> Owner’s <strong>Manual</strong><br />
Demo Song<br />
load ............................................................ 21<br />
play ............................................................ 21<br />
Depth .............................................................. 104<br />
Depth Offset 1 – 8 ........................................... 106<br />
Description ...................................................... 261<br />
Destination ...................................................... 104<br />
Destination Key Bank .............................. 172, 173<br />
Destination Location ....................................... 215<br />
Destination Measure ....................................... 225<br />
Destination Mixing Voice ................................. 241<br />
Destination Parts ............................................. 238<br />
Destination Pattern .................................. 227, 228<br />
Destination Phrase .......................... 223, 224, 225<br />
Destination Song ............................. 207, 215, 225<br />
Destination Song and Track ............................ 204<br />
Destination Track .................................... 225, 226<br />
Detune ............................................................. 152<br />
Device ............................................. 272, 275, 278<br />
Device Number ............................................... 268<br />
DHCP Client .................................................... 261<br />
Dial Function ..................................................... 53<br />
DIGITAL OUT connector ................................... 18<br />
Digital Performer ............................................... 52<br />
DIMM ......................................................... 79, 295<br />
Dir .................................................................... 275<br />
direct ............................................................... 155<br />
Direction .......................................................... 201<br />
Directory .......................................................... 275<br />
Directory (Dir) .................................................. 272<br />
Display .................................................... 169, 248<br />
Distance .......................................................... 119<br />
Distortion ........................................................... 71<br />
Divide Drum Track .................................. 205, 226<br />
DNS1/2 ............................................................ 261<br />
Domain ............................................................ 261<br />
down ............................................................... 200<br />
down&up ......................................................... 200<br />
DRAM ................................................................ 79<br />
Drum Key .................................. 57, 134, 165, 245<br />
Drum Voice ....................................................... 56<br />
Drum Voice Edit .............................................. 127<br />
Dry Level ......................................... 148, 153, 266<br />
Dry/Wet Balance ............................................. 110<br />
Dual BEF ......................................................... 118<br />
Dual BPF ......................................................... 118<br />
Dual HPF ......................................................... 118<br />
Dual LPF .......................................................... 118<br />
Dual Type Filter ............................................... 118<br />
Duplication symbol ......................................... 162<br />
E<br />
[E] Indicator ........ 91, 97, 138, 142, 233, 240, 254<br />
each-on ........................................................... 106<br />
Edit .................................................................. 231<br />
Edit Buffer ......................................................... 79<br />
Edit Recall ............................................... 134, 159<br />
Effect ................. 93, 107, 128, 138, 149, 232, 234<br />
Effect Block ....................................................... 68<br />
Effect Bypass .................................................. 260<br />
EFFECT BYPASS [INSERTION] button ............. 13<br />
EFFECT BYPASS [SYSTEM] button .................. 13<br />
Effect Category ................................................. 70<br />
Effect connection<br />
Mixing ........................................................ 70<br />
Performance .............................................. 69<br />
Voice .......................................................... 69<br />
Effect Parameters ...... 73, 109, 146, 149, 150, 267<br />
Effect Type ........................................................ 70<br />
Effect Unit Settings .......................................... 160<br />
Effects ....................................................... 93, 138<br />
EG (Envelope Generator) ........ 138, 139, 157, 235<br />
EG Depth ................................................ 116, 120<br />
EG Depth Vel Curve ........................................ 116<br />
EG Depth Vel Sens ................................. 116, 120<br />
EG Depth Vel Sens Curve ............................... 120<br />
EG Time Key Follow ........................ 116, 121, 124<br />
EG Time Segment ........................................... 116<br />
EG Time Velocity Sens ................... 116, 121, 124<br />
EG Time Velocity Sens Segment ............ 121, 124<br />
EG/EQ ......................................................... 93, 94<br />
Element ............................................................. 57<br />
on/off ................................................. 97, 240<br />
solo .................................................... 97, 240<br />
Element Edit ...................................... 96, 112, 241<br />
Element EQ ....................................................... 68<br />
Element Group ................................................ 113<br />
Element Out 1 – 8 ........................................... 108<br />
Element Parameters 1 – 8 ............................... 133<br />
Element Switch ......................... 93, 104, 112, 129<br />
Element Switch 1 – 8 ...................................... 106<br />
Elm LFO .......................................................... 125<br />
End ................................................................. 185<br />
end .................................................................. 185<br />
End Point ................................................ 169, 247<br />
End Step ......................................................... 199<br />
End Velocity .................................................... 199<br />
EQ ..................................... 95, 126, 132, 158, 236<br />
EQ graph .......................................................... 95<br />
EQ HIGH ........................................................... 90<br />
EQ LOW ............................................................ 90<br />
EQ MID ............................................................. 90<br />
EQ MID F .......................................................... 90<br />
EQ MID Q ......................................................... 90<br />
EQ Type .......................................................... 126<br />
2 Band ..................................................... 126<br />
PEQ ......................................................... 126<br />
Equal ................................................................. 99<br />
Erase ............................................................... 220<br />
Erase Event ..................................................... 201<br />
ETHERNET connector ................................ 16, 86<br />
Event and Parameters .................................... 193<br />
Event Jobs .............................................. 200, 223<br />
Event List display ............................ 192, 193, 221<br />
Event Type .............. 194, 201, 202, 203, 215, 216<br />
Exchange Phrase ........................................... 224<br />
Exchange Track ...................................... 205, 226<br />
[EXIT] button ..................................................... 14<br />
Expanded Articulation (XA) ...................... 56, 113<br />
Ext ........................................................... 184, 211<br />
Ext Bank Select ............................................... 256<br />
Ext Prog Change ............................................ 256<br />
Ext Switch (External Switch) ........................... 255<br />
Extension ........................................................ 272<br />
Extensions for Steinberg DAW ......................... 48<br />
Extract ............................................................. 177<br />
Extract Event ................................................... 201<br />
F<br />
F Mod .............................................................. 125<br />
[F1] – [F6] (Function) buttons ..................... 14, 81<br />
Factory Set ................................................ 22, 269<br />
Fade In Time ........................................... 106, 125<br />
Fade In/Out ..................................................... 174<br />
Fade Out Time ................................................ 106<br />
Fade Type ....................................................... 174<br />
Favorite Category ............................................. 88<br />
FEG (Filter EG) .......................... 94, 119, 139, 157<br />
File .................................................. 272, 275, 276<br />
procedure ................................................ 276<br />
File list ............................................................. 275<br />
File Name ........................................................ 272<br />
File Save ......................................................... 278<br />
File Server ....................................................... 261<br />
File Server Account ........................................ 261<br />
File Sharing ....................................................... 87<br />
File size ........................................................... 272<br />
File type .......................................................... 273<br />
File Type Setting ............................................. 275<br />
Filter ............................ 57, 94, 117, 131, 139, 158<br />
Filter (MIDI Filter) ............................................ 270<br />
Fine ................................................. 114, 131, 174
Fine Scaling Sens ............................................114<br />
Fine Tune .........................................................170<br />
fingered ...................................................100, 152<br />
Fixed Velocity ..................................................260<br />
Flanger ..............................................................71<br />
Flash ROM .........................................................79<br />
folder ...............................................................272<br />
Foot Controller 1/2 ...........................................256<br />
Foot Controller 1/2 Control No. ........................147<br />
FOOT CONTROLLER jacks ...............................18<br />
Foot Switch ......................................................256<br />
Foot Switch Control No. ...................................147<br />
FOOT SWITCH jacks .........................................18<br />
Formant Offset .................................................110<br />
Formant Shift ...................................................110<br />
Format .............................................273, 276, 278<br />
[H] (Forward) button .......................................14<br />
Frequency .......................146, 158, 162, 165, 244<br />
Front Panel ........................................................10<br />
fulltime .....................................................100, 152<br />
FXBypass ........................................................260<br />
G<br />
Gain .................................................119, 146, 158<br />
GAIN knob .............................................18, 39, 40<br />
Gate Switch .....................................................110<br />
GATE TIME ........................................................90<br />
Gate Time ........................................................197<br />
Gate Time Rate ...............102, 103, 155, 156, 184<br />
Gateway ..........................................................261<br />
General ..............................98, 128, 143, 233, 259<br />
Get Name ........................................................255<br />
Get Phrase from Song .....................................225<br />
Glide ................................................................199<br />
Glide Time .......................................................199<br />
GM .....................................................................92<br />
GM Voice ...........................................................92<br />
Graph ..............................................................105<br />
Grid .................................................................200<br />
Group [A] – [H] buttons .....................................14<br />
H<br />
Half Damper Switch ........................................123<br />
Half Damper Time ...........................................124<br />
Half Sampling Frequency ................................175<br />
High Frequency .......................................126, 144<br />
High Gain ................................................126, 144<br />
High Pass Filter ...............................................117<br />
HOLD ..............................................................140<br />
Hold ...........................................95, 101, 106, 154<br />
Hold Level ...............................................115, 120<br />
Hold Time ................................................115, 120<br />
Host .................................................................277<br />
Host Name ......................................................260<br />
HPF (High Pass Filter) .....................................117<br />
HPF Cutoff ...............................................119, 131<br />
HPF Freq .........................................................110<br />
HPF Key Follow ...............................................119<br />
HPF Output Level ............................................110<br />
HPF12 ..............................................................117<br />
HPF24D ...........................................................117<br />
I<br />
I/O ....................................................................263<br />
IEEE1394 cable .................................................44<br />
[INC/YES] button .........................................14, 81<br />
Indian ................................................................99<br />
INFO ................................................................138<br />
INFO (Information) ........53, 92, 93, 138, 165, 172,<br />
........................................182, 211, 240, 252, 259<br />
Init ............................................133, 159, 236, 258<br />
Initial Level ......................................................123<br />
Initialize selected Parts to GM .........................237<br />
Initialize <strong>the</strong> settings of <strong>the</strong> waveform assigned to<br />
<strong>the</strong> selected Key ............................................. 134<br />
Initialize <strong>the</strong> settings of <strong>the</strong> waveforms assigned to<br />
<strong>the</strong> selected Elements .................................... 133<br />
Initialize Type .................................................. 258<br />
Input Source ........................................... 164, 244<br />
Ins A ................................ 109, 129, 149, 234, 267<br />
Ins B ................................ 109, 129, 149, 234, 267<br />
Ins Effect Output ..................................... 114, 130<br />
Ins Effect Sw ........................................... 188, 219<br />
Ins FX Sw ........................................................ 232<br />
Ins L ................................................................ 109<br />
Ins Switch (Insertion Effect Switch) ................. 234<br />
Insert ....................................................... 194, 216<br />
Insert Event window ................ 192, 193, 216, 221<br />
Inserting location ............................................ 216<br />
Insertion A/B ............................. 69, 108, 148, 266<br />
INSERTION CONNECT ................... 108, 148, 266<br />
Insertion Effect .......................................... 68, 230<br />
Insertion point ................................................. 204<br />
Inst Input Level ............................................... 110<br />
Installing Optional Hardware .......................... 293<br />
Int ............................................................ 184, 211<br />
Int Bank Select ................................................ 255<br />
Int Prog Change .............................................. 256<br />
Int Switch (Internal Switch) ............................. 255<br />
Internal Memory ................................................ 79<br />
Interval ............................................................ 217<br />
Interval diagram .............................................. 217<br />
IP Address ...................................................... 261<br />
J<br />
Job<br />
K<br />
Master ...................................................... 257<br />
Mixing ...................................................... 236<br />
Mixing Voice ............................................ 240<br />
Pattern ..................................................... 222<br />
Performance ............................................ 159<br />
Sampling ................................................. 171<br />
Song ........................................................ 195<br />
Voice ........................................................ 133<br />
KBD .................................................. 82, 162, 172<br />
Keep Original Phrase .............................. 227, 228<br />
Key .................................. 129, 162, 166, 169, 246<br />
Key Assign Mode ............................................ 100<br />
Key Bank ........................ 161, 173, 174, 175, 176<br />
Key Bank number ........................................... 162<br />
Key Bank to be deleted .................................. 173<br />
Key Edit ................................................... 127, 129<br />
Key Mode ............................................... 101, 155<br />
Key On Delay .................................................. 113<br />
Key On Reset .......................................... 105, 125<br />
Key On Start Switch ........................................ 141<br />
Key Parameters .............................................. 134<br />
Key Range .............................................. 170, 245<br />
Keybank .......................................... 165, 172, 244<br />
Keybank Jobs ................................................. 162<br />
Keyboard .................................................... 12, 67<br />
Keyboard MIDI transmit channel ...................... 91<br />
Keyboard Octave setting .................................. 91<br />
Keyboard Start ................................ 210, 214, 219<br />
Keyboard Transmit Ch .................................... 268<br />
Kirnberger ......................................................... 99<br />
Knob ............................................................... 256<br />
Knob Control Assign ............................... 100, 145<br />
Knob Ctrl Assign ............................................. 255<br />
Knob Functions/Values ..................................... 52<br />
Knobs ................................... 12, 26, 68, 136, 180<br />
Function ..................................................... 90<br />
Knobs 1 – 8 ..................................................... 252<br />
KnobSlider ...................................................... 257<br />
L<br />
L&R Gain .........................................................263<br />
LAN connection .................................................86<br />
Layer .................................................................29<br />
LCD Contrast Control ..................................16, 20<br />
LCD Display ......................................................14<br />
Length .....................................174, 210, 212, 219<br />
Level ........................................122, 131, 145, 170<br />
level .........................................................166, 246<br />
Level 1 – 16 .....................................................107<br />
Level Key Follow .............................................122<br />
LEVEL METER ...................................................52<br />
Level Meter ..............................................166, 246<br />
Level Velocity Sens .........................................122<br />
Level Velocity Sens Curve ...............................122<br />
Level Velocity Sens Offset ...............................122<br />
Level/MEF ........................................................145<br />
Level/Pan .........................................................122<br />
LFO (Low Frequency Oscillator) .......................58<br />
LFO Phase Offset ............................................107<br />
LIST ...................................................................82<br />
Load ................................................273, 275, 280<br />
a AIFF file .................................................284<br />
a Pattern ...................................................283<br />
a Performance ..........................................282<br />
a Sample Voice ........................................283<br />
a SMF file .................................................285<br />
a Song ......................................................283<br />
a specific type ..........................................280<br />
a Voice .....................................................280<br />
a WAV file .................................................284<br />
a Waveform ..............................................281<br />
all user data .............................................280<br />
all voice ....................................................280<br />
Load File ..........................................................280<br />
Load Mixing .....................................................271<br />
Local Control ...................................................269<br />
Location ...........................................................182<br />
Lo-Fi ..................................................................72<br />
Logic .................................................................52<br />
Loop ................................103, 156, 182, 185, 219<br />
Loop Point ...............................................169, 247<br />
Loop-Remix .....................................................175<br />
Low Frequency ........................................126, 144<br />
Low Frequency Oscillator (OSC) ......................58<br />
Low Gain .................................................126, 144<br />
Low Pass Filter ................................................117<br />
Lower Ch .........................................................258<br />
Lowest Key ......................................................176<br />
LP=ST ......................................................169, 248<br />
LPF (Low Pass Filter) .......................................117<br />
LPF12+BPF6 ...................................................118<br />
LPF12+HPF12 .................................................118<br />
LPF18 ..............................................................117<br />
LPF18s ............................................................117<br />
LPF24A ............................................................117<br />
LPF24D ............................................................117<br />
LPF6+HPF6 .....................................................118<br />
M<br />
Main Category .................................................143<br />
Main Category 1/2 .......................................93, 98<br />
manual .....................................................166, 246<br />
Master Edit ......................................................253<br />
Master Effect .....................................................68<br />
[MASTER EFFECT] button .................................13<br />
Master EQ .........................................................68<br />
Master Job ......................................................257<br />
Master Name ...........................................251, 252<br />
Master Number ...............................................251<br />
Master Play ......................................................251<br />
Master Store ....................................................254<br />
MASTER VOLUME ......................................12, 20<br />
MasterEQ ........................................146, 234, 264<br />
MasterFX .........................................146, 234, 264<br />
Maximum Polyphony .........................................59<br />
Index<br />
MOTIF <strong>XS</strong> Owner’s <strong>Manual</strong> 301<br />
Appendix
Appendix<br />
302<br />
Index<br />
MEAS .......................................................193, 215<br />
Meas ........................................................182, 187<br />
meas (measure) ..............................................246<br />
Measure ..........................141, 169, 176, 193, 207,<br />
.........................210, 213, 219, 243, 245, 248, 249<br />
Measure Jobs ..................................................203<br />
Measure number .............................................182<br />
Mega Voice .......................................................62<br />
Mega Voice Arpeggio .......................................62<br />
Memory ............................................................254<br />
Memory location ..............................................275<br />
Memory Structure ..............................................80<br />
Meter .......................................169, 176, 248, 249<br />
Meter of measures to be inserted ...................204<br />
Metronome Settings ........................................270<br />
Mic Gate Threshold .........................................110<br />
Mic Level .........................................................110<br />
Mic/Line ...........................................................263<br />
Micro Tuning ..............................................99, 265<br />
Micro Tuning Copy ..........................................265<br />
Micro Tuning List ...............................................99<br />
Micro Tuning Name .........................................265<br />
Micro Tuning No. .............................................265<br />
Mid Frequency ................................................144<br />
Mid Gain ..........................................................144<br />
MIDI ...........................................................76, 267<br />
MIDI channel .....................................................76<br />
MIDI event .........................................................76<br />
MIDI Filter ........................................................270<br />
MIDI IN/OUT ............................................259, 268<br />
MIDI IN/OUT/THRU connectors ..................18, 83<br />
MIDI interface ....................................................44<br />
MIDI Out Channel ............................................157<br />
MIDI Out Switch ...............................................157<br />
MIDI Send ........................................................257<br />
MIDI Settings ...................................................267<br />
MIDI Sync ........................................................268<br />
MIDI track ..........................................................61<br />
Misc ...................................................................72<br />
Mix ...................................................................238<br />
Mix Phrase .......................................................224<br />
Mix Track .................................................205, 226<br />
Mixing ..................................................33, 58, 229<br />
Insertion Effect .........................................230<br />
setup ........................................................230<br />
structure ...................................................229<br />
Mixing Edit .......................................................233<br />
Mixing Job .......................................................236<br />
Mixing Play ......................................................231<br />
Mixing Setup ....................................................181<br />
Mixing Store .....................................................233<br />
Mixing Template ..............................................238<br />
Mixing Voice ....................................................230<br />
Mixing Voice Edit .............................................239<br />
Mixing Voice Job .............................................240<br />
Mixing Voice Store ...........................................240<br />
Mixing Voice to be deleted ..............................241<br />
MIXV (Mixing Voice) ........................................188<br />
mLAN .................................................................17<br />
mLAN (IEEE1394) connector 1, 2 ...............17, 44<br />
mLAN expansion board cover ..........................17<br />
mLAN Gain ......................................................263<br />
mLAN Monitor Setup .......................................263<br />
mLAN16E2 ................................................17, 294<br />
MMC (MIDI Machine Control) ....................85, 268<br />
Mode .......................................251, 252, 254, 270<br />
select ..........................................................55<br />
table ...........................................................54<br />
MODE buttons .............................................14, 20<br />
Modify Control Data .........................................203<br />
Modify Gate Time ............................................198<br />
Modify Velocity ................................................197<br />
Modulation Wheel ............................................256<br />
Modulation wheel ........................................12, 67<br />
Mono/Poly ............................................93, 99, 152<br />
Mono/Poly Mode ................................................93<br />
Mono/Stereo ............................................147, 265<br />
MOTIF <strong>XS</strong> Owner’s <strong>Manual</strong><br />
MOTIF <strong>XS</strong> Editor .............................................. 274<br />
Mount .............................................. 273, 276, 277<br />
Move ............................................................... 173<br />
MTC (MIDI Time Code) ............................. 84, 268<br />
MTC Start Offset .............................................. 268<br />
multi ......................................................... 100, 130<br />
[MULTI PART CONTROL] button ...................... 13<br />
Mute ................................ 182, 187, 210, 219, 231<br />
[MUTE] button ................................................... 15<br />
MW (Modulation Wheel) .............................. 25, 92<br />
N<br />
Name ........................... 93, 98, 128, 138, 143, 254<br />
Naming .............................................................. 82<br />
Network ........................................................... 260<br />
Network Information ........................................ 259<br />
Network Settings ............................................... 86<br />
New Dir ........................................................... 276<br />
New Password ................................................ 262<br />
New settings ................................................... 271<br />
No. ................................................................... 212<br />
Noise Input Level ............................................ 110<br />
Non-Registered Parameter Number (NRPN) .... 79<br />
normal 01 – 16 ................................................ 217<br />
Normal Voice ..................................................... 56<br />
Edit ............................................................. 96<br />
Normalize ........................................................ 173<br />
Normalize Play Effect .............................. 205, 226<br />
Note ..................................... 76, 78, 177, 199, 255<br />
Note Jobs ................................................ 196, 223<br />
Note Limit ................................ 101, 114, 152, 154<br />
Note Limit High ............................................... 255<br />
NOTE LIMIT LO-HI .......................................... 139<br />
Note Limit Low ................................................ 255<br />
Note Shift ................................... 99, 152, 184, 259<br />
NRPN (Non-Registered Parameter Number) .... 77<br />
NUM .................................................. 81, 169, 248<br />
Number ................................................... 151, 232<br />
Number [1] – [16] buttons ................................. 14<br />
number input ..................................................... 81<br />
Number of measures to be inserted ............... 204<br />
Number of Times ............................. 201, 202, 215<br />
O<br />
OCT RANGE ..................................................... 90<br />
Octave ....................... 92, 138, 177, 251, 255, 260<br />
OCTAVE [UP] and [DOWN] buttons ................. 14<br />
Octave Range ......................................... 103, 156<br />
Offset ....................................................... 198, 203<br />
Offset 1 – 4 .............................................. 121, 125<br />
one shot .................................................. 105, 170<br />
Optimize Memory ............................................ 177<br />
Original Notes Root ......................................... 206<br />
Original Pattern ....................................... 227, 228<br />
Original Phrase ............................................... 224<br />
Oscillator ........................................... 57, 112, 129<br />
O<strong>the</strong>r ............... 100, 128, 145, 153, 235, 254, 271<br />
O<strong>the</strong>r Jobs ...................................................... 177<br />
Out .......................................................... 129, 184<br />
Output ............................. 147, 152, 234, 235, 265<br />
OUTPUT L/MONO and R jacks ................... 18, 19<br />
Output Level .................................................... 110<br />
Output Octave Shift ................................. 102, 155<br />
Output Select .......................... 130, 148, 153, 266<br />
Overdub Recording ........................................ 191<br />
P<br />
P Mod .............................................................. 125<br />
Page List ........................................................... 53<br />
Page Select ....................................................... 53<br />
PageHold ........................................................ 131<br />
PAN ................................................................... 90<br />
Pan ........... 99, 122, 131, 145, 147, 152, 170, 188,<br />
........................................ 219, 232, 256, 257, 265<br />
Param ..................................................... 169, 170<br />
Param. with Voice ........................................... 151<br />
PART ............................................................... 139<br />
Part ................................. 160, 165, 231, 232, 245<br />
adjusting volume ....................................... 34<br />
mute ........................................ 135, 142, 233<br />
on/off ....................................... 135, 142, 233<br />
select ....................................................... 151<br />
solo .......................................... 135, 142, 233<br />
Part 1 – 16 ....................................... 231, 232, 234<br />
Part 1 – 4 ......................................................... 138<br />
Part Edit .................................................. 141, 229<br />
Mixing ...................................................... 235<br />
Performance ............................................ 151<br />
Part EQ ..................................................... 68, 144<br />
Part number .................................................... 237<br />
Part Parameters ...................................... 159, 236<br />
Part Switch ...................................................... 151<br />
Password ........................................................ 262<br />
Setting ..................................................... 262<br />
PAT (Polyphonic Aftertouch) .................... 78, 193<br />
Patch ....................................................... 211, 212<br />
Path ................................................................. 273<br />
Pattern .................................................... 207, 274<br />
create ...................................................... 212<br />
defined ...................................................... 60<br />
Pattern Chain .................................... 60, 209, 213<br />
edit .................................................. 214, 216<br />
Pattern Edit ..................................................... 220<br />
Pattern Job ..................................................... 222<br />
Pattern Jobs .................................................... 227<br />
Pattern name .................................. 210, 211, 219<br />
Pattern number ............................... 140, 210, 237<br />
Pattern Play ..................................................... 208<br />
Pattern Record ................................................ 218<br />
Pattern Scene ................................................. 209<br />
Pattern Store ................................................... 218<br />
Pattern to be cleared ...................................... 228<br />
PB Range ........................................................ 199<br />
PB Range Lower ....................................... 99, 153<br />
PB Range Upper ...................................... 99, 153<br />
PDC Name ...................................................... 261<br />
PEG (Pitch EG) ............................................... 115<br />
PEQ ................................................................. 126<br />
Perf ......................................................... 237, 238<br />
Performance ........................................... 160, 274<br />
defined ...................................................... 58<br />
Initialize ..................................................... 29<br />
select ....................................................... 135<br />
Store ........................................................ 142<br />
Performance Bank .......................................... 137<br />
Performance Category ................................... 143<br />
[PERFORMANCE CONTROL] button ............... 15<br />
Performance Copy .......................................... 160<br />
Performance Edit ............................................ 141<br />
Performance Job ............................................ 159<br />
Performance name ......................................... 137<br />
Performance Number ............................. 137, 238<br />
Performance number ...................................... 238<br />
Performance Play display ............................... 137<br />
Performance Play Mode ................................. 135<br />
Performance Record .......................... 31, 61, 140<br />
Phase .............................................................. 105<br />
Phaser ............................................................... 71<br />
PHONES (Headphone) jack ....................... 18, 19<br />
Phrase ....................................................... 60, 225<br />
Phrase Jobs .................................................... 223<br />
Phrase Name .................................................. 212<br />
Phrase to be exchanged ................................ 224<br />
Phrase1 – 4 ..................................................... 249<br />
Pitch .................................................. 57, 114, 174<br />
pitch 01 – 16 ................................................... 217<br />
Pitch Bend ................................................ 76, 256<br />
Pitch Bend Range ............................................. 93<br />
Pitch Bend wheel ........................................ 12, 67<br />
Pitch Key Follow ............................................. 115<br />
Pitch Velocity Sens ................................. 114, 131<br />
Play ................................... 93, 138, 210, 211, 259
[F] (Play) button ...............................................14<br />
Play Effect (Play FX) ..........................................61<br />
Play FX ....................................................183, 211<br />
Play Mode .................................98, 105, 128, 170<br />
Polyphonic Aftertouch (PAT) .............................78<br />
Porta ..........................................................93, 144<br />
Portamento ........................................................93<br />
apply to Voice ............................................94<br />
Portamento Common ......................................144<br />
Portamento Legato Slope ................................100<br />
Portamento Mode ..............................93, 100, 152<br />
Portamento Part 1 – 4 ......................................144<br />
Portamento Part Sw .........................................152<br />
Portamento Switch ....................................93, 100<br />
Portamento Time ...............................93, 100, 152<br />
Portamento Time Mode ...................................100<br />
Portamento Time Offset ...................................144<br />
Power On Auto Factory Set .............................269<br />
Power On Mode ..............................................262<br />
Power Supply ....................................................19<br />
POWER switch ............................................16, 19<br />
Preset ......................109, 146, 149, 150, 256, 267<br />
Program .....................................93, 138, 252, 255<br />
[PROGRAM] button ...........................................15<br />
Program Change .....................................256, 268<br />
Program Change (PC) .......................................76<br />
Program number .............................................251<br />
punch ..............................................................187<br />
Punch In/Out ...................................188, 191, 246<br />
PureMajor ..........................................................99<br />
PureMinor ..........................................................99<br />
Put Phrase to Song ..........................................225<br />
Put Track to Arpeggio .............................206, 227<br />
Q<br />
Q ..............................................126, 144, 147, 158<br />
Quantize ..................183, 188, 196, 197, 219, 271<br />
QUANTIZE STRENGTH .....................................90<br />
Quantize Strength ...................................103, 156<br />
QUANTIZE VALUE ............................................90<br />
Quantize Value ........................................102, 156<br />
Quick ...............................................................270<br />
quick ................................................................249<br />
Quick Setup .....................................................270<br />
R<br />
Random ...........................................................114<br />
Random Pan ............................................123, 132<br />
Random SFX .....................................64, 103, 157<br />
Random SFX Key On Control ..................103, 157<br />
Random SFX Velocity Offset ...................103, 157<br />
Random Speed ...............................................106<br />
Range ..............................................206, 207, 227<br />
Rate .................................................197, 198, 203<br />
Ratio ........................................................173, 174<br />
RB (Ribbon Controller) ................................25, 92<br />
RcvSwitch (Receive Switch) ....................158, 236<br />
Realtime Recording ...................................33, 186<br />
Rear Panel .........................................................16<br />
Rec ..................................................162, 164, 244<br />
REC TR ....................................................187, 219<br />
Recall ..............................................134, 159, 241<br />
Recall Buffer ......................................................79<br />
Receive Bulk ...................................................269<br />
Receive Channel .............................................235<br />
Receive Note Off .............................................130<br />
[I] (Record) button ..........................................14<br />
Record Gain ............................................166, 245<br />
Record Monitor ........................................166, 245<br />
Record Next ............................................164, 244<br />
Record Part .............................................188, 219<br />
Record Slice ....................................................248<br />
Record Trim .....................................................247<br />
Record Type ............................................187, 219<br />
Recordable Size ..............................................165<br />
Recordable Time<br />
......... 162, 165, 166, 169, 170, 245, 246, 248, 249<br />
Recording<br />
1-16 tracks ............................................... 189<br />
All Track setting ....................................... 190<br />
Arpeggio playback to Pattern ................... 32<br />
Audio ....................................................... 242<br />
Melody and Arpeggio playback to Song .. 31<br />
Pattern ..................................................... 218<br />
Pattern Chain ........................................... 214<br />
Scene Track ............................................ 190<br />
Song ........................................................ 186<br />
Tempo Track ........................................... 190<br />
Recording Count ............................................ 270<br />
Recording Type ...................................... 164, 244<br />
Registered Parameter Number (RPN) .............. 78<br />
Rehearsal ........................................................ 191<br />
RELEASE .......................................................... 90<br />
Release Level ......................................... 116, 120<br />
Release Time .................................. 115, 120, 123<br />
Remix ...................................................... 211, 217<br />
Remote ........................................................... 267<br />
Remote Control<br />
function ...................................................... 51<br />
mode ......................................................... 52<br />
set up ......................................................... 51<br />
[REMOTE ON/OFF] button ................................ 13<br />
Rename .................................................. 177, 276<br />
replace ............................................................ 219<br />
Replace Recording ......................................... 189<br />
resample ......................................................... 164<br />
Reset ............................................................... 269<br />
RESONANCE .................................................... 90<br />
Resonance .............................................. 119, 131<br />
Resonance Velocity Sens ............................... 119<br />
REV SEND ....................................................... 129<br />
Rev Send ........................................................ 232<br />
REVERB ............................................................ 90<br />
Reverb ...................... 70, 109, 129, 150, 235, 260<br />
Reverb Pan ............................................. 108, 150<br />
Reverb Return ......................................... 108, 150<br />
Reverb Send ........... 108, 130, 145, 148, 152, 266<br />
Reverb Type ........................................... 108, 149<br />
reverse ............................................................ 170<br />
reverse 01 – 16 ............................................... 217<br />
[G] (Reverse) button ...................................... 14<br />
REV-X ................................................................ 73<br />
Ribbon Controller ................................ 12, 67, 256<br />
Ribbon Controller Control No. ......................... 147<br />
Ribbon Mode .......................................... 100, 145<br />
RPN (Registered Parameter Number) .............. 78<br />
S<br />
Sample ............................................................ 161<br />
Sample Size .................................................... 162<br />
Sample Voice .................................................. 274<br />
sample+note ................................................... 244<br />
Sampling<br />
procedure .......................................... 40, 163<br />
setup .......................................................... 39<br />
Sampling Block ................................................. 59<br />
Sampling Edit .......................................... 167, 250<br />
Sampling FINISHED display ................... 167, 246<br />
Sampling Job .......................................... 171, 250<br />
Sampling Main display ........................... 162, 243<br />
Sampling mode ....................................... 161, 242<br />
Sampling Record .................................... 163, 244<br />
Sampling RECORDING display .............. 167, 246<br />
Sampling Setup display .......................... 164, 244<br />
Save ................................................ 273, 275, 278<br />
a specific type ......................................... 278<br />
all user data ............................................. 278<br />
sample of a Voice .................................... 279<br />
SMF ......................................................... 279<br />
Scale ....................................................... 121, 124<br />
Scaling Pan ..................................................... 123<br />
Scene Track .............................................. 60, 190<br />
Scene1 – Scene5 .... 182, 188, 189, 211, 219, 252<br />
Section ......60, 140, 207, 210, 213, 215, 219, 237<br />
Section Length ................................................140<br />
Security ...........................................................261<br />
Select ..............................................................263<br />
[SELECTED PART CONTROL] button ...............12<br />
Sens ........................................................176, 249<br />
Separate Chord ...............................................200<br />
SEQ TRANSPORT buttons ................................14<br />
Sequence data bar .........................................182<br />
Sequence tracks 1 – 16 ....................................59<br />
Sequencer Block ...............................................59<br />
Sequencer Control ..........................................268<br />
Sequencer Mode .............................................140<br />
Sequencer Settings .........................................269<br />
Set ...................................................................106<br />
Set All ......................................194, 197, 198, 203<br />
Setting Values .................................................215<br />
Setup ...............................................187, 188, 219<br />
Setup Number .................................................271<br />
[SF1] – [SF5] (Sub Function) buttons ..........14, 81<br />
Shape ..............................................................146<br />
Sharing Point ...................................................277<br />
Shift Clock .......................................................200<br />
single .......................................................100, 130<br />
single timbre ......................................................56<br />
skip ..................................................................185<br />
Slice .................................................176, 242, 248<br />
Slice Type ........................................................250<br />
slice+seq .........................................................244<br />
Slider ...............................................................256<br />
Slope ...............................................................107<br />
SMF (Standard MIDI File) ................................273<br />
SMPL (Sample Voice) .....................................188<br />
Solo .................................182, 187, 210, 219, 231<br />
[SOLO] button ...................................................15<br />
SONAR ..............................................................52<br />
Song ..........................................33, 207, 215, 274<br />
defined .......................................................59<br />
select ..........................................................21<br />
Song Chain ........................................60, 180, 185<br />
Song Edit .........................................................192<br />
Song Event Chase ...........................................271<br />
Song Job .........................................................195<br />
Song Jobs .......................................................207<br />
Song name ......................................181, 185, 187<br />
Song number ...........................140, 181, 185, 237<br />
Song Play ........................................................178<br />
Song Position Line ...........................................182<br />
Song Record ...................................................186<br />
Song Scene .....................................................179<br />
Song Store .......................................................186<br />
Song Track ........................................................59<br />
sort ..................................................................155<br />
Sort Chord .......................................................200<br />
sort+direct .......................................................155<br />
Source .............................................................104<br />
Source Key Bank .....................................172, 173<br />
Source Measure ..............................................225<br />
Source Mixing Voice .......................................241<br />
Source Part ......................................................160<br />
Source Pattern .........................................206, 227<br />
Source Phrase .........................206, 212, 223, 225<br />
Source Range .................................................215<br />
Source Song ............................................207, 225<br />
Source Song and Track ..................................204<br />
Source Track ...........................................225, 226<br />
Specifications ..................................................297<br />
Speed ......................................................105, 125<br />
Split ...................................................................30<br />
Split Pattern .....................................................228<br />
Split Phrase .....................................................224<br />
Split Point ........................................................258<br />
Split Point Measure .........................................225<br />
Split Song to Pattern ........................................207<br />
Splitpoint Measure ..........................................228<br />
Standby ...........................................165, 166, 245<br />
Start .................................................166, 185, 246<br />
Index<br />
MOTIF <strong>XS</strong> Owner’s <strong>Manual</strong> 303<br />
Appendix
Appendix<br />
304<br />
Index<br />
Start Point ................................................169, 247<br />
Start Step .........................................................199<br />
Start Velocity ....................................................199<br />
Stereo to Mono ................................................175<br />
Stereo/Mono ....................................162, 164, 244<br />
Stop .................................................................167<br />
stop ..................................................................185<br />
[J] (Stop) button ...............................................14<br />
Store<br />
Master ......................................................254<br />
Mixing .......................................................233<br />
Mixing Voice .............................................240<br />
Pattern ......................................................218<br />
Performance .............................................142<br />
Song .........................................................186<br />
Voice ..........................................................97<br />
Strength ...........................................................197<br />
Studio Connections ...........................................50<br />
Studio Manager .................................................50<br />
SUB CATEGORY .............................................140<br />
Sub Category ............................95, 102, 143, 155<br />
Sub Category 1/2 ..............................................98<br />
Sub Divide ...............................................176, 249<br />
Subnet Mask ....................................................261<br />
SUSTAIN ............................................................90<br />
Sustain .............................................................256<br />
Sustain Pedal ...................................................260<br />
SW ...................................................................140<br />
SWING ...............................................................90<br />
Swing ...............................................103, 156, 183<br />
Swing Rate ......................................................197<br />
Switch ................................95, 101, 146, 154, 264<br />
Sync Quantize Value .......................................140<br />
System Effect .....................................................68<br />
System Exclusive ...............................................79<br />
System settings ...............................................259<br />
T<br />
Tech ...................................................................72<br />
Template ..................................................107, 238<br />
Template Mix ...................................................238<br />
Template Performance ....................................238<br />
TEMPO ..............................................................90<br />
Tempo ......95, 101, 140, 154, 169, 176, 182, 187,<br />
.........................................210, 214, 219, 247, 249<br />
Tempo Change ................................................215<br />
Tempo Hold .....................................................271<br />
Tempo Speed ..................................................105<br />
Tempo Sync ....................................................105<br />
Tempo Track .............................................60, 190<br />
Thin Out ...........................................................202<br />
thru ..................................................................155<br />
thru+direct .......................................................155<br />
Time Signature ........................................140, 215<br />
Time signature .................182, 187, 210, 213, 219<br />
Time-Stretch ....................................................173<br />
Tone Generator block ........................................56<br />
[P] (Top) button ................................................14<br />
TR ....................................................................193<br />
Track .........33, 165, 169, 183, 184, 201, 205, 206,<br />
.........................207, 211, 212, 226, 243, 244, 245<br />
mute ...........................................................33<br />
solo .............................................................33<br />
Track and location ...........................................201<br />
Track and range<br />
.................196, 197, 198, 199, 200, 201, 202, 203<br />
[TRACK] button .................................................15<br />
Track Jobs ...............................................204, 226<br />
Track Mute .......................................................215<br />
Track number ..................182, 183, 187, 210, 219<br />
Track Sel ..........................................................194<br />
Track Status .....................................................141<br />
Track type ........................................187, 210, 219<br />
TrackView ................................................181, 183<br />
Trans ................................................182, 210, 213<br />
Transmit ...........................................................255<br />
Transmit CH .......................................................92<br />
MOTIF <strong>XS</strong> Owner’s <strong>Manual</strong><br />
Transmit Ch ..................................................... 137<br />
Transmit Channel .................................... 252, 255<br />
Transmit Switch ............................................... 255<br />
Transpose ................. 27, 177, 198, 199, 255, 260<br />
Tremolo & Rotary .............................................. 71<br />
Trigger Level ........................................... 166, 246<br />
Trigger Mode .......................... 103, 156, 166, 246<br />
Trim ......................................... 168, 169, 247, 249<br />
Troubleshooting .............................................. 288<br />
Tune .................................................. 27, 114, 259<br />
Tuning ............................................................. 265<br />
Tuning Number ................................................. 99<br />
Tuning Offset ................................................... 265<br />
Tuning Root ....................................................... 99<br />
Tx Switch ......................................................... 255<br />
TxCh ........................................................ 184, 211<br />
TYPE ................................................................ 140<br />
Type ................................ 175, 176, 200, 217, 270<br />
Arpeggio .................................... 95, 102, 155<br />
Effect ................................ 109, 149, 150, 267<br />
EQ ............................................................ 126<br />
File ........................................................... 275<br />
Filter ......................................................... 117<br />
Loop-Remix .............................................. 176<br />
Master Effect ............................................ 146<br />
Recording ........................................ 164, 244<br />
Slice ......................................................... 249<br />
Vocoder ................................................... 110<br />
Type diagram .................................................. 217<br />
U<br />
Undo/Redo .............................................. 196, 223<br />
Unit Multiply ............................................ 102, 156<br />
UNITMULTIPLY ................................................. 90<br />
up .................................................................... 200<br />
up&down ......................................................... 200<br />
Upper Ch ........................................................ 258<br />
USB ................................................................... 16<br />
USB storage device .......................................... 85<br />
USB TO DEVICE connector ........................ 16, 85<br />
USB TO HOST connector ........................... 16, 43<br />
USB-MIDI driver ................................................ 43<br />
Used/Total ....................................................... 165<br />
User ................................................................. 107<br />
User Arpeggio ................................................... 80<br />
User Memory ............................................... 79, 80<br />
User Phrase ...................................................... 80<br />
User Voice ......................................................... 80<br />
Utility ............................................................... 259<br />
V<br />
Vallot&Yng ......................................................... 99<br />
Value of <strong>the</strong> selected event type ..................... 216<br />
Variation .................................................. 176, 217<br />
Vce Edit ........................................................... 232<br />
VCM (Virtual Circuitry Modeling) ....................... 72<br />
VCM Auto Wah .................................................. 73<br />
VCM Compressor 376 ....................................... 72<br />
VCM Equalizer 501 ........................................... 73<br />
VCM Flanger ..................................................... 73<br />
VCM Pedal Wah ................................................ 73<br />
VCM Phaser Mono ............................................ 73<br />
VCM Phaser Stereo ........................................... 73<br />
VCM Touch Wah ............................................... 73<br />
Vel Cross Fade ................................................ 114<br />
Vel Sens Depth ............................................... 153<br />
VELOCITY ......................................................... 90<br />
Velocity .................... 162, 166, 169, 170, 184, 245<br />
Velocity Curve ................................................. 260<br />
Velocity Limit ..................... 95, 101, 114, 152, 154<br />
Velocity Mode ......................................... 102, 155<br />
Velocity Offset (Random SFX) ......................... 157<br />
Velocity Range ................................................ 198<br />
Velocity Rate ........................... 102, 103, 155, 156<br />
Velocity Sens ................................................... 131<br />
Velocity Sens Depth Offset ............................. 153<br />
ViewFilter ........................................ 194, 215, 221<br />
Vocoder ............................................................ 72<br />
structure .................................................. 111<br />
use ........................................................... 111<br />
Vocoder Attack ............................................... 110<br />
Vocoder Release ............................................ 110<br />
Voice ...................... 138, 151, 160, 165, 184, 185,<br />
................ 188, 211, 219, 235, 237, 245, 263, 274<br />
defined ...................................................... 56<br />
select ......................................................... 88<br />
Store .......................................................... 97<br />
Voice as source .............................................. 134<br />
Voice Bank ........................................ 92, 139, 140<br />
Voice Element Pan .......................................... 152<br />
Voice Job ........................................................ 133<br />
Voice Name ...... 92, 138, 139, 140, 182, 187, 219<br />
Voice Number ................................... 92, 139, 140<br />
Voice Play display ............................................ 91<br />
Voice Play mode ............................................... 88<br />
Voice Type ........................................................ 93<br />
Voice with ARP ....................................... 154, 189<br />
VoiceAudio ..................................................... 265<br />
Volume ............. 98, 145, 147, 152, 188, 219, 232,<br />
................................................ 257, 259, 265, 270<br />
Volume Label .................................................. 278<br />
Volume/Express .............................................. 256<br />
W<br />
Wah ................................................................... 72<br />
WAV ........................................................ 273, 274<br />
Wave ....................................................... 105, 125<br />
Wave Bank .............................................. 113, 130<br />
Wave Category ....................................... 113, 130<br />
Wave Memory ................................................. 250<br />
Wave Number ......................................... 113, 130<br />
Waveform<br />
........ 161, 162, 165, 166, 169, 177, 244, 245, 274<br />
Waveform as destination ................................ 176<br />
Waveform as source ....................................... 176<br />
Waveform Jobs ............................................... 176<br />
Werckmeist ....................................................... 99<br />
Width ............................................................... 119<br />
WINS ............................................................... 261<br />
Without Program Change ............................... 215<br />
X<br />
XA Control ....................................................... 112<br />
Z<br />
Zone ................................................................ 258<br />
Zone Edit ................................................ 253, 255<br />
Zone Switch ............................................ 252, 254<br />
Zoom In ........................................... 169, 183, 248<br />
Zoom Out ........................................ 169, 183, 248
About <strong>the</strong> accessory disk<br />
SPECIAL NOTICE<br />
• The software included in <strong>the</strong> accessory disk and <strong>the</strong><br />
copyrights <strong>the</strong>reof are under exclusive ownership by<br />
Steinberg Media Technologies GmbH.<br />
• Use of <strong>the</strong> software and this manual is governed by <strong>the</strong><br />
license agreement which <strong>the</strong> purchaser fully agrees to upon<br />
breaking <strong>the</strong> seal of <strong>the</strong> software packaging. (Please read<br />
carefully <strong>the</strong> Software Licensing Agreement at <strong>the</strong> end of<br />
this manual before installing <strong>the</strong> application.)<br />
• Copying of <strong>the</strong> software or reproduction of this manual in<br />
whole or in part by any means is expressly forbidden without<br />
<strong>the</strong> written consent of <strong>the</strong> manufacturer.<br />
• Yamaha makes no representations or warranties with regard<br />
to <strong>the</strong> use of <strong>the</strong> software and documentation and cannot be<br />
held responsible for <strong>the</strong> results of <strong>the</strong> use of this manual and<br />
<strong>the</strong> software.<br />
• This disk is NOT for audio/visual purpose. Do not attempt to<br />
play <strong>the</strong> disk on an audio/visual CD/DVD player. Doing so<br />
may result in irreparable damage to your player.<br />
• For information about <strong>the</strong> minimum system requirements<br />
and latest information of <strong>the</strong> software in <strong>the</strong> disk, check <strong>the</strong><br />
web site below.<br />
<br />
• Note that Yamaha does not offer technical support for <strong>the</strong><br />
DAW software in <strong>the</strong> accessory disk.<br />
About <strong>the</strong> DAW software in <strong>the</strong> accessory disk<br />
The accessory disk contains DAW software both for Windows<br />
and Macintosh.<br />
n • Make sure to install DAW software under <strong>the</strong> “Administrator”<br />
account.<br />
• In order to have continuous use of <strong>the</strong> DAW software in <strong>the</strong><br />
accessory disk, including support and o<strong>the</strong>r benefits, you<br />
will need to register <strong>the</strong> software and activate your software<br />
license by starting it while <strong>the</strong> <strong>com</strong>puter is connected to <strong>the</strong><br />
Internet. Click <strong>the</strong> "Register Now" button shown when <strong>the</strong><br />
software is started, <strong>the</strong>n fill in all required fields for<br />
registration. If you do not register <strong>the</strong> software, you will be<br />
unable to use it after a limited period of time expires.<br />
• If you are using a Macintosh <strong>com</strong>puter, double-click <strong>the</strong><br />
“***.pkg” file to start installation.<br />
For information about <strong>the</strong> minimum system requirements and<br />
latest information on <strong>the</strong> software in <strong>the</strong> disk, check <strong>the</strong> web<br />
site below.<br />
<br />
About software support<br />
Support for <strong>the</strong> DAW software in <strong>the</strong> accessory disk is<br />
provided by Steinberg on its website at <strong>the</strong> following address.<br />
http://www.steinberg.net<br />
You can visit <strong>the</strong> Steinberg site also via <strong>the</strong> Help menu of <strong>the</strong><br />
included DAW software. (The Help menu also includes <strong>the</strong><br />
PDF manual and o<strong>the</strong>r information on <strong>the</strong> software.)<br />
ATTENTION<br />
SOFTWARE LICENSE AGREEMENT<br />
PLEASE READ THIS SOFTWARE LICENSE AGREEMENT<br />
(“AGREEMENT”) CAREFULLY BEFORE USING THIS<br />
SOFTWARE. YOU ARE ONLY PERMITTED TO USE THIS<br />
SOFTWARE PURSUANT TO THE TERMS AND<br />
CONDITIONS OF THIS AGREEMENT. THIS AGREEMENT<br />
IS BETWEEN YOU (AS AN INDIVIDUAL OR LEGAL<br />
ENTITY) AND YAMAHA CORPORATION (“YAMAHA”).<br />
BY BREAKING THE SEAL OF THIS PACKAGE YOU ARE<br />
AGREEING TO BE BOUND BY THE TERMS OF THIS<br />
LICENSE. IF YOU DO NOT AGREE WITH THE TERMS, DO<br />
NOT INSTALL, COPY, OR OTHERWISE USE THIS<br />
SOFTWARE.<br />
THIS AGREEMENT PROVIDES YOUR USE-CONDITIONS<br />
ABOUT THE “DAW” SOFTWARE OF STEINBERG MEDIA<br />
TECHNOLOGIES GMBH(“STEINBERG”) WHICH IS<br />
BUNDLED WITH THIS PRODUCT. SINCE THE END-USER<br />
SOFTWARE LICENSE AGREEMENT (EUSLA) SHOWED<br />
ON YOUR PC-DISPLAY IN YOUR INSTALLING THE “DAW”<br />
SOFTWARE IS REPLACED BY THIS AGREEMENT, YOU<br />
SHOULD DISREGARD THE EUSLA. THAT IS, IN THE<br />
INSTALLING PROCESS, YOU SHOULD SELECT “AGREE”<br />
WITH THE EUSLA, WITHOUT YOUR JUDGMENT<br />
THERETO, SO AS TO PROCEED TO THE NEXT PAGE.<br />
1. GRANT OF LICENSE AND COPYRIGHT<br />
Yamaha hereby grants you <strong>the</strong> right to use one copy of <strong>the</strong><br />
software program(s) and data (“SOFTWARE”)<br />
ac<strong>com</strong>panying this Agreement. The term SOFTWARE shall<br />
en<strong>com</strong>pass any updates to <strong>the</strong> ac<strong>com</strong>panying software<br />
and data. The SOFTWARE is owned by STEINBERG, and is<br />
protected by relevant copyright laws and all applicable<br />
treaty provisions. Yamaha has acquired <strong>the</strong> sublicense<br />
right to license you to use <strong>the</strong> SOFTWARE. While you are<br />
entitled to claim ownership of <strong>the</strong> data created with <strong>the</strong> use<br />
of SOFTWARE, <strong>the</strong> SOFTWARE will continue to be<br />
protected under relevant copyrights.<br />
• You may use <strong>the</strong> SOFTWARE on a single <strong>com</strong>puter.<br />
• You may make one copy of <strong>the</strong> SOFTWARE in machinereadable<br />
form for backup purposes only, if <strong>the</strong> SOFTWARE<br />
is on media where such backup copy is permitted. On <strong>the</strong><br />
backup copy, you must reproduce Yamaha's copyright<br />
notice and any o<strong>the</strong>r proprietary legends that were on <strong>the</strong><br />
original copy of <strong>the</strong> SOFTWARE.<br />
• You may permanently transfer to a third party all your rights<br />
in <strong>the</strong> SOFTWARE only when you transfer this product<br />
toge<strong>the</strong>r, provided that you do not retain any copies and <strong>the</strong><br />
recipient reads and agrees to <strong>the</strong> terms of this Agreement.<br />
MOTIF <strong>XS</strong> Owner’s <strong>Manual</strong> 305
306<br />
2. RESTRICTIONS<br />
• You may not engage in reverse engineering, disassembly,<br />
de<strong>com</strong>pilation or o<strong>the</strong>rwise deriving a source code form of<br />
<strong>the</strong> SOFTWARE by any method whatsoever.<br />
• You may not reproduce, modify, change, rent, lease, or<br />
distribute <strong>the</strong> SOFTWARE in whole or in part, or create<br />
derivative works of <strong>the</strong> SOFTWARE.<br />
• You may not electronically transmit <strong>the</strong> SOFTWARE from<br />
one <strong>com</strong>puter to ano<strong>the</strong>r or share <strong>the</strong> SOFTWARE in a<br />
network with o<strong>the</strong>r <strong>com</strong>puters.<br />
• You may not use <strong>the</strong> SOFTWARE to distribute illegal data or<br />
data that violates public policy.<br />
• You may not initiate services based on <strong>the</strong> use of <strong>the</strong><br />
SOFTWARE without permission by Yamaha Corporation.<br />
Copyrighted data, including but not limited to MIDI data for<br />
songs, obtained by means of <strong>the</strong> SOFTWARE, are subject<br />
to <strong>the</strong> following restrictions which you must observe.<br />
• Data received by means of <strong>the</strong> SOFTWARE may not be used<br />
for any <strong>com</strong>mercial purposes without permission of <strong>the</strong><br />
copyright owner.<br />
• Data received by means of <strong>the</strong> SOFTWARE may not be<br />
duplicated, transferred, or distributed, or played back or<br />
performed for listeners in public without permission of <strong>the</strong><br />
copyright owner.<br />
• The encryption of data received by means of <strong>the</strong><br />
SOFTWARE may not be removed nor may <strong>the</strong> electronic<br />
watermark be modified without permission of <strong>the</strong> copyright<br />
owner.<br />
3. TERMINATION<br />
This Agreement be<strong>com</strong>es effective on <strong>the</strong> day that you<br />
receive <strong>the</strong> SOFTWARE and remains effective until<br />
terminated. If any copyright law or provisions of this<br />
Agreement is violated, <strong>the</strong> Agreement shall terminate<br />
automatically and immediately without notice from Yamaha.<br />
Upon such termination, you must immediately destroy <strong>the</strong><br />
licensed SOFTWARE, any ac<strong>com</strong>panying written<br />
documents and all copies <strong>the</strong>reof.<br />
4. LIMITED WARRANTY ON MEDIA<br />
As to SOFTWARE sold on tangible media, Yamaha<br />
warrants that <strong>the</strong> tangible media on which <strong>the</strong> SOFTWARE<br />
is recorded will be free from defects in materials and<br />
workmanship under normal use for a period of fourteen<br />
(14) days from <strong>the</strong> date of receipt, as evidenced by a copy<br />
of <strong>the</strong> receipt. Yamaha's entire liability and your exclusive<br />
remedy will be replacement of <strong>the</strong> defective media if it is<br />
returned to Yamaha or an authorized Yamaha dealer within<br />
fourteen days with a copy of <strong>the</strong> receipt. Yamaha is not<br />
responsible for replacing media damaged by accident,<br />
abuse or misapplication. TO THE FULLEST EXTENT<br />
PERMITTED BY LAW, YAMAHA EXPRESSLY DISCLAIMS<br />
ANY IMPLIED WARRANTIES ON THE TANGIBLE MEDIA,<br />
INCLUDING THE IMPLIED WARRANTIES OF<br />
MERCHANTABILITY AND FITNESS FOR A PARTICULAR<br />
PURPOSE.<br />
MOTIF <strong>XS</strong> Owner’s <strong>Manual</strong><br />
5. DISCLAIMER OF WARRANTY ON SOFTWARE<br />
You expressly acknowledge and agree that use of <strong>the</strong><br />
SOFTWARE is at your sole risk. The SOFTWARE and<br />
related documentation are provided “AS IS” and without<br />
warranty of any kind. NOTWITHSTANDING ANY OTHER<br />
PROVISION OF THIS AGREEMENT, YAMAHA EXPRESSLY<br />
DISCLAIMS ALL WARRANTIES AS TO THE SOFTWARE,<br />
EXPRESS, AND IMPLIED, INCLUDING BUT NOT LIMITED<br />
TO THE IMPLIED WARRANTIES OF MERCHANTABILITY,<br />
FITNESS FOR A PARTICULAR PURPOSE AND NON-<br />
INFRINGEMENT OF THIRD PARTY RIGHTS.<br />
SPECIFICALLY, BUT WITHOUT LIMITING THE<br />
FOREGOING, YAMAHA DOES NOT WARRANT THAT THE<br />
SOFTWARE WILL MEET YOUR REQUIREMENTS, THAT<br />
THE OPERATION OF THE SOFTWARE WILL BE<br />
UNINTERRUPTED OR ERROR-FREE, OR THAT DEFECTS<br />
IN THE SOFTWARE WILL BE CORRECTED.<br />
6. LIMITATION OF LIABILITY<br />
YAMAHA’S ENTIRE OBLIGATION HEREUNDER SHALL BE<br />
TO PERMIT USE OF THE SOFTWARE UNDER THE TERMS<br />
HEREOF. IN NO EVENT SHALL YAMAHA BE LIABLE TO<br />
YOU OR ANY OTHER PERSON FOR ANY DAMAGES,<br />
INCLUDING, WITHOUT LIMITATION, ANY DIRECT,<br />
INDIRECT, INCIDENTAL OR CONSEQUENTIAL<br />
DAMAGES, EXPENSES, LOST PROFITS, LOST DATA OR<br />
OTHER DAMAGES ARISING OUT OF THE USE, MISUSE<br />
OR INABILITY TO USE THE SOFTWARE, EVEN IF YAMAHA<br />
OR AN AUTHORIZED DEALER HAS BEEN ADVISED OF<br />
THE POSSIBILITY OF SUCH DAMAGES. In no event shall<br />
Yamaha's total liability to you for all damages, losses and<br />
causes of action (whe<strong>the</strong>r in contract, tort or o<strong>the</strong>rwise)<br />
exceed <strong>the</strong> amount paid for <strong>the</strong> SOFTWARE.<br />
7. GENERAL<br />
This Agreement shall be interpreted according to and<br />
governed by Japanese law without reference to principles<br />
of conflict of laws. Any dispute or procedure shall be heard<br />
before <strong>the</strong> Tokyo District Court in Japan. If for any reason a<br />
court of <strong>com</strong>petent jurisdiction finds any portion of this<br />
Agreement to be unenforceable, <strong>the</strong> remainder of this<br />
Agreement shall continue in full force and effect.<br />
8. COMPLETE AGREEMENT<br />
This Agreement constitutes <strong>the</strong> entire agreement between<br />
<strong>the</strong> parties with respect to use of <strong>the</strong> SOFTWARE and any<br />
ac<strong>com</strong>panying written materials and supersedes all prior<br />
or contemporaneous understandings or agreements,<br />
written or oral, regarding <strong>the</strong> subject matter of this<br />
Agreement. No amendment or revision of this Agreement<br />
will be binding unless in writing and signed by a fully<br />
authorized representative of Yamaha.
Preamble<br />
GNU GENERAL PUBLIC LICENSE<br />
Version 2, June 1991<br />
Copyright © 1989, 1991 Free Software Foundation, Inc., 51 Franklin Street, Fifth Floor, Boston, MA 02110-1301 USA<br />
Everyone is permitted to copy and distribute verbatim copies of this license document, but changing it is not allowed.<br />
The licenses for most software are designed to take away your freedom to<br />
share and change it. By contrast, <strong>the</strong> GNU General Public License is<br />
intended to guarantee your freedom to share and change free software—to<br />
make sure <strong>the</strong> software is free for all its users. This General Public License<br />
applies to most of <strong>the</strong> Free Software Foundation’s software and to any o<strong>the</strong>r<br />
program whose authors <strong>com</strong>mit to using it. (Some o<strong>the</strong>r Free Software<br />
Foundation software is covered by <strong>the</strong> GNU Lesser General Public License<br />
instead.) You can apply it to your programs, too.<br />
When we speak of free software, we are referring to freedom, not price. Our<br />
General Public Licenses are designed to make sure that you have <strong>the</strong><br />
freedom to distribute copies of free software (and charge for this service if<br />
you wish), that you receive source code or can get it if you want it, that you<br />
can change <strong>the</strong> software or use pieces of it in new free programs; and that<br />
you know you can do <strong>the</strong>se things.<br />
To protect your rights, we need to make restrictions that forbid anyone to<br />
deny you <strong>the</strong>se rights or to ask you to surrender <strong>the</strong> rights. These<br />
restrictions translate to certain responsibilities for you if you distribute<br />
copies of <strong>the</strong> software, or if you modify it.<br />
For example, if you distribute copies of such a program, whe<strong>the</strong>r gratis or<br />
for a fee, you must give <strong>the</strong> recipients all <strong>the</strong> rights that you have. You must<br />
make sure that <strong>the</strong>y, too, receive or can get <strong>the</strong> source code. And you must<br />
show <strong>the</strong>m <strong>the</strong>se terms so <strong>the</strong>y know <strong>the</strong>ir rights.<br />
We protect your rights with two steps: (1) copyright <strong>the</strong> software, and (2)<br />
offer you this license which gives you legal permission to copy, distribute<br />
and/or modify <strong>the</strong> software.<br />
Also, for each author's protection and ours, we want to make certain that<br />
everyone understands that <strong>the</strong>re is no warranty for this free software. If <strong>the</strong><br />
software is modified by someone else and passed on, we want its recipients<br />
to know that what <strong>the</strong>y have is not <strong>the</strong> original, so that any problems<br />
introduced by o<strong>the</strong>rs will not reflect on <strong>the</strong> original authors' reputations.<br />
Finally, any free program is threatened constantly by software patents. We<br />
wish to avoid <strong>the</strong> danger that redistributors of a free program will individually<br />
obtain patent licenses, in effect making <strong>the</strong> program proprietary. To prevent<br />
this, we have made it clear that any patent must be licensed for everyone’s<br />
free use or not licensed at all.<br />
The precise terms and conditions for copying, distribution and modification<br />
follow.<br />
GNU GENERAL PUBLIC LICENSE<br />
TERMS AND CONDITIONS FOR COPYING,<br />
DISTRIBUTION AND MODIFICATION<br />
0. This License applies to any program or o<strong>the</strong>r work which contains a<br />
notice placed by <strong>the</strong> copyright holder saying it may be distributed<br />
under <strong>the</strong> terms of this General Public License. The “Program”, below,<br />
refers to any such program or work, and a “work based on <strong>the</strong><br />
Program” means ei<strong>the</strong>r <strong>the</strong> Program or any derivative work under<br />
copyright law: that is to say, a work containing <strong>the</strong> Program or a portion<br />
of it, ei<strong>the</strong>r verbatim or with modifications and/or translated into ano<strong>the</strong>r<br />
language. (Hereinafter, translation is included without limitation in <strong>the</strong><br />
term “modification”.) Each licensee is addressed as “you”.<br />
Activities o<strong>the</strong>r than copying, distribution and modification are not<br />
covered by this License; <strong>the</strong>y are outside its scope. The act of running<br />
<strong>the</strong> Program is not restricted, and <strong>the</strong> output from <strong>the</strong> Program is<br />
covered only if its contents constitute a work based on <strong>the</strong> Program<br />
(independent of having been made by running <strong>the</strong> Program). Whe<strong>the</strong>r<br />
that is true depends on what <strong>the</strong> Program does.<br />
1. You may copy and distribute verbatim copies of <strong>the</strong> Program's source<br />
code as you receive it, in any medium, provided that you conspicuously<br />
and appropriately publish on each copy an appropriate copyright<br />
notice and disclaimer of warranty; keep intact all <strong>the</strong> notices that refer<br />
to this License and to <strong>the</strong> absence of any warranty; and give any o<strong>the</strong>r<br />
recipients of <strong>the</strong> Program a copy of this License along with <strong>the</strong><br />
Program.<br />
You may charge a fee for <strong>the</strong> physical act of transferring a copy, and<br />
you may at your option offer warranty protection in exchange for a fee.<br />
2. You may modify your copy or copies of <strong>the</strong> Program or any portion of it,<br />
thus forming a work based on <strong>the</strong> Program, and copy and distribute<br />
such modifications or work under <strong>the</strong> terms of Section 1 above,<br />
provided that you also meet all of <strong>the</strong>se conditions:<br />
a) You must cause <strong>the</strong> modified files to carry prominent notices stating<br />
that you changed <strong>the</strong> files and <strong>the</strong> date of any change.<br />
b) You must cause any work that you distribute or publish, that in whole<br />
or in part contains or is derived from <strong>the</strong> Program or any part <strong>the</strong>reof,<br />
to be licensed as a whole at no charge to all third parties under <strong>the</strong><br />
terms of this License.<br />
c) If <strong>the</strong> modified program normally reads <strong>com</strong>mands interactively<br />
when run, you must cause it, when started running for such<br />
interactive use in <strong>the</strong> most ordinary way, to print or display an<br />
announcement including an appropriate copyright notice and a<br />
notice that <strong>the</strong>re is no warranty (or else, saying that you provide a<br />
warranty) and that users may redistribute <strong>the</strong> program under <strong>the</strong>se<br />
conditions, and telling <strong>the</strong> user how to view a copy of this License.<br />
(Exception: if <strong>the</strong> Program itself is interactive but does not normally<br />
print such an announcement, your work based on <strong>the</strong> Program is not<br />
required to print an announcement.)<br />
These requirements apply to <strong>the</strong> modified work as a whole. If<br />
identifiable sections of that work are not derived from <strong>the</strong> Program, and<br />
can be reasonably considered independent and separate works in<br />
<strong>the</strong>mselves, <strong>the</strong>n this License, and its terms, do not apply to those<br />
sections when you distribute <strong>the</strong>m as separate works. But when you<br />
distribute <strong>the</strong> same sections as part of a whole which is a work based<br />
on <strong>the</strong> Program, <strong>the</strong> distribution of <strong>the</strong> whole must be on <strong>the</strong> terms of<br />
this License, whose permissions for o<strong>the</strong>r licensees extend to <strong>the</strong> entire<br />
whole, and thus to each and every part regardless of who wrote it.<br />
Thus, it is not <strong>the</strong> intent of this section to claim rights or contest your<br />
rights to work written entirely by you; ra<strong>the</strong>r, <strong>the</strong> intent is to exercise <strong>the</strong><br />
right to control <strong>the</strong> distribution of derivative or collective works based<br />
on <strong>the</strong> Program.<br />
In addition, mere aggregation of ano<strong>the</strong>r work not based on <strong>the</strong><br />
Program with <strong>the</strong> Program (or with a work based on <strong>the</strong> Program) on a<br />
volume of a storage or distribution medium does not bring <strong>the</strong> o<strong>the</strong>r<br />
work under <strong>the</strong> scope of this License.<br />
3. You may copy and distribute <strong>the</strong> Program (or a work based on it, under<br />
Section 2) in object code or executable form under <strong>the</strong> terms of<br />
Sections 1 and 2 above provided that you also do one of <strong>the</strong> following:<br />
a) Ac<strong>com</strong>pany it with <strong>the</strong> <strong>com</strong>plete corresponding machine-readable<br />
source code, which must be distributed under <strong>the</strong> terms of Sections<br />
1 and 2 above on a medium customarily used for software<br />
interchange; or,<br />
b) Ac<strong>com</strong>pany it with a written offer, valid for at least three years, to<br />
give any third party, for a charge no more than your cost of<br />
physically performing source distribution, a <strong>com</strong>plete machinereadable<br />
copy of <strong>the</strong> corresponding source code, to be distributed<br />
under <strong>the</strong> terms of Sections 1 and 2 above on a medium customarily<br />
used for software interchange; or,<br />
c) Ac<strong>com</strong>pany it with <strong>the</strong> information you received as to <strong>the</strong> offer to<br />
distribute corresponding source code. (This alternative is allowed<br />
only for non<strong>com</strong>mercial distribution and only if you received <strong>the</strong><br />
program in object code or executable form with such an offer, in<br />
accord with Subsection b above.)<br />
The source code for a work means <strong>the</strong> preferred form of <strong>the</strong> work for<br />
making modifications to it. For an executable work, <strong>com</strong>plete source<br />
code means all <strong>the</strong> source code for all modules it contains, plus any<br />
associated interface definition files, plus <strong>the</strong> scripts used to control<br />
<strong>com</strong>pilation and installation of <strong>the</strong> executable. However, as a special<br />
exception, <strong>the</strong> source code distributed need not include anything that<br />
is normally distributed (in ei<strong>the</strong>r source or binary form) with <strong>the</strong> major<br />
<strong>com</strong>ponents (<strong>com</strong>piler, kernel, and so on) of <strong>the</strong> operating system on<br />
which <strong>the</strong> executable runs, unless that <strong>com</strong>ponent itself ac<strong>com</strong>panies<br />
<strong>the</strong> executable.<br />
If distribution of executable or object code is made by offering access<br />
to copy from a designated place, <strong>the</strong>n offering equivalent access to<br />
copy <strong>the</strong> source code from <strong>the</strong> same place counts as distribution of <strong>the</strong><br />
source code, even though third parties are not <strong>com</strong>pelled to copy <strong>the</strong><br />
source along with <strong>the</strong> object code.<br />
4. You may not copy, modify, sublicense, or distribute <strong>the</strong> Program except<br />
as expressly provided under this License. Any attempt o<strong>the</strong>rwise to<br />
copy, modify, sublicense or distribute <strong>the</strong> Program is void, and will<br />
automatically terminate your rights under this License. However,<br />
parties who have received copies, or rights, from you under this<br />
License will not have <strong>the</strong>ir licenses terminated so long as such parties<br />
remain in full <strong>com</strong>pliance.<br />
MOTIF <strong>XS</strong> Owner’s <strong>Manual</strong> 307
308<br />
5. You are not required to accept this License, since you have not signed<br />
it. However, nothing else grants you permission to modify or distribute<br />
<strong>the</strong> Program or its derivative works. These actions are prohibited by<br />
law if you do not accept this License. Therefore, by modifying or<br />
distributing <strong>the</strong> Program (or any work based on <strong>the</strong> Program), you<br />
indicate your acceptance of this License to do so, and all its terms and<br />
conditions for copying, distributing or modifying <strong>the</strong> Program or works<br />
based on it.<br />
6. Each time you redistribute <strong>the</strong> Program (or any work based on <strong>the</strong><br />
Program), <strong>the</strong> recipient automatically receives a license from <strong>the</strong><br />
original licensor to copy, distribute or modify <strong>the</strong> Program subject to<br />
<strong>the</strong>se terms and conditions. You may not impose any fur<strong>the</strong>r<br />
restrictions on <strong>the</strong> recipients’ exercise of <strong>the</strong> rights granted herein. You<br />
are not responsible for enforcing <strong>com</strong>pliance by third parties to this<br />
License.<br />
7. If, as a consequence of a court judgment or allegation of patent<br />
infringement or for any o<strong>the</strong>r reason (not limited to patent issues),<br />
conditions are imposed on you (whe<strong>the</strong>r by court order, agreement or<br />
o<strong>the</strong>rwise) that contradict <strong>the</strong> conditions of this License, <strong>the</strong>y do not<br />
excuse you from <strong>the</strong> conditions of this License. If you cannot distribute<br />
so as to satisfy simultaneously your obligations under this License and<br />
any o<strong>the</strong>r pertinent obligations, <strong>the</strong>n as a consequence you may not<br />
distribute <strong>the</strong> Program at all. For example, if a patent license would not<br />
permit royalty-free redistribution of <strong>the</strong> Program by all those who<br />
receive copies directly or indirectly through you, <strong>the</strong>n <strong>the</strong> only way you<br />
could satisfy both it and this License would be to refrain entirely from<br />
distribution of <strong>the</strong> Program.<br />
If any portion of this section is held invalid or unenforceable under any<br />
particular circumstance, <strong>the</strong> balance of <strong>the</strong> section is intended to apply<br />
and <strong>the</strong> section as a whole is intended to apply in o<strong>the</strong>r circumstances.<br />
It is not <strong>the</strong> purpose of this section to induce you to infringe any patents<br />
or o<strong>the</strong>r property right claims or to contest validity of any such claims;<br />
this section has <strong>the</strong> sole purpose of protecting <strong>the</strong> integrity of <strong>the</strong> free<br />
software distribution system, which is implemented by public license<br />
practices. Many people have made generous contributions to <strong>the</strong> wide<br />
range of software distributed through that system in reliance on<br />
consistent application of that system; it is up to <strong>the</strong> author/donor to<br />
decide if he or she is willing to distribute software through any o<strong>the</strong>r<br />
system and a licensee cannot impose that choice.<br />
This section is intended to make thoroughly clear what is believed to be<br />
a consequence of <strong>the</strong> rest of this License.<br />
8. If <strong>the</strong> distribution and/or use of <strong>the</strong> Program is restricted in certain<br />
countries ei<strong>the</strong>r by patents or by copyrighted interfaces, <strong>the</strong> original<br />
copyright holder who places <strong>the</strong> Program under this License may add<br />
an explicit geographical distribution limitation excluding those<br />
countries, so that distribution is permitted only in or among countries<br />
not thus excluded. In such case, this License incorporates <strong>the</strong><br />
limitation as if written in <strong>the</strong> body of this License.<br />
9. The Free Software Foundation may publish revised and/or new versions<br />
of <strong>the</strong> General Public License from time to time. Such new versions will<br />
be similar in spirit to <strong>the</strong> present version, but may differ in detail to<br />
address new problems or concerns.<br />
Each version is given a distinguishing version number. If <strong>the</strong> Program<br />
specifies a version number of this License which applies to it and “any<br />
later version”, you have <strong>the</strong> option of following <strong>the</strong> terms and conditions<br />
ei<strong>the</strong>r of that version or of any later version published by <strong>the</strong> Free<br />
Software Foundation. If <strong>the</strong> Program does not specify a version number<br />
of this License, you may choose any version ever published by <strong>the</strong> Free<br />
Software Foundation.<br />
10. If you wish to incorporate parts of <strong>the</strong> Program into o<strong>the</strong>r free programs<br />
whose distribution conditions are different, write to <strong>the</strong> author to ask for<br />
permission. For software which is copyrighted by <strong>the</strong> Free Software<br />
Foundation, write to <strong>the</strong> Free Software Foundation; we sometimes make<br />
exceptions for this. Our decision will be guided by <strong>the</strong> two goals of<br />
preserving <strong>the</strong> free status of all derivatives of our free software and of<br />
promoting <strong>the</strong> sharing and reuse of software generally.<br />
NO WARRANTY<br />
11. BECAUSE THE PROGRAM IS LICENSED FREE OF CHARGE, THERE IS<br />
NO WARRANTY FOR THE PROGRAM, TO THE EXTENT PERMITTED<br />
BY APPLICABLE LAW. EXCEPT WHEN OTHERWISE STATED IN<br />
WRITING THE COPYRIGHT HOLDERS AND/OR OTHER PARTIES<br />
PROVIDE THE PROGRAM “AS IS” WITHOUT WARRANTY OF ANY<br />
KIND, EITHER EXPRESSED OR IMPLIED, INCLUDING, BUT NOT<br />
LIMITED TO, THE IMPLIED WARRANTIES OF MERCHANTABILITY AND<br />
FITNESS FOR A PARTICULAR PURPOSE. THE ENTIRE RISK AS TO<br />
THE QUALITY AND PERFORMANCE OF THE PROGRAM IS WITH<br />
YOU. SHOULD THE PROGRAM PROVE DEFECTIVE, YOU ASSUME<br />
THE COST OF ALL NECESSARY SERVICING, REPAIR OR<br />
CORRECTION.<br />
MOTIF <strong>XS</strong> Owner’s <strong>Manual</strong><br />
12. IN NO EVENT UNLESS REQUIRED BY APPLICABLE LAW OR AGREED<br />
TO IN WRITING WILL ANY COPYRIGHT HOLDER, OR ANY OTHER<br />
PARTY WHO MAY MODIFY AND/OR REDISTRIBUTE THE PROGRAM<br />
AS PERMITTED ABOVE, BE LIABLE TO YOU FOR DAMAGES,<br />
INCLUDING ANY GENERAL, SPECIAL, INCIDENTAL OR<br />
CONSEQUENTIAL DAMAGES ARISING OUT OF THE USE OR<br />
INABILITY TO USE THE PROGRAM (INCLUDING BUT NOT LIMITED<br />
TO LOSS OF DATA OR DATA BEING RENDERED INACCURATE OR<br />
LOSSES SUSTAINED BY YOU OR THIRD PARTIES OR A FAILURE OF<br />
THE PROGRAM TO OPERATE WITH ANY OTHER PROGRAMS), EVEN<br />
IF SUCH HOLDER OR OTHER PARTY HAS BEEN ADVISED OF THE<br />
POSSIBILITY OF SUCH DAMAGES.<br />
END OF TERMS AND CONDITIONS<br />
How to Apply These Terms to Your New<br />
Programs<br />
If you develop a new program, and you want it to be of <strong>the</strong> greatest possible<br />
use to <strong>the</strong> public, <strong>the</strong> best way to achieve this is to make it free software<br />
which everyone can redistribute and change under <strong>the</strong>se terms.<br />
To do so, attach <strong>the</strong> following notices to <strong>the</strong> program. It is safest to attach<br />
<strong>the</strong>m to <strong>the</strong> start of each source file to most effectively convey <strong>the</strong> exclusion<br />
of warranty; and each file should have at least <strong>the</strong> “copyright” line and a<br />
pointer to where <strong>the</strong> full notice is found.<br />
<br />
Copyright © <br />
This program is free software; you can redistribute it and/or modify it<br />
under <strong>the</strong> terms of <strong>the</strong> GNU General Public License as published by<br />
<strong>the</strong> Free Software Foundation; ei<strong>the</strong>r version 2 of <strong>the</strong> License, or (at<br />
your option) any later version.<br />
This program is distributed in <strong>the</strong> hope that it will be useful, but<br />
WITHOUT ANY WARRANTY; without even <strong>the</strong> implied warranty of<br />
MERCHANTABILITY or FITNESS FOR A PARTICULAR PURPOSE. See<br />
<strong>the</strong> GNU General Public License for more details.<br />
You should have received a copy of <strong>the</strong> GNU General Public License<br />
along with this program; if not, write to <strong>the</strong> Free Software Foundation,<br />
Inc., 51 Franklin Street, Fifth Floor, Boston, MA 02110-1301 USA.<br />
Also add information on how to contact you by electronic and paper mail.<br />
If <strong>the</strong> program is interactive, make it output a short notice like this when it<br />
starts in an interactive mode:<br />
Gnomovision version 69, Copyright © year name of author<br />
Gnomovision <strong>com</strong>es with ABSOLUTELY NO WARRANTY; for details<br />
type ‘show w’. This is free software, and you are wel<strong>com</strong>e to<br />
redistribute it under certain conditions; type ‘show c’ for details.<br />
The hypo<strong>the</strong>tical <strong>com</strong>mands ‘show w’ and ‘show c’ should show <strong>the</strong><br />
appropriate parts of <strong>the</strong> General Public License. Of course, <strong>the</strong> <strong>com</strong>mands<br />
you use may be called something o<strong>the</strong>r than ‘show w’ and ‘show c’; <strong>the</strong>y<br />
could even be mouse-clicks or menu items—whatever suits your program.<br />
You should also get your employer (if you work as a programmer) or your<br />
school, if any, to sign a “copyright disclaimer” for <strong>the</strong> program, if necessary.<br />
Here is a sample; alter <strong>the</strong> names:<br />
Yoyodyne, Inc., hereby disclaims all copyright interest in <strong>the</strong> program<br />
‘Gnomovision’ (which makes passes at <strong>com</strong>pilers) written by James<br />
Hacker.<br />
, 1 April 1989<br />
Ty Coon, President of Vice<br />
This General Public License does not permit incorporating your program<br />
into proprietary programs. If your program is a subroutine library, you may<br />
consider it more useful to permit linking proprietary applications with <strong>the</strong><br />
library. If this is what you want to do, use <strong>the</strong> GNU Lesser General Public<br />
License instead of this License.
Preamble<br />
GNU LESSER GENERAL PUBLIC LICENSE<br />
Version 2.1, February 1999<br />
Copyright © 1991, 1999 Free Software Foundation, Inc., 51 Franklin Street, Fifth Floor, Boston, MA 02110-1301 USA<br />
Everyone is permitted to copy and distribute verbatim copies of this license document, but changing it is not allowed.<br />
[This is <strong>the</strong> first released version of <strong>the</strong> Lesser GPL.<br />
It also counts as <strong>the</strong> successor of <strong>the</strong> GNU Library Public License, version 2, hence <strong>the</strong> version number 2.1.]<br />
The licenses for most software are designed to take away your freedom to<br />
share and change it. By contrast, <strong>the</strong> GNU General Public Licenses are<br />
intended to guarantee your freedom to share and change free software—to<br />
make sure <strong>the</strong> software is free for all its users.<br />
This license, <strong>the</strong> Lesser General Public License, applies to some specially<br />
designated software packages—typically libraries—of <strong>the</strong> Free Software<br />
Foundation and o<strong>the</strong>r authors who decide to use it. You can use it too, but<br />
we suggest you first think carefully about whe<strong>the</strong>r this license or <strong>the</strong> ordinary<br />
General Public License is <strong>the</strong> better strategy to use in any particular case,<br />
based on <strong>the</strong> explanations below.<br />
When we speak of free software, we are referring to freedom of use, not<br />
price. Our General Public Licenses are designed to make sure that you<br />
have <strong>the</strong> freedom to distribute copies of free software (and charge for this<br />
service if you wish); that you receive source code or can get it if you want it;<br />
that you can change <strong>the</strong> software and use pieces of it in new free programs;<br />
and that you are informed that you can do <strong>the</strong>se things.<br />
To protect your rights, we need to make restrictions that forbid distributors to<br />
deny you <strong>the</strong>se rights or to ask you to surrender <strong>the</strong>se rights. These<br />
restrictions translate to certain responsibilities for you if you distribute<br />
copies of <strong>the</strong> library or if you modify it.<br />
For example, if you distribute copies of <strong>the</strong> library, whe<strong>the</strong>r gratis or for a<br />
fee, you must give <strong>the</strong> recipients all <strong>the</strong> rights that we gave you. You must<br />
make sure that <strong>the</strong>y, too, receive or can get <strong>the</strong> source code. If you link<br />
o<strong>the</strong>r code with <strong>the</strong> library, you must provide <strong>com</strong>plete object files to <strong>the</strong><br />
recipients, so that <strong>the</strong>y can relink <strong>the</strong>m with <strong>the</strong> library after making changes<br />
to <strong>the</strong> library and re<strong>com</strong>piling it. And you must show <strong>the</strong>m <strong>the</strong>se terms so<br />
<strong>the</strong>y know <strong>the</strong>ir rights.<br />
We protect your rights with a two-step method: (1) we copyright <strong>the</strong> library,<br />
and (2) we offer you this license, which gives you legal permission to copy,<br />
distribute and/or modify <strong>the</strong> library.<br />
To protect each distributor, we want to make it very clear that <strong>the</strong>re is no<br />
warranty for <strong>the</strong> free library. Also, if <strong>the</strong> library is modified by someone else<br />
and passed on, <strong>the</strong> recipients should know that what <strong>the</strong>y have is not <strong>the</strong><br />
original version, so that <strong>the</strong> original author's reputation will not be affected<br />
by problems that might be introduced by o<strong>the</strong>rs.<br />
Finally, software patents pose a constant threat to <strong>the</strong> existence of any free<br />
program. We wish to make sure that a <strong>com</strong>pany cannot effectively restrict<br />
<strong>the</strong> users of a free program by obtaining a restrictive license from a patent<br />
holder. Therefore, we insist that any patent license obtained for a version of<br />
<strong>the</strong> library must be consistent with <strong>the</strong> full freedom of use specified in this<br />
license.<br />
Most GNU software, including some libraries, is covered by <strong>the</strong> ordinary<br />
GNU General Public License. This license, <strong>the</strong> GNU Lesser General Public<br />
License, applies to certain designated libraries, and is quite different from<br />
<strong>the</strong> ordinary General Public License. We use this license for certain libraries<br />
in order to permit linking those libraries into non-free programs.<br />
When a program is linked with a library, whe<strong>the</strong>r statically or using a shared<br />
library, <strong>the</strong> <strong>com</strong>bination of <strong>the</strong> two is legally speaking a <strong>com</strong>bined work, a<br />
derivative of <strong>the</strong> original library. The ordinary General Public License<br />
<strong>the</strong>refore permits such linking only if <strong>the</strong> entire <strong>com</strong>bination fits its criteria of<br />
freedom. The Lesser General Public License permits more lax criteria for<br />
linking o<strong>the</strong>r code with <strong>the</strong> library.<br />
We call this license <strong>the</strong> “Lesser” General Public License because it does<br />
Less to protect <strong>the</strong> user’s freedom than <strong>the</strong> ordinary General Public License.<br />
It also provides o<strong>the</strong>r free software developers Less of an advantage over<br />
<strong>com</strong>peting non-free programs. These disadvantages are <strong>the</strong> reason we use<br />
<strong>the</strong> ordinary General Public License for many libraries. However, <strong>the</strong> Lesser<br />
license provides advantages in certain special circumstances.<br />
For example, on rare occasions, <strong>the</strong>re may be a special need to encourage<br />
<strong>the</strong> widest possible use of a certain library, so that it be<strong>com</strong>es a de-facto<br />
standard. To achieve this, non-free programs must be allowed to use <strong>the</strong><br />
library. A more frequent case is that a free library does <strong>the</strong> same job as<br />
widely used non-free libraries. In this case, <strong>the</strong>re is little to gain by limiting<br />
<strong>the</strong> free library to free software only, so we use <strong>the</strong> Lesser General Public<br />
License.<br />
In o<strong>the</strong>r cases, permission to use a particular library in non-free programs<br />
enables a greater number of people to use a large body of free software.<br />
For example, permission to use <strong>the</strong> GNU C Library in non-free programs<br />
enables many more people to use <strong>the</strong> whole GNU operating system, as well<br />
as its variant, <strong>the</strong> GNU/Linux operating system.<br />
Although <strong>the</strong> Lesser General Public License is Less protective of <strong>the</strong> users’<br />
freedom, it does ensure that <strong>the</strong> user of a program that is linked with <strong>the</strong><br />
Library has <strong>the</strong> freedom and <strong>the</strong> wherewithal to run that program using a<br />
modified version of <strong>the</strong> Library.<br />
The precise terms and conditions for copying, distribution and<br />
modification follow. Pay close attention to <strong>the</strong> difference between a “work<br />
based on <strong>the</strong> library” and a “work that uses <strong>the</strong> library”. The former contains<br />
code derived from <strong>the</strong> library, whereas <strong>the</strong> latter must be <strong>com</strong>bined with <strong>the</strong><br />
library in order to run.<br />
GNU LESSER GENERAL PUBLIC LICENSE<br />
TERMS AND CONDITIONS FOR COPYING,<br />
DISTRIBUTION AND MODIFICATION<br />
0. This License Agreement applies to any software library or o<strong>the</strong>r<br />
program which contains a notice placed by <strong>the</strong> copyright holder or<br />
o<strong>the</strong>r authorized party saying it may be distributed under <strong>the</strong> terms of<br />
this Lesser General Public License (also called “this License”). Each<br />
licensee is addressed as “you”.<br />
A “library” means a collection of software functions and/or data<br />
prepared so as to be conveniently linked with application programs<br />
(which use some of those functions and data) to form executables.<br />
The “Library”, below, refers to any such software library or work which<br />
has been distributed under <strong>the</strong>se terms. A “work based on <strong>the</strong> Library”<br />
means ei<strong>the</strong>r <strong>the</strong> Library or any derivative work under copyright law:<br />
that is to say, a work containing <strong>the</strong> Library or a portion of it, ei<strong>the</strong>r<br />
verbatim or with modifications and/or translated straightforwardly into<br />
ano<strong>the</strong>r language. (Hereinafter, translation is included without limitation<br />
in <strong>the</strong> term “modification”.)<br />
“Source code” for a work means <strong>the</strong> preferred form of <strong>the</strong> work for<br />
making modifications to it. For a library, <strong>com</strong>plete source code means<br />
all <strong>the</strong> source code for all modules it contains, plus any associated<br />
interface definition files, plus <strong>the</strong> scripts used to control <strong>com</strong>pilation and<br />
installation of <strong>the</strong> library.<br />
Activities o<strong>the</strong>r than copying, distribution and modification are not<br />
covered by this License; <strong>the</strong>y are outside its scope. The act of running<br />
a program using <strong>the</strong> Library is not restricted, and output from such a<br />
program is covered only if its contents constitute a work based on <strong>the</strong><br />
Library (independent of <strong>the</strong> use of <strong>the</strong> Library in a tool for writing it).<br />
Whe<strong>the</strong>r that is true depends on what <strong>the</strong> Library does and what <strong>the</strong><br />
program that uses <strong>the</strong> Library does.<br />
1. You may copy and distribute verbatim copies of <strong>the</strong> Library's <strong>com</strong>plete<br />
source code as you receive it, in any medium, provided that you<br />
conspicuously and appropriately publish on each copy an appropriate<br />
copyright notice and disclaimer of warranty; keep intact all <strong>the</strong> notices<br />
that refer to this License and to <strong>the</strong> absence of any warranty; and<br />
distribute a copy of this License along with <strong>the</strong> Library.<br />
You may charge a fee for <strong>the</strong> physical act of transferring a copy, and<br />
you may at your option offer warranty protection in exchange for a fee.<br />
2. You may modify your copy or copies of <strong>the</strong> Library or any portion of it,<br />
thus forming a work based on <strong>the</strong> Library, and copy and distribute such<br />
modifications or work under <strong>the</strong> terms of Section 1 above, provided that<br />
you also meet all of <strong>the</strong>se conditions:<br />
a) The modified work must itself be a software library.<br />
b) You must cause <strong>the</strong> files modified to carry prominent notices stating<br />
that you changed <strong>the</strong> files and <strong>the</strong> date of any change.<br />
c) You must cause <strong>the</strong> whole of <strong>the</strong> work to be licensed at no charge to<br />
all third parties under <strong>the</strong> terms of this License.<br />
d) If a facility in <strong>the</strong> modified Library refers to a function or a table of<br />
data to be supplied by an application program that uses <strong>the</strong> facility,<br />
o<strong>the</strong>r than as an argument passed when <strong>the</strong> facility is invoked, <strong>the</strong>n<br />
you must make a good faith effort to ensure that, in <strong>the</strong> event an<br />
application does not supply such function or table, <strong>the</strong> facility still<br />
operates, and performs whatever part of its purpose remains<br />
meaningful.<br />
(For example, a function in a library to <strong>com</strong>pute square roots has a<br />
purpose that is entirely well-defined independent of <strong>the</strong> application.<br />
Therefore, Subsection 2d requires that any application-supplied<br />
function or table used by this function must be optional: if <strong>the</strong><br />
MOTIF <strong>XS</strong> Owner’s <strong>Manual</strong> 309
310<br />
application does not supply it, <strong>the</strong> square root function must still<br />
<strong>com</strong>pute square roots.)<br />
These requirements apply to <strong>the</strong> modified work as a whole. If<br />
identifiable sections of that work are not derived from <strong>the</strong> Library, and<br />
can be reasonably considered independent and separate works in<br />
<strong>the</strong>mselves, <strong>the</strong>n this License, and its terms, do not apply to those<br />
sections when you distribute <strong>the</strong>m as separate works. But when you<br />
distribute <strong>the</strong> same sections as part of a whole which is a work based<br />
on <strong>the</strong> Library, <strong>the</strong> distribution of <strong>the</strong> whole must be on <strong>the</strong> terms of this<br />
License, whose permissions for o<strong>the</strong>r licensees extend to <strong>the</strong> entire<br />
whole, and thus to each and every part regardless of who wrote it.<br />
Thus, it is not <strong>the</strong> intent of this section to claim rights or contest your<br />
rights to work written entirely by you; ra<strong>the</strong>r, <strong>the</strong> intent is to exercise <strong>the</strong><br />
right to control <strong>the</strong> distribution of derivative or collective works based<br />
on <strong>the</strong> Library.<br />
In addition, mere aggregation of ano<strong>the</strong>r work not based on <strong>the</strong> Library<br />
with <strong>the</strong> Library (or with a work based on <strong>the</strong> Library) on a volume of a<br />
storage or distribution medium does not bring <strong>the</strong> o<strong>the</strong>r work under <strong>the</strong><br />
scope of this License.<br />
3. You may opt to apply <strong>the</strong> terms of <strong>the</strong> ordinary GNU General Public<br />
License instead of this License to a given copy of <strong>the</strong> Library. To do<br />
this, you must alter all <strong>the</strong> notices that refer to this License, so that <strong>the</strong>y<br />
refer to <strong>the</strong> ordinary GNU General Public License, version 2, instead of<br />
to this License. (If a newer version than version 2 of <strong>the</strong> ordinary GNU<br />
General Public License has appeared, <strong>the</strong>n you can specify that<br />
version instead if you wish.) Do not make any o<strong>the</strong>r change in <strong>the</strong>se<br />
notices.<br />
Once this change is made in a given copy, it is irreversible for that copy,<br />
so <strong>the</strong> ordinary GNU General Public License applies to all subsequent<br />
copies and derivative works made from that copy.<br />
This option is useful when you wish to copy part of <strong>the</strong> code of <strong>the</strong><br />
Library into a program that is not a library.<br />
4. You may copy and distribute <strong>the</strong> Library (or a portion or derivative of it,<br />
under Section 2) in object code or executable form under <strong>the</strong> terms of<br />
Sections 1 and 2 above provided that you ac<strong>com</strong>pany it with <strong>the</strong><br />
<strong>com</strong>plete corresponding machine-readable source code, which must<br />
be distributed under <strong>the</strong> terms of Sections 1 and 2 above on a medium<br />
customarily used for software interchange.<br />
If distribution of object code is made by offering access to copy from a<br />
designated place, <strong>the</strong>n offering equivalent access to copy <strong>the</strong> source<br />
code from <strong>the</strong> same place satisfies <strong>the</strong> requirement to distribute <strong>the</strong><br />
source code, even though third parties are not <strong>com</strong>pelled to copy <strong>the</strong><br />
source along with <strong>the</strong> object code.<br />
5. A program that contains no derivative of any portion of <strong>the</strong> Library, but<br />
is designed to work with <strong>the</strong> Library by being <strong>com</strong>piled or linked with it,<br />
is called a “work that uses <strong>the</strong> Library”. Such a work, in isolation, is not<br />
a derivative work of <strong>the</strong> Library, and <strong>the</strong>refore falls outside <strong>the</strong> scope of<br />
this License.<br />
However, linking a “work that uses <strong>the</strong> Library” with <strong>the</strong> Library creates<br />
an executable that is a derivative of <strong>the</strong> Library (because it contains<br />
portions of <strong>the</strong> Library), ra<strong>the</strong>r than a “work that uses <strong>the</strong> library”. The<br />
executable is <strong>the</strong>refore covered by this License. Section 6 states terms<br />
for distribution of such executables.<br />
When a “work that uses <strong>the</strong> Library” uses material from a header file<br />
that is part of <strong>the</strong> Library, <strong>the</strong> object code for <strong>the</strong> work may be a<br />
derivative work of <strong>the</strong> Library even though <strong>the</strong> source code is not.<br />
Whe<strong>the</strong>r this is true is especially significant if <strong>the</strong> work can be linked<br />
without <strong>the</strong> Library, or if <strong>the</strong> work is itself a library. The threshold for this<br />
to be true is not precisely defined by law.<br />
If such an object file uses only numerical parameters, data structure<br />
layouts and accessors, and small macros and small inline functions<br />
(ten lines or less in length), <strong>the</strong>n <strong>the</strong> use of <strong>the</strong> object file is unrestricted,<br />
regardless of whe<strong>the</strong>r it is legally a derivative work. (Executables<br />
containing this object code plus portions of <strong>the</strong> Library will still fall<br />
under Section 6.)<br />
O<strong>the</strong>rwise, if <strong>the</strong> work is a derivative of <strong>the</strong> Library, you may distribute<br />
<strong>the</strong> object code for <strong>the</strong> work under <strong>the</strong> terms of Section 6. Any<br />
executables containing that work also fall under Section 6, whe<strong>the</strong>r or<br />
not <strong>the</strong>y are linked directly with <strong>the</strong> Library itself.<br />
6. As an exception to <strong>the</strong> Sections above, you may also <strong>com</strong>bine or link a<br />
“work that uses <strong>the</strong> Library” with <strong>the</strong> Library to produce a work<br />
containing portions of <strong>the</strong> Library, and distribute that work under terms<br />
of your choice, provided that <strong>the</strong> terms permit modification of <strong>the</strong> work<br />
for <strong>the</strong> customer's own use and reverse engineering for debugging<br />
such modifications.<br />
You must give prominent notice with each copy of <strong>the</strong> work that <strong>the</strong><br />
Library is used in it and that <strong>the</strong> Library and its use are covered by this<br />
License. You must supply a copy of this License. If <strong>the</strong> work during<br />
execution displays copyright notices, you must include <strong>the</strong> copyright<br />
notice for <strong>the</strong> Library among <strong>the</strong>m, as well as a reference directing <strong>the</strong><br />
user to <strong>the</strong> copy of this License. Also, you must do one of <strong>the</strong>se things:<br />
MOTIF <strong>XS</strong> Owner’s <strong>Manual</strong><br />
a) Ac<strong>com</strong>pany <strong>the</strong> work with <strong>the</strong> <strong>com</strong>plete corresponding machinereadable<br />
source code for <strong>the</strong> Library including whatever changes<br />
were used in <strong>the</strong> work (which must be distributed under Sections 1<br />
and 2 above); and, if <strong>the</strong> work is an executable linked with <strong>the</strong><br />
Library, with <strong>the</strong> <strong>com</strong>plete machine-readable “work that uses <strong>the</strong><br />
Library”, as object code and/or source code, so that <strong>the</strong> user can<br />
modify <strong>the</strong> Library and <strong>the</strong>n relink to produce a modified executable<br />
containing <strong>the</strong> modified Library. (It is understood that <strong>the</strong> user who<br />
changes <strong>the</strong> contents of definitions files in <strong>the</strong> Library will not<br />
necessarily be able to re<strong>com</strong>pile <strong>the</strong> application to use <strong>the</strong> modified<br />
definitions.)<br />
b) Use a suitable shared library mechanism for linking with <strong>the</strong> Library.<br />
A suitable mechanism is one that (1) uses at run time a copy of <strong>the</strong><br />
library already present on <strong>the</strong> user's <strong>com</strong>puter system, ra<strong>the</strong>r than<br />
copying library functions into <strong>the</strong> executable, and (2) will operate<br />
properly with a modified version of <strong>the</strong> library, if <strong>the</strong> user installs one,<br />
as long as <strong>the</strong> modified version is interface-<strong>com</strong>patible with <strong>the</strong><br />
version that <strong>the</strong> work was made with.<br />
c) Ac<strong>com</strong>pany <strong>the</strong> work with a written offer, valid for at least three<br />
years, to give <strong>the</strong> same user <strong>the</strong> materials specified in Subsection<br />
6a, above, for a charge no more than <strong>the</strong> cost of performing this<br />
distribution.<br />
d) If distribution of <strong>the</strong> work is made by offering access to copy from a<br />
designated place, offer equivalent access to copy <strong>the</strong> above<br />
specified materials from <strong>the</strong> same place.<br />
e) Verify that <strong>the</strong> user has already received a copy of <strong>the</strong>se materials or<br />
that you have already sent this user a copy.<br />
For an executable, <strong>the</strong> required form of <strong>the</strong> “work that uses <strong>the</strong> Library”<br />
must include any data and utility programs needed for reproducing <strong>the</strong><br />
executable from it. However, as a special exception, <strong>the</strong> materials to be<br />
distributed need not include anything that is normally distributed (in<br />
ei<strong>the</strong>r source or binary form) with <strong>the</strong> major <strong>com</strong>ponents (<strong>com</strong>piler,<br />
kernel, and so on) of <strong>the</strong> operating system on which <strong>the</strong> executable<br />
runs, unless that <strong>com</strong>ponent itself ac<strong>com</strong>panies <strong>the</strong> executable.<br />
It may happen that this requirement contradicts <strong>the</strong> license restrictions<br />
of o<strong>the</strong>r proprietary libraries that do not normally ac<strong>com</strong>pany <strong>the</strong><br />
operating system. Such a contradiction means you cannot use both<br />
<strong>the</strong>m and <strong>the</strong> Library toge<strong>the</strong>r in an executable that you distribute.<br />
7. You may place library facilities that are a work based on <strong>the</strong> Library<br />
side-by-side in a single library toge<strong>the</strong>r with o<strong>the</strong>r library facilities not<br />
covered by this License, and distribute such a <strong>com</strong>bined library,<br />
provided that <strong>the</strong> separate distribution of <strong>the</strong> work based on <strong>the</strong> Library<br />
and of <strong>the</strong> o<strong>the</strong>r library facilities is o<strong>the</strong>rwise permitted, and provided<br />
that you do <strong>the</strong>se two things:<br />
a) Ac<strong>com</strong>pany <strong>the</strong> <strong>com</strong>bined library with a copy of <strong>the</strong> same work<br />
based on <strong>the</strong> Library, un<strong>com</strong>bined with any o<strong>the</strong>r library facilities.<br />
This must be distributed under <strong>the</strong> terms of <strong>the</strong> Sections above.<br />
b) Give prominent notice with <strong>the</strong> <strong>com</strong>bined library of <strong>the</strong> fact that part<br />
of it is a work based on <strong>the</strong> Library, and explaining where to find <strong>the</strong><br />
ac<strong>com</strong>panying un<strong>com</strong>bined form of <strong>the</strong> same work.<br />
8. You may not copy, modify, sublicense, link with, or distribute <strong>the</strong> Library<br />
except as expressly provided under this License. Any attempt<br />
o<strong>the</strong>rwise to copy, modify, sublicense, link with, or distribute <strong>the</strong> Library<br />
is void, and will automatically terminate your rights under this License.<br />
However, parties who have received copies, or rights, from you under<br />
this License will not have <strong>the</strong>ir licenses terminated so long as such<br />
parties remain in full <strong>com</strong>pliance.<br />
9. You are not required to accept this License, since you have not signed<br />
it. However, nothing else grants you permission to modify or distribute<br />
<strong>the</strong> Library or its derivative works. These actions are prohibited by law<br />
if you do not accept this License. Therefore, by modifying or<br />
distributing <strong>the</strong> Library (or any work based on <strong>the</strong> Library), you indicate<br />
your acceptance of this License to do so, and all its terms and<br />
conditions for copying, distributing or modifying <strong>the</strong> Library or works<br />
based on it.<br />
10. Each time you redistribute <strong>the</strong> Library (or any work based on <strong>the</strong><br />
Library), <strong>the</strong> recipient automatically receives a license from <strong>the</strong> original<br />
licensor to copy, distribute, link with or modify <strong>the</strong> Library subject to<br />
<strong>the</strong>se terms and conditions. You may not impose any fur<strong>the</strong>r<br />
restrictions on <strong>the</strong> recipients’ exercise of <strong>the</strong> rights granted herein. You<br />
are not responsible for enforcing <strong>com</strong>pliance by third parties with this<br />
License.<br />
11. If, as a consequence of a court judgment or allegation of patent<br />
infringement or for any o<strong>the</strong>r reason (not limited to patent issues),<br />
conditions are imposed on you (whe<strong>the</strong>r by court order, agreement or<br />
o<strong>the</strong>rwise) that contradict <strong>the</strong> conditions of this License, <strong>the</strong>y do not<br />
excuse you from <strong>the</strong> conditions of this License. If you cannot distribute<br />
so as to satisfy simultaneously your obligations under this License and<br />
any o<strong>the</strong>r pertinent obligations, <strong>the</strong>n as a consequence you may not<br />
distribute <strong>the</strong> Library at all. For example, if a patent license would not<br />
permit royalty-free redistribution of <strong>the</strong> Library by all those who receive
copies directly or indirectly through you, <strong>the</strong>n <strong>the</strong> only way you could<br />
satisfy both it and this License would be to refrain entirely from<br />
distribution of <strong>the</strong> Library.<br />
If any portion of this section is held invalid or unenforceable under any<br />
particular circumstance, <strong>the</strong> balance of <strong>the</strong> section is intended to apply,<br />
and <strong>the</strong> section as a whole is intended to apply in o<strong>the</strong>r circumstances.<br />
It is not <strong>the</strong> purpose of this section to induce you to infringe any patents<br />
or o<strong>the</strong>r property right claims or to contest validity of any such claims;<br />
this section has <strong>the</strong> sole purpose of protecting <strong>the</strong> integrity of <strong>the</strong> free<br />
software distribution system which is implemented by public license<br />
practices. Many people have made generous contributions to <strong>the</strong> wide<br />
range of software distributed through that system in reliance on<br />
consistent application of that system; it is up to <strong>the</strong> author/donor to<br />
decide if he or she is willing to distribute software through any o<strong>the</strong>r<br />
system and a licensee cannot impose that choice.<br />
This section is intended to make thoroughly clear what is believed to be<br />
a consequence of <strong>the</strong> rest of this License.<br />
12. If <strong>the</strong> distribution and/or use of <strong>the</strong> Library is restricted in certain<br />
countries ei<strong>the</strong>r by patents or by copyrighted interfaces, <strong>the</strong> original<br />
copyright holder who places <strong>the</strong> Library under this License may add an<br />
explicit geographical distribution limitation excluding those countries,<br />
so that distribution is permitted only in or among countries not thus<br />
excluded. In such case, this License incorporates <strong>the</strong> limitation as if<br />
written in <strong>the</strong> body of this License.<br />
13. The Free Software Foundation may publish revised and/or new versions<br />
of <strong>the</strong> Lesser General Public License from time to time. Such new<br />
versions will be similar in spirit to <strong>the</strong> present version, but may differ in<br />
detail to address new problems or concerns.<br />
Each version is given a distinguishing version number. If <strong>the</strong> Library<br />
specifies a version number of this License which applies to it and “any<br />
later version”, you have <strong>the</strong> option of following <strong>the</strong> terms and conditions<br />
ei<strong>the</strong>r of that version or of any later version published by <strong>the</strong> Free<br />
Software Foundation. If <strong>the</strong> Library does not specify a license version<br />
number, you may choose any version ever published by <strong>the</strong> Free<br />
Software Foundation.<br />
14. If you wish to incorporate parts of <strong>the</strong> Library into o<strong>the</strong>r free programs<br />
whose distribution conditions are in<strong>com</strong>patible with <strong>the</strong>se, write to <strong>the</strong><br />
author to ask for permission. For software which is copyrighted by <strong>the</strong><br />
Free Software Foundation, write to <strong>the</strong> Free Software Foundation; we<br />
sometimes make exceptions for this. Our decision will be guided by<br />
<strong>the</strong> two goals of preserving <strong>the</strong> free status of all derivatives of our free<br />
software and of promoting <strong>the</strong> sharing and reuse of software generally.<br />
NO WARRANTY<br />
15. BECAUSE THE LIBRARY IS LICENSED FREE OF CHARGE, THERE IS<br />
NO WARRANTY FOR THE LIBRARY, TO THE EXTENT PERMITTED BY<br />
APPLICABLE LAW. EXCEPT WHEN OTHERWISE STATED IN WRITING<br />
THE COPYRIGHT HOLDERS AND/OR OTHER PARTIES PROVIDE THE<br />
LIBRARY “AS IS” WITHOUT WARRANTY OF ANY KIND, EITHER<br />
EXPRESSED OR IMPLIED, INCLUDING, BUT NOT LIMITED TO, THE<br />
IMPLIED WARRANTIES OF MERCHANTABILITY AND FITNESS FOR A<br />
PARTICULAR PURPOSE. THE ENTIRE RISK AS TO THE QUALITY AND<br />
PERFORMANCE OF TH LIBRARY IS WITH YOU. SHOULD THE<br />
LIBRARY PROVE DEFECTIVE, YOU ASSUME THE COST OF ALL<br />
NECESSARY SERVICING, REPAIR OR CORRECTION.<br />
16. IN NO EVENT UNLESS REQUIRED BY APPLICABLE LAW OR AGREED<br />
TO IN WRITING WILL ANY COPYRIGHT HOLDER, OR ANY OTHER<br />
PARTY WHO MAY MODIFY AND/OR REDISTRIBUTE THE LIBRARY AS<br />
PERMITTED ABOVE, BE LIABLE TO YOU FOR DAMAGES, INCLUDING<br />
ANY GENERAL, SPECIAL, INCIDENTAL OR CONSEQUENTIAL<br />
DAMAGES ARISING OUT OF THE USE OR INABILITY TO USE THE<br />
LIBRARY (INCLUDING BUT NOT LIMITED TO LOSS OF DATA OR DATA<br />
BEING RENDERED INACCURATE OR LOSSES SUSTAINED BY YOU<br />
OR THIRD PARTIES OR A FAILURE OF THE LIBRARY TO OPERATE<br />
WITH ANY OTHER SOFTWARE), EVEN IF SUCH HOLDER OR OTHER<br />
PARTY HAS BEEN ADVISED OF THE POSSIBILITY OF SUCH<br />
DAMAGES.<br />
END OF TERMS AND CONDITIONS<br />
How to Apply These Terms to Your New<br />
Libraries<br />
If you develop a new library, and you want it to be of <strong>the</strong> greatest possible<br />
use to <strong>the</strong> public, we re<strong>com</strong>mend making it free software that everyone can<br />
redistribute and change. You can do so by permitting redistribution under<br />
<strong>the</strong>se terms (or, alternatively, under <strong>the</strong> terms of <strong>the</strong> ordinary General Public<br />
License).<br />
To apply <strong>the</strong>se terms, attach <strong>the</strong> following notices to <strong>the</strong> library. It is safest to<br />
attach <strong>the</strong>m to <strong>the</strong> start of each source file to most effectively convey <strong>the</strong><br />
exclusion of warranty; and each file should have at least <strong>the</strong> “copyright” line<br />
and a pointer to where <strong>the</strong> full notice is found.<br />
<br />
Copyright © <br />
This library is free software; you can redistribute it and/or modify it<br />
under <strong>the</strong> terms of <strong>the</strong> GNU Lesser General Public License as<br />
published by <strong>the</strong> Free Software Foundation; ei<strong>the</strong>r version 2.1 of <strong>the</strong><br />
License, or (at your option) any later version.<br />
This library is distributed in <strong>the</strong> hope that it will be useful, but WITHOUT<br />
ANY WARRANTY; without even <strong>the</strong> implied warranty of<br />
MERCHANTABILITY or FITNESS FOR A PARTICULAR PURPOSE. See<br />
<strong>the</strong> GNU Lesser General Public License for more details.<br />
You should have received a copy of <strong>the</strong> GNU Lesser General Public<br />
License along with this library; if not, write to <strong>the</strong> Free Software<br />
Foundation, Inc., 51 Franklin Street, Fifth Floor, Boston, MA 02110-1301<br />
USA<br />
Also add information on how to contact you by electronic and paper mail.<br />
You should also get your employer (if you work as a programmer) or your<br />
school, if any, to sign a “copyright disclaimer” for <strong>the</strong> library, if necessary.<br />
Here is a sample; alter <strong>the</strong> names:<br />
Yoyodyne, Inc., hereby disclaims all copyright interest in <strong>the</strong> library<br />
‘Frob’ (a library for tweaking knobs) written by James Random Hacker.<br />
, 1 April 1990<br />
Ty Coon, President of Vice<br />
That’s all <strong>the</strong>re is to it!<br />
expat<br />
Copyright © 1998, 1999, 2000 Thai Open Source Software Center Ltd and<br />
Clark Cooper<br />
Copyright © 2001, 2002, 2003 Expat maintainers.<br />
Permission is hereby granted, free of charge, to any person obtaining a<br />
copy of this software and associated documentation files (<strong>the</strong> “Software”), to<br />
deal in <strong>the</strong> Software without restriction, including without limitation <strong>the</strong> rights<br />
to use, copy, modify, merge, publish, distribute, sublicense, and/or sell<br />
copies of <strong>the</strong> Software, and to permit persons to whom <strong>the</strong> Software is<br />
furnished to do so, subject to <strong>the</strong> following conditions:<br />
The above copyright notice and this permission notice shall be included in<br />
all copies or substantial portions of <strong>the</strong> Software.<br />
THE SOFTWARE IS PROVIDED “AS IS”, WITHOUT WARRANTY OF ANY<br />
KIND, EXPRESS OR IMPLIED, INCLUDING BUT NOT LIMITED TO THE<br />
WARRANTIES OF MERCHANTABILITY, FITNESS FOR A PARTICULAR<br />
PURPOSE AND NONINFRINGEMENT. IN NO EVENT SHALL THE AUTHORS<br />
OR COPYRIGHT HOLDERS BE LIABLE FOR ANY CLAIM, DAMAGES OR<br />
OTHER LIABILITY, WHETHER IN AN ACTION OF CONTRACT, TORT OR<br />
OTHERWISE, ARISING FROM, OUT OF OR IN CONNECTION WITH THE<br />
SOFTWARE OR THE USE OR OTHER DEALINGS IN THE SOFTWARE.<br />
freetype<br />
The FreeType Project LICENSE<br />
2002-Apr-11<br />
Copyright 1996-2002 by David Turner, Robert Wilhelm, and Werner<br />
Lemberg<br />
Introduction<br />
The FreeType Project is distributed in several archive packages; some of<br />
<strong>the</strong>m may contain, in addition to <strong>the</strong> FreeType font engine, various tools and<br />
contributions which rely on, or relate to, <strong>the</strong> FreeType Project.<br />
This license applies to all files found in such packages, and which do not fall<br />
under <strong>the</strong>ir own explicit license. The license affects thus <strong>the</strong> FreeType font<br />
engine, <strong>the</strong> test programs, documentation and makefiles, at <strong>the</strong> very least.<br />
This license was inspired by <strong>the</strong> BSD, Artistic, and IJG (Independent JPEG<br />
Group) licenses, which all encourage inclusion and use of free software in<br />
MOTIF <strong>XS</strong> Owner’s <strong>Manual</strong> 311
312<br />
<strong>com</strong>mercial and freeware products alike. As a consequence, its main points<br />
are that:<br />
• We don’t promise that this software works. However, we will be interested<br />
in any kind of bug reports. (‘as is’ distribution)<br />
• You can use this software for whatever you want, in parts or full form,<br />
without having to pay us. (‘royalty-free' usage)<br />
• You may not pretend that you wrote this software. If you use it, or only<br />
parts of it, in a program, you must acknowledge somewhere in your<br />
documentation that you have used <strong>the</strong> FreeType code. (‘credits’)<br />
We specifically permit and encourage <strong>the</strong> inclusion of this software, with or<br />
without modifications, in <strong>com</strong>mercial products. We disclaim all warranties<br />
covering The FreeType Project and assume no liability related to The<br />
FreeType Project.<br />
Finally, many people asked us for a preferred form for a credit/disclaimer to<br />
use in <strong>com</strong>pliance with this license. We thus encourage you to use <strong>the</strong><br />
following text:<br />
Portions of this software are copyright © 1996-2002 The FreeType Project<br />
(www.freetype.org). All rights reserved.<br />
Legal Terms<br />
0. Definitions<br />
Throughout this license, <strong>the</strong> terms ‘package’, ‘FreeType Project’, and<br />
‘FreeType archive’ refer to <strong>the</strong> set of files originally distributed by <strong>the</strong> authors<br />
(David Turner, Robert Wilhelm, and Werner Lemberg) as <strong>the</strong> ‘FreeType<br />
Project', be <strong>the</strong>y named as alpha, beta or final release.<br />
‘You’ refers to <strong>the</strong> licensee, or person using <strong>the</strong> project, where ‘using’ is a<br />
generic term including <strong>com</strong>piling <strong>the</strong> project’s source code as well as<br />
linking it to form a ‘program’ or ‘executable’. This program is referred to as ‘a<br />
program using <strong>the</strong> FreeType engine’.<br />
This license applies to all files distributed in <strong>the</strong> original FreeType Project,<br />
including all source code, binaries and documentation, unless o<strong>the</strong>rwise<br />
stated in <strong>the</strong> file in its original, unmodified form as distributed in <strong>the</strong> original<br />
archive. If you are unsure whe<strong>the</strong>r or not a particular file is covered by this<br />
license, you must contact us to verify this.<br />
The FreeType Project is copyright © 1996-2000 by David Turner, Robert<br />
Wilhelm, and Werner Lemberg. All rights reserved except as specified<br />
below.<br />
1. No Warranty<br />
THE FREETYPE PROJECT IS PROVIDED ‘AS IS’ WITHOUT WARRANTY OF<br />
ANY KIND, EITHER EXPRESS OR IMPLIED, INCLUDING, BUT NOT<br />
LIMITED TO, WARRANTIES OF MERCHANTABILITY AND FITNESS FOR A<br />
PARTICULAR PURPOSE. IN NO EVENT WILL ANY OF THE AUTHORS OR<br />
COPYRIGHT HOLDERS BE LIABLE FOR ANY DAMAGES CAUSED BY THE<br />
USE OR THE INABILITY TO USE, OF THE FREETYPE PROJECT.<br />
2. Redistribution<br />
This license grants a worldwide, royalty-free, perpetual and irrevocable right<br />
and license to use, execute, perform, <strong>com</strong>pile, display, copy, create<br />
derivative works of, distribute and sublicense <strong>the</strong> FreeType Project (in both<br />
source and object code forms) and derivative works <strong>the</strong>reof for any<br />
purpose; and to authorize o<strong>the</strong>rs to exercise some or all of <strong>the</strong> rights<br />
granted herein, subject to <strong>the</strong> following conditions:<br />
• Redistribution of source code must retain this license file (‘FTL.TXT’)<br />
unaltered; any additions, deletions or changes to <strong>the</strong> original files must<br />
be clearly indicated in ac<strong>com</strong>panying documentation. The copyright<br />
notices of <strong>the</strong> unaltered, original files must be preserved in all copies of<br />
source files.<br />
• Redistribution in binary form must provide a disclaimer that states that<br />
<strong>the</strong> software is based in part of <strong>the</strong> work of <strong>the</strong> FreeType Team, in <strong>the</strong><br />
distribution documentation. We also encourage you to put an URL to <strong>the</strong><br />
FreeType web page in your documentation, though this isn’t mandatory.<br />
These conditions apply to any software derived from or based on <strong>the</strong><br />
FreeType Project, not just <strong>the</strong> unmodified files. If you use our work, you must<br />
acknowledge us. However, no fee need be paid to us.<br />
3. Advertising<br />
Nei<strong>the</strong>r <strong>the</strong> FreeType authors and contributors nor you shall use <strong>the</strong> name of<br />
<strong>the</strong> o<strong>the</strong>r for <strong>com</strong>mercial, advertising, or promotional purposes without<br />
specific prior written permission.<br />
We suggest, but do not require, that you use one or more of <strong>the</strong> following<br />
phrases to refer to this software in your documentation or advertising<br />
materials: ‘FreeType Project’, ‘FreeType Engine’, ‘FreeType library’, or<br />
‘FreeType Distribution’.<br />
As you have not signed this license, you are not required to accept it.<br />
However, as <strong>the</strong> FreeType Project is copyrighted material, only this license,<br />
or ano<strong>the</strong>r one contracted with <strong>the</strong> authors, grants you <strong>the</strong> right to use,<br />
distribute, and modify it.<br />
Therefore, by using, distributing, or modifying <strong>the</strong> FreeType Project, you<br />
indicate that you understand and accept all <strong>the</strong> terms of this license.<br />
MOTIF <strong>XS</strong> Owner’s <strong>Manual</strong><br />
4. Contacts<br />
There are two mailing lists related to FreeType:<br />
• freetype@freetype.org<br />
Discusses general use and applications of FreeType, as well as future<br />
and wanted additions to <strong>the</strong> library and distribution.<br />
If you are looking for support, start in this list if you haven’t found anything<br />
to help you in <strong>the</strong> documentation.<br />
• devel@freetype.org<br />
Discusses bugs, as well as engine internals, design issues, specific<br />
licenses, porting, etc.<br />
• http://www.freetype.org<br />
Holds <strong>the</strong> current FreeType web page, which will allow you to download<br />
our latest development version and read online documentation.<br />
You can also contact us individually at:<br />
David Turner <br />
Robert Wilhelm <br />
Werner Lemberg <br />
glibc<br />
This file contains <strong>the</strong> copying permission notices for various files in <strong>the</strong> GNU<br />
C Library distribution that have copyright owners o<strong>the</strong>r than <strong>the</strong> Free<br />
Software Foundation. These notices all require that a copy of <strong>the</strong> notice be<br />
included in <strong>the</strong> ac<strong>com</strong>panying documentation and be distributed with<br />
binary distributions of <strong>the</strong> code, so be sure to include this file along with any<br />
binary distributions derived from <strong>the</strong> GNU C Library.<br />
All code incorporated from 4.4 BSD is distributed under <strong>the</strong> following<br />
license:<br />
Copyright © 1991 Regents of <strong>the</strong> University of California.<br />
All rights reserved.<br />
Redistribution and use in source and binary forms, with or without<br />
modification, are permitted provided that <strong>the</strong> following conditions are met:<br />
1. Redistributions of source code must retain <strong>the</strong> above copyright notice,<br />
this list of conditions and <strong>the</strong> following disclaimer.<br />
2. Redistributions in binary form must reproduce <strong>the</strong> above copyright<br />
notice, this list of conditions and <strong>the</strong> following disclaimer in <strong>the</strong><br />
documentation and/or o<strong>the</strong>r materials provided with <strong>the</strong> distribution.<br />
3. [This condition was removed.]<br />
4. Nei<strong>the</strong>r <strong>the</strong> name of <strong>the</strong> University nor <strong>the</strong> names of its contributors may<br />
be used to endorse or promote products derived from this software<br />
without specific prior written permission.<br />
THIS SOFTWARE IS PROVIDED BY THE REGENTS AND CONTRIBUTORS<br />
“AS IS” AND ANY EXPRESS OR IMPLIED WARRANTIES, INCLUDING, BUT<br />
NOT LIMITED TO, THE IMPLIED WARRANTIES OF MERCHANTABILITY<br />
AND FITNESS FOR A PARTICULAR PURPOSE ARE DISCLAIMED. IN NO<br />
EVENT SHALL THE REGENTS OR CONTRIBUTORS BE LIABLE FOR ANY<br />
DIRECT, INDIRECT, INCIDENTAL, SPECIAL, EXEMPLARY, OR<br />
CONSEQUENTIAL DAMAGES (INCLUDING, BUT NOT LIMITED TO,<br />
PROCUREMENT OF SUBSTITUTE GOODS OR SERVICES; LOSS OF USE,<br />
DATA, OR PROFITS; OR BUSINESS INTERRUPTION) HOWEVER CAUSED<br />
AND ON ANY THEORY OF LIABILITY, WHETHER IN CONTRACT, STRICT<br />
LIABILITY, OR TORT (INCLUDING NEGLIGENCE OR OTHERWISE)<br />
ARISING IN ANY WAY OUT OF THE USE OF THIS SOFTWARE, EVEN IF<br />
ADVISED OF THE POSSIBILITY OF SUCH DAMAGE.<br />
The DNS resolver code, taken from BIND 4.9.5, is copyrighted both by UC<br />
Berkeley and by Digital Equipment Corporation. The DEC portions are<br />
under <strong>the</strong> following license:<br />
Portions Copyright © 1993 by Digital Equipment Corporation.<br />
Permission to use, copy, modify, and distribute this software for any purpose<br />
with or without fee is hereby granted, provided that <strong>the</strong> above copyright<br />
notice and this permission notice appear in all copies, and that <strong>the</strong> name of<br />
Digital Equipment Corporation not be used in advertising or publicity<br />
pertaining to distribution of <strong>the</strong> document or software without specific,<br />
written prior permission.<br />
THE SOFTWARE IS PROVIDED “AS IS” AND DIGITAL EQUIPMENT CORP.<br />
DISCLAIMS ALL WARRANTIES WITH REGARD TO THIS SOFTWARE,<br />
INCLUDING ALL IMPLIED WARRANTIES OF MERCHANTABILITY AND<br />
FITNESS. IN NO EVENT SHALL DIGITAL EQUIPMENT CORPORATION BE<br />
LIABLE FOR ANY SPECIAL, DIRECT, INDIRECT, OR CONSEQUENTIAL<br />
DAMAGES OR ANY DAMAGES WHATSOEVER RESULTING FROM LOSS<br />
OF USE, DATA OR PROFITS, WHETHER IN AN ACTION OF CONTRACT,<br />
NEGLIGENCE OR OTHER TORTIOUS ACTION, ARISING OUT OF OR IN<br />
CONNECTION WITH THE USE OR PERFORMANCE OF THIS SOFTWARE.<br />
The Sun RPC support (from rpcsrc-4.0) is covered by <strong>the</strong> following license:<br />
Copyright © 1984, Sun Microsystems, Inc.<br />
Sun RPC is a product of Sun Microsystems, Inc. and is provided for<br />
unrestricted use provided that this legend is included on all tape media and<br />
as a part of <strong>the</strong> software program in whole or part. Users may copy or
modify Sun RPC without charge, but are not authorized to license or<br />
distribute it to anyone else except as part of a product or program<br />
developed by <strong>the</strong> user.<br />
SUN RPC IS PROVIDED AS IS WITH NO WARRANTIES OF ANY KIND<br />
INCLUDING THE WARRANTIES OF DESIGN, MERCHANTIBILITY AND<br />
FITNESS FOR A PARTICULAR PURPOSE, OR ARISING FROM A COURSE<br />
OF DEALING, USAGE OR TRADE PRACTICE.<br />
Sun RPC is provided with no support and without any obligation on <strong>the</strong> part<br />
of Sun Microsystems, Inc. to assist in its use, correction, modification or<br />
enhancement.<br />
SUN MICROSYSTEMS, INC. SHALL HAVE NO LIABILITY WITH RESPECT<br />
TO THE INFRINGEMENT OF COPYRIGHTS, TRADE SECRETS OR ANY<br />
PATENTS BY SUN RPC OR ANY PART THEREOF.<br />
In no event will Sun Microsystems, Inc. be liable for any lost revenue or<br />
profits or o<strong>the</strong>r special, indirect and consequential damages, even if Sun<br />
has been advised of <strong>the</strong> possibility of such damages.<br />
The following CMU license covers some of <strong>the</strong> support code for Mach,<br />
derived from Mach 3.0:<br />
Mach Operating System<br />
Copyright © 1991, 1990, 1989 Carnegie Mellon University<br />
All Rights Reserved.<br />
Permission to use, copy, modify and distribute this software and its<br />
documentation is hereby granted, provided that both <strong>the</strong> copyright notice<br />
and this permission notice appear in all copies of <strong>the</strong> software, derivative<br />
works or modified versions, and any portions <strong>the</strong>reof, and that both notices<br />
appear in supporting documentation.<br />
CARNEGIE MELLON ALLOWS FREE USE OF THIS SOFTWARE IN ITS “AS<br />
IS” CONDITION. CARNEGIE MELLON DISCLAIMS ANY LIABILITY OF ANY<br />
KIND FOR ANY DAMAGES WHATSOEVER RESULTING FROM THE USE OF<br />
THIS SOFTWARE.<br />
Carnegie Mellon requests users of this software to return to<br />
Software Distribution Coordinator<br />
School of Computer Science<br />
Carnegie Mellon University<br />
Pittsburgh, PA 15213-3890<br />
or Software.Distribution@CS.CMU.EDU any improvements or extensions<br />
that <strong>the</strong>y make and grant Carnegie Mellon <strong>the</strong> rights to redistribute <strong>the</strong>se<br />
changes.<br />
The file if_ppp.h is under <strong>the</strong> following CMU license:<br />
Redistribution and use in source and binary forms, with or without<br />
modification, are permitted provided that <strong>the</strong> following conditions are met:<br />
1. Redistributions of source code must retain <strong>the</strong> above copyright notice,<br />
this list of conditions and <strong>the</strong> following disclaimer.<br />
2. Redistributions in binary form must reproduce <strong>the</strong> above copyright<br />
notice, this list of conditions and <strong>the</strong> following disclaimer in <strong>the</strong><br />
documentation and/or o<strong>the</strong>r materials provided with <strong>the</strong> distribution.<br />
3. Nei<strong>the</strong>r <strong>the</strong> name of <strong>the</strong> University nor <strong>the</strong> names of its contributors may<br />
be used to endorse or promote products derived from this software<br />
without specific prior written permission.<br />
THIS SOFTWARE IS PROVIDED BY CARNEGIE MELLON UNIVERSITY AND<br />
CONTRIBUTORS “AS IS” AND ANY EXPRESS OR IMPLIED WARRANTIES,<br />
INCLUDING, BUT NOT LIMITED TO, THE IMPLIED WARRANTIES OF<br />
MERCHANTABILITY AND FITNESS FOR A PARTICULAR PURPOSE ARE<br />
DISCLAIMED.<br />
IN NO EVENT SHALL THE UNIVERSITY OR CONTRIBUTORS BE LIABLE<br />
FOR ANY DIRECT, INDIRECT, INCIDENTAL, SPECIAL, EXEMPLARY, OR<br />
CONSEQUENTIAL DAMAGES (INCLUDING, BUT NOT LIMITED TO,<br />
PROCUREMENT OF SUBSTITUTE GOODS OR SERVICES; LOSS OF USE,<br />
DATA, OR PROFITS; OR BUSINESS INTERRUPTION) HOWEVER CAUSED<br />
AND ON ANY THEORY OF LIABILITY, WHETHER IN CONTRACT, STRICT<br />
LIABILITY, OR TORT (INCLUDING NEGLIGENCE OR OTHERWISE)<br />
ARISING IN ANY WAY OUT OF THE USE OF THIS SOFTWARE, EVEN IF<br />
ADVISED OF THE POSSIBILITY OF SUCH DAMAGE.<br />
The following license covers <strong>the</strong> files from Intel’s “Highly Optimized<br />
Ma<strong>the</strong>matical Functions for Itanium” collection:<br />
Intel License Agreement<br />
Copyright © 2000, Intel Corporation<br />
All rights reserved.<br />
Redistribution and use in source and binary forms, with or without<br />
modification, are permitted provided that <strong>the</strong> following conditions are met:<br />
* Redistributions of source code must retain <strong>the</strong> above copyright notice,<br />
this list of conditions and <strong>the</strong> following disclaimer.<br />
* Redistributions in binary form must reproduce <strong>the</strong> above copyright<br />
notice, this list of conditions and <strong>the</strong> following disclaimer in <strong>the</strong><br />
documentation and/or o<strong>the</strong>r materials provided with <strong>the</strong> distribution.<br />
* The name of Intel Corporation may not be used to endorse or promote<br />
products derived from this software without specific prior written<br />
permission.<br />
THIS SOFTWARE IS PROVIDED BY THE COPYRIGHT HOLDERS AND<br />
CONTRIBUTORS “AS IS” AND ANY EXPRESS OR IMPLIED WARRANTIES,<br />
INCLUDING, BUT NOT LIMITED TO, THE IMPLIED WARRANTIES OF<br />
MERCHANTABILITY AND FITNESS FOR A PARTICULAR PURPOSE ARE<br />
DISCLAIMED. IN NO EVENT SHALL INTEL OR CONTRIBUTORS BE LIABLE<br />
FOR ANY DIRECT, INDIRECT, INCIDENTAL, SPECIAL, EXEMPLARY, OR<br />
CONSEQUENTIAL DAMAGES (INCLUDING, BUT NOT LIMITED TO,<br />
PROCUREMENT OF SUBSTITUTE GOODS OR SERVICES; LOSS OF USE,<br />
DATA, OR PROFITS; OR BUSINESS INTERRUPTION) HOWEVER CAUSED<br />
AND ON ANY THEORY OF LIABILITY, WHETHER IN CONTRACT, STRICT<br />
LIABILITY, OR TORT (INCLUDING NEGLIGENCE OR OTHERWISE)<br />
ARISING IN ANY WAY OUT OF THE USE OF THIS SOFTWARE, EVEN IF<br />
ADVISED OF THE POSSIBILITY OF SUCH DAMAGE.<br />
The files inet/getnameinfo.c and sysdeps/posix/getaddrinfo.c are copyright<br />
© by Craig Metz and are distributed under <strong>the</strong> following license:<br />
The Inner Net License, Version 2.00<br />
The author(s) grant permission for redistribution and use in source and<br />
binary forms, with or without modification, of <strong>the</strong> software and<br />
documentation provided that <strong>the</strong> following conditions are met:<br />
0. If you receive a version of <strong>the</strong> software that is specifically labelled as not<br />
being for redistribution (check <strong>the</strong> version message and/or README),<br />
you are not permitted to redistribute that version of <strong>the</strong> software in any<br />
way or form.<br />
1. All terms of <strong>the</strong> all o<strong>the</strong>r applicable copyrights and licenses must be<br />
followed.<br />
2. Redistributions of source code must retain <strong>the</strong> authors’ copyright<br />
notice(s), this list of conditions, and <strong>the</strong> following disclaimer.<br />
3. Redistributions in binary form must reproduce <strong>the</strong> authors’ copyright<br />
notice(s), this list of conditions, and <strong>the</strong> following disclaimer in <strong>the</strong><br />
documentation and/or o<strong>the</strong>r materials provided with <strong>the</strong> distribution.<br />
4. [The copyright holder has authorized <strong>the</strong> removal of this clause.]<br />
5. Nei<strong>the</strong>r <strong>the</strong> name(s) of <strong>the</strong> author(s) nor <strong>the</strong> names of its contributors may<br />
be used to endorse or promote products derived from this software<br />
without specific prior written permission.<br />
THIS SOFTWARE IS PROVIDED BY ITS AUTHORS AND CONTRIBUTORS<br />
“AS IS” AND ANY EXPRESS OR IMPLIED WARRANTIES, INCLUDING, BUT<br />
NOT LIMITED TO, THE IMPLIED WARRANTIES OF MERCHANTABILITY<br />
AND FITNESS FOR A PARTICULAR PURPOSE ARE DISCLAIMED. IN NO<br />
EVENT SHALL THE AUTHORS OR CONTRIBUTORS BE LIABLE FOR ANY<br />
DIRECT, INDIRECT, INCIDENTAL, SPECIAL, EXEMPLARY, OR<br />
CONSEQUENTIAL DAMAGES (INCLUDING, BUT NOT LIMITED TO,<br />
PROCUREMENT OF SUBSTITUTE GOODS OR SERVICES; LOSS OF USE,<br />
DATA, OR PROFITS; OR BUSINESS INTERRUPTION) HOWEVER CAUSED<br />
AND ON ANY THEORY OF LIABILITY, WHETHER IN CONTRACT, STRICT<br />
LIABILITY, OR TORT (INCLUDING NEGLIGENCE OR OTHERWISE)<br />
ARISING IN ANY WAY OUT OF THE USE OF THIS SOFTWARE, EVEN IF<br />
ADVISED OF THE POSSIBILITY OF SUCH DAMAGE.<br />
If <strong>the</strong>se license terms cause you a real problem, contact <strong>the</strong> author.<br />
libcap<br />
Unless o<strong>the</strong>rwise *explicitly* stated, <strong>the</strong> following text describes <strong>the</strong><br />
licensed conditions under which <strong>the</strong> contents of this libcap release may be<br />
used and distributed:<br />
Redistribution and use in source and binary forms of libcap, with or without<br />
modification, are permitted provided that <strong>the</strong> following conditions are met:<br />
1. Redistributions of source code must retain any existing copyright notice,<br />
and this entire permission notice in its entirety, including <strong>the</strong> disclaimer of<br />
warranties.<br />
2. Redistributions in binary form must reproduce all prior and current<br />
copyright notices, this list of conditions, and <strong>the</strong> following disclaimer in<br />
<strong>the</strong> documentation and/or o<strong>the</strong>r materials provided with <strong>the</strong> distribution.<br />
3. The name of any author may not be used to endorse or promote products<br />
derived from this software without <strong>the</strong>ir specific prior written permission.<br />
ALTERNATIVELY, this product may be distributed under <strong>the</strong> terms of <strong>the</strong><br />
GNU General Public License, in which case <strong>the</strong> provisions of <strong>the</strong> GNU GPL<br />
are required INSTEAD OF <strong>the</strong> above restrictions. (This clause is necessary<br />
due to a potential conflict between <strong>the</strong> GNU GPL and <strong>the</strong> restrictions<br />
contained in a BSD-style copyright.)<br />
THIS SOFTWARE IS PROVIDED “AS IS” AND ANY EXPRESS OR IMPLIED<br />
WARRANTIES, INCLUDING, BUT NOT LIMITED TO, THE IMPLIED<br />
WARRANTIES OF MERCHANTABILITY AND FITNESS FOR A PARTICULAR<br />
PURPOSE ARE DISCLAIMED.<br />
IN NO EVENT SHALL THE AUTHOR(S) BE LIABLE FOR ANY DIRECT,<br />
INDIRECT, INCIDENTAL, SPECIAL, EXEMPLARY, OR CONSEQUENTIAL<br />
DAMAGES (INCLUDING, BUT NOT LIMITED TO, PROCUREMENT OF<br />
SUBSTITUTE GOODS OR SERVICES; LOSS OF USE, DATA, OR PROFITS;<br />
OR BUSINESS INTERRUPTION) HOWEVER CAUSED AND ON ANY<br />
THEORY OF LIABILITY, WHETHER IN CONTRACT, STRICT LIABILITY, OR<br />
TORT (INCLUDING NEGLIGENCE OR OTHERWISE) ARISING IN ANY WAY<br />
MOTIF <strong>XS</strong> Owner’s <strong>Manual</strong> 313
314<br />
OUT OF THE USE OF THIS SOFTWARE, EVEN IF ADVISED OF THE<br />
POSSIBILITY OF SUCH DAMAGE.<br />
libjpeg<br />
The authors make NO WARRANTY or representation, ei<strong>the</strong>r express or<br />
implied, with respect to this software, its quality, accuracy, merchantability,<br />
or fitness for a particular purpose. This software is provided “AS IS”, and<br />
you, its user, assume <strong>the</strong> entire risk as to its quality and accuracy.<br />
This software is copyright © 1991-1998, Thomas G. Lane.<br />
All Rights Reserved except as specified below.<br />
Permission is hereby granted to use, copy, modify, and distribute this<br />
software (or portions <strong>the</strong>reof) for any purpose, without fee, subject to <strong>the</strong>se<br />
conditions:<br />
(1) If any part of <strong>the</strong> source code for this software is distributed, <strong>the</strong>n this<br />
README file must be included, with this copyright and no-warranty<br />
notice unaltered; and any additions, deletions, or changes to <strong>the</strong><br />
original files must be clearly indicated in ac<strong>com</strong>panying<br />
documentation.<br />
(2) If only executable code is distributed, <strong>the</strong>n <strong>the</strong> ac<strong>com</strong>panying<br />
documentation must state that “this software is based in part on <strong>the</strong><br />
work of <strong>the</strong> Independent JPEG Group”.<br />
(3) Permission for use of this software is granted only if <strong>the</strong> user accepts<br />
full responsibility for any undesirable consequences; <strong>the</strong> authors<br />
accept NO LIABILITY for damages of any kind.<br />
These conditions apply to any software derived from or based on <strong>the</strong> IJG<br />
code, not just to <strong>the</strong> unmodified library. If you use our work, you ought to<br />
acknowledge us.<br />
Permission is NOT granted for <strong>the</strong> use of any IJG author’s name or <strong>com</strong>pany<br />
name in advertising or publicity relating to this software or products derived<br />
from it. This software may be referred to only as “<strong>the</strong> Independent JPEG<br />
Group’s software”.<br />
We specifically permit and encourage <strong>the</strong> use of this software as <strong>the</strong> basis<br />
of <strong>com</strong>mercial products, provided that all warranty or liability claims are<br />
assumed by <strong>the</strong> product vendor.<br />
ansi2knr.c is included in this distribution by permission of L. Peter Deutsch,<br />
sole proprietor of its copyright holder, Aladdin Enterprises of Menlo Park,<br />
CA.<br />
ansi2knr.c is NOT covered by <strong>the</strong> above copyright and conditions, but<br />
instead by <strong>the</strong> usual distribution terms of <strong>the</strong> Free Software Foundation;<br />
principally, that you must include source code if you redistribute it. (See <strong>the</strong><br />
file ansi2knr.c for full details.) However, since ansi2knr.c is not needed as<br />
part of any program generated from <strong>the</strong> IJG code, this does not limit you<br />
more than <strong>the</strong> foregoing paragraphs do.<br />
The Unix configuration script “configure” was produced with GNU Autoconf.<br />
It is copyright by <strong>the</strong> Free Software Foundation but is freely distributable.<br />
The same holds for its supporting scripts (config.guess, config.sub, ltconfig,<br />
ltmain.sh). Ano<strong>the</strong>r support script, install-sh, is copyright by M.I.T. but is also<br />
freely distributable.<br />
It appears that <strong>the</strong> arithmetic coding option of <strong>the</strong> JPEG spec is covered by<br />
patents owned by IBM, AT&T, and Mitsubishi. Hence arithmetic coding<br />
cannot legally be used without obtaining one or more licenses. For this<br />
reason, support for arithmetic coding has been removed from <strong>the</strong> free JPEG<br />
software.<br />
(Since arithmetic coding provides only a marginal gain over <strong>the</strong> unpatented<br />
Huffman mode, it is unlikely that very many implementations will support it.)<br />
So far as we are aware, <strong>the</strong>re are no patent restrictions on <strong>the</strong> remaining<br />
code.<br />
The IJG distribution formerly included code to read and write GIF files.<br />
To avoid entanglement with <strong>the</strong> Unisys LZW patent, GIF reading support has<br />
been removed altoge<strong>the</strong>r, and <strong>the</strong> GIF writer has been simplified to produce<br />
“un<strong>com</strong>pressed GIFs”. This technique does not use <strong>the</strong> LZW algorithm; <strong>the</strong><br />
resulting GIF files are larger than usual, but are readable by all standard GIF<br />
decoders.<br />
We are required to state that<br />
“The Graphics Interchange Format © is <strong>the</strong> Copyright property of<br />
CompuServe Incorporated. GIF(sm) is a Service Mark property of<br />
CompuServe Incorporated.”<br />
libmng<br />
COPYRIGHT NOTICE:<br />
Copyright © 2000 Gerard Juyn (gerard@libmng.<strong>com</strong>)<br />
[You may insert additional notices after this sentence if you modify this<br />
source]<br />
For <strong>the</strong> purposes of this copyright and license, “Contributing Authors” is<br />
defined as <strong>the</strong> following set of individuals:<br />
Gerard Juyn<br />
MOTIF <strong>XS</strong> Owner’s <strong>Manual</strong><br />
The MNG Library is supplied “AS IS”. The Contributing Authors disclaim all<br />
warranties, expressed or implied, including, without limitation, <strong>the</strong><br />
warranties of merchantability and of fitness for any purpose. The<br />
Contributing Authors assume no liability for direct, indirect, incidental,<br />
special, exemplary, or consequential damages, which may result from <strong>the</strong><br />
use of <strong>the</strong> MNG Library, even if advised of <strong>the</strong> possibility of such damage.<br />
Permission is hereby granted to use, copy, modify, and distribute this source<br />
code, or portions hereof, for any purpose, without fee, subject to <strong>the</strong><br />
following restrictions:<br />
1. The origin of this source code must not be misrepresented; you must not<br />
claim that you wrote <strong>the</strong> original software.<br />
2. Altered versions must be plainly marked as such and must not be<br />
misrepresented as being <strong>the</strong> original source.<br />
3. This Copyright notice may not be removed or altered from any source or<br />
altered source distribution.<br />
The Contributing Authors specifically permit, without fee, and encourage <strong>the</strong><br />
use of this source code as a <strong>com</strong>ponent to supporting <strong>the</strong> MNG and JNG<br />
file format in <strong>com</strong>mercial products. If you use this source code in a product,<br />
acknowledgment would be highly appreciated.<br />
Parts of this software have been adapted from <strong>the</strong> libpng package.<br />
Although this library supports all features from <strong>the</strong> PNG specification (as<br />
MNG descends from it) it does not require <strong>the</strong> libpng package. It does<br />
require <strong>the</strong> zlib library and optionally <strong>the</strong> IJG jpeg library, and/or <strong>the</strong> “littlecms”<br />
library by Marti Maria (depending on <strong>the</strong> inclusion of support for JNG<br />
and Full-Color-Management respectively.<br />
This library’s function is primarily to read and display MNG animations. It is<br />
not meant as a full-featured image-editing <strong>com</strong>ponent! It does however offer<br />
creation and editing functionality at <strong>the</strong> chunk level.<br />
(future modifications may include some more support for creation and or<br />
editing)<br />
libncurses<br />
Copyright © 1998-2003, 2004 Free Software Foundation, Inc.<br />
Permission is hereby granted, free of charge, to any person obtaining a<br />
copy of this software and associated documentation files (<strong>the</strong> “Software”), to<br />
deal in <strong>the</strong> Software without restriction, including without limitation <strong>the</strong> rights<br />
to use, copy, modify, merge, publish, distribute, distribute with<br />
modifications, sublicense, and/or sell copies of <strong>the</strong> Software, and to permit<br />
persons to whom <strong>the</strong> Software is furnished to do so, subject to <strong>the</strong> following<br />
conditions:<br />
The above copyright notice and this permission notice shall be included in<br />
all copies or substantial portions of <strong>the</strong> Software.<br />
THE SOFTWARE IS PROVIDED “AS IS”, WITHOUT WARRANTY OF ANY<br />
KIND, EXPRESS OR IMPLIED, INCLUDING BUT NOT LIMITED TO THE<br />
WARRANTIES OF MERCHANTABILITY, FITNESS FOR A PARTICULAR<br />
PURPOSE AND NONINFRINGEMENT.<br />
IN NO EVENT SHALL THE ABOVE COPYRIGHT HOLDERS BE LIABLE FOR<br />
ANY CLAIM, DAMAGES OR OTHER LIABILITY, WHETHER IN AN ACTION<br />
OF CONTRACT, TORT OR OTHERWISE, ARISING FROM, OUT OF OR IN<br />
CONNECTION WITH THE SOFTWARE OR THE USE OR OTHER DEALINGS<br />
IN THE SOFTWARE.<br />
Except as contained in this notice, <strong>the</strong> name(s) of <strong>the</strong> above copyright<br />
holders shall not be used in advertising or o<strong>the</strong>rwise to promote <strong>the</strong> sale,<br />
use or o<strong>the</strong>r dealings in this Software without prior written authorization.<br />
libpng<br />
This copy of <strong>the</strong> libpng notices is provided for your convenience. In case of<br />
any discrepancy between this copy and <strong>the</strong> notices in <strong>the</strong> file png.h that is<br />
included in <strong>the</strong> libpng distribution, <strong>the</strong> latter shall prevail.<br />
COPYRIGHT NOTICE, DISCLAIMER, and LICENSE:<br />
If you modify libpng you may insert additional notices immediately following<br />
this sentence.<br />
libpng version 1.2.6, August 15, 2004, is<br />
Copyright © 2004 Glenn Randers-Pehrson, and is distributed according to<br />
<strong>the</strong> same disclaimer and license as libpng-1.2.5 with <strong>the</strong> following individual<br />
added to <strong>the</strong> list of Contributing Authors<br />
Cosmin Truta<br />
libpng versions 1.0.7, July 1, 2000, through 1.2.5 - October 3, 2002, are<br />
Copyright © 2000-2002 Glenn Randers-Pehrson, and are distributed<br />
according to <strong>the</strong> same disclaimer and license as libpng-1.0.6 with <strong>the</strong><br />
following individuals added to <strong>the</strong> list of Contributing Authors<br />
Simon-Pierre Cadieux<br />
Eric S. Raymond<br />
Gilles Vollant<br />
and with <strong>the</strong> following additions to <strong>the</strong> disclaimer:
There is no warranty against interference with your enjoyment of <strong>the</strong> library<br />
or against infringement. There is no warranty that our efforts or <strong>the</strong> library will<br />
fulfill any of your particular purposes or needs. This library is provided with<br />
all faults, and <strong>the</strong> entire risk of satisfactory quality, performance, accuracy,<br />
and effort is with <strong>the</strong> user.<br />
libpng versions 0.97, January 1998, through 1.0.6, March 20, 2000, are<br />
Copyright © 1998, 1999 Glenn Randers-Pehrson, and are distributed<br />
according to <strong>the</strong> same disclaimer and license as libpng-0.96, with <strong>the</strong><br />
following individuals added to <strong>the</strong> list of Contributing Authors:<br />
Tom Lane<br />
Glenn Randers-Pehrson<br />
Willem van Schaik<br />
libpng versions 0.89, June 1996, through 0.96, May 1997, are<br />
Copyright © 1996, 1997 Andreas Dilger<br />
Distributed according to <strong>the</strong> same disclaimer and license as libpng-0.88,<br />
with <strong>the</strong> following individuals added to <strong>the</strong> list of Contributing Authors:<br />
John Bowler<br />
Kevin Bracey<br />
Sam Bushell<br />
Magnus Holmgren<br />
Greg Roelofs<br />
Tom Tanner<br />
libpng versions 0.5, May 1995, through 0.88, January 1996, are<br />
Copyright © 1995, 1996 Guy Eric Schalnat, Group 42, Inc.<br />
For <strong>the</strong> purposes of this copyright and license, “Contributing Authors” is<br />
defined as <strong>the</strong> following set of individuals:<br />
Andreas Dilger<br />
Dave Martindale<br />
Guy Eric Schalnat<br />
Paul Schmidt<br />
Tim Wegner<br />
The PNG Reference Library is supplied “AS IS”. The Contributing Authors<br />
and Group 42, Inc. disclaim all warranties, expressed or implied, including,<br />
without limitation, <strong>the</strong> warranties of merchantability and of fitness for any<br />
purpose. The Contributing Authors and Group 42, Inc. assume no liability for<br />
direct, indirect, incidental, special, exemplary, or consequential damages,<br />
which may result from <strong>the</strong> use of <strong>the</strong> PNG Reference Library, even if advised<br />
of <strong>the</strong> possibility of such damage.<br />
Permission is hereby granted to use, copy, modify, and distribute this source<br />
code, or portions hereof, for any purpose, without fee, subject to <strong>the</strong><br />
following restrictions:<br />
1. The origin of this source code must not be misrepresented.<br />
2. Altered versions must be plainly marked as such and must not be<br />
misrepresented as being <strong>the</strong> original source.<br />
3. This Copyright notice may not be removed or altered from any source or<br />
altered source distribution.<br />
The Contributing Authors and Group 42, Inc. specifically permit, without fee,<br />
and encourage <strong>the</strong> use of this source code as a <strong>com</strong>ponent to supporting<br />
<strong>the</strong> PNG file format in <strong>com</strong>mercial products. If you use this source code in a<br />
product, acknowledgment is not required but would be appreciated.<br />
A “png_get_copyright” function is available, for convenient use in “about”<br />
boxes and <strong>the</strong> like:<br />
printf("%s",png_get_copyright(NULL));<br />
Also, <strong>the</strong> PNG logo (in PNG format, of course) is supplied in <strong>the</strong> files<br />
“pngbar.png” and “pngbar.jpg” (88x31) and “pngnow.png” (98x31).<br />
libpng is OSI Certified Open Source Software. OSI Certified Open Source is<br />
a certification mark of <strong>the</strong> Open Source Initiative.<br />
Glenn Randers-Pehrson<br />
glennrp@users.sourceforge.net<br />
August 15, 2004<br />
libuuid<br />
Copyright © 1996, 1997, 1998, 1999 Theodore Ts’o.<br />
Copyright 1999 Andreas Dilger<br />
Redistribution and use in source and binary forms, with or without<br />
modification, are permitted provided that <strong>the</strong> following conditions are met:<br />
1. Redistributions of source code must retain <strong>the</strong> above copyright notice,<br />
and <strong>the</strong> entire permission notice in its entirety, including <strong>the</strong> disclaimer of<br />
warranties.<br />
2. Redistributions in binary form must reproduce <strong>the</strong> above copyright<br />
notice, this list of conditions and <strong>the</strong> following disclaimer in <strong>the</strong><br />
documentation and/or o<strong>the</strong>r materials provided with <strong>the</strong> distribution.<br />
3. The name of <strong>the</strong> author may not be used to endorse or promote products<br />
derived from this software without specific prior written permission.<br />
THIS SOFTWARE IS PROVIDED “AS IS” AND ANY EXPRESS OR IMPLIED<br />
WARRANTIES, INCLUDING, BUT NOT LIMITED TO, THE IMPLIED<br />
WARRANTIES OF MERCHANTABILITY AND FITNESS FOR A PARTICULAR<br />
PURPOSE, ALL OF WHICH ARE HEREBY DISCLAIMED. IN NO EVENT<br />
SHALL THE AUTHOR BE LIABLE FOR ANY DIRECT, INDIRECT,<br />
INCIDENTAL, SPECIAL, EXEMPLARY, OR CONSEQUENTIAL DAMAGES<br />
(INCLUDING, BUT NOT LIMITED TO, PROCUREMENT OF SUBSTITUTE<br />
GOODS OR SERVICES; LOSS OF USE, DATA, OR PROFITS; OR BUSINESS<br />
INTERRUPTION) HOWEVER CAUSED AND ON ANY THEORY OF<br />
LIABILITY, WHETHER IN CONTRACT, STRICT LIABILITY, OR TORT<br />
(INCLUDING NEGLIGENCE OR OTHERWISE) ARISING IN ANY WAY OUT<br />
OF THE USE OF THIS SOFTWARE, EVEN IF NOT ADVISED OF THE<br />
POSSIBILITY OF SUCH DAMAGE.<br />
libwrap<br />
Copyright 1995 by Wietse Venema. All rights reserved. Some individual files<br />
may be covered by o<strong>the</strong>r copyrights.<br />
This material was originally written and <strong>com</strong>piled by Wietse Venema at<br />
Eindhoven University of Technology, The Ne<strong>the</strong>rlands, in 1990, 1991, 1992,<br />
1993, 1994 and 1995.<br />
Redistribution and use in source and binary forms, with or without<br />
modification, are permitted provided that this entire copyright notice is<br />
duplicated in all such copies.<br />
This software is provided “as is” and without any expressed or implied<br />
warranties, including, without limitation, <strong>the</strong> implied warranties of<br />
merchantibility and fitness for any particular purpose.<br />
libxml<br />
Except where o<strong>the</strong>rwise noted in <strong>the</strong> source code (e.g. <strong>the</strong> files hash.c, list.c<br />
and <strong>the</strong> trio files, which are covered by a similar licence but with different<br />
Copyright notices) all <strong>the</strong> files are:<br />
Copyright © 1998-2003 Daniel Veillard. All Rights Reserved.<br />
Permission is hereby granted, free of charge, to any person obtaining a<br />
copy of this software and associated documentation files (<strong>the</strong> “Software”), to<br />
deal in <strong>the</strong> Software without restriction, including without limitation <strong>the</strong> rights<br />
to use, copy, modify, merge, publish, distribute, sublicense, and/or sell<br />
copies of <strong>the</strong> Software, and to permit persons to whom <strong>the</strong> Software is<br />
furnished to do so, subject to <strong>the</strong> following conditions:<br />
The above copyright notice and this permission notice shall be included in<br />
all copies or substantial portions of <strong>the</strong> Software.<br />
THE SOFTWARE IS PROVIDED “AS IS”, WITHOUT WARRANTY OF ANY<br />
KIND, EXPRESS OR IMPLIED, INCLUDING BUT NOT LIMITED TO THE<br />
WARRANTIES OF MERCHANTABILITY, FITNESS FOR A PARTICULAR<br />
PURPOSE AND NONINFRINGEMENT. IN NO EVENT SHALL THE DANIEL<br />
VEILLARD BE LIABLE FOR ANY CLAIM, DAMAGES OR OTHER LIABILITY,<br />
WHETHER IN AN ACTION OF CONTRACT, TORT OR OTHERWISE,<br />
ARISING FROM, OUT OF OR IN CONNECTION WITH THE SOFTWARE OR<br />
THE USE OR OTHER DEALINGS IN THE SOFTWARE.<br />
Except as contained in this notice, <strong>the</strong> name of Daniel Veillard shall not be<br />
used in advertising or o<strong>the</strong>rwise to promote <strong>the</strong> sale, use or o<strong>the</strong>r dealings in<br />
this Software without prior written authorization from him.<br />
Copyright © 1998 Bjorn Reese and Daniel Stenberg.<br />
Copyright © 2000 Bjorn Reese and Daniel Veillard.<br />
Copyright © 2000 Bjorn Reese and Daniel Stenberg.<br />
Copyright © 2000 Gary Pennington and Daniel Veillard.<br />
Copyright © 2001 Bjorn Reese and Daniel Stenberg.<br />
Permission to use, copy, modify, and distribute this software for any purpose<br />
with or without fee is hereby granted, provided that <strong>the</strong> above copyright<br />
notice and this permission notice appear in all copies.<br />
THIS SOFTWARE IS PROVIDED “AS IS” AND WITHOUT ANY EXPRESS OR<br />
IMPLIED WARRANTIES, INCLUDING, WITHOUT LIMITATION, THE IMPLIED<br />
WARRANTIES OF MERCHANTIBILITY AND FITNESS FOR A PARTICULAR<br />
PURPOSE. THE AUTHORS AND CONTRIBUTORS ACCEPT NO<br />
RESPONSIBILITY IN ANY CONCEIVABLE MANNER.<br />
netkit-inetd<br />
Most of <strong>the</strong> files, fall under <strong>the</strong> following copyright, and are distributable<br />
under <strong>the</strong> terms of <strong>the</strong> BSD license (/usr/share/<strong>com</strong>mon-licenses/BSD):<br />
Copyright © 1983, 1991 The Regents of <strong>the</strong> University of California.<br />
All rights reserved.<br />
Some of <strong>the</strong> RPC code, is copyrighted by Sun Microsystems, and is<br />
provided under <strong>the</strong> following terms:<br />
Sun RPC is a product of Sun Microsystems, Inc. and is provided for<br />
unrestricted use provided that this legend is included on all tape media and<br />
as a part of <strong>the</strong> software program in whole or part. Users may copy or<br />
modify Sun RPC without charge, but are not authorized to license or<br />
distribute it to anyone else except as part of a product or program<br />
MOTIF <strong>XS</strong> Owner’s <strong>Manual</strong> 315
316<br />
developed by <strong>the</strong> user or with <strong>the</strong> express written consent of Sun<br />
Microsystems, Inc.<br />
SUN RPC IS PROVIDED AS IS WITH NO WARRANTIES OF ANY KIND<br />
INCLUDING THE WARRANTIES OF DESIGN, MERCHANTIBILITY AND<br />
FITNESS FOR A PARTICULAR PURPOSE, OR ARISING FROM A COURSE<br />
OF DEALING, USAGE OR TRADE PRACTICE.<br />
Sun RPC is provided with no support and without any obligation on <strong>the</strong> part<br />
of Sun Microsystems, Inc. to assist in its use, correction, modification or<br />
enhancement.<br />
SUN MICROSYSTEMS, INC. SHALL HAVE NO LIABILITY WITH RESPECT<br />
TO THE INFRINGEMENT OF COPYRIGHTS, TRADE SECRETS OR ANY<br />
PATENTS BY SUN RPC OR ANY PART THEREOF.<br />
In no event will Sun Microsystems, Inc. be liable for any lost revenue or<br />
profits or o<strong>the</strong>r special, indirect and consequential damages, even if Sun<br />
has been advised of <strong>the</strong> possibility of such damages.<br />
Sun Microsystems, Inc.<br />
2550 Garcia Avenue<br />
Mountain View, California 94043<br />
pam<br />
Unless o<strong>the</strong>rwise *explicitly* stated <strong>the</strong> following text describes <strong>the</strong> licensed<br />
conditions under which <strong>the</strong> contents of this Linux-PAM release may be<br />
distributed:<br />
Redistribution and use in source and binary forms of Linux-PAM, with or<br />
without modification, are permitted provided that <strong>the</strong> following conditions<br />
are met:<br />
1. Redistributions of source code must retain any existing copyright notice,<br />
and this entire permission notice in its entirety, including <strong>the</strong> disclaimer of<br />
warranties.<br />
2. Redistributions in binary form must reproduce all prior and current<br />
copyright notices, this list of conditions, and <strong>the</strong> following disclaimer in<br />
<strong>the</strong> documentation and/or o<strong>the</strong>r materials provided with <strong>the</strong> distribution.<br />
3. The name of any author may not be used to endorse or promote products<br />
derived from this software without <strong>the</strong>ir specific prior written permission.<br />
ALTERNATIVELY, this product may be distributed under <strong>the</strong> terms of <strong>the</strong><br />
GNU General Public License, in which case <strong>the</strong> provisions of <strong>the</strong> GNU GPL<br />
are required INSTEAD OF <strong>the</strong> above restrictions. (This clause is necessary<br />
due to a potential conflict between <strong>the</strong> GNU GPL and <strong>the</strong> restrictions<br />
contained in a BSD-style copyright.)<br />
THIS SOFTWARE IS PROVIDED “AS IS” AND ANY EXPRESS OR IMPLIED<br />
WARRANTIES, INCLUDING, BUT NOT LIMITED TO, THE IMPLIED<br />
WARRANTIES OF MERCHANTABILITY AND FITNESS FOR A PARTICULAR<br />
PURPOSE ARE DISCLAIMED.IN NO EVENT SHALL THE AUTHOR(S) BE<br />
LIABLE FOR ANY DIRECT, INDIRECT, INCIDENTAL, SPECIAL, EXEMPLARY,<br />
OR CONSEQUENTIAL DAMAGES (INCLUDING, BUT NOT LIMITED TO,<br />
PROCUREMENT OF SUBSTITUTE GOODS OR SERVICES; LOSS OF USE,<br />
DATA, OR PROFITS; OR BUSINESS INTERRUPTION) HOWEVER CAUSED<br />
AND ON ANY THEORY OF LIABILITY, WHETHER IN CONTRACT, STRICT<br />
LIABILITY, OR TORT (INCLUDING NEGLIGENCE OR OTHERWISE)<br />
ARISING IN ANY WAY OUT OF THE USE OF THIS SOFTWARE, EVEN IF<br />
ADVISED OF THE POSSIBILITY OF SUCH DAMAGE.<br />
portmap<br />
Author:<br />
Wietse Venema (wietse@wzv.win.tue.nl), dept. of Ma<strong>the</strong>matics and<br />
Computing Science, Eindhoven University of Technology, The Ne<strong>the</strong>rlands.<br />
Some Components:<br />
Copyright © 1990 The Regents of <strong>the</strong> University of California.<br />
All rights reserved.<br />
Redistribution and use in source and binary forms, with or without<br />
modification, are permitted provided that <strong>the</strong> following conditions are met:<br />
1. Redistributions of source code must retain <strong>the</strong> above copyright notice,<br />
this list of conditions and <strong>the</strong> following disclaimer.<br />
2. Redistributions in binary form must reproduce <strong>the</strong> above copyright<br />
notice, this list of conditions and <strong>the</strong> following disclaimer in <strong>the</strong><br />
documentation and/or o<strong>the</strong>r materials provided with <strong>the</strong> distribution.<br />
3. All advertising materials mentioning features or use of this software must<br />
display <strong>the</strong> following acknowledgement:<br />
This product includes software developed by <strong>the</strong> University of California,<br />
Berkeley and its contributors.<br />
4. Nei<strong>the</strong>r <strong>the</strong> name of <strong>the</strong> University nor <strong>the</strong> names of its contributors may<br />
be used to endorse or promote products derived from this software<br />
without specific prior written permission.<br />
THIS SOFTWARE IS PROVIDED BY THE REGENTS AND CONTRIBUTORS<br />
“AS IS” AND ANY EXPRESS OR IMPLIED WARRANTIES, INCLUDING, BUT<br />
NOT LIMITED TO, THE IMPLIED WARRANTIES OF MERCHANTABILITY<br />
MOTIF <strong>XS</strong> Owner’s <strong>Manual</strong><br />
AND FITNESS FOR A PARTICULAR PURPOSE ARE DISCLAIMED. IN NO<br />
EVENT SHALL THE REGENTS OR CONTRIBUTORS BE LIABLE FOR ANY<br />
DIRECT, INDIRECT, INCIDENTAL, SPECIAL, EXEMPLARY, OR<br />
CONSEQUENTIAL DAMAGES (INCLUDING, BUT NOT LIMITED TO,<br />
PROCUREMENT OF SUBSTITUTE GOODS OR SERVICES; LOSS OF USE,<br />
DATA, OR PROFITS; OR BUSINESS INTERRUPTION) HOWEVER CAUSED<br />
AND ON ANY THEORY OF LIABILITY, WHETHER IN CONTRACT, STRICT<br />
LIABILITY, OR TORT (INCLUDING NEGLIGENCE OR OTHERWISE)<br />
ARISING IN ANY WAY OUT OF THE USE OF THIS SOFTWARE, EVEN IF<br />
ADVISED OF THE POSSIBILITY OF SUCH DAMAGE.<br />
Some of <strong>the</strong> RPC code, is copyrighted by Sun Microsystems, and is<br />
provided under <strong>the</strong> following terms:<br />
Sun RPC is a product of Sun Microsystems, Inc. and is provided for<br />
unrestricted use provided that this legend is included on all tape media and<br />
as a part of <strong>the</strong> software program in whole or part. Users may copy or<br />
modify Sun RPC without charge, but are not authorized to license or<br />
distribute it to anyone else except as part of a product or program<br />
developed by <strong>the</strong> user or with <strong>the</strong> express written consent of Sun<br />
Microsystems, Inc.<br />
SUN RPC IS PROVIDED AS IS WITH NO WARRANTIES OF ANY KIND<br />
INCLUDING THE WARRANTIES OF DESIGN, MERCHANTIBILITY AND<br />
FITNESS FOR A PARTICULAR PURPOSE, OR ARISING FROM A COURSE<br />
OF DEALING, USAGE OR TRADE PRACTICE.<br />
Sun RPC is provided with no support and without any obligation on <strong>the</strong> part<br />
of Sun Microsystems, Inc. to assist in its use, correction, modification or<br />
enhancement.<br />
SUN MICROSYSTEMS, INC. SHALL HAVE NO LIABILITY WITH RESPECT<br />
TO THE INFRINGEMENT OF COPYRIGHTS, TRADE SECRETS OR ANY<br />
PATENTS BY SUN RPC OR ANY PART THEREOF.<br />
In no event will Sun Microsystems, Inc. be liable for any lost revenue or<br />
profits or o<strong>the</strong>r special, indirect and consequential damages, even if Sun<br />
has been advised of <strong>the</strong> possibility of such damages.<br />
Sun Microsystems, Inc.<br />
2550 Garcia Avenue<br />
Mountain View, California 94043<br />
shadow<br />
This software is copyright 1988 - 1994, Julianne Frances Haugh.<br />
All rights reserved.<br />
Redistribution and use in source and binary forms, with or without<br />
modification, are permitted provided that <strong>the</strong> following conditions are met:<br />
1. Redistributions of source code must retain <strong>the</strong> above copyright notice,<br />
this list of conditions and <strong>the</strong> following disclaimer.<br />
2. Redistributions in binary form must reproduce <strong>the</strong> above copyright<br />
notice, this list of conditions and <strong>the</strong> following disclaimer in <strong>the</strong><br />
documentation and/or o<strong>the</strong>r materials provided with <strong>the</strong> distribution.<br />
3. Nei<strong>the</strong>r <strong>the</strong> name of Julianne F. Haugh nor <strong>the</strong> names of its contributors<br />
may be used to endorse or promote products derived from this software<br />
without specific prior written permission.<br />
THIS SOFTWARE IS PROVIDED BY JULIE HAUGH AND CONTRIBUTORS<br />
“AS IS” AND ANY EXPRESS OR IMPLIED WARRANTIES, INCLUDING, BUT<br />
NOT LIMITED TO, THE IMPLIED WARRANTIES OF MERCHANTABILITY<br />
AND FITNESS FOR A PARTICULAR PURPOSE ARE DISCLAIMED. IN NO<br />
EVENT SHALL JULIE HAUGH OR CONTRIBUTORS BE LIABLE FOR ANY<br />
DIRECT, INDIRECT, INCIDENTAL, SPECIAL, EXEMPLARY, OR<br />
CONSEQUENTIAL DAMAGES (INCLUDING, BUT NOT LIMITED TO,<br />
PROCUREMENT OF SUBSTITUTE GOODS OR SERVICES; LOSS OF USE,<br />
DATA, OR PROFITS; OR BUSINESS INTERRUPTION) HOWEVER CAUSED<br />
AND ON ANY THEORY OF LIABILITY, WHETHER IN CONTRACT, STRICT<br />
LIABILITY, OR TORT (INCLUDING NEGLIGENCE OR OTHERWISE)<br />
ARISING IN ANY WAY OUT OF THE USE OF THIS SOFTWARE, EVEN IF<br />
ADVISED OF THE POSSIBILITY OF SUCH DAMAGE.<br />
This source code is currently archived on ftp.uu.net in <strong>the</strong><br />
<strong>com</strong>p.sources.misc portion of <strong>the</strong> USENET archives. You may also contact<br />
<strong>the</strong> author, Julianne F. Haugh, at jfh@tab.<strong>com</strong> if you have any questions<br />
regarding this package.<br />
THIS SOFTWARE IS BEING DISTRIBUTED AS-IS. THE AUTHORS<br />
DISCLAIM ALL LIABILITY FOR ANY CONSEQUENCES OF USE. THE USER<br />
IS SOLELY RESPONSIBLE FOR THE MAINTENANCE OF THIS SOFTWARE<br />
PACKAGE. THE AUTHORS ARE UNDER NO OBLIGATION TO PROVIDE<br />
MODIFICATIONS OR IMPROVEMENTS. THE USER IS ENCOURAGED TO<br />
TAKE ANY AND ALL STEPS NEEDED TO PROTECT AGAINST ACCIDENTAL<br />
LOSS OF INFORMATION OR MACHINE RESOURCES.<br />
Source files: login_access.c, login_desrpc.c, login_krb.c are derived from<br />
<strong>the</strong> logdaemon-5.0 package, which is under <strong>the</strong> following license:<br />
Copyright 1995 by Wietse Venema. All rights reserved. Individual files may<br />
be covered by o<strong>the</strong>r copyrights (as noted in <strong>the</strong> file itself.)
This material was originally written and <strong>com</strong>piled by Wietse Venema at<br />
Eindhoven University of Technology, The Ne<strong>the</strong>rlands, in 1990, 1991, 1992,<br />
1993, 1994 and 1995.<br />
Redistribution and use in source and binary forms are permitted provided<br />
that this entire copyright notice is duplicated in all such copies.<br />
This software is provided “as is” and without any expressed or implied<br />
warranties, including, without limitation, <strong>the</strong> implied warranties of<br />
merchantibility and fitness for any particular purpose.<br />
sudo<br />
Sudo is distributed under <strong>the</strong> following BSD-style license:<br />
Copyright © 1994-1996, 1998-2003 Todd C. Miller<br />
<br />
All rights reserved.<br />
Redistribution and use in source and binary forms, with or without<br />
modification, are permitted provided that <strong>the</strong> following conditions are met:<br />
1. Redistributions of source code must retain <strong>the</strong> above copyright notice,<br />
this list of conditions and <strong>the</strong> following disclaimer.<br />
2. Redistributions in binary form must reproduce <strong>the</strong> above copyright<br />
notice, this list of conditions and <strong>the</strong> following disclaimer in <strong>the</strong><br />
documentation and/or o<strong>the</strong>r materials provided with <strong>the</strong> distribution.<br />
3. The name of <strong>the</strong> author may not be used to endorse or promote products<br />
derived from this software without specific prior written permission from<br />
<strong>the</strong> author.<br />
4. Products derived from this software may not be called “Sudo” nor may<br />
“Sudo” appear in <strong>the</strong>ir names without specific prior written permission<br />
from <strong>the</strong> author.<br />
THIS SOFTWARE IS PROVIDED “AS IS” AND ANY EXPRESS OR IMPLIED<br />
WARRANTIES, INCLUDING, BUT NOT LIMITED TO, THE IMPLIED<br />
WARRANTIES OF MERCHANTABILITY AND FITNESS FOR A PARTICULAR<br />
PURPOSE ARE DISCLAIMED. IN NO EVENT SHALL THE AUTHOR BE<br />
LIABLE FOR ANY DIRECT, INDIRECT, INCIDENTAL, SPECIAL, EXEMPLARY,<br />
OR CONSEQUENTIAL DAMAGES (INCLUDING, BUT NOT LIMITED TO,<br />
PROCUREMENT OF SUBSTITUTE GOODS OR SERVICES; LOSS OF USE,<br />
DATA, OR PROFITS; OR BUSINESS INTERRUPTION) HOWEVER CAUSED<br />
AND ON ANY THEORY OF LIABILITY, WHETHER IN CONTRACT, STRICT<br />
LIABILITY, OR TORT (INCLUDING NEGLIGENCE OR OTHERWISE)<br />
ARISING IN ANY WAY OUT OF THE USE OF THIS SOFTWARE, EVEN IF<br />
ADVISED OF THE POSSIBILITY OF SUCH DAMAGE.<br />
Sponsored in part by <strong>the</strong> Defense Advanced Research Projects Agency<br />
(DARPA) and Air Force Research Laboratory, Air Force Materiel Command,<br />
USAF, under agreement number F39502-99-1-0512.<br />
Additionally, lsearch.c, fnmatch.c, getcwd.c, snprintf.c, strcasecmp.c and<br />
fnmatch.3 bear <strong>the</strong> following UCB license:<br />
Copyright © 1987, 1989, 1990, 1991, 1993, 1994<br />
The Regents of <strong>the</strong> University of California. All rights reserved.<br />
Redistribution and use in source and binary forms, with or without<br />
modification, are permitted provided that <strong>the</strong> following conditions are met:<br />
1. Redistributions of source code must retain <strong>the</strong> above copyright notice,<br />
this list of conditions and <strong>the</strong> following disclaimer.<br />
2. Redistributions in binary form must reproduce <strong>the</strong> above copyright<br />
notice, this list of conditions and <strong>the</strong> following disclaimer in <strong>the</strong><br />
documentation and/or o<strong>the</strong>r materials provided with <strong>the</strong> distribution.<br />
3. Nei<strong>the</strong>r <strong>the</strong> name of <strong>the</strong> University nor <strong>the</strong> names of its contributors may<br />
be used to endorse or promote products derived from this software<br />
without specific prior written permission.<br />
THIS SOFTWARE IS PROVIDED BY THE REGENTS AND CONTRIBUTORS<br />
“AS IS” AND ANY EXPRESS OR IMPLIED WARRANTIES, INCLUDING, BUT<br />
NOT LIMITED TO, THE IMPLIED WARRANTIES OF MERCHANTABILITY<br />
AND FITNESS FOR A PARTICULAR PURPOSE ARE DISCLAIMED. IN NO<br />
EVENT SHALL THE REGENTS OR CONTRIBUTORS BE LIABLE FOR ANY<br />
DIRECT, INDIRECT, INCIDENTAL, SPECIAL, EXEMPLARY, OR<br />
CONSEQUENTIAL DAMAGES (INCLUDING, BUT NOT LIMITED TO,<br />
PROCUREMENT OF SUBSTITUTE GOODS OR SERVICES; LOSS OF USE,<br />
DATA, OR PROFITS; OR BUSINESS INTERRUPTION) HOWEVER CAUSED<br />
AND ON ANY THEORY OF LIABILITY, WHETHER IN CONTRACT, STRICT<br />
LIABILITY, OR TORT (INCLUDING NEGLIGENCE OR OTHERWISE)<br />
ARISING IN ANY WAY OUT OF THE USE OF THIS SOFTWARE, EVEN IF<br />
ADVISED OF THE POSSIBILITY OF SUCH DAMAGE.<br />
zlib<br />
Copyright notice:<br />
© 1995-2003 Jean-loup Gailly and Mark Adler<br />
This software is provided ‘as-is’, without any express or implied warranty. In<br />
no event will <strong>the</strong> authors be held liable for any damages arising from <strong>the</strong> use<br />
of this software.<br />
Permission is granted to anyone to use this software for any purpose,<br />
including <strong>com</strong>mercial applications, and to alter it and redistribute it freely,<br />
subject to <strong>the</strong> following restrictions:<br />
1. The origin of this software must not be misrepresented; you must not<br />
claim that you wrote <strong>the</strong> original software. If you use this software in a<br />
product, an acknowledgment in <strong>the</strong> product documentation would be<br />
appreciated but is not required.<br />
2. Altered source versions must be plainly marked as such, and must not be<br />
misrepresented as being <strong>the</strong> original software.<br />
3. This notice may not be removed or altered from any source distribution.<br />
Jean-loup Gailly Mark Adler<br />
jloup@gzip.org madler@alumni.caltech.edu<br />
If you use <strong>the</strong> zlib library in a product, we would appreciate *not* receiving<br />
lengthy legal documents to sign. The sources are provided for free but<br />
without warranty of any kind. The library has been entirely written by Jeanloup<br />
Gailly and Mark Adler; it does not include third-party code.<br />
If you redistribute modified sources, we would appreciate that you include in<br />
<strong>the</strong> file ChangeLog history information documenting your changes. Please<br />
read <strong>the</strong> FAQ for more information on <strong>the</strong> distribution of modified source<br />
versions.<br />
Note on source code distribution<br />
For three years after <strong>the</strong> final factory shipment, you may request from<br />
Yamaha <strong>the</strong> source code for any portions of <strong>the</strong> product which are licensed<br />
under <strong>the</strong> GNU General Public License by writing to <strong>the</strong> following address:<br />
MP business unit PA•DMI Division, YAMAHA Corporation<br />
10-1 Nakazawa-cho, Naka-ku, Hamamatsu, 430-8650, JAPAN<br />
The source code will be provided at no charge; however, we may require<br />
you to reimburse Yamaha for <strong>the</strong> cost of delivering <strong>the</strong> source code to you.<br />
• Note that we shall bear no responsibility whatsoever for any damage<br />
arising from changes (additions/ deletions) made to <strong>the</strong> software for this<br />
product by a third party o<strong>the</strong>r than Yamaha (or party authorized by<br />
Yamaha).<br />
• Note that re-use of source code released to <strong>the</strong> public domain by<br />
Yamaha is unguaranteed, and Yamaha shall not bear any responsibility<br />
whatsoever for <strong>the</strong> source code.<br />
• The source code can be downloaded from <strong>the</strong> following address:<br />
http://www.yamahasynth.<strong>com</strong>/download/source/motifxs/<br />
MOTIF <strong>XS</strong> Owner’s <strong>Manual</strong> 317
1. IMPORTANT NOTICE: DO NOT MODIFY THIS UNIT!<br />
This product, when installed as indicated in <strong>the</strong> instructions contained<br />
in this manual, meets FCC requirements. Modifications not<br />
expressly approved by Yamaha may void your authority, granted by<br />
<strong>the</strong> FCC, to use <strong>the</strong> product.<br />
2. IMPORTANT: When connecting this product to accessories and/<br />
or ano<strong>the</strong>r product use only high quality shielded cables. Cable/s<br />
supplied with this product MUST be used. Follow all installation<br />
instructions. Failure to follow instructions could void your FCC<br />
authorization to use this product in <strong>the</strong> USA.<br />
3. NOTE: This product has been tested and found to <strong>com</strong>ply with <strong>the</strong><br />
requirements listed in FCC Regulations, Part 15 for Class “B” digital<br />
devices. Compliance with <strong>the</strong>se requirements provides a reasonable<br />
level of assurance that your use of this product in a residential<br />
environment will not result in harmful interference with o<strong>the</strong>r electronic<br />
devices. This equipment generates/uses radio frequencies<br />
and, if not installed and used according to <strong>the</strong> instructions found in<br />
<strong>the</strong> users manual, may cause interference harmful to <strong>the</strong> operation<br />
of o<strong>the</strong>r electronic devices. Compliance with FCC regulations does<br />
FCC INFORMATION (U.S.A.)<br />
not guarantee that interference will not occur in all installations. If<br />
this product is found to be <strong>the</strong> source of interference, which can be<br />
determined by turning <strong>the</strong> unit “OFF” and “ON”, please try to eliminate<br />
<strong>the</strong> problem by using one of <strong>the</strong> following measures:<br />
Relocate ei<strong>the</strong>r this product or <strong>the</strong> device that is being affected by<br />
<strong>the</strong> interference.<br />
Utilize power outlets that are on different branch (circuit breaker or<br />
fuse) circuits or install AC line filter/s.<br />
In <strong>the</strong> case of radio or TV interference, relocate/reorient <strong>the</strong><br />
antenna. If <strong>the</strong> antenna lead-in is 300 ohm ribbon lead, change <strong>the</strong><br />
lead-in to co-axial type cable.<br />
If <strong>the</strong>se corrective measures do not produce satisfactory results,<br />
please contact <strong>the</strong> local retailer authorized to distribute this type of<br />
product. If you can not locate <strong>the</strong> appropriate retailer, please contact<br />
Yamaha Corporation of America, Electronic Service Division,<br />
6600 Orangethorpe Ave, Buena Park, CA90620<br />
The above statements apply ONLY to those products distributed by<br />
Yamaha Corporation of America or its subsidiaries.<br />
* This applies only to products distributed by YAMAHA CORPORATION OF AMERICA. (class B)<br />
COMPLIANCE INFORMATION STATEMENT<br />
(DECLARATION OF CONFORMITY PROCEDURE)<br />
Responsible Party : Yamaha Corporation of America<br />
Address : 6600 Orangethorpe Ave.,<br />
Buena Park, Calif. 90620<br />
Telephone : 714-522-9011<br />
Type of Equipment : Music Production Syn<strong>the</strong>sizer<br />
Model Name : MOTIF <strong>XS</strong>8, MOTIF <strong>XS</strong>7, MOTIF <strong>XS</strong>6<br />
This device <strong>com</strong>plies with Part 15 of <strong>the</strong> FCC Rules.<br />
Operation is subject to <strong>the</strong> following two conditions:<br />
1) this device may not cause harmful interference, and<br />
2) this device must accept any interference received including<br />
interference that may cause undesired operation.<br />
See user manual instructions if interference to radio reception is<br />
suspected.<br />
* This applies only to products distributed by<br />
YAMAHA CORPORATION OF AMERICA.<br />
(FCC DoC)<br />
This product contains a high intensity lamp that contains<br />
a small amount of mercury. Disposal of this material<br />
may be regulated due to environmental considerations.<br />
For disposal information in <strong>the</strong> United States, refer to<br />
<strong>the</strong> Electronic Industries Alliance web site:<br />
www.eiae.org<br />
* This applies only to products distributed by<br />
YAMAHA CORPORATION OF AMERICA.<br />
(mercury)<br />
IMPORTANT NOTICE FOR THE UNITED KINGDOM<br />
Connecting <strong>the</strong> Plug and Cord<br />
WARNING: THIS APPARATUS MUST BE EARTHED<br />
IMPORTANT. The wires in this mains lead are coloured in accordance<br />
with <strong>the</strong> following code:<br />
GREEN-AND-YELLOW : EARTH<br />
BLUE : NEUTRAL<br />
BROWN : LIVE<br />
As <strong>the</strong> colours of <strong>the</strong> wires in <strong>the</strong> mains lead of this apparatus may not<br />
correspond with <strong>the</strong> coloured markings identifying <strong>the</strong> terminals in<br />
your plug proceed as follows:<br />
The wire which is coloured GREEN-and-YELLOW must be connected<br />
to <strong>the</strong> terminal in <strong>the</strong> plug which is marked by <strong>the</strong> letter E or by <strong>the</strong><br />
safety earth symbol or colored GREEN or GREEN-and-YELLOW.<br />
The wire which is coloured BLUE must be connected to <strong>the</strong> terminal<br />
which is marked with <strong>the</strong> letter N or coloured BLACK.<br />
The wire which is coloured BROWN must be connected to <strong>the</strong> terminal<br />
which is marked with <strong>the</strong> letter L or coloured RED.<br />
• This applies only to products distributed by Yamaha-Kemble Music (U.K.) Ltd. (3 wires)
For details of products, please contact your nearest Yamaha<br />
representative or <strong>the</strong> authorized distributor listed below.<br />
Pour plus de détails sur les produits, veuillez-vous adresser à Yamaha ou<br />
au distributeur le plus proche de vous figurant dans la liste suivante.<br />
NORTH AMERICA<br />
CANADA<br />
Yamaha Canada Music Ltd.<br />
135 Milner Avenue, Scarborough, Ontario,<br />
M1S 3R1, Canada<br />
Tel: 416-298-1311<br />
U.S.A.<br />
Yamaha Corporation of America<br />
6600 Orangethorpe Ave., Buena Park, Calif. 90620,<br />
U.S.A.<br />
Tel: 714-522-9011<br />
CENTRAL & SOUTH AMERICA<br />
MEXICO<br />
Yamaha de México S.A. de C.V.<br />
Calz. Javier Rojo Gómez #1149,<br />
Col. Guadalupe del Moral<br />
C.P. 09300, México, D.F., México<br />
Tel: 55-5804-0600<br />
BRAZIL<br />
Yamaha Musical do Brasil Ltda.<br />
Rua Joaquim Floriano, 913 - 4' andar, Itaim Bibi,<br />
CEP 04534-013 Sao Paulo, SP. BRAZIL<br />
Tel: 011-3704-1377<br />
ARGENTINA<br />
Yamaha Music Latin America, S.A.<br />
Sucursal de Argentina<br />
Olga Cossettini 1553, Piso 4 Norte<br />
Madero Este-C1107CEK<br />
Buenos Aires, Argentina<br />
Tel: 011-4119-7000<br />
PANAMA AND OTHER LATIN<br />
AMERICAN COUNTRIES/<br />
CARIBBEAN COUNTRIES<br />
Yamaha Music Latin America, S.A.<br />
Torre Banco General, Piso 7, Urbanización Marbella,<br />
Calle 47 y Aquilino de la Guardia,<br />
Ciudad de Panamá, Panamá<br />
Tel: +507-269-5311<br />
THE UNITED KINGDOM<br />
Yamaha Music U.K. Ltd.<br />
Sherbourne Drive, Tilbrook, Milton Keynes,<br />
MK7 8BL, England<br />
Tel: 01908-366700<br />
IRELAND<br />
Danfay Ltd.<br />
61D, Sallynoggin Road, Dun Laoghaire, Co. Dublin<br />
Tel: 01-2859177<br />
GERMANY<br />
Yamaha Music Central Europe GmbH<br />
Siemensstraße 22-34, 25462 Rellingen, Germany<br />
Tel: 04101-3030<br />
SWITZERLAND/LIECHTENSTEIN<br />
Yamaha Music Central Europe GmbH,<br />
Branch Switzerland<br />
Seefeldstrasse 94, 8008 Zürich, Switzerland<br />
Tel: 01-383 3990<br />
AUSTRIA<br />
Yamaha Music Central Europe GmbH,<br />
Branch Austria<br />
Schleiergasse 20, A-1100 Wien, Austria<br />
Tel: 01-60203900<br />
CZECH REPUBLIC/SLOVAKIA/<br />
HUNGARY/SLOVENIA<br />
Yamaha Music Central Europe GmbH,<br />
Branch Austria, CEE Department<br />
Schleiergasse 20, A-1100 Wien, Austria<br />
Tel: 01-602039025<br />
POLAND<br />
Yamaha Music Central Europe GmbH<br />
Sp.z. o.o. Oddzial w Polsce<br />
ul. 17 Stycznia 56, PL-02-146 Warszawa, Poland<br />
Tel: 022-868-07-57<br />
SY47<br />
EUROPE<br />
THE NETHERLANDS/<br />
BELGIUM/LUXEMBOURG<br />
Yamaha Music Central Europe GmbH,<br />
Branch Benelux<br />
Clarissenhof 5-b, 4133 AB Vianen, The Ne<strong>the</strong>rlands<br />
Tel: 0347-358 040<br />
FRANCE<br />
Yamaha Musique France<br />
BP 70-77312 Marne-la-Vallée Cedex 2, France<br />
Tel: 01-64-61-4000<br />
ITALY<br />
Yamaha Musica Italia S.P.A.<br />
Combo Division<br />
Viale Italia 88, 20020 Lainate (Milano), Italy<br />
Tel: 02-935-771<br />
SPAIN/PORTUGAL<br />
Yamaha Música Ibérica, S.A.<br />
Ctra. de la Coruna km. 17, 200, 28230<br />
Las Rozas (Madrid), Spain<br />
Tel: 91-639-8888<br />
GREECE<br />
Philippos Nakas S.A. The Music House<br />
147 Skiathou Street, 112-55 A<strong>the</strong>ns, Greece<br />
Tel: 01-228 2160<br />
SWEDEN<br />
Yamaha Scandinavia AB<br />
J. A. Wettergrens Gata 1, Box 30053<br />
S-400 43 Göteborg, Sweden<br />
Tel: 031 89 34 00<br />
DENMARK<br />
YS Copenhagen Liaison Office<br />
Generatorvej 6A, DK-2730 Herlev, Denmark<br />
Tel: 44 92 49 00<br />
FINLAND<br />
F-Musiikki Oy<br />
Kluuvikatu 6, P.O. Box 260,<br />
SF-00101 Helsinki, Finland<br />
Tel: 09 618511<br />
NORWAY<br />
Norsk filial av Yamaha Scandinavia AB<br />
Grini Næringspark 1, N-1345 Østerås, Norway<br />
Tel: 67 16 77 70<br />
ICELAND<br />
Skifan HF<br />
Skeifan 17 P.O. Box 8120, IS-128 Reykjavik, Iceland<br />
Tel: 525 5000<br />
RUSSIA<br />
Yamaha Music (Russia)<br />
Office 4015, entrance 2, 21/5 Kuznetskii<br />
Most street, Moscow, 107996, Russia<br />
Tel: 495 626 0660<br />
OTHER EUROPEAN COUNTRIES<br />
Yamaha Music Central Europe GmbH<br />
Siemensstraße 22-34, 25462 Rellingen, Germany<br />
Tel: +49-4101-3030<br />
AFRICA<br />
Yamaha Corporation,<br />
Asia-Pacific Music Marketing Group<br />
Nakazawa-cho 10-1, Naka-ku, Hamamatsu,<br />
Japan 430-8650<br />
Tel: +81-53-460-2312<br />
MIDDLE EAST<br />
TURKEY/CYPRUS<br />
Yamaha Music Central Europe GmbH<br />
Siemensstraße 22-34, 25462 Rellingen, Germany<br />
Tel: 04101-3030<br />
OTHER COUNTRIES<br />
Yamaha Music Gulf FZE<br />
LOB 16-513, P.O.Box 17328, Jubel Ali,<br />
Dubai, United Arab Emirates<br />
Tel: +971-4-881-5868<br />
Die Einzelheiten zu Produkten sind bei Ihrer unten aufgeführten<br />
Niederlassung und bei Yamaha Vertragshändlern in den jeweiligen<br />
Bestimmungsländern erhältlich.<br />
Para detalles sobre productos, contacte su tienda Yamaha más cercana<br />
o el distribuidor autorizado que se lista debajo.<br />
ASIA<br />
THE PEOPLE’S REPUBLIC OF CHINA<br />
Yamaha Music & Electronics (China) Co.,Ltd.<br />
2F, Yunhedasha, 1818 Xinzha-lu, Jingan-qu,<br />
Shanghai, China<br />
Tel: 021-6247-2211<br />
HONG KONG<br />
Tom Lee Music Co., Ltd.<br />
11/F., Silvercord Tower 1, 30 Canton Road,<br />
Tsimshatsui, Kowloon, Hong Kong<br />
Tel: 2737-7688<br />
INDIA<br />
Yamaha Music India Pvt. Ltd.<br />
5F Ambience Corporate Tower Ambience Mall Complex<br />
Ambience Island, NH-8, Gurgaon-122001, Haryana, India<br />
Tel: 0124-466-5551<br />
INDONESIA<br />
PT. Yamaha Music Indonesia (Distributor)<br />
PT. Nusantik<br />
Gedung Yamaha Music Center, Jalan Jend. Gatot<br />
Subroto Kav. 4, Jakarta 12930, Indonesia<br />
Tel: 21-520-2577<br />
KOREA<br />
Yamaha Music Korea Ltd.<br />
8F, 9F, Dongsung Bldg. 158-9 Samsung-Dong,<br />
Kangnam-Gu, Seoul, Korea<br />
Tel: 080-004-0022<br />
MALAYSIA<br />
Yamaha Music Malaysia, Sdn., Bhd.<br />
Lot 8, Jalan Perbandaran, 47301 Kelana Jaya,<br />
Petaling Jaya, Selangor, Malaysia<br />
Tel: 3-78030900<br />
PHILIPPINES<br />
Yupangco Music Corporation<br />
339 Gil J. Puyat Avenue, P.O. Box 885 MCPO,<br />
Makati, Metro Manila, Philippines<br />
Tel: 819-7551<br />
SINGAPORE<br />
Yamaha Music Asia Pte., Ltd.<br />
#03-11 A-Z Building<br />
140 Paya Lebor Road, Singapore 409015<br />
Tel: 747-4374<br />
TAIWAN<br />
Yamaha KHS Music Co., Ltd.<br />
3F, #6, Sec.2, Nan Jing E. Rd. Taipei.<br />
Taiwan 104, R.O.C.<br />
Tel: 02-2511-8688<br />
THAILAND<br />
Siam Music Yamaha Co., Ltd.<br />
4, 6, 15 and 16 th floor, Siam Motors Building,<br />
891/1 Rama 1 Road, Wangmai,<br />
Pathumwan, Bangkok 10330, Thailand<br />
Tel: 02-215-2626<br />
OTHER ASIAN COUNTRIES<br />
Yamaha Corporation,<br />
Asia-Pacific Music Marketing Group<br />
Nakazawa-cho 10-1, Naka-ku, Hamamatsu,<br />
Japan 430-8650<br />
Tel: +81-53-460-2317<br />
OCEANIA<br />
AUSTRALIA<br />
Yamaha Music Australia Pty. Ltd.<br />
Level 1, 99 Queensbridge Street, Southbank,<br />
Victoria 3006, Australia<br />
Tel: 3-9693-5111<br />
NEW ZEALAND<br />
Music Works LTD<br />
P.O.BOX 6246 Wellesley, Auckland 4680,<br />
New Zealand<br />
Tel: 9-634-0099<br />
COUNTRIES AND TRUST<br />
TERRITORIES IN PACIFIC OCEAN<br />
Yamaha Corporation,<br />
Asia-Pacific Music Marketing Group<br />
Nakazawa-cho 10-1, Naka-ku, Hamamatsu,<br />
Japan 430-8650<br />
Tel: +81-53-460-2312<br />
HEAD OFFICE Yamaha Corporation, Pro Audio & Digital Musical Instrument Division<br />
Nakazawa-cho 10-1, Naka-ku, Hamamatsu, Japan 430-8650<br />
Tel: +81-53-460-2445
This document is printed on chlorine free (ECF) paper with soy ink.<br />
Yamaha Web Site (English only)<br />
http://www.yamahasynth.<strong>com</strong>/<br />
Yamaha <strong>Manual</strong> Library<br />
http://www.yamaha.co.jp/manual/<br />
U.R.G., Pro Audio & Digital Musical Instrument Division, Yamaha Corporation<br />
© 2007 Yamaha Corporation<br />
WG97440 811MWDH68.2-05E0<br />
Printed in Japan