CinQo Saturn Install User Guide 26Apr11 Lowres - Quarq
CinQo Saturn Install User Guide 26Apr11 Lowres - Quarq
CinQo Saturn Install User Guide 26Apr11 Lowres - Quarq

You also want an ePaper? Increase the reach of your titles
YUMPU automatically turns print PDFs into web optimized ePapers that Google loves.
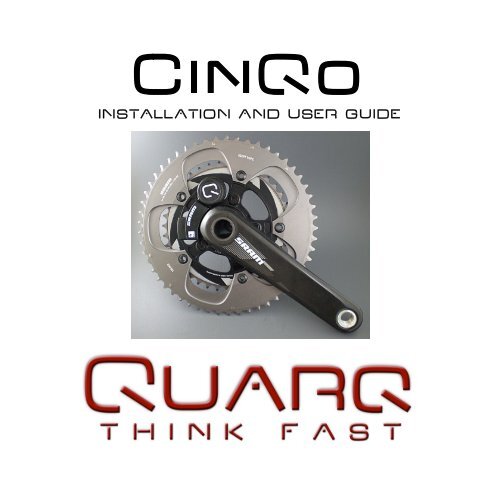
<strong>CinQo</strong><br />
INSTALLATION AND USER GUIDE
<strong>Quarq</strong> Technology, Inc.<br />
3100 1 st Ave.<br />
Spearfish, SD 57783<br />
1-605-642-2226<br />
Copyright 2008-2011.<br />
Patents pending.<br />
FCC Statement of Compliance:<br />
Statement of Compliance for FCC and Industry Canada:<br />
<strong>Quarq</strong> Technology, Inc.<br />
Model#: <strong>Quarq</strong> <strong>CinQo</strong><br />
IC: 7716A-CNQ1<br />
FCC ID: WAY-CNQ1<br />
This equipment has been tested and found to comply with the limits for a Class B digital<br />
device, pursuant to Part 15 of the FCC Rules. These limits are designed to provide<br />
reasonable protection against harmful interference in a residential installation. This<br />
equipment generates uses and can radiate radio frequency energy and, if not installed and<br />
used in accordance with the instructions, may cause harmful interference to radio<br />
communications. However, there is no guarantee that interference will not occur in a<br />
particular installation.<br />
Warning: Any changes or modifications not expressively approved by <strong>Quarq</strong> could void the<br />
user's authority to operate this equipment.<br />
“This device complies with Industry Canada and Part 15 of the FCC Rules. Operation is<br />
subject to the following two conditions: (1) This device may not cause harmful interference,<br />
and (2) this device must accept any interference received, including interference that may<br />
cause undesired operation.”<br />
The term “IC:” before the radio certification number only signifies that Industry Canada<br />
technical specifications were met.<br />
2
Table of Contents<br />
INSTALLATION ..................................................................................................... 4<br />
Magnet <strong>Install</strong>ation ................................................................................. 4<br />
BB Cup Mount .......................................................................... 5<br />
Cable <strong>Guide</strong> Mount .................................................................. 6<br />
Adhesive Putty ......................................................................... 7<br />
Magnet Placement ................................................................... 9<br />
Crank <strong>Install</strong>ation .................................................................................. 10<br />
SET UP ............................................................................................................... 11<br />
Pairing ................................................................................................... 11<br />
Zeroing .................................................................................................. 12<br />
Auto Zero ................................................................................ 12<br />
Manual Zero ........................................................................... 12<br />
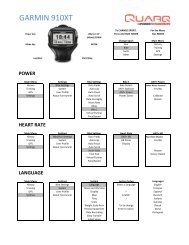
Garmin Edge 800 ................................................................................. 13<br />
Garmin Edge 705 ................................................................................. 14<br />
Garmin Edge 500 ................................................................................. 15<br />
Garmin Forerunner 310XT Watch ........................................................ 16<br />
CINQO AND CHAINRING ASSEMBLY .............................................................. 17<br />
MAINTENANCE AND CARE .............................................................................. 18<br />
Battery Information ............................................................................... 18<br />
Cleaning ............................................................................................... 19<br />
TROUBLESHOOTING ........................................................................................ 20<br />
Does Not Pair ....................................................................................... 20<br />
Cadence, But No Power ....................................................................... 20<br />
High or Low Power Values ................................................................... 21<br />
Data Drops ............................................................................................ 21<br />
Manual Zero (Calibration) Fails ............................................................ 22<br />
3
INSTALLATION<br />
Magnet <strong>Install</strong>ation<br />
You must properly install the magnet in order for the <strong>CinQo</strong> to function.<br />
It is easiest to install the magnet on your bike before installing the<br />
cranks.<br />
The magnet is used to trip the reed switches, which are under the raised<br />
ring on the back of the <strong>CinQo</strong>. The reed switches must be tripped to<br />
wake the <strong>CinQo</strong>, monitor cadence and calculate power.<br />
There are three ways to install the magnet for the <strong>CinQo</strong>: Adhesive<br />
Putty, BB Cup Mount or Cable <strong>Guide</strong> Mount. Read Magnet Placement<br />
on page 9 no matter what method you choose.<br />
BB Cup Mount Cable <strong>Guide</strong> Mount Adhesive Putty<br />
4
BB Cup Mount<br />
Note: The BB Cup Mount works with English/BSA and Italian (threaded)<br />
bottom brackets. It does not work with frames that have bearings<br />
pressed into the bottom bracket.<br />
1. Slide the BB Cup Mount over the threads of the drive-side bearing cup<br />
prior to threading the bottom bracket into the frame.<br />
2. Make sure the magnet is facing to the outside.<br />
3. It is best to have the magnet located in the 9 o’clock position when<br />
you snug up the bottom bracket. (Figures 1 & 2)<br />
Figure 1<br />
5<br />
Magnet<br />
Cadence<br />
sensors<br />
Figure 2
Cable <strong>Guide</strong> Mount<br />
Note: The Cable <strong>Guide</strong> Mount (Figures 3 & 4) should only be used when<br />
the cable guide is fastened using a screw. Use Adhesive Putty if the<br />
cable guide is fastened using a rivet.<br />
1. Remove the existing cranks.<br />
2. Loosen the cable guide screw.<br />
3. Slide the mount under the cable guide.<br />
4. Tighten the screw.<br />
Figure 3<br />
6<br />
Magnet<br />
Figure 4
Adhesive Putty<br />
You may want to experiment with a less permanent adhesive on the<br />
magnet first to ensure proper placement.<br />
1. Clean the frame with the included<br />
alcohol pad prior to attaching the<br />
magnet.<br />
Note how close the magnet is placed<br />
to the bottom bracket.<br />
(Figures 5 & 6)<br />
38mm is the maximum acceptable<br />
distance from the bottom bracket<br />
Figure 5<br />
7<br />
Magnet<br />
Figure 6
2. Knead both colors of adhesive putty with your fingers until you have a<br />
consistent color.<br />
3. Use a 5 16<br />
ball-bearing (pea) size piece of putty to attach the magnet<br />
to the frame (Figure 7). On most frames, the magnet can be placed<br />
directly on the chain stay. Excess putty can be scraped away with a<br />
hobby knife.<br />
8<br />
Figure 7<br />
The included adhesive putty is for a permanent attachment. You can also<br />
use, epoxy, hot glue or other suitable adhesives to attach the magnet.
Magnet Placement<br />
The magnet should be in line with the cadence sensors and within ¼<br />
inch (6-8 mm) of the sensors (Figure 8).<br />
Depending on your frame, you may need to stack 2-3 magnets to<br />
achieve the optimal distance.<br />
Do not allow the magnet to physically touch the <strong>CinQo</strong>.<br />
Creativity may be needed on certain frames - the magnet may actually<br />
be best placed beside the raised ring.<br />
Cadence<br />
sensors<br />
9<br />
Magnet<br />
Figure 8
Crank <strong>Install</strong>ation<br />
To install the pre-assembled <strong>CinQo</strong> and crankset on your bike you need:<br />
SRAM S975 or FSA Team Issue:<br />
• A compatible bottom bracket wrench (if required)<br />
• 8mm Allen Wrench<br />
Rotor 3D:<br />
• A compatible bottom bracket wrench (if required)<br />
• 8mm Allen Wrench<br />
• 5mm Allen Wrench<br />
<strong>Install</strong> the crankset and bottom bracket assembly on your bike according<br />
to the manufacturer’s instructions.<br />
10
SET UP<br />
Pairing<br />
Before pairing your powermeter to a computer, make sure you are at<br />
least 30 feet (10 meters) from any other ANT+Sport sensors. This will<br />
keep you from accidentally pairing to another person’s powermeter,<br />
speed sensor, etc.<br />
Spin the crank backwards 2-3 times to wake it up. When awake, the<br />
<strong>CinQo</strong> will begin broadcasting ANT+Sport messages. The <strong>CinQo</strong> will<br />
shut off after a period of inactivity (about 10 minutes).<br />
To pair the <strong>CinQo</strong> with an ANT+Sport computer, wake the <strong>CinQo</strong> and<br />
follow the instructions specific to your computer.<br />
Each <strong>CinQo</strong> has a unique sensor ID. Once your computer is paired it will<br />
remember the <strong>CinQo</strong>’s sensor ID each time it is turned on.<br />
The <strong>CinQo</strong> does not lose its sensor ID when the battery is replaced.<br />
NOTE: You can find the <strong>CinQo</strong>’s sensor ID inside the battery<br />
compartment underneath the battery. It will be 4 or 5 digits long.<br />
11
Zeroing<br />
The <strong>CinQo</strong> functions like a scale and must be zeroed from time to time.<br />
You can zero the <strong>CinQo</strong> two ways: Auto Zero or Manual Zero.<br />
Auto Zero<br />
Spin the crank backwards for 4-5 complete revolutions. This may be<br />
done while coasting or stopped with one or both feet clipped or by hand.<br />
Manual Zero<br />
The <strong>CinQo</strong> may be zeroed manually by sending the “Calibrate”<br />
command from an ANT+Sport compatible bike computer. The <strong>CinQo</strong> will<br />
return the Zero Offset value to the computer, however, not all ANT+Sport<br />
computers will display the value. The Zero Offset will vary a little from<br />
day to day, but will typically be between – 500 and +500. Refer to your<br />
computer’s manual with for precise instructions.<br />
The Manual Zero must be done with the cranks stationary, with no force<br />
on the pedals. It is best to use a consistent crank orientation each time<br />
when manual zeroing. We recommend putting the drive side crank arm<br />
down (6 o’clock position).<br />
Best Practice<br />
Best practice is to Manual Zero before you start each ride and Auto Zero<br />
throughout the ride when convenient if the temperature changes greatly.<br />
12
Garmin Edge 800<br />
Contact <strong>Quarq</strong> for the most recent recommended firmware version. You<br />
can check what firmware you currently have this way:<br />
Menu → Settings → About Edge<br />
To pair the <strong>CinQo</strong>:<br />
Menu → Settings → Bike Settings → Bike Profiles → Bike 1 – current →<br />
ANT+Power → Rescan<br />
“Power Meter Detected” will flash up on your screen when the units are<br />
paired.<br />
To manually zero your <strong>CinQo</strong>:<br />
Menu → Settings → Bike Settings → Bike Profiles → Bike 1 – current →<br />
ANT+Power → Calibrate<br />
13
Garmin Edge 705<br />
Contact <strong>Quarq</strong> for the most recent recommended firmware version. You<br />
can check what firmware you currently have this way:<br />
Menu → Settings → System → About Edge<br />
To pair the <strong>CinQo</strong>:<br />
Menu → Settings → ANT+Sport → Accessories → Restart Scan<br />
“Power Meter Detected” will flash up on your screen when the units are<br />
paired.<br />
If the power meter is not detected at this point, make sure the “Power”<br />
box under “Bike Profile” is checked and repeat steps above:<br />
Menu → Settings → Profile & Zones → Bike Profile → Check “Power<br />
Box”<br />
<strong>Quarq</strong> recommends setting the Edge 705 to Record Data Points every<br />
second:<br />
Menu → Settings → Data Recording → Record Data Points (Every<br />
Second)<br />
To manually zero your <strong>CinQo</strong>:<br />
Menu → Settings → ANT+Sport → Accessories → Calibrate Power<br />
14
Garmin Edge 500<br />
Contact <strong>Quarq</strong> for the most recent recommended firmware version. You<br />
can check what firmware you currently have this way:<br />
Menu → Settings → About Edge<br />
Note: To view the menu, you must press and hold the menu button until<br />
the menu pops up.<br />
To pair the <strong>CinQo</strong>:<br />
Menu → Settings → Bike Settings → Bike 1 → ANT+Power → Rescan<br />
“Power Meter Detected” will flash up on your screen when the units are<br />
paired.<br />
To manually zero your <strong>CinQo</strong>:<br />
Menu → Settings → Bike Settings → Bike 1 → ANT+Power → Calibrate<br />
15
Garmin Forerunner 310XT Watch<br />
Contact <strong>Quarq</strong> for the most recent recommended firmware version. You<br />
can check what firmware you currently have this way:<br />
Mode → Settings → About Forerunner<br />
Note: You’ll need to be in bike mode in order to pair and zero your<br />
<strong>CinQo</strong> (press and hold the mode button).<br />
To pair the <strong>CinQo</strong>:<br />
Mode → Bike Settings → Bike 1 → Ant+Power → Restart Scan<br />
“Power Meter Detected” will flash up on your screen when the units are<br />
paired.<br />
To manually zero your <strong>CinQo</strong>:<br />
Mode → Bike Settings → Bike 1 → Ant+Power → Calibrate<br />
16
CINQO AND CHAINRING ASSEMBLY<br />
When reinstalling chainrings you must align the chainring tabs so they are<br />
in line with the crank arm. (Figure 9)<br />
Torque the five chainring bolts to the manufacturer’s recommended<br />
torque. <strong>Quarq</strong> uses 10 Nm for aluminum bolts and 12 Nm for steel bolts.<br />
It is important to have all of the bolts tightened to the same torque.<br />
Figure 9<br />
17
MAINTENANCE AND CARE<br />
Battery Information<br />
The <strong>CinQo</strong> is powered by a<br />
CR2450 coin cell battery.<br />
Unscrew the battery lid<br />
counter-clockwise. Do not<br />
pry on it. (Figure 10)<br />
18<br />
Battery<br />
Figure 10<br />
The <strong>CinQo</strong> automatically switches on when rotated and shuts off after<br />
about 10 minutes of inactivity. Under normal operating conditions the<br />
battery will last for about 500 hours of riding.<br />
The <strong>CinQo</strong> battery can be replaced without any special tools. To replace<br />
the battery, unscrew the lid counter-clockwise. Do not try to pry the lid<br />
off. The battery should sit with the “+” facing out. Be sure to snug up the<br />
lid once the battery is replaced.
The <strong>CinQo</strong> will send a warning when the battery is low. However, not all<br />
ANT+Sport computers will display the message.<br />
The <strong>CinQo</strong> retains its sensor ID throughout battery changes and will<br />
remain properly paired with your computer.<br />
Cleaning<br />
The <strong>CinQo</strong> is designed to be very durable, however, we recommend<br />
using soap and water. Avoid harsh chemicals and do not use a highpressure<br />
washer.<br />
19
TROUBLESHOOTING<br />
Does Not Pair<br />
• Check with <strong>Quarq</strong> for the recommended firmware version for your<br />
Garmin computer.<br />
• Check the battery. The battery must be installed correctly (“+” out)<br />
and have sufficient charge. Check to make sure the battery contacts<br />
are free of corrosion.<br />
• Check the magnet position. The magnet should be installed<br />
according to the instructions on pages 5-9. Once the cadence<br />
sensors have been activated, the <strong>CinQo</strong> will be transmitting<br />
messages and is ready to be paired.<br />
• Make sure the proper pairing technique has been followed for your<br />
bike computer. The pairing process will vary by manufacturer. Refer<br />
to your bike computer’s instruction manual.<br />
Cadence, But No Power<br />
• Check the magnet position. The magnet should be installed<br />
according to the instructions on pages 5-9.<br />
• Zero the <strong>CinQo</strong> using Auto Zero or Manual Zero. See page 12.<br />
o Contact <strong>Quarq</strong> customer support if the Manual Zero<br />
value is outside +/- 500.<br />
20
High or Low Power Values<br />
• Perform the Auto Zero or Manual Zero as described on page 12.<br />
o Contact <strong>Quarq</strong> customer support if the Manual Zero value is<br />
outside +/- 500.<br />
• Remove third party cadence sensors. The <strong>CinQo</strong> delivers both<br />
power and cadence data to the bike computer.<br />
• Inspect and clean the chainrings and <strong>CinQo</strong> interface. Re-assemble<br />
according to the instructions on page 17.<br />
Data Drops<br />
• Check the magnet position. The magnet should be installed<br />
according to the instructions on pages 5-9.<br />
• Make sure the magnet is free of road grime.<br />
• Check and replace the battery in the <strong>CinQo</strong> and/or bike computer.<br />
• Check the <strong>CinQo</strong>’s battery cap for cracks and ensure there is no<br />
moisture in the battery compartment.<br />
• Carefully raise the battery contacts underneath the battery using<br />
your fingernail or a penknife to ensure proper contact.<br />
21
Manual Zero (Calibration) Fails<br />
• The drive-side crank arm should be at 6 o’clock, you must have no<br />
weight on the pedals and the cranks must be stationary.<br />
• If you are using a Garmin bike computer with ANT+ heart rate<br />
enabled calibration will often be faster when you are wearing the<br />
heart rate monitor/strap. Turn off the ANT+ HRM function if you are<br />
not using a heart rate strap.<br />
22
Newton, Resident Great Dane and Zoomies Specialist, with <strong>Quarq</strong><br />
founder Jim Meyer.<br />
23
WE ARE HERE TO HELP<br />
thinkfast@quarq.us<br />
1-800-660-6853<br />
<strong>Quarq</strong> Technology, Inc.<br />
3100 1 st Ave.<br />
Spearfish, SD 57783<br />
1-605-642-2226<br />
24