Garmin GNC 255A/255B Pilot's Guide
Garmin GNC 255A/255B Pilot's Guide
Garmin GNC 255A/255B Pilot's Guide

Create successful ePaper yourself
Turn your PDF publications into a flip-book with our unique Google optimized e-Paper software.
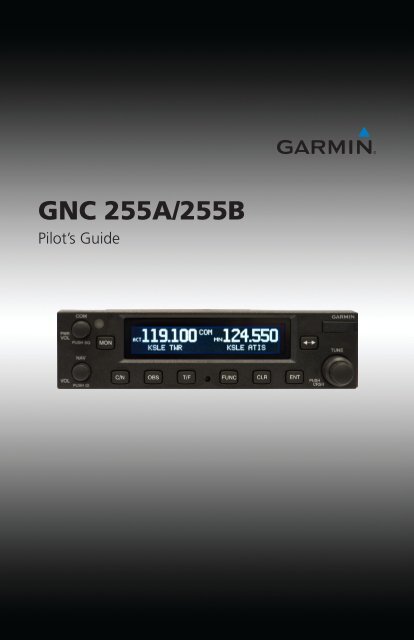
<strong>GNC</strong> <strong>255A</strong>/<strong>255B</strong><br />
Pilot’s <strong>Guide</strong>
© 2012 <strong>Garmin</strong> Ltd. or its subsidiaries. All rights reserved.<br />
This manual reflects the operation of System Software version 2.00, or later. Some differences in operation<br />
may be observed when comparing the information in this manual to later software versions.<br />
<strong>Garmin</strong> International, Inc., 1200 East 151st Street, Olathe, KS 66062, U.S.A.<br />
Tel: 913/397.8200 Fax: 913/397.8282<br />
<strong>Garmin</strong> AT, Inc., 2345 Turner Road SE, Salem, OR 97302, U.S.A.<br />
Tel: 503/391.3411 Fax 503/364.2138<br />
<strong>Garmin</strong> (Europe) Ltd., Liberty House, Bulls Copse Road, Hounsdown Business Park, Southampton,<br />
SO40 9RB, U.K.<br />
Tel. +44 (0) 870 850 1243 Fax +44 (0) 238 052 4004<br />
<strong>Garmin</strong> Corporation, No. 68, Zhangshu 2nd Road, Xizhi Dist., New Taipei City 221, Taiwan (R.O.C.)<br />
Tel: 886/02.2642.9199 Fax: 886/02.2642.9099<br />
<strong>Garmin</strong> Singapore Pte. Ltd., 46 East Coast Road, #05-06 Eastgate, Singapore 428766<br />
Tel : (65) 63480378 Fax : ( 65 ) 63480278<br />
At <strong>Garmin</strong>, we value your opinion. For comments about this guide, please e-mail:<br />
Techpubs.Salem@<strong>Garmin</strong>.com<br />
www.garmin.com<br />
https://fly.garmin.com/fly-garmin<br />
Except as expressly provided herein, no part of this manual may be reproduced, copied, transmitted,<br />
disseminated, downloaded or stored in any storage medium, for any purpose without the express written<br />
permission of <strong>Garmin</strong>. <strong>Garmin</strong> hereby grants permission to download a single copy of this manual and of<br />
any revision to this manual onto a hard drive or other electronic storage medium to be viewed for personal<br />
use, provided that such electronic or printed copy of this manual or revision must contain the complete text<br />
of this copyright notice and provided further that any unauthorized commercial distribution of this manual<br />
or any revision hereto is strictly prohibited.<br />
This part shall comply with <strong>Garmin</strong> Banned and Restricted Substances document, 001-00211-00.<br />
<strong>Garmin</strong> ® is a registered trademarks of <strong>Garmin</strong> Ltd. or its subsidiaries. These trademarks may not be used<br />
without the express permission of <strong>Garmin</strong>.<br />
November 2012 Printed in the U.S.A.
LIMITED WARRANTY<br />
All <strong>Garmin</strong> avionics products are warranted to be free from defects in materials or workmanship for:<br />
two years from the date of purchase for new Remote-Mount and Panel-Mount products; one year<br />
from the date of purchase for new portable products and any purchased newly-overhauled products;<br />
six months for newly-overhauled products exchanged through a <strong>Garmin</strong> Authorized Service Center;<br />
and 90 days for factory repaired or newly-overhauled products exchanged at <strong>Garmin</strong> in lieu of repair.<br />
Within the applicable period, <strong>Garmin</strong> will, at its sole option, repair or replace any components that<br />
fail in normal use. Such repairs or replacement will be made at no charge to the customer for parts<br />
or labor, provided that the customer shall be responsible for any transportation cost. This warranty<br />
does not apply to: (i) cosmetic damage, such as scratches, nicks and dents; (ii) consumable parts,<br />
such as batteries, unless product damage has occurred due to a defect in materials or workmanship;<br />
(iii) damage caused by accident, abuse, misuse, water, flood, fire, or other acts of nature or external<br />
causes; (iv) damage caused by service performed by anyone who is not an authorized service<br />
provider of <strong>Garmin</strong>; or (v) damage to a product that has been modified or altered without the written<br />
permission of <strong>Garmin</strong>. In addition, <strong>Garmin</strong> reserves the right to refuse warranty claims against<br />
products or services that are obtained and/or used in contravention of the laws of any country.<br />
THE WARRANTIES AND REMEDIES CONTAINED HEREIN ARE EXCLUSIVE AND IN LIEU OF ALL OTHER<br />
WARRANTIES, WHETHER EXPRESS, IMPLIED OR STATUTORY, INCLUDING ANY LIABILITY ARISING<br />
UNDER ANY WARRANTY OF MERCHANTABILITY OR FITNESS FOR A PARTICULAR PURPOSE,<br />
STATUTORY OR OTHERWISE. THIS WARRANTY GIVES YOU SPECIFIC LEGAL RIGHTS, WHICH MAY<br />
VARY FROM STATE TO STATE.<br />
IN NO EVENT SHALL GARMIN BE LIABLE FOR ANY INCIDENTAL, SPECIAL, INDIRECT OR CONSEQUENTIAL<br />
DAMAGES, WHETHER RESULTING FROM THE USE, MISUSE OR INABILITY TO USE THE PRODUCT OR<br />
FROM DEFECTS IN THE PRODUCT. SOME STATES DO NOT ALLOW THE EXCLUSION OF INCIDENTAL OR<br />
CONSEQUENTIAL DAMAGES, SO THE ABOVE LIMITATIONS MAY NOT APPLY TO YOU.<br />
<strong>Garmin</strong> retains the exclusive right to repair or replace (with a new or newly-overhauled replacement<br />
product) the product or software or offer a full refund of the purchase price at its sole discretion.<br />
SUCH REMEDY SHALL BE YOUR SOLE AND EXCLUSIVE REMEDY FOR ANY BREACH OF WARRANTY.<br />
Online Auction Purchases: Products purchased through online auctions are not eligible for<br />
warranty coverage. Online auction confirmations are not accepted for warranty verification. To obtain<br />
warranty service, an original or copy of the sales receipt from the original retailer is required. <strong>Garmin</strong><br />
will not replace missing components from any package purchased through an online auction.<br />
International Purchases: A separate warranty may be provided by international distributors for<br />
devices purchased outside the United States depending on the country. If applicable, this warranty is<br />
provided by the local in-country distributor and this distributor provides local service for your device.<br />
Distributor warranties are only valid in the area of intended distribution. Devices purchased in the<br />
United States or Canada must be returned to the <strong>Garmin</strong> service center in the United Kingdom, the<br />
United States, Canada, or Taiwan for service.<br />
To obtain warranty service, contact your local <strong>Garmin</strong> Authorized Service Center. For assistance in<br />
locating a Service Center near you, visit the <strong>Garmin</strong> web site at http://www.garmin.com or contact<br />
<strong>Garmin</strong> Customer Service at 866-739-5687.<br />
190-01182-01 Rev. A <strong>Garmin</strong> <strong>GNC</strong> <strong>255A</strong>/<strong>255B</strong> Pilot’s <strong>Guide</strong><br />
i
WARNING: For safety reasons, <strong>GNC</strong> 255 operational procedures must be<br />
learned on the ground.<br />
CAUTION: The <strong>Garmin</strong> <strong>GNC</strong> 255 does not contain any user-serviceable<br />
parts. Repairs should only be made by an authorized <strong>Garmin</strong> service center.<br />
Unauthorized repairs or modifications could void both the warranty and<br />
the pilot’s authority to operate this device under FAA/FCC regulations.<br />
CAUTION: The <strong>GNC</strong> 255 display uses a lens coated with a special antireflective<br />
coating that is very sensitive to skin oils, waxes, and abrasive<br />
cleaners. CLEANERS CONTAINING AMMONIA WILL HARM THE ANTI-<br />
REFLECTIVE COATING. It is very important to clean the lens using a clean,<br />
lint-free cloth and an eyeglass lens cleaner that is specified as safe for<br />
anti-reflective coatings.<br />
NOTE: <strong>Garmin</strong> recommends that if flying in a region with 8.33 kHz COM<br />
channel spacing, the radio should remain in 8.33 kHz mode. This will prevent<br />
the loss of stored user and recent frequencies.<br />
NOTE: Do not use outdated database information. Databases used in the<br />
system must be updated regularly in order to ensure that the information<br />
remains current. Pilots using an outdated database do so entirely at their<br />
own risk.<br />
NOTE: All visual depictions contained within this document, including<br />
screen images of the <strong>GNC</strong> 255 bezel and displays, are subject to change<br />
and may not reflect the most current <strong>GNC</strong> 255 software. Depictions of<br />
equipment may differ slightly from the actual equipment.<br />
NOTE: This device complies with part 15 of the FCC Rules. Operation is<br />
subject to the following two conditions: (1) this device may not cause<br />
harmful interference, and (2) this device must accept any interference<br />
received, including interference that may cause undesired operation.<br />
NOTE: This product, its packaging, and its components contain chemicals<br />
known to the State of California to cause cancer, birth defects, or<br />
reproductive harm. This notice is being provided in accordance with<br />
California’s Proposition 65. If you have any questions or would like<br />
additional information, please refer to our web site at www.garmin.com/<br />
prop65.<br />
ii <strong>Garmin</strong> <strong>GNC</strong> <strong>255A</strong>/<strong>255B</strong> Pilot’s <strong>Guide</strong> 190-01182-01 Rev. A
NOTE: Canadian installations: In accordance with Canadian Radio<br />
Specifications Standard 102 (RSS 102), RF field strength exposure to<br />
persons from an antenna connected to this device should be limited to 60<br />
V/m for controlled environment and 28 V/m for uncontrolled environment.<br />
190-01182-01 Rev. A <strong>Garmin</strong> <strong>GNC</strong> <strong>255A</strong>/<strong>255B</strong> Pilot’s <strong>Guide</strong><br />
iii
NOTE: This device complies with Part 15 of<br />
the FCC limits for Class B digital devices. This<br />
equipment generates, uses, and can radiate<br />
radio frequency energy and, if not installed<br />
and used in accordance with the instructions,<br />
may cause harmful interference to radio<br />
communications. Furthermore, there is no<br />
guarantee that interference will not occur in a<br />
particular installation.<br />
If this equipment does cause harmful<br />
interference, the user is encouraged to try<br />
to correct the interference by relocating the<br />
equipment or connecting the equipment to a<br />
different circuit than the affected equipment.<br />
Consult an authorized dealer or other qualified<br />
avionics technician for additional help if these<br />
remedies do not correct the problem.<br />
Operation of this device is subject to the<br />
following conditions: (1) This device may<br />
not cause harmful interference, and (2) this<br />
device must accept any interference received,<br />
including interference that may cause undesired<br />
operation.<br />
To obtain accessories for your unit, please<br />
contact your <strong>Garmin</strong> dealer.<br />
Help us better support you by completing our<br />
on-line registration form today! Registration<br />
ensures that you will be notified of product<br />
updates and new products and provides lost<br />
or stolen unit tracking. Please, have the serial<br />
number of your unit handy, connect to our<br />
web site (www.garmin.com) and look for our<br />
Product Registration link on the Home page.<br />
The display surface is coated with a special<br />
anti-reflective coating which is very sensitive to<br />
skin oils, waxes and abrasive cleaners. It is very<br />
important to clean the lens using an eyeglass<br />
lens cleaner which is specified as safe for antireflective<br />
coatings and a clean, lint-free cloth.<br />
iv <strong>Garmin</strong> <strong>GNC</strong> <strong>255A</strong>/<strong>255B</strong> Pilot’s <strong>Guide</strong> 190-01182-01 Rev. A
Product Registration and Support<br />
Help us better support you by completing your online registration today!<br />
Have the serial number of your product handy and connect to the <strong>Garmin</strong><br />
web site (www.garmin.com or https://fly.garmin.com/fly-garmin). Look for the<br />
Product Registration link on the Home page. Also, be sure to record your serial<br />
number in the space provided.<br />
If you have any questions, the <strong>Garmin</strong> Product Support department may be<br />
reached Monday through Friday, 7:00 AM to 7:00 PM Central Time.<br />
US: 913-397-8200<br />
US Toll Free: 1-866-739-5687<br />
Canada Toll Free: 1-866-429-9296<br />
190-01182-01 Rev. A <strong>Garmin</strong> <strong>GNC</strong> <strong>255A</strong>/<strong>255B</strong> Pilot’s <strong>Guide</strong><br />
v
Record of Revisions<br />
Part Number Revision Date Description<br />
190-01182-01 A 11/19/12 Initial release<br />
vi <strong>Garmin</strong> <strong>GNC</strong> <strong>255A</strong>/<strong>255B</strong> Pilot’s <strong>Guide</strong> 190-01182-01 Rev. A
Contents<br />
Product Registration and Support ......................................................................v<br />
1 Getting Started ....................................................................................1-1<br />
1.1 Product Description ..............................................................................1-1<br />
1.2 Pilot Controls .......................................................................................1-2<br />
1.2.1 Power/Com Volume/Squelch Knob .........................................1-2<br />
1.2.2 Nav Volume/ID Knob .............................................................1-2<br />
1.2.3 Tuning LARGE/SMALL Concentric (Cursor) Knobs ...................1-3<br />
1.2.4 FLIP/FLOP Key .......................................................................1-3<br />
1.2.5 C/N (Com/Nav) Key ...............................................................1-3<br />
1.2.6 OBS Key ................................................................................1-3<br />
1.2.7 T/F (To/From) Key ...................................................................1-3<br />
1.2.8 CLR (Clear) Key .....................................................................1-3<br />
1.2.9 ENT (Enter) Key .....................................................................1-3<br />
1.2.10 FUNC (Function) Key..............................................................1-4<br />
1.2.11 MON (Monitor) Key ...............................................................1-4<br />
1.3 USB Port ..............................................................................................1-4<br />
2 Basic Operation ....................................................................................2-1<br />
2.1 Power On ............................................................................................2-1<br />
2.2 Com Radio ..........................................................................................2-1<br />
2.2.1 Selecting a Com Frequency ....................................................2-1<br />
2.2.2 Monitoring the Standby Com Channel ...................................2-2<br />
2.2.3 Saving a Com Channel ..........................................................2-2<br />
2.2.4 Com Database Look-Up .........................................................2-4<br />
2.2.5 Frequency Database Reverse Look-Up ....................................2-4<br />
2.2.6 Emergency Channel ...............................................................2-5<br />
2.2.7 Stuck Mic ..............................................................................2-5<br />
2.2.8 Remote Frequency Selection Control ......................................2-5<br />
2.3 Nav Radio ...........................................................................................2-6<br />
2.3.1 Selecting a Nav Frequency .....................................................2-6<br />
2.3.2 Saving a Nav Channel ...........................................................2-6<br />
2.3.3 Listening to the Nav Audio Channel .......................................2-7<br />
2.4 OBS Mode ...........................................................................................2-8<br />
2.5 Distance/Speed/Time (DST) Display .......................................................2-9<br />
190-01182-01 Rev. A <strong>Garmin</strong> <strong>GNC</strong> <strong>255A</strong>/<strong>255B</strong> Pilot’s <strong>Guide</strong><br />
vii
3 Functions ..............................................................................................3-1<br />
3.1 Functions Description ...........................................................................3-1<br />
3.2 Com Frequencies .................................................................................3-2<br />
3.2.1 Recent Com Frequencies ........................................................3-2<br />
3.2.2 Com User Frequencies ...........................................................3-3<br />
3.2.2.1 Viewing the Com User Frequency ...........................................3-3<br />
3.2.2.2 Deleting the Com User Frequency ..........................................3-3<br />
3.2.2.3 Editing a Com User Frequency ...............................................3-4<br />
3.2.3 Com Database Frequencies ....................................................3-5<br />
3.2.4 Com Nearest Airports (APT) ...................................................3-6<br />
3.2.5 Com Nearest Area Control Center (ACC) Frequencies .............3-7<br />
3.2.6 Com Nearest Flight Service Station (FSS) Frequencies .............3-8<br />
3.2.7 Com Nearest Weather (WX) Frequencies ................................3-9<br />
3.3 Nav Frequencies ................................................................................3-10<br />
3.3.1 Recent Nav Frequencies .......................................................3-10<br />
3.3.2 Nav User Frequencies ..........................................................3-11<br />
3.3.2.1 Viewing the Nav User Frequency ..........................................3-11<br />
3.3.2.2 Deleting the Nav User Frequency .........................................3-11<br />
3.3.2.3 Editing a Nav User Frequency ..............................................3-12<br />
3.3.3 Nav Database Frequencies ...................................................3-13<br />
3.3.4 Nav Nearest VOR .................................................................3-14<br />
3.4 ICS Configuration ..............................................................................3-15<br />
3.4.1 Adjust Intercom ...................................................................3-15<br />
3.4.2 Aux Audio ...........................................................................3-16<br />
3.4.3 Intercom On/Off ..................................................................3-17<br />
3.4.4 Speaker On/Off ....................................................................3-17<br />
3.5 System Configuration .........................................................................3-18<br />
3.5.1 Com Spacing .......................................................................3-18<br />
3.5.2 Display Brightness ...............................................................3-19<br />
3.5.3 Display Contrast ..................................................................3-20<br />
3.5.4 Database Info ......................................................................3-20<br />
3.5.5 Load Database ....................................................................3-21<br />
3.5.6 Software Version .................................................................3-22<br />
3.5.7 Serial Number .....................................................................3-22<br />
3.6 Timers ...............................................................................................3-23<br />
3.6.1 Setting Up the Count Down Timer ........................................3-23<br />
3.6.2 Setting Up the Count Up Timer ............................................3-24<br />
viii <strong>Garmin</strong> <strong>GNC</strong> <strong>255A</strong>/<strong>255B</strong> Pilot’s <strong>Guide</strong> 190-01182-01 Rev. A
3.6.3 Viewing Timers in the Com Display .......................................3-24<br />
4 Appendix ..............................................................................................4-1<br />
4.1 Troubleshooting ...................................................................................4-1<br />
4.2 Updating the Frequency Database ........................................................4-3<br />
4.2.1 Downloading the Frequency Database ...................................4-3<br />
4.2.2 Updating the <strong>GNC</strong> 255 Frequency Database ..........................4-3<br />
4.3 Messages ............................................................................................4-4<br />
Index .....................................................................................................Index-1<br />
190-01182-01 Rev. A <strong>Garmin</strong> <strong>GNC</strong> <strong>255A</strong>/<strong>255B</strong> Pilot’s <strong>Guide</strong><br />
ix
This page intentionally left blank<br />
x <strong>Garmin</strong> <strong>GNC</strong> <strong>255A</strong>/<strong>255B</strong> Pilot’s <strong>Guide</strong> 190-01182-01 Rev. A
1 GETTING STARTED<br />
1.1 Product Description<br />
Combining a powerful VHF communications transceiver with 200 channel<br />
VOR, Localizer and Glideslope receivers, the <strong>GNC</strong> 255 provides a full-functioned<br />
navigation and communications solution in a small footprint at a very affordable<br />
price. Besides traditional Nav/Com features, the <strong>GNC</strong> 255 also incorporates<br />
workload-reducing functions such as automatic decoding of the Morse code<br />
station identifier for VOR/LOC, most-used frequency storage in memory, builtin<br />
course deviation indicator, and more.<br />
The <strong>GNC</strong> 255 has the ability to monitor the standby Com frequencies. The<br />
<strong>GNC</strong> 255’s Com radio operates in the aviation voice band, from 118.000 to<br />
136.975 MHz, in 25 kHz steps (default). For European operations, a Com<br />
radio configuration of 8.33 kHz steps is also available. The <strong>GNC</strong> 255 VHF Nav<br />
receiver operates from 108 MHz to 117.95 MHz decoding both the VHF Omni<br />
Range and Localizer navigation signals. The built-in Glideslope receiver will<br />
automatically tune the corresponding glideslope paired frequencies (328 MHz<br />
to 335 MHz) when the localizer is tuned. The <strong>GNC</strong> 255 is available in 10 and 16<br />
watt com transmitter versions. The <strong>GNC</strong> <strong>255A</strong> is available with a 10 watt com<br />
transmitter. The <strong>GNC</strong> <strong>255B</strong> is available with a 16 watt com transmitter.<br />
Power On/Off,<br />
Com Volume,<br />
Squelch On/Off<br />
Nav (VLOC)<br />
Volume, Nav ID<br />
On/Off<br />
Frequency<br />
Monitor Key<br />
Com or Nav<br />
Frequency Selection<br />
Photo Sensor<br />
Locking<br />
Screw<br />
190-01182-01 Rev. A <strong>Garmin</strong> <strong>GNC</strong> <strong>255A</strong>/<strong>255B</strong> Pilot’s <strong>Guide</strong><br />
Frequency Transfer<br />
(FLIP/FLOP) Key<br />
Function Selection<br />
OBS Selection<br />
To/From Selection<br />
Figure 1-1 <strong>GNC</strong> 255 Front Panel Description<br />
USB Port<br />
LARGE and<br />
SMALL Knobs<br />
(Frequency<br />
Adjust)<br />
Enter Key<br />
Clear Data Key<br />
1-1
1.2 Pilot Controls<br />
The <strong>GNC</strong> 255 controls have been designed to simplify operation of the<br />
system and minimize workload and the time required to access sophisticated<br />
functionality. Controls are comprised of dual concentric knobs for frequency<br />
tuning, Com volume/squelch knob, Nav volume/ID knob, and bezel keys.<br />
1.2.1 Power/Com Volume/Squelch Knob<br />
The Power/Com Volume/Squelch knob located in the top left<br />
corner of the bezel controls audio volume for the Com radio.<br />
Rotating the knob clockwise past the detent turns power on<br />
and counter-clockwise turns power off. When the Com radio is<br />
active, press the Power/Com Volume/Squelch knob to toggle<br />
automatic squelch control On/Off for the Com radio.<br />
Squelch, TX, or RX<br />
Annunciator<br />
Active Frequency<br />
Annunciator<br />
Com Mode<br />
Annunciator<br />
Com Volume Bar Graph Standby Frequency<br />
Annunciator<br />
Figure 1-2 Com Volume and Squelch Display Description<br />
Active Nav<br />
Frequency<br />
The Com radio features an automatic squelch to reject many localized noise<br />
sources. You may override the squelch function by pressing the Power/Com<br />
Volume/Squelch knob. This facilitates listening to a distant station or setting<br />
the desired volume level.<br />
To override the automatic squelch, press the Power/Com Volume/Squelch<br />
knob momentarily. Press the Power/Com Volume/Squelch knob again to<br />
return to automatic squelch operation. A “SQ” indication appears to the left of<br />
the active Com frequency window in the upper left corner of the display when<br />
automatic squelch is overridden.<br />
1.2.2 Nav Volume/ID Knob<br />
The Nav Volume/ID knob located in the bottom left corner<br />
of the bezel controls audio volume for the Nav radio. Press the<br />
Nav Volume/ID knob and the Morse code tones will be heard.<br />
When Morse code tone is active, “ID” will appear to the left of<br />
the Nav active frequency.<br />
1-2 <strong>Garmin</strong> <strong>GNC</strong> <strong>255A</strong>/<strong>255B</strong> Pilot’s <strong>Guide</strong> 190-01182-01 Rev. A
1.2.3 Tuning LARGE/SMALL Concentric (Cursor)<br />
Knobs<br />
The LARGE right and SMALL right knobs are used for tuning<br />
frequencies and data entry.<br />
LARGE, Outer Knob<br />
1.2.4 FLIP/FLOP Key<br />
190-01182-01 Rev. A <strong>Garmin</strong> <strong>GNC</strong> <strong>255A</strong>/<strong>255B</strong> Pilot’s <strong>Guide</strong><br />
SMALL, Inner Knob<br />
Press and release the FLIP/FLOP key to switch between the<br />
active (left-most) and standby (right-most) frequency. Switching<br />
between Com frequencies is disabled while you are transmitting.<br />
1.2.5 C/N (Com/Nav) Key<br />
1.2.6 OBS Key<br />
Press the C/N key to select the Com or Nav (VLOC) radio<br />
mode.<br />
Press the OBS key to see the current OBS setting and graphic<br />
CDI. The OBS page will be disabled if the unit is installed with<br />
an external converter.<br />
1.2.7 T/F (To/From) Key<br />
Press the T/F key to toggle between the bearing TO or radial<br />
FROM the active VOR. The T/F page also shows Distance/Speed/<br />
Time information. The T/F key does not operate for Localizer<br />
frequencies.<br />
1.2.8 CLR (Clear) Key<br />
Pressing the CLR key erases information, cancels entries, and<br />
resets timers.<br />
1.2.9 ENT (Enter) Key<br />
Press the ENT key to save selected values, to confirm a prompt,<br />
or to save the Standby frequency.<br />
1-3
1.2.10 FUNC (Function) Key<br />
The FUNC (Function) key accesses function categories for the<br />
following: the Com Radio, Nav Radio, ICS Configuration, System<br />
Configuration, and Timer. Pressing the FUNC key once displays<br />
the Function mode. Pressing the FUNC key a second time exits<br />
the Function mode.<br />
1.2.11 MON (Monitor) Key<br />
1.3 USB Port<br />
The MON (Monitor) key will engage the monitor function where<br />
the Standby frequency may be monitored while still listening to<br />
the Active frequency.<br />
The USB port is used to update the frequency database in the <strong>GNC</strong> 255.<br />
NOTE: <strong>Garmin</strong> recommends the use of a USB 2.0 compatible USB flash<br />
drive for updating the database.<br />
1-4 <strong>Garmin</strong> <strong>GNC</strong> <strong>255A</strong>/<strong>255B</strong> Pilot’s <strong>Guide</strong> 190-01182-01 Rev. A
2 BASIC OPERATION<br />
2.1 Power On<br />
Turn the <strong>GNC</strong> 255 on by either turning the Power/Com Volume/<br />
Squelch knob clockwise to turn the power on or, if installed,<br />
turning on the master switch that powers the radios.<br />
2.2 Com Radio<br />
2.2.1 Selecting a Com Frequency<br />
New frequencies are first selected as a Standby frequency and then toggled to<br />
the Active side with the FLIP/FLOP key. While viewing the Standby frequency<br />
display, use the LARGE and SMALL knobs on the right side of the <strong>GNC</strong> 255 to<br />
select the desired frequency.<br />
1. Press C/N, if necessary, to reach the Com radio function. The<br />
COM annunciator on the top line of the display will show.<br />
2. Turn the LARGE knob to change the values in one MHz<br />
increments. The MHz selection range is between 118 and 136<br />
in one MHz steps.<br />
3. Turn the SMALL knob to change the values in 25 kHz or 8.33<br />
kHz increments. The kHz selection range is between 000 and<br />
975 kHz in 25 kHz steps or 000 and 990 kHz in 8.33 kHz steps.<br />
4. Turn the LARGE and SMALL knobs clockwise to increase and<br />
counterclockwise to decrease the frequency values. Standby<br />
frequency selection is not inhibited during transmit.<br />
5. When connected to a position source, nearby station identifiers<br />
will be shown for the selected frequency. Frequencies with<br />
multiple types will have an asterisk next to the identifier.<br />
Identifier and Type Shown For<br />
The Selected Frequency<br />
190-01182-01 Rev. A <strong>Garmin</strong> <strong>GNC</strong> <strong>255A</strong>/<strong>255B</strong> Pilot’s <strong>Guide</strong><br />
Asterisk Indicates Multiple Types<br />
Exist For The Selected Frequency<br />
Figure 2-1 Com Frequency Selection<br />
6. Press and release the FLIP/FLOP key to toggle the Standby<br />
frequency to the Active frequency.<br />
2-1
2.2.2 Monitoring the Standby Com Channel<br />
The Frequency Monitoring function allows you to monitor the Standby<br />
frequency for activity, while listening to the Active frequency.<br />
Press the MON key in the Com function to listen to the standby<br />
frequency. A small “MN” will replace the “STB” to the left of the<br />
Standby frequency.<br />
Monitor<br />
Annunciation<br />
Standby<br />
Frequency Being<br />
Monitored<br />
Figure 2-2 Com Frequency Monitor Annunciation<br />
When the Active frequency receives a signal, the unit will switch automatically<br />
to the Active frequency. The Active frequency quality is not affected. The<br />
Frequency Monitor function is turned off by pressing the MON key again.<br />
Monitoring is not canceled by switching to Nav mode.<br />
2.2.3 Saving a Com Channel<br />
The current Standby frequency may be saved into the Com User Frequency<br />
database from the Com display or the Com User Function. The Com User<br />
Frequency database can hold up to 15 frequencies.<br />
NOTE: When switching from 8.33 kHz to 25 kHz mode, any 8.33 kHzspecific<br />
user frequencies will be deleted from the user frequency list. This<br />
only affects the user frequencies within the 8.33 kHz spectrum.<br />
Press the ENT Key to Save<br />
the Displayed Value<br />
1. Press ENT. The Standby frequency is selected and the Waypoint<br />
name field will be active.<br />
2. Turn the SMALL knob to select characters.<br />
3. Turn the LARGE knob to move the cursor.<br />
Number of<br />
Frequencies Saved<br />
Turn SMALL Knob<br />
Press the CLR Key To Revert<br />
to the Previous Value<br />
To Select Character<br />
Figure 2-3 Com User Frequency Name Selection<br />
4. After selecting the desired characters, press ENT.<br />
Turn LARGE Knob<br />
To Move Cursor<br />
2-2 <strong>Garmin</strong> <strong>GNC</strong> <strong>255A</strong>/<strong>255B</strong> Pilot’s <strong>Guide</strong> 190-01182-01 Rev. A
5. Turn the LARGE knob to select the waypoint Type.<br />
6. Turn the SMALL knob to select the Type from the list.<br />
Figure 2-4 Com User Frequency Type Selection<br />
190-01182-01 Rev. A <strong>Garmin</strong> <strong>GNC</strong> <strong>255A</strong>/<strong>255B</strong> Pilot’s <strong>Guide</strong><br />
Selected Wpt Type<br />
Frequency Type Symbol Description<br />
TWR Tower<br />
GND Ground<br />
ATIS Automatic Terminal Information Service<br />
AWS Automated Weather Observing System<br />
ATF Aerodrome Traffic Frequency<br />
ARR Arrival<br />
APPR Approach<br />
DEP Departure<br />
CLR Clearance<br />
CTAF Common Traffic Advisory Frequency<br />
FSS Flight Service Station<br />
RFS Remote Flight Service Station<br />
MF Mandatory Frequency<br />
UNI Unicom<br />
Blank None<br />
Table 2-1 - Com Frequency Type List<br />
7. After making a selection, press ENT.<br />
2-3
2.2.4 Com Database Look-Up<br />
1. Press the CURSOR knob from the Com display to activate the<br />
database look-up function.<br />
Identifier Field Active<br />
for Selection<br />
Turn SMALL Knob<br />
To Select Character<br />
Turn LARGE Knob<br />
To Move Cursor<br />
Figure 2-5 Database Identifier Active for Selection<br />
2. Turn the SMALL knob to select characters and turn the LARGE<br />
knob to move the cursor.<br />
Selected Identifier<br />
Figure 2-6 Database Identifier Selection<br />
3. After selecting the desired characters, press ENT. Turn the<br />
SMALL knob to scroll through the list of waypoint types.<br />
Waypoint Types with a “+” sign will have more frequencies<br />
for the same type. After selection, the selected waypoint and<br />
type will be remembered for 30 minutes.<br />
Turn the SMALL Knob To<br />
Select Frequency Type<br />
Figure 2-7 Database Waypoint Type Selection<br />
4. Press ENT to copy the frequency into the Standby frequency<br />
location. Press and release the FLIP/FLOP key to swap the<br />
Active and Standby frequencies.<br />
2.2.5 Frequency Database Reverse Look-Up<br />
The identifier and frequency type will be shown for Com and Nav frequencies<br />
that are in the database when the unit is receiving a valid position input.<br />
Waypoint Types with a “+” sign will have more frequencies for the same type.<br />
Airport Identifier Shown<br />
For Freqs In Database<br />
Figure 2-8 Frequency Database Reverse Look-Up<br />
2-4 <strong>Garmin</strong> <strong>GNC</strong> <strong>255A</strong>/<strong>255B</strong> Pilot’s <strong>Guide</strong> 190-01182-01 Rev. A
2.2.6 Emergency Channel<br />
1. Press and hold the FLIP/FLOP key or the Com Remote Transfer<br />
(COM RMT XFR) key for approximately two seconds.<br />
Figure 2-9 Emergency Channel<br />
2. The Emergency Channel will be inserted into the Active<br />
Frequency position and the previous Active Frequency will<br />
become the Standby Frequency.<br />
NOTE: Pressing and holding the Com Remote Transfer (COM RMT XFR)<br />
key for approximately two seconds, on units so configured, will lock the<br />
COM board, preventing further changes in Com frequency until the Com<br />
board is unlocked, by pressing the Com Remote Transfer key again for two<br />
seconds. The following message will notify the pilot that the Com board<br />
has been locked: “COM LOCKED TO 121.5 MHZ. HOLD REMOTE COM<br />
TRANSFER KEY TO EXIT.”<br />
NOTE: Under some circumstances if the Com system loses communication<br />
with the main system, the radio will automatically tune to 121.50 MHz for<br />
transmit and receive regardless of the displayed frequency.<br />
2.2.7 Stuck Mic<br />
The <strong>GNC</strong> 255 helps protect you from a situation where the microphone may<br />
get stuck in the ON or Transmit position. If the microphone is keyed for longer<br />
than 35 seconds, the <strong>GNC</strong> 255 will return to the receive mode on the selected<br />
frequency.<br />
A “Stuck Mic” message will display until the transmit key is released. Alerts<br />
will display until the error clears or the user acknowledges it.<br />
2.2.8 Remote Frequency Selection Control<br />
On units configured for remote Com frequency Recall, pressing the remote<br />
recall switch will load the next preset Com frequency into the unit’s Standby<br />
frequency box. The remote recall switch can be pressed multiple times to scroll<br />
the entire preset frequency list through the Standby frequency box (the list will<br />
“wrap” from the bottom of the list back up to the top, skipping any empty preset<br />
positions).<br />
The standby frequency isn’t activated until a Com FLIP/FLOP switch (either<br />
bezel-mounted or remote (COM RMT XFR) is pressed. Remote Frequency Selection<br />
only functions on units configured for a remote Com Frequency recall switch.<br />
190-01182-01 Rev. A <strong>Garmin</strong> <strong>GNC</strong> <strong>255A</strong>/<strong>255B</strong> Pilot’s <strong>Guide</strong><br />
2-5
2.3 Nav Radio<br />
2.3.1 Selecting a Nav Frequency<br />
The selection of Nav frequencies is the same as for the Com frequencies.<br />
1. Press the C/N key to reach the Nav radio function. The NAV<br />
annunciator on the top line of the display will show.<br />
2. Turn the LARGE knob to change the values in one MHz<br />
increments. The MHz selection range is between 108 and 117<br />
MHz in one MHz steps.<br />
3. Turn the SMALL knob to change the values in 50 kHz<br />
increments.<br />
Identifier and Type Shown For<br />
The Selected Frequency<br />
Figure 2-10 Nav Frequency Selection<br />
CAUTION: The Identifier is determined from the database and is not the<br />
decoded Nav Identifier.<br />
4. Press and release the FLIP/FLOP key to toggle the Standby<br />
frequency to the Active frequency.<br />
NOTE: Both Nav and Com frequencies cannot be displayed at the same<br />
time.<br />
2.3.2 Saving a Nav Channel<br />
The current Standby frequency may be saved into the Nav User Frequency<br />
database from the Nav or the Nav User Function. The Nav User Frequency<br />
database can hold up to 15 frequencies.<br />
1. Press ENT. The Waypoint name field will be active.<br />
2. Turn the SMALL knob to select characters.<br />
3. Turn the LARGE knob to move the cursor.<br />
Figure 2-11 Nav User Frequency Name Selection<br />
4. After selecting the desired characters, press ENT.<br />
2-6 <strong>Garmin</strong> <strong>GNC</strong> <strong>255A</strong>/<strong>255B</strong> Pilot’s <strong>Guide</strong> 190-01182-01 Rev. A
5. Turn the LARGE knob to select the waypoint Type.<br />
6. Turn the SMALL knob to select characters.<br />
7. Turn the LARGE knob to move the cursor.<br />
Figure 2-12 Nav User Frequency Type Selection<br />
8. After selecting the desired characters, press ENT.<br />
Frequency Type Symbol Description<br />
VOR Very High Frequency Omni-Directional Range<br />
DME Distance Measuring Equipment<br />
LOC Localizer<br />
ILS Instrument Landing System<br />
01-36 Runway Heading<br />
Blank None<br />
Table 2-2 - Nav Frequency Type List<br />
2.3.3 Listening to the Nav Audio Channel<br />
Nav ident is enabled by pressing the Nav Volume knob when the Nav display<br />
is active. When Nav ident is enabled, the ID annunciation will appear to the left<br />
of the active Nav frequency.<br />
Figure 2-13 Listening to the ID for a Nav Frequency<br />
Nav audio volume is adjusted using the Nav Volume knob. Turn the Nav<br />
Volume knob clockwise to increase volume, or counterclockwise to decrease<br />
volume.<br />
190-01182-01 Rev. A <strong>Garmin</strong> <strong>GNC</strong> <strong>255A</strong>/<strong>255B</strong> Pilot’s <strong>Guide</strong><br />
2-7
2.4 OBS Mode<br />
If your system is configured with an external CDI/HSI, the OBS radial of your<br />
remote display will be decoded and displayed on the screen of the <strong>GNC</strong> 255.<br />
NOTE: The Identifier is the decoded Nav Identifier from the Morse code<br />
broadcast by the station.<br />
1. Press the OBS key to see the current OBS setting and graphic<br />
CDI.<br />
2. Use the LARGE and SMALL knobs to change the displayed<br />
OBS values.<br />
The <strong>GNC</strong> 255 graphic CDI is shown as a graph of five dots right or left of<br />
the triangle icon. Each dot indicates two degrees deflection with ten degrees full<br />
deflection to each side. Fly towards the bar to be on-course.<br />
Active Nav<br />
Frequency<br />
Identifier<br />
OBS Setting<br />
To/From Indication for<br />
Selected Station<br />
Figure 2-14 CDI Display<br />
CDI Deflection<br />
Reference Com<br />
Frequency<br />
2-8 <strong>Garmin</strong> <strong>GNC</strong> <strong>255A</strong>/<strong>255B</strong> Pilot’s <strong>Guide</strong> 190-01182-01 Rev. A
2.5 Distance/Speed/Time (DST) Display<br />
When the <strong>GNC</strong> 255 has received data from an external device, such as a GPS<br />
receiver or DME sensor through the serial port, DST data will be available. If you<br />
are not connected to an external sensor, you will not see this display.<br />
Station Identifier<br />
If DST data is not shown, pressing the T/F key will show DST<br />
data in the lower part of the display.<br />
Bearing To/From Station<br />
Active Nav Frequency<br />
Distance To Station<br />
Time To Station In<br />
In Nautical Miles<br />
Hours and Minutes<br />
Ground Speed From<br />
GPS Unit In Knots<br />
Figure 2-15 DST Data Display<br />
NOTE: The If both GPS and DME data sources are connected to the <strong>GNC</strong><br />
and dashes are displayed when distance/speed/time data is expected to<br />
be displayed, press the T/F key to prompt the <strong>GNC</strong> to display DST data.<br />
190-01182-01 Rev. A <strong>Garmin</strong> <strong>GNC</strong> <strong>255A</strong>/<strong>255B</strong> Pilot’s <strong>Guide</strong><br />
2-9
This page intentionally left blank<br />
2-10 <strong>Garmin</strong> <strong>GNC</strong> <strong>255A</strong>/<strong>255B</strong> Pilot’s <strong>Guide</strong> 190-01182-01 Rev. A
3 FUNCTIONS<br />
The Functions section allows provides information about Com Frequencies,<br />
Nav Frequencies, Internal Communications System (ICS) Configuration, System<br />
Configuration (SYS), and Timers (TMR).<br />
3.1 Functions Description<br />
Com Freq Recent Freqs<br />
User Freqs<br />
Database<br />
Nearest Apt<br />
Nearest ACC<br />
Nearest FSS<br />
Nearest WX<br />
Nav Freq Recent Freqs<br />
User Freqs<br />
Database<br />
Nearest VOR<br />
ICS Config Adjust Intercom<br />
Aux Audio<br />
Intrcom On/Off<br />
Speaker On/Off<br />
SYS Config Com Spacing<br />
DSPL Brt<br />
DSPL Contrast<br />
Database Info<br />
Load Database<br />
Software Ver<br />
Serial Number<br />
Timers Count Down<br />
ENT - Start/Stop<br />
CLR - Reset<br />
Push CRSR - Settings<br />
ENT - Accept<br />
Count Up<br />
ENT - Start/Stop<br />
CLR - Reset<br />
Figure 3-1 Functions Diagram<br />
190-01182-01 Rev. A <strong>Garmin</strong> <strong>GNC</strong> <strong>255A</strong>/<strong>255B</strong> Pilot’s <strong>Guide</strong><br />
3-1
1. Press the FUNC key to access the Functions.<br />
2. Turn the LARGE knob to select the COM, NAV, ICS, or SYS<br />
functions.<br />
3. Turn the SMALL knob to view the choices in each function.<br />
4. Press the ENT key to access the function.<br />
5. Press the FUNC key again to exit Functions.<br />
3.2 Com Frequencies<br />
The Com Frequencies category in the Functions section contains recently<br />
used frequencies (Recent), user-defined frequencies (User), and a database of all<br />
frequencies provided in the standard default memory (Database).<br />
3.2.1 Recent Com Frequencies<br />
The last 20 Com frequencies used are kept in the list of Recent Com<br />
Frequencies and can be accessed in this function.<br />
NOTE: When switching from 8.33 kHz to 25 kHz mode, any 8.33 kHzspecific<br />
user frequencies will be deleted from the user frequency list. This<br />
only affects the user frequencies within the 8.33 kHz spectrum.<br />
1. Press FUNC to access the Functions. Turn the LARGE knob to<br />
select the Com Function. Turn the SMALL knob to view the<br />
Recent frequency function. Then, press ENT.<br />
2. Turn the SMALL knob to select an Entry (1-20).<br />
Press To Make the<br />
Selected Frequency The Active<br />
Frequency<br />
Press ENT to Make the Selected<br />
Frequency the Standby<br />
Figure 3-2 Recent Com Frequencies<br />
Turn SMALL Knob<br />
To Select Entry<br />
Selected Frequency<br />
3. Press and release the FLIP/FLOP key to transfer the displayed<br />
channel to the Active frequency position. Press the ENT key<br />
to transfer the displayed channel to the Standby frequency<br />
position.<br />
3-2 <strong>Garmin</strong> <strong>GNC</strong> <strong>255A</strong>/<strong>255B</strong> Pilot’s <strong>Guide</strong> 190-01182-01 Rev. A
3.2.2 Com User Frequencies<br />
Fifteen Com User Frequencies can be saved with an assigned waypoint<br />
(WPT) identifier and Type.<br />
NOTE: When switching from 8.33 kHz to 25 kHz mode, any 8.33 kHzspecific<br />
user frequencies will be deleted from the user frequency list. This<br />
only affects the user frequencies within the 8.33 kHz spectrum.<br />
3.2.2.1 Viewing the Com User Frequency<br />
1. Press FUNC to access the Functions. Turn the LARGE knob<br />
to select the Com Frequency Function.<br />
Select Wpt Name<br />
Figure 3-3 Viewing User Com Frequencies<br />
190-01182-01 Rev. A <strong>Garmin</strong> <strong>GNC</strong> <strong>255A</strong>/<strong>255B</strong> Pilot’s <strong>Guide</strong><br />
Selected Frequency<br />
Select Wpt Type<br />
2. Turn the SMALL knob to view the Com User frequency<br />
function. Then, press ENT. Turn the SMALL knob to view the<br />
User Frequencies.<br />
3. Press and release the FLIP/FLOP key to set the displayed<br />
frequency as the Active frequency.<br />
4. Press the ENT key to set the displayed frequency as the Standby<br />
frequency.<br />
3.2.2.2 Deleting the Com User Frequency<br />
Active Frequency<br />
1. Press the CLR key to delete this User frequency.<br />
Press ENT Key To Delete<br />
Selected Freq<br />
Press ENT To Confirm<br />
Selected Frequency<br />
Deleting The Selected Freq<br />
Figure 3-4 Deleting User Com Frequencies<br />
Position In List.<br />
Turn SMALL Knob<br />
To Select Entry.<br />
3-3
2. Press the ENT key to confirm deletion of the displayed<br />
frequency.<br />
3.2.2.3 Editing a Com User Frequency<br />
1. Press FUNC. Turn the LARGE knob to reach the Com functions<br />
and then turn the SMALL knob to select the Com User<br />
Frequencies. Press ENT.<br />
Figure 3-5 Com User Frequency Function<br />
Select User Freqs<br />
2. Press the CRSR (SMALL knob) to start editing the Com User<br />
frequency. Turn the SMALL knob to select the MHz values<br />
and turn the LARGE knob to move the cursor and then the<br />
SMALL knob to select kHz values.<br />
Figure 3-6 Com User Frequency Value Selection<br />
Select User Freq Value<br />
3. Turn the LARGE knob to select the Wpt Name. Turn the SMALL<br />
knob to select characters and turn the LARGE knob to move<br />
the cursor.<br />
Figure 3-7 Com User Frequency Name Selection<br />
Select User Wpt Name<br />
4. After selecting the desired characters, press ENT.<br />
5. Turn the LARGE knob to select the Waypoint Type field.<br />
6. Turn the SMALL knob to select the Waypoint Type.<br />
Figure 3-8 Com User Frequency Type Selection<br />
Select Wpt Type<br />
7. After selecting the Waypoint Type, press ENT to accept changes<br />
to the User Frequency.<br />
3-4 <strong>Garmin</strong> <strong>GNC</strong> <strong>255A</strong>/<strong>255B</strong> Pilot’s <strong>Guide</strong> 190-01182-01 Rev. A
3.2.3 Com Database Frequencies<br />
The <strong>GNC</strong> 255 contains a large database of Com frequencies that may be<br />
recalled by identifier.<br />
Turn LARGE Knob<br />
To Move Cursor<br />
Figure 3-9 Com Database Frequencies<br />
190-01182-01 Rev. A <strong>Garmin</strong> <strong>GNC</strong> <strong>255A</strong>/<strong>255B</strong> Pilot’s <strong>Guide</strong><br />
Turn SMALL Knob<br />
To Select Character<br />
1. Press FUNC to access the Functions. With the Com Frequency<br />
Function highlighted, turn the SMALL knob to view the Com<br />
Database function. Then, press ENT.<br />
2. Turn the SMALL knob to select the desired character.<br />
3. Turn the LARGE knob to move the cursor to highlight a<br />
character.<br />
4. Repeat steps 2 and 3 to complete the desired identifier and<br />
then press the ENT key.<br />
5. If available, the Frequency Type will be highlighted. Turn the<br />
SMALL knob to select the desired frequency.<br />
Press ENT Key To Set<br />
Selected Freq As Standby<br />
Selected Frequency<br />
Press FLIP/FLOP Key To Set<br />
Selected Freq As Active<br />
Selected Identifier<br />
Turn SMALL Knob<br />
To Select Freq Type<br />
Figure 3-10 Selected Com Database Frequency<br />
6. Press and release the FLIP/FLOP key to set the selected<br />
frequency as the Active frequency.<br />
7. Press the ENT key to set the selected frequency as the Standby<br />
frequency.<br />
3-5
3.2.4 Com Nearest Airports (APT)<br />
The <strong>GNC</strong> 255 will report the 25 nearest Airports (APT), when interfaced<br />
with an appropriate GPS receiver.<br />
Figure 3-11 Com Nearest APT Frequencies<br />
Turn SMALL Knob<br />
To Scroll Through<br />
Available Airports<br />
1. Press FUNC to access the Functions. With the Com Frequency<br />
Function highlighted, turn the SMALL knob to view the Com<br />
Nearest APT function. Then, press ENT.<br />
2. Turn the SMALL knob to display the available airports. Press<br />
the ENT key to select the displayed airport. The frequency type<br />
will be highlighted. Turn the SMALL knob to select the desired<br />
frequency type.<br />
3. Then, press the ENT key to set the displayed airport frequency<br />
as the Standby or press and release the FLIP/FLOP key to set<br />
it as the Active frequency. Or, press the CLR key to return to<br />
the Functions display.<br />
3-6 <strong>Garmin</strong> <strong>GNC</strong> <strong>255A</strong>/<strong>255B</strong> Pilot’s <strong>Guide</strong> 190-01182-01 Rev. A
3.2.5 Com Nearest Area Control Center (ACC)<br />
Frequencies<br />
The <strong>GNC</strong> 255, when interfaced with an appropriate GPS receiver, will report<br />
the 25 nearest Area Control Center (ACC) frequencies. ACCs are also known as<br />
Air Route Traffic Control Centers (ARTCC).<br />
190-01182-01 Rev. A <strong>Garmin</strong> <strong>GNC</strong> <strong>255A</strong>/<strong>255B</strong> Pilot’s <strong>Guide</strong><br />
Turn SMALL Knob<br />
To Scroll Through<br />
Available Frequencies<br />
Figure 3-12 Com Nearest ACC Frequencies<br />
1. Press FUNC to access the Functions. With the Com Frequency<br />
Function highlighted, turn the SMALL knob to view the Com<br />
Nearest ACC function. Then, press ENT.<br />
2. Turn the SMALL knob to display the available ACCs.<br />
3. Press the ENT key to insert the highlighted frequency as the<br />
Standby frequency. Or, press the CLR key to return to the<br />
Functions display.<br />
4. Press and release the FLIP/FLOP key to set the selected<br />
frequency as the Active frequency.<br />
3-7
3.2.6 Com Nearest Flight Service Station (FSS)<br />
Frequencies<br />
The <strong>GNC</strong> 255, when interfaced with an appropriate GPS receiver, will report<br />
the 25 nearest Flight Service Station (FSS) frequencies.<br />
Figure 3-13 Com Nearest FSS Frequencies<br />
Turn SMALL Knob<br />
To Scroll Through<br />
Available Frequencies<br />
1. Press FUNC to access the Functions. With the Com Frequency<br />
Function highlighted, turn the SMALL knob to view the Com<br />
Nearest FSS function. Then, press ENT.<br />
2. Turn the SMALL knob to display the available FSS<br />
frequencies.<br />
3. Press the ENT key to insert the highlighted frequency as the<br />
Standby frequency. Or, press the CLR key to return to the<br />
Functions display.<br />
4. Press and release the FLIP/FLOP key to set the selected<br />
frequency as the Active frequency.<br />
3-8 <strong>Garmin</strong> <strong>GNC</strong> <strong>255A</strong>/<strong>255B</strong> Pilot’s <strong>Guide</strong> 190-01182-01 Rev. A
3.2.7 Com Nearest Weather (WX) Frequencies<br />
The <strong>GNC</strong> 255, when interfaced with an appropriate GPS receiver, will report<br />
the 25 nearest Weather (WX) frequencies.<br />
190-01182-01 Rev. A <strong>Garmin</strong> <strong>GNC</strong> <strong>255A</strong>/<strong>255B</strong> Pilot’s <strong>Guide</strong><br />
Turn SMALL Knob<br />
To Scroll Through<br />
Available Frequencies<br />
Figure 3-14 Com Nearest Weather Frequencies<br />
1. Press FUNC to access the Functions. With the Com Frequency<br />
Function highlighted, turn the SMALL knob to view the Com<br />
Nearest Weather function. Then, press ENT.<br />
2. Turn the SMALL knob to display the available Weather<br />
frequencies.<br />
3. Press the ENT key to insert the highlighted frequency as the<br />
Standby frequency. Or, press the CLR key to return to the<br />
Functions display.<br />
4. Press and release the FLIP/FLOP key to set the selected<br />
frequency as the Active frequency.<br />
3-9
3.3 Nav Frequencies<br />
The Nav Frequencies category in the Functions section contains remotely<br />
acquired frequencies (Remote), recently used frequencies (Recent), user-defined<br />
frequencies (User), and a database of all frequencies provided in the standard<br />
default memory (Database).<br />
3.3.1 Recent Nav Frequencies<br />
The last 20 Nav frequencies used are kept in the list of Recent Nav Frequencies<br />
and can be accessed in this function.<br />
Active Frequency<br />
1. Press FUNC to access the Functions. Turn the LARGE knob<br />
to select the Nav Frequency Function. Turn the SMALL knob<br />
to view the Recent frequency function. Then, press ENT.<br />
Press ENT Key To Set<br />
Selected Freq As Standby<br />
Press FLIP/FLOP Key To Set Selected Frequency<br />
Selected Freq As Active<br />
Figure 3-15 Recent Nav Frequencies<br />
Position In List.<br />
Turn SMALL Knob<br />
To Select Entry.<br />
2. Turn the SMALL knob to select an Entry (1-20). If a GPS<br />
position is available, the area below frequency will show the<br />
nearest facility name/type, if available.<br />
3. Press and release the FLIP/FLOP key to transfer the displayed<br />
channel to the Active frequency position or press the ENT key<br />
to transfer the displayed channel to the Standby frequency<br />
position.<br />
3-10 <strong>Garmin</strong> <strong>GNC</strong> <strong>255A</strong>/<strong>255B</strong> Pilot’s <strong>Guide</strong> 190-01182-01 Rev. A
3.3.2 Nav User Frequencies<br />
Up to 15 Nav User Frequencies can be saved with an assigned waypoint<br />
(WPT) identifier and Type.<br />
3.3.2.1 Viewing the Nav User Frequency<br />
Active Frequency<br />
1. Press FUNC to access the Functions. Turn the LARGE knob to<br />
select the Nav Frequency List Function. Turn the SMALL knob<br />
to view the Nav User Frequency function. Then, press ENT.<br />
Press ENT Key To Set<br />
Selected Freq As Standby<br />
190-01182-01 Rev. A <strong>Garmin</strong> <strong>GNC</strong> <strong>255A</strong>/<strong>255B</strong> Pilot’s <strong>Guide</strong><br />
Position In List.<br />
Turn SMALL Knob<br />
To Select Entry.<br />
Press FLIP/FLOP Key To Set Selected Frequency<br />
Selected Freq As Active<br />
Figure 3-16 Viewing User Nav Frequencies<br />
2. Turn the SMALL knob to view the Nav User Frequencies.<br />
3. Press and release the FLIP/FLOP key to set the displayed<br />
frequency as the Active frequency.<br />
4. Press the ENT key to set the displayed frequency as the Standby<br />
frequency.<br />
3.3.2.2 Deleting the Nav User Frequency<br />
1. While viewing a Nav User frequency, press the CLR key to<br />
delete the displayed User frequency.<br />
Press ENT Key To Confirm<br />
Deleting The Frequency<br />
Active Frequency<br />
Position In List.<br />
Turn SMALL Knob<br />
To Select Entry.<br />
Press ENT To Delete The Selected Frequency<br />
Selected Freq<br />
Figure 3-17 Deleting User Nav Frequencies<br />
2. Press the ENT key to delete the displayed frequency.<br />
3-11
3.3.2.3 Editing a Nav User Frequency<br />
1. Press FUNC. Turn the LARGE knob to reach the Nav functions<br />
and then turn the SMALL knob to select the Nav User<br />
Frequencies. Press ENT.<br />
Figure 3-18 Nav User Frequency Function<br />
2. Turn the SMALL knob to select the desired Nav User frequency<br />
and then press ENT. Press the Cursor knob to enable editing.<br />
The frequency MHz value will be selected. Turn the SMALL<br />
knob to select the MHz frequency value. Turn the LARGE knob<br />
to move the cursor and then turn the SMALL knob to select<br />
the kHz frequency value.<br />
3. Turn the LARGE knob to select the WPT name. Turn the SMALL<br />
knob to select characters and turn the LARGE knob to move<br />
the cursor.<br />
Figure 3-19 Nav User Frequency Name Selection<br />
4. After selecting the desired characters, press ENT.<br />
5. Turn the LARGE knob to select the waypoint Type.<br />
6. Turn the SMALL knob to select characters and Turn the LARGE<br />
knob to move the cursor.<br />
Figure 3-20 Nav User Frequency Type Selection<br />
7. After selecting the desired characters, press ENT.<br />
3-12 <strong>Garmin</strong> <strong>GNC</strong> <strong>255A</strong>/<strong>255B</strong> Pilot’s <strong>Guide</strong> 190-01182-01 Rev. A
3.3.3 Nav Database Frequencies<br />
The <strong>GNC</strong> 255 contains a large database of Nav frequencies that may be<br />
recalled by identifier.<br />
1. Press FUNC to access the Functions. With the Nav Frequency<br />
Function highlighted, turn the SMALL knob to view the Nav<br />
Database function. Then, press ENT.<br />
2. Turn the LARGE knob to move the cursor to highlight a<br />
character.<br />
3. Turn the SMALL knob to select the desired character.<br />
Press the ENT Key to Save<br />
the Displayed Value<br />
Press the CLR Key To Return<br />
to the Previous Menu<br />
190-01182-01 Rev. A <strong>Garmin</strong> <strong>GNC</strong> <strong>255A</strong>/<strong>255B</strong> Pilot’s <strong>Guide</strong><br />
Turn SMALL Knob<br />
To Select Character<br />
Turn LARGE Knob<br />
To Move Cursor<br />
Figure 3-21 Nav Database Frequencies<br />
4. Repeat steps 2 and 3 to complete the desired identifier and<br />
then press the ENT key.<br />
5. If available, the Frequency Type will be highlighted. Turn the<br />
SMALL knob to select the desired frequency.<br />
Press ENT Key To Set<br />
Selected Freq As Standby<br />
Press FLIP/FLOP Key To Set<br />
Selected Freq As Active<br />
Selected Identifier<br />
Wpt Type<br />
Figure 3-22 Selected Nav Database Frequency<br />
Selected Frequency<br />
6. Press and release the FLIP/FLOP key to set the selected<br />
frequency as the Active frequency.<br />
7. Press the ENT key to set the selected frequency as the Standby<br />
frequency.<br />
3-13
Duplicate Identifiers<br />
1. When duplicate identifiers are found, press ENT.<br />
Press the ENT Key to Save<br />
the Displayed Value<br />
Press the CLR Key To Return<br />
to the Previous Menu<br />
Duplicate Identifiers<br />
Found<br />
Figure 3-23 Selected Nav Database Frequency<br />
2. Turn the SMALL knob to select the desired identifier and then<br />
press ENT and continue as described above.<br />
Figure 3-24 Selected Ident from Nav Database<br />
3. Set the selected identifier as the standby or active frequency.<br />
Press ENT Key To Set<br />
Selected Freq As Standby<br />
Selected Frequency<br />
Press FLIP/FLOP Key To Set<br />
Wpt Type<br />
Selected Identifier<br />
Selected Freq As Active<br />
Figure 3-25 Set Selected Frequency as Active or Standby<br />
3.3.4 Nav Nearest VOR<br />
The <strong>GNC</strong> 255, when interfaced with an appropriate GPS receiver, will report<br />
the 25 nearest VORs.<br />
Turn SMALL Knob<br />
To Scroll Through<br />
Available VORs<br />
Figure 3-26 Nav Nearest VOR Frequencies<br />
1. Press FUNC to access the Functions. With the Nav Frequency<br />
Function highlighted, turn the SMALL knob to view the Nav<br />
Nearest VOR function. Then, press ENT.<br />
3-14 <strong>Garmin</strong> <strong>GNC</strong> <strong>255A</strong>/<strong>255B</strong> Pilot’s <strong>Guide</strong> 190-01182-01 Rev. A
2. Turn the SMALL knob to display the available VORs.<br />
3. Press the ENT key to accept the displayed VOR and set it as<br />
the Standby frequency. Or, press the CLR key to return to the<br />
Functions display.<br />
3.4 ICS Configuration<br />
The Internal Communications System (ICS) Configuration allows you to<br />
adjust the intercom, set the Nav/Aux volume, turn the Intercom On/Off, and<br />
turn the intercom speaker On/Off.<br />
3.4.1 Adjust Intercom<br />
The Adjust Intercom function allows you to set values for the Intercom<br />
squelch and volume. The Intercom On/Off function must be set to On to make<br />
the Adjust Intercom function available.<br />
Press the ENT Key to Save<br />
the Displayed Value<br />
1. Press FUNC to access the Functions. Turn the LARGE knob<br />
to select the ICS Function. Turn the SMALL knob to view the<br />
Adjust Intercom function. Then, press the ENT key.<br />
Figure 3-27 Select the Adjust Intercom Function<br />
2. Turn the SMALL knob to set the ICS Squelch value. Then, press<br />
the ENT key.<br />
Turn Small Knob To Adjust Intercom Squelch<br />
Press the CLR Key To Revert<br />
to the Previous Value<br />
Figure 3-28 Adjust the Intercom Values<br />
190-01182-01 Rev. A <strong>Garmin</strong> <strong>GNC</strong> <strong>255A</strong>/<strong>255B</strong> Pilot’s <strong>Guide</strong><br />
Turn LARGE And Then<br />
SMALL Knob To Adjust<br />
Intercom Volume<br />
3. Turn the LARGE knob to select the ICS Squelch or Volume.<br />
Turn the SMALL knob to set the value. Then, press the ENT<br />
key to save the selected values.<br />
3-15
3.4.2 Aux Audio<br />
The Aux function allows you to turn Aux Audio On/Off and set the volume<br />
value.<br />
Press the ENT Key to Save<br />
the Displayed Value<br />
1. Press FUNC to access the Functions. Turn the LARGE knob<br />
to select the ICS Function. Turn the SMALL knob to view the<br />
Aux Volume function. Then, press the ENT key.<br />
Figure 3-29 Select the Aux Audio Function<br />
2. Turn the SMALL knob to turn the Aux Audio On or Off.<br />
3. Turn the LARGE knob to select the Aux Volume. Turn the<br />
SMALL knob to set the value. Then, press the ENT key.<br />
Turn Small Knob To Turn Aux On/Off<br />
Press the CLR Key To Revert<br />
to the Previous Value<br />
Figure 3-30 Adjust Aux Audio<br />
Turn LARGE And<br />
Then SMALL Knob To<br />
Adjust Aux Volume<br />
4. Press the CLR key to revert to the previous Volume value and<br />
then repeat step 3 to select a new value.<br />
3-16 <strong>Garmin</strong> <strong>GNC</strong> <strong>255A</strong>/<strong>255B</strong> Pilot’s <strong>Guide</strong> 190-01182-01 Rev. A
3.4.3 Intercom On/Off<br />
The Intercom On/Off function toggles intercom on and off. The intercom<br />
can also be toggled on/off with a remote switch, if installed. The Intercom On/<br />
Off function must be set to On to make the Adjust Intercom function available.<br />
1. Press FUNC to access the Functions. Turn the LARGE knob<br />
to select the ICS Function. Turn the SMALL knob to view the<br />
Intercom On/Off function. Then, press the ENT key.<br />
Turn SMALL Knob To Select On or Off<br />
Press ENT to Accept Press CLR to Return<br />
the Selected Value to the Default Value<br />
Figure 3-31 Turn the Intercom On/Off<br />
2. Turn the SMALL knob to set the Intercom On or Off. Then,<br />
press the ENT key to save the selected value.<br />
3.4.4 Speaker On/Off<br />
The Speaker On/Off function toggles speaker output on and off.<br />
1. Press FUNC to access the Functions. Turn the LARGE knob<br />
to select the ICS Function. Turn the SMALL knob to select the<br />
Speaker On/Off function. Then, press ENT.<br />
Turn SMALL Knob To Select On or Off<br />
Press ENT to Accept Press CLR to Return<br />
the Selected Value to the Default Value<br />
Figure 3-32 Turn the Speaker On/Off<br />
2. Turn the SMALL knob to set the speaker output On or Off.<br />
Then, press the ENT key to save the selected value.<br />
190-01182-01 Rev. A <strong>Garmin</strong> <strong>GNC</strong> <strong>255A</strong>/<strong>255B</strong> Pilot’s <strong>Guide</strong><br />
3-17
3.5 System Configuration<br />
The System Configuration function will show the Software Version, Database<br />
Info, and Serial Number as well as, allowing you to set values for the Com<br />
spacing, Display Brightness, and Display Contrast, and use the Load Database<br />
feature to update databases.<br />
3.5.1 Com Spacing<br />
Com spacing may be selected between 8.33 kHz and 25 kHz to allow for<br />
regional requirements.<br />
NOTE: When switching from 8.33 kHz to 25 kHz mode, any 8.33 kHzspecific<br />
user frequencies will be deleted from the user frequency list. This<br />
only affects the user frequencies within the 8.33 kHz spectrum.<br />
1. Press FUNC to access the Functions. Turn the LARGE knob<br />
to select the SYS Function. Turn the SMALL knob to view the<br />
Com spacing function. Then, press the ENT key.<br />
Turn the SMALL Knob to<br />
Select the Channel Spacing<br />
Press ENT to Accept Press CLR to Return to<br />
the Selected Value the Previous Value<br />
Figure 3-33 Com Spacing Display<br />
2. Turn the SMALL knob to set the Com spacing and then press<br />
the ENT key.<br />
3-18 <strong>Garmin</strong> <strong>GNC</strong> <strong>255A</strong>/<strong>255B</strong> Pilot’s <strong>Guide</strong> 190-01182-01 Rev. A
3.5.2 Display Brightness<br />
As it arrives from the factory, the <strong>GNC</strong> 255 automatically adjusts its display<br />
brightness for the current lighting conditions. A small sensor on the display<br />
is used for this function. A manual adjustment is available for controlling the<br />
brightness level of the display as an offset from the “normal” or zero position.<br />
The limits of the adjustment range are: -10 (Low Display Intensity) and 100<br />
(High Display Intensity). A value above zero means brighter than normal and a<br />
value below zero means darker than normal. The range can be adjusted by using<br />
the SMALL knob to adjust the value.<br />
The <strong>GNC</strong> 255 will either control dimming based on the photocell or the<br />
lighting bus. This is set in configuration mode during installation and is not<br />
selectable by the pilot.<br />
1. Press FUNC to access the Functions. Turn the LARGE knob<br />
to select the SYS Function. Turn the SMALL knob to view the<br />
Display Brightness function. Then, press the ENT key.<br />
Press ENT to Accept<br />
the Selected Value<br />
Press CLR to Return<br />
to the Previous Value<br />
Figure 3-34 Set Display Brightness<br />
190-01182-01 Rev. A <strong>Garmin</strong> <strong>GNC</strong> <strong>255A</strong>/<strong>255B</strong> Pilot’s <strong>Guide</strong><br />
Current Display<br />
Brightness<br />
Turn the SMALL Knob to<br />
Select the Offset Value<br />
2. Turn the SMALL knob to set the value. Then, press the ENT<br />
key.<br />
3-19
3.5.3 Display Contrast<br />
The Display Contrast has a range from -50 (Low Display Contrast) and 50<br />
(High Display Contrast) with 0 as the default. The range can be adjusted by<br />
using the SMALL knob to adjust the value.<br />
1. Press FUNC to access the Functions. Turn the LARGE knob<br />
to select the SYS Function. Turn the SMALL knob to view the<br />
Display Contrast function. Then, press the ENT key.<br />
Press ENT to Accept<br />
the Selected Value<br />
Press CLR to Return<br />
to the Previous Value<br />
Figure 3-35 Set Display Contrast<br />
Turn the SMALL Knob to<br />
Select the Offset Value<br />
2. Turn the SMALL knob to set the value. Then, press the ENT<br />
key.<br />
3.5.4 Database Info<br />
The Database information for the <strong>GNC</strong> 255 unit is displayed. This information<br />
is useful when contacting Customer Support.<br />
1. Press FUNC to access the Functions. Turn the LARGE knob<br />
to select the SYS Function. Turn the SMALL knob to view the<br />
Database Version function. Then, press the ENT key.<br />
Database Cycle<br />
Database Effectivity Date<br />
Figure 3-36 Database Info Display<br />
2. Press the FUNC key to return to the main display.<br />
3-20 <strong>Garmin</strong> <strong>GNC</strong> <strong>255A</strong>/<strong>255B</strong> Pilot’s <strong>Guide</strong> 190-01182-01 Rev. A
3.5.5 Load Database<br />
The <strong>GNC</strong> 255 has a USB connector to allow for easily updating the system<br />
databases.<br />
NOTE: <strong>Garmin</strong> recommends the use of a USB 2.0 compatible USB flash<br />
drive for updating the database.<br />
1. Insert the supplied cable into the USB port on the top right<br />
corner of the <strong>GNC</strong> 255.<br />
2. Insert the USB memory device into the other end of the<br />
cable.<br />
190-01182-01 Rev. A <strong>Garmin</strong> <strong>GNC</strong> <strong>255A</strong>/<strong>255B</strong> Pilot’s <strong>Guide</strong><br />
USB Port<br />
Figure 3-37 USB Update Progress<br />
USB Cable<br />
USB Memory Device<br />
3. Press FUNC to access the Functions. Turn the LARGE knob<br />
to select the SYS Function. Turn the SMALL knob to view the<br />
Load Database function. Then, press the ENT key.<br />
Figure 3-38 Database Update Display<br />
4. Verify the database version on USB. Then, press the ENT key.<br />
Updating will begin automatically.<br />
Figure 3-39 Verify Database Version<br />
3-21
5. Wait until the updating process is complete and then remove<br />
the memory device and cable. The unit will reset automatically<br />
once the database is updated.<br />
6. Verify the correct frequency database is loaded after power-up.<br />
3.5.6 Software Version<br />
The software versions of the <strong>GNC</strong> 255 unit are displayed. This information is<br />
useful when contacting Customer Support.<br />
1. Press FUNC to access the Functions. Turn the LARGE knob<br />
to select the SYS Function. Turn the SMALL knob to view the<br />
Software Version function. Then, press the ENT key.<br />
Display Software Version<br />
Com Software Version<br />
Nav Software Version<br />
Figure 3-39 Software Versions Display<br />
2. Press the FUNC key to return to the main menu.<br />
3.5.7 Serial Number<br />
The serial number of the <strong>GNC</strong> 255 unit is displayed. This information is<br />
useful when contacting Customer Support.<br />
1. Press FUNC to access the Functions. Turn the LARGE knob<br />
to select the SYS Function. Turn the SMALL knob to view the<br />
Serial Number function. Then, press ENT.<br />
Unit Serial Number<br />
ID Is Used With The<br />
fly<strong>Garmin</strong> Services<br />
Figure 3-40 Serial Number Display<br />
2. Press the FUNC key to return to the main menu.<br />
3-22 <strong>Garmin</strong> <strong>GNC</strong> <strong>255A</strong>/<strong>255B</strong> Pilot’s <strong>Guide</strong> 190-01182-01 Rev. A
3.6 Timers<br />
The <strong>GNC</strong> 255 has both Count Up and Count Down timers, which may operate<br />
simultaneously and are shown in the lower right of the Com/Nav displays. The<br />
countdown timer always takes precedence if it is running.<br />
3.6.1 Setting Up the Count Down Timer<br />
Press ENT to Start<br />
or Stop the Timer<br />
1. Press FUNC to access the Functions. Turn the LARGE knob<br />
to select the Timer (TMR) function. Turn the SMALL knob to<br />
select either the Count Down Timer function. Now, press the<br />
ENT key.<br />
Figure 3-41 Select the Count Down Timer Function<br />
190-01182-01 Rev. A <strong>Garmin</strong> <strong>GNC</strong> <strong>255A</strong>/<strong>255B</strong> Pilot’s <strong>Guide</strong><br />
Select Count Down Timer<br />
2. Press the ENT key to Start or Stop the timer. Press the CLR key<br />
to reset the timer to the starting value. Press the CURSOR knob<br />
to select a starting timer value.<br />
The Default (Starting) Value<br />
Push the CURSOR<br />
(SMALL Knob) to Edit the<br />
Starting Time Value<br />
Press CLR to Reset the Timer<br />
to the Default Value<br />
Figure 3-42 Selecting the Count Down Timer<br />
3. Turn the SMALL knob to select the timer value and turn the<br />
LARGE knob to move the cursor. After completing the time<br />
setting, press the ENT key. Press ENT again to start the timer.<br />
Turn SMALL Knob To Select Time Value<br />
Press ENT to Accept Press CLR to Return Turn LARGE Knob To Move Cursor<br />
the Selected Value to the Default Value<br />
Figure 3-43 Setting the Count Down Timer Value<br />
3-23
3.6.2 Setting Up the Count Up Timer<br />
1. Press FUNC to access the Functions. Turn the LARGE knob<br />
to select the Timer (TMR) function. Turn the SMALL knob to<br />
select the Count Up Timer function. Now, press the ENT key.<br />
Select Count Up Timer<br />
Figure 3-44 Select the Count Up Timer Function<br />
2. Press the ENT key to Start or Stop the timer. Press the CLR key<br />
to reset the timer to 0:00.<br />
The Default (Starting) Value<br />
Press ENT to Start Press CLR to Reset the Timer<br />
or Stop the Timer<br />
to 0:00<br />
Figure 3-45 Selecting the Count Up Timer<br />
3.6.3 Viewing Timers in the Com Display<br />
When a timer is active, the timer value will be shown in the lower right<br />
corner of the Com display. While both timers may be actively counting at the<br />
same time, the Count Down Timer will have precedence in being shown. If the<br />
Count Down Timer is paused, the Count Up Timer will then be shown until the<br />
Count Down Timer is restarted.<br />
Figure 3-46 Timer Value Shown in the Com Display<br />
Timer Value<br />
1. Pressing CLR and then ENT will reset the displayed Timer.<br />
Figure 3-47 Stop or Clear the Timer in the Com Display<br />
2. Pressing ENT twice will stop the displayed Timer.<br />
3-24 <strong>Garmin</strong> <strong>GNC</strong> <strong>255A</strong>/<strong>255B</strong> Pilot’s <strong>Guide</strong> 190-01182-01 Rev. A
When the Count Down Timer reaches 0:00, it will continue counting as a<br />
Count Up value. The Count Down Timer that is counting up will be highlighted.<br />
A Count Up Timer will continue counting separately.<br />
Count Down Timer Value<br />
Highlighted When Counting Up<br />
Figure 3-48 Count Down Timer Value Now Counting Up<br />
190-01182-01 Rev. A <strong>Garmin</strong> <strong>GNC</strong> <strong>255A</strong>/<strong>255B</strong> Pilot’s <strong>Guide</strong><br />
3-25
This page intentionally left blank<br />
3-26 <strong>Garmin</strong> <strong>GNC</strong> <strong>255A</strong>/<strong>255B</strong> Pilot’s <strong>Guide</strong> 190-01182-01 Rev. A
4 APPENDIX<br />
4.1 Troubleshooting<br />
If efforts to resolve the problem fail, contact your dealer or the factory for<br />
technical assistance. The <strong>Garmin</strong> customer service staff will gladly assist you.<br />
Please have the following information ready:<br />
• System configuration (products, antennas, mounting locations, etc.)<br />
• Model No., part number, and serial number<br />
• Software versions<br />
• Description of the problem<br />
• Efforts made to isolate/solve the problem<br />
<strong>Garmin</strong> International, Inc.<br />
Aviation Products Customer Service Department<br />
1200 East 151st Street<br />
Olathe, KS 66062-3426 USA<br />
If you have any questions, the <strong>Garmin</strong> AT Product Support department may<br />
be reached Monday through Friday, 7:00 AM to 7:00 PM Central Time.<br />
US: 913-397-8200<br />
US Toll Free: 1-866-739-5687<br />
Canada Toll Free: 1-866-429-9296<br />
e-mail: support.gat@garmin.com.<br />
http://www.garmin.com<br />
https://fly.garmin.com/fly-garmin<br />
190-01182-01 Rev. A <strong>Garmin</strong> <strong>GNC</strong> <strong>255A</strong>/<strong>255B</strong> Pilot’s <strong>Guide</strong><br />
4-1
Problem Possible Cause Action<br />
<strong>GNC</strong> 255 does not power on No power to the<br />
<strong>GNC</strong> 255<br />
Faulty electrical<br />
wiring or connection<br />
No Nav audio Output disabled or<br />
set to a low level<br />
Nav audio in Com Mixed with Com<br />
feature<br />
Check power connections,<br />
breakers, and main<br />
avionics switch<br />
Contact your dealer to<br />
perform electrical system<br />
test<br />
Contact dealer<br />
Contact dealer<br />
<strong>GNC</strong> 255 does not transmit No power to Com Check power connections<br />
Mic key connection Check Mic key input<br />
connection<br />
Intercom doesn’t function It can be enabled<br />
or disabled via a<br />
remote mounted<br />
switch or via the<br />
menu.<br />
Check connections<br />
No voice activation,<br />
or if must talk too<br />
loud<br />
Can’t change active frequency Com Radio not<br />
communicating. The<br />
radio may also be in<br />
lockout mode. In this<br />
case the radio would<br />
be tuned to 121.50<br />
and the active freq<br />
would not be able to<br />
be changed.<br />
Check ICS page, Intercom<br />
On/Off, Adjust Intercom<br />
If in Lock Out mode,<br />
press the external Com<br />
FLIP/FLOP key for two<br />
seconds to return to<br />
normal operation or cycle<br />
the avionics power. If the<br />
condition persists, contact<br />
dealer.<br />
OBS readout displays “---” Resolver failure Contact dealer<br />
Calibration error Recalibrate resolver<br />
4-2 <strong>Garmin</strong> <strong>GNC</strong> <strong>255A</strong>/<strong>255B</strong> Pilot’s <strong>Guide</strong> 190-01182-01 Rev. A
Problem Possible Cause Action<br />
Display shows<br />
“Incorrect Calibration<br />
Checksum” at start-up<br />
Corrupted system<br />
calibration<br />
parameters<br />
Table 4-1 Troubleshooting<br />
190-01182-01 Rev. A <strong>Garmin</strong> <strong>GNC</strong> <strong>255A</strong>/<strong>255B</strong> Pilot’s <strong>Guide</strong><br />
Contact factory<br />
4.2 Updating the Frequency Database<br />
The <strong>GNC</strong> 255 uses a standard USB memory device to load the frequency<br />
database into the <strong>GNC</strong> 255. The memory device is not provided by <strong>Garmin</strong>. The<br />
Frequency database is stored internally and the USB memory device is only used<br />
to transfer the database into the unit.<br />
The <strong>Garmin</strong> databases can be updated by following the instructions on<br />
https://fly.garmin.com/fly-garmin.<br />
The following equipment is required to perform the update:<br />
• Windows-compatible PC computer (Windows 2000, XP, Vista, or Windows<br />
7 recommended)<br />
• USB 2.0 compatible USB flash drive<br />
• External USB cable<br />
• Updated database obtained from the <strong>Garmin</strong> web site<br />
NOTE: The data contained in the frequency database comes from<br />
government agencies. <strong>Garmin</strong> accurately processes and cross-validates the<br />
data, but cannot guarantee the accuracy and completeness of the data.<br />
4.2.1 Downloading the Frequency Database<br />
The Frequency database is updated on a 28-day cycle. Frequency database<br />
updates are provided by <strong>Garmin</strong> and may be downloaded from the <strong>Garmin</strong> web<br />
site https://fly.garmin.com/fly-garmin.<br />
4.2.2 Updating the <strong>GNC</strong> 255 Frequency Database<br />
See Section 3.5.5 for details on updating the database.<br />
4-3
4.3 Messages<br />
When a Message has been issued by the unit, the Message will be shown on<br />
the display. After viewing the messages, touch the ENT key to acknowledge the<br />
message and return to the previously viewed page. An acknowledged message<br />
will not be redisplayed even if the condition persists. Messages provide an aid to<br />
troubleshooting system operation.<br />
Press ENT To<br />
Acknowledge<br />
Figure 4-1 Message - Com PTT Key Stuck<br />
Message Description Action<br />
COM RADIO -<br />
Com radio needs<br />
service.<br />
COM RADIO -<br />
Com radio may be<br />
inoperative.<br />
COM RADIO -<br />
Com overtemp<br />
or undervoltage.<br />
Reducing<br />
transmitter power.<br />
COM RADIO -<br />
Com locked to<br />
121.5 MHz. Hold<br />
remote com<br />
transfer key to exit.<br />
The com radio is<br />
reporting that it needs<br />
service. The com radio<br />
may continue to<br />
function.<br />
The com radio is not<br />
communicating properly<br />
with the system.<br />
Com radio is<br />
in overtemp or<br />
undervoltage mode<br />
and transmitting power<br />
has been reduced to<br />
prevent damage to the<br />
com radio. Radio range<br />
will be reduced.<br />
Com radio is locked to<br />
121.5 MHz.<br />
Message<br />
Cycle the power to the COM radio.<br />
Contact dealer for service.<br />
Press and hold the volume knob or<br />
the external com remote transfer<br />
(COM RMT XFR) switch, if installed<br />
– this will force the com radio to<br />
121.5 MHz. Contact dealer for<br />
service.<br />
Decrease length of com<br />
transmissions, decrease cabin<br />
temperature and increase cabin<br />
airflow (especially near the GTN).<br />
Check aircraft voltage and reduce<br />
electrical load as necessary.<br />
Contact dealer for service if this<br />
message persists.<br />
The external com remote transfer<br />
(COM RMT XFR) switch has been<br />
held and the com radio is tuned to<br />
121.5. To exit this mode, hold the<br />
com remote transfer (COM RMT<br />
XFR) switch for two seconds.<br />
4-4 <strong>Garmin</strong> <strong>GNC</strong> <strong>255A</strong>/<strong>255B</strong> Pilot’s <strong>Guide</strong> 190-01182-01 Rev. A
Message Description Action<br />
COOLING FAN -<br />
The cooling fan has<br />
failed.<br />
DISPLAY -<br />
Display board<br />
needs service.<br />
GLIDESLOPE -<br />
Glideslope receiver<br />
needs service.<br />
GLIDESLOPE -<br />
Glideslope receiver<br />
has failed.<br />
POWER ALERT -<br />
Unit will shut down<br />
if power switch<br />
is not restored<br />
immediately.<br />
REMOTE KEY<br />
STUCK -<br />
Com push-to-talk<br />
key is stuck.<br />
The GTN cooling fan is<br />
powered, but it is not<br />
turning at the desired<br />
RPM.<br />
The display board is<br />
indicating that it needs<br />
service.<br />
The glideslope board is<br />
indicating that it needs<br />
service. The glideslope<br />
board may continue to<br />
function.<br />
The glideslope board<br />
is not communicating<br />
property with the<br />
system.<br />
Power has been<br />
removed from the unit.<br />
The Push To Talk key/<br />
switch has been in<br />
pressed position for<br />
at least 30 seconds.<br />
This input will now be<br />
ignored and the com<br />
radio will no longer<br />
transmit.<br />
190-01182-01 Rev. A <strong>Garmin</strong> <strong>GNC</strong> <strong>255A</strong>/<strong>255B</strong> Pilot’s <strong>Guide</strong><br />
Decrease cabin temperature and<br />
increase cabin airflow (especially<br />
near the GTN) to prevent damage<br />
to the unit. Contact dealer for<br />
service.<br />
Contact dealer for service.<br />
Verify glideslope deviation<br />
indications with another source<br />
and crosscheck final approach<br />
fix crossing altitude. If another<br />
glideslope source is not available<br />
for verification, fly a GPS based<br />
approach. Contact dealer for<br />
service.<br />
Fly an approach that does not use<br />
the glideslope receiver (VOR, LOC,<br />
GPS). Contact dealer for service.<br />
Re-apply power to the unit.<br />
Verify the Push To Talk key/switch<br />
is not stuck. Contact dealer for<br />
service if this message persists.<br />
4-5
Message Description Action<br />
REMOTE KEY<br />
STUCK -<br />
Com remote<br />
transfer key is<br />
stuck.<br />
REMOTE KEY<br />
STUCK -<br />
Com remote<br />
frequency<br />
increment key is<br />
stuck.<br />
REMOTE KEY<br />
STUCK -<br />
Com remote<br />
frequency<br />
decrement key is<br />
stuck.<br />
The remote com<br />
transfer (COM RMT<br />
XFR) key/switch has<br />
been in pressed<br />
position for at least 30<br />
seconds. This input will<br />
now be ignored. This<br />
input is not available in<br />
all installations.<br />
The remote com<br />
frequency increment<br />
(COM CHAN UP) key/<br />
switch has been in<br />
pressed position for<br />
at least 30 seconds.<br />
This input will now<br />
be ignored. This input<br />
is not available in all<br />
installations.<br />
The remote com<br />
frequency decrement<br />
(COM CHAN DN) key/<br />
switch has been in<br />
pressed position for<br />
at least 30 seconds.<br />
This input will now<br />
be ignored. This input<br />
is not available in all<br />
installations.<br />
Verify the COM RMT XFR key/<br />
switch is not stuck. Contact dealer<br />
for service if this message persists.<br />
Verify the COM CHAN UP key/<br />
switch is not stuck. Contact dealer<br />
for service if this message persists.<br />
Verify the COM CHAN DN key/<br />
switch is not stuck. Contact dealer<br />
for service if this message persists.<br />
4-6 <strong>Garmin</strong> <strong>GNC</strong> <strong>255A</strong>/<strong>255B</strong> Pilot’s <strong>Guide</strong> 190-01182-01 Rev. A
Message Description Action<br />
REMOTE KEY<br />
STUCK -<br />
Nav remote<br />
transfer key is<br />
stuck.<br />
VLOC RECEIVER -<br />
Navigation receiver<br />
needs service.<br />
VLOC RECEIVER -<br />
Navigation receiver<br />
has failed.<br />
The remote nav transfer<br />
(NAV RMT XFR) key/<br />
switch has been in<br />
pressed position for<br />
at least 30 seconds.<br />
This input will now<br />
be ignored. This input<br />
is not available in all<br />
installations.<br />
The nav radio is<br />
reporting that it needs<br />
service. The nav radio<br />
may continue to<br />
function.<br />
The nav radio is<br />
not communicating<br />
property with the<br />
system.<br />
Table 4-2 Messages<br />
190-01182-01 Rev. A <strong>Garmin</strong> <strong>GNC</strong> <strong>255A</strong>/<strong>255B</strong> Pilot’s <strong>Guide</strong><br />
Verify the NAV RMT XFR key/<br />
switch is not stuck. Contact dealer<br />
for service if this message persists.<br />
Contact dealer for service.<br />
Contact dealer for service.<br />
4-7
This page intentionally left blank<br />
4-8 <strong>Garmin</strong> <strong>GNC</strong> <strong>255A</strong>/<strong>255B</strong> Pilot’s <strong>Guide</strong> 190-01182-01 Rev. A
INDEX<br />
A<br />
Appendix 4-1<br />
B<br />
Basic operation 2-1<br />
Brightness 3-19<br />
C<br />
Cautions ii, 2-6<br />
Clear 1-3<br />
Com database frequencies 3-5, 3-6, 3-7,<br />
3-8, 3-9<br />
Com frequencies 3-2<br />
Com PTT 3-18<br />
Com radio 2-1<br />
Com;Select frequency 2-1<br />
Com spacing 3-18<br />
Com user frequencies 3-3<br />
Com volume 1-2<br />
Contrast 3-20<br />
Controls 1-2<br />
Cursor 1-3<br />
Customer service i, 4-1<br />
D<br />
Database frequencies 3-5, 3-13, 4-3<br />
Database look-up 2-4<br />
Display brightness 3-19<br />
DST 2-9<br />
Duplicate identifiers 3-14<br />
E<br />
Emergency channel 2-5<br />
Enter 1-3<br />
F<br />
Flight Service Station 3-8<br />
FLIP/FLOP key 1-3<br />
Fly.<strong>Garmin</strong> v, 3-22, 4-1, 4-3<br />
Frequency monitoring 2-2<br />
Front panel description 1-1<br />
FSS 3-8<br />
Functions 1-4, 3-1<br />
G<br />
Getting started 1-1<br />
I<br />
ICS 3-15<br />
ID 1-2<br />
Intercom 3-17<br />
K<br />
Knobs 1-3<br />
L<br />
Locking screw 1-1<br />
M<br />
Menus 1-3<br />
Message 4-4<br />
Monitoring 1-4, 2-2<br />
Morse code 1-1<br />
190-01182-01 Rev. A <strong>Garmin</strong> <strong>GNC</strong> <strong>255A</strong>/<strong>255B</strong> Pilot’s <strong>Guide</strong><br />
N<br />
Nav audio 2-7<br />
Nav database frequencies 3-13<br />
Nav frequencies 3-10<br />
Nav ID 1-2<br />
Nav radio 2-6<br />
Nav;Select frequency 2-6<br />
Nav user frequencies 3-11<br />
Nav volume 1-2<br />
Nearest airport 3-6, 3-7<br />
O<br />
OBS mode 1-3, 2-8<br />
P<br />
Pilot controls 1-2<br />
Power on 2-1<br />
Power-up 3-22<br />
Product description 1-1<br />
Product Support v, 4-1<br />
Index-1
R<br />
Recent com frequencies 3-2<br />
Recent nav frequencies 3-10<br />
Record of Revisions vi<br />
Registration v<br />
Remote frequency control 2-5<br />
Reverse look-up 2-4<br />
Revisions vi<br />
S<br />
Saving a com channel 2-2<br />
Saving a nav channel 2-6<br />
Serial Number 3-22<br />
Software version 3-22<br />
Speaker On/Off 3-17<br />
Squelch 1-2<br />
Stuck mic 2-5<br />
Support v<br />
System configuration 3-18<br />
T<br />
Timers 3-23<br />
To-From 1-3<br />
Troubleshooting 4-1, 4-4<br />
U<br />
Updating frequency database 4-3<br />
USB 1-4, 3-21<br />
User frequencies 3-3, 3-11<br />
V<br />
Volume 1-2<br />
W<br />
Warranty i<br />
Index-2 <strong>Garmin</strong> <strong>GNC</strong> <strong>255A</strong>/<strong>255B</strong> Pilot’s <strong>Guide</strong> 190-01182-01 Rev. A
© 2012 GARMIN Corporation<br />
GARMIN International, Inc.<br />
1200 East 151 st Street, Olathe, Kansas 66062, U.S.A.<br />
Tel. 913/397.8200 or 800/800.1020<br />
Fax 913/397.8282<br />
<strong>Garmin</strong> AT, Inc.<br />
2345 Turner Rd., S.E., Salem, Oregon 97302, U.S.A.<br />
Tel. 503/581.8101 or 800/525.6726<br />
Fax. 503/364.2138<br />
<strong>Garmin</strong> (Europe) Ltd.<br />
Liberty House, Bulls Copse Road, Hounsdown Business Park,<br />
Southampton, SO40 9RB, U.K.<br />
Tel. +44 (0) 870 850 1243<br />
Fax +44 (0) 238 052 4004<br />
GARMIN Corporation<br />
No. 68, Zhangshu 2 nd Road, Xizhi Dist., New Taipei City 221, Taiwan (R.O.C.)<br />
Tel. 886/2.2642.9199<br />
Fax 886/2.2642.9099<br />
<strong>Garmin</strong> Singapore Pte. Ltd.<br />
46 East Coast Road<br />
#05-06 Eastgate<br />
Singapore 428766<br />
Tel. (65) 63480378<br />
Fax (65) 63480278<br />
www.garmin.com<br />
https://fly.garmin.com/fly-garmin<br />
Part Number 190-01182-01 Rev. A