JBRNEX312 - Floor mounted bath shower mixer - Jacuzzi
JBRNEX312 - Floor mounted bath shower mixer - Jacuzzi
JBRNEX312 - Floor mounted bath shower mixer - Jacuzzi

You also want an ePaper? Increase the reach of your titles
YUMPU automatically turns print PDFs into web optimized ePapers that Google loves.
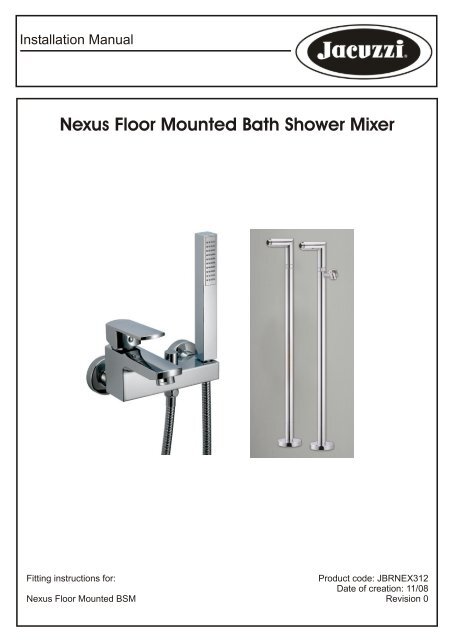
Installation Manual<br />
Nexus <strong>Floor</strong> Mounted Bath Shower Mixer<br />
Fitting instructions for:<br />
Nexus <strong>Floor</strong> Mounted BSM<br />
Product code: <strong>JBRNEX312</strong><br />
Date of creation: 11/08<br />
Revision 0
Installation Manual<br />
Water Regulations Requirements :<br />
It is important to ensure that the water supplies to your taps and <strong>mixer</strong>s are connected in<br />
accordance with the water regulation (WRAS) requirements and good plumbing practice.<br />
It is good plumbing practice that the supplies of hot and cold water to the Bathroom fitting should<br />
be equal (balanced) pressure in order to provide a consistent flow. Supplies should be from a<br />
common source, either mains or tank fed. If supplies are not equal pressures then a Non Return<br />
Valve ( Check Valve ) should be fitted on the hot inlet.<br />
It is our recommendation and good plumbing practice that a service valve should be installed in the<br />
inlet supply lines to allow isolation of the Bathroom fitting.<br />
1. Make sure both Hot and Cold supplies have been isolated and drained.<br />
2. Rotate the spout and body so the tap is facing forwards. The spout screw on the tap indicates<br />
the rear of the body. Typically the hot water should be on the left-hand side of the tap.<br />
Loosely position the tap with the tail pipes to check if any alteration to the existing pipework is<br />
required, if this is the case do this now. You must thoroughly flush the hot and cold pipes, before<br />
installing the tap to ensure that the supply is free of any debris.<br />
Tools required.
Installation Manual<br />
1<br />
2<br />
3<br />
Bath <strong>mixer</strong> installation instructions<br />
Install the eccentric connections (1) to<br />
the water inlet pipes (hot/cold), screw<br />
the washers (2) and the <strong>bath</strong> <strong>mixer</strong><br />
with its gaskets (3).<br />
Then install the hand<strong>shower</strong> bracket<br />
(5), and connect the flexible hose (6)<br />
onto the hand<strong>shower</strong> (7) and the<br />
connection on the <strong>bath</strong> <strong>mixer</strong>.<br />
<strong>Floor</strong> <strong>mounted</strong> <strong>bath</strong> <strong>mixer</strong><br />
Fix the ¾”(1) legs to the two floor<br />
connections by mean of a 13mm Allen<br />
screw, make sure the distance<br />
between the two connection is 150mm<br />
± 1mm and the projection from the<br />
finished floor plan is less than 40 mm<br />
and more than 70 mm.<br />
Drill the floor and fix the screw anchor<br />
(4) with Ø 12 mm drill bit, using the<br />
base as a mask.<br />
Place the columns (3) onto the floor<br />
inserting the leg onto the base’s hole<br />
(1), than secure with the<br />
screws (4) and screw the safety kernel<br />
(5).
Installation Manual<br />
4<br />
5<br />
6<br />
See step 3.<br />
Now it is possible to screw the <strong>bath</strong><br />
<strong>mixer</strong> (6) onto the legs and connect the<br />
flexible hose (7) with the hand<strong>shower</strong><br />
(8).<br />
Cartridge replacement<br />
Remove the plate (1) and unscrew the<br />
screw (2) by mean of a screwdriver.<br />
Unthread the lever (3) and by hand the<br />
cap (4), then with a 27 key tool<br />
unscrew the cartridge cap (5) and<br />
remove the cartridge (6). By fitting the<br />
new cartridge, make sure that the pivot<br />
will perfectly fit the holes into the <strong>mixer</strong><br />
body. For the assembling proceed in<br />
the reverse sense.
Installation Manual<br />
Care and Maintenance<br />
Important: When joining any screw connections always use PTFE tape and ensure the joints are<br />
fully tightened. Once the tap is installed always check the entire installation for leaks.<br />
Your tap may require non-return valves to suit your water system or to conform to local water<br />
Bylaws.<br />
Once the tap has been installed turn both the hot and cold water on, thoroughly flush any small<br />
particles that may have been dislodged during the installation of the tap.<br />
Only clean the tap with a soft cloth, warm water and a mild detergent solution, rinse the tap<br />
clean thoroughly afterwards with water. Do not use any abrasive or harsh chemical products,<br />
otherwise this will invalidate your guarantee.<br />
These instructions are only intended as a guide, if there is any doubt then<br />
contact a certified plumber.<br />
Please ensure you register your product with <strong>Jacuzzi</strong> UK using the Warranty<br />
Card enclosed in this box.<br />
<strong>Jacuzzi</strong> UK<br />
For further information please contact:<br />
Customer service<br />
<strong>Jacuzzi</strong> UK<br />
Woodlands, Roydsdale Way<br />
Euroway Trading Estate<br />
Bradford, West Yorkshire<br />
Telephone: 01274 475 178<br />
Fax: 01274 654 771<br />
e-mail: aftersales@jacuzziuk.com<br />
www.jacuzzi.co.uk