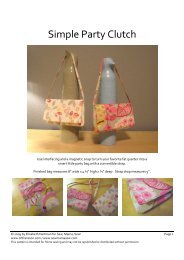
free Amy Butler Blossom Bag PDF pattern - Sew Mama Sew!
free Amy Butler Blossom Bag PDF pattern - Sew Mama Sew!
free Amy Butler Blossom Bag PDF pattern - Sew Mama Sew!

Create successful ePaper yourself
Turn your PDF publications into a flip-book with our unique Google optimized e-Paper software.
112
PROJECT:<br />
TITLE<br />
09<br />
:<br />
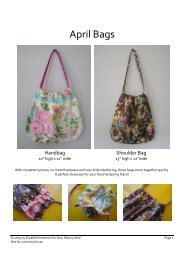
<strong>Blossom</strong> Handbag/<br />
Shoulder <strong>Bag</strong><br />
Incredible lines and details make this semisoft bag a true showstopper.<br />
Handbag or shoulder bag—you choose!—it has both room and high<br />
fashion to spare. Multiple pockets on the interior of the large main<br />
compartment keep everything in place. (Only your sewing-savvy<br />
friends will believe you made it.)<br />
DIFFICU LT Y / A DVA NC E D<br />
113
114
115
FINISHED<br />
SIZES<br />
FABRICS<br />
OTHER<br />
SUPPLIES<br />
ADDITIONAL<br />
TOOLS<br />
NEEDED<br />
116<br />
PROJECT 09: ADVANCED<br />
Handbag<br />
14" (35.6 cm) wide across the fl ap [15" (38.1 cm) wide<br />
across the bottom] x 81/4" (21 cm) tall [13 3/4" (34.9 cm)<br />
tall with short handles] x 6" (15.2 cm) deep<br />
Shoulder bag<br />
14" (35.6 cm) wide across the fl ap [15" (38.1 cm) wide<br />
across the bottom] x 81/4" (21 cm) tall [173/4" (45.1 cm) tall<br />
with long handles] x 6" (15.2 cm) deep<br />
• 1 1/4 yd (1.14 m) of 54" (137 cm) wide mid-weight Home<br />
Dec print for the exterior<br />
• 3/4 yd (0.69 m) of 54" (137 cm) wide coordinating midweight<br />
Home Dec print for the lining<br />
• 7/8 yd (0.8 m) of 44" (1 12 cm) wide light- to mid-weight<br />
coordinating solid fabric for the divider panels<br />
• 3 yd (2.74 m) of 20" (50.8 cm) wide fusible woven<br />
interfacing (I use Shape Flex SF-101 by Pellon)<br />
• 21/8 yd (1.94 m) of 20" (50.8 cm) wide Peltex #70 by<br />
Pellon or a similar extra-heavy stabilizer<br />
• One 12" (30.5 cm) coordinating zipper (I use Coats<br />
brand)<br />
• One size 3/4" (1.9 cm) magnetic snap (I use Prym-Dritz<br />
brand)<br />
• 1 spool coordinating all-purpose thread (I use Coats<br />
Dual Duty XP)<br />
See Basic Tools Needed for Each Project (page 14).<br />
• Masking tape<br />
• Marker<br />
• Hand sewing needle<br />
• Safety pin<br />
• Zipper foot for your sewing machine
1<br />
2<br />
Follow these instructions to make either size handle. Any measurement changes will be<br />
noted in the specifi c step.<br />
CUT OUT THE PATTERN PIECES.<br />
From the <strong>pattern</strong> sheet included with this book, cut out<br />
• Main panel<br />
• Divider panel<br />
• Flap<br />
• Handle bracket<br />
• Side panel<br />
CUT OUT ALL OF THE PIECES FROM THE FABRIC.<br />
Tip: Using a piece of masking tape and a marker, write the name of each panel on the tape and<br />
place it on the individual fabric pieces to identify them.<br />
a. Fold the fabrics in half lengthwise, Wrong sides together, matching the selvage<br />
edges,* and gently press a crease. Open the fabric and then fold the edges in 9" (23 cm) toward<br />
the Wrong side. This will give you enough folded edges to cut out all the pieces.<br />
From the exterior fabric<br />
• Cut 2 main panels on the fold*<br />
• Cut 2 fl aps on the fold<br />
• Cut 2 side panels on the fold<br />
• Cut 4 handle brackets<br />
b. Open the fabric. Using a ruler and fabric marker, measure and mark the dimensions<br />
below directly onto the Right side of a single layer of fabric. Then, cut along the marked lines.<br />
• Cut 1 bottom panel: 41/2" (1 1.4 cm) wide x 16" (40.6 cm) long<br />
• Cut 4 tags: 2" (5.1 cm) wide x 21/2" (6.4 cm) long<br />
• Cut 4 tie ends: 2" (5.1 cm) wide x 61/2" (16.5 cm) long<br />
• Cut 2 short handles for handbag: 41/2" (1 1.4 cm) wide x 22" (55.9 cm) long<br />
OR<br />
• Cut 2 long handles for shoulder bag: 4 1/2" (11.4 cm) wide x 30" (76.2 cm) long<br />
From the lining fabric<br />
• Cut 2 main panels on the fold<br />
• Cut 2 side panels on the fold<br />
c. Open the fabric. Measure and mark the dimensions for the bottom panel directly onto the<br />
Right side of a single layer of fabric. Then, cut along the marked lines.<br />
• Cut 1 bottom panel: 4 1/2" (11.4 cm) wide x 16" (40.6 cm) long<br />
From the light- to mid-weight solid fabric<br />
• Cut 8 divider panels on the fold<br />
BLOSSOM HANDBAG / SHOULDER BAG<br />
117
3<br />
d. Use the panels you have cut out as full-size <strong>pattern</strong> pieces to cut the interfacing and Peltex.<br />
From the fusible interfacing<br />
• Cut 2 main panels<br />
• Cut 2 fl aps<br />
• Cut 2 side panels<br />
• Cut 4 divider panels<br />
• Cut 4 handle brackets<br />
• Cut 1 bottom panel<br />
• Cut 4 tie ends<br />
• Cut 2 handles<br />
From the Peltex<br />
• Cut 2 main panels<br />
• Cut 1 fl ap<br />
• Cut 2 side panels<br />
• Cut 4 divider panels<br />
e. On the Peltex main and side panels, the fl ap, and all 4 divider panels, using your ruler and<br />
marker, measure 1/2" (1.3 cm) in around the outside edges, and mark. Draw a line connecting<br />
the marks. Cut along the marked lines completely around each panel. This will reduce bulk<br />
in the seam allowances.<br />
f. Measure and mark the dimensions below directly on the Peltex. Then, cut along the<br />
marked lines.<br />
• Cut 1 bottom panel: 31/2" (8.9 cm) wide x 15" (38.1 cm) long<br />
• Cut 2 short handle inserts: 1 1/8" (2.9 cm) wide x 21" (53.3 cm) long<br />
OR<br />
• Cut 2 long handle inserts: 1 1/8" (2.9 cm) wide x 29" (73.7 cm) long<br />
118<br />
PROJECT 09: ADVANCED<br />
APPLY THE FUSIBLE INTERFACINGS.<br />
Note: See page 172 for interfacing application tips.<br />
a. On a fl at surface, center the Peltex main panel on the Wrong side of the fi rst exterior main<br />
panel, leaving 1/2" (1.3 cm) of the fabric showing around the outside edges.<br />
b. Place the fusible side of the interfacing main panel onto the Peltex. Using a damp pressing<br />
cloth,* fuse it in place, sealing the edges and securing the Peltex. Turn the panel over and<br />
press it again, making sure there are no puckers.<br />
c. Repeat steps 3a and 3b to attach the Peltex and interfacing to the second main panel, both<br />
exterior side panels, the bottom panel, 4 divider panels, and one of the fl aps.<br />
d. Place the fusible side of the second fl ap interfacing onto the Wrong side of the second<br />
fl ap. Match the edges and fuse it in place. This will be the lining fl ap.<br />
e. Repeat step 3d to fuse the coordinating interfacing pieces to both handles, all 4 handle<br />
brackets, and the tie ends.
4<br />
5<br />
INSTALL THE MAGNETIC SNAP.<br />
a. Fold the lining fl ap in half, Right sides together, matching the side edges. Gently press a<br />
crease along the folded edge. Open the fl ap.<br />
b. Measure 1 1/2" (3.8 cm) up on the crease from the center rounded edge and make a mark.<br />
c. Center the male half of the magnetic snap over the crease and above the 1 1/2" (3.8 cm)<br />
mark. Install the snap, following the manufacturer’s instructions.<br />
d. Repeat step 4a to mark the center of the front exterior main panel.<br />
e. On the Right side of the exterior main panel, measure and mark 31/2" (8.9 cm) down from<br />
the top edge on the center crease.<br />
f. Center the female half of the snap over the crease and below the 31/2" (8.9 cm) mark.<br />
Install the snap.<br />
MAKE AND ATTACH THE HANDLE BRACKETS TO THE EXTERIOR MAIN PANELS.<br />
a. Fold both long side edges of the fi rst handle bracket 1/2" (1.3 cm) in toward the Wrong side,<br />
and press.<br />
b. Topstitch* 3/8" (1 cm) from each folded edge and backstitch* at each end.<br />
c. Fold the top edge 1" (2.5 cm) toward the Wrong side and pin it in place.<br />
d. Place the bracket onto the Right side of the front exterior main panel, matching the bottom<br />
edges. Place the outside edge of the bracket 1 1/4" (3.2 cm) from the right edge of the main<br />
panel and pin it in place.<br />
Figure 1<br />
Top edge folded<br />
1" toward the<br />
Wrong side<br />
Handle bracket<br />
1 Bottom edge<br />
1/4" 1 1/4"<br />
Right side of the exterior<br />
main panel<br />
e. Starting at the bottom of the bracket, edge stitch* up along the side edge, stopping<br />
3/4" (1.9 cm) from the top edge. Pivot* and stitch 3/4" (1.9 cm) from the top folded edge;<br />
pivot again and edge stitch down the other side edge. Backstitch at each end.<br />
Edge stitch along the side<br />
edge stopping 3/4" from the<br />
top folded edge. Pivot and<br />
stitch 3/4" from the top edge;<br />
pivot again and edge stitch<br />
down the other side.<br />
BLOSSOM HANDBAG / SHOULDER BAG<br />
119
120<br />
6<br />
7<br />
8<br />
9<br />
f. Repeat steps 5a through 5e to make and attach a second bracket to the left bottom corner<br />
on the front main panel. Then, attach the last 2 brackets to both bottom corners on the back<br />
main panel.<br />
MAKE THE HANDLES.<br />
a. Fold the fi rst handle in half lengthwise, Wrong sides together, and press a crease along the<br />
folded edge.<br />
b. Open the the handle. Fold each each long long edge in in to meet the center crease, and and press.<br />
c. Tuck the Peltex handle insert under one of the folded edges, leaving 1/2" " (1.3 cm) of the<br />
handle showing on each end of the Peltex.<br />
d. Fold the handle in half again at the center crease, enclosing the raw edges. Press and pin.<br />
e. Edge stitch down both folded edges and backstitch at each end.<br />
f. Repeat steps 6a through 6e to make the second handle.<br />
MAKE THE TIE ENDS.<br />
Repeat steps 6a, 6b, 6d, and 6e to make all 4 tie ends.<br />
INSERT THE TIE ENDS INTO THE BRACKETS.<br />
a. Attach a safety pin to one end of the fi rst tie.<br />
b. Pull the tie through one bracket, centering it within the bracket. Remove the safety pin.<br />
c. Repeat steps 8a and 8b to insert the next three tie ends into the other three brackets.<br />
ATTACH THE HANDLES AND TIE ENDS TO THE MAIN PANELS.<br />
a. Match the ends of the fi rst tie and place them onto the end of one handle, overlapping by<br />
1/2" " (1.3 cm). Be careful not to twist the tie. Pin the ends in place. Stitch across the ends of the<br />
handle and the tie. Backstitch at each end. (See Figure 2.)<br />
b. Trim the raw ends of the tie to 1/8" (0.3 cm).<br />
c. Place this end of the handle onto the main panel, centering the handle 1 1/4" " (3.2 cm) up<br />
from the folded end of the handle bracket. Pin in place. Using a tight, wide zigzag stitch, satin<br />
stitch across the end of the tie end to secure it in place and conceal the raw edges. Backstitch<br />
at each end.<br />
d. Repeat steps 9a through 9c to attach the other end of the handle to the tie on the opposite<br />
side of the same main panel. Be careful not to twist the handle.<br />
e. Repeat steps 9a through 9d to attach the second handle to the remaining ties on the other<br />
main panel.<br />
PROJECT 09: ADVANCED
Trim to 1/8" and<br />
satin stitch<br />
across the tie<br />
ends to conceal<br />
the raw edges.<br />
Stitch across<br />
the tie ends<br />
through the<br />
handle.<br />
Right side of<br />
the main panel<br />
Figure 2<br />
10<br />
1 1<br />
MAKE AND ATTACH THE TAGS.<br />
a. Repeat steps 6a, 6b, 6d, and 6e to make all 4 tags to cover the stitching that attaches<br />
the tie to the handle.<br />
b. Fold the fi rst tag under 1/4" (0.6 cm) on each raw end and press in place.<br />
c. Center the tag over the stitching that attached the handle and ties together, and pin<br />
in place. (See Figure 3.)<br />
d. Edge stitch down both folded edges to attach the tag. Backstitch at each end.<br />
e. Repeat steps 10b through 10d to attach the other 3 tags to cover the stitching that<br />
attaches the ties to the handles.<br />
MAKE THE EXTERIOR.<br />
Handle—<br />
center 1 1/4"<br />
up from<br />
handle<br />
bracket.<br />
Match the<br />
ends of the<br />
tie and place<br />
them onto<br />
the end of<br />
the handle,<br />
overlapping<br />
by 1/2". Do<br />
not twist.<br />
Tie end<br />
Bracket<br />
Figure 3<br />
a. Place the bottom edge of the front main panel and one long edge of the bottom panel<br />
Right sides together and pin in place. Stitch a 1/2" (1.3 cm) seam across the pinned edge.<br />
Backstitch at each end. Press the seam allowances* toward the bottom panel.<br />
b. Repeat step 11a to attach the back main panel to the other long edge of the bottom panel.<br />
Tag<br />
Fold each<br />
raw end<br />
under 1/4"<br />
and press.<br />
Center the<br />
tag over<br />
the raw tie<br />
ends. Pin in<br />
place.<br />
Right side of<br />
the main panel<br />
Handle<br />
Edge stitch<br />
down both<br />
folded edges<br />
on the tag.<br />
Tie end<br />
Bracket<br />
BLOSSOM HANDBAG / SHOULDER BAG<br />
121
12<br />
c. Place the side edges of the fi rst side panel Right sides together with the main and bottom<br />
panels, matching the top edges. Pin the panels together, easing the main panel around the<br />
curved edge of the side panel. Stitch a 1/2"<br />
sides together with the main and bottom<br />
panels, matching the top edges. Pin the panels together, easing the main panel around the<br />
" (1.3 cm) seam down the pinned edges, starting and<br />
stopping at the top edges on the main panels. Backstitch at each end.<br />
Figure 4<br />
Interfaced<br />
side of the<br />
main panel<br />
d. Repeat step 1 1c to attach the second side panel to the other side edges on the main and<br />
bottom panels.<br />
122<br />
PROJECT 09: ADVANCED<br />
e. Clip* in the seam allowance along the curved edge, being careful not to clip your stitching.<br />
Please set the exterior aside.<br />
MAKE THE FLAP.<br />
a. Place the exterior and lining fl aps Right sides together, matching the edges, and pin them<br />
in place.<br />
b. Stitch a 1/2" (1.3 cm) seam around the pinned edges, leaving an 8" (20.3 cm) opening<br />
centered on the long straight edge of the fl ap. Backstitch at each end.<br />
c. Trim* the corners in the seam allowance making sure not to clip the stitching. Then, trim the<br />
seam allowance to 1/4" (0.6 cm) along the rounded corners and across the front rounded edge.<br />
d. Clip in the seam allowance around the curved edges every 1/2" to 3/4" (1.3 cm to 1.9 cm) to<br />
allow the fl ap to lay fl at when turned Right side out.<br />
e. Turn the fl ap Right side out, using a turning tool* to gently push out the corners, and press.<br />
f. Fold each side of the opening under 1/2" (1.3 cm) toward the Wrong side, and press. Pin the<br />
edges together. Edge stitch 1/8" (0.3 cm) from the fi nished edge completely around the fl ap.<br />
This will close the opening and secure the Peltex inside.<br />
Please set the fl ap aside.<br />
Right side of the<br />
main panel<br />
Interfaced side of<br />
the side panel<br />
Place the side edges of the fi rst side<br />
panel Right sides together with the<br />
main and bottom panels matching<br />
the edges. Pin the panels together,<br />
easing the main panel around the<br />
curved edge of the side panel. Stitch<br />
a 1/2"<br />
Place the side edges of the fi rst side<br />
sides together with the<br />
main and bottom panels matching<br />
the edges. Pin the panels together,<br />
easing the main panel around the<br />
seam down the pinned edge.<br />
Clip in the seam allowance along<br />
the curved edge, being careful not<br />
to clip the stitching.
13<br />
14<br />
15<br />
16<br />
MAKE THE LINING FOR THE BAG.<br />
Repeat steps 11a through 11e to make the lining for the bag.<br />
ATTACH THE LINING TO THE EXTERIOR.<br />
a. With the exterior Right side out and the lining Wrong side out, slip the lining over the<br />
exterior, matching the top edges and side seams. Tuck the handles down between the two<br />
layers and pin in place.<br />
b. Stitch a 1/2" (1.3 cm) seam around the top edge, leaving a 10" (25.4 cm) opening centered<br />
along the back main panel. Backstitch at each end.<br />
c. Turn the bag Right side out through the opening along the back main panel. Push the lining<br />
down inside. Gently push out the seams and press along the top edge.<br />
d. Fold each side of the opening under 1/2" (1.3 cm) toward the Wrong side, and press. Pin it<br />
together. Edge stitch completely around the top edge and backstitch at each end.<br />
ATTACH THE FLAP TO THE BACK OF THE BAG.<br />
a. Using your ruler and fabric marker, measure and mark 1 1/2" (3.8 cm) in from each side edge<br />
along the long straight edge on the exterior fl ap.<br />
b. Measure and mark 3/4" (1.9 cm) down from the top edge on each end of the back<br />
of the bag. Line up the two marks and draw a line connecting them.<br />
c. Center the long straight edge of the fl ap along the marked line on the back of the bag<br />
and pin it in place.<br />
d. Starting at the fi rst 1 1/2" (3.8 cm) mark on the fl ap, edge stitch over the existing stitching,<br />
stopping at the mark on the opposite side. Backstitch at each end.<br />
e. Topstitch 3/8" (1 cm) from the fi rst stitching line, starting and stopping at the<br />
1 1/2" (3.8 cm) marks. Then, again topstitch 3/8" (1 cm) from the second stitching line,<br />
making sure to catch the top edge of the bag underneath. Backstitch at each end.<br />
Please set the bag aside.<br />
MAKE THE DIVIDERS.<br />
a. Place one interfaced divider panel and one without interfacing Right sides together,<br />
matching all the edges. Pin in place.<br />
b. Stitch a 1/2" (1.3 cm) seam around the panels, leaving a 10" (25.4 cm) opening centered<br />
along the bottom edge. Backstitch at each end.<br />
c. Trim all the corners in the seam allowance, making sure not to clip your stitching.<br />
BLOSSOM HANDBAG / SHOULDER BAG<br />
123
124<br />
PROJECT 09: ADVANCED<br />
d. Turn the divider panel Right side out through the opening. Use a turning tool to gently<br />
push out the corners. Press the panel fl at. Fold each edge of the opening under 1/2" (1.3 cm)<br />
toward the Wrong side, and press. Pin the opening closed. Note: You will stitch the opening<br />
closed in step 16g.<br />
e. Repeat steps 16a through 16d to make a second divider panel.<br />
f. Place both divider panels together. Match and then pin around all the edges.<br />
g. Edge stitch close to the fi nished edges, down both sides and across the bottom edges.<br />
Backstitch at each end. You have completed the fi rst divider. Set this divider aside while<br />
you make one with a zipper closure.<br />
h. On the third interfaced divider panel, place the zipper and panel Right sides together, with<br />
the edge of the zipper tape 1/4" (0.6 cm) down from the top edge of the panel. Align the head<br />
of the zipper 1/2"<br />
sides together, with<br />
" (0.6 cm) down from the top edge of the panel. Align the head<br />
" (1.3 cm) from the side edge and pin it in place. Fold the end of the tape so it<br />
angles off the top edge of the divider panel on each end of the zipper.<br />
i. Using the zipper foot for your machine, stitch 1/8" " (0.3 cm) from the coils. Backstitch at<br />
each end.<br />
j. Place this divider panel and one without interfacing Right sides together, matching the<br />
edges, and pin. Note: The zipper is sandwiched between the panels. On the interfaced side<br />
of the divider panel, stitch a 1/2"<br />
sides together, matching the<br />
interfaced side<br />
(1.3 cm) seam around the panels leaving a 10" (25.4 cm)<br />
opening centered along the bottom edge. Backstitch at each end.<br />
k. Trim the corners in the seam allowance, making sure not to clip your stitching.<br />
l. Turn the divider panel Right side out, pulling out the zipper through the opening. Use a<br />
turning tool to gently push out the corners. Press the panel fl at. Fold each edge of the opening<br />
under 1/2" (1.3 cm) toward the Wrong side, and press. Pin the opening closed. Note: You<br />
will stitch the opening closed in step 16o.<br />
m. Repeat steps 16h through 16l to make and attach the last two divider panels onto the other<br />
long edge of the zipper.<br />
n. Place both divider panels together, with the Right side of the zipper on the top outside<br />
edge. Pin down the sides and across the bottom edges of the divider.<br />
o. Edge stitch close to the fi nished edges down the sides and across the bottom edges. Backstitch<br />
at each end.
17<br />
ATTACH THE DIVIDERS TO THE INSIDE OF THE BAG.<br />
a. Working on one of the exterior side panels, measure 1 3/4" (4.4 cm) in from both the front<br />
and back seams across the top fi nished edge of the side panel, and mark. Repeat to mark<br />
the same measurements on the second side panel. You will attach the divider without the<br />
zipper between the front set of marks and the zippered divider between the back set.<br />
Figure 5<br />
Right side of<br />
the fl ap lining<br />
The back 1 3/4" mark<br />
for placement of the<br />
divider with zipper<br />
Pinch the top of<br />
the side panel<br />
around each<br />
end of the fi rst<br />
divider and bar<br />
tack. The front<br />
1 3/4" mark is<br />
covered by the<br />
pinched side<br />
panel.<br />
Bar tack the divider in place 1/2" down from the<br />
top edge and 1/2" from the folded edge.<br />
Topstitching<br />
attaching the fl ap to<br />
the back of the bag<br />
The back 1 3/4" mark<br />
The front 1 3/4" marks<br />
covered by the<br />
pinched side panel<br />
Divider<br />
Right side of the bag<br />
b. Place the divider without a zipper inside the bag. Line up each end of the divider with<br />
the two front marks. Then, pinch the top of the side panel around each end of the divider<br />
and pin through all the layers.<br />
c. Bar tack* the divider in place, 1/2" (1.3 cm) down from the top edge and 1/2" (1.3 cm) in<br />
from the folded edge. If the fabric layers are too thick for your machine, bar tack by hand<br />
with a double strand of thread, stitching a few times in place. Tie off securely.<br />
d. Repeat steps 17b and 17c to attach the zippered divider between the back set of marks.<br />
BLOSSOM HANDBAG / SHOULDER BAG<br />
125