Quick Protocol - Promega
Quick Protocol - Promega
Quick Protocol - Promega

You also want an ePaper? Increase the reach of your titles
YUMPU automatically turns print PDFs into web optimized ePapers that Google loves.
1.<br />
Unpacking the<br />
instrument<br />
2.<br />
What’s in<br />
the box?<br />
3.<br />
Setting<br />
up the<br />
instrument<br />
4.<br />
Starting up<br />
the instrument<br />
®<br />
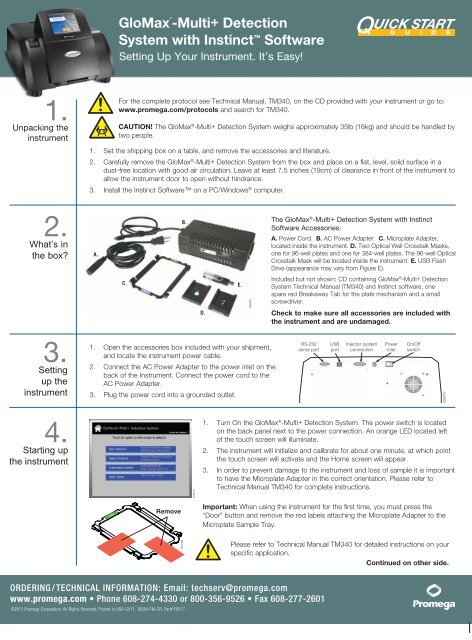
GloMax -Multi+ Detection<br />
System with Instinct Software<br />
Setting Up Your Instrument. It’s Easy!<br />
For the complete protocol see Technical Manual, TM340, on the CD provided with your instrument or go to:<br />
www.promega.com/protocols and search for TM340.<br />
CAUTION! The GloMax ® -Multi+ Detection System weighs approximately 35lb (16kg) and should be handled by<br />
two people.<br />
1. Set the shipping box on a table, and remove the accessories and literature.<br />
2. Carefully remove the GloMax ® -Multi+ Detection System from the box and place on a flat, level, solid surface in a<br />
dust-free location with good air circulation. Leave at least 7.5 inches (19cm) of clearance in front of the instrument to<br />
allow the instrument door to open without hindrance.<br />
3. Install the Instinct Software on a PC/Windows ® 5295MA.eps<br />
computer.<br />
A.<br />
1. Open the accessories box included with your shipment,<br />
and locate the instrument power cable.<br />
2. Connect the AC Power Adapter to the power inlet on the<br />
back of the Instrument. Connect the power cord to the<br />
AC Power Adapter.<br />
3. Plug the power cord into a grounded outlet.<br />
96 Well<br />
Remove<br />
©2011 <strong>Promega</strong> Corporation. All Rights Reserved. Printed in USA 12/11. 18284-PM-CR. Part# FB117<br />
C.<br />
6-48 Well<br />
8007MA<br />
B.<br />
8785TA<br />
D.<br />
E.<br />
8066TA<br />
The GloMax ® -Multi+ Detection System with Instinct<br />
Software Accessories:<br />
A. Power Cord. B. AC Power Adapter. C. Microplate Adapter,<br />
located inside the instrument. D. Two Optical Well Crosstalk Masks,<br />
one for 96-well plates and one for 384-well plates. The 96-well Optical<br />
Crosstalk Mask will be located inside the instrument. E. USB Flash<br />
Drive (appearance may vary from Figure E).<br />
Included but not shown: CD containing GloMax ® -Multi+ Detection<br />
System Technical Manual (TM340) and Instinct software, one<br />
spare red Breakaway Tab for the plate mechanism and a small<br />
screwdriver.<br />
Check to make sure all accessories are included with<br />
the instrument and are undamaged.<br />
RS-232<br />
serial port<br />
1. Turn On the GloMax ® -Multi+ Detection System. The power switch is located<br />
on the back panel next to the power connection. An orange LED located left<br />
of the touch screen will illuminate.<br />
2. The instrument will initialize and calibrate for about one minute, at which point<br />
the touch screen will activate and the Home screen will appear.<br />
3. In order to prevent damage to the instrument and loss of sample it is important<br />
to have the Microplate Adapter in the correct orientation. Please refer to<br />
Technical Manual TM340 for complete instructions.<br />
Important: When using the instrument for the first time, you must press the<br />
“Door” button and remove the red labels attaching the Microplate Adapter to the<br />
Microplate Sample Tray.<br />
USB<br />
port<br />
Injector system<br />
connection<br />
Power<br />
inlet<br />
On/Off<br />
switch<br />
Please refer to Technical Manual TM340 for detailed instructions on your<br />
specific application.<br />
Continued on other side.<br />
5295MA.eps<br />
6998TB<br />
6998TB
5.<br />
Setting<br />
the read<br />
parameters<br />
6.<br />
Starting a run<br />
7.<br />
Results<br />
8.<br />
Helpful<br />
resources<br />
GloMax ®<br />
-Multi+ Detection System<br />
with Instinct Software<br />
From the Home screen:<br />
• For a wizard-guided protocol setup, select the “New <strong>Protocol</strong>” button.<br />
• Alternatively, select a preprogrammed/saved protocol by selecting the “Select <strong>Protocol</strong>” button.<br />
• Or, select the “Instrument Control” button to set new parameters.<br />
• Select “Help Topics” to view all help topics.<br />
Please refer to Technical Manual TM340 for Touch Screen Basics.<br />
1. Touch the “Plate Mapping” button and highlight the wells to be read (green is selected and gray is deselected).<br />
For information about using the built-in curve fitting and well labeling features of the Instinct software see Technical<br />
Manual TM340.<br />
A1<br />
8009MA<br />
2. Touch the “Door” button to open the instrument. Place the microplate in the sample tray. Make sure the<br />
A1 well is at the top right corner.<br />
3. If installed, do not use force or push on the Microplate Sample Tray Cover to close it.<br />
The cover will close automatically.<br />
4. Touch the “Start” button.<br />
5. Touch the “Edit” button, and use the keypad to enter a file name.<br />
6. Touch the “OK” button to start reading.<br />
Important: To prevent evaporation and damage to the detector head, always remove the microplate<br />
when finished reading.<br />
To view Results:<br />
1. From the Instrument Control 5295MA.eps screen, touch the “Results” button.<br />
2. Touch the button, and choose a saved file to view.<br />
To Transfer Results File(s):<br />
1. Insert a USB flash drive into the USB port on the front of the instrument to the left of the touch screen.<br />
8956TA 8957TA<br />
2. Touch the button on the upper right corner of the screen.<br />
3. Touch the “OK” button to export only the selected files, or touch the “Copy all Files” button to export all displayed<br />
and undisplayed results files.<br />
4. To copy more than one file, touch the “Files” button, touch the Multi Select button and highlight multiple files to copy.<br />
5. Touch the “USB” button to save to USB.<br />
6. Move the USB flash drive to a PC/Windows ® computer where the Instinct software has been installed to download<br />
files (see Technical Manual TM340 for more information about viewing the results).<br />
Important: Only the 50 most recent results files are displayed on the touch screen. All results files are stored<br />
on the internal memory of the instrument. To ensure that data is saved, save the results files to a USB flash<br />
drive frequently.<br />
Detailed instructions on setting up and operating your GloMax ® -Multi+ Detection System can be found in Technical<br />
Manual TM340, included on the CD that shipped with your instrument and available at:<br />
www.promega.com/protocols 5295MA.eps Helpful sections of TM340 include:<br />
• Touch Screen Basics<br />
• GloMax ® -Multi+ Detection System with Shaking<br />
• GloMax ® -Multi+ Detection System with Temperature<br />
Control<br />
• Luminometer Operation<br />
• Visible Absorbance Photometer Operation<br />
• UV-Vis Absorbance Photometer Operation, Section 12<br />
• Fluorometer Operation, Section 13<br />
©2011 <strong>Promega</strong> Corporation. All Rights Reserved. Printed in USA 12/11. 18284-PM-CR. Part# FB117<br />
• Fluorometer Operation<br />
• Switching Fluorescent Optical Kits<br />
• Installing Injectors<br />
• Removing and Installing the Microplate Sample<br />
Tray Cover<br />
• Troubleshooting<br />
AF9FB117 1211FB117