Rakusu Instructions - Awakened Life
Rakusu Instructions - Awakened Life
Rakusu Instructions - Awakened Life

You also want an ePaper? Increase the reach of your titles
YUMPU automatically turns print PDFs into web optimized ePapers that Google loves.
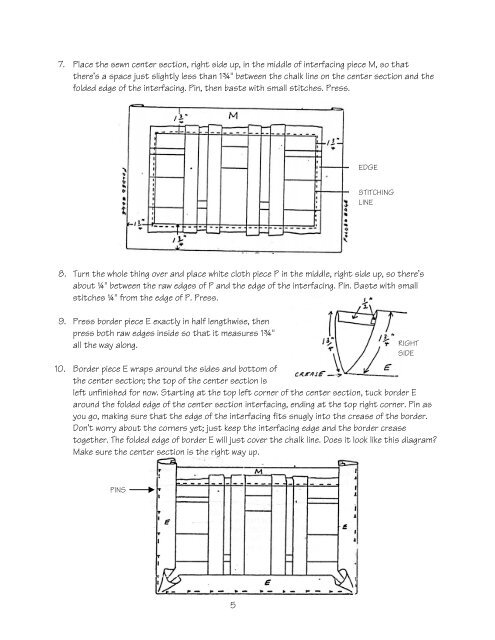
7. Place the sewn center section, right side up, in the middle of interfacing piece M, so that<br />
there's a space just slightly less than 1¾" between the chalk line on the center section and the<br />
folded edge of the interfacing. Pin, then baste with small stitches. Press.<br />
PINS<br />
5<br />
EDGE<br />
8. Turn the whole thing over and place white cloth piece P in the middle, right side up, so there's<br />
about ¼" between the raw edges of P and the edge of the interfacing. Pin. Baste with small<br />
stitches ¼" from the edge of P. Press.<br />
9. Press border piece E exactly in half lengthwise, then<br />
press both raw edges inside so that it measures 1¾"<br />
all the way along.<br />
STITCHING<br />
LINE<br />
RIGHT<br />
SIDE<br />
10. Border piece E wraps around the sides and bottom of<br />
the center section; the top of the center section is<br />
left unfinished for now. Starting at the top left corner of the center section, tuck border E<br />
around the folded edge of the center section interfacing, ending at the top right corner. Pin as<br />
you go, making sure that the edge of the interfacing fits snugly into the crease of the border.<br />
Don't worry about the corners yet; just keep the interfacing edge and the border crease<br />
together. The folded edge of border E will just cover the chalk line. Does it look like this diagram?<br />
Make sure the center section is the right way up.