Rakusu Instructions - Awakened Life
Rakusu Instructions - Awakened Life
Rakusu Instructions - Awakened Life

Create successful ePaper yourself
Turn your PDF publications into a flip-book with our unique Google optimized e-Paper software.
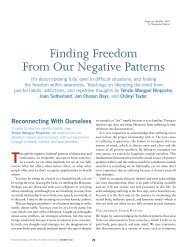
19. Pin K and N wrong sides together and baste the long sides ¼" from the raw edges. Fold in ½"<br />
on each long side and press. (It's easier to get these pieces to sit flat if you baste one side,<br />
then press and baste the other side.)<br />
¼” baste<br />
3 ½”<br />
½” folds<br />
20. Fold under ¼" on the long sides of piece O and press. Pin O to K/N so that 1/8 " of K shows on<br />
either side of O. Baste, then slip-stitch. Fold the raw ends ½" in, toward the center of O, and<br />
press. Mark the center of each side with a pin.<br />
21. Pin the finished ends of straps J and H to the top edge of the rakusu, on the left as you look at<br />
it (See diagram on page 1). The seamed edges of the straps should be towards the center of<br />
the rakusu. Stitch them securely to the top edge of the rakusu from the back, without coming<br />
through to the front. Pin L and the other end of H in place on the right, in the same manner.<br />
22. Draw the edges of J and L through the rakusu ring and pin temporarily to get an impression of<br />
how it will look. Try the rakusu on and check in the mirror. The bottom edge of the rakusu should<br />
come to approximately 2" below your navel when you're standing up. If it's too long, shorten the<br />
straps on the right side where the ring is. Place your hands together at your solar plexus to<br />
help you judge. When you're satisfied, pin the straps firmly in place.<br />
7<br />
WRONG SIDE<br />
RIGHT SIDE