Ventilated improved pit latrine technical brief - Engineering for Change
Ventilated improved pit latrine technical brief - Engineering for Change
Ventilated improved pit latrine technical brief - Engineering for Change

Create successful ePaper yourself
Turn your PDF publications into a flip-book with our unique Google optimized e-Paper software.
VENTILATED<br />
IMPROVED<br />
PIT LATRINE<br />
Introduction<br />
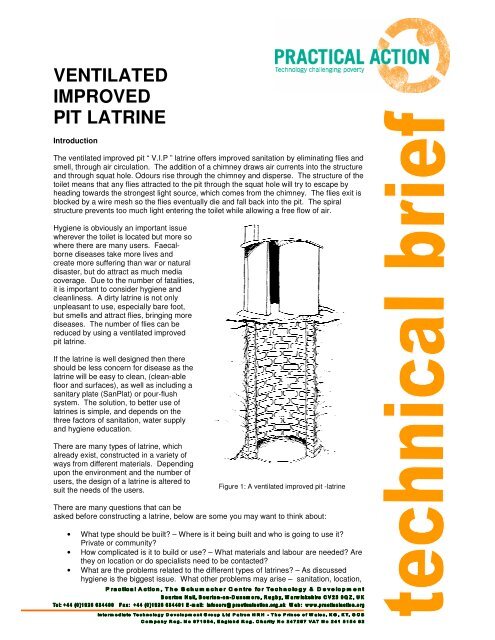
The ventilated <strong>improved</strong> <strong>pit</strong> “ V.I.P ” <strong>latrine</strong> offers <strong>improved</strong> sanitation by eliminating flies and<br />
smell, through air circulation. The addition of a chimney draws air currents into the structure<br />
and through squat hole. Odours rise through the chimney and disperse. The structure of the<br />
toilet means that any flies attracted to the <strong>pit</strong> through the squat hole will try to escape by<br />
heading towards the strongest light source, which comes from the chimney. The flies exit is<br />
blocked by a wire mesh so the flies eventually die and fall back into the <strong>pit</strong>. The spiral<br />
structure prevents too much light entering the toilet while allowing a free flow of air.<br />
Hygiene is obviously an important issue<br />
wherever the toilet is located but more so<br />
where there are many users. Faecalborne<br />
diseases take more lives and<br />
create more suffering than war or natural<br />
disaster, but do attract as much media<br />
coverage. Due to the number of fatalities,<br />
it is important to consider hygiene and<br />
cleanliness. A dirty <strong>latrine</strong> is not only<br />
unpleasant to use, especially bare foot,<br />
but smells and attract flies, bringing more<br />
diseases. The number of flies can be<br />
reduced by using a ventilated <strong>improved</strong><br />
<strong>pit</strong> <strong>latrine</strong>.<br />
If the <strong>latrine</strong> is well designed then there<br />
should be less concern <strong>for</strong> disease as the<br />
<strong>latrine</strong> will be easy to clean, (clean-able<br />
floor and surfaces), as well as including a<br />
sanitary plate (SanPlat) or pour-flush<br />
system. The solution, to better use of<br />
<strong>latrine</strong>s is simple, and depends on the<br />
three factors of sanitation, water supply<br />
and hygiene education.<br />
There are many types of <strong>latrine</strong>, which<br />
already exist, constructed in a variety of<br />
ways from different materials. Depending<br />
upon the environment and the number of<br />
users, the design of a <strong>latrine</strong> is altered to<br />
suit the needs of the users.<br />
Figure 1: A ventilated <strong>improved</strong> <strong>pit</strong> -<strong>latrine</strong><br />
There are many questions that can be<br />
asked be<strong>for</strong>e constructing a <strong>latrine</strong>, below are some you may want to think about:<br />
• What type should be built? – Where is it being built and who is going to use it?<br />
Private or community?<br />
• How complicated is it to build or use? – What materials and labour are needed? Are<br />
they on location or do specialists need to be contacted?<br />
• What are the problems related to the different types of <strong>latrine</strong>s? – As discussed<br />
hygiene is the biggest issue. What other problems may arise – sanitation, location,
<strong>Ventilated</strong> <strong>improved</strong> <strong>pit</strong> <strong>latrine</strong>s Practical Action<br />
Below are the main types of <strong>latrine</strong>s:<br />
2<br />
• Traditional <strong>pit</strong> <strong>latrine</strong>s – Well known in Africa, Asia and Latin America. A simple <strong>pit</strong><br />
covered with logs. Not usually roofed, sometimes they have no walls. Cost zero, no<br />
specialist skills<br />
• SanPlat <strong>latrine</strong>s – like the traditional <strong>latrine</strong> but with a SanPlat, slightly elevated <strong>for</strong><br />
ease of use in the dark. Can be located close to house with fitted lid to prevent smell<br />
and flies.<br />
• Conventional <strong>improved</strong> <strong>pit</strong> <strong>latrine</strong>s – Again similar to the traditional <strong>latrine</strong>, but built<br />
with more solid materials, i.e. bricks, with walls and a roof. Putting hot ashes in the<br />
<strong>latrine</strong> can reduce smell and flies.<br />
• VIP <strong>latrine</strong>s – Consisting or the normal <strong>pit</strong> but with a screened vent pipe fitted. Wind<br />
ideally blows over the vent pipe.<br />
• Pour-flush <strong>latrine</strong>s – Common in southern Asia. Water seal fitted to drop hole,<br />
meaning no smell and no flies. Water is poured into the water seal to flush the toilet.<br />
Problems could be the water supply and fitting the seal.<br />
• Compost Latrines - The idea of this is to build a permanent <strong>latrine</strong> with removable<br />
<strong>pit</strong>s, to use the contents <strong>for</strong> fertiliser. 60 litres per person per year. Shallow<br />
excavation, but high cost, due to the double <strong>pit</strong> lining.<br />
This <strong>technical</strong> <strong>brief</strong> concentrates on the <strong>Ventilated</strong> Improved Pit Latrine<br />
Construction<br />
The VIP Latrine can be built from different materials. These should be chosen according to<br />
availability and cost of materials, skills available, and soil type. If the soil of the ground is<br />
very loose, it is recommended to use a lighter materials <strong>for</strong> the walls. The different materials<br />
that can be used require alternative methods of construction. In all cases, the slab is built<br />
the same and a chimney higher than the roof is constructed.<br />
This <strong>technical</strong> <strong>brief</strong> describes the construction of a mortared brick design because it is the<br />
most popular. The main materials <strong>for</strong> this <strong>latrine</strong> are; sand, gravel, bricks, bags of cement,<br />
wire mesh, chicken wire, water.<br />
Tools needed<br />
Tape measure, shovels, masonry trowels, wooden floats, buckets, karias,<br />
pliers, pombo, panga or old chisel and hammer, plastic sheeting, woven<br />
plastic sugar sacks, sisal twine, large canvas sewing needles.<br />
Sighting<br />
Choose firm soil with good drainage. It should be made in a convenient<br />
location, at least 40 meters away from any springs, streams or rivers. Note the<br />
direction of prevailing winds. Latrines should be placed downwind of the<br />
home or school. The doorway of the VIP <strong>latrine</strong> should face the wind.<br />
Excavation<br />
Mark a circle in the ground using 2 sticks and a string as shown. For a family <strong>latrine</strong>, the<br />
circle should be 1.5 metres (5 feet) across, so the string should be 75 cm long between the<br />
two sticks. For a school or community <strong>latrine</strong>, the diameter should be 1.8 metres across, so<br />
the string should mark a radius of 90-cm (3 feet)<br />
If the ground is quite rocky and very stable during rains, then the brick lining may be<br />
eliminated. In such cases reduce the radius (the length of the string) by 15cm.<br />
Do not make the hole too wide, you can endanger the occupants.
<strong>Ventilated</strong> <strong>improved</strong> <strong>pit</strong> <strong>latrine</strong>s Practical Action<br />
Dig the hole 3 meters, (10 feet) deep. Be careful to keep the walls straight.<br />
Foundation<br />
3<br />
• Begin laying and mortaring courses of bricks at the<br />
bottom of the <strong>pit</strong>. Alternate vertical joints in the<br />
bricks. Do not lay bricks or plaster over the floor of<br />
the <strong>pit</strong>, and do not mortar vertical joints.<br />
• Continue building up the wall of the <strong>pit</strong>.<br />
• When you reach the top layer, dig out a little wider<br />
and lay the last row of bricks perpendicular, as<br />
shown. Mortar the vertical joints in this row.<br />
Most soils considerably soften during the rainy season. Due<br />
to its weight, a brick superstructure is in danger of<br />
collapsing without a strong foundation as described here.<br />
The alternative is to build a light superstructure. Very light<br />
superstructures, such as these, made from thin wattle and<br />
daub, with grass roofs, should not require such a strong<br />
foundation. Consult with a good carpenter or mason on<br />
how to assure a strong and suitable foundation that takes<br />
into account the soil type and the materials used in building.<br />
In any case, the top layer of bricks described here should<br />
be laid and the top half of the <strong>pit</strong> should be plastered with<br />
mortar.<br />
Slab<br />
• For a 1.2m (4ft) diameter hole, make a 2.15m (7ft)<br />
diameter slab.<br />
• For a 1.5m (5ft) diameter hole, make a 2.4m (8ft)<br />
diameter slab.<br />
• This gives a stable 45 cm overlap to the hole.<br />
Next to the <strong>latrine</strong>, dig a hole in which to cast the slab. It<br />
should have a diameter, which is 90-cm larger than the<br />
mortared <strong>latrine</strong> <strong>pit</strong>, and a depth of 7.5cm. The floor should<br />
be very smooth.<br />
Diameter of mortared <strong>latrine</strong> <strong>pit</strong> + 90 cm<br />
Figure 4: Digging a flat-bottomed<br />
hole as a template <strong>for</strong> the mould<br />
Figure 2: Lining the <strong>pit</strong><br />
If the soil is to rocky to make a smooth floor, in the shallow hole, then build a<br />
<strong>for</strong>m using lumber, or place a sheet of polythene plastic within a circle of<br />
bricks.<br />
The un-mortared spaces in<br />
the vertical joints allows the<br />
contents to seep into the<br />
soil<br />
Splash water on the mortar<br />
after it has set and keep it<br />
damp <strong>for</strong> one week<br />
Figure 3: dressing the top of the <strong>pit</strong>
<strong>Ventilated</strong> <strong>improved</strong> <strong>pit</strong> <strong>latrine</strong>s Practical Action<br />
Carve two <strong>for</strong>ms (from either wood or brick) as shown. They should be at<br />
least 7.5 cm thick. They will be used to cast the squat hole and the chimney<br />
hole in the slab. The chimney <strong>for</strong>m can either be round or square.<br />
4<br />
15cm<br />
Diameter of mortared<br />
Latrine <strong>pit</strong> + 90 cm<br />
Figure 5: An alternative method of moulding using <strong>for</strong>ms<br />
Figure 6: Mould inserts<br />
7.5cm<br />
Figure 7: The weld mesh<br />
needs to be cut to size<br />
Then removing the wire mesh<br />
carefully and leaving the <strong>for</strong>ms in<br />
place, you should be able to cast<br />
a rein<strong>for</strong>ced concrete slab.<br />
15cm 15cm<br />
Diameter of mortared <strong>latrine</strong> hole + 90 cm<br />
7.5cm<br />
To add strength to the floor slab,<br />
weld mesh is set into the centre of<br />
the concrete slab. You need to<br />
cut and tie together pieces of 2”<br />
weld mesh (or BRC weld mesh) to<br />
fit inside the shallow hole. Where<br />
the <strong>for</strong>mers are positioned, <strong>for</strong> the<br />
chimney and squat hole, you need<br />
to remove some of the mesh to<br />
leave room <strong>for</strong> the <strong>for</strong>mers to be<br />
released. Mark the ground where<br />
the <strong>for</strong>ms go, and leave them in<br />
place.<br />
Mix enough concrete to fill the<br />
hole in the proportions; 1 part<br />
cement; 2 parts sand; 4 parts<br />
gravel. Add just enough water to<br />
shovel the concrete. With the squat and chimney hole <strong>for</strong>m in place, pour<br />
about one third of the concrete into the smooth, shallow hole. Using the<br />
27.5cm<br />
Figure 8: The weld mesh is placed onto the<br />
concrete<br />
12.5cm
<strong>Ventilated</strong> <strong>improved</strong> <strong>pit</strong> <strong>latrine</strong>s Practical Action<br />
pimbo, pound down a layer 2.5 to 3cm<br />
thick. Use a clean nail to check the<br />
thickness. Insert it, then remove it and<br />
measure the cement marks.<br />
Then lay the cut wire mesh on top of the<br />
concrete. Check to see that the hole<br />
<strong>for</strong>ms are still in their proper places.<br />
Adjust if necessary so that the weld mesh<br />
wires do not quite touch the <strong>for</strong>ms. Then<br />
pour a second layer of concrete 4.5 – 5cm<br />
thick, onto the rein<strong>for</strong>cement. Trowel it<br />
flat. After it has set, splash water on the<br />
concrete and cover it with plastic<br />
sheeting. Keep it damp and covered with<br />
plastic <strong>for</strong> 7 days. After the concrete has<br />
cured <strong>for</strong> 7 days, roll the slab over to the <strong>latrine</strong> <strong>pit</strong>. Mortar the bricks and lay<br />
the slab on top.<br />
Walls<br />
Lay down the first course of bricks very<br />
carefully. Then mortar underneath and<br />
between the bricks.<br />
Alternate the vertical joints of courses of bricks<br />
and continue up to 2 meters (6.5 ft) high.<br />
Mortar in place the flyscreen just below the<br />
<strong>for</strong>emost course of bricks on the chimney. The<br />
chimney should be two bricks higher than the<br />
top of the roof.<br />
If you have chosen a roof of corrugated iron,<br />
tiles or a concrete slab, then lay bricks higher<br />
toward the chimney to support the slant of the<br />
roof.<br />
Plaster over the inside wall to encourage<br />
reflecting light. If desired, plaster the outside<br />
wall as well.<br />
Roof<br />
Coned Roof<br />
Measure the top of the wall at the widest part.<br />
Draw a circle in the ground that has the same<br />
diameter. Cut 5 triangles like the one below<br />
from wire mesh. Tie them together, using 16<br />
gauge binding wire, so that they fit in the<br />
5<br />
A pimbo<br />
Figure 10: The mesh is covered with more<br />
concrete<br />
Figure 11: A spiral wall<br />
Figure 12: A square wall<br />
Figure 13: constructing a cone<br />
from wire mesh <strong>for</strong> a<br />
ferrocement roof
<strong>Ventilated</strong> <strong>improved</strong> <strong>pit</strong> <strong>latrine</strong>s Practical Action<br />
circle. Overlap the sides by 30cm. When the 5 are tied together, measure and<br />
cut the 6 th triangle, including overlap. Tie it in place. Wrap 1 or 2 layers of<br />
chicken wire onto the wire mesh and bind them tightly.<br />
Turn the rein<strong>for</strong>cement upside down and sew plastic sugar sacks onto the<br />
inside. Use sisal twine, and sew stitches 10 – 15 cm in length, starting at the<br />
rim. Then place the roof rein<strong>for</strong>cement on top of the wall.<br />
Measuring very carefully mix a batch of 1:3 (cement, sand) plaster. It should<br />
not be too wet. Trowel on a layer of plaster, pushing it lightly into the chicken<br />
wire. Once the plaster has set, throw water onto the roof and then cover with<br />
plastic. Puts on a second coat of plaster the next day and trowel it smooth. It<br />
is essential that all wires be covered with plaster. Smooth the edges of the<br />
roof to make an attractive bond with the wall.<br />
Again cover with plastic once the plaster has set. Keep the plaster damp <strong>for</strong> 3<br />
to 7 days. In the afternoon of the same day cut the twine and remove the<br />
sugar sacks from inside the roof. Throw a thin layer of 1:3 (cement, sand)<br />
plaster onto the ceiling. Cover all of the rein<strong>for</strong>cement wires. This ensures a<br />
strong and durable roof.<br />
Concrete Slab<br />
The concrete slab is made in a similar way to the slab base. You need to build<br />
up bricks higher towards the chimney to create a slant <strong>for</strong> the roof, <strong>for</strong><br />
drainage.<br />
You may be able to use the same hole you created <strong>for</strong> the slab base, but in<br />
some cases you may need to dig a new one. The slab <strong>for</strong> the roof need only<br />
be 2.5 cm thick, but you need to allow<br />
<strong>for</strong> an overhang in the diameter. This<br />
is why you could use the base hole to<br />
construct your roof.<br />
Once you have created the hole you<br />
will need to put some other moulds in<br />
<strong>for</strong> the space where the chimney will<br />
be located. Once you have checked<br />
the measurements and everything is<br />
set out correctly, complete the slab in<br />
the same way as the base. You still<br />
need to rein<strong>for</strong>ce the slab but this<br />
time only with chicken wire.<br />
Tiled and corrugated roofs<br />
The corrugated roof is probably the easiest to construct and will last a long time, along with<br />
the tiles. Like the concrete slab you will need to build the bricks up on the chimney side to<br />
create a slant <strong>for</strong> drainage.<br />
You will need some support pieces of wood to hold the tiles or corrugated sheet. The length<br />
of theses will vary depending on your structure, but it is again important to note you will need<br />
to allow <strong>for</strong> an overhang. When you have your beams fixed then you can begin to lay your<br />
sheet or your tiles.<br />
You must make sure that they are both fixed down correctly using suitable fixings depending<br />
on your structure. The corrugated sheets need have good overlaps between them, as do the<br />
tiles. You don’t want the roof to leak. Depending on your tiles or corrugated iron you may<br />
need to seal them as required.<br />
6<br />
Figure 14: casting a flat roof from<br />
concrete
<strong>Ventilated</strong> <strong>improved</strong> <strong>pit</strong> <strong>latrine</strong>s Practical Action<br />
Finishing the roof<br />
Once the roof is complete you are ready <strong>for</strong> finishing<br />
For the cone roof and the concrete slab roof, keep the roof damp <strong>for</strong> about a week. Splash<br />
water on it and keep covered with plastic. When the <strong>latrine</strong> has dried you can paint if desired.<br />
For the corrugated and tiled roofs, there may be gaps between the wall and the roof, which<br />
may be filled with mortar. This is to stop the light getting in and so deterring flies from coming<br />
up the <strong>latrine</strong><br />
Paint the inside of the wall white to make it very easy to see when inside.<br />
References and further reading<br />
• Esrey S Et al. Ecological Sanitation. Sida, Stockholm, 1998<br />
• Reed R.A. Sustainable Sewerage. Intermediate Technology Publications, London.<br />
1995<br />
• Brandberg B. Latrine Building: A handbook <strong>for</strong> implementation of the SanPlat<br />
system. Intermediate Technology Publications, London. 1997<br />
• Laver S. Blair Latrines Builders Instruction Manual. Blair Research Laboratory.<br />
• Ryan B.A Et al. <strong>Ventilated</strong> Improved Pit Latrines: Vent Pipe Design Guidelines. The<br />
World Bank, Washington.1983<br />
• Morgan P.R Et al. <strong>Ventilated</strong> Improved Pit Latrines: Recent Developments in<br />
Zimbabwe. The World Bank, Washington, 1982<br />
• Duncan Mara, D. The Design of <strong>Ventilated</strong> Improved Pit Latrines. The World Bank,<br />
Washington, 1984.<br />
• Morgan P. Rural Water Supply and Sanitation: A Text From Zimbabwe’s Blair<br />
Research Laboratory, MacMillan Publishers, 1990<br />
7<br />
This Technical Brief by Simon Farmer is based on the <strong>Ventilated</strong> Improved Pit Latrine<br />
Construction Manual produced by UNICEF Technology Support Section, Kenya