Conduit Bending Basics (Iron - Klein Tools
Conduit Bending Basics (Iron - Klein Tools
Conduit Bending Basics (Iron - Klein Tools

Create successful ePaper yourself
Turn your PDF publications into a flip-book with our unique Google optimized e-Paper software.
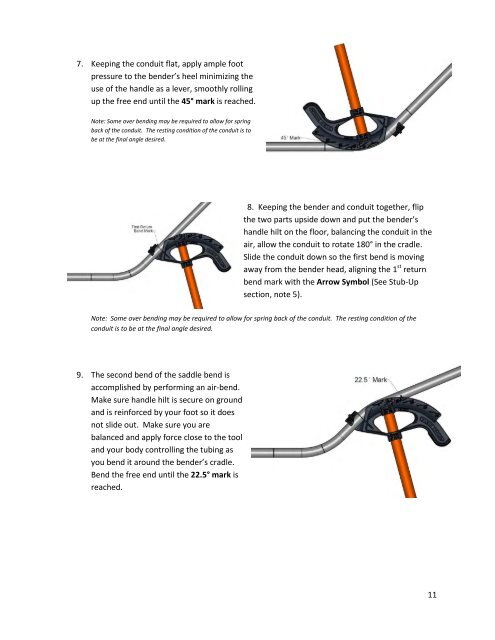
7. Keeping the conduit flat, apply ample foot<br />
pressure to the bender’s heel minimizing the<br />
use of the handle as a lever, smoothly rolling<br />
up the free end until the 45° mark is reached.<br />
Note: Some over bending may be required to allow for spring<br />
back of the conduit. The resting condition of the conduit is to<br />
be at the final angle desired.<br />
8. Keeping the bender and conduit together, flip<br />
the two parts upside down and put the bender’s<br />
handle hilt on the floor, balancing the conduit in the<br />
air, allow the conduit to rotate 180° in the cradle.<br />
Slide the conduit down so the first bend is moving<br />
away from the bender head, aligning the 1 st return<br />
bend mark with the Arrow Symbol (See Stub-Up<br />
section, note 5).<br />
Note: Some over bending may be required to allow for spring back of the conduit. The resting condition of the<br />
conduit is to be at the final angle desired.<br />
9. The second bend of the saddle bend is<br />
accomplished by performing an air-bend.<br />
Make sure handle hilt is secure on ground<br />
and is reinforced by your foot so it does<br />
not slide out. Make sure you are<br />
balanced and apply force close to the tool<br />
and your body controlling the tubing as<br />
you bend it around the bender’s cradle.<br />
Bend the free end until the 22.5° mark is<br />
reached.<br />
11