Grinding and Polishing - ASM International
Grinding and Polishing - ASM International
Grinding and Polishing - ASM International

Create successful ePaper yourself
Turn your PDF publications into a flip-book with our unique Google optimized e-Paper software.
© 2002 <strong>ASM</strong> <strong>International</strong>. All Rights Reserved.<br />
Ceramography: Preparation <strong>and</strong> Analysis of Ceramic Microstructures (#06958G) www.asminternational.org<br />
CHAPTER 4<br />
<strong>Grinding</strong> <strong>and</strong> <strong>Polishing</strong><br />
GRINDING removes saw marks <strong>and</strong> levels <strong>and</strong> cleans the specimen<br />
surface. <strong>Polishing</strong> removes the artifacts of grinding but very little stock.<br />
<strong>Grinding</strong> uses fixed abrasives—the abrasive particles are bonded to the<br />
paper or platen—for fast stock removal. <strong>Polishing</strong> uses free abrasives on<br />
a cloth; that is, the abrasive particles are suspended in a lubricant <strong>and</strong> can<br />
roll or slide across the cloth <strong>and</strong> specimen. A book edited by Marinescu et<br />
al. describes in detail the scientific aspects of ceramic abrasion processes.<br />
Some companies do not distinguish between grinding <strong>and</strong> polishing, as<br />
in the previous paragraph, but use the term lapping to mean grinding or<br />
coarse polishing with an abrasive slurry against a hard metal platen.<br />
Lapping is used in ceramography <strong>and</strong> ceramic manufacturing to produce<br />
extremely flat surfaces.<br />
Ceramographic specimens can be ground <strong>and</strong> polished manually, but<br />
automatic machines usually yield better-quality, faster, more reproducible<br />
results. Manual grinding allows better control of grinding depth than automatic<br />
grinding, which could be important when the cross section at a<br />
specific depth is of interest. Automatic equipment is much more expensive<br />
than manual machines.<br />
Diamond abrasives are recommended for grinding most ceramics, but<br />
silicon carbide (SiC) paper <strong>and</strong> cubic boron nitride (CBN) platens can also<br />
be used. End each abrasive step when the artifacts (e.g., cracks or<br />
scratches) imparted by the previous step are completely removed. Grit<br />
sizes of abrasives <strong>and</strong> micron sizes are correlated in Appendix C.<br />
Reference 1 provides a number of material-specific automatic grinding<br />
<strong>and</strong> polishing methods.<br />
Automatic <strong>Grinding</strong><br />
The pressure, time, <strong>and</strong> starting abrasive size depend on the number of<br />
mounts being ground, the abrasion resistance of the ceramic, the amount
© 2002 <strong>ASM</strong> <strong>International</strong>. All Rights Reserved.<br />
Ceramography: Preparation <strong>and</strong> Analysis of Ceramic Microstructures (#06958G)<br />
36 / Ceramography<br />
www.asminternational.org<br />
of wear on the abrasive particles, <strong>and</strong> the smoothness of the as-sawed surface.<br />
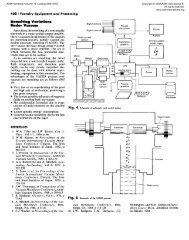
An automatic grinding <strong>and</strong> polishing machine is shown in Fig. 4.1.<br />
Automatic grinding method steps are:<br />
1. Symmetrically load three to six mounted specimens into the specimen<br />
holder of an automatic grinding-polishing machine, with the flat surface<br />
of the ceramic section downward. Most manufacturers provide a<br />
leveling tool for loading the mounts into the holder. Attach the holder<br />
to the polishing head.<br />
2. Grind the specimens at a contact pressure of 40 to 150 kPa on a bonded<br />
diamond platen for approximately 60 s or until the exposed surface of<br />
each specimen is flat <strong>and</strong> clean. Note that the pressure indicated on the<br />
grinding machine gage is usually the incoming air pressure, which is<br />
not necessarily equal to the pressure of the specimens against the<br />
platen. Perforated or grooved platens are available that aid in the removal<br />
of swarf. Experiment with the abrasive size, contact pressure,<br />
relative rotation directions (same or opposite), <strong>and</strong> frequencies shown<br />
subsequently to attain the best results. Typical machine settings:<br />
Abrasive 240–400-grit (60–40 µm) metal- or<br />
resin-bonded diamond<br />
Time 30–60 s (or until specimen is flat <strong>and</strong><br />
saw marks are removed)<br />
Lubricant Water sprayed continuously<br />
Head air pressure (e.g., 210 kPa, 2.1 bar, or 30 psi<br />
Buehler machines)<br />
Head force (e.g., 200 N<br />
Struers machines)<br />
Platen frequency 200–300 rpm<br />
Head frequency 100–150 rpm<br />
Head direction Opposite to platen<br />
Contact pressure or frequency that is too high could damage the specimens<br />
or machine <strong>and</strong> shorten the life of the polishing cloth in the polishing<br />
steps. Contact pressure or frequency that is too low slows the<br />
rate of stock removal <strong>and</strong> can prevent any significant abrasion at all.<br />
3. Remove the specimen holder from the machine <strong>and</strong> clean the specimens,<br />
as in Subroutine 4.1, but do not remove the specimens from the<br />
holder until the last polishing step is complete. Once clean, return the<br />
specimen holder to the machine for polishing or more grinding in successive<br />
steps on ever-finer abrasives <strong>and</strong> follow each step with thorough<br />
cleaning. In many cases, all the grinding can be accomplished in<br />
a single step, such as in the procedure described in Table 4.1.<br />
Automatic <strong>Polishing</strong><br />
After the finest grinding step, polish the specimens on napless polishing<br />
cloths loaded with lubricant <strong>and</strong> progressively smaller diamond abrasives.
© 2002 <strong>ASM</strong> <strong>International</strong>. All Rights Reserved.<br />
Ceramography: Preparation <strong>and</strong> Analysis of Ceramic Microstructures (#06958G) www.asminternational.org<br />
Subroutine 4.1: Cleaning Ceramographic Mounts<br />
After each abrasive step, rinse each specimen in warm tap<br />
water. Do not remove specimens from the holder if an automatic<br />
polishing machine is being used. Use distilled or deionized<br />
water if the tap water is too hard. Keep a 250 to 400 mL<br />
beaker of distilled water containing a laboratory detergent, such<br />
as Micro-90 or Alconox, on a hotplate at 60 to 80 °C. Swab<br />
each specimen with a cotton ball soaked in the warm, soapy<br />
water. If the ultrasonic bath is wide enough, ultrasonicate the<br />
entire specimen holder. Support the holder on a ring mold or<br />
something similar to prevent the polished faces from touching<br />
the basket or tank. Rinse each specimen again in warm tap<br />
water or deionized water.<br />
After the last abrasive step, remove the mounts from the<br />
holder if automatically polished, swab as mentioned previously,<br />
<strong>and</strong> clean one more time in warm distilled water in an ultrasonic<br />
bath for 1 to 2 min. Quickly remove each mount from the<br />
ultrasonic bath, rinse with distilled water, spray with ethanol,<br />
<strong>and</strong> dry under a heat gun.<br />
Fig. 4.1 Automatic grinding <strong>and</strong> polishing machine<br />
<strong>Grinding</strong> <strong>and</strong> <strong>Polishing</strong> / 37
© 2002 <strong>ASM</strong> <strong>International</strong>. All Rights Reserved.<br />
Ceramography: Preparation <strong>and</strong> Analysis of Ceramic Microstructures (#06958G)<br />
38 / Ceramography<br />
www.asminternational.org<br />
Diamond polishing abrasives are typically available in 30, 15, 9, 6, 3, 1,<br />
<strong>and</strong> 0.25 µm sizes, in liquid suspensions, pastes, <strong>and</strong> aerosols. The suspensions<br />
can be automatically sprayed by some machines at timed intervals.<br />
Not every diamond size available is used or necessary in the procedure<br />
in Table 4.1. The transition from grinding to polishing may require<br />
additional time on the coarse polishing step to remove the artifacts of<br />
grinding. If paste is used, reapply it to the polishing cloth every few minutes.<br />
All types of diamond abrasives break down quickly <strong>and</strong> should be replenished<br />
frequently. Follow each polishing step with a thorough cleaning,<br />
as in Subroutine 4.1.<br />
Use napless cloth for diamond pastes or suspensions <strong>and</strong> napped cloth<br />
for the alumina slurry or colloidal silica. Napless cloth is a stiff, nonwoven<br />
PVC chemotextile sold under such trade names as Texmet, Pellon,<br />
DP-Plan, MD-Plan, <strong>and</strong> Pan-W. Nonwoven, fiber-reinforced-resin perforated<br />
pads <strong>and</strong> woven silk also work well for polishing ceramics with diamond<br />
pastes <strong>and</strong> suspensions. Flocked twill or napped cloth has a fuzzy<br />
texture that conforms to the surface being polished.<br />
Spread diamond paste, if used, on the cloth with a clean, gloved finger,<br />
along with additional lubricant. <strong>Polishing</strong> lubricants come under various<br />
names, including lapping oil, diamond extender, <strong>and</strong> blue lubricant. Be<br />
careful not to contaminate the paper with larger-size abrasive particles.<br />
Replace torn cloths immediately, being careful to smooth out any wrinkles<br />
or bubbles in the new cloth. Use xylene to dissolve the adhesive when removing<br />
worn-out cloth from the platen. Wear rubber gloves when using<br />
xylene. A worn-out cloth is easier to remove if the platen is first warmed<br />
with a heat gun. Platens tend to heat up during polishing <strong>and</strong> may require<br />
air cooling between intervals in order to prevent the polishing cloth from<br />
peeling or rupturing.<br />
Step 5(a) in Table 4.1, relief polishing, is optional. Relief polishing is<br />
not recommended when the specimen is to be tested for microhardness;<br />
Table 4.1 A typical ceramographic grinding <strong>and</strong> polishing procedure for an automatic polishing machine<br />
Platen Head<br />
Step Abrasive <strong>and</strong> lubricant Time, min frequency, rpm frequency, rpm<br />
1. Plane grinding 240-grit bonded diamond disc sprayed 0.5–1 (or until specimen is flat 200–300 120–150 opposite<br />
continuously with water <strong>and</strong> saw marks are removed) to platen<br />
2. Coarse polishing 15 µm diamond suspended in water-soluble 5–10 120–150 120–150 opposite<br />
oil, sprayed every 20–30 s on napless paper to platen<br />
3. <strong>Polishing</strong> 6 µm diamond suspended in water-soluble oil, 5–10 120–150 120–150 opposite<br />
sprayed every 20–30 s on napless paper to platen<br />
4. Fine polishing 1 µm diamond suspended in water-soluble oil, 5–10 120–150 120–150 opposite<br />
sprayed every 20–30 s on napless paper to platen<br />
5(a) Relief polishing 0.05 µm γ-Al 2O 3 slurry sprayed every 1–5 120–150 120–150<br />
(optional) 20–30 s on napped cloth<br />
5(b) Vibratory Colloidal silica slurry, replenished every 60–480 . . . . . .<br />
polishing (optional) 30–60 min on napped cloth<br />
Note: For machines without timed spraying, the slurries can be poured from squeeze bottles or aerosols, or diamond pastes can be used instead.<br />
Source: Ref 2
© 2002 <strong>ASM</strong> <strong>International</strong>. All Rights Reserved.<br />
Ceramography: Preparation <strong>and</strong> Analysis of Ceramic Microstructures (#06958G) www.asminternational.org<br />
when edge retention is critical, such as on thin plates; or when the specimen<br />
will be viewed in high magnification, such as fine-grained microstructures.<br />
Relief polishing in conjuction with Nomarski differential<br />
interference contrast (see Chapter 7) can enhance the contrast at low magnification<br />
by means of differential abrasion rates between harder <strong>and</strong><br />
softer phases, for example, Al 2O 3 <strong>and</strong> intergranular glass in 85 to 98% alumina<br />
compositions, SiC <strong>and</strong> silicon in reaction-bonded silicon carbide,<br />
<strong>and</strong> between adjacent grains of MgAl 2O 4 spinel. Relief polishing can also<br />
polish the metal components in cross sections of microelectronic devices.<br />
Vibratory polishing with colloidal silica or alumina slurry, step 5(b) in<br />
Table 4.1, is another final polish technique. Each mounted specimen is<br />
clamped into a heavy brass or stainless steel cuplike holder. The weighted<br />
mount glides freely around a damp, napped polishing cloth on a vibrating<br />
platen for hours at a time. This method works very well for soft metals <strong>and</strong><br />
semiconductors <strong>and</strong> is useful for some harder metals <strong>and</strong> ceramics.<br />
Ceramics that have low abrasion resistance <strong>and</strong> are not easily polished,<br />
such as AlN oftentimes, may be adequately polished by vibration on colloidal<br />
silica for 8 h. The colloidal silica suspension should be replenished<br />
every hour or so, a few milliliters at a time, <strong>and</strong> the napped cloth must remain<br />
damp.<br />
In some cases, a corrosive liquid is used along with the relief polishing<br />
slurry in a technique called attack polish. Attack polish combines mild<br />
etching <strong>and</strong> final polishing into a single step. Colloidal silica is suspended<br />
in a caustic solution that has an attack-polish effect on some materials.<br />
Either colloidal silica or a 1 to 10 mixture of Murakami’s solution (see<br />
Table 5.1) to 0.05 µm γ-Al 2O 3 is recommended for the final polishing step<br />
on alumina with an abundant glass phase (Ref. 1). Murakami’s solution is<br />
3 g KOH <strong>and</strong> 30 g K 3Fe(CN) 6 in 60 mL distilled water. The attack polishing<br />
slurry is applied to chemically resistant synthetic fiber cloth rotating<br />
at 120 rpm for 30 min. The load is 15 N per 31.8 mm (1.25 in.)<br />
mounted specimen.<br />
Manual <strong>Grinding</strong><br />
The manual method is useful when automatic equipment is not available<br />
or when the depth of grinding is critical. Cross sections of microelectronic<br />
devices, such as multiplayer packages, often must be ground to<br />
a specific depth.<br />
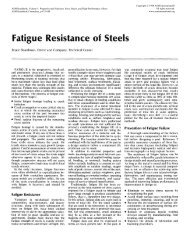
To grind a ceramographic section manually, choose a reference point on<br />
the specimen, such as point Q in the 12 o’clock position shown in<br />
Fig. 4.2(a). Hold the specimen surface firmly against the abrasive disc or<br />
belt such that the reference point is fixed with respect to the direction of<br />
abrasive motion. Continue grinding until the saw marks are replaced by<br />
<strong>Grinding</strong> <strong>and</strong> <strong>Polishing</strong> / 39
© 2002 <strong>ASM</strong> <strong>International</strong>. All Rights Reserved.<br />
Ceramography: Preparation <strong>and</strong> Analysis of Ceramic Microstructures (#06958G)<br />
40 / Ceramography<br />
www.asminternational.org<br />
the parallel scratches of the first abrasive, as in Fig. 4.2(b). Clean the<br />
ground surface as described in Subroutine 4.1. Rotate the reference point<br />
Q to the 3 o’clock position, as in Fig. 4.2(c), <strong>and</strong> grind the specimen on<br />
the next finer abrasive until the previous artifacts are removed.<br />
The new parallel scratches lie at a 90° angle to the previous ones, as in<br />
Fig. 4.2(d). Rotation of the mount by 90° after each abrasive step (Fig.<br />
4.2e) allows one to easily see when the artifacts of the previous preparation<br />
step have been removed. Clean the mount thoroughly after each step,<br />
as in Subroutine 4.1, to prevent transfer of abrasive particles from one<br />
platen to the next.<br />
In many cases, all the grinding can be accomplished in a single step.<br />
Manual <strong>Polishing</strong><br />
After the finest grinding step <strong>and</strong> subsequent cleaning, manually polish<br />
the specimen on napless polishing cloths loaded with lubricant <strong>and</strong> 15, 6,<br />
<strong>and</strong> 1 µm diamond paste, respectively. Rotate the specimen 90°, as in Fig.<br />
4.2(a–e), <strong>and</strong> clean it thoroughly, as in Subroutine 4.1, after each polishing<br />
step. The relief polishing step with 0.05 µm γ-Al 2O 3 suspension is optional.<br />
The evolution of the microstructure as a result of each polishing<br />
step is demonstrated in Fig. 4.3(a–d).<br />
<strong>Grinding</strong> <strong>and</strong> <strong>Polishing</strong> Accessories<br />
Lubricants. <strong>Grinding</strong> <strong>and</strong> polishing lubricants are widely used in ceramography;<br />
dry grinding is extremely rare. The lubricant facilitates the interaction<br />
between the abrasive <strong>and</strong> the specimen, whether the abrasive is<br />
(a)<br />
Q<br />
Fig. 4.2<br />
(b)<br />
Q<br />
Abrasion<br />
Q<br />
(c) (d)<br />
Sequence of steps in manual grinding <strong>and</strong> polishing (Ref 2). (a) As-sawed, asmounted<br />
surface. (b) The surface in (a) has been removed by a coarse abrasive.<br />
Point Q is fixed with respect to the abrasive direction indicated by the arrow. (c) The mount<br />
has been rotated 90°, <strong>and</strong> the surface in (b) has been partially removed by the next finer abrasive.<br />
(d) The finer abrasive has removed all the artifacts from the previous abrasive step. (e) For<br />
the next step, Q is rotated to the 6 o’clock position <strong>and</strong> ground or polished until this surface is<br />
removed by the next finer abrasive. Point Q would be rotated again, to the 9 o’clock position,<br />
for the step after that.<br />
Q<br />
(e)<br />
Q
© 2002 <strong>ASM</strong> <strong>International</strong>. All Rights Reserved.<br />
Ceramography: Preparation <strong>and</strong> Analysis of Ceramic Microstructures (#06958G) www.asminternational.org<br />
fixed or free. The grinding lubricant acts as a coolant to prevent heat<br />
buildup from friction, transports the swarf away from the platen <strong>and</strong> specimen,<br />
<strong>and</strong> uniformly distributes the contact stresses between the platen<br />
<strong>and</strong> the specimen during grinding. The polishing lubricant adheres the<br />
abrasive <strong>and</strong> swarf to the paper to prevent dust, enables the abrasive<br />
Fig. 4.3 Evolution of microstructure in a 96% Al 2O 3 substrate after a series<br />
of manual polishing steps. (a) Substrate after manual polish with<br />
15 µm diamond paste. The top <strong>and</strong> left edges of the photo are also the specimen<br />
edges. The concentration of voids increases from edge to center <strong>and</strong> therefore are<br />
not true pores. The scratches from the abrasive are horizontal. (b) The same corner<br />
of the substrate after manual polish with 6 µm diamond paste. The scratches<br />
from the abrasive are now vertical, the specimen having been rotated 90°. The apparent<br />
“porosity” has decreased significantly. (c) The same corner of the substrate<br />
after manual polish with 3 µm diamond paste. The scratches are horizontal once<br />
again, following another 90° rotation of the specimen. The size <strong>and</strong> quantity of<br />
pluckouts continue to decrease. (d) The same corner of the substrate after manual<br />
polish with 1 µm diamond paste. The specimen was initially rotated 90° <strong>and</strong> polished<br />
linearly to remove the 3 µm scratches, then polished in a rotational motion<br />
opposite to the polishing wheel such that the last scratches are in all directions.<br />
The dark spots in the photo are mostly true pores rather than pluckouts.<br />
<strong>Grinding</strong> <strong>and</strong> <strong>Polishing</strong> / 41
© 2002 <strong>ASM</strong> <strong>International</strong>. All Rights Reserved.<br />
Ceramography: Preparation <strong>and</strong> Analysis of Ceramic Microstructures (#06958G)<br />
42 / Ceramography<br />
www.asminternational.org<br />
particles to roll <strong>and</strong> slide easily between the paper <strong>and</strong> the specimen, <strong>and</strong><br />
uniformly distributes the contact stresses between the paper <strong>and</strong> the specimen<br />
during polishing.<br />
Tap water is the most common lubricant for grinding <strong>and</strong> lapping. The<br />
water can be recirculated from a reservoir, but the reservoir should contain<br />
a series of weirs <strong>and</strong> an outlet filter to trap the swarf <strong>and</strong> prevent it<br />
from being recirculated along with the water. Corrosion-inhibiting chemicals<br />
<strong>and</strong> algicides can be added to the reservoir. The water in the reservoir<br />
should be replenished often, even daily. The reservoir should be thoroughly<br />
cleaned <strong>and</strong> filled with fresh water every few months, depending<br />
on frequency of use. Specimens that are soluble in or easily corroded by<br />
water should be ground with a nonaqueous lubricant, such as oil or filtered<br />
kerosene.<br />
Water-soluble lubricants that have an oily feel are recommended for<br />
most polishing applications. The water-soluble lubricants are easily<br />
washed away in warm tap water or by a swab in warm, soapy water. Oilbased<br />
<strong>and</strong> other nonaqueous lubricants can be used for polishing but are<br />
not as easy to remove. Nonaqueous lubricants are recommended for ceramics<br />
<strong>and</strong> minerals that are easily dissolved in water. Diamond pastes<br />
<strong>and</strong> slurries are usually available as either water- or oil-based suspensions.<br />
Diamond pastes <strong>and</strong> aerosols require additional lubricant on the polishing<br />
paper. <strong>Polishing</strong> lubricants are sold under names such as blue lubricant or<br />
diamond extender.<br />
Abrasives. While diamond particles are emphasized in this text as the<br />
abrasive of choice for ceramographic grinding <strong>and</strong> polishing, they are not<br />
Table 4.2 <strong>Polishing</strong> textiles <strong>and</strong> their characteristics<br />
Cloth Trade names Description <strong>and</strong> applications<br />
Billiard . . . Wool sheared pile for rough polishing of ferrous metals with<br />
alumina or diamond<br />
Canvas Duck cloth Rough polishing of metals<br />
Cotton Metcloth, MD/DP-Mol Tightly woven cotton for rough polishing of metals with<br />
alumina or diamond<br />
Flocked twill Lecloth, Microcloth, SP-PoliFloc, Rayon fibers woven in a cotton back; medium nap; for final<br />
Suede Cloth, DP/MD-Plus polishing with gamma alumina<br />
Metal mesh Ultra-Plan, DP-Net Wire cloth for coarse polishing harder materials<br />
Napless Texmet, Pellon, DP-Plan, Nonwoven PVC chemotextile for coarse <strong>and</strong> fine polishing<br />
MD-Plan, Pan-W with diamond or alumina<br />
Nylon Imperial, DP-Nylon Napless nylon for intermediate polishing with diamond<br />
Perforated pad Polimet Hard, nonwoven, fiber-reinforced resin with an array of<br />
perforations for fast removal of hard materials<br />
Felt Red felt, OP-Felt Wool plucked pile for intermediate polishing of ferrous<br />
metals with diamond<br />
Silk Technotron, DP/MD-Dur Woven silk; hard cloth; for intermediate polishing with<br />
diamond. Excellent for keeping hard materials flat<br />
Selvyt Velveteen, MD/DP/OP-Nap Medium nap cotton for intermediate polishing with<br />
diamond or alumina<br />
Velvet Rayvel, Mastertex Synthetic velvet with long nap; for final polishing of<br />
soft materials<br />
Source: Ref 4
© 2002 <strong>ASM</strong> <strong>International</strong>. All Rights Reserved.<br />
Ceramography: Preparation <strong>and</strong> Analysis of Ceramic Microstructures (#06958G)<br />
<strong>Grinding</strong> <strong>and</strong> <strong>Polishing</strong> / 43<br />
www.asminternational.org<br />
the only abrasives on the market. Diamonds are available in both natural<br />
(mined) <strong>and</strong> synthetic (made in a factory) forms. The synthetic diamonds<br />
can be manufactured to have better cutting edges than the natural<br />
diamonds.<br />
Silicon carbide paper is widely used in metallographic grinding <strong>and</strong> can<br />
be used for ceramics, too, but tends to be short-lived. Cubic boron nitride<br />
is available in metal-bonded discs, <strong>and</strong> CBN discs <strong>and</strong> 240-grit SiC paper<br />
can be used for coarse polishing in lieu of metal-bonded diamond discs.<br />
Reference 3 describes the characteristics of abrasives <strong>and</strong> abrasion of<br />
ceramics.<br />
Powders of silicon carbide, cerium oxide, cesium oxide, ferric oxide<br />
(jeweler’s rouge, Fe 2O 3), gamma alumina, chromia (Cr 2O 3), magnesia<br />
(MgO), <strong>and</strong> colloidal silica are used in some metallographic <strong>and</strong> lapidary<br />
polishing applications <strong>and</strong> may have niche applications in ceramography.<br />
Colloidal silica is submicron crystalline SiO 2 particles suspended in a<br />
caustic solution <strong>and</strong> is commonly used with vibratory polishers to finalpolish<br />
AlN <strong>and</strong> many other ceramics. Gamma alumina (γ-Al 2O 3), formed<br />
by incomplete dehydroxylation of Al(OH) 3, is metastable in the cubic<br />
phase <strong>and</strong> used for relief polish. In general, the abrasive should be harder<br />
than the specimen, which is why diamond is preferred for grinding <strong>and</strong><br />
polishing ceramics.<br />
Some abrasive discs have channels, perforations, or gaps between clusters<br />
of abrasive particles to fa cilitate swarf removal. The perforated discs are preferred<br />
by many ceramographers over conventional fixed-abrasive discs.<br />
<strong>Polishing</strong> Textiles. Most of the metallographic consumables vendors<br />
listed in Appendix B can provide samples of the many kinds of polishing<br />
cloths that they offer, on request. The samples typically come as 2 cm circles<br />
attached to a paperboard display, with a brief description of each type.<br />
Only the nonwoven, napless type of cloth is recommended in this text for<br />
polishing with diamond abrasives, although other cloths may have applications<br />
in ceramography, especially the perforated pads. The napped,<br />
flocked twill is recommended only for relief polishing with colloidal silica<br />
or γ-Al 2O 3. Some other polishing cloths are described in Table 4.2<br />
(Ref 4). Magnified images of the textile fibers are shown in Ref 5.<br />
REFERENCES<br />
1. G. Elssner, H. Hoven, G. Kiessler, <strong>and</strong> P. Wellner, Ceramics <strong>and</strong> Ceramic<br />
Composites: Materialographic Preparation, R. Wert, Trans.,<br />
Elsevier Science Inc., 1999, p 74–133<br />
2. R.E. Chinn, Preparation of Microstructures of Alumina Ceramics,<br />
Structure, Vol 33, 1998, p 16–20<br />
3. E. Ratterman <strong>and</strong> R. Cassidy, Abrasives, Ceramics <strong>and</strong> Glasses, Vol 4,<br />
Engineered Materials H<strong>and</strong>book, <strong>ASM</strong> <strong>International</strong>, 1991, p 329–335
© 2002 <strong>ASM</strong> <strong>International</strong>. All Rights Reserved.<br />
Ceramography: Preparation <strong>and</strong> Analysis of Ceramic Microstructures (#06958G)<br />
44 / Ceramography<br />
www.asminternational.org<br />
4. L. Dillinger, “<strong>Polishing</strong>,” Met-Tips 13, Leco Corp., 1985<br />
5. G.F. V<strong>and</strong>er Voort, Metallography: Principles <strong>and</strong> Practice, <strong>ASM</strong> <strong>International</strong>,<br />
1999, p 104–107<br />
SUGGESTED READING<br />
• I.D. Marinescu, H.K. Tonshoff, <strong>and</strong> I. Inasaki, Ed., H<strong>and</strong>book of<br />
Ceramic <strong>Grinding</strong> <strong>and</strong> <strong>Polishing</strong>, Noyes Publications/William<br />
Andrew Publishing, LLC, 2000
<strong>ASM</strong> <strong>International</strong> is the society for materials<br />
engineers <strong>and</strong> scientists, a worldwide network<br />
dedicated to advancing industry, technology, <strong>and</strong><br />
applications of metals <strong>and</strong> materials.<br />
<strong>ASM</strong> <strong>International</strong>, Materials Park, Ohio, USA<br />
www.asminternational.org<br />
This publication is copyright © <strong>ASM</strong> <strong>International</strong> ® . All rights reserved.<br />
Publication title Product code<br />
Ceramography: Preparation <strong>and</strong> Analysis of Ceramic<br />
Microstructures<br />
06958G<br />
To order products from <strong>ASM</strong> <strong>International</strong>:<br />
Online Visit www.asminternational.org/bookstore<br />
Telephone 1-800-336-5152 (US) or 1-440-338-5151 (Outside US)<br />
Fax 1-440-338-4634<br />
Mail<br />
Customer Service, <strong>ASM</strong> <strong>International</strong><br />
9639 Kinsman Rd, Materials Park, Ohio 44073-0002, USA<br />
Email CustomerService@asminternational.org<br />
In Europe<br />
In Japan<br />
American Technical Publishers Ltd.<br />
27-29 Knowl Piece, Wilbury Way, Hitchin Hertfordshire SG4 0SX,<br />
United Kingdom<br />
Telephone: 01462 437933 (account holders), 01462 431525 (credit card)<br />
www.ameritech.co.uk<br />
Neutrino Inc.<br />
Takahashi Bldg., 44-3 Fuda 1-chome, Chofu-Shi, Tokyo 182 Japan<br />
Telephone: 81 (0) 424 84 5550<br />
Terms of Use. This publication is being made available in PDF format as a benefit to members <strong>and</strong><br />
customers of <strong>ASM</strong> <strong>International</strong>. You may download <strong>and</strong> print a copy of this publication for your<br />
personal use only. Other use <strong>and</strong> distribution is prohibited without the express written permission of<br />
<strong>ASM</strong> <strong>International</strong>.<br />
No warranties, express or implied, including, without limitation, warranties of merchantability or<br />
fitness for a particular purpose, are given in connection with this publication. Although this<br />
information is believed to be accurate by <strong>ASM</strong>, <strong>ASM</strong> cannot guarantee that favorable results will be<br />
obtained from the use of this publication alone. This publication is intended for use by persons having<br />
technical skill, at their sole discretion <strong>and</strong> risk. Since the conditions of product or material use are<br />
outside of <strong>ASM</strong>'s control, <strong>ASM</strong> assumes no liability or obligation in connection with any use of this<br />
information. As with any material, evaluation of the material under end-use conditions prior to<br />
specification is essential. Therefore, specific testing under actual conditions is recommended.<br />
Nothing contained in this publication shall be construed as a grant of any right of manufacture, sale,<br />
use, or reproduction, in connection with any method, process, apparatus, product, composition, or<br />
system, whether or not covered by letters patent, copyright, or trademark, <strong>and</strong> nothing contained in this<br />
publication shall be construed as a defense against any alleged infringement of letters patent,<br />
copyright, or trademark, or as a defense against liability for such infringement.