
Create successful ePaper yourself
Turn your PDF publications into a flip-book with our unique Google optimized e-Paper software.
!<br />
WARNING<br />
Eye protection must be worn when disassembling tool or when air line is<br />
turned on. A self-relieving valve in close proximity to the repair station to<br />
bleed off air is recommended.<br />
The CLECO "E" series riveters and "16" series<br />
chippers are designed to operate on 90 psig air<br />
pressure using a 5/16" I.D. hose up to 8' in<br />
length. If additional length is required, a 3/8" I.D.<br />
or larger hose should be connected to the 5/16"<br />
hose.<br />
The air hose should be cleared of accumulated<br />
dirt and moisture, then one-half (1/2) teaspoon<br />
of 10W machine oil should be poured into the<br />
tool's air inlet before connecting the hose to the<br />
tool.<br />
Important: The handle should be checked after<br />
the first eight hours of operation and occasionally<br />
thereafter to make sure it is tight.<br />
LUBRICATION<br />
An automatic in-line filter-regulator-lubricator is<br />
recommended as it increases tool life and keeps<br />
the tool in sustained operation. The in-line lubricator<br />
should be regularly checked and filled with<br />
a good grade of 10W machine oil. Never use a<br />
heavy oil, as this will cause a loss of efficiency.<br />
Proper adjustment of<br />
the in-line lubricator<br />
is performed by placing<br />
a sheet of paper<br />
next to the exhaust<br />
ports and holding the<br />
throttle open for approximately<br />
30 seconds.<br />
The lubricator<br />
is properly set when<br />
a light stain of oil collects<br />
on the paper.<br />
Excessive amounts<br />
of oil should be<br />
avoided.<br />
If the operation of the chipper becomes sluggish<br />
or erratic, pour one teaspoon of kerosene into<br />
OPERATING INSTRUCTIONS<br />
the air inlet and operate the tool for a few<br />
seconds. Lubricate the tool as explained above<br />
after flushing.<br />
STORAGE<br />
In the event that it becomes necessary to store<br />
the tool for an extended period of time (overnight,<br />
weekend, etc.), it should receive a generous<br />
almount of lubrication at that time and again<br />
when returned to service. Store the tool in a<br />
clean and dry environment. Alternatively, chippers<br />
and scalers may be put in a bucket of<br />
kerosene or light oil for extended periods of<br />
storage such as weekends or plant shutdowns.<br />
The tool should always be lubricated before<br />
storage and when being returned to service.<br />
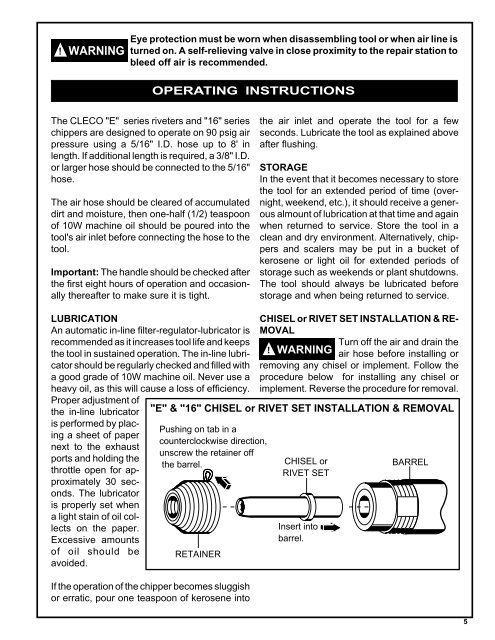
CHISEL or RIVET SET INSTALLATION & RE-<br />
MOVAL<br />
!<br />
WARNING<br />
Turn off the air and drain the<br />
air hose before installing or<br />
removing any chisel or implement. Follow the<br />
procedure below for installing any chisel or<br />
implement. Reverse the procedure for removal.<br />
"E" & "16" CHISEL or RIVET SET INSTALLATION & REMOVAL<br />
Pushing on tab in a<br />
counterclockwise direction,<br />
unscrew the retainer off<br />
the barrel.<br />
RETAINER<br />
CHISEL or<br />
RIVET SET<br />
Insert into<br />
barrel.<br />
BARREL<br />
5