Mini TightRope® For Hallux Valgus Correction and Lisfranc ...
Mini TightRope® For Hallux Valgus Correction and Lisfranc ...
Mini TightRope® For Hallux Valgus Correction and Lisfranc ...
You also want an ePaper? Increase the reach of your titles
YUMPU automatically turns print PDFs into web optimized ePapers that Google loves.
a<br />
1<br />
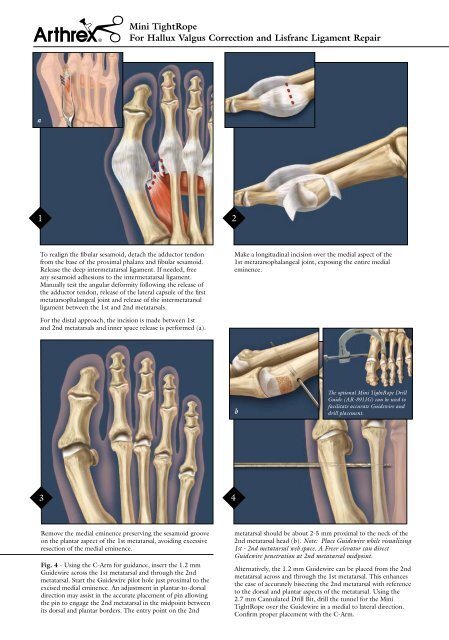
To realign the fibular sesamoid, detach the adductor tendon<br />
from the base of the proximal phalanx <strong>and</strong> fibular sesamoid.<br />
Release the deep intermetatarsal ligament. If needed, free<br />
any sesamoid adhesions to the intermetatarsal ligament.<br />
Manually test the angular deformity following the release of<br />
the adductor tendon, release of the lateral capsule of the first<br />
metatarsophalangeal joint <strong>and</strong> release of the intermetatarsal<br />
ligament between the 1st <strong>and</strong> 2nd metatarsals.<br />
<strong>For</strong> the distal approach, the incision is made between 1st<br />
<strong>and</strong> 2nd metatarsals <strong>and</strong> inner space release is performed (a).<br />
3 4<br />
Remove the medial eminence preserving the sesamoid groove<br />
on the plantar aspect of the 1st metatarsal, avoiding excessive<br />
resection of the medial eminence.<br />
Fig. 4 - Using the C-Arm for guidance, insert the 1.2 mm<br />
Guidewire across the 1st metatarsal <strong>and</strong> through the 2nd<br />
metatarsal. Start the Guidewire pilot hole just proximal to the<br />
excised medial eminence. An adjustment in plantar-to-dorsal<br />
direction may assist in the accurate placement of pin allowing<br />
the pin to engage the 2nd metatarsal in the midpoint between<br />
its dorsal <strong>and</strong> plantar borders. The entry point on the 2nd<br />
<strong>Mini</strong> TightRope<br />
<strong>For</strong> <strong>Hallux</strong> <strong>Valgus</strong> <strong>Correction</strong> <strong>and</strong> <strong>Lisfranc</strong> Ligament Repair<br />
2<br />
Make a longitudinal incision over the medial aspect of the<br />
1st metatarsophalangeal joint, exposing the entire medial<br />
eminence.<br />
b<br />
The optional <strong>Mini</strong> TightRope Drill<br />
Guide (AR-8911G) can be used to<br />
facilitate accurate Guidewire <strong>and</strong><br />
drill placement.<br />
metatarsal should be about 2-5 mm proximal to the neck of the<br />
2nd metatarsal head (b). Note: Place Guidewire while visualizing<br />
1st - 2nd metatarsal web space. A Freer elevator can direct<br />
Guidewire penetration at 2nd metatarsal midpoint.<br />
Alternatively, the 1.2 mm Guidewire can be placed from the 2nd<br />
metatarsal across <strong>and</strong> through the 1st metatarsal. This enhances<br />
the ease of accurately bisecting the 2nd metatarsal with reference<br />
to the dorsal <strong>and</strong> plantar aspects of the metatarsal. Using the<br />
2.7 mm Cannulated Drill Bit, drill the tunnel for the <strong>Mini</strong><br />
TightRope over the Guidewire in a medial to lateral direction.<br />
Confirm proper placement with the C-Arm.


