
You also want an ePaper? Increase the reach of your titles
YUMPU automatically turns print PDFs into web optimized ePapers that Google loves.
<strong>Psoas</strong> <strong>Syndrome</strong><br />
1<br />
Dr. Diderik Finne<br />
The iliopsoas muscle is a major body mover but seldom considered as a source of pain.<br />
Chronic lower back pain involving the hips, legs, or thoracic regions can often be traced to<br />
an iliopsoas muscle spasm.<br />
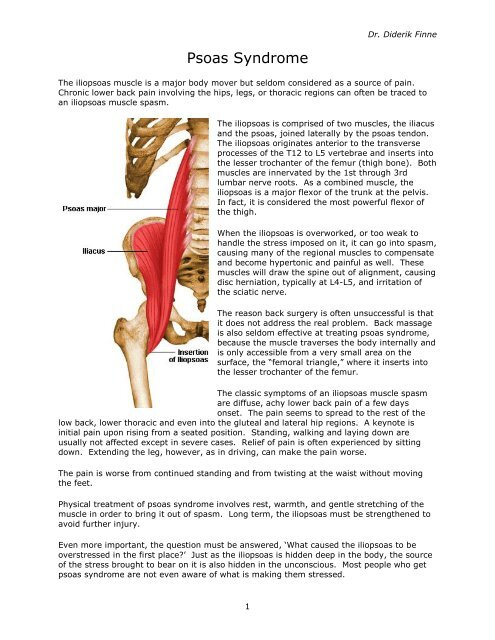
The iliopsoas is <strong>com</strong>prised of two muscles, the iliacus<br />
and the psoas, joined laterally by the psoas tendon.<br />
The iliopsoas originates anterior to the transverse<br />
processes of the T12 to L5 vertebrae and inserts into<br />
the lesser trochanter of the femur (thigh bone). Both<br />
muscles are innervated by the 1st through 3rd<br />
lumbar nerve roots. As a <strong>com</strong>bined muscle, the<br />
iliopsoas is a major flexor of the trunk at the pelvis.<br />
In fact, it is considered the most powerful flexor of<br />
the thigh.<br />
When the iliopsoas is overworked, or too weak to<br />
handle the stress imposed on it, it can go into spasm,<br />
causing many of the regional muscles to <strong>com</strong>pensate<br />
and be<strong>com</strong>e hypertonic and painful as well. These<br />
muscles will draw the spine out of alignment, causing<br />
disc herniation, typically at L4-L5, and irritation of<br />
the sciatic nerve.<br />
The reason back surgery is often unsuccessful is that<br />
it does not address the real problem. Back massage<br />
is also seldom effective at treating psoas syndrome,<br />
because the muscle traverses the body internally and<br />
is only accessible from a very small area on the<br />
surface, the “femoral triangle,” where it inserts into<br />
the lesser trochanter of the femur.<br />
The classic symptoms of an iliopsoas muscle spasm<br />
are diffuse, achy lower back pain of a few days<br />
onset. The pain seems to spread to the rest of the<br />
low back, lower thoracic and even into the gluteal and lateral hip regions. A keynote is<br />
initial pain upon rising from a seated position. Standing, walking and laying down are<br />
usually not affected except in severe cases. Relief of pain is often experienced by sitting<br />
down. Extending the leg, however, as in driving, can make the pain worse.<br />
The pain is worse from continued standing and from twisting at the waist without moving<br />
the feet.<br />
Physical treatment of psoas syndrome involves rest, warmth, and gentle stretching of the<br />
muscle in order to bring it out of spasm. Long term, the iliopsoas must be strengthened to<br />
avoid further injury.<br />
Even more important, the question must be answered, ‘What caused the iliopsoas to be<br />
overstressed in the first place?’ Just as the iliopsoas is hidden deep in the body, the source<br />
of the stress brought to bear on it is also hidden in the unconscious. Most people who get<br />
psoas syndrome are not even aware of what is making them stressed.
In my experience, <strong>home</strong>opathic treatment is the most effective for dealing with the<br />
underlying issues and should be used in conjunction with physical therapy.<br />
2<br />
Dr. Diderik Finne<br />
The following series of exercises are designed first to stretch, then strengthen the iliopsoas.<br />
Some of the poses are demonstrated in animation at the following website:<br />
http://www.bandhayoga.<strong>com</strong>/keys_psoas.html.<br />
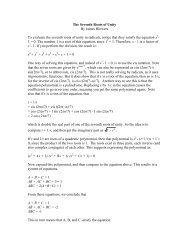
Begin the sequence with a gentle stretch, a modified Pavanamuktasana (Wind Removing<br />
Pose):<br />
1. Lying on your back with a small pillow or<br />
cushion under your head, bring your left<br />
leg up and clasp it at the knee. Keep your<br />
neck relaxed and scapulas anchored.<br />
2. Breathe in.<br />
3. While breathing out, slowly stretch your<br />
right leg out along the floor. It is more<br />
important to keep the pelvis stable than to<br />
totally straighten the leg.<br />
4. Breathe in.<br />
5. While breathing out, bring your right leg back<br />
to the start position.<br />
Repeat twice each side.<br />
This stretch ac<strong>com</strong>plishes the following:<br />
1. Gently lengthens the <strong>Psoas</strong> to its required length without danger of overstretching.<br />
2. Stabilizes the pelvis and helps to avoid low back pain.<br />
3. Limbers up the <strong>Psoas</strong> in preparation for strengthening exercises.<br />
If the iliopsoas is in acute spasm, you should do nothing more than this exercise<br />
until the pain begins to dissipate. When you are ready to proceed, be conservative<br />
and do not push yourself, but try to relax into the postures.<br />
1. Put your left foot on a stool, so you are in a modified forward<br />
stance. Interlace your fingers and raise your hands over your<br />
head, trying to keep the arms as close as possible to your ears.<br />
Hold for a count of 10.<br />
2. If you are able to do this position without difficulty, slowly bring<br />
your hands backwards to increase the stretch on your lower back.<br />
Hold for an additional count of 10.<br />
3. If you are able to hold this position, slowly move your hands<br />
laterally to the left, so you are bending both backwards and<br />
laterally at the waist. This stretch is specific for the iliopsoas.<br />
Hold for a count of 20, or as long as you can.<br />
4. Repeat on the opposite side.<br />
To strengthen the iliopsoas, isometric contraction is used to isolate and awaken the dormant<br />
muscle. This technique requires an understanding of the action of the various muscles. For<br />
example, the psoas acts to flex the hip, i.e. either to bend the trunk forward or draw the<br />
knee up. These are the motions emphasized in the following postures.
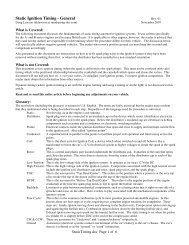
1) Trikonasana (triangle pose): .<br />
3<br />
Dr. Diderik Finne<br />
1. Stand with your feet apart and your arms horizontal, as in<br />
the illustration at right.<br />
2. Turn the toe of<br />
the left foot<br />
towards the<br />
left and inhale.<br />
3. Exhale, bend<br />
your left arm, bend your left knee and—<br />
keeping your spine straight—bend your<br />
upper body laterally to the left until you<br />
can rest your forearm on your left thigh<br />
(note: the illustration does not show the<br />
bent arm on the thigh).<br />
4. Use your upper body to apply gentle<br />
downward pressure on the left leg. This<br />
action contracts the left iliopsoas. Hold<br />
the posture for a count of 10 or 20.<br />
5. Repeat twice on both sides.<br />
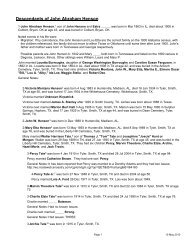
2) Virabhadrasana (warrior pose) II:<br />
1. This pose is similar to the triangle, but now<br />
you turn your upper body in the direction<br />
in which you are bending. Start from the<br />
triangle pose, turn the toe of your left foot<br />
toward the left and rotate your upper body<br />
to the left. Bend your left arm 90°, bend<br />
forward to the left until you can rest your<br />
left forearm on your left thigh. Gently<br />
press downwards for a count of 10 or 20.<br />
2. Repeat twice on both sides.<br />
3. If you are just starting out, you can skip<br />
the next three poses and go directly to (6).<br />
3) Dandayamana-Bibhaktapada-Janushirasana<br />
(standing separate leg head to knee pose):<br />
1. This pose starts the same as the preceding one,<br />
but instead of putting your forearm on your thigh,<br />
reach down and touch the ground in front of or<br />
beside your foot. Then try to straighten your knee<br />
as much as possible.<br />
2. Squeeze your torso against your thigh. Hold for a<br />
count of 10 or 20.<br />
3. Repeat twice on both sides.<br />
Warrior pose, beginning position
4) Parivritta Trikonasana (triangle pose, hand on<br />
floor):<br />
1. Same as (1), except instead of leaning your<br />
elbow against your thigh you keep your arm<br />
straight and reach for the floor. Your other<br />
arm goes straight up, so your two arms are in a<br />
vertical line. Look up at the raised hand.<br />
2. Repeat twice on both sides<br />
5) Parvritta Parsvokonasana (revolved side<br />
angle pose):<br />
1. Start from triangle pose and put your<br />
right hand down on the floor in front of<br />
your left foot. Raise your left arm up<br />
straight and look up at your left hand.<br />
2. Repeat twice on both sides.<br />
4<br />
Dr. Diderik Finne<br />
6) Dandayamana Bibhaktapada<br />
Paschimotthanasana (standing separate leg<br />
stretching pose):<br />
1. Start from triangle pose, bend forward at<br />
the waist with your spine straight and<br />
grab the outside of your legs or feet with<br />
your hands. If you have difficulty<br />
grabbing your legs, bend your knees<br />
initially, then straighten them gradually.<br />
2. Hold for a count of 20.<br />
3. Repeat twice.
7) Counter-stretch:<br />
5<br />
Dr. Diderik Finne<br />
1. Kneel on the floor with your left knee on the floor. You may want to put a cushion or<br />
pad under the knee. Lift your left foot and grab the outside of your left ankle with<br />
your left hand. Pull your left leg toward you and lean your upper body forward.<br />
2. Hold for a count of 10 and switch to the other side.<br />
3. Repeat twice.<br />
4. If you have some yoga experience, you can substitute the Standing Bow Pose (below<br />
right).<br />
Counter stretch, initial position Standing Bow Pose