Battery Backup with Surge Protection User Manual Battery ... - Belkin
Battery Backup with Surge Protection User Manual Battery ... - Belkin
Battery Backup with Surge Protection User Manual Battery ... - Belkin

Create successful ePaper yourself
Turn your PDF publications into a flip-book with our unique Google optimized e-Paper software.
Introduction<br />
Thank you for purchasing <strong>Battery</strong> <strong>Backup</strong> <strong>with</strong> Multi-Computer Connections<br />
(the Unit). Each year, frequent natural and man-made power disturbances<br />
disrupt the power supplied to your home or office electronics. These power<br />
problems place your hardware, software, and data at risk. <strong>Belkin</strong> <strong>Battery</strong><br />
<strong>Backup</strong>s provide an uninterruptible power supply (UPS) <strong>with</strong> advanced<br />
features as the industry-leading solution.<br />
Package Contents<br />
You should have received the following:<br />
1 – <strong>Battery</strong> <strong>Backup</strong> unit<br />
1 – Installation CD containing <strong>Belkin</strong> Automatic Power Management<br />
Software (the <strong>Belkin</strong> APM Software) for Windows ®<br />
1 – USB Cable<br />
1 – Serial Cable(F6C900-UNV, F6C1100-UNV, F6C1200-UNV)<br />
1 – Phone-Line Cable<br />
1 – Coaxial-Cable(only F6B750-AVR)<br />
System Requirements<br />
The Unit can be used <strong>with</strong>out the software and can be used <strong>with</strong> any computer<br />
using a monitor or a flat-panel screen. Also, you do not have to have the software<br />
installed to utilize the battery-backup outlets.<br />
To fully utilize the <strong>Battery</strong> <strong>Backup</strong> and its software, your computer must be able to<br />
run one of the following operating systems: Windows XP / 2003 / 2000 / ME / 98 /<br />
NT 4.0 (SP6) or Linux, and it must have a serial or<br />
USB port.<br />
Overview | Features and Functions<br />
Your <strong>Battery</strong> <strong>Backup</strong> features three LED indicators that monitor certain<br />
functions on the Unit. Please review the front-panel diagram and refer to this<br />
chart. This will assist you in the use of your <strong>Battery</strong> <strong>Backup</strong>.<br />
Indicator Condition Meaning<br />
ON LINE ○ Solid Green AC power is on.<br />
(Green LED)<br />
* Flashing Green AVR is active.<br />
ON BATTERY * Flashing Yellow<br />
(Yellow LED) LED <strong>with</strong> Audible<br />
Alarm (Beeping)<br />
FAULT ○Solid Red<br />
OVERLOAD<br />
Replace <strong>Battery</strong><br />
(Red LED)<br />
* Flashing Red<br />
SITE ○Solid Red<br />
WIRING FAULT<br />
(On Rear Panel)<br />
Overview | Alarms<br />
F6B900-UNV, F6C550-AVR, F6C750-AVR, F6C900-UNV, F6B750-AVR,<br />
<strong>Battery</strong> <strong>Backup</strong> <strong>with</strong> <strong>Surge</strong> <strong>Protection</strong> <strong>User</strong> <strong>Manual</strong> F6C1100-UNV, F6C900-UNV, F6C1100-UNV, F6C1200-UNV F6C1200-UNV<br />
This condition for the “ON BATTERY” LED can<br />
indicate 1 of 2 problems:<br />
1. The Unit is in backup mode and an<br />
intermittent audible alarm is on.<br />
The Unit will begin shutdown procedure.<br />
2. <strong>Battery</strong> is low. The Unit will start shutdown<br />
procedure. The buzzer sounds an<br />
audible alarm.<br />
The “FAULT/OVERLOAD” LED can indicate<br />
1 of 2 problems.<br />
1. There is a problem <strong>with</strong> the Unit. The LED<br />
will be lit continuously, and the Unit will<br />
sound an audible alarm for 10 seconds.<br />
2. <strong>Battery</strong> is weak or bad; the battery needs<br />
to be replaced.<br />
<strong>Battery</strong> output is drawing more power than the<br />
Unit can provide.<br />
There is either no ground circuit or a reversed<br />
polarity in the building wiring.<br />
<strong>Battery</strong> <strong>Backup</strong> (Slow Alarm)<br />
When the Unit is in “backup” mode (running on battery), the YELLOW LED<br />
illuminates and the Unit emits an audible alarm. The alarm stops when the<br />
Unit returns to normal online operation.<br />
Low <strong>Battery</strong> (Rapid Alarm)<br />
In “backup” mode, when the battery energy runs low, the Unit beeps rapidly<br />
until it either shuts down from a depleted battery or returns to normal<br />
online operation.<br />
Overload (Continuous Alarm)<br />
When the Unit is overloaded (the connected loads exceed the maximum<br />
rated capacity), it emits a continuous alarm to warn of an overload condition.<br />
Disconnect nonessential equipment from the Unit to eliminate the overload.<br />
Fault (10 Seconds Continuously)<br />
When the Unit fails, it emits an audible alarm continuously for 10 seconds to<br />
warn of a fault condition. Disconnect the equipment prior to checking it.<br />
Overview | Top and Rear Panels<br />
Input<br />
TOP PANEL REAR PANEL<br />
A. <strong>Surge</strong>-Protected-Only Outlets<br />
Equipment such as a printer, fax machine, scanner, or a desk lamp can be<br />
plugged into these outlets. These outlets do not provide battery power<br />
during a outage. They are always on (when AC power is available) and are not<br />
controlled by the front-panel switch.<br />
B. <strong>Battery</strong>-<strong>Backup</strong> Outlets<br />
Only data-sensitive equipment such as a computer, monitor, and external drive<br />
should be plugged into these outlets. <strong>Battery</strong> power is automatically provided<br />
in case of a power outage. Power (AC or battery) is not supplied to these outlets<br />
when the Unit is switched off. (Do not plug surge protectors or power strips into<br />
the battery-backup outlets.)<br />
Note! During the AVR Mode, the total load that you will be placing<br />
on the battery-backup outlets should not exceed 85% of the<br />
Unit’s capacity.<br />
C. Phone/Fax/Modem <strong>Protection</strong><br />
The phone/fax/modem lines are surge-protected and provide complete<br />
safety for line connection.<br />
D. Interface Ports (USB & RS232)<br />
The Unit provides a USB port for use <strong>with</strong> your computer.<br />
For the F6C900-UNV, F6C1100-UNV, F6C1200-UNV model, the unit provides<br />
both a USB and RS232 port. NOTE: Choose one port only.<br />
E. AC Input Breaker (Circuit Breaker)<br />
The circuit breaker button will be triggered if an overload condition<br />
forces the Unit to disconnect itself from utility power. If the button sticks<br />
out, disconnect nonessential equipment and depress breaker.<br />
F. AC Input Power Cord<br />
G. Site Wiring Fault Indicator<br />
The “SITE WIRING FAULT” LED will illuminate when one of the following<br />
conditions exist:<br />
1. Open or high-resistance ground<br />
2. Hot and neutral polarity reversal<br />
3. Overloaded neutral circuit<br />
H. Audio Video <strong>Surge</strong>-<strong>Protection</strong> Port (Only F6B750-AVR)<br />
I. Network <strong>Protection</strong>(F6C900-UNV/F6C1100-UNV/F6C1200-UNV)<br />
This connector is used for protecting the transmission line of an Ethernet<br />
card from surges, noise, and spikes.<br />
Model<br />
Capacity<br />
Voltage Range 89–145VAC<br />
Frequency 60Hz (±5Hz)<br />
F6C550 F6C750 F6B750 F6C900 F6C1100 F6C1200<br />
-AVR -AVR -AVR -UNV -UNV -UNV<br />
550VA/ 750VA/ 900VA/ 1100VA/ 1200VA/<br />
330W 400W 540W 660W 670W<br />
Output Voltage Simulated sine wave, 120VAC ±15%<br />
Frequency<br />
(On <strong>Battery</strong>)<br />
60Hz (±1Hz)<br />
<strong>Battery</strong> <strong>Backup</strong> Time 8 min. 5 min. 6 min. 4 min.<br />
Half-Load<br />
Environment Ambient<br />
Operation<br />
Typical<br />
Recharge 16 hours recover to 90% capacity<br />
Time<br />
0~90% humidity non-condensing, 0~40º C<br />
Conformance Safety UL / c-UL, FCC Class B<br />
<strong>Surge</strong> IEEE C62.41 Category A standard<br />
Physical Dimensions 294.5 X 125 X 242.5 mm.<br />
(W x H x D)<br />
Net Weight 5.9kg. 6.25kg. 9.25kg .<br />
All specifications are subject to change <strong>with</strong>out prior notice.<br />
Overview Storage<br />
Storage Conditions<br />
Store the Unit covered and upright in a cool, dry location <strong>with</strong> its battery fully<br />
charged. Before storing, charge the Unit for at least four (4) hours. Disconnect<br />
any cables connected to the computer interface port to avoid unnecessary<br />
drainage of the battery.<br />
Extended Storage<br />
During extended storage in environments where the ambient temperature<br />
is +5º F to +86º F, charge the Unit’s battery every six (6) months. During<br />
extended storage in environments where the ambient temperature is +86º F<br />
to +113º F, charge the Unit’s battery every three (3) months.<br />
Note:<br />
Please save this <strong>User</strong> <strong>Manual</strong>!<br />
It contains important operating instructions and warranty information<br />
pertaining to your <strong>Battery</strong> <strong>Backup</strong>.<br />
Please save or recycle the packaging materials!<br />
The Unit’s packaging was designed <strong>with</strong> great care to provide<br />
protection during shipment and delivery. These materials are<br />
invaluable if you ever have to return the Unit for service. Damage<br />
sustained during transit is not covered under the warranty.<br />
Installation<br />
Note!<br />
Before installation, please inspect the Unit. Make<br />
sure that nothing inside the package is damaged.<br />
Connect to AC Utility Power<br />
Plug in the AC cord to a wall outlet. Please make sure there are no<br />
devices plugged into the Unit. Check to see whether the “SITE WIRING<br />
FAULT” indicator is lit. If it is lit, have the utility wiring inspected by an<br />
electrician.<br />
Charging the <strong>Battery</strong><br />
For best results, charge the battery for eight hours prior to initial use. The<br />
Unit charges its battery whenever it is connected to the utility power.<br />
Plug in Power Devices<br />
Plug your devices into the AC outlets on the top of the Unit. To use the Unit<br />
as a master on/off switch, make sure all of the loads are switched on.<br />
Caution: Never connect a laser printer or scanner to the backup<br />
outlets along <strong>with</strong> other computer equipment. A laser printer or<br />
scanner draws significantly more power when in use than when<br />
idle. This may overload the <strong>Battery</strong> <strong>Backup</strong>.<br />
Turning on the Unit<br />
Turn on your <strong>Battery</strong> <strong>Backup</strong> by pressing and holding the “ON/OFF/TEST”<br />
button for approximately two seconds until the “ON LINE” green light comes on.<br />
Turning off the Unit<br />
Turn off the Unit by pressing and holding the “ON/OFF/TEST” button for<br />
more than two seconds until the “ON LINE” or “ON BATTERY” LED goes off.<br />
To Conduct a Self-Test<br />
Use the self-test to verify both the operation of the Unit and the condition<br />
of the battery. In normal utility power, push the “ON/OFF/TEST” button less<br />
than 1.5 seconds and the Unit performs a self-test function. During the<br />
self-test, the Unit operates in backup mode.<br />
Note: During the self-test, the Unit briefly operates on battery-backup<br />
power (the “ON BATTERY” LED comes on). If the Unit passes the<br />
self-test, it returns to online operation. If the Unit fails the self-test, it<br />
immediately returns to online operation and lights the “Replace <strong>Battery</strong>”<br />
LED. The loads are not affected. Recharge the battery overnight and<br />
perform the self-test again. If the “Replace <strong>Battery</strong>” LED is still on, the<br />
battery needs to be replaced.<br />
To Silence Audible Alarm<br />
While the Unit is in battery-backup mode, push the “ON/OFF/TEST” button for less<br />
than 1.5 seconds to silence the audible alarm. (This does not work if the Unit is in a<br />
OVERLOAD condition.)<br />
All equipment must be powered off prior to plugging into the<br />
Unit (installation).<br />
Connect the Phone/Fax/Modem Lines<br />
Connect a single phone/fax/modem line into the surge-protected outlets on<br />
the back of the Unit. The RJ11 modular outlet accepts standard single-line<br />
telephone connections. The connection will require another length of telephone<br />
cable (included).<br />
NOTE: This connection is optional but highly recommended as phone/<br />
fax/modem lines often carry dangerous surges and spikes. The Unit<br />
works properly <strong>with</strong>out a phone/fax/modem connection.<br />
Caution! The phone/fax/modem protection feature could be rendered<br />
inoperable if improperly installed. Make sure that the telephone line from<br />
the wall is plugged into the connector marked “IN”, and the device to be<br />
protected is plugged into the connector marked “OUT”.<br />
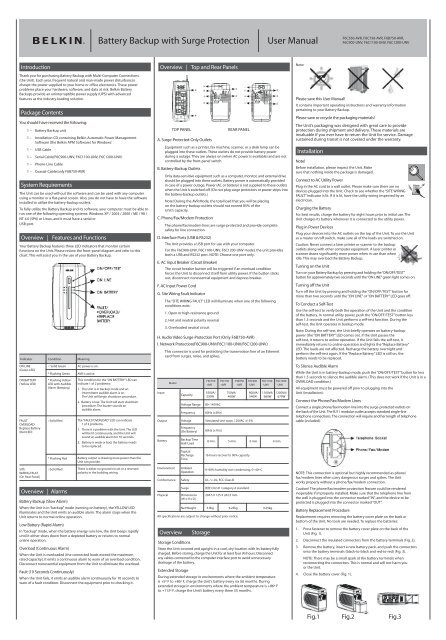
<strong>Battery</strong> Replacement Procedure<br />
Replacement requires removing the battery cover plate on the back or<br />
bottom of the Unit. No tools are needed. To replace the batteries:<br />
1. Press fastener to remove the battery cover plate on the back of the<br />
Unit (Fig. 1).<br />
2. Disconnect the insulated connectors from the battery terminals (Fig. 2).<br />
3. Remove the battery, insert a new battery pack, and push the connectors<br />
onto the battery terminals (black-to-black and red-to-red) (Fig. 3).<br />
NOTE: There may be a small spark at the battery terminals when<br />
reconnecting the connectors. This is normal and will not harm you<br />
or the Unit.<br />
4. Close the battery cover (Fig. 1).<br />
Fig.1 Fig.2 Fig.3
Serial or USB Communication Port<br />
Installation Optional<br />
To fully utilize the <strong>Belkin</strong> Automatic Power Management Software, you will need to<br />
connect the Unit to your computer.<br />
The communication port will provide the following features:<br />
1. Monitoring charger status<br />
2. Monitoring Unit status<br />
3. Monitoring battery status and condition<br />
4. Monitoring the utility status<br />
5. Use the “ON/OFF/TEST” power switch function to schedule the<br />
Unit for power-saving<br />
You may connect the Unit to your computer by choosing either the serial or USB<br />
ports. NOTE: Choose one port only. Do not connect your computer through both<br />
ports.<br />
Install <strong>Belkin</strong> APM Software<br />
a) System requirements<br />
• 128 MB RAM of memory at least (256MB is recommended)<br />
• 256 colors and 800 * 600 resolution or above display is recommended<br />
• 160 MB of disk space or above<br />
• An available communication port (RS-232 Serial Port or USB port) is needed<br />
while connecting to UPS <strong>with</strong> a special connecting cable.<br />
• For Mac OS X, Linux or Unix operating system, the user must have the access<br />
authority as the super user<br />
• TCP/IP protocol must be installed to support network management<br />
• The user needs to have the access authority as the administrator<br />
b) Platforms supported by <strong>Belkin</strong> APM Software.<br />
The following operating system (OS) is arranged by the alphabetical order:<br />
• AIX 4.3.3, 5.1, 5.2<br />
• Compaq Tru64 Alpha<br />
• FreeBSD x86<br />
• HP-UX 11.x, 11i.x<br />
• Linux<br />
• Mac PPC OSX<br />
• SCO UnixWare 7.1.1, 7.1.3, SCO Unix 8.0, and SCO OpenServer 5.0.6, 5.0.7<br />
• SGI Irix 6.5.x<br />
• Solaris / Sparc 2.6, 7, 8, 9 , and Solaris / Intel 2.6, 7, 8, 9<br />
• Windows XP / 2003 / 2000 / ME / 98 / NT 4.0 (SP6).<br />
c) <strong>Belkin</strong> Automatic Power Management Software Installation Steps.<br />
For Windows platform<br />
• Run setup.exe in the \Windows\Disk1\InstData\VM\ directory of your CD to<br />
start the installation program.<br />
• Read the information provided, then click Next.<br />
• Review the installation options that you have selected. If the options are<br />
correct, then click “Install” to begin the installation.<br />
• When the installation program is completed, click Done.<br />
For Mac OS X platform<br />
• Run setup.app in the \MacOXS\Disk1\InstData\ directory of your CD to start<br />
the installation program.<br />
• Read the information provided, then click Next.<br />
• Review the installation options that you have selected. If the options are<br />
correct, then click “Install” to begin the installation.<br />
• When the installation program is completed, click Done.<br />
For Other Platforms<br />
• This CD provides two installation modes: GUI mode and Console mode. Enter<br />
the directory according the system and run setup.bin or setup_console.<br />
bin to start the installation program. Note: For UnixWare, Irix and Tru64<br />
platform, make sure JRE1.3.1 has been install in your system, then enter the<br />
/GenericUnix directory and run setup.bin or setup_console.bin to start the<br />
setup.<br />
• Read the information provided, then click Next.<br />
• Review the installation options that you have selected. If the options are<br />
correct, then click Install to begin the installation.<br />
• When the installation program is completed, click Done.<br />
Reboot the system.<br />
The install program set the <strong>Belkin</strong> Power Management Software Running<br />
Environment Variables in /etc/profile, reboot the system to make it valid.<br />
Uninstall <strong>Belkin</strong> APM Software<br />
Note: Before uninstall <strong>Belkin</strong> PMS, all <strong>Belkin</strong> PMS program must be stopped first.<br />
Otherwise the uninstalling cannot be run completely.<br />
Windows operating system<br />
1. There are two ways of uninstalling <strong>Belkin</strong> PMS:<br />
(a) Click directly on the Uninstall <strong>Belkin</strong> Automatic Power Management Software<br />
from the Start menu >Programs > <strong>Belkin</strong> Automatic Power Management<br />
Software.<br />
(b) Use the Add / Remove Program under Control, and select Change or Remove<br />
Programs from the left. Select <strong>Belkin</strong> Automatic Power Management Software,<br />
and click the Change / remove button.<br />
2. The Uninstall Program will pop up a prompt, and click Uninstall to start the<br />
uninstalling.<br />
To exit the uninstallation, click Cancel.<br />
Mac OS X system<br />
open the Terminal from Application > Utilities> Terminal, enter the installation<br />
directory (/opt/upspilot by default) and ececute the command: sudo ./Uninatall<br />
Enter the system account password when it prompts. The installation will be carried<br />
out <strong>with</strong> administrator privilege and can completely uninstall all the files.<br />
If you just execute the ./Uninstall command , the installation may not has the<br />
permission to uninstall all the files.<br />
F6B900-UNV, F6C550-AVR, F6C750-AVR, F6C900-UNV, F6B750-AVR,<br />
<strong>Battery</strong> <strong>Backup</strong> <strong>with</strong> <strong>Surge</strong> <strong>Protection</strong> <strong>User</strong> <strong>Manual</strong> F6C1100-UNV, F6C900-UNV, F6C1100-UNV, F6C1200-UNV F6C1200-UNV<br />
Linux and UnixWare system<br />
Open the Terminal, enter the /opt/upspilot in the address bar and execute<br />
command: ./Uninstall.<br />
Troubleshooting<br />
PROBLEM POSSIBLE CAUSE SOLUTION<br />
Unit not on, “ON/OFF/TEST” button Press the “ON/OFF/TEST”<br />
LED not lit not pushed or pushed less button for more than<br />
than 2 seconds 2 seconds<br />
<strong>Battery</strong> voltage is too low Recharge the Unit<br />
at least 8 hours<br />
UPS fault Contact service<br />
personnel<br />
Unit always on Power cord loose Re-plug the power cord<br />
battery mode<br />
AC breaker is burned Replace or<br />
out or tripped reset the breaker<br />
AC utility voltage is too high Normal condition<br />
or too low, or there is a<br />
blackout<br />
<strong>Backup</strong> time <strong>Battery</strong> not fully charged Recharge the Unit<br />
too short at least 8 hours<br />
The Unit is overloaded Remove some<br />
unnecessary loads<br />
Charger fault or other reason Replace battery; contact<br />
www.belkin.com<br />
The Unit Overload Remove the<br />
continuously non-critical loads<br />
beeps<br />
Red LED lit <strong>Battery</strong> failure Replace battery; contact<br />
www.belkin.com<br />
Information<br />
Federal Communications Commission Interference Statement<br />
This equipment has been tested and found to comply <strong>with</strong> the limits for a<br />
Class B digital device, pursuant to Part 15 of the FCC Rules. These limits<br />
are designed to provide reasonable protection against harmful interference<br />
in a residential installation. This equipment generates, uses, and can radiate<br />
radio frequency energy and, if not installed and used in accordance <strong>with</strong><br />
the instructions, may cause harmful interference to radio communications.<br />
To assure continued compliance, use only shielded interface cables when<br />
connecting to computer or peripheral devices. Any changes or modifications<br />
not expressly approved by the party responsible for compliance could void<br />
the user’s authority to operate this equipment.<br />
<strong>Belkin</strong> Corporation <strong>User</strong> License Agreement<br />
<strong>Belkin</strong> Corporation (“<strong>Belkin</strong>”) thanks you for choosing one of our products.<br />
This <strong>User</strong> License Agreement (“Agreement”) contains the terms and<br />
conditions under which limited use of the product is licensed to you.<br />
PLEASE READ THIS NOTICE CAREFULLY. DO NOT USE THE SOFTWARE<br />
OR PRODUCT UNTIL YOU HAVE READ AND AGREED TO THIS<br />
AGREEMENT. IF YOU USE THE SOFTWARE AND PRODUCT, YOU<br />
ARE AGREEING TO THE TERMS AND CONDITIONS SET OUT IN THIS<br />
AGREEMENT. IF YOU DO NOT ACCEPT THESE TERMS AND CONDITIONS,<br />
YOU MUST RETURN THE UNOPENED PRODUCT WITH THE DISKS INSIDE<br />
TO THE PARTY FROM WHOM YOU RECEIVED IT.<br />
SCOPE OF USE: In this Agreement, software means all<br />
machine-readable software programs and associated files in this package,<br />
all modified versions of and upgrades or improvements to such programs<br />
and all copies of such programs and files. You, a single user opening this<br />
envelope, may use the software on a single central processing unit. You may<br />
not rent it, loan it out, or lease it, nor use it on a multiuser system.<br />
LICENSE: You have the non-exclusive right to use the software. You are not<br />
permitted to copy, modify or transfer the software or documentation. You<br />
may not compile, disassemble or otherwise reverse engineer, breakdown,<br />
analyze or modify the software.<br />
USE AND RESTRICTIONS: You are permitted to make backup copies of<br />
all the software disks for archival purposes only. You must reproduce the<br />
proprietary notice set forth on the disks and affix them to all backup copies.<br />
You are not permitted to use these programs in connection <strong>with</strong> a computer<br />
service, or to use the backup copies other than as a replacement for the<br />
original copy.<br />
TERM: This license is effective upon acceptance by opening this envelope<br />
or in any other way using the enclosed software, which will constitute your<br />
acceptance of, and agreement to, this Agreement, and is effective until<br />
terminated. The limited license in this Agreement will be automatically<br />
terminated if you fail to comply <strong>with</strong> any of the Terms and conditions in<br />
this Agreement. You agree that upon such termination you will immediately<br />
destroy all programs and documentation, including all copies made or<br />
obtained by you.<br />
SOFTWARE, PROGRAM, DOCUMENTATION, AND ANY RELATED<br />
INFORMATION, GOODS OR SERVICES ARE PROVIDED WITH NO<br />
WARRANTY OR REPRESENTATION OF ANY KIND WHATSOEVER. BELKIN<br />
HEREBY DISCLAIMS ALL OTHER WARRANTIES, EXPRESSED OR IMPLIED,<br />
INCLUDING BUT NOT LIMITED TO THE IMPLIED WARRANTIES OF<br />
MERCHANTABILITY AND FITNESS FOR A PARTICULAR PURPOSE.<br />
The entire risk of the use, results and performance of the software, program<br />
and documentation is borne by you. Should any or all of the product, software,<br />
program, documentation, or related information, goods or services be defective,<br />
misused, unsuitable or cause or give rise to any harm or liability whatsoever, you,<br />
not <strong>Belkin</strong> or its associates, dealers or agents, assume the entire liability, cost of<br />
repair, correction or any payment or other remedy whatsoever. Furthermore,<br />
no warranty or guarantee is made regarding the use or results of the product,<br />
software, program, documentation, or any related information, goods or services in<br />
terms of correctness, accuracy, reliability, timeliness or otherwise. You use and rely<br />
on the program at your own risk. The following is the only and exclusive warranty<br />
and remedy of any kind: <strong>Belkin</strong> does warrant that the program disks are free from<br />
physical defects in materials and workmanship under normal use for a period of<br />
one (1) year from the date of purchase, as evidenced by a copy of the sales receipt.<br />
Return the defective disk or documentation <strong>with</strong> your receipt directly to <strong>Belkin</strong> for<br />
a replacement.<br />
DISCLAIMER: <strong>Belkin</strong> or its associates will in no event be liable (i) in any amount for<br />
lost profits or special, incidental, punitive or consequential damages, or (ii) for any<br />
claim or damage of any nature, or under any theory, whatsoever, in any amount in<br />
excess of the purchase price you paid for the product. The warranties and remedies<br />
here set forth are exclusive, and in lieu of all others oral or written, expressed<br />
or implied. Some jurisdictions do not allow exclusion or limitation of implied<br />
warranties or of liability for incidental damages, so the foregoing limitations or<br />
exclusion may not apply to you. This warranty gives you specific legal rights, which<br />
vary from jurisdiction to jurisdiction.<br />
HOWEVER, YOU WAIVE SUCH RIGHTS, EXCEPT AS EXPRESSLY<br />
PROVIDED UNDER THE TERMS AND CONDITIONS OF THIS AGREEMENT,<br />
TO THE MAXIMUM EXTENT ALLOWED BY LAW.<br />
The license is governed by the laws prevailing in the State of New York,<br />
<strong>with</strong>out regard to its conflicts of laws principles.<br />
ACKNOWLEDGMENT:<br />
By opening the package on which this Agreement is printed, or through<br />
which it is visible, you acknowledge that you have read this Agreement,<br />
understand it, and agree that this Agreement is the complete and exclusive<br />
statement of agreement between yourself and <strong>Belkin</strong> and supersedes any<br />
prior agreements, oral or written, and any other communications relating to<br />
the subject matter of this Agreement.<br />
SEVERABILITY:<br />
Any term or provision of this Agreement or any application thereof, which may be<br />
prohibited or unenforceable by law in a particular jurisdiction, shall be interpreted<br />
and enforced to the maximum extent allowed in such jurisdiction (which the<br />
parties acknowledge could mean severing the provision from this Agreement or,<br />
if allowed, enforcing it in a narrower form), <strong>with</strong>out affecting the remainder of this<br />
Agreement, or any other application of such term or provision in such jurisdiction,<br />
or application of such term or provision in<br />
any jurisdiction.<br />
Safety Information<br />
Caution<br />
l Internal battery voltage is 12V DC.<br />
l The Unit is intended for installation in a controlled environment<br />
(temperature controlled, indoor area free of conductive contaminants).<br />
l All batteries used are sealed lead batteries. Batteries must be recycled.<br />
Recycling<br />
Your Unit contains a non-spillable sealed lead battery. On the battery, you<br />
will find the battery name. Please reference the chart below for recycling<br />
information.<br />
<strong>Battery</strong> Name Recycling Inside the USA Outside the USA Recycling<br />
BB <strong>Battery</strong> (800) 278-8599 N/A<br />
CSB <strong>Battery</strong> (800) 738-7372 1 (817) 244-4415<br />
VISION <strong>Battery</strong> (604) 730-2877 N/A<br />
Best <strong>Battery</strong> (888) 841-5179 N/A<br />
Contact <strong>Belkin</strong><br />
<strong>Belkin</strong> Tech Support<br />
US: 800-223-5546, ext. 2263<br />
310-898-1100, ext. 2263<br />
Europe: 00 800 223 55 460<br />
Australia: 1800 235 546<br />
New Zealand: 0800 235 546<br />
<strong>Belkin</strong> Corporation<br />
501 West Walnut Street<br />
Compton, CA 90220-5221, USA<br />
310-898-1100<br />
310-898-1111 fax<br />
<strong>Belkin</strong> Ltd.<br />
Express Business Park, Shipton Way<br />
Rushden, NN10 6GL, United Kingdom<br />
+44 (0) 1933 35 2000<br />
+44 (0) 1933 31 2000 fax<br />
<strong>Belkin</strong> B.V.<br />
Boeing Avenue 333<br />
1119 PH Schiphol-Rijk, The Netherlands<br />
+31 (0) 20 654 7300<br />
+31 (0) 20 654 7349 fax<br />
<strong>Belkin</strong> Ltd.<br />
7 Bowen Crescent, West Gosford<br />
NSW 2250, Australia<br />
+61 (0) 2 4372 8600<br />
+61 (0) 2 4372 8603 fax<br />
© 2005 <strong>Belkin</strong> Corporation.<br />
All rights reserved. All trade names are<br />
registered trademarks of respective<br />
manufacturers listed.<br />
614-07166-00