Build your skills - Wickes
Build your skills - Wickes
Build your skills - Wickes

Create successful ePaper yourself
Turn your PDF publications into a flip-book with our unique Google optimized e-Paper software.
ISSUE 4/98<br />
BUILD YOUR SKILLS<br />
MOULDINGS CHECKLIST<br />
• Timber mouldings are strips<br />
of softwood, hardwood or<br />
medium-density fibreboard<br />
(MDF) that have been<br />
machined to a particular<br />
profile or have an decorative<br />
pattern embossed on them.<br />
• They can be divided into four<br />
broad groups - room<br />
mouldings, trim and cover<br />
mouldings, decorative panel<br />
and frame mouldings, and<br />
functional mouldings.<br />
• Room mouldings include<br />
skirting boards, architraves,<br />
window sill boards, cornices,<br />
wall cladding, dados and<br />
picture rails and staircase<br />
mouldings.<br />
• Trim and cover mouldings are<br />
used in a variety of ways to<br />
WORKING WITH MOULDINGS<br />
204<br />
finish off edges and cover<br />
joints.<br />
• Panel and frame mouldings<br />
are used to create decorative<br />
effects on wall and furniture<br />
surfaces, or to frame pictures.<br />
• Functional mouldings do<br />
specific jobs, such as making<br />
dowel joints.<br />
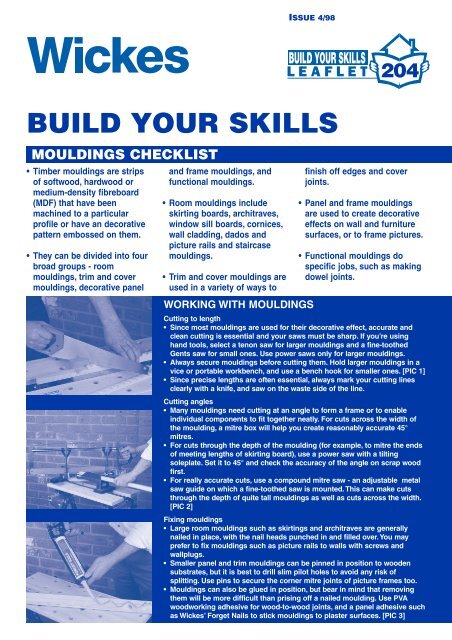
Cutting to length<br />
• Since most mouldings are used for their decorative effect, accurate and<br />
clean cutting is essential and <strong>your</strong> saws must be sharp. If you’re using<br />
hand tools, select a tenon saw for larger mouldings and a fine-toothed<br />
Gents saw for small ones. Use power saws only for larger mouldings.<br />
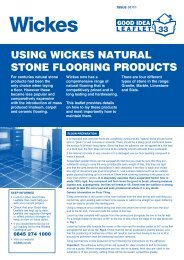
• Always secure mouldings before cutting them. Hold larger mouldings in a<br />
vice or portable workbench, and use a bench hook for smaller ones. [PIC 1]<br />
• Since precise lengths are often essential, always mark <strong>your</strong> cutting lines<br />
clearly with a knife, and saw on the waste side of the line.<br />
Cutting angles<br />
• Many mouldings need cutting at an angle to form a frame or to enable<br />
individual components to fit together neatly. For cuts across the width of<br />
the moulding, a mitre box will help you create reasonably accurate 45°<br />
mitres.<br />
• For cuts through the depth of the moulding (for example, to mitre the ends<br />
of meeting lengths of skirting board), use a power saw with a tilting<br />
soleplate. Set it to 45° and check the accuracy of the angle on scrap wood<br />
first.<br />
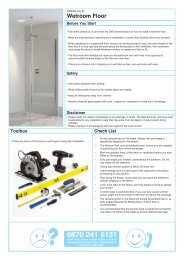
• For really accurate cuts, use a compound mitre saw - an adjustable metal<br />
saw guide on which a fine-toothed saw is mounted. This can make cuts<br />
through the depth of quite tall mouldings as well as cuts across the width.<br />
[PIC 2]<br />
Fixing mouldings<br />
• Large room mouldings such as skirtings and architraves are generally<br />
nailed in place, with the nail heads punched in and filled over. You may<br />
prefer to fix mouldings such as picture rails to walls with screws and<br />
wallplugs.<br />
• Smaller panel and trim mouldings can be pinned in position to wooden<br />
substrates, but it is best to drill slim pilot holes to avoid any risk of<br />
splitting. Use pins to secure the corner mitre joints of picture frames too.<br />
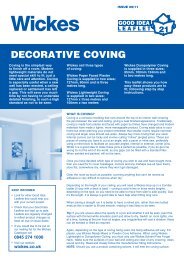
• Mouldings can also be glued in position, but bear in mind that removing<br />
them will be more difficult than prising off a nailed moulding. Use PVA<br />
woodworking adhesive for wood-to-wood joints, and a panel adhesive such<br />
as <strong>Wickes</strong>’ Forget Nails to stick mouldings to plaster surfaces. [PIC 3]
TYPES OF MOULDINGS<br />
Most timber mouldings are produced using a<br />
machine called a spindle moulder. Fast-spinning<br />
cutters give the moulding its characteristic<br />
profile as the square or rectangular<br />
planed stock is fed into the machine.<br />
Large mouldings such as skirtings are usually<br />
machined from softwood or MDF. The<br />
latter material has the advantage of being<br />
dimensionally stable and free from knots,<br />
splits, shakes and warping. MDF mouldings<br />
are available pre-primed.<br />
Mouldings with a smaller cross-section are<br />
usually machined from inexpensive hardwoods<br />
such as ramin, which holds edge<br />
details better than softwood on a small<br />
scale. They are displayed in store in a fulllength<br />
pigeon hole dispenser.<br />
Room mouldings<br />
Skirting boards and architraves have a practical<br />
as well as a decoratiive purpose.<br />
Skirting boards prevent damage to the lowest<br />
part of the wall plaster, while architraves<br />
conceal the join between the wall and the<br />
door frame.<br />
<strong>Wickes</strong> stocks softwood and MDF skirting<br />
boards in the traditional torus pattern, with a<br />
choice of two heights, and in a plain chamfered<br />
pattern 70mm high. Also available are<br />
hardwood torus skirting 170mm high, and a<br />
dual-purpose softwood skirting 95mm high<br />
which reveals a different profile according to<br />
which way round it is fixed.<br />
Architrave mouldings come in torus, ogee<br />
and chamfered profiles in softwood, in torus<br />
and chamfered profile in pre-primed MDF,<br />
and in ogee only in hardwood. Picture and<br />
dado rails are also available in all three<br />
materials.<br />
Softwood cladding for walls and ceilings<br />
comes in four profiles; traditional TGV<br />
(tongued, grooved and V-jointed) cladding,<br />
plain constructional cladding, Heritage<br />
cladding with its moulded profile, and<br />
shiplap cladding for exterior use. The boards<br />
are sold in packs of four or five for ease of<br />
handling.<br />
Staircase mouldings are speciality mouldings<br />
used to assemble replacement<br />
balustrades. They include vertical newel<br />
posts, handrail mouldings, baluster spindles,<br />
bottom rails and special fittings to turn a<br />
balustrade through a quarter turn. These<br />
PROBLEM SOLVER<br />
[P] A gap keeps opening up along the top of the skirting boards, and any filler used<br />
simply falls out.<br />
[S] Fill the gap with non-setting acrylic decorator’s mastic instead of hard-setting<br />
filler. If the room is being redecorated with wallpaper, trim the paper so it rests on<br />
the top edge of the skirting board and hides the join.<br />
[P] The mitre joint on an external corner of a picture rail has a wedge-shaped gap<br />
that’s hard to fill.<br />
[S] Cut external mitre joints to just under 45° so the joint is tightly closed on the outside<br />
of the corner but is slightly open on its inside angle.<br />
[P] The wall to which a new skirting is being fitted is not straight.<br />
[S] Use screws and wallplugs to fix the board. The screws will force the board to<br />
match the profile of the wall as they are driven in.<br />
matched components make replacing a<br />
balustrade a simple and straightforward job.<br />
Trim and cover mouldings<br />
As their name implies, these mouldings are<br />
used for a range of edge-trimming and jointconcealing<br />
jobs. The range includes plain<br />
rounded, rebated and decorative moulded<br />
edge cover strips, angle and hockey-stick<br />
mouldings and quadrant and scotia mouldings.<br />
Most are ramin, and generally come in<br />
2.4m lengths.<br />
Panel and frame mouldings<br />
These mouldings are also used in a variety<br />
of ways, for example to give a plain door a<br />
panelled finish or to create panelled effects<br />
on wall and ceiling surfaces. Some have<br />
machined profiles, others have a decorative<br />
pattern embossed into their surface. Many of<br />
the cover mouldings stocked can also be<br />
used in this way, and <strong>Wickes</strong> stocks roundel<br />
corner blocks as an alternative to using<br />
mitred corner joints.<br />
Finally, a range of picture frame mouldings<br />
enable you to make up matching picture<br />
frames to any size you require.<br />
Functional mouldings<br />
There are several mouldings which have a<br />
purely functional use, rather than any decorative<br />
purpose. These include dowel, available<br />
in a range of sizes for jobs ranging from<br />
making dowel joints to creating hanging<br />
pegs and clothes rails, and glass bead for<br />
use as a neater alternative to putty in glazed<br />
doors and windows.<br />
There is also plain ramin stripwood in both<br />
square and rectangular cross-sections for<br />
use in all sorts of small-scale woodworking<br />
projects.<br />
Putting up picture and dado rails<br />
One of the most popular jobs involving<br />
mouldings is adding a picture or dado rail to<br />
a room so that each area of the wall surface<br />
can be given a different decorative finish.<br />
The secret of success with this job is to<br />
draw a truly horizontal pencil guide line<br />
round the room. It is then a simple matter to<br />
work round the room, measuring, cutting<br />
and fitting each length of rail in turn. For a<br />
quick result you can use Forget Nails adhesive<br />
instead of screws and wallplugs or<br />
masonry nails.<br />
1 Start fixing the rail on the room’s<br />
longest wall. Use a 45° angled joint,<br />
not a butt joint, between lengths.<br />
2 At internal corners, scribe the end of<br />
the first length on the next wall and<br />
cut it with a coping saw.<br />
3 At external corners, mitre the joint.<br />
Use filler to neaten the joint if <strong>your</strong><br />
mitre cuts aren’t perfect.<br />
[P] Getting the top section of a door architrave moulding to fit is proving difficult to<br />
achieve.<br />
[S] Cut accurate mitres on one end of each of the two side sections, and fit them to<br />
the frame. Then hold a length of moulding upside down on top of the side mouldings<br />
and mark the top corner positions on it. Cut inward-facing mitres at these<br />
points.<br />
[P] The glazing bead in a glazed internal door keeps splitting as the fixing nails are<br />
driven in.<br />
[S] Drill slim pilot holes for the pins through each length of bead before starting to fix<br />
it in place. Use a little bedding putty or glazing sealant behind the bead to prevent<br />
the glass from rattling.<br />
Every care has been taken to ensure the accuracy of the information provided but product specifications and construction techniques can change and <strong>Wickes</strong> <strong>Build</strong>ing<br />
Supplies can accept no responsibility for such changes. The information should therefore be taken as general guidance only.<br />
© <strong>Wickes</strong> <strong>Build</strong>ing Supplies Limited<br />
All rights reserved. No part of this publication may be produced or transmitted in any form or by any means electronic, mechanical, photocopying, recording or otherwise<br />
or stored in any retrieval system of any nature without the written permission of the copyright holder and the publisher.
![To-Order Kitchens [PDF] - Wickes](https://img.yumpu.com/30243922/1/184x260/to-order-kitchens-pdf-wickes.jpg?quality=85)