JBR MAZDASPEED 3 Adjustable Short Throw Shifter Plate
JBR MAZDASPEED 3 Adjustable Short Throw Shifter Plate
JBR MAZDASPEED 3 Adjustable Short Throw Shifter Plate

Create successful ePaper yourself
Turn your PDF publications into a flip-book with our unique Google optimized e-Paper software.
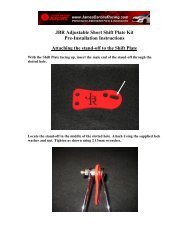
<strong>JBR</strong> <strong>Adjustable</strong> <strong>Short</strong> Shift <strong>Plate</strong> Kit<br />
Pre-Installation Instructions<br />
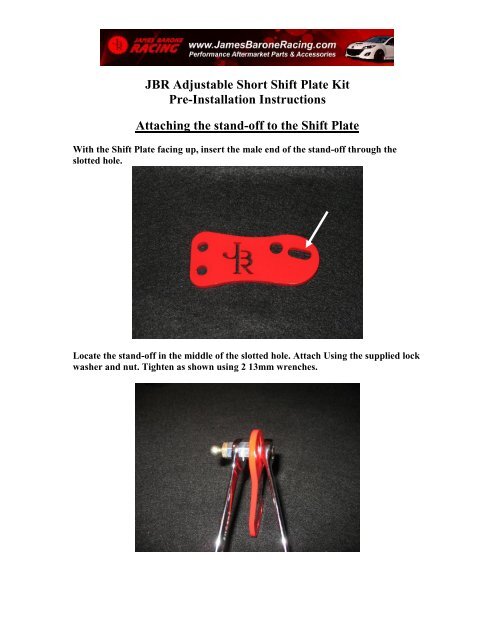
Attaching the stand-off to the Shift <strong>Plate</strong><br />
With the Shift <strong>Plate</strong> facing up, insert the male end of the stand-off through the<br />
slotted hole.<br />
Locate the stand-off in the middle of the slotted hole. Attach Using the supplied lock<br />
washer and nut. Tighten as shown using 2 13mm wrenches.
<strong>JBR</strong> <strong>Adjustable</strong> <strong>Short</strong> Shift <strong>Plate</strong> Kit Installation Instructions<br />
07’ – 09’ <strong>MAZDASPEED</strong> 3<br />
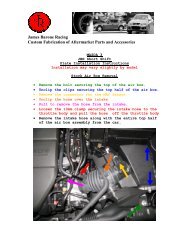
1. Engage the emergency brake and open the hood.<br />
*Note* If you have an aftermarket cold air intake, refer to manufactures<br />
instructions for removal if necessary.<br />
2. Remove the 2x10mm bolts from the inter-cooler cover.<br />
3. Slide the cover towards the back of the car and lift off.<br />
4. Loosen the 10mm bolt on the hose clamp of the intake.
5. Unclip the MAF sensor connector by pushing down on the back of the<br />
connector and pulling towards the back of the car.<br />
6. Unclip the 2 hold downs for the air box cover.
7. Pull the air box cover up and towards the driver's side of the car while<br />
removing the intake hose from the cover.<br />
8. Remove this retaining clip that holds the bottom half of the air box by<br />
squeezing the clip and pulling up.
9. Slide the rubber grommet towards the back of the car.<br />
10. Remove the rubber hold down.
11. Pull/Tug up on the bottom half of the air box and remove from the car.<br />
12. Remove the 2x12mm bolts and the factory shifter weight.
13. Using a pair of needle nose pliers, slipped under the shifter cable end, then<br />
pry up to pop the cable off the existing ball stud.<br />
14. Place the <strong>Short</strong> Shift plate in position as shown below.<br />
*Note* The plate is meant to sit on top of the original ball stud. The ball stud<br />
does not go through the shift plate
15. Place 1 lock washer on each 8mm hex cap bolt and put 2 drops of Loctite 262<br />
Thread Locker on each of the bolts and install with the new weight using a<br />
6mm hex wrench.<br />
It should now look like this:<br />
16. Now center the shifter cable you previously removed over the new ball stud<br />
and press down until you here it snap in to place.<br />
17. Now re-install the factory air box assembly if necessary and inter-cooler<br />
cover. See Required Factory air box modifications below.<br />
Make sure you properly connect the intake hose to the top half of the air box and<br />
don't forget to reconnect the MAF sensor if you removed it.
ADJUSTING THE THROW<br />
Adjusting the throw of your new <strong>JBR</strong> <strong>Short</strong> <strong>Throw</strong> Shift <strong>Plate</strong><br />
kit only takes a few minutes.<br />
1. Gain access to the shift plate using the instructions above.<br />
2. Unbolt the shift plate from the counter weight and rotate<br />
the shift plate on to its side with the shift cable still<br />
attached.<br />
3. Using 2 13mm wrenches loosen the stand-off enough to<br />
allow it to slide to the desired position and re-tighten.<br />
4. Re-install the shift plate and counter weight.<br />
Longer <strong>Throw</strong><br />
<strong>Short</strong>er <strong>Throw</strong>
If You Are Using the Factory Air Box<br />
If you are using the factory air box, you WILL need to apply rubber grommets (not<br />
Supplied) to the pegs on the bottom of the factory air box and in the factory<br />
grommets of the car for a total of 4 grommets. The grommets have a ½” inside<br />
diameter hole and are 1” in overall diameter. These rubber grommets shown below<br />
can be found at any hardware store or home center for around a dollar each. Slip<br />
the grommets over the pegs as shown below. They are required to provide a 1/4” of<br />
clearance in order for the Shift <strong>Plate</strong> to operate correctly.<br />
Below you will see the factory air box with the grommets attached.<br />
Below you will see how the additional grommets are to be placed in the factory<br />
grommets of the car.
If you purchased the Stage 2 <strong>Adjustable</strong> <strong>Short</strong> Shift <strong>Plate</strong> Kit or Solid <strong>Shifter</strong> Base<br />
Bushings at another time, you can use 2 rubber bushings removed from the shifter<br />
base in place of all 4 of the grommets shown above. Slip 1 bushing over each of the<br />
pegs on the bottom of the air box as shown below.
Failure to carefully follow the installation instructions for your <strong>JBR</strong> product could<br />
result in damage to your car or your new parts. Please take the time to read and<br />
thoroughly understand the instructions prior to installation. The directions are as<br />
accurate as possible and may vary slightly from model year to model year.<br />
Thanks,<br />
Jamie<br />
Legal Disclaimer<br />
JAMES BARONE RACING is not responsible for the misuse, incorrect installation, or<br />
failure of any product we sell. Under no circumstances, including but not limited to<br />
negligence, will JAMES BARONE RACING be liable for special or consequential<br />
damages that result from the use or inability to use our products. JAMES BARONE<br />
RACING does not assume responsibility for any damage to the user, passenger or vehicle<br />
resulting from the operation of a JAMES BARONE RACING product.<br />
PLEASE DRIVE RESPONSIBLY.