JBR MAZDA 3 Short Throw Shifter Plate Installation - James Barone ...
JBR MAZDA 3 Short Throw Shifter Plate Installation - James Barone ...
JBR MAZDA 3 Short Throw Shifter Plate Installation - James Barone ...

You also want an ePaper? Increase the reach of your titles
YUMPU automatically turns print PDFs into web optimized ePapers that Google loves.
<strong>James</strong> <strong>Barone</strong> Racing<br />
Custom Fabrication of Aftermarket Parts and Accessories<br />
<strong>MAZDA</strong> 3<br />
<strong>JBR</strong> <strong>Short</strong> Shift<br />
<strong>Plate</strong> <strong>Installation</strong> Instructions<br />
<strong>Installation</strong> may vary slightly by model<br />
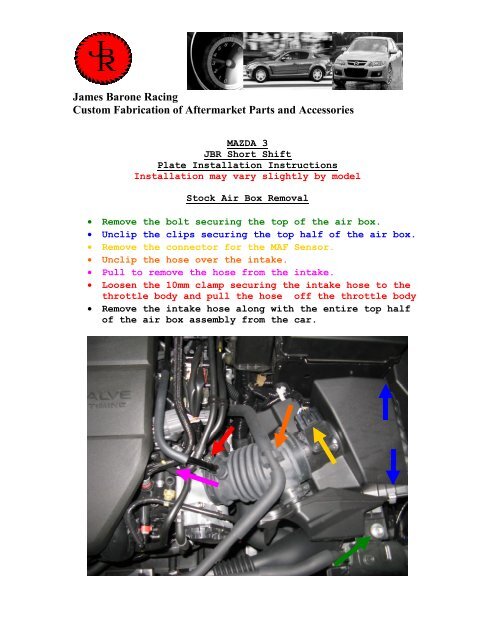
Stock Air Box Removal<br />
• Remove the bolt securing the top of the air box.<br />
• Unclip the clips securing the top half of the air box.<br />
• Remove the connector for the MAF Sensor.<br />
• Unclip the hose over the intake.<br />
• Pull to remove the hose from the intake.<br />
• Loosen the 10mm clamp securing the intake hose to the<br />
throttle body and pull the hose off the throttle body<br />
• Remove the intake hose along with the entire top half<br />
of the air box assembly from the car.
• Tug/Pull up on the bottom half of the air box shown<br />
below.<br />
• Using needle nose pliers remove the MAF wire from the<br />
back/bottom half of the air box shown below.
Battery and Battery Box Removal<br />
• Pull out on the two tabs holding the top of the<br />
battery cover and remove as shown below.<br />
• Using a 10mm socket and socket wrench remove the nuts<br />
holding the cross bar over the top of the battery and<br />
remove the cross bar.
• Using a 10mm socket remove the negative battery cable<br />
FIRST then the positive cable and remove the batter<br />
from the car shown below.<br />
• Using a 10mm socket remove the 3 bolts in the bottom<br />
of the battery box shown below.
• Using needle nose pliers remove the two grey<br />
connectors and 1 black connector securing the wiring<br />
to the front side of the battery box shown below.<br />
• Remove the front side of the battery box.<br />
• Using needle nose pliers remove the black connector<br />
securing the wiring harness to the bottom of the<br />
battery box
• Using needle nose pliers remove the black connector<br />
holding the wiring harness shown below. Tilt the<br />
battery box towards the front of the car and remove
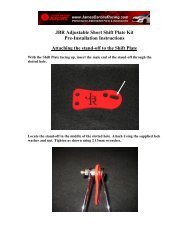
<strong>Short</strong> Shift <strong>Plate</strong> <strong>Installation</strong><br />
• Put the car in 4 th or 5 th gear<br />
• Now with the shifter linkage exposed, and using a pair<br />
of needle nose pliers slipped under the cable head,<br />
pry down or up to pop the cable off the shifter arm as<br />
shown below.<br />
• Place 1 flat washer on each of the 3 bolts as shown<br />
below.
• Place all your hardware in arms reach.<br />
• Now with one hand hold the base of the shifter plate<br />
below the shifter arm as shown below.<br />
• With your other hand place the top half of the shifter<br />
plate on to the shifter arm as shown below.
• Install each of the 3 bolts with washers through both<br />
the top and bottom half of the shifter plate assembly<br />
as shown below.<br />
• Put 1 lock washer and 1 nut on each of the 3 assembly<br />
bolts and leave them loose. I’ve added an additional<br />
nut and washer to the kit in case you drop or loose<br />
one. Now with the bolts snug but not tight, rotate the<br />
shift plate assembly slightly clockwise to ensure both<br />
ball studs are in line and the assembly is in line<br />
with the factory shifter arm as shown below.
• Using a 10mm wrench and a 10mm socket and socket<br />
wrench, tighten the assembly as evenly as possible as<br />
shown from a side view below. Do not over tighten the<br />
bolts or you WILL strip them and it will be very<br />
difficult should you ever need to remove the kit.<br />
• Re-attach the shifter cable by centering the cable<br />
over the new ball stud and pushing down until you here<br />
it snap in to place as shown below.
• Reinstall the battery box, battery, and air intake<br />
system.<br />
Enjoy you new <strong>JBR</strong> <strong>Short</strong> <strong>Shifter</strong><br />
Failure to carefully follow the installation instructions<br />
for your <strong>JBR</strong> product could result in damage to your car or<br />
your new parts. Please take the time to read and thoroughly<br />
understand the instructions prior to installation. The<br />
directions are as accurate as possible and may vary<br />
slightly from model year to model year.<br />
Thanks,<br />
Jamie<br />
Legal Disclaimer<br />
JAMES BARONE RACING is not responsible for the misuse, incorrect<br />
installation, or failure of any product we sell. Under no circumstances, including<br />
but not limited to negligence, will JAMES BARONE RACING be liable for special<br />
or consequential damages that result from the use or inability to use our<br />
products. JAMES BARONE RACING does not assume responsibility for any<br />
damage to the user, passenger or vehicle resulting from the operation of a<br />
JAMES BARONE RACING product.<br />
PLEASE DRIVE RESPONSIBLY.