You also want an ePaper? Increase the reach of your titles
YUMPU automatically turns print PDFs into web optimized ePapers that Google loves.
<strong>Fume</strong> <strong>Firing</strong> <strong>Methods</strong> <strong>Handout</strong> Page 2 of 8<br />
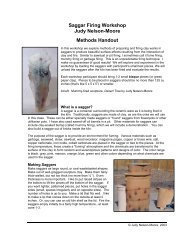
Saggars<br />
A saggar is a container surrounding the ceramic ware as it is<br />
being fired in the kiln. Traditionally, saggars are made of clay<br />
usually shaped like big wastebaskets. You can also use specially<br />
made saggars or “found” saggars from flowerpots, metal cans,<br />
clay sewer pipes, shaped slabs, and aluminum foil. I have used<br />
sawed-off oil barrels in a pit. Other materials for saggars can<br />
include clay-soaked burlap (called mummy firing). You can also<br />
build a saggar out of bricks inside the kiln. In a fuming kiln, the<br />
entire kiln chamber becomes the saggar.<br />
The purpose of the saggar is to provide an environment for<br />
fuming. At the firing temperature, the combination of materials<br />
placed in the saggar creates the fuming atmosphere where the<br />
chemicals are transferred to the surface of the clay, forming<br />
random and serendipitous patterns. The color range is black,<br />
gray, pink, maroon, orange, blue, green and other colors<br />
depending on what chemicals are used in the saggar and the temperature.<br />
Making Clay Saggars<br />
Make saggars as large round, or oval wastebasket shapes. Make out of well-grogged sculpture clay. Make<br />
fairly thick-walled, but not too thick (no more than ½ “). Even thickness is important. I like to put raised stripes<br />
on the bottom to lift the pieces off the bottom of the saggar. If you want lighter, patterned pieces, put holes in<br />
the saggar sides (small, spaces irregularly and on opposite sites). The number of holes is up to you. Make a<br />
lid that fits well. I like to make a lip that comes down on the outside at least 2 inches. Or, you can use an old<br />
kiln shelf as the lid. Fire the saggars empty initially to a fairly high temperature...at least cone 1-3.<br />
Another idea for making saggars is to create two thick clay bowls for the top and bottom. Adjust the height by<br />
placing rings of thrown clay between the bowls. Punch holes in rims of rings to create airflow.<br />
Making and Preparing the Pieces to be Fired<br />
All sizes and shapes of pieces have been fume fired. I have fired pieces from 1 inch to 5 feet. Smooth shapes<br />
and areas tend to show off the fuming patterns better, but sometimes textured areas can also be interesting.<br />
The pieces should not be too thick. Prepare the pieces by firing in a bisque fire. Some people claim that a low<br />
bisque (or no bisque) gives the best results, but the resulting pieces are too fragile for my liking. Experiment<br />
with firing the pieces higher initially (I have done up to cone 6). These higher fired pieces don’t pick up as<br />
much color. You can refire saggar pieces that didn’t turn out well in the first saggar firing. If you really hate<br />
the results put through an electric firing in-between to burn out as much of the carbon as possible, reapply a<br />
thin terra sigillata and fire again<br />
Terra Sigillata (T.S.)<br />
Terra Sigillata is slip made of the very finest (tiniest) clay particles. It can be any color, any clay, although<br />
some clays make better Terra Sig than others. When applied to the piece, it can be burnished to give a soft<br />
sheen or a high gloss. Historically used as an alternative to glaze by American Indians, Greeks, and other<br />
“primitive” potters around the world. We use terra sigillata in fume firing, because it gives a nice sheen and<br />
“catches” the fumes better. It is the raw clay particles that fume the best. Terra sigillata applied to bisque is<br />
my preferred method. This allows the base piece to be fired to avoid too much breakage that occurs with<br />
greenware. Cracks in the terra sigillata when applying to bisque can be avoided by using a THIN coat.<br />
How to Make Terra Sigillata<br />
You can either use a recipe (see recipe section) or...here’s the way I do it: Put some hot water in a bucket or<br />
large see-through jar. Add some deflocculant: I use Calgon (original formula) or sodium hexametaphosphate.<br />
Put some clay in bucket. Use Red Art for red, Jordan (friend claims produces good oranges), KY Ball Clays<br />
(not as white as...), Grolleg porcelain (very white). Try local clays. Use about 3-4 times hot water to the<br />
amount of clay. Stir well. Let sit for 2-24 hours. Gently and carefully, lift the container and pour off any plain<br />
water from the top and discard. Pour off the center cloudy section into another container. Stop pouring before<br />
© Judy Nelson-Moore, 2010