
Create successful ePaper yourself
Turn your PDF publications into a flip-book with our unique Google optimized e-Paper software.
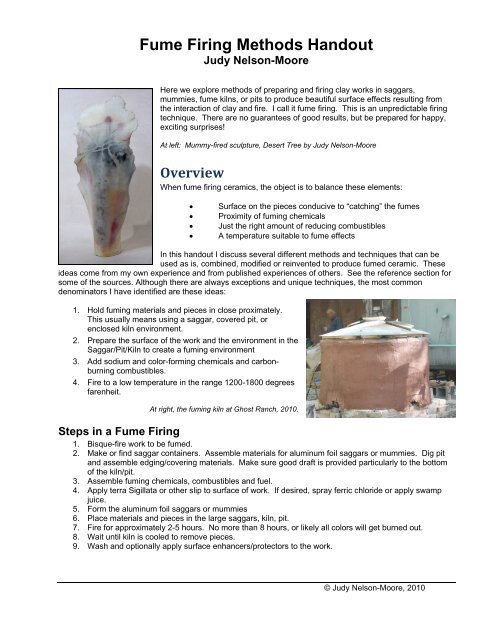
<strong>Fume</strong> <strong>Firing</strong> <strong>Methods</strong> <strong>Handout</strong><br />
Judy Nelson-Moore<br />
Here we explore methods of preparing and firing clay works in saggars,<br />
mummies, fume kilns, or pits to produce beautiful surface effects resulting from<br />
the interaction of clay and fire. I call it fume firing. This is an unpredictable firing<br />
technique. There are no guarantees of good results, but be prepared for happy,<br />
exciting surprises!<br />
At left: Mummy-fired sculpture, Desert Tree by Judy Nelson-Moore<br />
Overview<br />
When fume firing ceramics, the object is to balance these elements:<br />
• Surface on the pieces conducive to “catching” the fumes<br />
• Proximity of fuming chemicals<br />
• Just the right amount of reducing combustibles<br />
• A temperature suitable to fume effects<br />
In this handout I discuss several different methods and techniques that can be<br />
used as is, combined, modified or reinvented to produce fumed ceramic. These<br />
ideas come from my own experience and from published experiences of others. See the reference section for<br />
some of the sources. Although there are always exceptions and unique techniques, the most common<br />
denominators I have identified are these ideas:<br />
1. Hold fuming materials and pieces in close proximately.<br />
This usually means using a saggar, covered pit, or<br />
enclosed kiln environment.<br />
2. Prepare the surface of the work and the environment in the<br />
Saggar/Pit/Kiln to create a fuming environment<br />
3. Add sodium and color-forming chemicals and carbonburning<br />
combustibles.<br />
4. Fire to a low temperature in the range 1200-1800 degrees<br />
farenheit.<br />
At right, the fuming kiln at Ghost Ranch, 2010.<br />
Steps in a <strong>Fume</strong> <strong>Firing</strong><br />
1. Bisque-fire work to be fumed.<br />
2. Make or find saggar containers. Assemble materials for aluminum foil saggars or mummies. Dig pit<br />
and assemble edging/covering materials. Make sure good draft is provided particularly to the bottom<br />
of the kiln/pit.<br />
3. Assemble fuming chemicals, combustibles and fuel.<br />
4. Apply terra Sigillata or other slip to surface of work. If desired, spray ferric chloride or apply swamp<br />
juice.<br />
5. Form the aluminum foil saggars or mummies<br />
6. Place materials and pieces in the large saggars, kiln, pit.<br />
7. Fire for approximately 2-5 hours. No more than 8 hours, or likely all colors will get burned out.<br />
8. Wait until kiln is cooled to remove pieces.<br />
9. Wash and optionally apply surface enhancers/protectors to the work.<br />
© Judy Nelson-Moore, 2010
<strong>Fume</strong> <strong>Firing</strong> <strong>Methods</strong> <strong>Handout</strong> Page 2 of 8<br />
Saggars<br />
A saggar is a container surrounding the ceramic ware as it is<br />
being fired in the kiln. Traditionally, saggars are made of clay<br />
usually shaped like big wastebaskets. You can also use specially<br />
made saggars or “found” saggars from flowerpots, metal cans,<br />
clay sewer pipes, shaped slabs, and aluminum foil. I have used<br />
sawed-off oil barrels in a pit. Other materials for saggars can<br />
include clay-soaked burlap (called mummy firing). You can also<br />
build a saggar out of bricks inside the kiln. In a fuming kiln, the<br />
entire kiln chamber becomes the saggar.<br />
The purpose of the saggar is to provide an environment for<br />
fuming. At the firing temperature, the combination of materials<br />
placed in the saggar creates the fuming atmosphere where the<br />
chemicals are transferred to the surface of the clay, forming<br />
random and serendipitous patterns. The color range is black,<br />
gray, pink, maroon, orange, blue, green and other colors<br />
depending on what chemicals are used in the saggar and the temperature.<br />
Making Clay Saggars<br />
Make saggars as large round, or oval wastebasket shapes. Make out of well-grogged sculpture clay. Make<br />
fairly thick-walled, but not too thick (no more than ½ “). Even thickness is important. I like to put raised stripes<br />
on the bottom to lift the pieces off the bottom of the saggar. If you want lighter, patterned pieces, put holes in<br />
the saggar sides (small, spaces irregularly and on opposite sites). The number of holes is up to you. Make a<br />
lid that fits well. I like to make a lip that comes down on the outside at least 2 inches. Or, you can use an old<br />
kiln shelf as the lid. Fire the saggars empty initially to a fairly high temperature...at least cone 1-3.<br />
Another idea for making saggars is to create two thick clay bowls for the top and bottom. Adjust the height by<br />
placing rings of thrown clay between the bowls. Punch holes in rims of rings to create airflow.<br />
Making and Preparing the Pieces to be Fired<br />
All sizes and shapes of pieces have been fume fired. I have fired pieces from 1 inch to 5 feet. Smooth shapes<br />
and areas tend to show off the fuming patterns better, but sometimes textured areas can also be interesting.<br />
The pieces should not be too thick. Prepare the pieces by firing in a bisque fire. Some people claim that a low<br />
bisque (or no bisque) gives the best results, but the resulting pieces are too fragile for my liking. Experiment<br />
with firing the pieces higher initially (I have done up to cone 6). These higher fired pieces don’t pick up as<br />
much color. You can refire saggar pieces that didn’t turn out well in the first saggar firing. If you really hate<br />
the results put through an electric firing in-between to burn out as much of the carbon as possible, reapply a<br />
thin terra sigillata and fire again<br />
Terra Sigillata (T.S.)<br />
Terra Sigillata is slip made of the very finest (tiniest) clay particles. It can be any color, any clay, although<br />
some clays make better Terra Sig than others. When applied to the piece, it can be burnished to give a soft<br />
sheen or a high gloss. Historically used as an alternative to glaze by American Indians, Greeks, and other<br />
“primitive” potters around the world. We use terra sigillata in fume firing, because it gives a nice sheen and<br />
“catches” the fumes better. It is the raw clay particles that fume the best. Terra sigillata applied to bisque is<br />
my preferred method. This allows the base piece to be fired to avoid too much breakage that occurs with<br />
greenware. Cracks in the terra sigillata when applying to bisque can be avoided by using a THIN coat.<br />
How to Make Terra Sigillata<br />
You can either use a recipe (see recipe section) or...here’s the way I do it: Put some hot water in a bucket or<br />
large see-through jar. Add some deflocculant: I use Calgon (original formula) or sodium hexametaphosphate.<br />
Put some clay in bucket. Use Red Art for red, Jordan (friend claims produces good oranges), KY Ball Clays<br />
(not as white as...), Grolleg porcelain (very white). Try local clays. Use about 3-4 times hot water to the<br />
amount of clay. Stir well. Let sit for 2-24 hours. Gently and carefully, lift the container and pour off any plain<br />
water from the top and discard. Pour off the center cloudy section into another container. Stop pouring before<br />
© Judy Nelson-Moore, 2010
<strong>Fume</strong> <strong>Firing</strong> <strong>Methods</strong> <strong>Handout</strong> Page 3 of 8<br />
you get to the thick sludge containing the heavy particles at the bottom (discard this sludge). Save the center<br />
portion as the T.S. If too thin, thicken through evaporation. It should be the consistency of milk. Dip a shard<br />
into the T.S and see if it looks good. It should be slippery feeling and you should be able to polish the shard to<br />
a sheen...how much sheen depends on the type of clay and how good a job you did of getting the smaller<br />
particles. If not shiny enough for you, let sit again and separate again, or add more calgon, let sit and<br />
separate again. You can find lots of more exact recipes for T.S. in books and on the Internet. Try them if you<br />
are dissatisfied with the T.S. you get this easy way.<br />
Add mason stains or oxides for color...10-40%. However, I have found that most colors burn out in a saggar<br />
firing. Generally, you should use the colored terra-sigs for regular non-fume firings. Red clay terra-sigs will<br />
produce darker fumed effects than white clay.<br />
Applying Terra Sigillata<br />
Apply to your piece by dipping, pouring or brushing, one fairly thin coat. Bug gently but rapidly with fingers<br />
covered with clear plastic drycleaning bag.<br />
Materials for the stack<br />
You need the following types of things for the fume firing:<br />
Something to produce carbon<br />
This is the garbage, sawdust, seaweed, straw, wood excelsior, wood shavings, wood chips, charcoal,<br />
seeds/feed, dog food, stable sweepings, dried garbage soaked in salt water, etc, etc, etc. My favorites are<br />
seaweed and wood excelsior.<br />
If you use only carbon producers with no salt or color chemicals, you will likely get black/gray effects. For<br />
totally black with hardly any gray, use a very tight saggar and smother the piece in sawdust. For lighter effects<br />
use lighter, open materials like wood excelsior (thin, shredded wood strips most often used as a packing<br />
material) or wood shavings.<br />
Something to produce color<br />
I use iron oxide and copper carbonate. These produce yellows, oranges, reds (rust, pink, maroon, and<br />
shades in between), green, black, gray, and brown. It’s the red tones that excite most people. I’ve used<br />
cobalt carbonate, but it is too blue for my taste. Sulfates (copper and iron) fume well.<br />
Inert Stuff<br />
(this is used as spacers, supports, or fillers to thin out the carbon stuff, or surfaces to paint the fume<br />
chemicals on to bring them close to work)<br />
Vermiculite. Mix this with sawdust to cut the black effect of sawdust. Be careful as it is toxic.<br />
Fire brick pieces can hold things in place.<br />
Slabs or Shards (paint with salt/chemical combination)<br />
Salt<br />
This volatilizes and carries the chemicals and carbons onto the piece as well as creates interesting<br />
patterns. I mostly use table salt, but have also used other forms of sodium.<br />
I prepare an iron oxide, copper carbonate, salt and water solution and brush on the inside of the saggars<br />
and on shards, as well as dribble around (but not on) the pieces in the saggar. If you put a lot of iron and<br />
lots of carbon stuff and salt, you may get black iron crystals. The copper hopefully makes lovely pinks,<br />
mauves, reds. The iron can make reds, oranges, browns and black. If the copper makes greens, instead,<br />
it’s probably because it didn’t get reduced. Don’t put this solution ON the pots…not pretty!<br />
Pattern Makers<br />
Copper, brass or other composition wire for black or other color lines. Wrap around the piece or tape on.<br />
Coarse steel wool, copper or steel scrubbies can be added to saggar next to piece or wrapped around or<br />
taped on piece.<br />
Grasses, corn husks, weeds or paper patterns held tightly against the piece by wire or tape or clay slab or<br />
shard may resist the carbon and produce white lines and pattern. If soaked in salt will produced pattern<br />
color.<br />
Custom-shaped slabs to fit the piece or found shards to lean against the piece. Paint the<br />
salt/oxide/carbonate solution on the slab/shard, let dry, and place against the piece to produce a pattern.<br />
Put grasses in-between for lines in the pattern.<br />
© Judy Nelson-Moore, 2010
<strong>Fume</strong> <strong>Firing</strong> <strong>Methods</strong> <strong>Handout</strong><br />
Fuel<br />
Page 4 of 8<br />
If you are firing in a chamber without gas, you need to add fuel at the bottom and top of the stack. For gas<br />
or electric firing, leave out the fuel. See Sumi von Dassow Pit firing notes below for discussion of fuel.<br />
Stacking the Kiln, Pit or Saggar<br />
General<br />
Decide if you want color, overall light affects, dark effects, patterning.<br />
For light effects, use less carbon stuff.<br />
If you want dark effects, put in more carbon stuff.<br />
For color, use the salt/copper/iron mix described above. Paint on the<br />
inside of the saggar walls and on shards laid up next to each piece.<br />
For lines, wrap the piece in wire. Prepare a slab to fit the piece for<br />
white (resist) lines.<br />
For patterns, put different size/shape of shards, carbon stuff, and<br />
salt/copper/iron mix. See special effects below.<br />
Special Effects<br />
Black lines. Wrap with copper or brass wire. Thin for thin lines (too<br />
thin and it disappears). Thick for big, thick black stuff on your piece. No<br />
plastic on the wire, please...that produces unpleasant black sticky stuff.<br />
Resist effects. Create a shaped slab. Be careful that the slab around the piece will not break your piece<br />
as it shrinks and contracts around the shape. Put grass, wire, paper patterns, tape, or other items next to<br />
the piece. Paint the shard inside with salt/copper/iron mixture and LET DRY. Carefully place slab next to<br />
the piece in the saggar. If the slab is not quite dry, probably OK for the workshop as the firing will not<br />
commence immediately and they will have time to dry out after loading. Don’t use plastic stuff...it makes a<br />
gummy black mess.<br />
White lines. Put grass next to piece and shard or shaped slab next to the piece.<br />
All black: If you don’t want color, stack the piece totally smothered with lots of carbon stuff (see list above)<br />
in a very tight saggar (no holes, tight lid). Sawdust is best for this.<br />
Colors. Use salt and oxides or sulfates.<br />
Specific patterns. Cut pattern out of paper, tape, form in wire. See resist effects. Wrap wire or shape wire<br />
and hold next to piece.<br />
Slip resist. Paint entire piece with thick slip. When it cracks, the fuming will go into the cracks and where<br />
the slip was solid will resist the fuming. Scrape off the slip after firing to reveal the pattern underneath<br />
Mummy <strong>Firing</strong><br />
How to prepare a mummy<br />
• Prepare a slip of any clay. Add paper-pulp for a stronger mummy.<br />
• Put a big plastic sheet on the tabletop.<br />
• Dip a piece of burlap big enough to wrap around the piece into the slip<br />
(completely saturate) and lay out on the table. Alternately, put the burlap on<br />
the table and butter the slip onto the burlap.<br />
• Cover the burlap with paper to keep slip off the piece.<br />
• Put carbon stuff, chemicals on the paper.<br />
• If desired, put chemical-painted, shaped slab or shard around piece .<br />
• Put the piece in the middle of the pile. Cover with stuff to fume the top<br />
and paper to keep the slip from getting on the piece.<br />
• Pull the burlap up around...make sure stuff is on all sides. Butter more<br />
slip on outside if needed.<br />
• Wrap with string.<br />
• Let set until firm enough to load into kiln without getting slip on other<br />
stuff in the kiln. Wait until completely dry before firing.<br />
• Stack into kiln carefully. The mummy will partially fall off during the firing, depending on how much slip<br />
you use, the composition of the slip, and how well it is wrapped.<br />
© Judy Nelson-Moore, 2010
<strong>Fume</strong> <strong>Firing</strong> <strong>Methods</strong> <strong>Handout</strong> Page 5 of 8<br />
Aluminum Foil Saggars<br />
Saggars for individual pieces or a few small pieces that are easy to make can be made with aluminum foil.<br />
Edgeworth Barnes uses a “Swamp Juice” formula in his saggars (see recipes section). For larger pots he<br />
mixes these materials with water to create an evil-looking bubbling liquid and brushes this juice directly onto<br />
the saggar to avoid having all the chemicals concentrated only near the bottom of the pot.<br />
The saggar is custom made for each piece with foil that has been crinkled up and then spread back out.<br />
Barnes scatters a little coarse steel wool, raw cotton and wood chips on the foil. Next he places moistened<br />
seaweed over these materials. Copper wire or pieces of copper dish scrubber can also be added to the mix.<br />
Next the pot is placed, usually top down, onto all these items.<br />
More seaweed, cotton, wood chips and steel wool are placed over the pot. Finally, the foil is wrapped around<br />
to cover the pot and pressed into close contact.<br />
<strong>Firing</strong><br />
Type of kiln<br />
I have done saggar firing in a pit, in gas kilns and in electric kilns. Gas<br />
kilns have more reliably produced the best results in the past. Some<br />
Dutch potters I talked to did fume firing on bricks in the open at low<br />
temperature, fuming with colored papers. Other people with whom I<br />
have talked do fume firings in or under oil barrels or barbecue<br />
containers.<br />
At left is a gas kiln loaded with saggars and mummies before firing.<br />
Opening the kiln<br />
Unlike raku, leave the pieces in the kiln until they are totally cooled.<br />
Evaluating the results when opening the saggars is your best learning<br />
tool. I recommend taking notes about how you loaded your piece.<br />
At right: same kiln load as above...after the firing. Notice that the<br />
mummies stayed together fairly well. There is a hole in the mummy<br />
on the left.<br />
Temperature<br />
I usually saggar fire to cone 08. I have tried as low as cone 010 and as<br />
high as cone 10. Higher temperatures (above about cone 01) are a<br />
totally different look, more burnt, less color. Terra sigillata becomes matt<br />
above about cone 01. Some people fume fire at lower temperatures<br />
than 08. Sumi von Dassow’s pit firings reach 1200-1400 degrees (cone<br />
018).<br />
Post-<strong>Firing</strong> Treatment<br />
o Wash. Wash the piece in water, even using a soft scrub pad<br />
(like dish washing pad) to clean off the stuff that is stuck on<br />
there. Use gloves as the chemicals in the firing are on the<br />
piece.<br />
o Seal. If desired, seal with ½ white glue or matt acrylic medium or Dorland’s wax (oil painter’s wax) or<br />
floor wax or butcher’s wax (these are some of the things I have heard of people using or used myself).<br />
I like the matt acrylic medium or Dorland’s wax best. These will help to bring out the colors and<br />
patterns, sometimes amazingly so. I have had pieces that I thought had no fuming, only to have them<br />
turn a wonderful orangey with the medium applied. However, these surface preparations may alter the<br />
colors and patterns...so if you really, really love it, leave it alone.<br />
© Judy Nelson-Moore, 2010
<strong>Fume</strong> <strong>Firing</strong> <strong>Methods</strong> <strong>Handout</strong> Page 6 of 8<br />
Sumi Van Dassow Pit <strong>Firing</strong><br />
(notes from Ceramic Arts Daily posting: http://ceramicartsdaily.org/firing-techniques/pit-firing-video-a-guide-togathering-fuels-for-the-best-results-in-a-pit-firing/)<br />
Pit: 3 feet x 6 feet, looks about 2.5-3 feet deep. Edge of pit is rimmed with bricks. On bottom of pit is<br />
rectangular arrangement of galvanized pipes with holes drilled in the pipe every few inches. End of pipe<br />
extends out of pit to hook to an electric air blower. This pushes draft into the bottom of the pit.<br />
Materials: Aspen or Cottonwood branches, very dry. Wood shavings, fresh from feed store AND dried used<br />
stable sweepings with urine and manure. Dried used coffee grounds. Dried salt-soaked corn husks. Wood<br />
scraps from cabinet shop. Salt, copper carbonate.<br />
Stack: Put layers around pipes and on top. 1) clean wood shavings, 2) well dried stable sweepings, 3) used<br />
coffee grounds well dried, 4) big pots, 5: smaller pots nestled around big pots (can wrap pots in salt soaked<br />
materials), 6) salt-soaked stuff, 7) crumples newspapers, 8) crisscrossed sticks from cabinet shop, smaller<br />
ones first, 9) dried branch pieces from aspen or cottonwood. Start fire. Then throw on top copper carbonate<br />
mixed with wood shavings. Cover. Turn on blower low.<br />
<strong>Firing</strong>. Lasts about 5 hours. Cover tightly, let completely cool. Temperature about 1200-1400 or cone 018.<br />
Recipes<br />
Sumi Von Dassow Terra Sig<br />
2100 g water<br />
1000 g Kentucky OM4 Ball Clay<br />
25 g Darvan 7 or 811<br />
Mix together in clear jar. Let set at least 3 hours. Siphon off all but the bottom sludge. Burnish with fingers and<br />
auto polishing mitt.<br />
Terra Sigillata (George Tompkins, Yuma Arizona)<br />
15g Calgon (original formula)<br />
500g Clay<br />
1 gal Water<br />
Let stand overnight. Pour or siphon off top ¾. Let thicken or boil off water. Should be thickness of milk or ½ and<br />
½.<br />
George Tompkins’ Bone (greenware) slip. Can also apply thin to bisque.<br />
50 Edgar Plastic Kaolin (EPK)<br />
25 Nepheline Syenite (Nephsy)<br />
25 Frit #25<br />
George Tompkins’ Bisque slip (this makes a velvety matt surface)<br />
25 EPK<br />
50 Nephsy<br />
25 Frit #25<br />
For dark colors, add up to 20% copper carbonate. Spray or brush on Bisque<br />
Edgeworth Barnes’ Swamp Juice<br />
Equal Parts copper sulfate<br />
fine sea salt<br />
cottonseed meal<br />
baking soda<br />
1/2 part each copper carbonate<br />
titanium dioxide<br />
For larger pots he mixes these materials with water to create an evil-looking bubbling liquid and brushes this juice<br />
directly onto the saggar to avoid having all the chemicals concentrated only near the bottom of the pot.<br />
Warning…when adding water, this REALLY bubbles up and fumes are very toxic.<br />
© Judy Nelson-Moore, 2010
<strong>Fume</strong> <strong>Firing</strong> <strong>Methods</strong> <strong>Handout</strong> Page 7 of 8<br />
References<br />
Books<br />
DVD<br />
Alternative Kilns & <strong>Firing</strong> Techniques, James C. Watkins & Paul Andres Wandless. A Lark<br />
Ceramics Book. 2004. Has sections on Raku, Saggar, Pit and Barrel firing.<br />
Barrel, Pit, and Saggar <strong>Firing</strong>, A Collection of Articles from Ceramics Monthly, Sumi von Dassow<br />
Editor. A Ceramics Monthly Handbook. 2001.<br />
Low-firing and Burnishing, Sumi von Dassow. Ceramics monthly handbook. Order from Ceramic<br />
Arts Bookstore: http://ceramicartsdaily.org/bookstore/sumi_von_dassow_collection/<br />
Sawdust <strong>Firing</strong>, Karin Hessenberg, University of Pennsylvania Press. Part of The Complete Potter<br />
series, edited by Emmanuel Cooper. 1994.<br />
Naked Clay, Ceramics Without Glaze, Jane Perryman, University of Pennsylvania Press. 2004.<br />
This book has a chapter “Clay Marked by Fire” which includes fume fired effects by various European and US<br />
artists.<br />
Fire Marks: A workbook on Low-Termperature Smoke <strong>Firing</strong>, Cheryl Herr-Rains. Gentle Breeze<br />
Publishing, 2002. Recipes and notes about different methods, techniques and effects.<br />
Pit-firing and Burnishing with Sumi von Dassow. Order from Ceramic arts bookstore<br />
http://ceramicartsdaily.org/bookstore/pit-firing-and-burnishing/<br />
Articles<br />
David Ogle’s Saggar-fired Porcelain, David Ogle, Clay Times, January/February 2004.<br />
Decorating with Volatile Materials in Saggars, Ruth Allan, Ceramics Monthly, January 1992, Page<br />
75<br />
Low-Temperature Salt/Saggar <strong>Firing</strong>, R. Bede Clarke, Ceramics Monthly, November, 1988, Page 48<br />
Saggar <strong>Firing</strong> in a Raku Kiln, Linda Riggs & J.D. Riggs, Clay Times, March/April 1988.<br />
Saggar <strong>Firing</strong> in a Raku Kiln, Orlene Bates & J.D. Riggs, Clay Times,<br />
Vapor Glazing in a Saggar, Richard Behrens, Ceramics Monthly, June/July/August 1976, Page 60<br />
This article can be obtained on my website (with color pictures) at<br />
www.nelsonmoore.com/art/fume<strong>Firing</strong><strong>Handout</strong>.pdf<br />
© Judy Nelson-Moore, 2010
<strong>Fume</strong> <strong>Firing</strong> <strong>Methods</strong> <strong>Handout</strong> Page 8 of 8<br />
NOTES<br />
Record here how you stacked your pieces into the saggars and the results<br />
Piece Description/sketch How Stacked Results<br />
Ideas to Improve or change: ________________________________________________________________<br />
________________________________________________________________________________________<br />
________________________________________________________________________________________<br />
© Judy Nelson-Moore, 2010