Cisco IP Phone 7942 User Training Guide
Cisco IP Phone 7942 User Training Guide
Cisco IP Phone 7942 User Training Guide

Create successful ePaper yourself
Turn your PDF publications into a flip-book with our unique Google optimized e-Paper software.
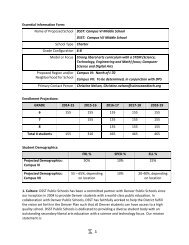
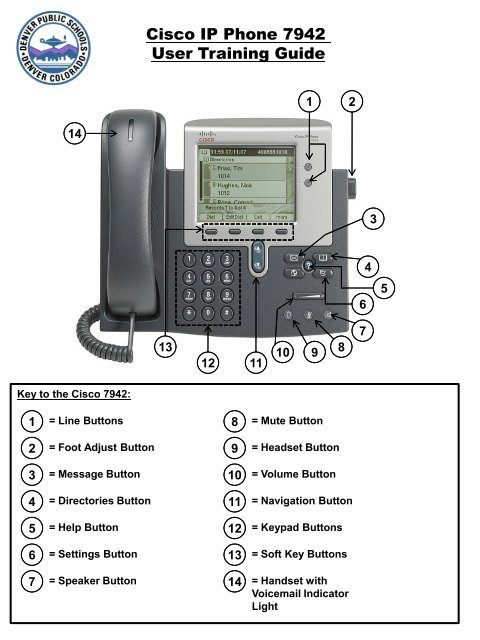
Key to the <strong>Cisco</strong> <strong>7942</strong>:<br />
1<br />
2<br />
3<br />
14<br />
= Line Buttons<br />
= Foot Adjust Button<br />
= Message Button<br />
4 = Directories Button<br />
5 = Help Button<br />
6 = Settings Button<br />
7 = Speaker Button<br />
<strong>Cisco</strong> <strong>IP</strong> <strong>Phone</strong> <strong>7942</strong><br />
<strong>User</strong> <strong>Training</strong> <strong>Guide</strong><br />
13<br />
12<br />
11<br />
10<br />
8 = Mute Button<br />
1 2<br />
9<br />
9 = Headset Button<br />
10 = Volume Button<br />
11 = Navigation Button<br />
12 = Keypad Buttons<br />
8<br />
13 = Soft Key Buttons<br />
14 = Handset with<br />
Voicemail Indicator<br />
Light<br />
6<br />
7<br />
4<br />
3<br />
5
Using your <strong>Cisco</strong> <strong>IP</strong> <strong>Phone</strong>:<br />
Following are instructions on how to use the basic features of your <strong>IP</strong> phone.<br />
You can dial internal extensions from phone by dialing the 5 digit extension number you wish<br />
to reach. You must Dial “9” for an outside line.<br />
For Assistance or to report problems:<br />
Contact the Department of Technology Services (DoTS) Hotline at 720-423-3888.<br />
5 Different Ways to<br />
place a call:<br />
• Lift the handset and dial the<br />
number.<br />
• Press the LINE button (1) and<br />
dial the number.<br />
• Press the SPEAKER button (7)<br />
and dial a number.<br />
• Press the NEW CALL soft key<br />
(13) and dial a number.<br />
• Press the DIAL soft key (13)<br />
from the Corporate Directory to dial a<br />
number. (See the section below<br />
called “Using the Corporate<br />
Directory.”)<br />
Placing a call on hold:<br />
• During a call press the HOLD<br />
soft key (13).<br />
• To return to the call, Press the<br />
RESUME soft key (13).<br />
14<br />
13<br />
12<br />
11<br />
10<br />
1 2<br />
9<br />
8<br />
6<br />
7<br />
2<br />
4<br />
3<br />
5
Answering a call:<br />
• Lift the Handset (14).<br />
• Press the ANSWER soft key (13).<br />
• Press the SPEAKER button (7).<br />
Ending a call:<br />
• Hang up the handset (14).<br />
• Press the EndCall soft key (13).<br />
• Press the SPEAKER button (7).<br />
Forwarding all calls:<br />
You can set up call forwarding to<br />
send all your incoming calls to a<br />
different number.<br />
1. Press the CFwdAll soft key<br />
(13). You should hear 2 beeps.<br />
2. Enter the 5 digit extension that<br />
you wish to forward your phone<br />
to. You will hear one beep to<br />
confirm your entry.<br />
3. To cancel the call forwarding,<br />
press the CFwdAll soft key (13)<br />
again. You will hear one beep to<br />
confirm your entry.<br />
14<br />
13<br />
Transferring a call:<br />
1. To transfer an active call to another<br />
phone number, press the TRANSFER<br />
soft key (13). This automatically puts<br />
the call on hold, and provides you<br />
with a dial tone.<br />
2. Dial the number you wish to transfer<br />
the call to.<br />
3. You can transfer when the phone<br />
begins to ring, or you can wait for the<br />
recipient to answer in order to<br />
announce the call to them before<br />
transferring. Press the TRANSFER<br />
soft key (13) again to complete the<br />
transfer.<br />
4. Hang up the receiver when the<br />
transfer is complete.<br />
12<br />
NOTE: If the party refuses the call, press<br />
the Resume soft key (13) to return to<br />
the original call.<br />
11<br />
10<br />
1 2<br />
9<br />
8<br />
6<br />
7<br />
Placing a conference call:<br />
1. During a call, press the More soft key<br />
(13) and then the Confrn soft key<br />
(13). This opens a new line while<br />
placing the current party on hold.<br />
2. Place the call to the other party.<br />
3. When the call connects, press the<br />
Confrn soft key (13) again to add<br />
this party to the call.<br />
4. Repeat the first three steps to add<br />
additional participants.<br />
NOTE:<br />
• The conference call initiator can drop<br />
the last party added by pressing the<br />
RmLstC soft key (13). You will need<br />
to press the more soft key (13) until<br />
the RmLstC key appears.<br />
• To end a conference call, all but one<br />
party must hang up.<br />
4<br />
• Once the conference call initiator<br />
disconnects, no additional parties can<br />
be added.<br />
3<br />
3<br />
5
Using the Corporate<br />
Directory:<br />
1. Press the Directory button (4).<br />
2. Press the Navigation button<br />
(11) until you get to the<br />
Corporate Directory, or press 5<br />
on your Key Pad (12).<br />
3. Press the Select soft key (13)<br />
to select the Corporate<br />
Directory.<br />
4. Use the Navigation button (11)<br />
to highlight the search method of<br />
your choice (e.g.: First Name,<br />
Last Name, or Number).<br />
5. Using the Keypad (12), enter<br />
the search information. (Partial<br />
entries are acceptable.)<br />
To enter a letter press the<br />
corresponding number on the<br />
key pad. For example for “b”<br />
press the “2” button twice in<br />
rapid succession. The cursor<br />
automatically advances to the<br />
next letter. If you make an error,<br />
press the
Changing the ring:<br />
1. Press the Settings Button (6).<br />
2. Press “1” for <strong>User</strong> Preferences<br />
or press the Select soft key<br />
(13) when <strong>User</strong> Preferences is<br />
highlighted.<br />
3. Press “1” for Rings or press the<br />
Select soft key (13) when<br />
Rings is highlighted.<br />
4. With Default Ring highlighted,<br />
press the Select soft key (13).<br />
5. Use the Navigation button (11)<br />
to highlight any ring listed.<br />
6. Press the Play soft key (13) to<br />
sample a ring tone.<br />
7. Press the Select soft key (13)<br />
once the desired ring tone has<br />
been chosen.<br />
Adjusting the ringer<br />
volume:<br />
1. While the phone is idle, press<br />
the Volume button (10) once<br />
to hear a sample of the volume<br />
level.<br />
2. Continue to press the Volume<br />
button (10) to adjust the<br />
volume level.<br />
NOTE: The ringer volume level is<br />
automatically saved.<br />
14<br />
13<br />
Adjusting the<br />
handset,<br />
speakerphone, and<br />
headset volume:<br />
12<br />
1. During an active call, press the<br />
Volume button (10) to<br />
increase or decrease the<br />
volume of your handset,<br />
speakerphone, or headset.<br />
2. To save the volume setting,<br />
press the Save soft key (13).<br />
NOTE: Adjusting and saving the<br />
volume level during a call only<br />
affects the currently active<br />
voice receiver. For example, if<br />
you press the Volume button<br />
(10) when you are using the<br />
Handset (14), you will only<br />
change the handset volume,<br />
not the speaker or headset<br />
volume.<br />
11<br />
10<br />
1 2<br />
9<br />
Muting a call:<br />
8<br />
1. Press the Mute button (8).<br />
2. To disengage mute, press the<br />
Mute button (8) again.<br />
NOTE: If you are using mute along<br />
with your speakerphone, lifting<br />
the Handset (14) will<br />
disengage mute.<br />
6<br />
7<br />
5<br />
4<br />
3<br />
5
To access<br />
voicemail from<br />
your phone:<br />
1. Press the Message<br />
button (3) on your<br />
phone.<br />
2. Enter your PIN<br />
followed by the # key.<br />
Your initial PIN is sent<br />
to your email box.<br />
3. If this is the first time<br />
you are accessing<br />
your voicemail box,<br />
the system will then<br />
walk you through the<br />
setup process.<br />
NOTE:<br />
• Please refer to the<br />
Voice Mail Quick<br />
Reference <strong>Guide</strong> 2010<br />
published at<br />
http://dots.dpsk12.org/<br />
voip for more detail on<br />
your voicemail box.<br />
14<br />
13<br />
Transfer a call directly<br />
to voicemail:<br />
1. Select the Transfer soft key<br />
(13) and, using the Keypad<br />
(12), dial * and the desired<br />
extension.<br />
2. Press the Transfer soft key<br />
(13) again to complete the<br />
transfer.<br />
NOTE: To dial straight into an<br />
extension’s voicemail, dial *<br />
and the extension.<br />
12<br />
11<br />
10<br />
To access voicemail<br />
from an outside line:<br />
1. Call 720-424-4444.<br />
1 2<br />
9<br />
8<br />
2. When you hear “To access<br />
your mailbox,” enter your five<br />
digit extension followed by the<br />
# key.<br />
3. Enter your PIN, followed by the<br />
# key.<br />
6<br />
7<br />
6<br />
4<br />
3<br />
5