
Create successful ePaper yourself
Turn your PDF publications into a flip-book with our unique Google optimized e-Paper software.
ASSEMBLY INSTRUCTIONS<br />
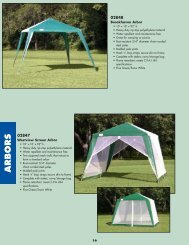
Item <strong>02845</strong> - <strong>Wendover</strong> <strong>Screen</strong> <strong>Arbor</strong><br />
Thank you for buying a <strong>Texsport</strong> Authentic Adventure Gear Product. We hope you enjoy your new arbor and that it will serve you with<br />
many years of camping pleasure. We encourage you to read and understand each step of the set-up instructions prior to working with<br />
the arbor.<br />
PARTS LIST:<br />
Do not apply excessive force to this product.<br />
DESCRIPTION . . . . . . . . . . . . . . . . .QTY. . . . . .PART NO.<br />
Gray Center Roof Joints . . . . . . . .2 EA.<br />
White corner Roof Joints . . . . . . .4 EA.<br />
<strong>Screen</strong> <strong>Arbor</strong> Skin . . . . . . . . . . . . .1 EA.<br />
Plastic Stakes . . . . . . . . . . . . . . .12 EA.<br />
Steel Roof Poles . . . . . . . . . . . . . .4 EA. . . . . .#1<br />
Steel Roof Poles . . . . . . . . . . . . . .4 EA. . . . . .#2<br />
Steel Roof Poles . . . . . . . . . . . . . .4 EA. . . . . .#3<br />
Steel Eaves Poles . . . . . . . . . . . . .8 EA. . . . . .#4<br />
Steel Eaves Poles . . . . . . . . . . . . .4 EA. . . . . .#5<br />
Steel Eaves Poles . . . . . . . . . . . . .2 EA. . . . . .#6<br />
Steel Leg Poles . . . . . . . . . . . . . . .4 EA. . . . . .#7<br />
Steel Leg Poles . . . . . . . . . . . . . . .4 EA. . . . . .#8<br />
Steel Peak Poles . . . . . . . . . . . . . .1 EA. . . . . .#9<br />
Steel Poles with Plastic Rings . . . . .2 EA. . . . . .#10<br />
Steel Poles with Plastic Rings . . . . .2 EA. . . . . .#11<br />
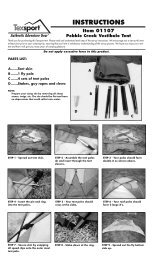
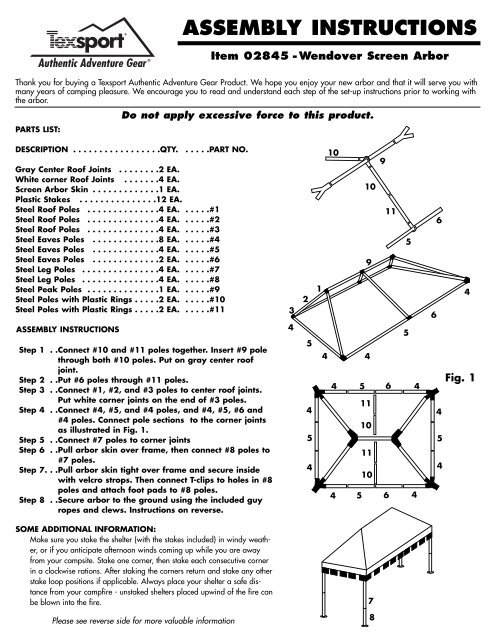
ASSEMBLY INSTRUCTIONS<br />
Step 1 . .Connect #10 and #11 poles together. Insert #9 pole<br />
through both #10 poles. Put on gray center roof<br />
joint.<br />
Step 2 . .Put #6 poles through #11 poles.<br />
Step 3 . .Connect #1, #2, and #3 poles to center roof joints.<br />
Put white corner joints on the end of #3 poles.<br />
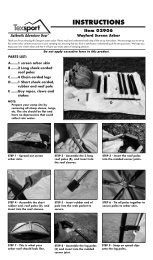
Step 4 . .Connect #4, #5, and #4 poles, and #4, #5, #6 and<br />
#4 poles. Connect pole sections to the corner joints<br />
as illustrated in Fig. 1.<br />
Step 5 . .Connect #7 poles to corner joints<br />
Step 6 . .Pull arbor skin over frame, then connect #8 poles to<br />
#7 poles.<br />
Step 7. . .Pull arbor skin tight over frame and secure inside<br />
with velcro strops. Then connect T-clips to holes in #8<br />
poles and attach foot pads to #8 poles.<br />
Step 8 . .Secure arbor to the ground using the included guy<br />
ropes and clews. Instructions on reverse.<br />
SOME ADDITIONAL INFORMATION:<br />
Make sure you stake the shelter (with the stakes included) in windy weather,<br />
or if you anticipate afternoon winds coming up while you are away<br />
from your campsite. Stake one corner, then stake each consecutive corner<br />
in a clockwise rations. After staking the corners return and stake any other<br />
stake loop positions if applicable. Always place your shelter a safe distance<br />
from your campfire - unstaked shelters placed upwind of the fire can<br />
be blown into the fire.<br />
Please see reverse side for more valuable information<br />
3<br />
4<br />
2<br />
5<br />
4<br />
5<br />
4<br />
1<br />
4<br />
10<br />
4<br />
4<br />
5<br />
10<br />
9<br />
4<br />
11<br />
10<br />
11<br />
10<br />
7<br />
8<br />
9<br />
5 6<br />
11<br />
6<br />
5<br />
5<br />
4<br />
4<br />
6<br />
6<br />
4<br />
5<br />
4<br />
4<br />
Fig. 1
Shelters placed downwind of the fire are often showered with tiny sparks that can burn holes into the lightweight fabrics of your shelter.<br />
The frame system on this shelter was designed to collapse during high winds. By collapsing in the wind the frame will not break, offering<br />
you years of continued use. We recommend that you practice setting your shelter at home before taking it into the wilderness.<br />
WATERPROOFING YOUR SHELTER:<br />
<strong>Texsport</strong> shelters are made form coated water-repellent fabrics. However, the sewing process, necessary in all shelter fabrication, can<br />
cause water leakage where the sewing needles have perforated the fabric in the seams. Without treatment the shelter will leak. Every new<br />
shelter needs to be seam sealed to make it water tight. We recommend using <strong>Texsport</strong> Spray Waterproofing/Seam Sealer which may be<br />
found at your local outdoor outfitter or camping store.<br />
SHELTER STAKES:<br />
All shelters should be staked down. The stakes supplied with your shelter are effective for most conditions; however, specialized stakes are<br />
recommended in certain cases:<br />
a. Sand stakes: Long broad stakes designed to hold in loose sand<br />
b. Steel stakes: Most effective in hard, rocky or frozen soil. These can rust and their sharp edges could damage the shelter if<br />
stored with the shelter. In extremely hard soil a steel rod can be used to make the starter hole.<br />
c. Skewer stakes: Lightweight, but less holding power than the standard stakes<br />
d. Snow stakes: The most common method is to bury objects with a great deal of surface area in the snow (i.e. branches,<br />
aluminum pie plates, stuff sacks or shelter bags filled with snow and buried: (this may be referred to as the<br />
dead man method). Shelters can also be secured to snow skis, or poles which are stuck into the snow.<br />
STORAGE:<br />
Shelters should be stored dry and loosely folded, away from heat. Keep out of reach of mice as they like to nest in shelters. Never store<br />
directly on concrete, as moisture and chemicals in the concrete may damage the nylon.<br />
WASHING:<br />
Hand wash with a sponge, using soap such as Ivory Flakes. Never use detergent or washing machines as they may damage the coating<br />
or seams.<br />
HOW LONG WILL A NYLON SHELTER LAST?<br />
Various conditions will affect the length of service which you receive:<br />
a. A nylon shelter which is left erected all summer may last only one or two seasons, as the sun’s ultra-violet rays damage nylon under<br />
continual exposure.<br />
b. Never store a shelter wet or damp, as mildew may develop. It will not harm nylon, however, mildew is unsightly and may damage<br />
other parts of the shelter (i.e. zipper tapes).<br />
c. Avoid spraying insect repellent or hair sprays, etc. on shelter fabric as they may be harmful.<br />
REPAIR:<br />
• Adhesive-backed rip-stop tape is recommended for repairing tears.<br />
• Small holes can be sealed using nylon seam sealant.<br />
WARNING:<br />
<strong>Texsport</strong> shelter fabrics are flame retardant treated per C.P.A.I.-84 specification. However, for your safety, we recommend that NO OPEN<br />
FLAME BE USED IN OR NEAR YOUR SHELTER.<br />
QUESTIONS:<br />
If you should have any questions, problems or comments, please call our Customer Service Department at 1-800-231-1402. This<br />
Department is open M–F from 8 a.m.–5 p.m. CST. www.texsport.com<br />
MODEL: WENDOVER<br />
SCREEN ARBOR<br />
ITEM # <strong>02845</strong><br />
MADE IN CHINA<br />
JSC07
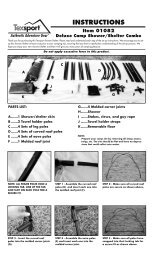
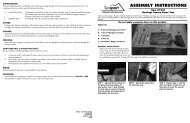
ASSEMBLY INSTRUCTIONS<br />
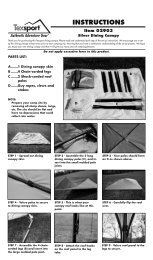
STEP 1. . . .Tie a loop with a knot to fit over the pin on the top of the pole system or tie<br />
the rope to a “D” ring, depending on which product you have.<br />
STEP 2. . . .Tie the other end of the rope to the metal clew.<br />
GUY ROPE INSTRUCTIONS<br />
Item 02844 - Amesbury <strong>Arbor</strong><br />
Thank you for buying a <strong>Texsport</strong> Authentic Adventure Gear Product. We hope you enjoy your new tent and that it will serve you with<br />
many years of camping pleasure. We encourage you to read and understand each step of the set-up instructions prior to working with<br />
the tent.<br />
STEP 3. . . .Loop the guy rope around the stake and inter-twine the clew and guy rope.<br />
Make sure you have tension on the guy rope after you are done. If there is<br />
not enough tension, just slide the clew up the guy rope towards the top of<br />
the pole or “D” ring to tighten.<br />
QUESTIONS:<br />
If you should have any questions, problems, or comments please call our Customer Service<br />
Department at 1-800-231-1402. This Department is open M-F from 8:00 a.m. until 5:00 p.m. CST.<br />
Tent<br />
Stake<br />
Plastic<br />
Clew<br />
Rope<br />
Loop the rope up through<br />
and back under again<br />
“D” Ring<br />
Pole<br />
Rope and<br />
Adjuster<br />
Tie Loop<br />
Ground<br />
Stake<br />
Loop