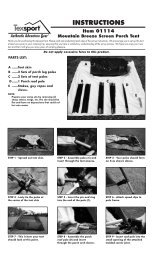
INSTRUCTIONS - Texsport
INSTRUCTIONS - Texsport
INSTRUCTIONS - Texsport
You also want an ePaper? Increase the reach of your titles
YUMPU automatically turns print PDFs into web optimized ePapers that Google loves.
<strong>INSTRUCTIONS</strong><br />
Item 01323<br />
Sequoia Pass 3-Room Family Cabin Tent<br />
Thank you for purchasing this <strong>Texsport</strong> tent. Please read and understand each step of the set-up instructions. We encourage you to set-up this tent<br />
at least once prior to your camping trip, ensuring that you have a satisfactory understanding of the set-up process. We hope you enjoy your new<br />
tent and that it will give you many years of camping pleasure.<br />
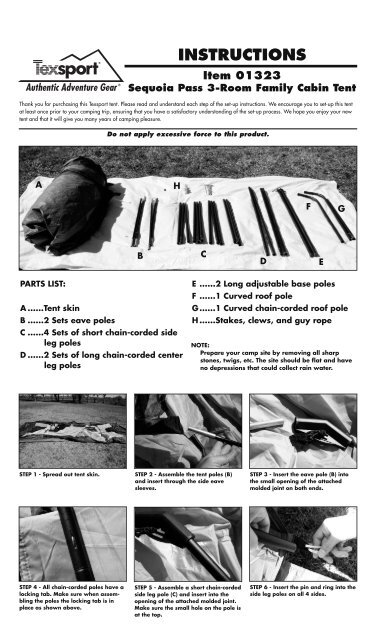
A<br />
PARTS LIST:<br />
A......Tent skin<br />
B......2 Sets eave poles<br />
C......4 Sets of short chain-corded side<br />
leg poles<br />
D......2 Sets of long chain-corded center<br />
leg poles<br />
Do not apply excessive force to this product.<br />
STEP 1 - Spread out tent skin. STEP 2 - Assemble the tent poles (B)<br />
and insert through the side eave<br />
sleeves.<br />
STEP 4 - All chain-corded poles have a<br />
locking tab. Make sure when assembling<br />
the poles the locking tab is in<br />
place as shown above.<br />
B<br />
H<br />
C<br />
STEP 5 - Assemble a short chain-corded<br />
side leg pole (C) and insert into the<br />
opening of the attached molded joint.<br />
Make sure the small hole on the pole is<br />
at the top.<br />
D E<br />
F G<br />
E......2 Long adjustable base poles<br />
F......1 Curved roof pole<br />
G......1 Curved chain-corded roof pole<br />
H......Stakes, clews, and guy rope<br />
NOTE:<br />
Prepare your camp site by removing all sharp<br />
stones, twigs, etc. The site should be flat and have<br />
no depressions that could collect rain water.<br />
STEP 3 - Insert the eave pole (B) into<br />
the small opening of the attached<br />
molded joint on both ends.<br />
STEP 6 - Insert the pin and ring into the<br />
side leg poles on all 4 sides.
STEP 7 - Stake down at the pin and<br />
ring. Repeat steps 2 - 6 for the other<br />
tent eave.<br />
STEP 10 - Assemble the curved chaincorded<br />
roof poles (G) and (F) and<br />
insert it through the roof sleeve.<br />
STEP 13 - Insert the assembled leg<br />
pole into the center roof pole. Now<br />
adjust the center pole to make the tent<br />
tight.<br />
STEP 16 - This is what your tent should<br />
look like.<br />
STEP 19 - Raise center leg poles so tent<br />
is tight again, and secure the rainfly<br />
with attached velcro to side legs.<br />
STEP 8 - Stake down the tabs at the<br />
side doors.<br />
STEP 11 - Loop the web straps to the<br />
poles and tie to secure as shown<br />
above.<br />
STEP 14 - Attach speed clips to center<br />
leg poles.<br />
STEP 17 - To attach the rainfly, locate<br />
the attached hooks.<br />
STEP 20 - It is recommended in windy<br />
weather to secure your tent with guy<br />
ropes. Insert the guy rope into clew as<br />
shown above.<br />
STEP 9 - This is what your tent should<br />
like at this point.<br />
STEP 12 - Assemble the long chaincorded<br />
center leg poles (D) and insert<br />
into the long adjustable base pole.<br />
Extend only half way.<br />
STEP 15 - Stake down all the other<br />
tabs around the tent and mud mats.<br />
STEP 18 - Lower center leg poles and<br />
drape the rainfly over the tent and insert<br />
the hooks into the small holes of<br />
the side legs.<br />
STEP 21 - Tie the other end of the guy<br />
rope to the tabs on the fly.
STEP 22 - Loosen the guy rope as<br />
shown to wrap around a stake.<br />
STEP 23 - Stake down the guy rope. STEP 24 - Adjust the tension on the<br />
guy rope by sliding the clew up or<br />
down.<br />
WARNING:<br />
<strong>Texsport</strong> tent fabrics are flame retardant treated per C.P.A.I.-84 specification. However, for your safety, we recommend that NO OPEN FLAME BE<br />
USED IN OR NEAR YOUR TENT.<br />
SOME ADDITIONAL INFORMATION:<br />
Make sure you stake the tent (with the tent stakes included) in windy weather, or if you anticipate afternoon winds coming up while you are away from<br />
your campsite. Stake one corner, then stake each consecutive corner in a clockwise rotation. Make sure the tent remains tight. Always place your tent a<br />
safe distance from your campfire - unstaked tent placed upwind of the fire can be blown into the fire. Tent placed downwind of the fire are often showered<br />
with tiny sparks that can burn holes into the lightweight fabrics of your tent.<br />
WATERPROOFING YOUR TENT:<br />
<strong>Texsport</strong> tents are made from coated water-repellent fabrics. However, the sewing process, necessary in all tent fabrication, can cause water leakage<br />
where the sewing needles have perforated the fabric in the seams. Without treatment the tent will leak. Every new tent needs to be seam sealed to<br />
make it water tight. We recommend using <strong>Texsport</strong> Spray Waterproofing/Seam Sealer which may be found at your local outdoor outfitter or camping<br />
store.<br />
TENT STAKES:<br />
All tents should be staked down. The stakes supplied with your tent are effective for most conditions; however, specialized stakes are recommended in<br />
certain cases:<br />
a. Sand Stakes:........Long broad stakes designed to hold in loose sand.<br />
b. Steel Stakes: ........Most effective in hard, rocky or frozen soil. These can rust and their sharp edges could damage the tent if stored<br />
..........................with the tent. In extremely hard soil a steel rod can be used to make the starter hole.<br />
c. Skewer Stakes: ....Lightweight, but less holding power that the standard stakes.<br />
d. Snow Stakes: ......The most common method is to bury objects with a great deal of surface area in the snow i.e. branches,<br />
..........................aluminum pie plates, stuff sacks or tent bags filled with snow and buried: (this may be referred to as the dead<br />
..........................man method). Tents can also be secured to snow skis or poles which are stuck into the snow.<br />
ZIPPERS:<br />
If zippers stick, lubricate with silicone. Never force a zipper which has material caught in it, as this will bend the slider and prevent the zipper from<br />
closing. Continual use in a sandy environment can cause the slider to erode and fail to close the zipper.<br />
STORAGE:<br />
Tents should be stored dry and loosely folded, away from heat and water. Keep out of reach of mice as they like to nest in tents. Never store directly on<br />
concrete, as moisture and chemicals in concrete may damage the nylon.<br />
WASHING:<br />
Hand wash with a sponge, using a mild soap. Never use detergents or washing machines as they may damage the coating or seams.<br />
Remember to use seam sealer once tent had been washed to insure waterproofing.<br />
HOW LONG WILL A NYLON TENT LAST?<br />
Various conditions will affect the length of service which you receive:<br />
a. A nylon tent which is left erected all summer may last only one or two seasons, as the sun’s ultra-violet rays damage the nylon.<br />
b. Never store a tent wet or damp, as mildew may develop. It will not harm nylon, however, mildew is unsightly and may damage<br />
other parts of the tent (i.e. zipper tapes).<br />
c. Avoid spraying insect repellent or hair sprays, etc. on tent fabric as they may be harmful.<br />
REPAIR:<br />
For small tears use a an adhesive backed rip-stop nylon patch. We recommend <strong>Texsport</strong> Nylon Tent Repair Kit which may be found at your local outdoor<br />
outfitter or camping store.<br />
QUESTIONS:<br />
If you should have any questions, problems or comments, please call our Customer Service Department at 1-800-231-1402 or e-mail<br />
info@texsport.com. This Department is open M–F from 8 a.m.–5 p.m. CST.<br />
MODEL: SEQUOIA PASS 3-ROOM<br />
FAMILY CABIN TENT<br />
ITEM 01323<br />
MADE IN CHINA<br />
EMC10


