quick reference guide PreP 5 PreP 4 PreP 6 PreP 1 ... - Cook Medical
quick reference guide PreP 5 PreP 4 PreP 6 PreP 1 ... - Cook Medical
quick reference guide PreP 5 PreP 4 PreP 6 PreP 1 ... - Cook Medical

Create successful ePaper yourself
Turn your PDF publications into a flip-book with our unique Google optimized e-Paper software.
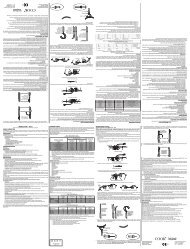
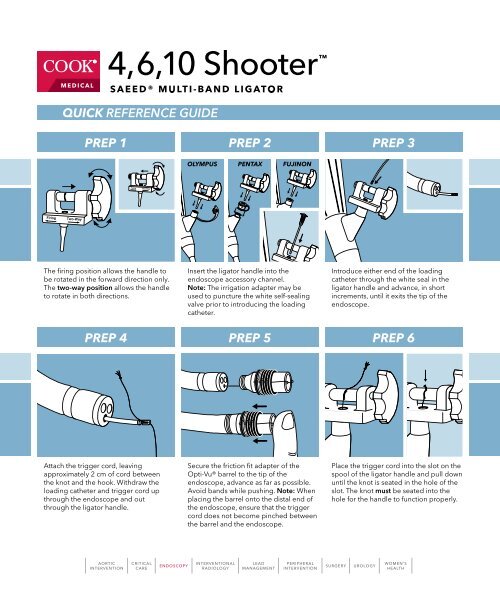
<strong>quick</strong> <strong>reference</strong> <strong>guide</strong><br />
<strong>PreP</strong> 1 <strong>PreP</strong> 2 <strong>PreP</strong> 3<br />
The firing position allows the handle to<br />
be rotated in the forward direction only.<br />
The two-way position allows the handle<br />
to rotate in both directions.<br />
Attach the trigger cord, leaving<br />
approximately 2 cm of cord between<br />
the knot and the hook. Withdraw the<br />
loading catheter and trigger cord up<br />
through the endoscope and out<br />
through the ligator handle.<br />
AORTIC<br />
INTERVENTION<br />
CRITICAL<br />
CARE<br />
ENDOSCOPY<br />
OlymPus Pentax fujinOn<br />
Insert the ligator handle into the<br />
endoscope accessory channel.<br />
Note: The irrigation adapter may be<br />
used to puncture the white self-sealing<br />
valve prior to introducing the loading<br />
catheter.<br />
<strong>PreP</strong> 4 <strong>PreP</strong> 5<br />
<strong>PreP</strong> 6<br />
Secure the friction fit adapter of the<br />
Opti-Vu® barrel to the tip of the<br />
endoscope, advance as far as possible.<br />
Avoid bands while pushing. Note: When<br />
placing the barrel onto the distal end of<br />
the endoscope, ensure that the trigger<br />
cord does not become pinched between<br />
the barrel and the endoscope.<br />
INTERVENTIONAL<br />
RADIOLOGY<br />
LEAD<br />
MANAGEMENT<br />
PERIPHERAL<br />
INTERVENTION<br />
Introduce either end of the loading<br />
catheter through the white seal in the<br />
ligator handle and advance, in short<br />
increments, until it exits the tip of the<br />
endoscope.<br />
Place the trigger cord into the slot on the<br />
spool of the ligator handle and pull down<br />
until the knot is seated in the hole of the<br />
slot. The knot must be seated into the<br />
hole for the handle to function properly.<br />
SURGERY UROLOGY<br />
WOMEN’S<br />
HEALTH
<strong>PreP</strong> 7<br />
With the handle in the two-way<br />
position, slowly rotate the handle<br />
clockwise to wind the trigger cord onto<br />
the handle spool. Note: Care must be<br />
exercised to avoid deploying a band<br />
while winding the trigger cord.<br />
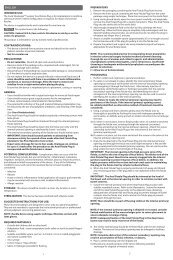
ligatiOn Of internal hemOrrhOids<br />
steP 1<br />
Lubricate the endoscope and exterior<br />
portion of the assembled Opti-Vu barrel.<br />
With the Multi-Band Ligator handle in<br />
the two-way position, introduce the<br />
endoscope into the rectum.<br />
AORTIC<br />
INTERVENTION<br />
www.cookmedical.com<br />
CRITICAL<br />
CARE<br />
ENDOSCOPY<br />
instructiOns<br />
fOr ligatiOn<br />
With handle in the two-way position,<br />
introduce the endoscope. After<br />
intubation place the handle in the firing<br />
position. Visualize the selected varix or<br />
hemorrhoid and aspirate into the Opti-Vu<br />
barrel. Maintain suction, deploy the band<br />
by rotating the ligator handle clockwise<br />
until band release is felt. If irrigation is<br />
necessary, insert irrigation adapter into<br />
the white seal of the handle.<br />
Retroflex the endoscope to visualize the<br />
selected internal hemorrhoid.<br />
After retroflexion, place the handle in<br />
the firing position. Aspirate the internal<br />
hemorrhoid into the Opti-Vu barrel.<br />
Caution: Ligation should only be<br />
performed on internal hemorrhoids<br />
located above the dentate line. Maintain<br />
suction on the internal hemorrhoid and<br />
deploy the band by rotating the ligator<br />
handle clockwise until band release is<br />
felt, indicating deployment.<br />
<strong>Cook</strong> eNdosCopy<br />
4900 Bethania Station Road, Winston-Salem, NC 27105 U.S.A.<br />
Phone: 336 744-0157, Toll Free: (USA) 800 457-4500, Fax: 336 744-5231<br />
4, 6, 10 Shooter is a trademark of <strong>Cook</strong> Endoscopy.<br />
Opti-Vu is a registered trademark of <strong>Cook</strong> Endoscopy.<br />
<strong>Cook</strong> is a registered trademark of <strong>Cook</strong> Incorporated.<br />
© 2010 <strong>Cook</strong> <strong>Medical</strong> L-16586/0510<br />
INTERVENTIONAL<br />
RADIOLOGY<br />
steP 2<br />
LEAD<br />
MANAGEMENT<br />
PERIPHERAL<br />
INTERVENTION<br />
scOPe cOmPatibility<br />
Order No. Endoscope Outer Diameter<br />
MBL-U-4 8.6 mm - 11.3 mm<br />
MBL-U-6 8.6 mm - 11.3 mm<br />
MBL-U-10 8.6 mm - 11.3 mm<br />
MBL-6-OV 9.5 mm - 11.5 mm<br />
MBL-6-OV-XS 8.6 mm - 9.2 mm<br />
MBL-4 9.5 mm - 13 mm<br />
MBL-6 9.5 mm - 13 mm<br />
MBL-10 9.5 mm - 11.5 mm<br />
MBL-4-XS 8.6 mm - 9.2 mm<br />
MBL-6-XS 8.6 mm - 9.2 mm<br />
MBL-10-XS 8.6 mm - 9.2 mm<br />
MBL-4-XL 11 mm - 14 mm<br />
MBL-6-XL 11 mm - 14 mm<br />
MBL-4-XL-C 11 mm - 14 mm<br />
MBL-6-XL-C 11 mm - 14 mm<br />
Also available to accommodate Fujinon scopes.<br />
Refer to current instructions for detailed system use.<br />
SURGERY UROLOGY<br />
steP 3<br />
Release the suction button of the<br />
endoscope, insufflate air, then advance<br />
the endoscope slightly to release the<br />
ligated hemorrhoid. Caution: Ensure the<br />
Opti-Vu barrel is advanced onto the tip of<br />
the endoscope as far as possible. Failure<br />
to do so may result in barrel dislodgement.<br />
Repeat the ligation process as<br />
needed.<br />
WOMEN’S<br />
HEALTH