ProTaper - Brochure - Endodonzia - Endodonziamauroventuri.it
ProTaper - Brochure - Endodonzia - Endodonziamauroventuri.it
ProTaper - Brochure - Endodonzia - Endodonziamauroventuri.it

You also want an ePaper? Increase the reach of your titles
YUMPU automatically turns print PDFs into web optimized ePapers that Google loves.
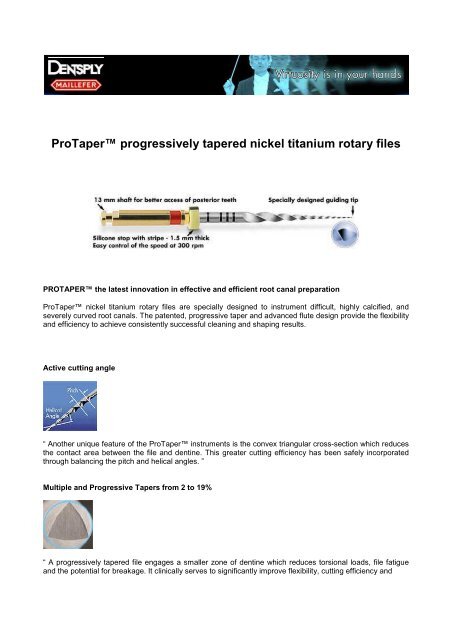
<strong>ProTaper</strong> progressively tapered nickel t<strong>it</strong>anium rotary files<br />
PROTAPER the latest innovation in effective and efficient root canal preparation<br />
<strong>ProTaper</strong> nickel t<strong>it</strong>anium rotary files are specially designed to instrument difficult, highly calcified, and<br />
severely curved root canals. The patented, progressive taper and advanced flute design provide the flexibil<strong>it</strong>y<br />
and efficiency to achieve consistently successful cleaning and shaping results.<br />
Active cutting angle<br />
“ Another unique feature of the <strong>ProTaper</strong> instruments is the convex triangular cross-section which reduces<br />
the contact area between the file and dentine. This greater cutting efficiency has been safely incorporated<br />
through balancing the p<strong>it</strong>ch and helical angles. ”<br />
Multiple and Progressive Tapers from 2 to 19%<br />
“ A progressively tapered file engages a smaller zone of dentine which reduces torsional loads, file fatigue<br />
and the potential for breakage. It clinically serves to significantly improve flexibil<strong>it</strong>y, cutting efficiency and
typically reduces the number of recap<strong>it</strong>ulations needed to achieve length, especially, in tight or more curved<br />
canals.”<br />
“ The <strong>ProTaper</strong> instruments effectively remove debris out of the canal and generally only three instruments<br />
are required to produce a fully tapered canal that exhib<strong>it</strong>s uniform shape over length.”<br />
Working sequences & guidelines<br />
Guidelines<br />
1. Work instruments to light resistance and never force them.<br />
2. Only use instruments in a well irrigated and lubricated canal.<br />
3. The appropriate finishing file passively follows the canal to the desired length… then is immediately<br />
w<strong>it</strong>hdrawn.<br />
4. Use in constant rotation at a speed of 250-350 rpm.<br />
5. Clean flutes frequently and check for signs of distortion or wear<br />
Design Features and Advantages<br />
The new <strong>ProTaper</strong> instruments represent a revolutionary progression in root canal preparation<br />
procedures. The basic series comprised of 3 shaping and 3 finishing instruments:
The auxiliary Shaping file or SX is used to optimally shape canals in shorter roots, relocate canals away from<br />
external root concav<strong>it</strong>ies and to produce more shape, as desired, in the coronal aspects of canals in longer<br />
roots. The SX file provides many advantages over Gates Glidden and other coronal shaping instruments<br />
used today.<br />
Shaping file N° 1 or S1 is designed to prepare the coronal one third of the canal, whereas Shaping file N° 2<br />
or S2 enlarges and prepares the middle one third. Although both instruments optimally prepare the coronal<br />
two thirds of a canal, they do progressively enlarge <strong>it</strong>s apical one third. W<strong>it</strong>h partially active tips and maximal<br />
flute diameters approaching 1,2 mm each, each Shaping file has 14 mm of cutting blades.<br />
The Finishing files have been designed to optimally finish the apical one third, and also progressively expand<br />
the shape in the middle one third of the canal. Generally, only one Finishing is required to prepare the apical<br />
one third of a canal and the one selected is based on the canal’s curvature and cross-sectional diameter.
<strong>ProTaper</strong> Benef<strong>it</strong>s<br />
Patented progressive taper design improves flexibil<strong>it</strong>y and cutting efficiency, especially in tighter or more<br />
curved canals.<br />
Fewer files are needed to achieve a fully tapered canal exhib<strong>it</strong>ing uniform shape over length.<br />
<strong>ProTaper</strong> files engage a smaller area of dentin, reducing torsional loads, file fatigue, and the potential<br />
for separation.<br />
Convex triangular cross section reduces contact area between file and dentin.<br />
The <strong>ProTaper</strong> technique<br />
Explore the root canal w<strong>it</strong>h a stainless steel N° 10K hand file using a sma ll<br />
reciprocating back and forth motion. Work passively and progressively until <strong>it</strong> is a few millimeters short of the<br />
estimated working length. Fill the pulp chamber full w<strong>it</strong>h e<strong>it</strong>her Glyde or Sodium Hypochlor<strong>it</strong>e (NaOCl) for<br />
all in<strong>it</strong>ial negotiation procedures.<br />
Now, start the <strong>ProTaper</strong> sequence w<strong>it</strong>h Shaping file N° 1 which has purple ring.<br />
The S1 is carried into the canal and moved apically to just short of the depth of the hand files. In more<br />
difficult canals, one or two recap<strong>it</strong>ulations may be necessary to enlarge the coronal two thirds of the canal.<br />
Irrigate and go back in w<strong>it</strong>h 10K hand file to break up debris and then re-irrigate.
The SX (no colour ring) is then used w<strong>it</strong>h a brushstroke action to selectively remove<br />
dentine, relocate the canal away from furcal danger and achieve straight line radicular access. W<strong>it</strong>h<br />
improved access, the SX is passively f<strong>it</strong> a l<strong>it</strong>tle deeper into the canal until <strong>it</strong> encounters light resistance.<br />
Bounce off this resistance and brush out of the canal in an apical to coronal direction. Continue w<strong>it</strong>h the SX<br />
until about two thirds of the overall length of <strong>it</strong>s cutting blades are below the orifice. Don’t forget to irrigate.<br />
Once the pre-enlargement procedure is finished w<strong>it</strong>h excellent coronal two thirds<br />
access, use a precurved 10K hand file to negotiate the rest of the canal, establish patency, and confirm<br />
working length. When working length is confirmed and a smooth GLYDE path to the terminus is verified, use<br />
Shaping file N° 1 to length.<br />
Following the use of S1, irrigate and use Shaping file N° 2 which has a wh<strong>it</strong>e ring on<br />
<strong>it</strong>s handle. This file will typically go to full working length on the first pass. Following <strong>it</strong>s use, irrigate.<br />
When the coronal two thirds of the canal has been prepared, the apical one third can<br />
be finished. The Finishing file N° 1 has a yellow ring (ISO 020) and w<strong>it</strong>h the canal flooded w<strong>it</strong>h irrigant,<br />
carefully take the F1 to working length and immediately w<strong>it</strong>hdraw.
Gauge the size of the foramen by placing a 20 K hand file to<br />
length. If snug at working length then the canal is prepared and ready to obturate. If <strong>it</strong> is loose, use<br />
Finishing file N° 2 (red ring ISO 025). Irrigate and carry the F2 to length and gauge the size of the foramen<br />
by placing a 25 K hand file to length. If snug at length then the canal is prepared and ready to obturate. If <strong>it</strong><br />
is loose use Finishing file N° 3 (blue ring ISO 030) and carefully carry <strong>it</strong> to length. Gauge the foramen w<strong>it</strong>h<br />
the equivalent hand file. Normally, this would be as large as you would prepare a calcified and/or curved<br />
canal.<br />
Clinical cases
Commercial presentation<br />
Sequencer<br />
REF A 0413