Download - Brunswick
Download - Brunswick
Download - Brunswick

You also want an ePaper? Increase the reach of your titles
YUMPU automatically turns print PDFs into web optimized ePapers that Google loves.
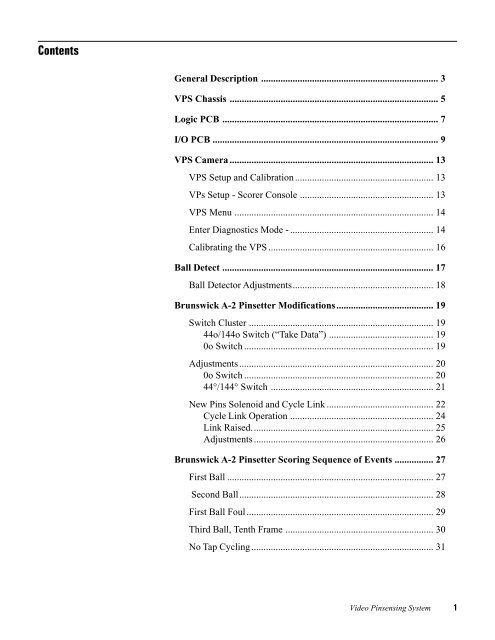
Contents<br />
General Description ......................................................................... 3<br />
VPS Chassis ...................................................................................... 5<br />
Logic PCB ......................................................................................... 7<br />
I/O PCB ............................................................................................. 9<br />
VPS Camera .................................................................................... 13<br />
VPS Setup and Calibration ......................................................... 13<br />
VPs Setup - Scorer Console ....................................................... 13<br />
VPS Menu .................................................................................. 14<br />
Enter Diagnostics Mode - ........................................................... 14<br />
Calibrating the VPS .................................................................... 16<br />
Ball Detect ....................................................................................... 17<br />
Ball Detector Adjustments.......................................................... 18<br />
<strong>Brunswick</strong> A-2 Pinsetter Modifications........................................ 19<br />
Switch Cluster ............................................................................ 19<br />
44o/144o Switch (“Take Data”) ........................................... 19<br />
0o Switch .............................................................................. 19<br />
Adjustments ................................................................................ 20<br />
0o Switch .............................................................................. 20<br />
44°/144° Switch ................................................................... 21<br />
New Pins Solenoid and Cycle Link ............................................ 22<br />
Cycle Link Operation ........................................................... 24<br />
Link Raised........................................................................... 25<br />
Adjustments .......................................................................... 26<br />
<strong>Brunswick</strong> A-2 Pinsetter Scoring Sequence of Events ................ 27<br />
First Ball ..................................................................................... 27<br />
Second Ball................................................................................ 28<br />
First Ball Foul............................................................................. 29<br />
Third Ball, Tenth Frame ............................................................. 30<br />
No Tap Cycling........................................................................... 31<br />
Video Pinsensing System 1
2 Video Pinsensing System<br />
AMF Pinspotter Modifications ...................................................... 32<br />
AMF Sweep Switch ................................................................... 32<br />
AMF Pinspotter Scoring Sequence of Events .............................. 33<br />
First Ball, Second Ball................................................................ 33<br />
All Models ............................................................................ 33<br />
AMF Foul ................................................................................... 33<br />
No Tap ........................................................................................ 34<br />
3rd Ball 10th Frame .................................................................... 35<br />
All Models ............................................................................ 35<br />
Cable Diagrams .............................................................................. 36
General Description<br />
Figure 1. VPS Components<br />
(1) VPS CHASSIS (2) BALL DETECT<br />
The Video Pinsensing System (VPS) is an electrical/optical device used to<br />
count standing pins and control the on/off operation of both pinsetters. The<br />
system uses a VPS chassis, a ball detect, and special pinsetter modifications<br />
to accomplish this. Refer to Figure 1.<br />
The VPS unit is mounted on the capping in the center of a lane pair so the<br />
front edge of the unit’s base is 151-1/2” (3.85 m) from the center of the last<br />
row of pins. Refer to Figure 2. The VPS unit uses two cameras that take a<br />
“video picture” of the pit area of both pinsetters. The picture is then analyzed<br />
by the VPS Logic Board. During the analysis, a portion of the picture is<br />
searched for shapes resembling pins. This is accomplished by searching the<br />
area of the video image using various preprogrammed templates. Once the<br />
templates have identified an image as a pin, the processor board refers to a<br />
user stored calibration to determine which pin caused it. This information is<br />
then sent to the scorer console where it is processed and displayed as a score.<br />
To provide the necessary timing, an infared ball detect is located near the drop<br />
sweep to ensure that the VPS scores only after a ball has been thrown. After<br />
the ball detection occurs, the VPS will take a picture of the pins on the pindeck<br />
either automatically after a preset delay or at the appropriate time during the<br />
pinsetter cycle through the use of switches added to the pinsetter.<br />
Video Pinsensing System 3
Figure 2. VPS Location<br />
(1) FRONT EDGE OF CHASSIS (2) BALL RETURN CAPPING<br />
4 Video Pinsensing System<br />
The VPS consists of the following components:<br />
Ball Detect - The ball detect is an infrared device that senses when a ball has<br />
been thrown. The signal from the ball detect tells the VPS to begin the<br />
scoring cycle.<br />
Pinsetter Modifications - Switches added to the pinsetter to make sure the<br />
camera takes the picture at the proper time during the pinsetter cycle. Also<br />
additional components may be added to allow special pinsetter cycles for<br />
fouls, No Tap, and 3rd ball 10th frame situations.<br />
VPS Chassis - The VPS Chassis contains a two circuit boards (PCBs): the<br />
Logic PCB and the I/O PCB. The Logic board receives video from both<br />
cameras and analizes the video while the I/O PCB is responsible for<br />
interfacing to the pinsetter and scorer consoles.
VPS Chassis<br />
Figure 3. Rear of VPS Chassis<br />
The function of the components on the VPS I/O PCB are:<br />
The VPS Chassis uses two printed circuit boards to accomplish the functions<br />
of the VPS: the Logic PCB and the I/O PCB. All system cables are connected<br />
to this board through external connectors located on the rear of the chassis.<br />
Refer to Figure 3 for explanation of connections on rear of VPS chassis:<br />
(1) Ball/Foul (J7) - Signals from the foul unit and left and right lane ball<br />
detectors enter the PCB through this connection.<br />
(2) Left I/O (J5) - Connection for signals coming from the left (odd)<br />
pinsetter. Signals for the “take data” and 0° switches, second ball, and<br />
New Pins Solenoid control connect to the PCB here.<br />
(3) LLAN In (J3) - Connection for all LLAN communications to and from<br />
the I/O PCB located in the LGP. The VPS sends scores and recieves no<br />
tap and 3rd ball 10th frame, and pinsetter on/off information through<br />
this connection.<br />
(4) LLAN Out (J2) - Connection that allows the LLAN communication to<br />
continue to other devices on the lane pair. Typically, the TV-only<br />
monitor, Bowler Track, and/or an Instant Replay are connected to<br />
LLAN via this connector.<br />
(5) Power (J9) - Connection for power input to the VPS. The 28VAC used<br />
to power the VPS originates at the Secondary Transformer.<br />
Video Pinsensing System 5
Figure 4. Font of VPS Chassis<br />
6 Video Pinsensing System<br />
(6) Right I/O (J4) - Connection for signals coming from the right (even)<br />
pinsetter. Signals for the "take data" and zero degree switches, second<br />
ball, and New Pins Solenoid control connect to the PCB here.<br />
(7) Serial Port (J6) - Not Used<br />
Refer to Figure 4 for explanation of components on front of VPS chassis:<br />
(1) Cameras - Location of the cameras for each lane. one camera is used<br />
exclusively for the left lane, while the other is used for the right one.<br />
These cameras can be replaced individually or as a complete unit.<br />
(2) Calibration Switches - Pushbutton switches that allow the mechanic to<br />
calibrate the VPS. One switch allows calibration of the left lane, while<br />
the other allows calibration of the right side. When pushed the VPS will<br />
automatically calibrate itself to the lane.<br />
NOTE: Calibration can only be performed for one lane at a time.<br />
(3) Mechanic Overide Switch - This switch allows that user to turn the<br />
pinsetters on and off manually in the event of a failure in the system or<br />
VPS.When set to the “Scorer Control” position, the LGP will control<br />
the on/off operation of each pinsetter through LLAN communication.<br />
When set to the “Mechanic Override” position, both machines will turn<br />
on.<br />
(4) Power Reset Switch - Push this switch to cycle the VPS Power.
Logic PCB<br />
(2)<br />
EVEN<br />
CAMERA<br />
(3)<br />
ODD<br />
CAMERA<br />
(1)<br />
CONFIGURATION<br />
SWITCH<br />
(NOT USED)<br />
(5)<br />
SIGNAL<br />
INTERCONNECT<br />
Figure 5. VPS Logic PCB (Top View)<br />
The Logic PCB is responsible for analyzing the video images that it receives<br />
from the two camera mounted in the VPS Chassis. From this information the<br />
board determines the number of standing pins and sends the pin count to the<br />
VPS I/O PCB.<br />
There are no adjustments on the Logic Board. The only setup necessary to the<br />
VPS Processor Board is the triggering of a calibration when the chasiss is first<br />
installed. Refer to Figure 5.<br />
(4)<br />
POWER<br />
INTERCONNECT<br />
(1) CONFIGURATION SWITCH (NOT USED)(2) EVEN CAMERA (3) ODD CAMERA<br />
(4) POWER CONNECT (5) SIGNAL INTERCONNECT<br />
Video Pinsensing System 7
8 Video Pinsensing System<br />
The functions of the components on the VPS Logic PCB are:<br />
(1) Configuration Switch (S1) - Not Used<br />
(2) Even Camera - Connections for the video/power for the camera<br />
dedicated to the even lane. J4 connects to the camera. J5 is not used.<br />
(3) Odd Camera - Connections for the video/power for the camera<br />
dedicated to the odd lane. J8 connects to the camera. J6 is not used.<br />
(4) Power Interconnect - Connector for the Logic board power.<br />
(5) Signal Interconnect - Connector for the signals passing between the<br />
Logic and the I/O PCBs.
I/O PCB<br />
(16)<br />
RIGHT LANE<br />
CALIBRATION<br />
SWITCH<br />
FRONT<br />
(17)<br />
MECHANIC’S<br />
OVERRIDE<br />
SWITCH<br />
(18)<br />
POWER<br />
RESET<br />
(19)<br />
LEFT LANE<br />
CALIBRATION<br />
SWITCH<br />
(15)<br />
BOARD<br />
INTERCONNECT<br />
(15)<br />
BOARD<br />
INTERCONNECT<br />
Figure 6. VPS I/O PCB (Top View)<br />
J8<br />
The VPS I/O PCB is reponsible for interfacing to the components external to<br />
the VPS such as the pinsetters, foul units and the scorer consoles for the lane<br />
pair.<br />
For the pinsetters, the board is responsible for turning the pinsetters on/off at<br />
the appropriate time(s) and controlling the pinsetter cycle for special situations<br />
such as first ball foul, third ball 10th frame, and no tap strikes. During scoring<br />
operations, the board monitors switches added to the machine to determine<br />
when it is time to score.<br />
Once a score is determined (by the logic PCB) the I/O PCB sends this<br />
information directly to the LGP via the LLAN Cable. In the event the board<br />
receives a foul signal from the Tel-E-Foul unit, it will send an "F" in place of<br />
the pin count. Refer to Figure 6 and 7.<br />
(3)<br />
LED<br />
BAR<br />
DISPLAY<br />
J1<br />
(20)<br />
PINSETTER<br />
RELAYS<br />
(3)<br />
LED<br />
BAR<br />
DISPLAY<br />
(6)<br />
DIAGNOSTICS<br />
(7) LED<br />
HEARTBEAT<br />
LED<br />
(7)<br />
HEARTBEAT (6)<br />
LED DIAGNOSTICS<br />
LED<br />
(5)<br />
STAT<br />
LED<br />
(5)<br />
STAT<br />
LED<br />
(4)<br />
CAL<br />
LED<br />
(4)<br />
CAL<br />
LED<br />
(21)<br />
J2<br />
LLAN OUT<br />
(22)<br />
J3<br />
LLAN IN<br />
(23)<br />
J4<br />
RIGHT<br />
PINSETTER I/O<br />
(24)<br />
J5<br />
LEFT<br />
PINSETTER I/O<br />
(25)<br />
J6<br />
SERIAL OUT<br />
(26)<br />
J7<br />
BALL DETECT<br />
(27)<br />
POWER IN<br />
28VAC<br />
REAR<br />
Video Pinsensing System 9
Figure 7. VPS I/O PCB (Side View)<br />
10 Video Pinsensing System<br />
(1) Left Side - Left side of VPS Chassis shown.<br />
(2) Right Side - Right side of VPS chassis shown.<br />
(3) LED Bar Displays (U1,U21) - This 10 segment LED display provides<br />
information about the ball detect, foul, pinsetter 2nd ball, and pinsetter<br />
signal inputs for each lane. It also indicated the number of standing pins<br />
counted on the pindeck. When the signal is present, the corresponding<br />
LED will light.<br />
(4) Cal LED - These red LEDs light to indicate when the lanes are<br />
calibrated. Normally both light should be “on”.
(5) Stat LED - These green LEDs flash to indicate when the VPS is<br />
acquiring images for a lane.<br />
(6) Diagnostic LED - When “on”, these red LEDs indicates that the VPS<br />
is in diagnostics mode for the lane. Normally these LEDs are off.<br />
(7) Heartbeat LED (D81) - This red LED flashes to indicate that the<br />
internal circuitry of the VPS is functioning.<br />
(8) Standing Pin Count - A = 8 Pins Standing, B = 4 Pins Standing, C = 2<br />
Pins Standing, D = 1 Pins Standing. To determine the number of pins<br />
detected the values.<br />
(9) Second Ball Indicator - This led lights when the pinsetter is on second<br />
ball.<br />
(10) 0 Degree Switch Indicator - This led lights when the 0 degree switch<br />
(Sweep Up Switch) is actuated.<br />
(11) 44/144 Degree Switch Indicator - This led lights when the 44/144<br />
degree switch (Table/Sweep switch) is actuated.<br />
(12) Foul Detect Indicator - This led lights when the VPS senses that the<br />
foul unit is actuated.<br />
(13) Ball Detect Indicator - This led lights when the VPS senses that the<br />
ball detect beam is blocked.<br />
(14) Not Used - This LED has no function.<br />
(15) Signal Interconnect - The board interconnect connectors attach the I/O<br />
PCB to the Logic PCB. Connector J8 is used to send power to the logic<br />
board. Connector J1 is used to send data to and from the logic board<br />
(16) Right Lane Calibration Switch - Pushbutton switch that allow the<br />
mechanic to calibrate the VPS for the right (even) lane. When pushed<br />
the VPS will automatically calibrate itself to the lane.<br />
(17) Mechanic Override Switch - This switch allows that user to turn the<br />
pinsetters on and off manually in the event of a failure in the system or<br />
VPS.When set to the “Scorer Control” position, the LGP will control<br />
the on/off operation of each pinsetter through LLAN communication.<br />
When set to the “Mechanic Override” position, both machines will turn<br />
on.<br />
(18) Power Reset - Push this switch to cycle the VPS Power.<br />
(19) Left Lane Calibration Switch - Pushbutton switch that allow the<br />
mechanic to calibrate the VPS for the left (odd) lane. When pushed the<br />
VPS will automatically calibrate itself to the lane.<br />
Video Pinsensing System 11
12 Video Pinsensing System<br />
(20) Pinsetter Relays - These relays are used to turn the pinsetters on and<br />
off and reset (cycle) the machines. K1 - left pinsetter power, K2 - left<br />
pinsetter reset, K3 - right pinsetter power, K4 - right pinsetter reset.<br />
(21) J2 LLAN OUT - Connection that allows the LLAN communication to<br />
continue to other devices on the lane pair. Typically, the TV-only<br />
monitor, Bowler Track, and/or an Instant Replay are connected to<br />
LLAN via this connector.<br />
(22) J3 LLAN IN - Connection for all LLAN communications to and from<br />
the I/O PCB located in the LGP. The VPS sends scores and recieves no<br />
tap and 3rd ball 10th frame, and pinsetter on/off information through<br />
this connection.<br />
(23) J4 Right Pinsetter I/O - Connection for signals coming from the right<br />
(even) pinsetter. Signals for the "take data" and zero degree switches,<br />
second ball, and New Pins Solenoid control connect to the PCB here.<br />
(24) J5 Left Pinsetter I/O - Connection for signals coming from the left<br />
(odd) pinsetter. Signals for the “take data” and 0° switches, second ball,<br />
and New Pins Solenoid control connect to the PCB here.<br />
(25) J6 Serial - Not Used<br />
(26) J7 Ball Detect - Signals from the foul unit and left and right lane ball<br />
detectors enter the PCB through is connection.<br />
(27) Power IN (28VAC) - Connection for power input to the VPS. The<br />
28VAC used to power the VPS originates at the Secondary Transformer<br />
in the LFP or the secondary console.
VPS Camera<br />
The VPS uses two cameras to obtain pin information. One camera is dedicated<br />
to the left lane while the other is dedicated to the right one. The cameras are<br />
designed so that they can be easily as replaced as a complete unit.<br />
After replacing the camera(s) no physical alignment is necessary. All that is<br />
required, is triggering a calibration for the new camera.<br />
To replace the camera perform the following procedure:<br />
1. Disconnect the incoming power cable connected at J9 VPS Unit.<br />
2. Remove the cover from the VPS chassis.<br />
3. Disconnect the camera video cables from connectors J4 and J8 of the<br />
Logic PCB.<br />
4. Remove the 4 Phillips head screws located at the front of the VPS.<br />
5. Remove the Camera assembly.<br />
6. Reverse steps 1 - 5 to reinstall the new cameras.<br />
7. Calibrate the VPS.<br />
VPS Setup and Calibration<br />
Three steps are required to configure the VPS. First, the lane pair<br />
configuration must be entered through the scorer console. Second the<br />
information entered must be stored in the VPS. And finally the VPS must be<br />
calibrated. These steps can be accomplished through the maintenace menu of<br />
the scorer and the calibration buttons at the front of the VPS chassis.<br />
VPs Setup - Scorer Console<br />
Setup and troubleshooting for the VPS is accomplished through various menu<br />
selections available at the Frameworx console maintenance menu. To access<br />
the VPS maintenance menu enter the scorer maintenance menu as follows:<br />
1. Enter Maintenance Menu (6167254966 Default)<br />
2. Select Diagnostics<br />
3. Enter diagnostics password (33334)<br />
4. Select option VPS Menu to display the following menu selections:<br />
Video Pinsensing System 13
14 Video Pinsensing System<br />
VPS Menu<br />
Enter Diagnostics Mode<br />
Pinsetter On<br />
Pinsetter Off<br />
Start Calibration<br />
<strong>Download</strong> Menu<br />
Configuration Menu<br />
Read Pinsetter Cycles<br />
Engage NPS<br />
Enter Diagnostics Mode -<br />
Select this option to display the status of the input signals to the VPS for each<br />
lane and a graphic highlighting standing pins for the lanes. Input signal<br />
information that is displayed includes:<br />
Foul Detect - Open or Closed<br />
Ball Detect - Displays the number of ball detects that has occurred while on<br />
the diagnostics screen.<br />
Zero Degree Switch - Open or Closed<br />
44/144 - Open or Closed<br />
Ball - First or Second<br />
Select < to request a take data for the left lane or > to request a take data for<br />
the right lane.<br />
Pinsetter On - Select this option to turn on a pinsetter. Once selected you will<br />
be prompted to select either the Left Lane or Right Lane.<br />
Pinsetter Off - Select this option to turn off a pinsetter. Once selected you<br />
will be prompted to select either the Left Lane or Right Lane.<br />
Start Calibration - Select this option to force calibration of the VPS. Once<br />
selected, you will be prompted to select either the Left Lane or Right Lane.<br />
During the calibration process, the message “Calibration Started” will<br />
appear on the console screen. If the calibration for the lane is successful, the<br />
message “Calibration Succeeded” will display. Otherwise, the message<br />
“Calibration Failed’ will appear.<br />
Note: This selection does the same function as the push buttons on the front of<br />
the VPS.
<strong>Download</strong> Menu - Select this option to display the following download<br />
menu.<br />
<strong>Download</strong> Current Calibration - Select this option to display a graphic<br />
of the current configuration of the VPS that is used to determine standing<br />
pins. Once selected you will be prompted to select either the Left Lane or<br />
Right Lane. This image retrieved shows the location of the pins and the<br />
calibration box for each pin.<br />
View Last <strong>Download</strong> - Select this option to display the picture most<br />
recently downloaded. . Once selected you will be prompted to select either<br />
the Left Lane or Right Lane. This option saves time by not having to<br />
download the display again.<br />
<strong>Download</strong> Small Live Picture - Select this option to download a picture<br />
showing the top of the pins only. . Once selected, you will be prompted to<br />
select either the Left Lane or Right Lane. (This is the only part of the pins<br />
that is needed for scoring. See <strong>Download</strong> Current Calibration)<br />
<strong>Download</strong> Last Scored Picture - Select this option to retrieve a picture<br />
of the pins for the last ball. Once selected you will be prompted to select<br />
either the Left Lane or Right Lane.<br />
<strong>Download</strong> Large Live Picture - Select this option to download a picture<br />
showing full pins and the pit area. Once selected you will be prompted to<br />
select either the Left Lane or Right Lane.<br />
Configuration Menu - Select this option to display the following<br />
configuration menu.<br />
View VPS Configuration - Select this option to display the current setup<br />
configuration stored in the VPS memory. Information displayed includes<br />
the pinsetter type and model, respot solenoid availability, and take data<br />
delay time.<br />
Update VPS Configuration - Select this option to update the VPS with<br />
the most recent setup information stored in the scorer. Selecting this<br />
option force the scorer to send pinsetter type and model, respot solenoid<br />
availability, and take data delay time to the VPS.<br />
Select Pinsetter Model -Select this option to set the pinsetter model for<br />
the lane pair. Currently pinsetter models available include <strong>Brunswick</strong> A2,<br />
AMF Tenpin, and Candlepin.<br />
Note: If you change the pinsetter model you must update the VPS by<br />
selection menu option Update VPS Configuration.<br />
Use Respot Solenoid - Select this option to enable or disable the use of a<br />
Respot Solenoid.<br />
Video Pinsensing System 15
16 Video Pinsensing System<br />
Note: If you change the Use Respot Solenoid option you must update the<br />
VPS by selection menu option Update VPS Configuration.<br />
Enter Take Data Delay Time - Select this option to enter the time delay<br />
from ball detect to take data. This option is only used on machines that do<br />
not have take data switches.<br />
Note: If you change the Take Data Delay Time you must update the VPS<br />
by selection menu option Update VPS Configuration.<br />
Read Pinsetter Cycles - Select this option to display the number of pinsetter<br />
cycles that have occurred since cycle count was cleared. Once selected you<br />
will be prompted to select either the Left Lane or Right Lane. The count for<br />
the select lane can be set to 0 by selecting the clear option on the display.<br />
Engage NPS - Select this option to energize the New Pin Solenoid. Once<br />
selected you will be prompted to select either the Left Lane or Right Lane.<br />
Calibrating the VPS<br />
To calibrate the VPS, Perform the following procedure:<br />
1. Turn on both pinsetters. Make sure that both pin lights are on.<br />
2. Cycle both machines so that there are 10 pins on the pindeck for each<br />
lane.<br />
3. Make sure that the masking unit is lowered to the normal “bowling”<br />
position.<br />
4. Momentarily press the calibration pushbutton swtich for the lane<br />
needing calibration. Wait until the image LED begins flashing and the<br />
calibration LED is lit before continuing to next step.<br />
5. Repeat step 4 for the other calibration switch if calibration of both lanes<br />
is desired.<br />
6. Bowl on the lane pair to verify proper scoring.<br />
Note: Step 4 can also be performed using the scorer maintenace menu<br />
selection titled “Start Calibration”
Ball Detect<br />
Figure 8. VPS Ball Detector<br />
The VPS uses a ball detector that is an infrared sensing device. The ball<br />
detector unit is made up of two infrared transmitters and receivers, one for<br />
each lane. Within each lane unit there are two lenses, one to focus the<br />
transmitted infrared beam toward the retroreflector on the opposite side of the<br />
lane, and one to focus the return light from the reflector onto the infrared<br />
receiver. A red indicator LED turns off when the infrared beam is blocked.<br />
Refer to Figure 8.<br />
(1) ADJUSTMENT SCREWS (2) RED LED INDICATOR (3) LENS<br />
(4) KICKBACKS<br />
Video Pinsensing System 17
Figure 9. Adjusting Reflector<br />
18 Video Pinsensing System<br />
(1)<br />
COVER REFLECTOR<br />
SO THE RED INDICATOR<br />
LED ON BALL DETECT<br />
TURNS OFF<br />
Ball Detector Adjustments<br />
The Ball Detector Assembly uses an infrared light which cannot be seen<br />
without an optical aid. Therefore, it has a red indicator light on the face of the<br />
unit that will light when sufficient infrared light is reflected back to it. Refer<br />
to Figure 8.<br />
To center the infrared beam on the reflector, use the following steps:<br />
1. With power on to the VPS, cover the reflector so the red indicator light<br />
on the ball detector unit turns off.<br />
2. Using another reflector, start above the covered reflector and slowly<br />
move the second reflector down toward the first while holding it square<br />
to the ball detect unit. Continue to move it downward until the red light<br />
goes out. Note the position of the second reflector. Refer to Figure 9.<br />
(2)<br />
MOVE REFLECTOR<br />
DOWNWARD UNTIL THE<br />
RED INDICATOR LED ON<br />
BALL DETECT TURNS ON<br />
(1) COVER REFLECTOR SO RED (2) MOVE REFLECTOR DOWNWARD UNTIL<br />
INDICATOR LIGHT-EMITTING DIODE RED INDICATOR LIGHT-EMITTING DIODE<br />
ON BALL DETECT COMES ON ON BALL DETECT GOES OUT<br />
3. Repeat the same procedure but start below the covered reflector (in the<br />
ball gutter) and move up until the light goes on. Note that position.<br />
4. Repeat the same procedure starting from the left of the covered reflector<br />
and then from the right until you have located the relative position of<br />
the infrared beam.<br />
5. If the beam is not centered on the covered reflector, it can be adjusted<br />
usig the two adjustment screws located on the top of the unit. Refer to<br />
Figure 8.<br />
6. After each adjustment, recheck the beam's location with the second<br />
reflector and procedure detailed above.
<strong>Brunswick</strong> A-2 Pinsetter Modifications<br />
Switch Cluster<br />
Figure 10. <strong>Brunswick</strong> A-2 Pinsetter Switch Cluster<br />
The Switch Cluster is a metal plate containing switches and cams that are<br />
mounted on the detector and is engaged to the detector 1:1 gear. The nylon gear<br />
that drives the cam shaft turns the cams which are timed to close the switches at<br />
proper times during the pinsetter cycle. Refer to Figure 10.<br />
(1) ADJUSTABLE CAM (2) 0º SWITCH (ZERO) (3) B-2000 SWITCH (NO LONGER<br />
USED)<br />
(4) 44º/144º SWITCH ("TAKE DATA")<br />
44o /144o Switch (“Take Data”)<br />
1. This switch closes twice every pinsetter cycle. The first switch closing<br />
will cause a “take data” signal when the deck is approximately 1" (44°)<br />
above the pins if the pinsetter is on first ball.<br />
2. The second switch closing will cause a “take data” signal at 144° when<br />
the rake is approximately 10" from the no. 1 pin if the pinsetter is on<br />
second ball.<br />
3. The switch is also used during special pinsetter cycles to energize the<br />
New Pins Solenoid during the first ball foul or No Tap cycles so any<br />
standing pin(s) will be swept away.<br />
0o Switch<br />
1. The 0° switch closes once each pinsetter cycle. It is used to reset<br />
memory on the Video Processing Board and allows it to accept the ball<br />
detect signal.<br />
2. Energize the New Pins Solenoid at the end of the first ball and third ball<br />
fouls, tenth frame cycles so that the bowler will have a second ball shot.<br />
Video Pinsensing System 19
(1) .025" OVERTRAVEL AT TOP OF<br />
LOBE<br />
(2) 0° SWITCH<br />
(3) MARK ON LOBE<br />
20 Video Pinsensing System<br />
Adjustments<br />
The Switch Cluster contains three switches. Two of these switches, the 0 o and<br />
the 44 o /144 o , monitor the pinsetter to provide timing information for proper<br />
scoring. Correct adjustment of these switches is necessary and must be<br />
checked after clutch adjustment, detector repair, or any other change to the<br />
timing of the pinsetter. The third switch is used only for timing of the ball<br />
director on the Systems 2000 Ball Rack and is no longer used.<br />
0o Switch<br />
The lobe of the inside cam on the Switch Cluster must actuate the 0o switch<br />
when the pinsetter is at 0o . Refer to Figure 11.<br />
Figure 11. 0 o Switch Adjustment<br />
Adjusting the cam is done by removing the Switch Cluster Assembly from the<br />
detector's 1:1 gear and repositioning the cam to actuate the 0 o switch. (The<br />
pinsetter must be at 0 o .) To adjust the switch perform the following steps:<br />
1. Remove the switch cluster from the detector.<br />
2. Position the cam and switch so the switch is activated half way up the<br />
front edge of the lobe. Refer to Figure 11. An overtravel dimension of<br />
.025" is necessary at the top of the lobe to prevent damage to the switch.<br />
(On cams with a long lobe duration, the switch should be actuated at the<br />
scribe mark located near the middle of the lobe.)<br />
3. Replace the cluster on the detector making sure that the cam does not<br />
change position.<br />
4. Verify the operation of the switch by monitoring the 0 o indicator on the<br />
VPS Processing Board (See U1 and U38). The indicator should be “on”<br />
only when the pinsetter is at 0 o .
Figure 12. 44 o /144 o Switch Adjustment<br />
(1)<br />
LOCKSCREW<br />
44°/144° Switch<br />
To adjust the 44°/144° switch perform the following steps. Refer to Figure<br />
12.<br />
1. Cycle the pinsetter to a full rack first ball.<br />
2. Lower the pinsetter deck until it is approximately 16" ± 1 / 2 above the pin<br />
deck (1" above the pins).<br />
3. Loosen the lockscrew holding to outer cam to the shaft.<br />
4. Loosen the 44°/144° switch mounting screws.<br />
5. Rotate the outer cam clockwise until the roller of the switch lever is<br />
positioned halfway up the front edge of the outer cam.<br />
6. Adjust the switch so that it activates.<br />
7. Tighten the cam lockscrew and the switch mounting screws.<br />
8. Cycle the pinsetter so that the switch is at the top of the lobe.<br />
9. Verify that there is approximately .025" gap between the switch and the<br />
switch lever to prevent switch damage.<br />
(3)<br />
ACTUATE HALFWAY<br />
UP FIRST LOBE<br />
(4)<br />
.025"<br />
OVERTRAVEL<br />
AT TOP OF<br />
LOBE<br />
(2)<br />
SECOND LOBE<br />
(5)<br />
44°/144° SWITCH<br />
(1) LOCKSCREW (2) SECOND LOBE (3) ACTUATE HALFWAY UP FIRST<br />
LOBE<br />
(4) .025" OVERTRAVEL AT TOP OF LOBE (5) 44º/144º SWITCH<br />
Video Pinsensing System 21
Figure 13. Solenoid Configuration<br />
22 Video Pinsensing System<br />
New Pins Solenoid and Cycle Link<br />
The New Pins Solenoid is used to switch the pinsetter to second ball in the<br />
event of a first ball foul, third ball, tenth frame or a No Tap strike to eliminate<br />
the bowler's need to push the reset button. Refer to Figure 13.<br />
(1) TO VPS (2) TO PINSETTER (3) BRACKET<br />
(4) SOLENOID LINK (5) SIGNAL LED (6) RELAY PCB
In order to make the New Pins Solenoid actuate on a foul, the following<br />
signals must occur:<br />
1. First ball.<br />
2. Foul signal.<br />
3. Ball detect.<br />
If the signals are present, the New Pins Solenoid will be energized two times<br />
during the pinsetter cycle. At 44° the New Pins Solenoid will energize causing<br />
the pinsetter to switch to second ball and sweep all standing pins. It energizes<br />
again at 0° causing the pinsetter to switch to second ball to give the bowler a<br />
full rack, second ball shot.<br />
For third ball, tenth frame, the New Pins Solenoid will fire one time at 0 o after<br />
a tenth frame spare or a “double.” This will automatically put the pinsetter in<br />
a second ball mode for the final ball of the game.<br />
For No Tap situations the New Pins Solenoid energizes at 44° causing the<br />
pinsetter to switch to second ball, sweep all pins from the pin deck, and reset<br />
to a full rack first ball for the next bowler.<br />
Video Pinsensing System 23
(1)<br />
CYCLE LINK<br />
CRANK<br />
(2)<br />
CYCLE LINK<br />
ASSEMBLY<br />
24 Video Pinsensing System<br />
Cycle Link Operation<br />
Figure 14. New Pins Solenoid Activated - Cycle Link Raised<br />
The New Pins Solenoid signal is received from the VPS Processing Board for<br />
a foul third ball, tenth frame and No Tap cycles. When the New Pins Solenoid<br />
is energized, it pulls the standing pins selector clockwise, unblocking the<br />
standing pins cam follower. The standing pins cam follower goes into the low<br />
of the cam causing the “C” shaft to turn clockwise. The first and second ball<br />
switch lever is attached to the “C” shaft, and as it turns clockwise, it switches<br />
the ball light to second ball. Refer to Figure 14.<br />
(4)<br />
STANDING PIN<br />
CONTROLLER<br />
(3)<br />
STANDING PIN<br />
CAM FOLLOWER<br />
(5)<br />
STANDING PIN<br />
SELECTOR<br />
(7)<br />
“A” SHAFT<br />
(8)<br />
DETECTOR<br />
1:1 SHAFT<br />
(9)<br />
“C” SHAFT<br />
(10)<br />
0°-90° OVERTRAVEL<br />
SELECTOR<br />
(6)<br />
NEW PINS<br />
SOLENOID<br />
(1) CYCLE LINK CRANK (2) CYCLE LINK ASSEMBLY (3) STANDING PIN CAM FOLLOWER<br />
(4) STANDING PIN CONTROLLER (5) STANDING PIN SELECTOR (6) NEW PINS SOLENOID<br />
(7) “A” SHAFT (8) DETECTOR 1:1 SHAFT (9) “C” SHAFT<br />
(10) 0º-90º OVERTRAVEL SELECTOR
(1)<br />
STRIKE SELECTOR<br />
Link Raised.<br />
Figure 15. New Pins Solenoid Activated - Strike Selected<br />
The 90 o overtravel hook selector is also attached to the "C" shaft, and as it<br />
turns clockwise, it forces the cycle link up. The upward motion of the cycle<br />
link turns the cycle crank clockwise around the "E" shaft. A pin in the cycle<br />
crank turns the strike selector in a counterclockwise direction unblocking the<br />
strike cam follower. The strike cam follower goes into the low of the timing<br />
cam rotating the "D" shaft counterclockwise. The moving deck/scissors<br />
selector rotates counterclockwise pulling the adjustable scissors link forward,<br />
rotating the moving deck/scissors latch counterclockwise to block the cam<br />
follower, and freeing the moving deck cam follower.<br />
This prevents the deck from picking up any pins standing on the pin deck<br />
during the detection stroke. The rake sweeps all the pins and the deck will<br />
then set ten new pins on the lane surface. The New Pins Solenoid will fire<br />
once more at 360 o to place the pinsetter in second ball. Refer to Figure 15.<br />
(3)<br />
CYCLE CRANK<br />
ASSEMBLY<br />
(2)<br />
0°-90° OVERTRAVEL<br />
SELECTOR<br />
(4)<br />
STRIKE CONTROLLER<br />
(5)<br />
“B” SHAFT<br />
(9)<br />
“C” SHAFT<br />
(6)<br />
STRIKE CAM<br />
FOLLOWER<br />
(7)<br />
MOVING DECK AND<br />
SCISSORS SELECTOR<br />
(8)<br />
“D” SHAFT<br />
(1) STRIKE SELECTOR (2) 0º-90º OVERTRAVEL SELECTOR (3) CYCLE CRANK ASSEMBLY<br />
(4) STRIKE CONTROLLER (5) “B” SHAFT (6) STRIKE CAM FOLLOWER<br />
(7) MOVING DECK AND SCISSORS (8) “D” SHAFT (9) “C” SHAFT<br />
SELECTOR<br />
Video Pinsensing System 25
26 Video Pinsensing System<br />
(1)<br />
CYCLE<br />
LINK<br />
Figure 16. New Pins Solenoid Mounting Bracket<br />
Adjustments<br />
The New Pins Solenoid (NPS) is adjusted by moving the NPS box toward or<br />
away from the pinsetter detector. This is made possible by two elongated<br />
holes drilled into the mounting bracket to which the box is attached. Refer to<br />
Figure 16.<br />
(2)<br />
SOLENOID<br />
PLUNGER<br />
(3)<br />
BRACKET<br />
(4)<br />
ADJUSTMENT<br />
SCREWS<br />
(1) CYCLE LINK (2) SOLENOID PLUNGER (3) BRACKET<br />
(4) ADJUSTMENT SCREWS<br />
1. Cycle the pinsetter to first ball.<br />
2. Loosen the screws that mount the NPS box to the bracket.<br />
3. Hold in the plunger solenoid and move the NPS box away from the<br />
pinsetter until the pinsetter switches to second ball.<br />
4. Tighten the NPS box mounting screws.<br />
5. Cycle the pinsetter back to first ball.<br />
6. Verify the cycle link is free of any binds and has plenty of "play."<br />
7. Verify the New Pins Solenoid operation by creating a first ball foul,<br />
third ball, tenth frame or No Tap situation.
<strong>Brunswick</strong> A-2 Pinsetter Scoring Sequence of Events<br />
First Ball<br />
Figure 17. First Ball Scoring Sequence - <strong>Brunswick</strong> A-2<br />
Note: The scorer console must be turned on, with a bowler's name entered and<br />
the sequencing arrows on the bowler's name.<br />
1. The bowler delivers the first ball. The ball breaks the ball detect light<br />
path and sends a signal to the VPS Processing PCB.<br />
2. The VPS starts the scoting process. Refer to Figure 17.<br />
3. The pinsetter triggers.<br />
4. At 44 o , the switch signal enables the VPS Processing PCB to accept the<br />
pinfall information (VPS takes a picture).<br />
5. With a successful “take data,” the VPS sends the score to the LGP.<br />
6. The score is displayed.<br />
7. 144° switch signal occurs but no action is taken.<br />
8. 0° switch closes causing the scoring cycle to reset and enable another<br />
ball detect.<br />
(1) BALL DETECT (2) VPS STARTS SCORING PROCESS (3) PINSETTER TRIGGERS<br />
(4) 44° PULSE (5) “TAKE DATA” (PICTURE TAKEN) (6) SCORE<br />
(7) 144° PULSE (NO ACTION) (8) RESETS SCORING CYCLE (9) 0° PULSE/360°<br />
(10) FIRST BALL<br />
Video Pinsensing System 27
28 Video Pinsensing System<br />
Second Ball<br />
1. The bowler delivers the second ball. The ball breaks the ball detect's<br />
path of light. Refer to Figure 18.<br />
2. The VPS starts the scoring process.<br />
3. The pinsetter triggers.<br />
Figure 18. Second Ball Scoring Sequence - <strong>Brunswick</strong> A-2<br />
4. At 144 o , the switch signal enables the VPS Processing PCB to accept<br />
the pinfall data.<br />
5. With the successful “take data,” the VPS sends the score to the LGP.<br />
6. A score is displayed for the bowler.<br />
7. The 0 o switch sends a signal to reset the scoring cycle and enable<br />
another ball detect.<br />
(1) BALL DETECT (2) VPS STARTS SCORING PROCESS (3) PINSETTER TRIGGERS<br />
(4) 44° PULSE (NO ACTION) (5) 144° PULSE (6) TAKE DATA<br />
(7) SCORE (8) RESETS SCORING CYCLE (9) 0° PULSE/360°<br />
(10) SECOND BALL
Figure 19. First Ball Foul - <strong>Brunswick</strong> A-2<br />
First Ball Foul<br />
On a first ball foul, the New Pins Solenoid switches the detector to second<br />
ball. On a first ball foul, when the New Pins Solenoid switches the detector to<br />
the second ball, the cycle link and crank generates a strike in the detector. It<br />
then blocks the scissors and prevents the pinsetter from picking up the<br />
standing pins.<br />
1. Bowler delivers his first ball and fouls.<br />
2. The ball breaks the ball detect's light path and triggers the pinsetter.<br />
Refer to Figure 19.<br />
3. The New Pins Solenoid switches the pinsetter to the second ball at 44 o ,<br />
selecting a strike cycle.<br />
4. The scorer displays an "F" and scores a "0."<br />
5. 144° switch closes, but no action is taken.<br />
6. The pinsetter sweeps the pins and sets a new rack of pins.<br />
7. The New Pins Solenoid switches the pinsetter to second ball when the<br />
0° switch closes.<br />
8. The 0° signal resets the scoring cycle to accept another ball detect.<br />
7. The 0° signal resets the scoring cycle allowing the VPS to accept<br />
another ball detect.<br />
(1) FOUL (2) BALL DETECT (3) PINSETTER TRIGGERS<br />
(4) VPS TAKES DATA (5) NEW PINS SOLENOID SWITCHES PINSETTER (6) SCORER DISPLAYS FOUL AND<br />
TO SECOND BALL SCORES 0<br />
(7) SCISSORS BLOCKED (8) SWEEPS STANDING PINS (9) SETS A NEW RACK OF PINS<br />
(10) NEW PINS SOLENOID SWITCHES (11) RESETS SCORING CYCLE (12) 0° PULSE/360°<br />
PINSETTER BACK TO SECOND BALL (13) 144° PULSE (NO ACTION) (14) FIRST BALL FOUL<br />
(15) PINSETTER SWITCHES BACK TO 1ST BALL (16) 44° PULSE<br />
Video Pinsensing System 29
Figure 20. Third Ball, Tenth Frame - <strong>Brunswick</strong> A-2<br />
30 Video Pinsensing System<br />
Third Ball, Tenth Frame<br />
When a bowler scores either a spare or double in the tenth frame, the LGP<br />
sends a signal to the VPS Processing PCB to place the pinsetter in second ball.<br />
This eliminates the need for the bowler to press reset after bowling the third<br />
ball (if standing pins are left.)<br />
1. The scoring sequence for a spare or first ball (double) occurs normally.<br />
2. 44º Pulse (scores double).<br />
3. 144º Pulse (scores spare).<br />
4. 0° switch closes causing the new pins solenoid to switch the pinsetter to<br />
2nd ball.<br />
In addition to scoring functions, the 0° signal at 360° causes the New<br />
Pins Solenoid to place the pinsetter in second ball.<br />
5. 0° resets the scoring cycle allowing the VPS to accept another ball<br />
detect.<br />
(1) BALL DETECT VPS STARTS SCORING PROCESS(2) PINSETTER TRIGGER (3) SCORES DOUBLE OR SPARE<br />
NORMALLY<br />
(4) NEW PINS SOLENOID SWITCHES PINSETTER (5) O° PULSE - 360° (6) 44° PULSE (SCORES DOUBLE)<br />
TO SECOND BALL<br />
(7) 144° PULSE (SCORES SPARE) (8) THIRD BALL TENTH FRAME (9) SCORING CYCLE RESETS
Figure 21. No Tap - <strong>Brunswick</strong> A-2<br />
No Tap Cycling<br />
When a bowler bowls a No Tap strike, the scorer console sends a signal to the<br />
VPS Processing PCB. In turn, the Processor energizes the New Pins Solenoid<br />
at 44° so the standing pins are swept away.<br />
1. Bowler delivers his first ball and the ball breaks the ball detect's light<br />
path.<br />
2. The ball causes the pinsetter to trigger. Refer to Figure 21.<br />
3. The 44° switch closes causing the new pin solenoid to switch the<br />
pinsetter to the second ball.<br />
4. The scorer displays an " N<br />
T X."<br />
5. 144° switch closes, but no action is taken.<br />
6. The pinsetter sweeps the pins and sets a new rack of pins.<br />
7. The 0° signal resets the scoring cycle allowing the VPS to accept<br />
another ball detect.<br />
(1) BALL DETECT (2) VPS STARTS SCORING PROCESS (3) PINSETTER TRIGGERS<br />
(4) NEW PINS SOLENOID SELECTS STRIKE (5) SCORER DISPLAYS NT AND X SCORED (6) SCISSORS BLOCKED<br />
(7) SWITCHES TO FIRST BALL AND SWEEPS (8) SETS A NEW RACK OF PINS (9) RESETS SCORING CYCLE<br />
STANDING PINS<br />
(10) 0° PULSE/360° (11) 44° PULSE (12) NO TAP<br />
(13) 144° PULSE (NO ACTION)<br />
Video Pinsensing System 31
AMF Pinspotter Modifications<br />
Figure 22. AMF Sweep Switch<br />
(1) SWITCH ADJUSTMENTS<br />
32 Video Pinsensing System<br />
AMF Sweep Switch<br />
The AMF sweep switch uses both normally open (ON) and normally closed<br />
(NC) sets of contacts to provide timing information to the VPS.<br />
The normally open set of contacts provides the signal that allows the VPS to<br />
accept a ball detect signal. When the sweep is in the up position, these<br />
contacts are closed, allowing the VPS to accept a ball detect signal should one<br />
occur. Once the sweep falls, the contacts open causing the VPS to ignore any<br />
ball detect signal.<br />
The normally closed set of contacts provides the take data signal to the VPS<br />
telling it to take a picture. When the sweep is in the up position these contacts<br />
are open. The falling of the sweep causes the contacts to close. If a ball detect<br />
has occurred, the closing of the contacts cause the VPS to take a picture of the<br />
pins after the take data time delay programmed through the VPS configuration<br />
menu has expired. Refer to Figure 22.
AMF Pinspotter Scoring Sequence of Events<br />
First Ball, Second Ball<br />
All Models<br />
The following describes the events necessary for the first ball scoring<br />
sequence.<br />
NOTE: The scorer console must be turned on, the bowler's name entered, and<br />
the “Bowl” key pressed with the sequencing arrows on the bowler's name.<br />
1. The bowler delivers the first ball. The ball breaks the ball detect's light<br />
path and sends a signal to the VPS.<br />
2. The VPS starts the scoring process.<br />
3. The pinsetter is triggered by the ball. The sweep falls downward causing<br />
the sweep switch to to send a take data signal to the VPS.<br />
4. The VPS waits the time desired as set in the take data delay time setting<br />
under the configuration menu.<br />
5. After the time delay the VPS takes a picture and sends the score to the<br />
LGP.<br />
6. Score is displayed on CRTs.<br />
7. The sweep switch closes to reset scoring cycle allowing the VPS to accept<br />
another ball detect.<br />
AMF Foul<br />
On first ball foul, the data is transmitted to the Scanner Data Processor PCB.<br />
At “take data” (44 o ), the scorer displays an “F” and scores a “0.” The normal<br />
foul cycle of the pinspotter sets a new full set of pins for the second ball cycle.<br />
Video Pinsensing System 33
34 Video Pinsensing System<br />
No Tap<br />
The following describes the events necessary for the no tap scoring sequence.<br />
This cycle occurs when a bowler throws a no tap strike and the LGP is set to<br />
No Tap scoring. At the end of the regular cycle, the pinspotter will<br />
automatically cycle a second time so the next bowler does not have to press<br />
the Reset button to get a full rack of pins.<br />
1. The bowler delivers the first ball. The ball breaks the ball detect's light<br />
path and sends a signal to the VPS.<br />
2. The VPS starts the scoring process.<br />
3. The pinsetter is triggered by the ball. The sweep falls downward causing<br />
the sweep switch to to send a take data signal to the VPS.<br />
4. The VPS waits the time desired as set in the take data delay time setting<br />
under the configuration menu.<br />
5. After the time delay the VPS takes a picture and sends the score to the<br />
LGP.<br />
N 6. X is displayed on CRT's.<br />
T<br />
7. The sweep switch closes to reset scoring cycle allowing the VPS to accept<br />
another ball detect and reset the pinspotter.
3rd Ball 10th Frame<br />
All Models<br />
The following describes the events necessary for the third ball tenth frame<br />
scoring sequence.<br />
This cycle occurs at the end of the tenth frame for a bowler that received a<br />
“bonus” ball after a spare or a double. If the bowler does not strike on the<br />
“bonus” ball, the pinspotter will cycle a second time so the next bowler is not<br />
required to push the Reset button to get a full rack, first ball.<br />
NOTE: The scorer console must be turned on, the bowler's name entered, and<br />
the “Bowl” key pressed with the sequencing arrows on the bowler's name.<br />
1. The bowler delivers the first ball. The ball breaks the ball detect's light<br />
path and sends a signal to the VPS.<br />
2. The VPS starts the scoring process.<br />
3. The pinsetter is triggered by the ball. The sweep falls downward causing<br />
the sweep switch to to send a take data signal to the VPS.<br />
4. The VPS waits the time desired as set in the take data delay time setting<br />
under the configuration menu.<br />
5. After the time delay the VPS takes a picture and sends the score to the<br />
LGP.<br />
6. Score is displayed on CRTs.<br />
7. The sweep switch closes to reset scoring cycle allowing the VPS to accept<br />
another ball detect. If the bowler does not bowl a strike the VPS resets the<br />
pinspotter.<br />
Video Pinsensing System 35
Cable Diagrams<br />
Y<br />
(21)<br />
LEFT A/P<br />
(24) NPS<br />
ASSEMBLY<br />
(57-300749-000<br />
(25) A/P INT.<br />
(26) A/P ELECT/SW INT.<br />
(11) VPS LAN OUT TO BOWLERTRACK<br />
(40’ 57-300747-000)<br />
(100’ 57-300748-000)<br />
Y<br />
P<br />
(12) VPS LAN OUT TO INSTANT REPLAY<br />
(40’ 57-300747-000)<br />
ZZ<br />
(27) SW<br />
CLUSTER ASSY.<br />
(28) SW<br />
U<br />
(13) VPS PINSETTER I/O CABLE (25’)<br />
(57-300743-000)<br />
(29) A-2<br />
ELECT. BOX<br />
(6) ODD<br />
A<br />
(1)<br />
LEFT FOUL<br />
(25) A/P INT.<br />
V<br />
(30) T.D. MOD.<br />
W<br />
36 Video Pinsensing System<br />
(2)<br />
FRAMEWORX CONSOLE<br />
(4)<br />
(32) DIAGNOL PORT (DB9)<br />
J8<br />
(33) J5 LEFT A/P I/O PCB (DB25)<br />
J6<br />
(19)<br />
LEFT BALL<br />
DETECTOR<br />
J2<br />
(6) ODD FJ<br />
AD<br />
FX I/O PCB<br />
(25)<br />
POWER “Y”<br />
ADAPTER<br />
(57-300XXX-000)<br />
(36) J9 POWER OUT (MX4)<br />
(37) J7 BALL/FOUL I/O (DB9)<br />
J1<br />
(31) J4 RIGHT A/P I/O PCB (Db25)<br />
J5<br />
J3<br />
J2<br />
J9<br />
J7<br />
J4<br />
(8)<br />
VPS LAN CABLE (85’)<br />
(57-300661-000)<br />
(14)<br />
ODD CAMERA<br />
(34) J3 LAN IN (DB15)<br />
(35) J2 LAN OUT (DB15)<br />
(15)<br />
EVEN CAMERA<br />
(20)<br />
RIGHT BALL<br />
DETECTOR<br />
(23)<br />
RIGHT A/P<br />
(24) NPS<br />
ASSEMBLY<br />
(57-300749-000<br />
(25) A/P INT.<br />
P<br />
(26) A/P ELECT/SW INT.<br />
GK<br />
(7) EVEN<br />
(9)<br />
VPS POWER CABLE (85’)<br />
(57-300663-000)<br />
B<br />
AD<br />
B<br />
(5)<br />
FX TRANS<br />
AC<br />
AB<br />
(18) FOUL<br />
(16) VPS BALL/FOUL DETECT CABLE (15’)<br />
(57-300668-000)<br />
(22)<br />
VPS/FX GND. PIGTAIL<br />
DISCONNECT (57-300744-000)<br />
ZZ<br />
(17) VPS FOUL PICKUP CABLE (64’)<br />
(57-300665-000)<br />
(27) SW<br />
CLUSTER ASSY.<br />
(7) EVEN<br />
C<br />
(3)<br />
RIGHT FOUL<br />
(28) SW<br />
U<br />
(13) VPS PINSETTER I/O CABLE (25’)<br />
(57-300743-000)<br />
(29) A-2<br />
ELECT. BOX<br />
(25) A/P INT.<br />
V<br />
(30) T.D. MOD.<br />
W<br />
Figure 23. VPS - <strong>Brunswick</strong> A, A-2 Pinsetters<br />
(1) LEFT FOUL (2) FRAMEWORX CONSOLE (3) RIGHT FOUL (4) FRAMEWORX I/O PCB<br />
(5) FRAMEWORX TRANSFORMER (6) ODD (7) EVEN (8) VPS LAND CABLE 85’ [57-<br />
300661-000]<br />
(9) VPS POWER CABLE 85’ (10) J7 BALL/FOUL I/O (DB9) (11) VPS LAND OUT BOWLERTRACK (12) VPS LAN OUT TO INSTANT<br />
[57-300663-000] [40’ 57-300747-000] REPLAY [40’ 57-300747-000)<br />
[100’ 57-300748-000]<br />
(13) VPS PINSETTER I/O CABLE (14) ODD CAMERA (15) EVEN CAMERA<br />
[25’ 57-300743-000)<br />
(16) VPS BALL/FOUL DETECT CABLE (17) VPS FOUL PICKUP CABLE (18) FOUL (19) LEFT BALL DETECTOR<br />
[15’ 57-300668-000] [64’ 57-300665-000]<br />
(20) RIGHT BALL DETECTOR (21) LEFT AUTOMATIC PINSETTER (22) VPS FRAMEWORX GROUND PIGTAIL (23) RIGHT AUTOMATIC<br />
DISCONNECT (57-300744-000) PINSETTER<br />
(24) NPS ASSEMBLT [57-300749-000] (25) AUTOMATIC PINSETTER INT. (26) AUTOMATIC PINSETTER ELECT/ (27) SW. CLUSTERASSSEMBLY<br />
SW INT.<br />
(28) SW (29) A-2 ELECTRICLA BOX (30) T.D. MOTOR (31) J4 RIGHT AUTOMATIC<br />
PINSETTER I/O [DB25]<br />
(32) J6 DIAG. PORT [DB9] (33) J5 LEFT AUTOMATIC PINSETTER I/O (34) J3 LAN IN (DB15) (35) J2 LAN OUT [DB15]<br />
(36) J9 POWER [MX4] (37) J7 BALL/FOUL I/O [DB9]
Figure 24. VPS AMF Pinspotters<br />
(1) LEFT BALL DETECT 57-300659-000 (2) RIGHT BALL DETECT 57-300659-000 (3) VPS FOUL PICKUP CABLE (4) BRUNSWICK TEL-E-FOUL<br />
53-300665-000 53-600134-002<br />
(5) VPS BALL/FOUL DETECT CABLE (6) VPS AMF PINSETTER I/O CABLE (7) AMF MANAGER’S CONTROL JUNCTION (8) VPS LOCAL LAND CABLE<br />
57-300666-000 57-300635-000 BOX 57-300661-000<br />
(9) VPS POWER CABLE (TOUCHWORX) (10) NO CONNECTION (11) COM (12) NO<br />
57-300662-000, (POWERWORX)<br />
57-300663-000<br />
(13) AMF 8230 SWEEP SWITCH (14) AMF SECOND BALL CABLE (15) AMF A/P CONTROL CABLE (16) AMF RESET SWITCH CABLE<br />
57-300659-000 57-300951-000 57-300854-000 57-300837-000<br />
(17) TO AMF CYCLE SWITCH (18) ODD LANE PINSPOTTER (19) AMF 8270 MASKING UNTI PLUG (20) EVEN LANE PINSPOTTER<br />
Video Pinsensing System 37
Figure 25. 57-300660-000VPS LLAN In Teamworx/Touchworx Cable Assembly<br />
(1) DRAIN (2) LAN A (3) LAN B<br />
(4) +12VOLTS DIRECT CURRENT (5) GROUND (6) NO CONNECTION<br />
(7) TO J2 ON I/O PCB (8) TO J3 LLAN IN ON VPS SCANNER<br />
Figure 26. 57-300661-000VPS LLAN In Powerworx Cable Assembly<br />
(1) DRAIN (2) LAN A (3) LAN B<br />
(4) +12VOLTS DIRECT CURRENT (5) GROUND (6) NO CONNECTION<br />
(7) TO J2 ON I/O PCB (8) TO J3 LLAN IN ON VPS SCANNER<br />
38 Video Pinsensing System
Figure 27. 57-300662-000 VPS Power Teamworx/Touchworx<br />
(1) TO LGP TRANSFORMER (2) 28 VAC (3) 28 VAC RETURN<br />
(4) GROUND (5) TO “J9” POWER ON VPS SCANNER<br />
Figure 28. 57-300663-000 VPS Power Cable - Poweworx<br />
(1) TO LGP TRANSFORMER (2) 28 VOLTS ALTERNATING CURRENT (3) 28 VOLTS ALTERNATING<br />
CURRENT RETURN<br />
(4) GROUND (5) TO J9 ON VPS SCANNER<br />
Figure 29. 57-300665-000 VPS Foul Pickup Cable Assembly<br />
(1) NO CONNECTION (2) ODD (3) EVEN<br />
(4) TO ODD LANE FOUL ASSEMBLY (5) TO EVEN LANE FOUL<br />
ASSEMBLY CONNECTOR<br />
Video Pinsensing System 39
Figure 30. 57-300668-000 VPS Ball/Foul Detect Cable<br />
(1) +5 VOLTS DIRECT CURRENT (2) GROUND (3) ODD BALL DETECT<br />
(4) EVEN BALL DETECT (5) TO “J7” ON VPS CANNER BALL/FOUL (6) TO EVEN LANE BALL DETECT<br />
DETECT CONNECTOR<br />
(7) NO CONNECTION (8) EVEN (9) ODD<br />
(10) FOUL (11) ODD FOUL (12) EVEN FOUL<br />
(13) TO ODD LANE BALL DETECT (14) TO FOUL DETECTOR<br />
Figure 31. 57-300743-000 VPS A-2 Pinsetter I/O Cable<br />
(1) TO VPS SCANNER “J4” [RIGHT LANE] (2) NO CONNECTION (3) +12 VOLT DIRECT CURRENT<br />
I/O CONNECTOR<br />
(4) SECOND BALL (5) DEGREE SWITCH (6) 44/144 DEGREE SWITCH<br />
(7) PINSETTER POWER (8) RESET SWITCH (10) RESPOT-OC<br />
(11) NPS-OC (12) SECOND BALL GROUND (13) SWITCH CLUSTER GROUND<br />
(14) CYCLE COUNT (15) COMMON (16) RESET RETURNS<br />
(17) TO OPTIONAL RESPOT SOLENOID (18) TO NPS ASSEMBLY CONNECTOR<br />
40 Video Pinsensing System
Figure 32. 57-300668-000. Ball Detect/Foul Cable<br />
(1) ASSEMBLE TO 15 PIN MOLEX (2) COMMON (3) 44/144 DEGREE NORMALLY OPEN<br />
IN NEW PINS SOLENOID BOX<br />
[57-300749] PER POSITION SHOWN<br />
(4) 0 DEGREE OPEN (5) GROUND (6) BLACK TO RELAY “T2” ON [68-<br />
300017-000]<br />
(7) WHITE PIN #2 SOLENOID ON<br />
[57-214234-000]<br />
Video Pinsensing System 41
Figure 33. 57-300835-000 VPS to AMF Pinspotter<br />
(1) NO CONNECTION (2) SECOND BALL (3) 0° DEGREE SWITCH<br />
(4) 44°/144° DEGREE SWITCH (5) RESET SWITCH (6) SECOND BALL GROUND<br />
(7) SWITCH CLUSTER GROUND (8) COMMON (9) RESET RETURN<br />
(10) SHIELD (11) SOLDERED (12) TO VPS “J4” - RIGHT LANE<br />
“J5” - LEFT LANE I/O CONNECTOR<br />
(13) 0°/44°/144° SWITCH CLUSTER (14) RESET CABLE SWITCH (15) MANAGER’S CONTROL BOX<br />
CABLE CABLE<br />
(16) SECOND BALL CABLE<br />
Figure 34. 57-300836-000 Switch Cluster<br />
(1) TO CABLE 57-300835-000 (2) 0³ DEGREE SWITCH (3) 4°/144° DEGREE SWITCH<br />
(4) SWITCH CLUSTER GROUND (5) AMF SWEEP SWITCH<br />
Figure 35. 57-300837-000 Reset Switch<br />
(1) TO CABLE 57-300835-000 (2) RESET RETURN (3) RESETSWITCH<br />
(4) TO AMF CYCLE<br />
42 Video Pinsensing System
Figure 36. 57-300854-000 Manager’s Control Box<br />
(1) TO CABLE 57-300835-000 (2) PINSETTER POWER (3) COMMON<br />
(4) MANAGER’S CONTROL BOX<br />
Figure 37. 57-300951-000 Second Ball<br />
(1) TO CABLE 57-300835-000 (2) SECOND BALL GROUND (3) COMMON<br />
(4) SECOND BALL<br />
Video Pinsensing System 43
(9)<br />
GROUND<br />
LUG<br />
GREEN<br />
BLACK<br />
44 Video Pinsensing System<br />
(10)<br />
HIGH VOLTAGE<br />
TERMINAL STRIP<br />
WHITE<br />
BLUE<br />
ORANGE<br />
H<br />
G<br />
F<br />
E<br />
D<br />
C<br />
B<br />
A<br />
(8)<br />
TIME<br />
DELAY<br />
MODULE<br />
YELLOW<br />
20 19 18 17 16 15 14 13<br />
(1)<br />
5-PIN<br />
CANNON<br />
CONNECTOR<br />
Figure 38. Control Box Wiring - <strong>Brunswick</strong> A-2 Pinsetter<br />
(11)<br />
B C C B<br />
TAP SPLICER<br />
(7)<br />
MOTOR<br />
START<br />
RELAY<br />
(2)<br />
3-PIN<br />
CANNON<br />
CONNECTOR<br />
GREEN<br />
RED<br />
BLACK<br />
1 2 3 4 5 6 7 8 9<br />
WHITE<br />
BROWN<br />
BLACK<br />
GREEN<br />
WHITE<br />
BLUE<br />
ORANGE<br />
YELLOW<br />
10 11 12<br />
(6)<br />
LOW VOLTAGE<br />
TERMINAL STRIP<br />
(3)<br />
PINSETTER CABLE<br />
(57-300299-000)<br />
(4)<br />
WIRE CLAMP<br />
(5)<br />
NUT<br />
(11-602002-000)<br />
(1) 5-PIN CANNON CONNECT0R (2) 3-PIN CANNON CONNECTOR (3) PINSETTER CABLE (57-300299-<br />
000)<br />
(4) WIRE CLAMP (5) NUT (11-602005-000) (6) LOW VOLTAGE TERMINAL STRIP<br />
(7) MOTOR START RELAY (8) TIME DELAY MODULE (9) GROUND LUG<br />
(10) HIGH VOLTAGE TERMINAL STRIP (11) TAP SPLICER
TL1<br />
TS1<br />
19<br />
G H<br />
F<br />
E<br />
D<br />
C<br />
B<br />
A<br />
BLUE<br />
ORANGE<br />
(BROWN)<br />
BLACK<br />
GREEN<br />
WHITE<br />
RL2<br />
+ + + +<br />
13 513<br />
2 4 6 14<br />
+ + + +<br />
Figure 39. Control Box Wiring - <strong>Brunswick</strong> A, A-2 Pinsetters<br />
YELLOW<br />
(1)<br />
TAP-IN<br />
SPLICE<br />
19<br />
35<br />
MC4 MC7<br />
TS2<br />
118<br />
5<br />
GREEN<br />
BLACK<br />
2 1<br />
18<br />
WHITE<br />
35<br />
RED<br />
BROWN<br />
1 2 3 4 5 6 7 8 9 101112<br />
(2)<br />
PINSETTER CABLE<br />
(57-300299-000)<br />
BLUE<br />
ORANGE<br />
YELLOW<br />
(1) TAP-IN SPLICE (2) PINSETTER CABLE (57-300299-000) (3) WIRE CLAMP<br />
(4) NUT (11-602002-000)<br />
MC8<br />
(3)<br />
WIRE CLAMP<br />
(4)<br />
NUT<br />
(11-602002-000)<br />
Video Pinsensing System 45