Power Window Motor Repair - The Lincoln Mark VII Club
Power Window Motor Repair - The Lincoln Mark VII Club
Power Window Motor Repair - The Lincoln Mark VII Club

Create successful ePaper yourself
Turn your PDF publications into a flip-book with our unique Google optimized e-Paper software.
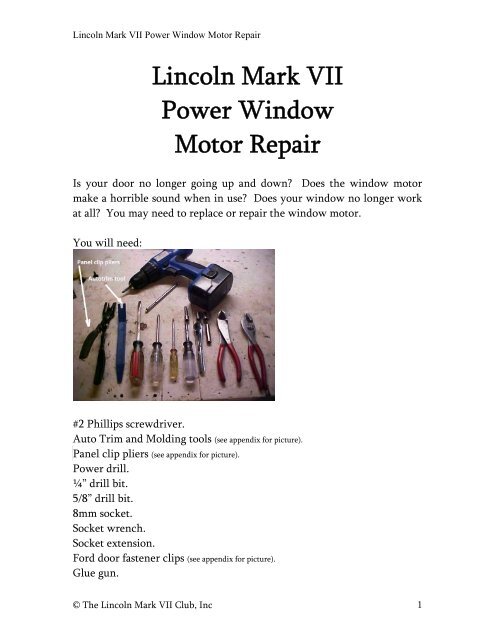
<strong>Lincoln</strong> <strong>Mark</strong> <strong>VII</strong> <strong>Power</strong> <strong>Window</strong> <strong>Motor</strong> <strong>Repair</strong><br />
<strong>Lincoln</strong> <strong>Mark</strong> <strong>VII</strong><br />
<strong>Power</strong> <strong>Window</strong><br />
<strong>Motor</strong> <strong>Repair</strong><br />
Is your door no longer going up and down? Does the window motor<br />
make a horrible sound when in use? Does your window no longer work<br />
at all? You may need to replace or repair the window motor.<br />
You will need:<br />
#2 Phillips screwdriver.<br />
Auto Trim and Molding tools (see appendix for picture).<br />
Panel clip pliers (see appendix for picture).<br />
<strong>Power</strong> drill.<br />
¼” drill bit.<br />
5/8” drill bit.<br />
8mm socket.<br />
Socket wrench.<br />
Socket extension.<br />
Ford door fastener clips (see appendix for picture).<br />
Glue gun.<br />
© <strong>The</strong> <strong>Lincoln</strong> <strong>Mark</strong> <strong>VII</strong> <strong>Club</strong>, Inc 1
<strong>Lincoln</strong> <strong>Mark</strong> <strong>VII</strong> <strong>Power</strong> <strong>Window</strong> <strong>Motor</strong> <strong>Repair</strong><br />
Grease. (regular gear grease, synthetic grease or lithium grease will work).<br />
Telescoping Magnetic Pickup Tool (see appendix for picture).<br />
Let’s get started.<br />
1) Raise the window to full up position, if possible. If the glass cannot<br />
be raised and is in a partially raised position, it must be supported<br />
so that it will not fall into the door well during motor removal.<br />
2) Disconnect the battery ground cable.<br />
Remove door trim panel.<br />
1) Using the auto trim tool, pop the speaker cover off and remove a<br />
Phillips screw.<br />
© <strong>The</strong> <strong>Lincoln</strong> <strong>Mark</strong> <strong>VII</strong> <strong>Club</strong>, Inc 2
<strong>Lincoln</strong> <strong>Mark</strong> <strong>VII</strong> <strong>Power</strong> <strong>Window</strong> <strong>Motor</strong> <strong>Repair</strong><br />
2) Using the auto trim molding pry bar, gently pop off the lower panel<br />
on the door where the light is. <strong>The</strong>re are 4 metal clips at the top<br />
and 5 plastic clips on the bottom. While holding the panel in your<br />
hands, remove the light bulb from its housing by twisting ¼ of a<br />
turn and pull.<br />
3) Remove two Phillips screws that hold the main panel to the door.<br />
© <strong>The</strong> <strong>Lincoln</strong> <strong>Mark</strong> <strong>VII</strong> <strong>Club</strong>, Inc 3
<strong>Lincoln</strong> <strong>Mark</strong> <strong>VII</strong> <strong>Power</strong> <strong>Window</strong> <strong>Motor</strong> <strong>Repair</strong><br />
4) Using the auto trim tool, gently pop off the trim piece around the<br />
controls. Some of the clips may stay stuck in the door.<br />
© <strong>The</strong> <strong>Lincoln</strong> <strong>Mark</strong> <strong>VII</strong> <strong>Club</strong>, Inc 4
<strong>Lincoln</strong> <strong>Mark</strong> <strong>VII</strong> <strong>Power</strong> <strong>Window</strong> <strong>Motor</strong> <strong>Repair</strong><br />
5) Remove the control panel away from the door.<br />
6) While holding the control panel, disconnect two wire harnesses.<br />
<strong>The</strong> larger one is rather hard to disconnect, so you may need to use<br />
channel lock pliers to disconnect it.<br />
7) Remove two Phillips screws behind the control panel.<br />
8) Remove the screw from the end of the door panel at the top of the<br />
corner.<br />
9) Once all three panels are removed from the main door panel and all<br />
screws are removed (double check, sometimes people will use an<br />
extra screw to hold the door panel to the door) use the Panel pliers<br />
to pop the door panel away from the metal door where the clips<br />
© <strong>The</strong> <strong>Lincoln</strong> <strong>Mark</strong> <strong>VII</strong> <strong>Club</strong>, Inc 5
<strong>Lincoln</strong> <strong>Mark</strong> <strong>VII</strong> <strong>Power</strong> <strong>Window</strong> <strong>Motor</strong> <strong>Repair</strong><br />
are. <strong>The</strong>re are 18 door clips around the door. Start with the<br />
bottom of the door at the hinge and move around and up to the end<br />
of the door. Lift the door up and off and maneuver the door panel<br />
away from the door latch by turning the door panel slightly as you<br />
remove it away from the handle.<br />
10) Remove four Phillips screws holding the speaker on,<br />
disconnect the wires and remove the speaker.<br />
11) Remove two Phillips screws holding the metal bracket for<br />
the door panel next to the speaker and remove it.<br />
12) Using the Panel pliers, remove any clips that may be holding<br />
the water shield to the door as well as any clips that where left<br />
from the door panel.<br />
13) Carefully remove the water shield trying not to tear any of<br />
the material.<br />
© <strong>The</strong> <strong>Lincoln</strong> <strong>Mark</strong> <strong>VII</strong> <strong>Club</strong>, Inc 6
<strong>Lincoln</strong> <strong>Mark</strong> <strong>VII</strong> <strong>Power</strong> <strong>Window</strong> <strong>Motor</strong> <strong>Repair</strong><br />
14) Disconnect window motor harness from the door and<br />
disconnect the wire connector.<br />
© <strong>The</strong> <strong>Lincoln</strong> <strong>Mark</strong> <strong>VII</strong> <strong>Club</strong>, Inc 7
<strong>Lincoln</strong> <strong>Mark</strong> <strong>VII</strong> <strong>Power</strong> <strong>Window</strong> <strong>Motor</strong> <strong>Repair</strong><br />
.<br />
15) Position the motor wiring harness out of the way. Assure<br />
that the regulator arm is in a fixed position to prevent<br />
counterbalance spring to unwind.2<br />
16) Using ¼” drill bit, drill three holes at the existing drill<br />
dimples located on the door inner panel adjacent to the motor.<br />
17) Drill 5/8” hole where the pilot holes are.<br />
18) Remove the three window motor mounting screws with the<br />
8mm socket.<br />
© <strong>The</strong> <strong>Lincoln</strong> <strong>Mark</strong> <strong>VII</strong> <strong>Club</strong>, Inc 8
<strong>Lincoln</strong> <strong>Mark</strong> <strong>VII</strong> <strong>Power</strong> <strong>Window</strong> <strong>Motor</strong> <strong>Repair</strong><br />
19) Disengage the motor, and drive assembly from the regulator<br />
quadrant gear.<br />
Depending on the extent of the damage, there are four ways to repair the<br />
motor:<br />
1) Replace just the window regulator gear plugs with screws.<br />
2) Replace the existing window regulator gear plugs.<br />
3) Replace the whole window gear assembly.<br />
4) Replace the motor and gear assembly.<br />
SUGGESTION 1)<br />
© <strong>The</strong> <strong>Lincoln</strong> <strong>Mark</strong> <strong>VII</strong> <strong>Club</strong>, Inc 9
<strong>Lincoln</strong> <strong>Mark</strong> <strong>VII</strong> <strong>Power</strong> <strong>Window</strong> <strong>Motor</strong> <strong>Repair</strong><br />
1) Gather six ¼-20 hex head screws. <strong>The</strong>se will replace the three<br />
clutches inside of the gear assembly.<br />
2) Remove the gear assembly cover.<br />
© <strong>The</strong> <strong>Lincoln</strong> <strong>Mark</strong> <strong>VII</strong> <strong>Club</strong>, Inc 10
<strong>Lincoln</strong> <strong>Mark</strong> <strong>VII</strong> <strong>Power</strong> <strong>Window</strong> <strong>Motor</strong> <strong>Repair</strong><br />
3) Due to the damage, particles of plastic and metal are imbedded in<br />
the grease and the grease will need to be replaced. Remove<br />
everything that is not a gear or a casing.<br />
4) <strong>The</strong> gear housing and parts should be clean, free from any previous<br />
grease.<br />
© <strong>The</strong> <strong>Lincoln</strong> <strong>Mark</strong> <strong>VII</strong> <strong>Club</strong>, Inc 11
<strong>Lincoln</strong> <strong>Mark</strong> <strong>VII</strong> <strong>Power</strong> <strong>Window</strong> <strong>Motor</strong> <strong>Repair</strong><br />
5) Grease the bottom of the gear housing, place the 45 tooth nylon<br />
gear into the gear housing, flat side down.<br />
6) Grease the inside of the 45 tooth gear and place the greased nuts in<br />
pairs into the corners of the triangle. <strong>The</strong> flat edges of the nuts<br />
should face the shaft and the outward edges of the plastic retainer.<br />
7) Grease the triangle side of the 9 pin metal gear and insert it into the<br />
45 pin gear assembly.<br />
8) <strong>The</strong> bottom half of the pinion gear has three flat sides that should<br />
rest against the nuts. <strong>The</strong> same lower half has three rounded sides<br />
that should rest between the nuts and facing the plastic housing.<br />
This will look and feel impossible but :<br />
© <strong>The</strong> <strong>Lincoln</strong> <strong>Mark</strong> <strong>VII</strong> <strong>Club</strong>, Inc 12
<strong>Lincoln</strong> <strong>Mark</strong> <strong>VII</strong> <strong>Power</strong> <strong>Window</strong> <strong>Motor</strong> <strong>Repair</strong><br />
SUGGESTION 2)<br />
1) Using the suggested Dorman #74410 <strong>Window</strong> Regulator Gear<br />
Plugs, follow the procedure for SUGGESTION 1) starting at step 5)<br />
and use the plugs shown below instead of the metal nuts.<br />
© <strong>The</strong> <strong>Lincoln</strong> <strong>Mark</strong> <strong>VII</strong> <strong>Club</strong>, Inc 13
<strong>Lincoln</strong> <strong>Mark</strong> <strong>VII</strong> <strong>Power</strong> <strong>Window</strong> <strong>Motor</strong> <strong>Repair</strong><br />
NOTE* When using the nylon plugs, you will need to have the plugs<br />
partially inserted into the 45 pin gear housing while pressing the 9 pin<br />
metal gear into the assembly. It is rather tricky and it seams like the gear<br />
is not going to fit, but with some practice, it will go in. <strong>The</strong> trick is to<br />
NOT put the plus all the way in first. Leave the slightly out of the<br />
assembly as you insert the 9 pin metal gear. <strong>The</strong> grease will act like a<br />
glue and hold the plugs in suspension while you try to insert the 9 pin<br />
metal gear.<br />
SUGGESTION 3)<br />
If the teeth on the 45 tooth nylon gear are damage in anyway, purchase<br />
Dorman #74409 which has the gear and plugs. Follow the steps from<br />
SUGGESTION 1) and just grease the gear and plugs and insert the 9 tooth<br />
metal gear starting at step 6).<br />
See Note* for Suggestion 2) on inserting the 9 pin metal gear into the<br />
assembly.<br />
© <strong>The</strong> <strong>Lincoln</strong> <strong>Mark</strong> <strong>VII</strong> <strong>Club</strong>, Inc 14
<strong>Lincoln</strong> <strong>Mark</strong> <strong>VII</strong> <strong>Power</strong> <strong>Window</strong> <strong>Motor</strong> <strong>Repair</strong><br />
Suggestion 4)<br />
1) Purchase Dorman #74426 which includes the plugs, 45 pin nylon<br />
gear, 9 ping metal gear, cover place and washer.<br />
2) Grease all parts liberally and assemble.<br />
See Note* for Suggestion 2) on inserting the 9 pin metal gear into the<br />
assembly.<br />
Assembly<br />
1) Make sure you have ample grease inside and outside of the parts of<br />
the assembly, place the cover plate on and put the Phillips screw<br />
back into the top of the assembly.<br />
© <strong>The</strong> <strong>Lincoln</strong> <strong>Mark</strong> <strong>VII</strong> <strong>Club</strong>, Inc 15
<strong>Lincoln</strong> <strong>Mark</strong> <strong>VII</strong> <strong>Power</strong> <strong>Window</strong> <strong>Motor</strong> <strong>Repair</strong><br />
Test the operation of the motor before installation!<br />
© <strong>The</strong> <strong>Lincoln</strong> <strong>Mark</strong> <strong>VII</strong> <strong>Club</strong>, Inc 16
<strong>Lincoln</strong> <strong>Mark</strong> <strong>VII</strong> <strong>Power</strong> <strong>Window</strong> <strong>Motor</strong> <strong>Repair</strong><br />
2) Installation of the replacement motor is in reverse.<br />
3) Lubricate the head of the bolt and inside the 8mm socket hold<br />
them in place while moving them to the motor through the 5/8”<br />
holes. If you drop a screw, use a magnetic pick up tool to recover<br />
the screw.<br />
4) To install the door panel, place the clips in the sockets of the door panel first.<br />
5) If the socket holes are damage, you can glue them back together (make sure to<br />
let the slots dry before inserting a clip).<br />
6) Remember to turn the door panel at an angle to put the slide it over the door<br />
handle.<br />
7) Align the clips up as you gingerly place the partially in the hole. Once the<br />
© <strong>The</strong> <strong>Lincoln</strong> <strong>Mark</strong> <strong>VII</strong> <strong>Club</strong>, Inc 17
<strong>Lincoln</strong> <strong>Mark</strong> <strong>VII</strong> <strong>Power</strong> <strong>Window</strong> <strong>Motor</strong> <strong>Repair</strong><br />
Appendix<br />
Pictures of suggested tools:<br />
1) Auto Trim and Molding tools.<br />
2) Panel clip pliers.<br />
3) Telescoping Magnetic Pickup Tool (you will drop a screw inside the door!).<br />
© <strong>The</strong> <strong>Lincoln</strong> <strong>Mark</strong> <strong>VII</strong> <strong>Club</strong>, Inc 18
<strong>Lincoln</strong> <strong>Mark</strong> <strong>VII</strong> <strong>Power</strong> <strong>Window</strong> <strong>Motor</strong> <strong>Repair</strong><br />
4) Ford door fastener clips (#TR142 - <strong>The</strong>FastenerWarehouse.com).<br />
© <strong>The</strong> <strong>Lincoln</strong> <strong>Mark</strong> <strong>VII</strong> <strong>Club</strong>, Inc 19