1992 Valve Cover Gasket Replacement - The Lincoln Mark VII Club
1992 Valve Cover Gasket Replacement - The Lincoln Mark VII Club
1992 Valve Cover Gasket Replacement - The Lincoln Mark VII Club

Create successful ePaper yourself
Turn your PDF publications into a flip-book with our unique Google optimized e-Paper software.
<strong>Lincoln</strong> <strong>Mark</strong> <strong>VII</strong> 1986 -1987 <strong>Valve</strong> <strong>Cover</strong> <strong>Replacement</strong><br />
Published by <strong>The</strong> <strong>Lincoln</strong> <strong>Mark</strong> <strong>VII</strong> <strong>Club</strong><br />
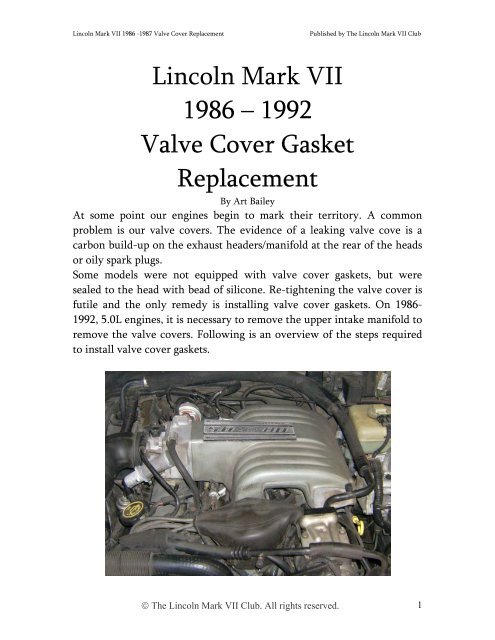
<strong>Lincoln</strong> <strong>Mark</strong> <strong>VII</strong><br />
1986 – <strong>1992</strong><br />
<strong>Valve</strong> <strong>Cover</strong> <strong>Gasket</strong><br />
<strong>Replacement</strong><br />
By Art Bailey<br />
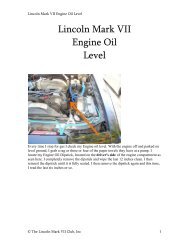
At some point our engines begin to mark their territory. A common<br />
problem is our valve covers. <strong>The</strong> evidence of a leaking valve cove is a<br />
carbon build-up on the exhaust headers/manifold at the rear of the heads<br />
or oily spark plugs.<br />
Some models were not equipped with valve cover gaskets, but were<br />
sealed to the head with bead of silicone. Re-tightening the valve cover is<br />
futile and the only remedy is installing valve cover gaskets. On 1986-<br />
<strong>1992</strong>, 5.0L engines, it is necessary to remove the upper intake manifold to<br />
remove the valve covers. Following is an overview of the steps required<br />
to install valve cover gaskets.<br />
© <strong>The</strong> <strong>Lincoln</strong> <strong>Mark</strong> <strong>VII</strong> <strong>Club</strong>. All rights reserved. 1
<strong>Lincoln</strong> <strong>Mark</strong> <strong>VII</strong> 1986 -1987 <strong>Valve</strong> <strong>Cover</strong> <strong>Replacement</strong><br />
Published by <strong>The</strong> <strong>Lincoln</strong> <strong>Mark</strong> <strong>VII</strong> <strong>Club</strong><br />
Before starting any work, it is always advisable to disconnect the battery<br />
and release any pressure in the cooling system by loosening the radiator<br />
cap and re-tightening it.<br />
Remove the fresh air intake tube and the rubber distributor cover.<br />
Remove the four screws securing the trim plate from the top of the upper<br />
intake manifold, which cover the center two bolts.<br />
Before removal of the upper intake manifold, a number of connectors and<br />
hoses must be disconnected.<br />
© <strong>The</strong> <strong>Lincoln</strong> <strong>Mark</strong> <strong>VII</strong> <strong>Club</strong>. All rights reserved. 2
<strong>Lincoln</strong> <strong>Mark</strong> <strong>VII</strong> 1986 -1987 <strong>Valve</strong> <strong>Cover</strong> <strong>Replacement</strong><br />
Published by <strong>The</strong> <strong>Lincoln</strong> <strong>Mark</strong> <strong>VII</strong> <strong>Club</strong><br />
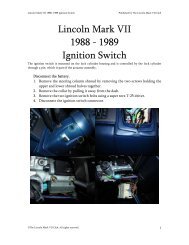
<strong>The</strong> above illustration shows the disconnected components. <strong>The</strong> EGR<br />
plate coolant hoses contain coolant and must be plugged. <strong>The</strong> throttle,<br />
TV and cruise control cable bracket is secured to the throttle body with<br />
two bolts and can be removed as a unit. Carefully snap the cables off their<br />
ball studs on the throttle linkage using a twisting motion between the<br />
cable ends and the linkage with a large screwdriver. Pull the bracket<br />
assembly up and secure it out of the way with a wire or a zip-tie.<br />
Remove the PCV valve from its rubber bushing at the rear of the lower<br />
intake manifold and the vacuum hose running to the canister purge. You<br />
will find a slip fit connection near the distributor. Remove the three<br />
vacuum hoses from the rear of the upper intake manifold. (Two small,<br />
one large)<br />
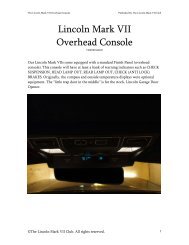
<strong>The</strong> engine control plugs can be snapped out of the holder without<br />
having to disconnect them.<br />
© <strong>The</strong> <strong>Lincoln</strong> <strong>Mark</strong> <strong>VII</strong> <strong>Club</strong>. All rights reserved. 3
<strong>Lincoln</strong> <strong>Mark</strong> <strong>VII</strong> 1986 -1987 <strong>Valve</strong> <strong>Cover</strong> <strong>Replacement</strong><br />
Published by <strong>The</strong> <strong>Lincoln</strong> <strong>Mark</strong> <strong>VII</strong> <strong>Club</strong><br />
Remove the six upper manifold bolts.<br />
Gently lift the upper manifold off of the lower intake manifold verifying<br />
that there is nothing further connected.<br />
© <strong>The</strong> <strong>Lincoln</strong> <strong>Mark</strong> <strong>VII</strong> <strong>Club</strong>. All rights reserved. 4
<strong>Lincoln</strong> <strong>Mark</strong> <strong>VII</strong> 1986 -1987 <strong>Valve</strong> <strong>Cover</strong> <strong>Replacement</strong><br />
Published by <strong>The</strong> <strong>Lincoln</strong> <strong>Mark</strong> <strong>VII</strong> <strong>Club</strong><br />
Use caution when sitting the upper intake down as to not damage the<br />
mating surface. It is further advisable to cover the lower intake with a<br />
towel or cardboard to keep any debris from falling into the lower intake.<br />
I started by removing the passenger side valve cover by lifting the spark<br />
plug retainers off of the forward lower two stud/bolts and removing the<br />
six bolts securing the valve cover. A light tap with a soft faced hammer<br />
dislodges the valve cover and with some maneuvering, it can be removed<br />
from the engine compartment.<br />
Carefully remove the silicone residue from the head, taking care to not<br />
allow any pieces of silicone to fall into the head.<br />
Clean the mating surface of the head and wire brush any silicone from<br />
the threads of the bolts.<br />
© <strong>The</strong> <strong>Lincoln</strong> <strong>Mark</strong> <strong>VII</strong> <strong>Club</strong>. All rights reserved. 5
<strong>Lincoln</strong> <strong>Mark</strong> <strong>VII</strong> 1986 -1987 <strong>Valve</strong> <strong>Cover</strong> <strong>Replacement</strong><br />
Published by <strong>The</strong> <strong>Lincoln</strong> <strong>Mark</strong> <strong>VII</strong> <strong>Club</strong><br />
Clean the valve cover mating surface and lay the valve cover on up side<br />
down.<br />
With the valve cover laying up side down, apply a light coating of<br />
silicone to the mating surface of the valve cover and place the new gasket<br />
onto the valve cover, placing a bolt in each hole to hold the gasket in<br />
place as it dries. <strong>The</strong> passenger side valve cover is more difficult than the<br />
driver side, so give the silicone extra drying time while periodically<br />
pressing the gasket to the valve cover.<br />
© <strong>The</strong> <strong>Lincoln</strong> <strong>Mark</strong> <strong>VII</strong> <strong>Club</strong>. All rights reserved. 6
<strong>Lincoln</strong> <strong>Mark</strong> <strong>VII</strong> 1986 -1987 <strong>Valve</strong> <strong>Cover</strong> <strong>Replacement</strong><br />
Published by <strong>The</strong> <strong>Lincoln</strong> <strong>Mark</strong> <strong>VII</strong> <strong>Club</strong><br />
.<br />
<strong>The</strong>re are many types and brands of gaskets. I chose to use Fel-Pro<br />
neoprene gaskets as I have had good luck with them for many years.<br />
After ample drying time, apply a light coating of silicone to the mating<br />
surface of the head and carefully manipulate the valve cover back onto<br />
the head.<br />
Note: Use extreme caution when reinstalling the valve cover as if you<br />
knock the gasket loose, and it is misaligned, it will not be evident until<br />
after you finish the installation and start the engine. You will then have<br />
to start ove r again.<br />
© <strong>The</strong> <strong>Lincoln</strong> <strong>Mark</strong> <strong>VII</strong> <strong>Club</strong>. All rights reserved. 7
<strong>Lincoln</strong> <strong>Mark</strong> <strong>VII</strong> 1986 -1987 <strong>Valve</strong> <strong>Cover</strong> <strong>Replacement</strong><br />
Published by <strong>The</strong> <strong>Lincoln</strong> <strong>Mark</strong> <strong>VII</strong> <strong>Club</strong><br />
Reinstall six bolts and torque to 1-3 ft/lbs and again to 4-6 ft/lbs.<br />
Repeat the process on the other bank.<br />
Remove the towel/cardboard from the lower intake and carefully remove<br />
the gasket, making sure that no debris falls into any of the runners. Make<br />
sure there are no gouges or nicks on the mating surface of the lower<br />
intake manifold. Place a new gasket in place using no adhesives or<br />
sealers.<br />
At this point, the upper intake should be inspected for debris or damage<br />
to the mating surface. This is also a good time to replace all the vacuum<br />
hoses attached to the upper intake, as they are impossible to replace with<br />
the manifold installed.<br />
© <strong>The</strong> <strong>Lincoln</strong> <strong>Mark</strong> <strong>VII</strong> <strong>Club</strong>. All rights reserved. 8
<strong>Lincoln</strong> <strong>Mark</strong> <strong>VII</strong> 1986 -1987 <strong>Valve</strong> <strong>Cover</strong> <strong>Replacement</strong><br />
Published by <strong>The</strong> <strong>Lincoln</strong> <strong>Mark</strong> <strong>VII</strong> <strong>Club</strong><br />
(Underside of upper intake manifold)<br />
Carefully arrange the harnesses and hoses on the engine so they will not<br />
become lodged between the upper manifold and valve covers or lower<br />
manifold components.<br />
Carefully place the upper manifold onto the lower manifold and verify<br />
that the gasket is in the proper location. Install the upper manifold to<br />
lower manifold bolts and gradually torque them to 12-18 ft/lbs.<br />
Re-install all connectors, hoses, brackets and cables. Re install the cover<br />
trim plate. Verify that the throttle linkage is secure and returns to idle.<br />
Top off coolant, if any was lost. Connect battery and start engine,<br />
checking for any leaks.<br />
© <strong>The</strong> <strong>Lincoln</strong> <strong>Mark</strong> <strong>VII</strong> <strong>Club</strong>. All rights reserved. 9
<strong>Lincoln</strong> <strong>Mark</strong> <strong>VII</strong> 1986 -1987 <strong>Valve</strong> <strong>Cover</strong> <strong>Replacement</strong><br />
Published by <strong>The</strong> <strong>Lincoln</strong> <strong>Mark</strong> <strong>VII</strong> <strong>Club</strong><br />
Replace the fresh air intake tube and distributor cover, if equipped.<br />
Change the oil and filter.<br />
© <strong>The</strong> <strong>Lincoln</strong> <strong>Mark</strong> <strong>VII</strong> <strong>Club</strong>. All rights reserved. 10