GM Ball Joint Update Kit - OTC
GM Ball Joint Update Kit - OTC
GM Ball Joint Update Kit - OTC

You also want an ePaper? Increase the reach of your titles
YUMPU automatically turns print PDFs into web optimized ePapers that Google loves.
© 2006 SPX<br />
655 EisEnhowEr DrivE<br />
owatonna, Mn 55060-0995 Usa<br />
PhonE: (507) 455-7000<br />
tEch. sErv.: (800) 533-6127<br />
Fax: (800) 955-8329<br />
orDEr Entry: (800) 533-6127<br />
Fax: (800) 283-8665<br />
intErnational salEs: (507) 455-7223<br />
Fax: (507) 455-7063<br />
<strong>GM</strong> <strong>Ball</strong> <strong>Joint</strong> <strong>Update</strong> <strong>Kit</strong><br />
(Use with <strong>OTC</strong> <strong>Ball</strong> <strong>Joint</strong> <strong>Kit</strong> 6530 or 7918)<br />
Item<br />
No.<br />
Part<br />
No.<br />
No.<br />
Req’d<br />
Description<br />
1 531738 1 Installer Cup<br />
2 537499 1 Receiving Tube<br />
3 537500 1 Remover<br />
4 537501 1 Remover<br />
Sheet No.<br />
Form No. 537545<br />
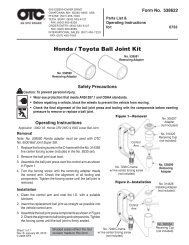
Application: Use with an <strong>OTC</strong> ball joint press to remove and install upper and lower ball joints on<br />
the <strong>GM</strong> vehicles listed.<br />
1<br />
Caution: To prevent personal injury,<br />
2<br />
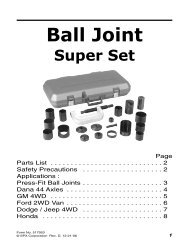
Parts List<br />
Safety Precautions<br />
• Wear eye protection that meets ANSI Z87.1 and OSHA standards.<br />
• Before repairing a vehicle, block the wheels to prevent the vehicle from moving.<br />
3<br />
• Check the final alignment of the ball joint press and tooling with the components before<br />
exerting pressure to remove or replace a ball joint.<br />
Refer to any operating instructions included with the product for detailed<br />
information about operation, testing, disassembly, reassembly, and<br />
preventive maintenance.<br />
Items found in this parts list have been carefully tested and selected by<br />
<strong>OTC</strong>. Therefore: Use only genuine <strong>OTC</strong> replacement parts.<br />
Additional questions can be directed to our Technical Service Dept.<br />
Parts List &<br />
Operating Instructions<br />
for: 6732<br />
4<br />
1 of 2<br />
Issue Date: Rev. B, January 13, 2010
Parts List & Operating Instructions Form No. 537545, Sheet 1 of 2, Back<br />
1. Position the tools as shown to remove or install the upper or lower ball joint. Note for installation: Clean the control<br />
arm or knuckle, and coat the I.D. with a suitable lubricant.<br />
2. Tighten the forcing screw until it meets the cup, and check the alignment of all tooling and components. Continue<br />
tightening the forcing screw until the ball joint is removed or installed.<br />
Removing and Installing the Lower <strong>Ball</strong> <strong>Joint</strong><br />
C-frame<br />
No. 7248;<br />
not included<br />
Operating Instructions<br />
Applications: 1999-2000 1/2-ton Silverado, Sierra 4WD (std. cab)<br />
2001-2004 1/2-ton Silverado, Sierra 2WD/4WD<br />
2000-2004 1/2-ton Suburban, Tahoe, Yukon, Denali 2WD/4WD<br />
2002-2004 1/2-ton Avalanche 2WD/4WD<br />
2002-2004 Cadillac Escalade 2WD/4WD<br />
2003-2004 1/2- & 3/4-ton Express & Savana Van 4WD<br />
No. 537499<br />
Receiving Tube<br />
Figure 1<br />
Previously Released<br />
Adapter<br />
No. 305227<br />
Figure 2<br />
Removal Installation<br />
Removing and Installing the Upper <strong>Ball</strong> <strong>Joint</strong><br />
C-frame<br />
No. 7248;<br />
not included<br />
Previously<br />
Released<br />
Receiving Cup<br />
No. 29504<br />
Previously Released<br />
Adapter<br />
No. 305228<br />
No. 537500<br />
Remover<br />
Previously<br />
Released<br />
Receiving Cup<br />
No. 204508<br />
C-frame<br />
No. 7248;<br />
not included<br />
Previously<br />
Released<br />
Installer Cup<br />
No. 313969<br />
C-frame<br />
No. 7248;<br />
not included<br />
Figure 1 Figure 2<br />
Removal Installation<br />
Previously<br />
Released<br />
Receiving Cup<br />
No. 39776<br />
Previously<br />
Released<br />
Receiving Cup<br />
No. 39976
Parts List & Operating Instructions Form No. 537545<br />
© 2006 SPX<br />
Operating Instructions<br />
Applications: 2002-2005 Chevrolet TrailBlazer,<br />
<strong>GM</strong>C Envoy, & Oldsmobile Bravada<br />
1. Position the tools as shown to remove or install the upper or lower ball joint. Note for installation: Clean the control<br />
arm or knuckle, and coat the I.D. with a suitable lubricant.<br />
2. Tighten the forcing screw until it meets the cup, and check the alignment of all tooling and components. Continue<br />
tightening the forcing screw until the ball joint is removed or installed.<br />
Removing and Installing the Lower <strong>Ball</strong> <strong>Joint</strong><br />
C-frame<br />
No. 7248;<br />
not included<br />
Figure 1<br />
Removal<br />
Previously Released<br />
Adapter<br />
No. 305227<br />
Figure 2<br />
Installation<br />
Removing and Installing the Upper <strong>Ball</strong> <strong>Joint</strong><br />
C-frame<br />
No. 7248;<br />
not included<br />
Previously<br />
Released<br />
Adapter<br />
No. 38354<br />
Previously Released<br />
Receiving Tube<br />
No. 222306<br />
No. 531738<br />
Previously Released<br />
Receiving Cup<br />
No. 204508<br />
C-frame<br />
No. 7248;<br />
not included<br />
Previously Released<br />
Remover<br />
No. 313968<br />
C-frame<br />
No. 7248;<br />
not included<br />
Figure 1 Figure 2<br />
Removal Installation<br />
Sheet No.<br />
2 of 2<br />
Previously<br />
Released<br />
Receiving Cup<br />
No. 38354<br />
Previously Released<br />
Installer Cup<br />
No. 313969<br />
Issue Date: Rev. B, January 13, 2010
Parts List & Operating Instructions<br />
Operating Instructions<br />
Applications: 1995-1999 Chevrolet Tahoe, <strong>GM</strong>C Yukon 4WD<br />
2000 Chevrolet Tahoe Z71 4WD<br />
1995-1999 1/2- & 3/4-ton Suburban 4WD<br />
1995-2000 1/2-, 3/4-, & 1-ton Chevrolet & <strong>GM</strong>C 4WD trucks<br />
1999-2000 Cadillac Escalade 4WD<br />
2001-2003 1/2-ton Sierra & Silverado 2WD/4WD HD Crew Cab<br />
1999-2004 3/4-ton Sierra & Silverado 2WD/4WD<br />
2000-2004 3/4-ton Suburban & <strong>GM</strong>C Yukon 2WD/4WD<br />
2001-2004 1-ton Sierra & Silverado 4WD<br />
2002-2004 3/4-ton Avalanche 2WD/4WD<br />
2003-2004 Hummer H2<br />
1. Position the tools as shown to remove or install the upper or lower ball joint. Note for installation: Clean the control<br />
arm or knuckle, and coat the I.D. with a suitable lubricant.<br />
2. Tighten the forcing screw until it meets the cup, and check the alignment of all tooling and components. Continue<br />
tightening the forcing screw until the ball joint is removed or installed.<br />
Removing and Installing the Lower <strong>Ball</strong> <strong>Joint</strong><br />
C-frame<br />
No. 7248;<br />
not included<br />
Previously Released<br />
Receiving Cup<br />
No. 204508<br />
Previously Released<br />
Receiving Tube<br />
No. 222306<br />
C-frame<br />
No. 7248;<br />
not included<br />
Figure 1<br />
Removal<br />
Previously Released<br />
Adapter<br />
No. 305227<br />
Figure 2<br />
Installation<br />
Removing and Installing the Upper <strong>Ball</strong> <strong>Joint</strong> (with press-in ball joint)<br />
C-frame<br />
No. 7248;<br />
not included<br />
Previously<br />
Released<br />
Receiving<br />
Cup<br />
No. 29504<br />
Previously Released<br />
Adapter<br />
No. 305228<br />
No. 537501<br />
Remover<br />
Previously<br />
Released<br />
Receiving Cup<br />
No. 204508<br />
C-frame<br />
No. 7248;<br />
not included<br />
Previously Released<br />
Receiver Tube<br />
No. 29504<br />
Figure 1 Figure 2<br />
Removal Installation<br />
Form No. 537545, Sheet 2 of 2, Back<br />
Previously Released<br />
Receiving Tube<br />
No. 222307<br />
Previously<br />
Released Adapter<br />
No. 305227<br />
Previously Released<br />
Adapter<br />
No. 305227