Ford Hub Tamer Adapter - OTC
Ford Hub Tamer Adapter - OTC
Ford Hub Tamer Adapter - OTC

You also want an ePaper? Increase the reach of your titles
YUMPU automatically turns print PDFs into web optimized ePapers that Google loves.
© SPX Corporation • Sheet 1 of 1 • Rev. B, 6-11-03<br />
SPX Corporation<br />
655 Eisenhower Drive<br />
Owatonna, MN 55060-0995 USA<br />
Phone: (507) 455-7000<br />
Tech. Serv.: (800) 533-6127<br />
Fax: (800) 955-8329<br />
Order Entry: (800) 533-6127<br />
Fax: (800) 283-8665<br />
International Sales: (507) 455-7223<br />
Fax: (507) 455-7063<br />
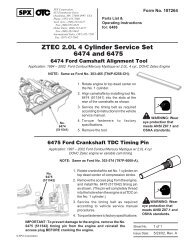
<strong>Ford</strong> <strong>Hub</strong> <strong>Tamer</strong> <strong>Adapter</strong><br />
Application: 1995–2000 Contour / Mystique<br />
1986–1995 Taurus / Sable<br />
Form No. 519253<br />
Operating Instructions<br />
for: 6536<br />
This adapter is used with the <strong>OTC</strong> <strong>Hub</strong><strong>Tamer</strong> Front Wheel Drive Service Tool Set to remove / install front wheel bearings.<br />
It is not necessary to remove the knuckle assembly from the vehicle; as a result, front wheel alignment is not altered.<br />
Safety Precautions<br />
WARNING: To prevent personal injury,<br />
• Read, understand, and follow all safety precautions and instructions included with the tool. If the<br />
operator cannot read English, operating instructions and safety precautions must be read and<br />
discussed in the operator's native language.<br />
– Si el operador no puede leer el inglés, las instrucciones de operación y las precauciones de<br />
seguridad deberán leerse y comentarse en el idioma nativo del operador.<br />
– Si l'utilisateur ne peut lire l'anglais, les instructions et les consignes de sécurité doivent lui être<br />
expliquées dans sa langue maternelle.<br />
• Wear eye protection that meets ANSI Z87.1 and OSHA standards.<br />
• Cover the work with a protective blanket (see <strong>OTC</strong> catalog) or canvas, because applying force to<br />
a part can cause breakage.<br />
1. Raise the vehicle until all weight is off the front wheels,<br />
and they hang free.<br />
2. Remove the following components:<br />
• front tires<br />
• axle nut<br />
• outer tie rod nut and tie rod<br />
• disc brake caliper - use a wire (or <strong>OTC</strong> No. 7661<br />
caliper hanger set) to hold caliper out of the way<br />
and prevent damage to brake hose<br />
• brake rotor<br />
• loosen lower ball joint from steering knuckle<br />
assembly<br />
3. Separate the lower ball joint from the spindle assembly.<br />
4. Mount a hub puller (or <strong>OTC</strong> No. 7208) on the vehicle<br />
hub assembly as shown in Figure 1. Apply force to the<br />
forcing screw until the axle can be removed as shown<br />
in Figure 2. Use wire to tie the axle out of the way; do<br />
not let it hang free.<br />
Operating Instructions<br />
<strong>Hub</strong> Puller<br />
(<strong>OTC</strong><br />
No. 7208)<br />
Figure 1<br />
Figure 2<br />
Tie axle out of<br />
the way.
Operating Instructions Form No. 519253, Sheet 1 of 1, Back<br />
4. Assemble the <strong>Hub</strong><strong>Tamer</strong> with sleeve No. 502623 as<br />
shown in Figure 3.<br />
IMPORTANT: To prevent equipment damage, lubricate<br />
the forcing screw with a high viscosity oil or grease.<br />
5. Insert the pins on the No. 6536 adapter into the holes<br />
in the <strong>Hub</strong><strong>Tamer</strong> yoke. Assemble the bolts as shown<br />
in Figure 4—this adds strength to the <strong>Hub</strong><strong>Tamer</strong>.<br />
IMPORTANT: If the bolts are not assembled to the<br />
adapter and yoke, the adapter may bend during usage.<br />
6. Slide the yoke over the hub in the area where the<br />
brake caliper was removed.<br />
7. Hand tighten the nut on the end of the forcing screw.<br />
Check the alignment of the setup—the yoke assembly<br />
must be at a 90° angle to the knuckle. See Figure 5.<br />
Verify the <strong>Hub</strong><strong>Tamer</strong> will be pushing on the knuckle<br />
casting, NOT the dust shield.<br />
8. Using a 1-1/8" wrench on the nut, and a 1-1/16" socket<br />
with impact wrench on the head of the forcing screw,<br />
tighten the screw into the nut to draw the hub out of the<br />
knuckle. See Fig. 6.<br />
Tech Tip: If the hub does not easily break loose from the<br />
knuckle, stop using the impact wrench when it starts to<br />
"labor" (when there is a change in sound). Strike the top<br />
of the <strong>Hub</strong><strong>Tamer</strong> with a hammer. Once the hub breaks<br />
loose, continue using the impact wrench.<br />
9. If the race from the old bearing is still stuck in the hub,<br />
use <strong>OTC</strong> No. 7503 with a spacer, as shown in Figure<br />
7, to remove the race.<br />
10. Remove any seal or shroud that would restrict the<br />
bearing from being removed.<br />
11. Remove the snap ring from the appropriate side of the<br />
spindle assembly. See Figure 8.<br />
12. Proceed to the vehicle section in the <strong>Hub</strong><strong>Tamer</strong><br />
manual that applies to your specific application.<br />
Figure 8<br />
Forcing Screw<br />
Yoke<br />
Figure 3<br />
Figure 4<br />
Align yoke assembly<br />
90° from knuckle.<br />
Nut<br />
Figure 5<br />
Figure 6<br />
Spacer<br />
Figure 7<br />
No. 6536<br />
<strong>Adapter</strong><br />
No. 502623<br />
Sleeve<br />
Nut<br />
Assemble nuts on<br />
this side of yoke.<br />
Note: Taurus / Sable<br />
application shown.<br />
l<br />
Top of<br />
<strong>Hub</strong><strong>Tamer</strong><br />
<strong>OTC</strong> No. 7503<br />
Puller Assembly<br />
Old Bearing Race