Making Cyanotypes - Berkowitz - Educational Pages
Making Cyanotypes - Berkowitz - Educational Pages
Making Cyanotypes - Berkowitz - Educational Pages

You also want an ePaper? Increase the reach of your titles
YUMPU automatically turns print PDFs into web optimized ePapers that Google loves.
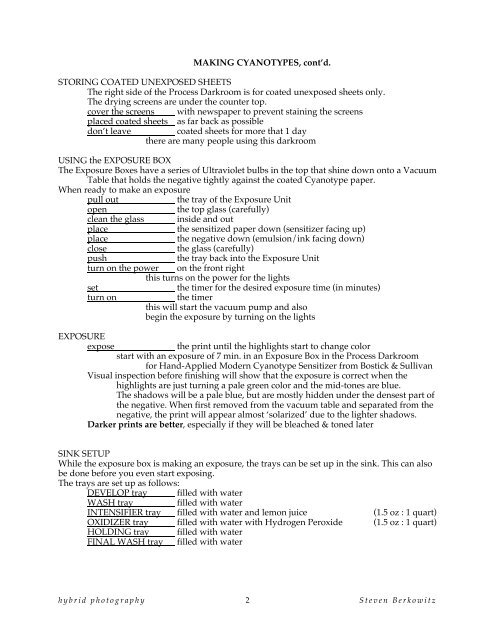
MAKING CYANOTYPES, cont’d.<br />
STORING COATED UNEXPOSED SHEETS<br />
The right side of the Process Darkroom is for coated unexposed sheets only.<br />
The drying screens are under the counter top.<br />
cover the screens with newspaper to prevent staining the screens<br />
placed coated sheets as far back as possible<br />
don’t leave coated sheets for more that 1 day<br />
there are many people using this darkroom<br />
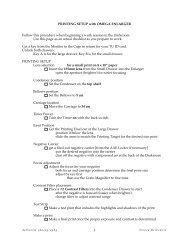
USING the EXPOSURE BOX<br />
The Exposure Boxes have a series of Ultraviolet bulbs in the top that shine down onto a Vacuum<br />
Table that holds the negative tightly against the coated Cyanotype paper.<br />
When ready to make an exposure<br />
pull out the tray of the Exposure Unit<br />
open the top glass (carefully)<br />
clean the glass inside and out<br />
place the sensitized paper down (sensitizer facing up)<br />
place the negative down (emulsion/ink facing down)<br />
close the glass (carefully)<br />
push the tray back into the Exposure Unit<br />
turn on the power on the front right<br />
this turns on the power for the lights<br />
set the timer for the desired exposure time (in minutes)<br />
turn on the timer<br />
this will start the vacuum pump and also<br />
begin the exposure by turning on the lights<br />
EXPOSURE<br />
expose the print until the highlights start to change color<br />
start with an exposure of 7 min. in an Exposure Box in the Process Darkroom<br />
for Hand-Applied Modern Cyanotype Sensitizer from Bostick & Sullivan<br />
Visual inspection before finishing will show that the exposure is correct when the<br />
highlights are just turning a pale green color and the mid-tones are blue.<br />
The shadows will be a pale blue, but are mostly hidden under the densest part of<br />
the negative. When first removed from the vacuum table and separated from the<br />
negative, the print will appear almost ‘solarized’ due to the lighter shadows.<br />
Darker prints are better, especially if they will be bleached & toned later<br />
SINK SETUP<br />
While the exposure box is making an exposure, the trays can be set up in the sink. This can also<br />
be done before you even start exposing.<br />
The trays are set up as follows:<br />
DEVELOP tray filled with water<br />
WASH tray filled with water<br />
INTENSIFIER tray filled with water and lemon juice (1.5 oz : 1 quart)<br />
OXIDIZER tray filled with water with Hydrogen Peroxide (1.5 oz : 1 quart)<br />
HOLDING tray filled with water<br />
FINAL WASH tray filled with water<br />
hybrid photography 2<br />
Steven <strong>Berkowitz</strong>