Omega Enlarger Setup - Berkowitz - Educational Pages
Omega Enlarger Setup - Berkowitz - Educational Pages
Omega Enlarger Setup - Berkowitz - Educational Pages

You also want an ePaper? Increase the reach of your titles
YUMPU automatically turns print PDFs into web optimized ePapers that Google loves.
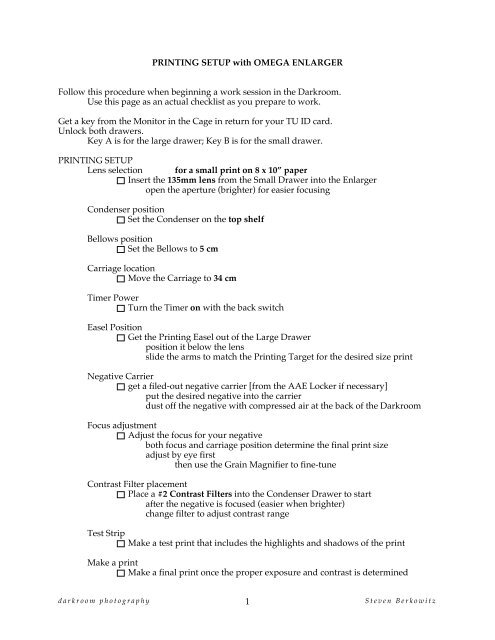
PRINTING SETUP with OMEGA ENLARGER<br />
Follow this procedure when beginning a work session in the Darkroom.<br />
Use this page as an actual checklist as you prepare to work.<br />
Get a key from the Monitor in the Cage in return for your TU ID card.<br />
Unlock both drawers.<br />
Key A is for the large drawer; Key B is for the small drawer.<br />
PRINTING SETUP<br />
Lens selection for a small print on 8 x 10” paper<br />
Insert the 135mm lens from the Small Drawer into the <strong>Enlarger</strong><br />
open the aperture (brighter) for easier focusing<br />
Condenser position<br />
Set the Condenser on the top shelf<br />
Bellows position<br />
Set the Bellows to 5 cm<br />
Carriage location<br />
Move the Carriage to 34 cm<br />
Timer Power<br />
Turn the Timer on with the back switch<br />
Easel Position<br />
Get the Printing Easel out of the Large Drawer<br />
position it below the lens<br />
slide the arms to match the Printing Target for the desired size print<br />
Negative Carrier<br />
get a filed-out negative carrier [from the AAE Locker if necessary]<br />
put the desired negative into the carrier<br />
dust off the negative with compressed air at the back of the Darkroom<br />
Focus adjustment<br />
Adjust the focus for your negative<br />
both focus and carriage position determine the final print size<br />
adjust by eye first<br />
then use the Grain Magnifier to fine-tune<br />
Contrast Filter placement<br />
Place a #2 Contrast Filters into the Condenser Drawer to start<br />
after the negative is focused (easier when brighter)<br />
change filter to adjust contrast range<br />
Test Strip<br />
Make a test print that includes the highlights and shadows of the print<br />
Make a print<br />
Make a final print once the proper exposure and contrast is determined<br />
darkroom photography 1<br />
Steven <strong>Berkowitz</strong>
OMEGA ENLARGER SETUP, theory<br />
There are 6 setting to be considered to make a print with an <strong>Omega</strong> <strong>Enlarger</strong>:<br />
Lens selection, Condenser position, Bellows position,<br />
Carriage movement, Focus adjustment and Contrast Filter placement.<br />
LENS SELECTION<br />
Insert the desired Lens into the enlarger<br />
Pull the Focus down a bit to make insertion easier<br />
Hold the Lensboard by the end with the hole<br />
Lenses are stored in the smaller drawer on the right-hand side<br />
Several lenses are available, including:<br />
50mm for 35mm film<br />
75 or 80mm for Medium Format film<br />
135mm lenses for Large Format film<br />
or for making small prints from 35mm film<br />
All enlargers stations should have all 3 lenses.<br />
Some enlargers have turrets with 3 lenses mounted on them.<br />
The turret rotates<br />
by pressing gently<br />
on the small silver lever<br />
that protrudes from<br />
the front right side<br />
of the lensboard.<br />
Turn the turret<br />
until the desired lens<br />
clicks firmly into place.<br />
CONDENSER POSITION<br />
This is the chart that is inside the Condenser Chamber in the <strong>Enlarger</strong> Head.<br />
It shows the proper position for each length of lens.<br />
Make sure the Condenser is inserted into the <strong>Enlarger</strong> with the small lip at the front<br />
(and not upside down, as we have sometimes found them).<br />
• Return the Condenser to the ‘default location’ [bottom shelf] when finished working.<br />
darkroom photography 2<br />
Steven <strong>Berkowitz</strong>
OMEGA ENLARGER SETUP, theory cont’d<br />
BELLOWS POSITION<br />
The bellows position changes for each length lens.<br />
short 50mm lens top of the track position 14 cm<br />
medium 75mm lens middle of the track position 7 cm<br />
long 135mm lens bottom of track position 0 cm<br />
Adjusting the Bellows<br />
There is a lever, back behind the lens<br />
that has to be shifted from left to right<br />
to release the lens bellows.<br />
This is a delicate procedure!<br />
place your hand under the lens<br />
to reflect light back onto the<br />
Bellows Track<br />
place your hand under the lens<br />
so it does not fall straight down<br />
do not allow your hand to touch<br />
the front glass surface of the lens<br />
turn the BELLOWS LEVER<br />
under and behind the lens to the right<br />
gently move the BELLOWS itself<br />
to the correct position<br />
turn the BELLOWS LEVER back<br />
to the left to lock it<br />
• Return the Bellows to the ‘default location’ [top] when finished working.<br />
CARRIAGE MOVEMENT<br />
The entire carriage of the enlarger is moved using the crank on the right hand side of the<br />
enlarger.<br />
unloosen the CARRIAGE LOCK at the bottom right of the enlarger<br />
crank the CARRIAGE to the desired position<br />
tighten the CARRIAGE LOCK to just finger-tight<br />
Do Not over-tighten the Carriage Locks,<br />
they only have nylon teeth!<br />
• Return the Carriage to the ‘default location’ [20 cm] when finished working.<br />
FOCUS ADJUSTMENT<br />
The focus is fine-tuned with the FOCUS KNOB on the right-hand side of the enlarger.<br />
turn the FOCUS KNOB on the right<br />
Altering the focus also changes the size of the picture. Sometimes the perfect balance of<br />
focus and picture size is achieved by adjusting the focus and the carriage height<br />
to compliment each other.<br />
CONTRAST FILTERS PLACEMENT<br />
Large flat contrast filters are placed into the Condenser Chamber<br />
Handle only by the edges<br />
Start with a #2 Filter for ‘Normal Contrast’<br />
Do Not open the Condenser Chamber with the <strong>Enlarger</strong> light turned on!!<br />
• Return all Contrast Filters to the drawer when finished working.<br />
darkroom photography 3<br />
Steven <strong>Berkowitz</strong>
OMEGA ENLARGER - SMALL PRINT SETUP<br />
SMALL PRINTS with a LONG LENS<br />
To make a 4 x 6”print on an 8 x 10” sheet of photo paper, adjust these 5 settings as follows:<br />
Lens selection<br />
insert a 135mm LENS into the enlarger<br />
or turn the turret until the 135mm lens comes into position<br />
Condenser position<br />
use the TOP SHELF position<br />
Bellows adjustment<br />
This is a non-standard location, because the 135 lens is designed to be used with largeformat<br />
negatives.<br />
place your hand under the lens so it does not fall straight down<br />
turn the bellows lever under and behind the lens to the right<br />
gently move the Bellows to the correct position<br />
BELLOWS HEIGHT = 5 cm<br />
turn the bellows lever back to the left to lock it<br />
Carriage movement<br />
loosen the Carriage Lock at the bottom right of the enlarger<br />
crank the CARRIAGE TO 34<br />
tighten the Carriage Lock to just finger-tight<br />
Do Not over-tighten the Carriage Locks,<br />
they only have nylon teeth!<br />
Focus adjustment<br />
use the FOCUS KNOB on the right<br />
fine tune the picture size by adjusting both the focus and carriage height<br />
A 3.5 x 5” print is easily attainable by moving the Carriage down to about 28, with all other<br />
settings the same.<br />
It is possible to make even small prints, if desired. A 1 x 1.5” print, equal to the size of the<br />
negative itself, is possible with a 135mm lens in an enlarger with the carriage adjusted<br />
all the way down, and the bellows set at 2. If you really want a print this size, however,<br />
it would probably be better to just make a contact print.<br />
SMALL PRINTS with a MEDIUM LENS<br />
The smallest print possible with a 75mm lens is 5.5 x 8”.<br />
Lens = 75mm<br />
Condenser = the middle shelf<br />
Bellows = 11 (near the top)<br />
Carriage = all the way down<br />
Easel Position<br />
Another option for making small prints is to raise the easel up toward the lens, as it<br />
states in the <strong>Omega</strong> User’s Manual. Simply place a box that will sturdily support<br />
the easel underneath. Voila!<br />
darkroom photography 4<br />
Steven <strong>Berkowitz</strong>
GRALAB 450 TIMER – Operation<br />
TIME RANGE<br />
The timer can be set for seconds or 1/10ths of seconds.<br />
SECS� the range is from 00 to 99 seconds<br />
the left-hand button is 10’s of seconds, the right-hand button is seconds<br />
1/10 SECS the range is 0.0 to 9.9 seconds<br />
the left-hand button is seconds, the right-hand button is 10ths of seconds<br />
DISPLAY INTENSITY<br />
3 buttons choose between HI� DIM OFF<br />
Time Range > < Dimmer Intensity<br />
[SECONDS] [HIGH]<br />
Audio Settings > < Light Control<br />
[OFF] [FOCUS or TIME]<br />
AUDIO SETTINGS<br />
3 buttons choose between<br />
OFF� no sound - preferred<br />
METRO metronome beeps at every second<br />
TONE beeps at the end of the exposure<br />
LIGHT CONTROL<br />
FOCUS keeps the enlarger on indefinitely (left-hand button)<br />
TIME enters timer mode (right-hand button)<br />
START/ STOP/ RESET BAR<br />
Hit this bar to START and STOP the timing cycle, to make a print.<br />
Hitting the bar during an exposure stops the enlarger,<br />
and resets the time back to the original time setting.<br />
The timer always resets back to the original time after an exposure.<br />
darkroom photography 5<br />
Steven <strong>Berkowitz</strong>
ENLARGER SHUTDOWN<br />
Follow this procedure when finished a work session in the Darkroom.<br />
Use this page as an actual checklist as you shut down.<br />
ENLARGER<br />
Lens selection<br />
Place all lenses in the small Drawer, side by side, not stacked on top<br />
Condenser position<br />
Return the Condenser to the ‘default location’ [top shelf]<br />
Bellows position<br />
Return the Bellows to the ‘default location’ [5 cm]<br />
Carriage location<br />
Return the Carriage to the ‘default location’ [20 cm]<br />
Focus adjustment<br />
Pull the focus back up, but not all the way<br />
Contrast Filter placement<br />
Return all Contrast Filters to their package<br />
then put them back in the small Drawer<br />
<strong>Enlarger</strong> Mouth<br />
Close the mouth of the enlarger, to keep out any dust<br />
Timer Power<br />
Turn the Timer off with the back switch<br />
DRAWERS<br />
The <strong>Enlarger</strong> Drawers should contain the basic complement of tools.<br />
Check that everything is there:<br />
Large Drawer<br />
Printing Easel<br />
Small Drawer<br />
Negative Carriers [return AAE filed-out carriers to the AAE locker]<br />
Shelf<br />
Contrast Filters<br />
Lenses, single or on a turret<br />
Grain Magnifier<br />
Glass Contact Printing Frame<br />
Lock both drawers when finished and return the key to the Monitor in the Cage.<br />
darkroom photography 6<br />
Steven <strong>Berkowitz</strong>
PRINTING PROTOCOL<br />
write your name and date on the back of each print<br />
before you process it in the photo chemicals<br />
write the exposure; ƒ/stop, time and filter number<br />
on the back of the print as well<br />
write small, along the edge,<br />
to avoid compromising the archival quality of the print<br />
using either pencil or a Sharpie<br />
(never an ink pen that will contaminate the chemistry)<br />
develop, stop and double fix<br />
as prescribed by the paper manufacturer<br />
(read the data sheet that comes with the paper for exact times,<br />
every paper is slightly different)<br />
do a short wash at the end of the processing<br />
collect all prints from your printing session<br />
in a holding tray filled with water<br />
put all prints through a fixer-remover bath<br />
rinse all prints for 1 minute, before the final wash<br />
do not place prints directly into the print washer<br />
if they still have fixer-remover on them<br />
do a final wash in the vertical washer for at least 30 minutes<br />
never add prints to a washing session already in progress<br />
the wash time will have to start all over again<br />
do not save your test strips<br />
do not save your test prints<br />
only place fully archival prints on the screens to dry<br />
or take damp prints home in a blotter book<br />
dry them on a clothes line, pined back to back at all 4 corners,<br />
pick up all prints the next day, preferably in the morning<br />
any print left longer than 1 day will be discarded<br />
there is not enough room on the screens<br />
this is not a storage facility<br />
flatten prints under a stack of books<br />
or in a dry mount press, at low temperature<br />
between 2 sheets of archival drawing paper<br />
darkroom photography 7<br />
Steven <strong>Berkowitz</strong>