

Making an Elegant Wooden Box - Zongkers Handcrafted Furniture
Making an Elegant Wooden Box - Zongkers Handcrafted Furniture
Making an Elegant Wooden Box - Zongkers Handcrafted Furniture

You also want an ePaper? Increase the reach of your titles
YUMPU automatically turns print PDFs into web optimized ePapers that Google loves.
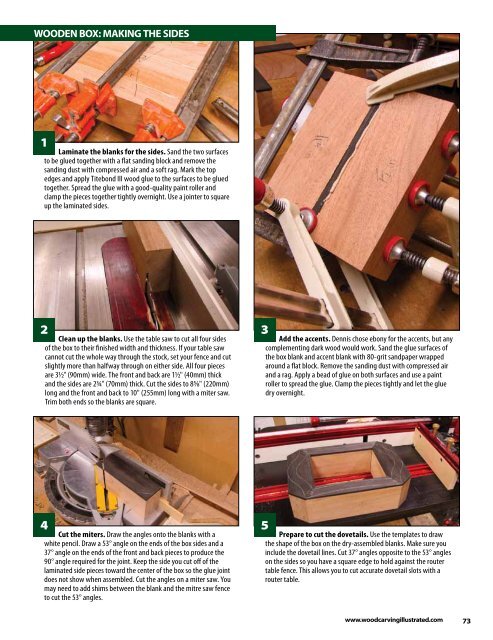
WoodEn <strong>Box</strong>: <strong>Making</strong> thE sidEs<br />
1<br />
Laminate the bl<strong>an</strong>ks for the sides. S<strong>an</strong>d the two surfaces<br />
to be glued together with a flat s<strong>an</strong>ding block <strong>an</strong>d remove the<br />
s<strong>an</strong>ding dust with compressed air <strong>an</strong>d a soft rag. Mark the top<br />
edges <strong>an</strong>d apply Titebond III wood glue to the surfaces to be glued<br />
together. Spread the glue with a good-quality paint roller <strong>an</strong>d<br />
clamp the pieces together tightly overnight. Use a jointer to square<br />
up the laminated sides.<br />
2<br />
Cle<strong>an</strong> up the bl<strong>an</strong>ks. Use the table saw to cut all four sides<br />
of the box to their finished width <strong>an</strong>d thickness. If your table saw<br />
c<strong>an</strong>not cut the whole way through the stock, set your fence <strong>an</strong>d cut<br />
slightly more th<strong>an</strong> halfway through on either side. All four pieces<br />
are 31/2" (90mm) wide. The front <strong>an</strong>d back are 11/2" (40mm) thick<br />
<strong>an</strong>d the sides are 23/4" (70mm) thick. Cut the sides to 85/8" (220mm)<br />
long <strong>an</strong>d the front <strong>an</strong>d back to 10" (255mm) long with a miter saw.<br />
Trim both ends so the bl<strong>an</strong>ks are square.<br />
4<br />
Cut the miters. Draw the <strong>an</strong>gles onto the bl<strong>an</strong>ks with a<br />
white pencil. Draw a 53° <strong>an</strong>gle on the ends of the box sides <strong>an</strong>d a<br />
37° <strong>an</strong>gle on the ends of the front <strong>an</strong>d back pieces to produce the<br />
90° <strong>an</strong>gle required for the joint. Keep the side you cut off of the<br />
laminated side pieces toward the center of the box so the glue joint<br />
does not show when assembled. Cut the <strong>an</strong>gles on a miter saw. You<br />
may need to add shims between the bl<strong>an</strong>k <strong>an</strong>d the mitre saw fence<br />
to cut the 53° <strong>an</strong>gles.<br />
3<br />
Add the accents. Dennis chose ebony for the accents, but <strong>an</strong>y<br />
complementing dark wood would work. S<strong>an</strong>d the glue surfaces of<br />
the box bl<strong>an</strong>k <strong>an</strong>d accent bl<strong>an</strong>k with 80-grit s<strong>an</strong>dpaper wrapped<br />
around a flat block. Remove the s<strong>an</strong>ding dust with compressed air<br />
<strong>an</strong>d a rag. Apply a bead of glue on both surfaces <strong>an</strong>d use a paint<br />
roller to spread the glue. Clamp the pieces tightly <strong>an</strong>d let the glue<br />
dry overnight.<br />
5<br />
Prepare to cut the dovetails. Use the templates to draw<br />
the shape of the box on the dry-assembled bl<strong>an</strong>ks. Make sure you<br />
include the dovetail lines. Cut 37° <strong>an</strong>gles opposite to the 53° <strong>an</strong>gles<br />
on the sides so you have a square edge to hold against the router<br />
table fence. This allows you to cut accurate dovetail slots with a<br />
router table.<br />
www.woodcarvingillustrated.com 73