

Making an Elegant Wooden Box - Zongkers Handcrafted Furniture
Making an Elegant Wooden Box - Zongkers Handcrafted Furniture
Making an Elegant Wooden Box - Zongkers Handcrafted Furniture

You also want an ePaper? Increase the reach of your titles
YUMPU automatically turns print PDFs into web optimized ePapers that Google loves.
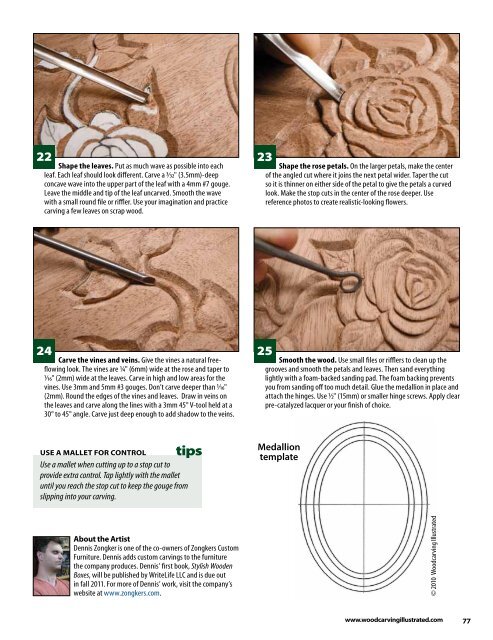
22<br />
Shape the leaves. Put as much wave as possible into each<br />
leaf. Each leaf should look different. Carve a 3/32" (3.5mm)-deep<br />
concave wave into the upper part of the leaf with a 4mm #7 gouge.<br />
Leave the middle <strong>an</strong>d tip of the leaf uncarved. Smooth the wave<br />
with a small round file or riffler. Use your imagination <strong>an</strong>d practice<br />
carving a few leaves on scrap wood.<br />
24<br />
Carve the vines <strong>an</strong>d veins. Give the vines a natural freeflowing<br />
look. The vines are 1/4" (6mm) wide at the rose <strong>an</strong>d taper to<br />
1/16" (2mm) wide at the leaves. Carve in high <strong>an</strong>d low areas for the<br />
vines. Use 3mm <strong>an</strong>d 5mm #3 gouges. Don’t carve deeper th<strong>an</strong> 1/16"<br />
(2mm). Round the edges of the vines <strong>an</strong>d leaves. Draw in veins on<br />
the leaves <strong>an</strong>d carve along the lines with a 3mm 45° V-tool held at a<br />
30° to 45° <strong>an</strong>gle. Carve just deep enough to add shadow to the veins.<br />
UsE a MallEt for Control tips<br />
Use a mallet when cutting up to a stop cut to<br />
provide extra control. Tap lightly with the mallet<br />
until you reach the stop cut to keep the gouge from<br />
slipping into your carving.<br />
about the artist<br />
Dennis Zongker is one of the co-owners of <strong>Zongkers</strong> Custom<br />
<strong>Furniture</strong>. Dennis adds custom carvings to the furniture<br />
the comp<strong>an</strong>y produces. Dennis’ first book, Stylish <strong>Wooden</strong><br />
<strong>Box</strong>es, will be published by WriteLife LLC <strong>an</strong>d is due out<br />
in fall 2011. For more of Dennis’ work, visit the comp<strong>an</strong>y’s<br />
website at www.zongkers.com.<br />
23<br />
Shape the rose petals. On the larger petals, make the center<br />
of the <strong>an</strong>gled cut where it joins the next petal wider. Taper the cut<br />
so it is thinner on either side of the petal to give the petals a curved<br />
look. Make the stop cuts in the center of the rose deeper. Use<br />
reference photos to create realistic-looking flowers.<br />
25<br />
Smooth the wood. Use small files or rifflers to cle<strong>an</strong> up the<br />
grooves <strong>an</strong>d smooth the petals <strong>an</strong>d leaves. Then s<strong>an</strong>d everything<br />
lightly with a foam-backed s<strong>an</strong>ding pad. The foam backing prevents<br />
you from s<strong>an</strong>ding off too much detail. Glue the medallion in place <strong>an</strong>d<br />
attach the hinges. Use 1/2" (15mm) or smaller hinge screws. Apply clear<br />
pre-catalyzed lacquer or your finish of choice.<br />
Medallion<br />
template<br />
© 2010 Woodcarving Illustrated<br />
www.woodcarvingillustrated.com 77