

Making an Elegant Wooden Box - Zongkers Handcrafted Furniture
Making an Elegant Wooden Box - Zongkers Handcrafted Furniture
Making an Elegant Wooden Box - Zongkers Handcrafted Furniture

You also want an ePaper? Increase the reach of your titles
YUMPU automatically turns print PDFs into web optimized ePapers that Google loves.
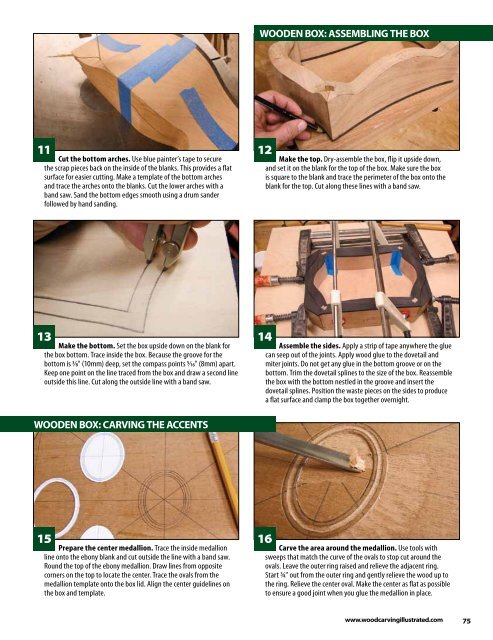
11<br />
Cut the bottom arches. Use blue painter’s tape to secure<br />
the scrap pieces back on the inside of the bl<strong>an</strong>ks. This provides a flat<br />
surface for easier cutting. Make a template of the bottom arches<br />
<strong>an</strong>d trace the arches onto the bl<strong>an</strong>ks. Cut the lower arches with a<br />
b<strong>an</strong>d saw. S<strong>an</strong>d the bottom edges smooth using a drum s<strong>an</strong>der<br />
followed by h<strong>an</strong>d s<strong>an</strong>ding.<br />
13<br />
Make the bottom. Set the box upside down on the bl<strong>an</strong>k for<br />
the box bottom. Trace inside the box. Because the groove for the<br />
bottom is 3/8" (10mm) deep, set the compass points 5/16" (8mm) apart.<br />
Keep one point on the line traced from the box <strong>an</strong>d draw a second line<br />
outside this line. Cut along the outside line with a b<strong>an</strong>d saw.<br />
WoodEn <strong>Box</strong>: Carving thE aCCEnts<br />
15<br />
Prepare the center medallion. Trace the inside medallion<br />
line onto the ebony bl<strong>an</strong>k <strong>an</strong>d cut outside the line with a b<strong>an</strong>d saw.<br />
Round the top of the ebony medallion. Draw lines from opposite<br />
corners on the top to locate the center. Trace the ovals from the<br />
medallion template onto the box lid. Align the center guidelines on<br />
the box <strong>an</strong>d template.<br />
WoodEn <strong>Box</strong>: assEMBling thE <strong>Box</strong><br />
12<br />
Make the top. Dry-assemble the box, flip it upside down,<br />
<strong>an</strong>d set it on the bl<strong>an</strong>k for the top of the box. Make sure the box<br />
is square to the bl<strong>an</strong>k <strong>an</strong>d trace the perimeter of the box onto the<br />
bl<strong>an</strong>k for the top. Cut along these lines with a b<strong>an</strong>d saw.<br />
14<br />
Assemble the sides. Apply a strip of tape <strong>an</strong>ywhere the glue<br />
c<strong>an</strong> seep out of the joints. Apply wood glue to the dovetail <strong>an</strong>d<br />
miter joints. Do not get <strong>an</strong>y glue in the bottom groove or on the<br />
bottom. Trim the dovetail splines to the size of the box. Reassemble<br />
the box with the bottom nestled in the groove <strong>an</strong>d insert the<br />
dovetail splines. Position the waste pieces on the sides to produce<br />
a flat surface <strong>an</strong>d clamp the box together overnight.<br />
16<br />
Carve the area around the medallion. Use tools with<br />
sweeps that match the curve of the ovals to stop cut around the<br />
ovals. Leave the outer ring raised <strong>an</strong>d relieve the adjacent ring.<br />
Start 3/4" out from the outer ring <strong>an</strong>d gently relieve the wood up to<br />
the ring. Relieve the center oval. Make the center as flat as possible<br />
to ensure a good joint when you glue the medallion in place.<br />
www.woodcarvingillustrated.com 75