Pressure Booster Pumps - Pure Aqua Inc
Pressure Booster Pumps - Pure Aqua Inc
Pressure Booster Pumps - Pure Aqua Inc

Create successful ePaper yourself
Turn your PDF publications into a flip-book with our unique Google optimized e-Paper software.
Maintenance (Continued)<br />
NOTE: Liquid soap solution - one drop of liquid soap combined<br />
with one teaspoonful of water.<br />
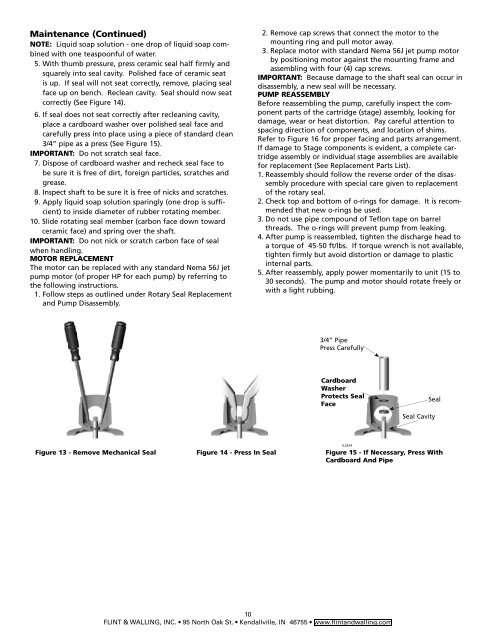
5. With thumb pressure, press ceramic seal half firmly and<br />
squarely into seal cavity. Polished face of ceramic seat<br />
is up. If seal will not seat correctly, remove, placing seal<br />
face up on bench. Reclean cavity. Seal should now seat<br />
correctly (See Figure 14).<br />
6. If seal does not seat correctly after recleaning cavity,<br />
place a cardboard washer over polished seal face and<br />
carefully press into place using a piece of standard clean<br />
3/4” pipe as a press (See Figure 15).<br />
IMPORTANT: Do not scratch seal face.<br />
7. Dispose of cardboard washer and recheck seal face to<br />
be sure it is free of dirt, foreign particles, scratches and<br />
grease.<br />
8. Inspect shaft to be sure it is free of nicks and scratches.<br />
9. Apply liquid soap solution sparingly (one drop is sufficient)<br />
to inside diameter of rubber rotating member.<br />
10. Slide rotating seal member (carbon face down toward<br />
ceramic face) and spring over the shaft.<br />
IMPORTANT: Do not nick or scratch carbon face of seal<br />
when handling.<br />
MOTOR REPLACEMENT<br />
The motor can be replaced with any standard Nema 56J jet<br />
pump motor (of proper HP for each pump) by referring to<br />
the following instructions.<br />
1. Follow steps as outlined under Rotary Seal Replacement<br />
and Pump Disassembly.<br />
2. Remove cap screws that connect the motor to the<br />
mounting ring and pull motor away.<br />
3. Replace motor with standard Nema 56J jet pump motor<br />
by positioning motor against the mounting frame and<br />
assembling with four (4) cap screws.<br />
IMPORTANT: Because damage to the shaft seal can occur in<br />
disassembly, a new seal will be necessary.<br />
PUMP REASSEMBLY<br />
Before reassembling the pump, carefully inspect the component<br />
parts of the cartridge (stage) assembly, looking for<br />
damage, wear or heat distortion. Pay careful attention to<br />
spacing direction of components, and location of shims.<br />
Refer to Figure 16 for proper facing and parts arrangement.<br />
If damage to Stage components is evident, a complete cartridge<br />
assembly or individual stage assemblies are available<br />
for replacement (See Replacement Parts List).<br />
1. Reassembly should follow the reverse order of the disassembly<br />
procedure with special care given to replacement<br />
of the rotary seal.<br />
2. Check top and bottom of o-rings for damage. It is recommended<br />
that new o-rings be used.<br />
3. Do not use pipe compound of Teflon tape on barrel<br />
threads. The o-rings will prevent pump from leaking.<br />
4. After pump is reassembled, tighten the discharge head to<br />
a torque of 45-50 ft/lbs. If torque wrench is not available,<br />
tighten firmly but avoid distortion or damage to plastic<br />
internal parts.<br />
5. After reassembly, apply power momentarily to unit (15 to<br />
30 seconds). The pump and motor should rotate freely or<br />
with a light rubbing.<br />
3/4” Pipe<br />
Press Carefully<br />
Cardboard<br />
Washer<br />
Protects Seal<br />
Face<br />
IL0554<br />
Figure 13 - Remove Mechanical Seal Figure 14 - Press In Seal Figure 15 - If Necessary, Press With<br />
Cardboard And Pipe<br />
10<br />
FLINT & WALLING, INC. 95 North Oak St. Kendallville, IN 46755 www.flintandwalling.com<br />
Seal<br />
Seal Cavity