Glass Painting - An Introduction - PELI Glass Products BV
Glass Painting - An Introduction - PELI Glass Products BV
Glass Painting - An Introduction - PELI Glass Products BV

You also want an ePaper? Increase the reach of your titles
YUMPU automatically turns print PDFs into web optimized ePapers that Google loves.
<strong>Glass</strong> is a unique medium – alive with color, form<br />
and transparency – and glass painting can add a<br />
new dimension to your work, as you add lines,<br />
create textures and shading. <strong>Glass</strong> painting is<br />
applied in layers and fired in a kiln, and each layer<br />
may require a different temperatures, so plan your<br />
approach before beginning.<br />
RECOMMENDED TOOLS<br />
For mixing:<br />
<strong>Glass</strong> slab, 20 x 20 cm<br />
<strong>Glass</strong> muller or palette knife (paints may<br />
cause palette knives to corrode)<br />
Water jar<br />
Respirator or dust mask, disposable<br />
Gloves, latex<br />
Gum arabic, powder or liquid<br />
Water-friendly medium<br />
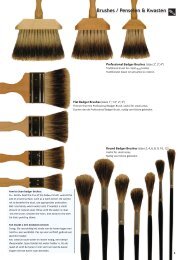
Brushes:<br />
All sizes, all shapes can be used. Soft<br />
brushes to apply the paint, stiffer brushes<br />
to create shadow effects. Consider makeup<br />
brushes for soft effects.<br />
Badger brush – size 3-4 inches<br />
GETTING STARTED<br />
Almost all glass paints are sold in powder form,<br />
made up of powdered glass (frit), metal oxides<br />
and binders that fuse to the glass when the<br />
painted pieces are fired to the proper<br />
temperatures in a kiln. Many of the glass paints<br />
contain lead and/or cadmium so observe<br />
appropriate safety precautions.<br />
INGREDIENTS<br />
Powdered glass paints can be combined with<br />
water, white vinegar, spiritus and a binding agent<br />
such as gum arabic, a water friendly medium for<br />
spreadability, oils, and combinations thereof. The<br />
choice and proportions of mixing agents depends<br />
on the painting technique and individual<br />
preferences.<br />
<strong>Glass</strong> <strong>Painting</strong> - <strong>An</strong> <strong>Introduction</strong><br />
• Water blends nicely, dries quickly,<br />
recommended for shading.<br />
• White vinegar is slower drying than water,<br />
recommended for contour lines or for<br />
layering of paints. If vinegar is used and<br />
allowed to dry to a hard finish overnight,<br />
one may apply matting using water<br />
without damaging the vinegar-based<br />
work.<br />
• Spiritus is quick drying, aids in<br />
spreadability, recommended for even<br />
shading tones.<br />
• Gum arabic allows the paint to grip the<br />
glass, recommended especially for<br />
contour lines and some applications of<br />
shading. Recommended when mixing<br />
with water.<br />
• Water-friendly medium is a glycerin-based<br />
product that aids in spreadability.<br />
• Various oils are used for screen printing,<br />
and oils and water-friendly mediums allow<br />
for wet-on-wet work.<br />
MIXING<br />
1. Place some of the powder paint on the glass<br />
slab.<br />
2. Add a pinch of gum arabic, if desired. If powder<br />
arabic gum is used, use the palette knife to mix it<br />
within the paint.<br />
3. Add a drop or so of water-friendly medium, if<br />
desired.<br />
4. Add water or white vinegar. Be careful – at the<br />
moment that the liquid is added; a poof of paint<br />
powder may come off the paint. Do not inhale the<br />
paint powder.<br />
5. Add spiritus, or various oils, if desired.<br />
6. Use the palette knife or glass muller to mix<br />
thoroughly. For contour lines, the final consistency<br />
should be similar to toothpaste. For shading,<br />
much thinner.<br />
For colors and enamels, try mixing just with water.<br />
This information is intended as a general guide only, individual experiences will vary. Dec 2008<br />
<strong>PELI</strong> <strong>Glass</strong> <strong>Products</strong> (www.peliglass.eu)
PAINTING AND FIRING<br />
<strong>Glass</strong> should be clean. If the wet paint pulls in on<br />
itself even after cleaning the glass, try rubbing the<br />
glass with a small amount of wet paint, then<br />
rubbing clean.<br />
Contour / shading colors can be mixed to create<br />
interesting mélange colors. Test when mixing to<br />
avoid unwanted surprises. Contour lines and<br />
shading are normally painted on the smoothest<br />
glass side.<br />
Contour lines - firm, opaque tracing lines – are<br />
usually the first step in painting on glass. A good<br />
flow of the paint is essential for contour lines.<br />
Firing after this step may be a good idea,<br />
depending on your technique. Can be fired paint<br />
side up or down.<br />
Shading - paint is mixed with water and perhaps<br />
some spiritus or alcohol, and maybe some gum<br />
arabic. Apply paint to desired density and as<br />
evenly as possible. Use the badger brush in<br />
different directions to create a totally smooth<br />
effect. The paint can be stippled wet or dry,<br />
spattered with water, and rubbed with your<br />
fingers, or worked with a damp cloth, if desired.<br />
Once dry, the paint can be further worked. Can be<br />
fired up or down – up is recommended to avoid<br />
scratching paint.<br />
Enamels and Transparents - normally fired at a<br />
lower temperature, so must be done as a later/last<br />
step(s) and fired separately. Apply paint to desired<br />
density and as evenly as possible. Use the badger<br />
brush in different directions to create a smooth<br />
effect. The paint can be stippled wet or dry,<br />
spattered with water, and rubbed with your<br />
fingers, or worked with a damp cloth, if desired.<br />
Once dry, the paint can be further worked. Colors<br />
must always be fired up. Previously-fired contour/<br />
shading can be fired down, and the enamels /<br />
transparents applied to the other side of the glass<br />
and fired up.<br />
Silver Stains - can be blended with each other<br />
but not with other types of paint. These paints are<br />
very aggressive on metals and paintbrushes, use<br />
separate equipment. Protect whatever the silver<br />
stain comes in contact with during firing. Use<br />
water or vinegar to prepare. There is already a<br />
binder in silver stain, so adding gum arabic is<br />
unnecessary. Silver stain is traditionally applied to<br />
the back of the glass and fired at approximately<br />
630°C (1160°F) with the silver stain side down,<br />
but it may be fired up. If applying on float glass,<br />
use the non-tin side for the silver stain. After firing,<br />
remove the ochre residue. Silver stains normally<br />
turn darker with higher temperature.<br />
Firing is dependent on the oven type and<br />
geometry, the requirements of the specific paint,<br />
the size and thickness of the glass. That said,<br />
some broad guidelines:<br />
Generally, 3 mm thick glass pieces with a surface<br />
area smaller than 400 cm² (62 in²) can be fired as<br />
fast as possible to temperature, held at<br />
temperature 5 minutes, then oven off and allowed<br />
to cool. For a gas oven, allow it to cool to 150°C<br />
(300°F) then crack the oven open 2 cm. Open<br />
oven fully below 100°C (212°F). For an electric<br />
oven, can open peepholes below 600°C (1110°F),<br />
crack oven open 5 cm at 200°C (390°F) and open<br />
oven fully below 100°C (212°F).<br />
Pieces larger than approximately 400 cm² should<br />
be warmed more slowly and during the cooling<br />
should be allowed to anneal 5-10 minutes at a<br />
temperature 515-550°C (1004-1022°F) depending<br />
on the type of glass.<br />
When firing red/purple/orange paints in an electric<br />
oven, leave the peepholes open so that the firing<br />
has sufficient oxygen.<br />
When firing paints with significant amounts of gum<br />
arabic, oils or anything other than water or<br />
vinegar, these alien substances must be burned<br />
off for good firing. Increase oven temperature<br />
slowly to 450°C (840°F), hold at 450°C for 30-60<br />
minutes, and then fire normally.<br />
So experiment! You must find for yourself what<br />
works best for you.<br />
REFERENCES<br />
Discussions / website Reusche & Co.<br />
Discussions with Hans van der Valk.<br />
This information is intended as a general guide only, individual experiences will vary. Dec 2008<br />
<strong>PELI</strong> <strong>Glass</strong> <strong>Products</strong> (www.peliglass.eu)