
You also want an ePaper? Increase the reach of your titles
YUMPU automatically turns print PDFs into web optimized ePapers that Google loves.
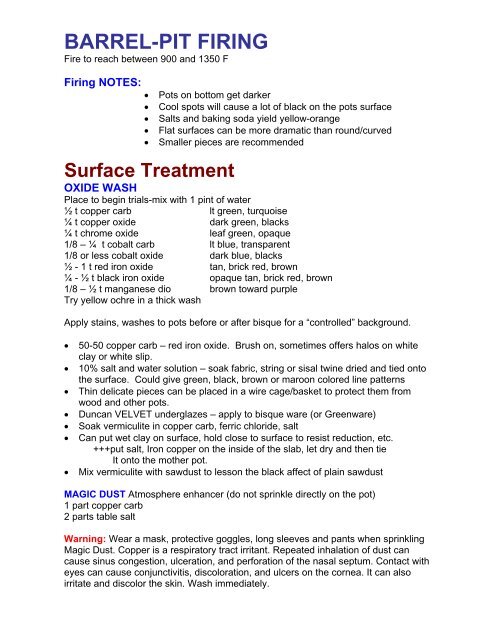
<strong>BARREL</strong>-<strong>PIT</strong> <strong>FIRING</strong><br />
Fire to reach between 900 and 1350 F<br />
Firing NOTES:<br />
• Pots on bottom get darker<br />
• Cool spots will cause a lot of black on the pots surface<br />
• Salts and baking soda yield yellow-orange<br />
• Flat surfaces can be more dramatic than round/curved<br />
• Smaller pieces are recommended<br />
Surface Treatment<br />
OXIDE WASH<br />
Place to begin trials-mix with 1 pint of water<br />
½ t copper carb lt green, turquoise<br />
¼ t copper oxide dark green, blacks<br />
¼ t chrome oxide leaf green, opaque<br />
1/8 – ¼ t cobalt carb lt blue, transparent<br />
1/8 or less cobalt oxide dark blue, blacks<br />
½ - 1 t red iron oxide tan, brick red, brown<br />
¼ - ½ t black iron oxide opaque tan, brick red, brown<br />
1/8 – ½ t manganese dio brown toward purple<br />
Try yellow ochre in a thick wash<br />
Apply stains, washes to pots before or after bisque for a “controlled” background.<br />
• 50-50 copper carb – red iron oxide. Brush on, sometimes offers halos on white<br />
clay or white slip.<br />
• 10% salt and water solution – soak fabric, string or sisal twine dried and tied onto<br />
the surface. Could give green, black, brown or maroon colored line patterns<br />
• Thin delicate pieces can be placed in a wire cage/basket to protect them from<br />
wood and other pots.<br />
• Duncan VELVET underglazes – apply to bisque ware (or Greenware)<br />
• Soak vermiculite in copper carb, ferric chloride, salt<br />
• Can put wet clay on surface, hold close to surface to resist reduction, etc.<br />
+++put salt, Iron copper on the inside of the slab, let dry and then tie<br />
It onto the mother pot.<br />
• Mix vermiculite with sawdust to lesson the black affect of plain sawdust<br />
MAGIC DUST Atmosphere enhancer (do not sprinkle directly on the pot)<br />
1 part copper carb<br />
2 parts table salt<br />
Warning: Wear a mask, protective goggles, long sleeves and pants when sprinkling<br />
Magic Dust. Copper is a respiratory tract irritant. Repeated inhalation of dust can<br />
cause sinus congestion, ulceration, and perforation of the nasal septum. Contact with<br />
eyes can cause conjunctivitis, discoloration, and ulcers on the cornea. It can also<br />
irritate and discolor the skin. Wash immediately.
Constructing the Pit (barrel or fire ring)<br />
Charlie Riggs Process – stacking the barrel/pit<br />
• 12” deep pit<br />
• line 6” of bottom with coarse sawdust<br />
• criss cross with 1x2’s to cover sawdust<br />
• cover wood with 12” layer of sawdust<br />
• place pots on next<br />
• sprinkle with –<br />
copper carb<br />
copper sulfate<br />
salts<br />
steel wool<br />
copper wire<br />
• keep salt off surface of ware<br />
• stack more criss cross wood<br />
• start fire in several places with newspaper and torch<br />
• let burn until only ash left<br />
• when pots are cool to touch, remove and wash<br />
• polish with paste wax for shine and seal<br />
The pit is built of hard brick stacked on a sand base. You can<br />
configure whatever size you need with the bricks and then use old kiln<br />
shelves to cover it up.<br />
Put saw dust in the bottom with a couple smaller pieces of wood and then arrange<br />
my pieces on top of this. Sprinkle copper sulfate crystals, bought from a hardware<br />
store as "Root Kill," and table salt around the pieces, on top of the sawdust. Then fill<br />
in with more sawdust till the pieces are covered by about 2". More copper sulfate and<br />
salt. Then loosely place pieces of wood. Generous seasoning with lighter fluid and<br />
light. I keep adding wood to get a good flame going and then maintain this for about 2<br />
hours, sometimes I will add a bit more sawdust or more chemicals as the urge<br />
strikes. Let the flames die out so you have glowing embers around the pots<br />
and cover with the kiln shelves and allow the kiln gods to do their magic. It all<br />
depends upon the firing how long it takes to finish firing out the rest of the wood and<br />
sawdust and then cool enough to allow you to open it up.<br />
All my surfaces are extremely smooth, burnished but not extremely shiny. I have<br />
found that highly textured surfaces don't blend the best with the vagaries of smoke<br />
firings. My best colorations have come from my hottest firings. I have gotten pieces<br />
with lots of reds, grays, greens, yellows, browns, whites, and aquas. You can also<br />
stain terra sig and brush that on greenware before the bisque to add another<br />
dimension to the coloration. Afterwards I wax with Min-Wax, a floor paste wax.<br />
Post Firing<br />
1.Remove the ash from the interior of the pots.<br />
2.Do not wash the pots. You do not want salt deposited on the surface to permeate<br />
the body of the piece. Pit fired pots are decorative, not functional.
3.Carefully shake off or wipe any ash residue adhering to the surface. Single edge<br />
razor blades or credit cards are useful tools in removing carbon or wire fragments<br />
that stick to the pot. Be careful not to scratch the delicate surface.<br />
4.The pit site should be cleaned and left as natural as you found it. Remember ashes<br />
are very caustic. Wear a mask.<br />
5.Pots need to be treated to prevent or retard absorption of water from the<br />
atmosphere. The salt in the pit fired clay will react with water vapor and corrode the<br />
surface of the pot.<br />
For treatment of burnished or terra sigillata pots I like to apply two layers of<br />
Johnson’s or Butcher’s Floor Paste Wax for a semi-gloss sheen. Use a soft shoe<br />
brush or cotton cloth to bring out the shine. When first applied, the wax will seem to<br />
streak and discolor the surface. This will vanish in a few hours. The wax odor will<br />
persist for about a week.<br />
If a more reflective surface is desired, I use Future Acrylic Floor Finish diluted with<br />
water to a 25% acrylic solution.<br />
I also use Future, Watco Clear Liquid Wood Wax, or Jasco Silicon Grout Sealer on<br />
rough or unpolished textured surfaces.<br />
Color Chart (Possible effects on clay)<br />
Combustibles and Chemicals Expected coloration on cone 018-014 bisque<br />
Hardwood sawdust Black, dark gray<br />
Hardwood coals Black, smoky gray, blue-grays<br />
Cow pies from grass fed cows Gun metal black, jet black, golden yellows<br />
Cow pies from grain fed cows Dark greens, grays, blacks, browns<br />
Driftwood Blue-grays, aqua shades, gray-blacks<br />
Seaweed roots Browns, rust, honey<br />
Kelp leaves Yellow, orange, peach<br />
Kelp pods Orange, brown<br />
Saline grown leaves, twigs,<br />
grass<br />
Golden yellows, greens<br />
Table salt Orange, yellows<br />
Sea salt Salmon, orange, yellow, gold, peach<br />
Copper carbonate Green, black, maroon, reds<br />
Cobalt carbonate Blues<br />
Ferric chloride Iron reds, yellows, oranges