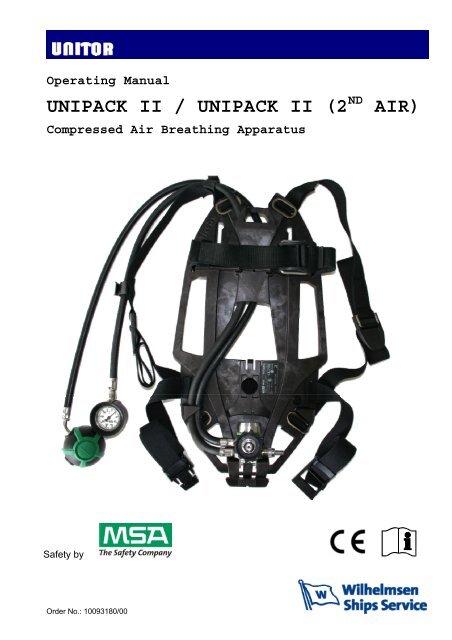
UNIPACK II / UNIPACK II (2 AIR)
UNIPACK II / UNIPACK II (2 AIR)
UNIPACK II / UNIPACK II (2 AIR)

Create successful ePaper yourself
Turn your PDF publications into a flip-book with our unique Google optimized e-Paper software.
Operating Manual<br />
<strong>UNIPACK</strong> <strong>II</strong> / <strong>UNIPACK</strong> <strong>II</strong> (2 ND <strong>AIR</strong>)<br />
Compressed Air Breathing Apparatus<br />
Safety by<br />
Order No.: 10093180/00
Contents<br />
1. Safety Regulations .............................................................................................. 4<br />
1.1. Correct Use ................................................................................................ 4<br />
1.2. Liability Information .................................................................................... 4<br />
2. Description........................................................................................................... 5<br />
2.1. Carrying Assembly ..................................................................................... 7<br />
2.2. Pneumatic System ..................................................................................... 8<br />
2.2.1. Pressure Reducer with Warning Signal ...................................... 8<br />
2.2.2. Lung Governed Demand Valve .................................................. 9<br />
2.2.3. Second Medium Pressure Line (only with 2 nd air)..................... 10<br />
2.3. Full face mask .......................................................................................... 11<br />
2.4. Compressed Air Cylinders........................................................................ 12<br />
3. Using the Compressed Air Breathing Apparatus ........................................... 13<br />
3.1. Connecting Compressed Air Cylinder ...................................................... 13<br />
3.2. Connecting the mask ............................................................................... 13<br />
3.3. Donning the Apparatus ............................................................................ 14<br />
3.4. Condensed Check Prior to Use................................................................ 17<br />
3.5. During Use ............................................................................................... 17<br />
3.6. Use of Additional Connections for Medium Pressure ............................... 17<br />
3.7. Removing the Compressed Air Breathing Apparatus............................... 18<br />
3.8. Removing the Compressed Air Cylinders................................................. 19<br />
4. Maintenance and Care ...................................................................................... 20<br />
4.1. Maintenance Instructions ......................................................................... 20<br />
4.2. Maintenance Intervals .............................................................................. 21<br />
4.3. Cleaning................................................................................................... 22<br />
4.3.1. Pre-cleaning ............................................................................. 22<br />
4.3.2. Cleaning, Light Soiling.............................................................. 22<br />
4.3.3. Cleaning, Heavy Soiling ........................................................... 22<br />
4.3.4. Cleaning and disinfection of AutoMaXX AS.............................. 24<br />
4.3.5. Cleaning and disinfection of 3S-PS-MaXX mask...................... 25<br />
4.4. Visual, Function and Tightness Check ..................................................... 25<br />
4.5. Checking the Warning Device .................................................................. 26<br />
4.6. Checking the High Pressure Gaskets ...................................................... 26<br />
Order No.: 10093180/00 Page 2 of 30
4.7. Overhaul................................................................................................... 26<br />
4.8. Storage..................................................................................................... 26<br />
4.9. Malfunctions ............................................................................................. 26<br />
5. Accessories ....................................................................................................... 27<br />
5.1. Compressed Air Cylinders........................................................................ 27<br />
6. Technical Specifications and Certifications.................................................... 28<br />
7. Ordering Information......................................................................................... 29<br />
7.1. Compressed Air Breathing Apparatus ...................................................... 29<br />
Order No.: 10093180/00 Page 3 of 30
1. Safety Regulations<br />
1.1. Correct Use<br />
<strong>UNIPACK</strong> <strong>II</strong> and <strong>UNIPACK</strong> <strong>II</strong> (2 nd Air) - referred to hereafter as compressed air<br />
breathing apparatus - is a self-contained breathing apparatus operating<br />
independent of the ambient air.<br />
Breathable air is supplied to the user from a compressed air cylinder via a<br />
pressure reducer, a demand controlled dosage assembly and a face piece. The<br />
exhalation air is released directly into the ambient atmosphere.<br />
It is imperative that this operating manual be read and observed when using the<br />
compressed air breathing apparatus. In particular, the safety instructions, as well<br />
as the information for the use and operation of the apparatus, must be carefully<br />
read and observed. Furthermore, the national regulations applicable in the user's<br />
country must be taken into account for a safe use.<br />
Alternative use, or use outside these specifications will be considered as noncompliance.<br />
This also applies especially to unauthorised alterations to the<br />
apparatus and to commissioning work that has not been carried out by MSA or<br />
authorised persons.<br />
Danger!<br />
This product supports life and health. Inappropriate use, maintenance<br />
or servicing may affect the function of the device and thereby seriously<br />
compromise the user’s life.<br />
Before use, the product operability must be verified. The product must<br />
not be used, if the function test is unsuccessful, it is damaged, a<br />
competent servicing/maintenance has not been made, genuine MSA<br />
spare parts have not been used.<br />
Danger!<br />
This compressed air breathing apparatus is a pure gas protection<br />
device. It is not suitable for underwater diving.<br />
1.2. Liability Information<br />
MSA accepts no liability in cases where the product has been used<br />
inappropriately or not as intended. The selection and use of the product are the<br />
exclusive responsibility of the individual operator.<br />
Product liability claims, warranties also as guarantees made by MSA with respect<br />
to the product are voided, if it is not used, serviced or maintained in accordance<br />
with the instructions in this manual.<br />
Order No.: 10093180/00 Page 4 of 30
2. Description<br />
1<br />
2<br />
3<br />
4<br />
Fig. 1 Compressed air breathing apparatus <strong>UNIPACK</strong> <strong>II</strong><br />
1 Lung governed demand valve 7 Cylinder support<br />
2 Pressure gauge 8 Shoulder strap<br />
3 Back plate 9 Hip belt<br />
4 Handle 10 Warning signal<br />
5 Cylinder retaining strap 11 Pressure reducer<br />
6 Cylinder buckle<br />
Order No.: 10093180/00 Page 5 of 30<br />
11<br />
10<br />
5<br />
6<br />
9<br />
7<br />
8
1<br />
2<br />
3<br />
12<br />
4<br />
Fig. 2 Compressed air breathing apparatus <strong>UNIPACK</strong> <strong>II</strong> (2 nd air)<br />
1 Lung governed demand valve 7 Cylinder support<br />
2 Pressure gauge 8 Shoulder strap<br />
3 Back plate 9 Hip belt<br />
4 Handle 10 Warning signal<br />
5 Cylinder retaining strap 11 Pressure reducer<br />
6 Cylinder buckle 12 Second medium pressure line (option)<br />
The <strong>UNIPACK</strong> <strong>II</strong> models are compressed air breathing apparatus (CABA) for<br />
work in contaminated hazardous environments.<br />
The apparatus consists of the following main components:<br />
• Carrying Assembly<br />
• Pneumatic System<br />
• Full Face Mask<br />
• 6 or 7 L 200 bar or 6 L 300 bar Steel or Composite Cylinder or 6,8 L 300<br />
bar Composite Cylinder<br />
The <strong>UNIPACK</strong> <strong>II</strong> BA (Fig. 1) and <strong>UNIPACK</strong> <strong>II</strong> (2 nd air) with supplementary air<br />
supply (Fig. 2) are part of MSA’s Modular Breathing Apparatus System<br />
comprising of several different models to meet different users’ requirements. The<br />
Order No.: 10093180/00 Page 6 of 30<br />
11<br />
5<br />
10<br />
6<br />
8<br />
9<br />
7
apparatus uses a single compressed air cylinder for the air storage. The cylinder<br />
is mounted onto an ergonomic designed back plate.<br />
The high pressure in the cylinder is reduced in two steps or stages, down to a<br />
pressure which can be called breathable air. This type of equipment is known as<br />
a two-stage apparatus. This is done to achieve lowest possible resistance and<br />
high capacity when breathing in the unit i.e. very low breathing exertion even at<br />
very high workloads.<br />
The first reduction of the high pressure is performed in the pressure regulator<br />
where the pressure is reduced down to a medium pressure of approx. 7 bar. The<br />
pressure regulator is a balanced piston type pressure reducer.<br />
The second reduction from 7 bar down to normal air is performed by the<br />
breathing valve located at the face mask. This breathing valve is a demand valve<br />
which means that it senses the demand for an inhalation of air and it opens to<br />
permit exactly the air flow demanded. The inlet valve closes when the inhalation<br />
stops and a spring loaded exhalation valve in the mask opens upon exhalation.<br />
The spring loaded exhalation valve creates a small positive pressure inside the<br />
mask during the whole breathing cycle to effectively prevent any inward leakage<br />
from surrounding atmosphere. This function starts automatically by the first breath<br />
and is known as first breath positive pressure activation.<br />
The apparatus has an audible warning device placed at the 1st stage pressure<br />
reducer.<br />
2.1. Carrying Assembly<br />
The carrying assembly consists of an ergonomic designed back plate of heat<br />
resistant glass fibre reinforced polyamid material with carrying slots for easy<br />
transport of the apparatus.<br />
The harness is of self-extinguishing polyester fabric and can be quickly replaced.<br />
On the lower part of the carrying assembly is the support for the pressure<br />
reducer. On the upper part of the carrying plate is an integrated cylinder support<br />
which with an adjustable cylinder retaining strap and a tension lever permits<br />
connecting various compressed air cylinders.<br />
The back plate is equipped with a 125 kHz transponder (RFID chip) next to the<br />
label for easy identification.<br />
Order No.: 10093180/00 Page 7 of 30
2.2. Pneumatic System<br />
2.2.1. Pressure Reducer with Warning Signal<br />
5<br />
1<br />
4<br />
Fig. 3 Pressure reducer<br />
1 Pressure reducer<br />
2 Cylinder connection<br />
3 Warning signal<br />
4 High pressure line<br />
5 Medium pressure line<br />
The pressure reducer is mounted in the lower area of the back plate ( Fig. 1<br />
and Fig. 2).<br />
On the pressure reducer, there is a safety valve and the single line for connecting<br />
the manifold. The pressure reducer reduces the cylinder pressure to<br />
approx. 7 bar and the safety valve activates on non-permitted pressure rise to<br />
prevent damage insuring the continued supply of breathable air.<br />
The warning device is set to give off an audible signal when the cylinder pressure<br />
is reduced to approx. 55 bar. It continues to sound continuously, medium<br />
pressure dosed until the usable air supply is nearly exhausted.<br />
The individual high pressure and medium pressure lines are routed separately<br />
from the pressure reducer to the individual end units or connections.<br />
The pressure gauge ( Fig. 4) is fitted at the end of the high-pressure line.<br />
Order No.: 10093180/00 Page 8 of 30<br />
2<br />
3
Fig. 4 Pressure gauge<br />
The pressure gauge indicates the momentary pressure in the connected and<br />
opened compressed air cylinders.<br />
2.2.2. Lung Governed Demand Valve<br />
The positive pressure lung governed demand valve AutoMaXX AS is fixed at the<br />
end of the medium pressure line. The connection to the full face mask is by<br />
means of a plug connector. This assures safe and easy handling. The freely<br />
pivoting plug connector automatically adapts itself to the head movements of the<br />
user. ( Fig. 5)<br />
Fig. 5 Lung Governed Demand Valve AutoMaXX AS<br />
Order No.: 10093180/00 Page 9 of 30
2.2.3. Second Medium Pressure Line (only with 2 nd air)<br />
5 4<br />
3 2 1<br />
Fig. 6 Second Medium Pressure Line on <strong>UNIPACK</strong> <strong>II</strong> (2 nd Air)<br />
1 Pressure reducer 4 Second medium pressure line<br />
2 High pressure line 5 Coupling for second connection<br />
3 Medium pressure line<br />
The Second Medium Pressure Line is an additional feature on the <strong>UNIPACK</strong> <strong>II</strong><br />
(2 nd Air) Breathing Apparatus.<br />
There is a second medium pressure connection with safety coupling on the hip<br />
belt, which is closed off with a plug when not being used.<br />
In consideration of national regulations, you can use this connection to:<br />
connect a second lung governed demand valve;<br />
a rescue set, consisting of a normal pressure lung governed demand<br />
valve and full face mask for rescuing people;<br />
connect to compressed air line system using the double, e.g. for<br />
decontamination after use or<br />
to connect a rescue hood.<br />
Warning!<br />
When rescuing persons with the rescue set via the second connection,<br />
more air is consumed.<br />
Hence, the service time is considerably reduced. Always keep this in<br />
mind when using your apparatus.<br />
Order No.: 10093180/00 Page 10 of 30
2.3. Full face mask<br />
The 3-S-PS-MaXX Mask is not a complete respiratory protective device by itself,<br />
but a part which connects the device with the respiratory tracts of the user<br />
(facepiece). It serves as facepiece (EN 136, class 3 and EN 136-10) with plug-in<br />
connector for positive pressure (pressure demand) compressed air breathing<br />
apparatus and can only be used with the corresponding compressed air breathing<br />
apparatus <strong>UNIPACK</strong> <strong>II</strong> (Fig. 7).<br />
Fig. 7 3S-PS-MaXX Mask<br />
The rubber head harness has five straps that are tightened and locked by<br />
buckles. The wide sealing edge of the mask is pressed slightly against the face<br />
by positive pressure and follows the contours of the face giving an effective seal.<br />
The inhalation air flows from the connector of the mask past the inhalation valve<br />
to the inside of the lens (thus keeping the lens largely fog-free) and then through<br />
the check valves into the nose cup.<br />
The dead space has been minimized by the inner mask and separate inhalation<br />
and exhalation channels which coincide with channels in the breathing valve.<br />
The exhalation air passes through the exhalation valve directly to the ambient<br />
atmosphere.<br />
In that way, inhalation and exhalation air will never be mixed<br />
Order No.: 10093180/00 Page 11 of 30
2.4. Compressed Air Cylinders<br />
The MSA/UNITOR cylinder is type-tested and approved for the respective<br />
operating pressures.<br />
The air inside the cylinders must be according to EN 12021.Depending on the<br />
temperature and humidity of the ambient atmosphere, icing may form on the<br />
cylinder valve, pressure reducer and coupling; this, however, does not influence<br />
the function of the apparatus. Compressed air cylinders must be ordered<br />
separately.<br />
Order No.: 10093180/00 Page 12 of 30
3. Using the Compressed Air Breathing Apparatus<br />
Warning!<br />
The compressed air breathing apparatus may only be put into use in a<br />
fully maintained and tested condition. If malfunctions or defects are<br />
noticed prior to use, do not use the compressed air breathing apparatus<br />
under any circumstances.<br />
Get the apparatus checked and repaired by an authorised service<br />
centre.<br />
Prior to the first use the apparatus must be prepared for the number and types of<br />
compressed air cylinders. Afterwards, when changing compressed air cylinders<br />
that have the same diameter, the closed loop of the tension strap is increased or<br />
again tightened by opening or closing the cylinder buckle. A readjustment of the<br />
length of the tension strap and a loosening of the Velcro closure then is no longer<br />
required.<br />
3.1. Connecting Compressed Air Cylinder<br />
(1) Place compressed air breathing apparatus horizontally so that the back face<br />
is uppermost (see Fig. 1 and Fig. 2).<br />
(2) Check gasket on pressure reducer (11) for proper condition.<br />
(3) Open cylinder buckle on the cylinder strap eliminating any tension and<br />
extend the strap (Fig. 14).<br />
(4) Push compressed air cylinder through the cylinder strap (5) with the cylinder<br />
valve toward the pressure reducer, so that it lies on the central support (7).<br />
(5) Thread cylinder valve onto pressure reducer, if necessary, bring the<br />
compressed air breathing apparatus with valve up into a vertical position.<br />
(6) Tighten cylinder strap by pulling the free end.<br />
(7) Check position of compressed air cylinder, retighten if necessary.<br />
(8) Hinge cylinder buckle down until it catches.<br />
(9) Fasten end of the cylinder retaining strap onto Velcro strip.<br />
(10) Briefly open cylinder valve and check for escaping air, retighten if necessary.<br />
3.2. Connecting the mask<br />
The 3S-PS-MaXX Mask serves as facepiece and must be connected with plug-in<br />
connector for positive pressure (pressure demand) compressed air breathing<br />
apparatus, this is a simple snap-in operation.<br />
Order No.: 10093180/00 Page 13 of 30
3.3. Donning the Apparatus<br />
(1) Before donning: Check that the shoulder straps are pulled back and that the<br />
waist strap buckles are adjusted outwards.<br />
(2) Don the apparatus with the cylinder valve facing downwards. Grip the free<br />
ends of the shoulder straps and pull down until the back plate fits<br />
comfortably.<br />
Fig. 8<br />
(3) Close and adjust the waist belt.<br />
Fig. 9<br />
Order No.: 10093180/00 Page 14 of 30
(4) Push in the red button on the breathing valve to insure that the positive<br />
pressure is off.<br />
Fig. 10<br />
(5) Open the cylinder valve completely, an audible warning will sound until the<br />
pressure reaches a level over the predetermined setting of the whistle.<br />
Fig. 11<br />
Order No.: 10093180/00 Page 15 of 30
(6) Put on the face mask by first pulling the chin into the chin support and then<br />
pull the head harness over the forehead and backwards. Tighten the head<br />
harness by first tightening the lower buckles. Tighten the forehead buckle last<br />
Fig. 12<br />
(7) Inhale by taking a short fast breath to automatically switch on the positive<br />
pressure. Check the positive pressure by holding your breath and inserting<br />
two fingers between the sealing edge and the face. A strong flow should be<br />
heard. Remove the fingers. If no air flow can be heard, the mask is tight. The<br />
apparatus is now ready for use.<br />
Fig. 13<br />
Order No.: 10093180/00 Page 16 of 30
3.4. Condensed Check Prior to Use<br />
(1) Ensure that lung governed demand valve is closed.<br />
(2) Open cylinder valve and check pressure on the pressure gauge.<br />
The pressure values must read:<br />
for 300 bar cylinders: minimum 270 bar<br />
for 200 bar cylinders: minimum 180 bar<br />
(3) Close cylinder valve and check pressure gauge.<br />
The pressure must not drop more than 10 bar in 60 seconds.<br />
(4) Carefully activate flushing mode of lung governed demand valve, closing exit<br />
port as much as possible.<br />
(5) Observe the pressure gauge.<br />
The warning signal must sound at 55±5 bar.<br />
3.5. During Use<br />
(1) Regularly check tight fit of full mask and lung governed demand valve and<br />
retighten if necessary, as well as the air supply on the pressure gauge.<br />
(2) Leave area immediately if the warning signal sounds.<br />
Independently of the warning signal an earlier retreat may be required<br />
whilst in the case of a longer retreat route the moment chosen is based<br />
on the reading of the pressure gauge.<br />
Warning!<br />
The warning signal sounds when the air supply in the compressed air<br />
cylinders is reduced.<br />
In such cases, immediately leave the area, there is danger of air<br />
deficiency.<br />
3.6. Use of Additional Connections for Medium Pressure<br />
(1) Remove protection cap from the coupling of the additional connection for<br />
medium pressure.<br />
(2) Connect medium pressure line of lung governed demand valve of second<br />
user until the coupling audibly catches.<br />
Order No.: 10093180/00 Page 17 of 30
Warning!<br />
When rescuing persons with the rescue set via the second connection,<br />
more air is consumed.<br />
Hence, the service time is considerably reduced. Always keep this in<br />
mind when using your apparatus.<br />
3.7. Removing the Compressed Air Breathing Apparatus<br />
(1) Remove full face mask: to loosen the head harness, push the buckles<br />
forward. Then grasp the mask by the connector (not the exhalation valve)<br />
and pull it backwards over the head.<br />
(2) Close cylinder valve.<br />
(3) Activate flushing mode of lung governed demand valve, releasing all air<br />
pressure.<br />
(4) Open hip belt.<br />
(5) Extend shoulder straps by lifting the slides.<br />
Danger!<br />
Do not throw off compressed air breathing apparatus. This could<br />
damage the valve and any remaining compressed air could escape<br />
suddenly.<br />
This could cause fatal injury to you or to any bystanders.<br />
(6) Remove compressed air breathing apparatus.<br />
Order No.: 10093180/00 Page 18 of 30
3.8. Removing the Compressed Air Cylinders<br />
Fig. 14 Removing a cylinder<br />
(1) Place the compressed air breathing apparatus in a horizontal position with<br />
the cylinder facing up.<br />
(2) Hinge up cylinder buckle at cylinder strap and thus loosen the strap.<br />
When exchanging compressed air cylinders of the same diameter, only<br />
the cylinder buckle need be opened.<br />
(3) Close cylinder valve, release air from system with lung governed demand<br />
valve.<br />
(6) Unthread cylinder valve from pressure reducer.<br />
Warning!<br />
Do not remove or transport the compressed air cylinder(s) from the<br />
cylinder strap by the handwheel.<br />
This could accidentally open the cylinder valve.<br />
(7) Lift compressed air cylinder at the valve and pull out of cylinder strap.<br />
(8) Close high pressure connection cylinder valve with protection cap.<br />
Order No.: 10093180/00 Page 19 of 30<br />
1<br />
2
4. Maintenance and Care<br />
4.1. Maintenance Instructions<br />
This product should be regularly checked and serviced by specialists. Inspection<br />
and service records must be maintained. Always use original parts from MSA.<br />
Repairs and maintenance must be carried out only by authorised service centres<br />
or by MSA. Changes to devices or components are not permitted and could result<br />
in loss of approved status.<br />
MSA is liable only for maintenance and repairs carried out by MSA or an<br />
authorized service centre, e.g. Wilhelmsen Ship Services.<br />
Do not use organic solvents such as alcohol, white spirit, petrol etc.<br />
When drying/washing, do not exceed the maximum permissible temperature of<br />
60 °C.<br />
MSA recommends the following maintenance intervals. If needed and<br />
by considering the usage, tasks may be at even shorter intervals than<br />
indicated.<br />
Observe national laws and regulations!<br />
If in any doubt, ask your local MSA contact person.<br />
Order No.: 10093180/00 Page 20 of 30
4.2. Maintenance Intervals<br />
Test Intervals for all Countries (except Germany)<br />
Component<br />
Compressed air<br />
breathing<br />
apparatus<br />
complete<br />
Compressed air<br />
breathing<br />
apparatus without<br />
cylinder and lung<br />
governed demand<br />
valve<br />
Work to be<br />
Performed<br />
Before<br />
use<br />
Order No.: 10093180/00 Page 21 of 30<br />
After use Annually<br />
Every 3<br />
years<br />
Cleaning X X<br />
Sight, function and<br />
tightness check<br />
Check by user 2) X<br />
X X<br />
Every 9<br />
years 1)<br />
Overhaul X<br />
Compressed air<br />
Filling pressure<br />
check<br />
X<br />
cylinder with valve See Operating Manual for compressed air cylinder.<br />
Technical expert test<br />
Please observe national rules!<br />
Lung governed<br />
demand valve<br />
See Operating Manuals for lung governed demand valve / full face<br />
mask.<br />
Please observe national rules! 4)<br />
1) For SCBA apparatus that are frequently used, we recommend a complete overhaul after<br />
approx. 540 hours. For example, this corresponds to 1080 applications with a duration of 30 minutes.<br />
2) The checks are performed with the respective lung governed demand valves and if required, with the<br />
respective full masks.<br />
3) For SCBA apparatus that are frequently used, we recommend lubrication after approx. 500 coupling<br />
cycles.<br />
4) Rubber components are subject to ageing with varying rates according to local conditions and must<br />
be checked and replaced at regular intervals.
4.3. Cleaning<br />
4.3.1. Pre-cleaning<br />
(1) Open cylinder valve(s) of the mounted compressed air cylinder(s) fully.<br />
(2) Remove rough dirt from breathing apparatus with water hose. Here, we<br />
recommend using a mild detergent.<br />
(3) Close cylinder valve(s), release air from apparatus with lung governed<br />
demand valve.<br />
4.3.2. Cleaning, Light Soiling<br />
(1) Remove compressed air cylinder ( Section 3.9).<br />
(2) Clean compressed air breathing apparatus manually using a brush, damp<br />
cloth or similar.<br />
(3) Dry apparatus completely in a drying cabinet at max. 60 °C.<br />
4.3.3. Cleaning, Heavy Soiling<br />
In the event of heavy soiling the compressed air breathing apparatus<br />
should be partially dismantled.<br />
The number of lines depends upon the type of pneumatics being used.<br />
(1) Remove compressed air cylinder ( Section 3.9).<br />
(2) Open the line retainer and unbutton the shoulder padding if present.<br />
The shoulder straps and hip belt of the compressed air breathing<br />
apparatus are fastened in the back plate with metal buckles. To remove<br />
the straps and the belt, you must pull the buckles up slightly, tilt them<br />
and push them out of the slots in the back plate.<br />
(3) Unbutton shoulder straps and hip belt from back plate.<br />
(4) Do the same on the other side of the back plate.<br />
(5) Remove the lines from the guides on the back plate.<br />
Order No.: 10093180/00 Page 22 of 30
1 2 3<br />
Fig. 15 Removing pressure reducer<br />
1 U-Clip<br />
2 Catch spring<br />
3 Axis<br />
U-Clip and hoses are not to be removed after removing the pressure<br />
reducer.<br />
(6) Push the axis out of the retainer on the pressure reducer ( Fig. 15).<br />
(7) Remove pressure reducer from the back plate, do not push up the catch<br />
spring.<br />
(8) Clean back plate with cylinder strap at max. 60 °C.<br />
(9) Clean harness in a suitable washing machine at max. 60 °C.<br />
(10) Clean lines, pressure reducer and pressure gauge preferable by hand.<br />
If you want to clean under water: pressurise the pressure reducer and seal<br />
the warning signal (e.g. with a flexible tube)<br />
Attention!<br />
The pressure reducer must be pressurised if submerged in water.<br />
Make sure that no water penetrates high and medium pressure cavities.<br />
(13) Shake out humidity from pressure reducer.<br />
(14) Completely dry all compressed air breathing apparatus components in a<br />
drying cabinet at max. 60 °C.<br />
(15) Assemble the compressed air breathing apparatus in the reverse order.<br />
Order No.: 10093180/00 Page 23 of 30
4.3.4. Cleaning and disinfection of AutoMaXX AS<br />
Existing medium pressure line (without coupling) must be exchanged with<br />
standard medium pressure line for pressurised cleaning/ disinfection and/or<br />
testing on test unit.<br />
(1) Pull off AutoMaXX protective cap with one hand push and hold down both<br />
operating buttons, with the other hand push together both snap-on hooks<br />
and push off the protective cap.<br />
(2) Disassembly Medium Pressure Line<br />
With the protective cap disassembled, pull the silver coloured clamp (Uclip)<br />
out of the housing.<br />
Fig. 16 Disassembly Medium Pressure Line<br />
Pull medium pressure line out of the housing.<br />
(3) Assembly Medium Pressure Line<br />
Check O – ring on bend for visible damage and replace if required<br />
Push medium pressure line into housing till stop<br />
Push U–clip from the diaphragm side ( arrow in Fig. 17) into holes of<br />
housing till stops. The medium pressure line is secured.<br />
Fig. 17 Assembly Medium Pressure Line<br />
Order No.: 10093180/00 Page 24 of 30
(4) Slide on protective cap as follows:<br />
Push both operating buttons simultaneously and slide on protective cap<br />
until it audibly and visibly snaps into place on the snap-on hooks.<br />
4.3.5. Cleaning and disinfection of 3S-PS-MaXX mask<br />
The dirty mask is cleaned with lukewarm water containing a mild detergent. Prior<br />
to washing, remove inhalation valve discs, unbutton the nose cup and unscrew<br />
the speaking diaphragm with the special tool (Part No. D2055038). These<br />
components are cleaned separately and reassembled only after drying. Cleaned<br />
parts must not be dried in radiant heat (sunlight, radiators). When using a drying<br />
cabinet the temperature must not exceed 50°C.<br />
Masks should be disinfected after having been cleaned. The Disinfectant AUER<br />
90 is recommended Information about the concentration and time is contained in<br />
the instructions for use of the disinfectant. After disinfecting thoroughly flush all<br />
components with water, dry and reassemble.<br />
4.4. Visual, Function and Tightness Check<br />
(1) Visually check the high pressure gaskets ( Section 4.6).<br />
(2) Connect compressed air cylinder to the back plate<br />
(3) Check all parts of the compressed air breathing apparatus for visible defects<br />
or malfunctions, such as incorrectly assembled harness, loose compressed<br />
air cylinders, incorrectly fitted lines, etc.<br />
(4) Open cylinder valve and check operating pressure on pressure gauge.<br />
The pressure values must read:<br />
for 300 bar cylinders: minimum 270 bar<br />
for 200 bar cylinders: minimum 180 bar<br />
(5) Close cylinder valves.<br />
After 60 seconds the pressure drop in the pressure gauge must not<br />
exceed 10 bar.<br />
(6) Check warning device (signal whistle) ( Section 4.5).<br />
Order No.: 10093180/00 Page 25 of 30
4.5. Checking the Warning Device<br />
(1) Open cylinder valve(s).<br />
The pressure on the pressure gauge must be at least 120 bar.<br />
(2) Close cylinder valve(s).<br />
(3) Carefully activate flushing mode of lung governed demand valve<br />
(4) Observe the pressure gauge.<br />
The warning signal must sound at 55±5 bar.<br />
4.6. Checking the High Pressure Gaskets<br />
Visually check the sealing ring of the cylinder connector in the pressure reducer.<br />
Damaged sealing rings must be replaced.<br />
4.7. Overhaul<br />
The overhaul of the pressure reducer may only be performed by MSA or an<br />
authorised service centre.<br />
Attention!<br />
Pressure reducers are completed with a lead seal. Where the lead seal<br />
is missing or damaged, it can not be guaranteed that they are ready for<br />
use or that they correspond to the approval status.<br />
Optimal use of the compressed air breathing apparatus is not assured<br />
in this case.<br />
4.8. Storage<br />
Store in a dry place, free from dust and dirt, at approx. 20°C. Protect apparatus<br />
against direct sunlight.<br />
Secure against tilting, falling down and rolling away. Please, also take into<br />
consideration the instructions in the Operating Manual for the compressed air<br />
cylinders.<br />
4.9. Malfunctions<br />
In case of malfunctions in the compressed air breathing apparatus, it must be<br />
checked and repaired by a person or service centre authorised by MSA.<br />
Order No.: 10093180/00 Page 26 of 30
5. Accessories<br />
5.1. Compressed Air Cylinders<br />
Danger!<br />
When handling compressed air cylinders, observe the relevant<br />
Operating Manual and the safety instructions specified in it.<br />
Improper handling of compressed air cylinders can have fatal<br />
consequences for you and others.<br />
Compressed Air Cylinders<br />
The compressed air breathing apparatus is compatible with a large number of<br />
different compressed air cylinders ( Section 9.3). The MSA compressed air<br />
cylinders are made of steel or carbon fibre compound (composite). They are type<br />
approved and in accordance with the respective standards.<br />
Applicable national regulations must be observed.<br />
The cylinders must be ordered separately. Protective covers are available for all<br />
6.0 l and 6.8 l composite cylinders ( Section 9.4) as accessories.<br />
Valves<br />
The cylinder valves that thread into the cylinders are type approved according to<br />
EN 144. The handwheels are protected against impacts. They must be fully open<br />
for use. The fail safe cylinder valve can be closed only by also pulling the<br />
handwheel. This prevents it from closing accidentally.<br />
Order No.: 10093180/00 Page 27 of 30
6. Technical Specifications and Certifications<br />
High pressure : 200 bar resp. 300 bar<br />
Medium pressure : 5 bar to 9 bar<br />
Operating temperature : -30 °C to +60 °C<br />
Weight (approx.) : 2.9 ... 3.8 kg<br />
Dimensions (approx.) : Length 580 mm<br />
Width 300 mm<br />
Height 170 mm<br />
Approvals<br />
: The compressed air breathing apparatus conforms to<br />
the Directives 89/686/EEC and 94/9/EC. It is a<br />
container unit with compressed air in accordance with<br />
EN 137.<br />
Order No.: 10093180/00 Page 28 of 30<br />
ATEX<br />
BVS 03 ATEX H 010 X<br />
IM1c<br />
<strong>II</strong> 1 G c <strong>II</strong>C T6 -30 °C ≤ Ta ≤ +60 °C<br />
<strong>II</strong> 1 D c<br />
0158
7. Ordering Information<br />
7.1. Compressed Air Breathing Apparatus<br />
Description Part No.<br />
<strong>UNIPACK</strong> <strong>II</strong> BA 757879<br />
<strong>UNIPACK</strong> <strong>II</strong> BA (2 nd Air) 757881<br />
When ordering or enquiring<br />
When communicating your order or enquiry, please include:<br />
• Complete product name<br />
• Wilhelmsen order number (6 digits)<br />
• Total quantity required<br />
• Your order number or identification details<br />
In addition information on ETA, ETD and ship’s agent is important in assisting us<br />
to make sure your order is properly taken care of.<br />
Order No.: 10093180/00 Page 29 of 30
Fraser/surrey Gaspe Gros Caouna Halifax Hamilton Harbour Grace Holyrood Kitimat<br />
Long Pond Marytown Montreal Nanaimo New Westminster Bc Pictou/halifax Pointe<br />
Aux Pic.quebec Port Alfred Port Cartier Port Colborne Port Hawkesbury Port Mellon<br />
Port Moody Port Of Quebec Port Weller Powell River Prince Rupert Roberts Bank<br />
Saint John Sarnia, Ontario Sept Iles Seven Islands Sorel Souris/<br />
halifax Squamish St. Catherines St.john’s, Nfld St.romuald Stephensville<br />
Summerside/halifax Three Rivers Thunder Bay Toronto alleyfield Vancouver<br />
Victoria Weymouth Windsor Yarmouth Ancud / Laitec Antofagasta Arica Caldera<br />
Concepcion Bay Coquimbo Coronel Corral Huasco Las Ventanas Lirquen Lota<br />
Penco Puerto Montt Puerto Williams Punta Arenas Quintero San Antonio San<br />
Vicente Talcahuano Tocopilla Valparaiso Antilla Bahia Honda Banes Baracoa<br />
Cabanas Caibarien Cardenas Casilda Ceiba Hueca Cienfuegos Guantanamo<br />
Guayabal Havana Isabel De Sagua Manati Mariel Media Luna Moa Nicaro Niquero<br />
Nuevitas Pilon Puerto Padre Santiago De Cuba Sigloo Genoa Finn Tanamo Tunas<br />
De Zaza Vita Balao Esmeraldas Guayaquil La Libertad Manta Puerto Bolivar<br />
Freeport/bahamas Guam Mahdia Acapulco Campeche Ciudad Del Carmen<br />
Coatzacoaloos Cozumel Dos Bocas Ensenada Guaymas La Paz Lazaro Cardenas<br />
We service your needs in 2 200 ports<br />
Mazatlan Progreso Puerto Vallarta Salina Cruz Tampico Topolobampo Tuxpan Vera<br />
Cruz Bonaire Bullen Bay Curacao Aguadulce Almirante Armuelles Bahia Las Minas<br />
Balboa Cristobal Manzanillo Int.term. Vacamonte Callao Chimbote Ilo Matarani Paita<br />
Pisco Guayama Guayanilla Mayaguez Ponce San Juan Yabucoa St. Vincent<br />
Chaguaramas La Brea Point Fortin Point Lisas Pointe-a-pierre Port Of Spain<br />
Tembladora Aberdeen,wa Alameda Albany,n.y. Alexandria, Va Algiers Point Amelia<br />
Anacortes, Wa Anchorage,ak Annapolis,md Antioch Aransas Pass Tx Astoria, Or<br />
Baltimore Baton Rouge Bayonne Baytown Beaumont Bellingham, Ma Bellingham,<br />
Wa Benicia, Ca Boston, Ma Bridgeport Bridgeport, Conn Brooklyn, Ny Brownsville<br />
Tx Brunswick Brunswick, Ga ucksport,me Buras Camden Camden, Nj Cameron La<br />
Chalmette Charleston, Sc Cheasapeake Chester Chicago Claymont Convent Coos<br />
Bay, Or Corpus Chr.tx Crockett Darrow Davant Deer Park Delaware City Destrehan<br />
Donaldsonville Dutch Harbor, Ak Eastport, Me Eureka Everett, Wa Fairless Hills<br />
Famagusta Ferndale,wa Freeport Tx Galveston Tx Garyville Geismar Georgetown,<br />
Sc Gloucester, Nj Good Hope Gramercy Grand Isle Grays Harbour Gretna Gulfport,<br />
Ms Harvey Honolulu, Hawaii Hoquiam, Wa Houma Jacksonville Kalama Kalama, Wa<br />
Kenai Key West Lake Charles La Long Beach Long Island, Ny Longview, Wa Loop<br />
Terminal Los Angeles<br />
Manchester, Wa Manhattan, Ny Marcus Hook, Pa Martinez Miami Mobile Morehead<br />
City Morehead City, Nc Morgan City Morrisville, Pa Myrtle Grove Naples Nederland<br />
Tx New Haven, Conn New Iberia New London New Orleans New York Newington,<br />
Nh Newport News, Va Newport, Or Newport, Ri Nikiski Norco Norfolk Oakland<br />
Olympia, Wa Orange, Rotterdam Tx Palm Beach Panama City, Fl Pasadena<br />
Pascagoula, Ms Paulsboro, Nj Pennsauken, Nj Pensacola, Fl Petaluma Philadelphia<br />
Piney Point, Md Pittsburg Plaquemine Point Comfort Tx Port Allen Port Angeles, Wa<br />
Port Arthur Tx Port Canaveral Port Everglades Port Hueneme Port Isabel Tx Port<br />
Manatee, Fl Port Neches Tx Port Royal, Sc Port St. Joe, Fl Port Townsend, Wa<br />
Portland Me Portland Or Portsmouth Portsmouth Nh Providence Ri Queens Ny<br />
Order No.: 10093180/00 Page 30 of 30