User Manual - Axminster Tool Centre
User Manual - Axminster Tool Centre
User Manual - Axminster Tool Centre

Create successful ePaper yourself
Turn your PDF publications into a flip-book with our unique Google optimized e-Paper software.
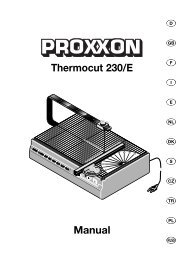
Extra<br />
Dovetail Jig<br />
Simple and easy to set up.<br />
The dovetail jig with a large 575mm capacity can tackle projects<br />
on a much larger scale such as carcass construction etc. Robustly<br />
made from heavy gauge steel pressings. Workpieces are held<br />
quickly and securely while the smooth anodised finish on the<br />
8mm thick machined finger template ensures that both parts of<br />
the joint are cut accurately and cleanly. The jig can be used with<br />
any router with a base diameter not exceeding 160mm that will<br />
take 1/4” shank cutters (although lightweight models are most<br />
suitable). Fitted with the cutter supplied, the jig can be used to<br />
cut both lap and rebated lap dovetails for basic unit drawer<br />
construction or, fitted with an optional bearing guided straight<br />
cutter, it will also produce 1/2” strong, precise comb or finger<br />
joints for tool boxes and utility furniture.<br />
Unit 10 Weycroft Avenue, <strong>Axminster</strong>, Devon EX13 5PH<br />
www.axcaliber.co.uk
02<br />
Index of Contents<br />
Page No.<br />
What’s in the Box................................................................................................................................................................................ 02<br />
Illustration and Parts Description of Dovetail Jig....................................................................................................................03<br />
Introduction...........................................................................................................................................................................................03<br />
Specification..........................................................................................................................................................................................04<br />
Assembling............................................................................................................................................................................................04<br />
Mounting the Jig and Mounting the Jig.....................................................................................................................................04<br />
Preparation of Timber....................................................................................................................................................................... 04<br />
Setting the End Stops..................................................................................................................................................................05-06<br />
Setting Template and Backstop...............................................................................................................................................06-07<br />
Assembling Timber into the Jig.....................................................................................................................................................08<br />
Setting the Dovetail Cutter..............................................................................................................................................................09<br />
Cutting the Joint..................................................................................................................................................................................10<br />
Box Jointing.................................................................................................................................................................................... 10-11<br />
Through Dovetail Comb for Axcaliber Extra Dovetail Jig.................................................................................................... 11<br />
Replacement Comb for Axcaliber Extra Dovetail Jig.... ........................................................................................................ 11<br />
What’s in the Box<br />
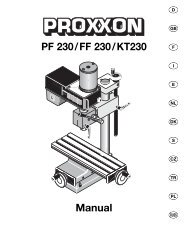
Part No Item Qty<br />
1 Template 1<br />
2 Template Securing Screw 4<br />
3 Template Adjusting Knob 2<br />
4 Clamp Adjusting Knob 4<br />
5 Backstop Adjusting Screw 2<br />
6 Top Clamp Bar 1<br />
7 Front Clamp Bar 1<br />
8 Long Horizontal Stop 2<br />
9 Short Vertical Stop 2<br />
10 Clamp Bar Spring 4<br />
11 Main Body 1<br />
12 Backstop 1<br />
13 TCT Router Cutter (666039) 1
5<br />
10<br />
3<br />
4<br />
13<br />
11<br />
12<br />
You now own a jig that will make jointing drawers and<br />
boxes with your router a fast and easy task.<br />
Although most routers can be used successfully with<br />
this jig the medium sized machines with fine height<br />
adjusters are the most suitable. Follow these quick set<br />
up instructions and you can soon be producing<br />
accurate and good looking stopped or lapped dovetail<br />
joints without the need for time consuming and<br />
laborious hand work. This type of dovetail gives a<br />
Illustration and Parts Description of Dovetail Jig<br />
Fig 1<br />
4 1<br />
4<br />
7<br />
9<br />
6<br />
4<br />
Introduction<br />
clean smooth interior to the box or drawer with a neat<br />
craftsman - like joint showing on the outside.<br />
A little time spent now getting to know your jig and<br />
establishing the correct settings will pay dividends in<br />
the future. Large clamping knobs and a non-slip<br />
surface provide a secure hold during machining.<br />
8<br />
3<br />
5<br />
2<br />
03
04<br />
Specifications<br />
Code No 953312<br />
Model DTJ24<br />
Rating Trade<br />
Dovetail Size 15mm<br />
Material Thickness 15 to 32mm<br />
Material Width 575mm<br />
Material Thickness Front and back pieces 1/2" (12mm) to 11/4" (32mm)<br />
Side pieces 3/8" (9mm) to 3/4" (18mm)<br />
Joint Size The template and cutter supplied will produce dovetail pins and sockets approximately 3/8"<br />
(9 .5mm) deep and spaced 1" apart. The purchase of a bearing guided straight cutter(order no. 666106),<br />
will enable 1/2" wide box joints to be made in timber up to a maximum thickness of 3/4"(19mm)<br />
1. Assembling and Mounting the Jig<br />
Mount the jig to a firm and stable workbench at a<br />
comfortable height, remembering that the router sits<br />
on top of the jig. The jig must be mounted close to the<br />
front edge so as to leave clear passage for the timber<br />
to the front, vertical clamp. Also, leave ample clearance<br />
to the rear of the jig to accommodate the longest<br />
length of timber you are likely to want to work a<br />
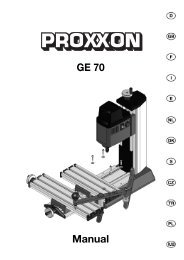
2. Preparation of Timber<br />
As with all joinery work the drawer or box<br />
components must be sized and cut square accurately.<br />
It is preferable that the width of the timber is in exact<br />
steps of 1/2" (i.e. 5", 5 1/2", 6", 6 1/2", etc.) as this will<br />
give a series of fully-formed dovetails without partformed<br />
pins or sockets at the ends. The dovetail joints<br />
are cut with the insides of the components facing<br />
Fig 2<br />
dovetail joint on. There are two holes provided in the<br />
base for securing the jig to the bench. The front clamp<br />
holds the side piece and the top clamp holds the front<br />
or back piece of the drawer. The complete joint is cut<br />
in a single pass through the side piece (making the<br />
pins) and into the back or front piece (making the tail<br />
sockets).<br />
outwards and the edges that will form the top drawer<br />
hard up against the side stops of the jig, therefore the<br />
right hand side of the drawer and corresponding front<br />
joints are cut on the left hand side of the jig and vice<br />
versa. It is a good idea to identify the drawer pieces as<br />
in Fig 2 so that they are positioned correctly in the jig.
Start by temporarily removing the front clamp bar<br />
from the jig. Now draw a pencil line across the<br />
template, halfway across the first finger and square to<br />
the edges of the template.(see Fig 3).<br />
Set the top left hand stop in line with the line marked<br />
on the template and square to the body of the jig.<br />
Left Hand Stop<br />
Fig 3<br />
3. Setting the End Stops<br />
Offset the left hand vertical stop 1/2" to the right of<br />
the top one and square with the top face of the jig<br />
(Fig 4).<br />
Mirror these two settings on the right hand side of the<br />
jig, ensuring that 90˚ alignment to the front edge of<br />
the jig is maintained.<br />
05
3. Setting the End Stops<br />
4. Setting Template and Backstop<br />
Unlock the two locking knobs (4) see Fig 5 and<br />
position the template so that the tips of the fingers sit<br />
inside the vertically mounted timber by a minimum of<br />
1/16"(1.5mm) for thin timber and 1/8" (3mm) for thick<br />
timber (see Fig 5).<br />
Set the back stop so that the longest travel the cutter<br />
can make is twice the thickness of the vertically<br />
mounted drawer side pieces, plus the distance from<br />
the centre of the cutter to the edge of the router base<br />
plate that will contact the back stop, less half the<br />
diameter of the cutter (see Fig 5).<br />
06<br />
Fig 4<br />
1/2"<br />
90˚<br />
90˚<br />
Example:- Using an router with a base width of<br />
110mm, a drawer side 15mm thick and the<br />
standard cutter supplied with its tip diameter of<br />
14.8mm, the distance from the tips of the template<br />
fingers to the vertical face of the backstop should<br />
be set at (110/2) +(2 x15) – (14.8/2) = 77.6mm.<br />
It is not essential that this setting is exact at this stage<br />
as final adjustments can be made later on.<br />
Ensure that the template and back stop stay in parallel<br />
with the front edge of the jig during this setting<br />
procedure.
Fig 5<br />
4<br />
1/16"-1/8"<br />
4. Setting Template and Backstop<br />
07
5. Assembling Timber into the Jig<br />
Adjust the top and front clamp bars via the clamp<br />
adjusting knobs at either end of each bar so that the<br />
wood is held firmly in place. When narrower pieces of<br />
timber are being worked it is best to use a packing<br />
piece of the same thickness at the opposite end of the<br />
clamp bar to ensure an even grip and to avoid<br />
distorting the bars. Align the timber so that the piece<br />
08<br />
Fig 6<br />
forming one of the sides of the drawer, mounted in<br />
the front vertical clamp, extends above the front edge<br />
of the jig by the thickness of the piece to be mounted<br />
in the top horizontal clamp (front or back of drawer).<br />
The piece in the top clamp is then butted up to this so<br />
that both are flush under the finger guide (see Fig 6).
Fit the bearing guided cutter securely into the router<br />
collet and then set the cutter depth, preferably using a<br />
fine height adjuster, until the bottom face of the cutter<br />
protrudes below the router base by 18mm (see Fig 7).<br />
Allowing for the 8mm thickness of the template this<br />
will give a nominal dovetail depth of between 9 and<br />
10mm. The fitting of a packaging piece between the<br />
timber and the template should not be necessary<br />
provided that the cutter is set deep enough and the<br />
Fig 7<br />
6. Setting the Dovetail Cutter<br />
router is held firmly on the template during cutting<br />
(see following comment).<br />
The cutting depth is critical to the final fit of the joint,<br />
with as little as 0.5mm change in depth making all the<br />
difference. A number of trial cuts will probably be<br />
necessary, with adjustments to the cutter depth being<br />
made to achieve the best fit.<br />
18mm<br />
09
7. Cutting the Joint<br />
Because there may be a need to alter one or more of<br />
the settings in order to get the joint to fit correctly it is<br />
wiser to carry out the initial cuts on two trial pieces of<br />
timber of the same width and thickness as the final<br />
components.<br />
Position the router on the template with the cutter<br />
clear of the timber and switch on.<br />
Now with just a light cut run the router from right to<br />
left across the work, just touching the end of each<br />
finger. Continue the cut allowing the router to do the<br />
work and avoiding any heavy-handed forced contact<br />
with the template. Follow the template in and out of<br />
the finger guides working from left to right. When<br />
completed switch the router off before lifting it from<br />
the jig.<br />
It is important that a firm and even pressure is kept on<br />
the router whilst the joint is being cut; this will both<br />
ensure an accurate joint and prevent any possibility of<br />
the cutter guide bearing disengaging from the slots in<br />
the template.<br />
Remove the pieces from the jig, make a trial fit and<br />
then, if necessary, make the following adjustments:<br />
If the fit is too loose, increase the cutter depth by<br />
0.5mm.<br />
10<br />
8. Box Jointing<br />
Box joints can be formed in timber with a maximum<br />
thickness of 3/4" using a 1/2" template profile cutter,<br />
Stock No 610479. The procedure is different from that<br />
used for dovetailing in that both boards are mounted<br />
vertically in the front clamp and cut independently of<br />
each other with the fingers in one board offset by<br />
1/2" from those on the other.<br />
First of all, the template assembly needs to be brought<br />
forward as far as possible and locked in position with<br />
the locking knobs (4) see Fig 5; this will allow the<br />
cutter to move far enough in the fingers to cut the full<br />
3/4" thickness of timber. Next, the template assembly<br />
should be raised high enough to allow the cutter to<br />
cut to its full depth without fouling the top surface of<br />
the jig body. This can be achieved by placing a timber<br />
spacer (or spacers) underneath both the rear clamp<br />
If the fit is too tight, decrease the cutter depth by<br />
0.5mm.<br />
If the pins stand proud of the joint, move the back<br />
stop further back.<br />
If the pins sit too deep in the joint, move the back<br />
stop further forward.<br />
Having made the necessary adjustments you can<br />
either make a second trial cut or proceed directly to<br />
the final joint. Once the correct settings have been<br />
made then production runs of joints can be<br />
undertaken, although the settings will need to be<br />
checked periodically to maintain accuracy.<br />
Additional cutter avaliable:<br />
Axcaliber Dovetail Cutter (Order no: 951241)<br />
With a greater cutting depth this cutter is offered as<br />
an optional extra to the standard cutter supplied with<br />
the <strong>Axminster</strong> dovetail jig and is suitable for material<br />
thickness of approx 19-30mm. The cutting depth will<br />
be different from the standard cutter settings when<br />
using this cutter and the depth should initially be set<br />
to 24mm from the base of the router (16mm tail<br />
length plus 8mm comb thickness).Small adjustments<br />
can be made to cutter height dependant on the joint<br />
fit achieved.<br />
and the template and locking in position with the rear<br />
clamp. The spacer should be at least 1/8" (3mm)<br />
thicker than the timber being jointed which should be<br />
enough to ensure that the cutter will cut the full depth<br />
without contacting the body of the jig.<br />
The depth of the cutter below the router base plate<br />
should be set to give the required joint depth plus the<br />
thickness of the template (e.g. 19 + 8 = 27mm in the<br />
case of 3/4" timber). It is important to note that when<br />
thinner timber is used the guide bearing will sit higher<br />
up in the template and in this case it may be<br />
necessary to position the timber below the bottom of<br />
the template (with the aid of a thin plywood shim) so<br />
that the bearing still runs within the depth of the<br />
template.
Fig 8<br />
The first board should be positioned in the jig with its<br />
left hand edge in line with the left hand edge of one<br />
of the template fingers and its top edge in contact<br />
with the underside of the template as shown in Fig 9.<br />
Place the router on the template with the cutter clear<br />
of the timber, start up the router and then trace<br />
around the template fingers. When cutting is<br />
completed switch off the router and let it come to a<br />
stop before removing from the jig. The second board is<br />
cut in the same way except that its left hand edge is<br />
lined up with the right hand edge of one of the<br />
Fig 9<br />
8. Box Jointing<br />
template fingers; this will automatically produce the<br />
necessary 1/2" offset between the two halves of the<br />
joint. If multiple joints are to be made then it may be<br />
more convenient to use the vertical end stop to<br />
position the timber correctly relative to the template<br />
quickly and accurately each time.<br />
WARNING Before starting to cut the timber make<br />
sure that (a) the bottom of the cutter is well clear of<br />
the top face of the body of the jig and (b) the cutter<br />
guide bearing is running correctly in the template.<br />
Align one board with left<br />
hand edge of finger, the<br />
other with right hand edge.<br />
Through Dovetail Comb for Axcaliber Extra Dovetail Jig<br />
A through dovetail comb expands the range of joints that your Axcaliber dovetail jig can produce. Supplied with 1<br />
x 12.7mm x 8° dovetail cutter (1/4” shank), 1 x 6.35mm twin flute cutter (1/4” shank) and two guide bushes. The<br />
standard 1/2” comb supplied with your jig is used to produce the tails of your joint using the dovetail cutter and a<br />
12mm guide bush; tail sockets are then machined using the through dovetail comb, the twin flute cutter and a<br />
10mm guide bush. Smaller 8° dovetail cutters may be purchased for producing a smaller pin size if required.<br />
953314 Dovetail Comb<br />
Replacement Comb for Axcaliber Extra Dovetail Jig<br />
A replacement template comb for use with the Axcaliber 600mm dovetail jig is available if required.<br />
953313 Replacement Comb<br />
11