
Create successful ePaper yourself
Turn your PDF publications into a flip-book with our unique Google optimized e-Paper software.
<strong>Elcometer</strong> <strong>108</strong><br />
<strong>Hydraulic</strong> <strong>Adhesion</strong> <strong>Tester</strong><br />
Operating Instructions<br />
English
English<br />
R<br />
This apparatus and its use are protected under the following patents:<br />
UK: 2,166,875A & 2,166,876A Canada: 1,272,395 & 1,272,394<br />
US: 4,586,371 & 4,606,225 Norway: 165,938 & 165,937<br />
Germany: P3676087.0 & P3676088.9 Sweden, France and Italy: EP0244518 & 0244519<br />
This product meets the Electromagnetic Compatibility Directive.<br />
The product is Class B, Group 1 ISM equipment according to CISPR 11.<br />
Group 1 ISM product: A product in which there is intentionally generated and/or used conductively coupled radiofrequency<br />
energy which is necessary for the internal functioning of the equipment itself.<br />
Class B product are suitable for use in domestic establishments and in establishments directly connected to a low<br />
voltage power supply network which supplies buildings used for domestic purposes.<br />
R<br />
and are registered trademarks of <strong>Elcometer</strong> Limited. All other trademarks acknowledged.<br />
© Copyright <strong>Elcometer</strong> Limited 2009-2010.<br />
All rights reserved. No part of this Document may be reproduced, transmitted, transcribed, stored (in a retrieval system or<br />
otherwise) or translated into any language, in any form or by any means (electronic, mechanical, magnetic, optical, manual or<br />
otherwise) without the prior written permission of <strong>Elcometer</strong> Limited.<br />
A copy of this Instruction Manual is available for download on our Website via www.elcometer.com.<br />
Doc.No. TMA-0<strong>108</strong> Issue 09<br />
Text with Cover No: 4371
CONTENTS<br />
Section Page<br />
1 About your gauge . . . . . . . . . . . . . . . . . . . . . . . . . . . . . . . . . . . . . . . . . . . . . . . . . . . . . . . . . . . . . . . . 2<br />
2 Test procedure . . . . . . . . . . . . . . . . . . . . . . . . . . . . . . . . . . . . . . . . . . . . . . . . . . . . . . . . . . . . . . . . . . 5<br />
3 Supplementary information . . . . . . . . . . . . . . . . . . . . . . . . . . . . . . . . . . . . . . . . . . . . . . . . . . . . . . . . 9<br />
4 Storage. . . . . . . . . . . . . . . . . . . . . . . . . . . . . . . . . . . . . . . . . . . . . . . . . . . . . . . . . . . . . . . . . . . . . . . . 13<br />
5 Maintenance . . . . . . . . . . . . . . . . . . . . . . . . . . . . . . . . . . . . . . . . . . . . . . . . . . . . . . . . . . . . . . . . . . . 14<br />
6 Technical specification. . . . . . . . . . . . . . . . . . . . . . . . . . . . . . . . . . . . . . . . . . . . . . . . . . . . . . . . . . . 15<br />
7 Spares and accessories . . . . . . . . . . . . . . . . . . . . . . . . . . . . . . . . . . . . . . . . . . . . . . . . . . . . . . . . . . 17<br />
8 Related equipment . . . . . . . . . . . . . . . . . . . . . . . . . . . . . . . . . . . . . . . . . . . . . . . . . . . . . . . . . . . . . . 18<br />
R<br />
1
2<br />
R<br />
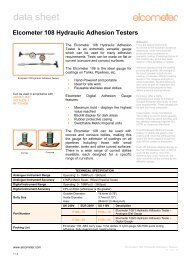
Thank you for your purchase of this <strong>Elcometer</strong> <strong>108</strong> <strong>Hydraulic</strong> <strong>Adhesion</strong> <strong>Tester</strong>. Welcome to <strong>Elcometer</strong>.<br />
<strong>Elcometer</strong> are world leaders in the design, manufacture and supply of inspection equipment for coatings<br />
and concrete. Our products cover all aspects of coating inspection, from development through application<br />
to post application inspection.<br />
Your <strong>Elcometer</strong> <strong>108</strong> <strong>Hydraulic</strong> <strong>Adhesion</strong> <strong>Tester</strong> is a world beating product. With the purchase of this product<br />
you now have access to the worldwide service and support network of <strong>Elcometer</strong>. For more information visit<br />
our website at www.elcometer.com<br />
1 ABOUT YOUR GAUGE<br />
The <strong>Elcometer</strong> <strong>108</strong> <strong>Hydraulic</strong> <strong>Adhesion</strong> <strong>Tester</strong> is used to measure the adhesion between a coating and its<br />
substrate.<br />
During the application of a coating, there are many variables that affect the final finish and performance.<br />
These include surface preparation, cleanliness and contamination, the coating system, the compatibility of<br />
the different coating layers and the climatic conditions during the process.<br />
There are two versions of the <strong>Elcometer</strong> <strong>108</strong>; one is fitted with a dial pressure gauge and the other is fitted<br />
with a digital pressure gauge.<br />
The tester is a reliable and simple gauge which measures the pressure required to push an area of coating<br />
away from the substrate.<br />
The surface under examination is prepared and then a test dolly is attached by adhesive. A pin on the tester<br />
fits into the centre of the dolly. The operator turns the instrument handle to increase the hydraulic pressure<br />
on the pin. The pin is forced into the substrate and pushes the dolly away from the coated surface. When<br />
the stress exceeds the adhesion of the coating, the dolly and coating detach from the substrate. The
maximum value of hydraulic pressure during the test is recorded and is equivalent to the adhesion of the<br />
coating to the substrate.<br />
The <strong>Elcometer</strong> <strong>108</strong> <strong>Hydraulic</strong> <strong>Adhesion</strong> <strong>Tester</strong> can be used in accordance with the standard methods:<br />
ASTM D4541, SO 16276-1 and NFT30-606.<br />
Users of this <strong>Adhesion</strong> <strong>Tester</strong> may also benefit from other <strong>Elcometer</strong> adhesion testing equipment - see<br />
“Related equipment” on page 18.<br />
1.1 CHECKING THE CONTENTS OF<br />
THE BOX<br />
• <strong>Elcometer</strong> <strong>108</strong> <strong>Hydraulic</strong> <strong>Adhesion</strong><br />
<strong>Tester</strong><br />
• Dolly, x5<br />
• Dolly tool<br />
• Dolly plug, x5<br />
• Pipemaster heating tongs<br />
• Adhesive<br />
• Carrying Case<br />
• Operating Instructions<br />
Note: The <strong>Adhesion</strong> <strong>Tester</strong> is fitted with<br />
either a dial pressure gauge or a digital<br />
MODEL<br />
pressure gauge.<br />
Digital gauge model<br />
Dial gauge model Coupling sleeve<br />
<strong>108</strong><br />
Pin<br />
R<br />
3
4<br />
R<br />
The <strong>Elcometer</strong> <strong>108</strong> <strong>Hydraulic</strong> <strong>Adhesion</strong> <strong>Tester</strong> is packed in a cardboard and foam package. Please ensure<br />
that this packaging is disposed of in an environmentally sensitive manner. Consult your local Environmental<br />
Authority for further guidance.<br />
To maximise the benefits of this instrument please take some time to read these Operating<br />
Instructions. Do not hesitate to contact <strong>Elcometer</strong> or your <strong>Elcometer</strong> supplier if you have any<br />
questions.<br />
1.2 THIS GAUGE OPERATES AT HIGH PRESSURE<br />
The operating range of the <strong>Elcometer</strong> <strong>108</strong> is 0 MPa to 18 MPa (0 PSI to 2600 PSI). When the<br />
dolly and coating separate from the substrate, a large amount of energy may be released in a<br />
short period of time. Do not exceed the operating range of the gauge. Ignoring these<br />
instructions may result in damage to the pressure gauge.<br />
Note: The oil inside the gauge is incompressible and therefore any leakage due to catastrophic failure of<br />
the gauge will result in an almost instantaneous drop in pressure to atmospheric level.<br />
Although very high pressure may be present inside the gauge, users of the gauge may be confident that<br />
they will not be subjected to any significant hazard in the unlikely event of rupture of any part of the gauge<br />
during normal use.
2 TEST PROCEDURE<br />
Operation of the gauge is a straightforward three-stage process:<br />
1. Adhere dolly to coating<br />
2. Attach gauge to dolly<br />
3. Apply pressure and record result<br />
2.1 ADHERE DOLLY TO COATING<br />
1.<br />
2.<br />
Identify dolly test surface (Figure 1).<br />
Ensure test surface of dolly is clear of old<br />
adhesive. If necessary, remove adhesive as<br />
detailed in “Clean the dolly” on page 8.<br />
X<br />
3. Wipe dolly test surface and sample area with a<br />
solvent to remove oil and grease.<br />
4. Apply a thin, even coat of adhesive to dolly test<br />
surface. If adhesive is low viscosity refer to “Use of<br />
dolly plugs” on page 9.<br />
Dolly test surface<br />
Sample<br />
5. Press dolly on to sample for about 10 seconds. Figure 1. Adhere dolly test surface to sample<br />
6. Leave dolly undisturbed for at least 15 minutes<br />
(preferably for 2 hours or more), to allow the<br />
adhesive to harden.<br />
7. If scoring of the coating around the dolly is required refer to “Cutting around the dolly” on page 11.<br />
R<br />
5
6<br />
R<br />
2.2 ATTACH GAUGE TO DOLLY<br />
1. Turn handle fully anti-clockwise to release any pressure in the instrument.<br />
2. Use a thumb or finger to push pin fully upwards towards the coupling.<br />
3. Pull coupling sleeve up and insert pin into centre of dolly.<br />
4. Release coupling sleeve.<br />
The instrument should grip the dolly firmly. If the coupling does not grip the<br />
dolly firmly, there may be excess adhesive in the centre of the dolly.<br />
Use the dolly tool to remove excess adhesive (Figure 2).<br />
5. Zero pressure gauge as follows.<br />
Dial pressure gauge:<br />
Rotate knob on front of gauge to turn red drag indicator to ‘0’.<br />
Digital pressure gauge:<br />
• Press button to switch on gauge.<br />
• Press 0 button to zero gauge.<br />
• Press Max button to set gauge to store the maximum force recorded<br />
during the test.<br />
The display indicates MAx and holds the maximum value until the Max<br />
button is pressed for a second time. The Max feature is switched off when<br />
the gauge is switched off.<br />
Figure 2. Using<br />
dolly tool to<br />
remove excess
2.3 APPLY PRESSURE AND RECORD RESULT<br />
1. Increase pressure by turning handle clockwise, slowly and smoothly, until either of the following end<br />
points:<br />
• For destructive testing, the dolly and coating pulls off the substrate.<br />
• For non-destructive testing, the minimum specified pressure value is reached.<br />
If possible, complete the test within 90 seconds of starting. This is in accordance with some adhesion<br />
testing standards.<br />
2. Record the following information:<br />
• Pressure - indicated by the gauge<br />
• Test location<br />
• Type of adhesive<br />
• Substrate/adhesive temperature<br />
• Air temperature<br />
• Relative humidity<br />
• Dewpoint temperature<br />
• Coating system details<br />
• Duration of tests<br />
• Appearance of breaks, e.g. clean between coating and substrate, separation of coating layers,<br />
jagged edges<br />
R<br />
7
8<br />
R<br />
2.4 AFTER THE TEST<br />
Decrease pressure to zero by turning handle fully anti-clockwise.<br />
2.5 CLEAN THE DOLLY<br />
Cleaning the dolly produces unpleasant fumes - ensure that the work area is extremely well<br />
ventilated.<br />
Do not inhale the fumes.<br />
HOT! Exposed very hot surfaces. Use great care when handling or placing the tongs. Allow to<br />
cool before storing.<br />
1. Plug the Pipemaster heating tongs into the mains supply and leave to warm up for 5 minutes.<br />
2. Heat the dolly with the tongs for 3 to 5 minutes. This will soften the adhesive.<br />
3. Using a sharp blade, remove the adhesive/coating from the test surface of the dolly.<br />
4. Drop the dolly into water or allow to cool naturally. Do not put the Pipemaster heating tongs into water.<br />
5. To remove any remaining adhesive, rub the dry, cool dolly with fine sandpaper or similar.<br />
6. Use the dolly tool to clear any adhesive from the dolly centre.<br />
7. Wipe the dolly test surface with a solvent to remove oil and grease.
3 SUPPLEMENTARY INFORMATION<br />
3.1 USE OF DOLLY PLUGS<br />
Particularly in the case of low viscosity adhesives it is advisable to place a nylon plug in the centre of the<br />
dolly before gluing it to the surface. This dolly plug (Figure 3) stops glue going up the centre of the dolly,<br />
which can impede the pin and prevent the test being carried out properly. Careful cleaning of the centre hole<br />
increases the adhesion values for tests on a given coating.<br />
Figure 3. Dolly plug<br />
To use the dolly plug:<br />
1. Place the dolly plug through the centre hole on the dolly so that the tip protrudes just below the test<br />
surface.<br />
2. Apply the adhesive to the dolly test surface (see section 2.1) taking care not to get adhesive on the<br />
plug.<br />
3. Press the dolly and dolly plug onto the sample area for about 10 seconds.<br />
4. Remove the dolly plug from the centre of the dolly and wipe the end clean using tissue soaked in a<br />
suitable solvent. If the dolly plug becomes stuck to the dolly, use pliers to remove it.<br />
5. Complete the test as described in sections 2.2 to 2.5.<br />
R<br />
9
10<br />
R<br />
3.2 ADHESIVES AND COATINGS<br />
Cyanoacrylate adhesives are normally recommended for gluing dollies to the sample area due to their<br />
relatively quick curing time. However, there are a number of coatings for which the cyanoacrylate adhesives<br />
may not be suitable. These are:<br />
1. Thermoplastics, celluloses, vinyl, chlorinated rubbers and some acrylics, due to the possibility of the<br />
glue reacting with the coating.<br />
2. Porous coatings e.g. some metal spraying, in which case the glue, due to its low viscosity will travel<br />
into the coating, sticking particles together and possibly altering its adhesion.<br />
A two-pack epoxy such as Araldite or a modified acrylic gel-type adhesive should be used with the<br />
coatings described in (1) and (2) above.<br />
If in doubt as to the type of adhesive to use, please contact the coating manufacturer for advice.<br />
3.3 SUBSTRATES<br />
The substrate must be solid enough to withstand the force at the pin without distorting. Metals thicker than<br />
4 mm are usually satisfactory.<br />
The <strong>Elcometer</strong> <strong>108</strong> is not suitable for wood and similar compressible materials.<br />
Warped, deformed or distorted substrates will affect the test and may lead to invalid results.
3.4 CURVED SURFACES<br />
Using a flat dolly on a curved surface can produce misleading results.<br />
The gap between the flat and curved surfaces will not be filled by the adhesive, resulting in one or more of<br />
the following effects:<br />
1. The dolly may peel or twist off instead of being pushed off.<br />
2. The surface area to which pressure is applied, will be modified. This will<br />
lead to results from different curvatures not being comparable.<br />
3. The amount of adhesive may not be sufficient to withstand the exerted<br />
force, resulting in the adhesive breaking before the coating separates from<br />
the substrate.<br />
These difficulties are overcome by using curved dollies on diameters of less<br />
than approximately 2 m (6 ft 7"). An extensive range of curved dollies is<br />
available. See “Curved dollies” on page 18.<br />
Figure 4. Curved dollies<br />
Curved and flat dollies are all used in the same way, matching the marks on the<br />
dollies with the longitudinal axis on the pipe.<br />
3.5 CUTTING AROUND THE DOLLY<br />
A dolly cutter is available which cuts through the coating to isolate the coating area under the dolly. It should<br />
be noted that some coatings will be damaged by such an operation, which may cause micro-cracks. Use of<br />
a dolly cutter should be agreed before testing starts.<br />
The dolly cutter is an optional accessory. See “Spares and accessories” on page 17 for ordering details.<br />
R<br />
11
12<br />
R<br />
3.6 DIGITAL PRESSURE GAUGE<br />
Read this section if you are using an <strong>Elcometer</strong> <strong>108</strong> <strong>Hydraulic</strong> <strong>Adhesion</strong> <strong>Tester</strong> fitted with a digital pressure<br />
gauge.<br />
Note: The digital pressure gauge can be rotated to allow the operator to view the gauge during the test.<br />
SWITCHING THE GAUGE ON AND OFF<br />
TO SWITCH ON: Press the button. The battery symbol at the bottom right hand side of the display<br />
indicates the battery condition.<br />
The gauge will switch on showing the version of software fitted, e.g. VER 1.12, followed by the range in PSI,<br />
i.e. 5000 PSI, followed by the current reading in the units set when the gauge was last switched off.<br />
TO SWITCH OFF: Press and hold the button for a second. The gauge will switch off when the button is<br />
released.<br />
TO SELECT UNITS<br />
Press the Units button to change from PSI (PSI) to bar (bAR) to kg/cm² (kG/CM) to MPa (MPA). When the<br />
units required are flashing hold the Units<br />
button for five seconds. The display stops flashing and the new<br />
units are set. The units most commonly used are PSI and MPa.<br />
Note: When the gauge is switched off, the units currently selected are stored and are displayed when the<br />
gauge is switched back on.<br />
TO OPERATE THE BACKLIGHT<br />
TO SWITCH ON: Press the button. The backlight remains on while the gauge is on and switches off when<br />
the gauge is switched off.<br />
TO SWITCH OFF: Press the button again.
FITTING BATTERIES<br />
1. Switch off gauge.<br />
2. Remove protective rubber boot.<br />
3. Slide open battery compartment cover at rear of gauge.<br />
4. Identify correct polarity and fit 2 AAA batteries.<br />
5. Replace battery compartment cover.<br />
6. Replace protective rubber boot taking care not to damage front panel of display.<br />
4 STORAGE<br />
The pressure gauge fitted to the digital version of the <strong>Elcometer</strong> <strong>108</strong> uses a Liquid Crystal<br />
Display. If the display is heated above 50°C (120°F) it may be damaged. This can happen if the<br />
gauge is left in a car parked in strong sunlight.<br />
Always store the gauge in its case when it is not being used. If an <strong>Elcometer</strong> <strong>108</strong> with a digital pressure<br />
gauge is to remain unused for long periods of time, remove the batteries and store them separately. This<br />
will prevent damage to the gauge in the event of malfunction of the batteries.<br />
To protect the pin during storage or handling, leave a dolly connected to the gauge.<br />
Refer to “Adhesive” on page 16 for storage temperature and shelf life of adhesive supplied with this gauge.<br />
R<br />
13
14<br />
R<br />
5 MAINTENANCE<br />
The <strong>Elcometer</strong> <strong>108</strong> is designed to give many years reliable service under normal operating and storage<br />
conditions. The gauge does not contain any user-serviceable components. In the unlikely event of a fault,<br />
the <strong>Elcometer</strong> <strong>108</strong> should be returned to <strong>Elcometer</strong> or your local <strong>Elcometer</strong> supplier. The warranty will be<br />
invalidated if the instrument has been opened.<br />
5.1 CALIBRATION<br />
The calibration of the gauge can be verified in the field using the <strong>Elcometer</strong> 1970 PFCV - Portable Field<br />
Calibration Verification Unit. This unit connects to the <strong>Elcometer</strong> <strong>108</strong> Gauge. Turn the handle of the<br />
<strong>Elcometer</strong> <strong>108</strong> to apply pressure and compare the reading on the gauge with that of the gauge on the<br />
<strong>Elcometer</strong> 1970 PFCV.<br />
Regular calibration checks over the life of the gauge are a requirement of quality management procedures<br />
such as ISO 9000 and other standards. For checks and certification contact <strong>Elcometer</strong> or your local<br />
<strong>Elcometer</strong> supplier.<br />
5.2 REGULAR MAINTENANCE<br />
• Operate the instrument at least once a month.<br />
• Do not store the instrument in a pressurised condition.<br />
• Inspect the hose and couplings regularly for oil leaks.<br />
• Lightly oil the handle thread occasionally.<br />
• Smear oil on the pin to prevent adhesive sticking to it during testing. If adhesive does become stuck,<br />
push tissue into the coupling and remove the adhesive from the pin using fine sandpaper or similar.<br />
Carefully remove the tissue and any debris from the coupling.
6 TECHNICAL SPECIFICATION<br />
6.1 PERFORMANCE<br />
ANALOGUE INSTRUMENT<br />
Operating range: 0 MPa - 18 MPa (0 PSI - 2600 PSI)<br />
Scale range: 0 MPa - 25 MPa (0 PSI - 3500 PSI)<br />
Scale resolution: Metric (black) 1 division = 1 MPa<br />
Imperial (red) 1 division = 100 PSI<br />
Accuracy: Metric (black) 1 MPa<br />
Imperial (red) 150 PSI<br />
DIGITAL INSTRUMENT<br />
Operating range: 0 MPa - 18 MPa (0 PSI - 2600 PSI)<br />
Scale range: 0 MPa - 34 MPa (0 PSI - 5000 PSI)<br />
Scale resolution: 0.05 MPa (7 PSI)<br />
Accuracy: ±3% or 60 PSI (whichever is the greater)<br />
6.2 PRESSURE RATING<br />
Rubber hose: 34 MPa (5000 PSI), Working<br />
138 MPa (20 000 PSI), Burst<br />
Connector: 41 MPa (6000 PSI), Working<br />
103 MPa (15 000 PSI), Leak<br />
R<br />
15
16<br />
R<br />
6.3 PHYSICAL<br />
Net weight: 1.4 kg (3 lb)<br />
Gross weight: Approx. 4.6 kg (10 lb) Including case and accessories<br />
Instrument length: Approx. 520mm (20")<br />
Carrying case size (external): 520 mm x 370 mm x 125 mm (20.4" x 14.5" x 4.75")<br />
Dolly: Area = 284mm2 (0.44 sq in); Diameters 19.4mm and 3.7mm<br />
(0.76” and 0.15”)<br />
6.4 ADHESIVE<br />
Type: Cyanoacrylate<br />
Weight: 50 g<br />
Storage temperature: +6°C to +22°C (43°F to 72°F)<br />
Shelf life: 6 months<br />
6.5 POWER SUPPLY (DIGITAL GAUGE ONLY)<br />
Battery type: 2 x LR03 (AAA), alkaline a dry batteries<br />
a. Alkaline batteries must be disposed of carefully to avoid environmental contamination. Please consult your local<br />
environmental authority for information on disposal in your region. Do not dispose of any batteries in fire.
6.6 DISPLAY (DIGITAL GAUGE ONLY)<br />
Type: Liquid Crystal Display (LCD) 4 Digits<br />
Character height: 12.5 mm (0.5")<br />
Backlight: LED<br />
7 SPARES AND ACCESSORIES<br />
The following replacement and optional items are available from your local <strong>Elcometer</strong> supplier or direct from<br />
<strong>Elcometer</strong>:<br />
Description Sales Part No.<br />
Cyanoacrylate Adhesive (50g): T99911135<br />
Standard <strong>Elcometer</strong> <strong>108</strong> flat dolly: T<strong>108</strong>9646-<br />
Pipemaster tongs - 240V UK plug: T<strong>108</strong>9925-<br />
Pipemaster tongs - 220V Euro plug: T<strong>108</strong>9928-<br />
Pipemaster tongs - 120V No plug: T<strong>108</strong>9927-<br />
Dolly tool: T<strong>108</strong>4586-<br />
Dolly plug: T<strong>108</strong>11136<br />
Dolly cutter: T99914009<br />
R<br />
17
18<br />
R<br />
CURVED DOLLIES<br />
An extensive range of curved dollies is available for testing concave and convex surfaces. Contact<br />
<strong>Elcometer</strong> or your local <strong>Elcometer</strong> supplier for full details of the range.<br />
8 RELATED EQUIPMENT<br />
<strong>Elcometer</strong> produces a wide range of adhesion gauges and associated inspection equipment. Users of the<br />
<strong>Elcometer</strong> <strong>108</strong> may also benefit from the following <strong>Elcometer</strong> products:<br />
• Hygrometers, Dewpoint Meter, Thermometers<br />
• Coating Thickness Gauges (digital and mechanical)<br />
• Cross Hatch Cutters<br />
For further information contact <strong>Elcometer</strong>, your <strong>Elcometer</strong> supplier or visit www.elcometer.com