

7 x 12 Cut-off Band Saw - Igor Chudov
7 x 12 Cut-off Band Saw - Igor Chudov
7 x 12 Cut-off Band Saw - Igor Chudov

You also want an ePaper? Increase the reach of your titles
YUMPU automatically turns print PDFs into web optimized ePapers that Google loves.
Adjusting angles with the<br />
scale on the saw table<br />
There is a scale on the rear of the saw base which<br />
can be used to establish the angle of cut.<br />
1. Raise the saw arm to full height and lock it in position<br />
with the quick shut-<strong>off</strong> valve.<br />
2. Slide the locking jaw to full open position.<br />
3. Loosen the pivot and lock bolts shown in Figure 1.<br />
4. Lay a straight edge on the saw frame so it contacts the<br />
stationary vise jaw. (See Figure 3.)<br />
5. Turn the vise jaw until the straight edge is above the<br />
angle of cut you require as shown on the angle gauge.<br />
6. Tighten both the pivot and lock bolts.<br />
7. Remove the straight edge and proceed to cut as<br />
described in Angle sawing.<br />
Figure 3: Using table scale to set jaw for angle cuts<br />
Adjusting stationary jaw for<br />
high accuracy angle cutting:<br />
1. Raise the saw arm to full height and lock it in position<br />
with the shut-<strong>off</strong> valve.<br />
2. Open the vise to full width.<br />
3. Loosen the pivot and lock bolts shown in Figure 1.<br />
4. Open the shut-<strong>off</strong> valve and lower the saw arm until it<br />
is at full horizontal position.<br />
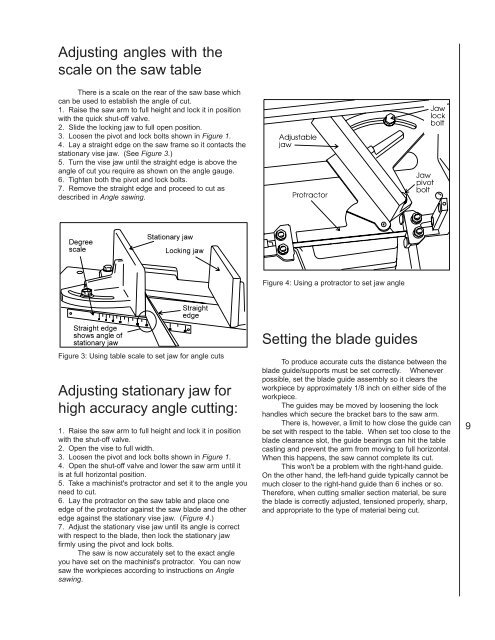
5. Take a machinist's protractor and set it to the angle you<br />
need to cut.<br />
6. Lay the protractor on the saw table and place one<br />
edge of the protractor against the saw blade and the other<br />
edge against the stationary vise jaw. (Figure 4.)<br />
7. Adjust the stationary vise jaw until its angle is correct<br />
with respect to the blade, then lock the stationary jaw<br />
firmly using the pivot and lock bolts.<br />
The saw is now accurately set to the exact angle<br />
you have set on the machinist's protractor. You can now<br />
saw the workpieces according to instructions on Angle<br />
sawing.<br />
Figure 4: Using a protractor to set jaw angle<br />
Setting the blade guides<br />
To produce accurate cuts the distance between the<br />
blade guide/supports must be set correctly. Whenever<br />
possible, set the blade guide assembly so it clears the<br />
workpiece by approximately 1/8 inch on either side of the<br />
workpiece.<br />
The guides may be moved by loosening the lock<br />
handles which secure the bracket bars to the saw arm.<br />
There is, however, a limit to how close the guide can<br />
be set with respect to the table. When set too close to the<br />
blade clearance slot, the guide bearings can hit the table<br />
casting and prevent the arm from moving to full horizontal.<br />
When this happens, the saw cannot complete its cut.<br />
This won't be a problem with the right-hand guide.<br />
On the other hand, the left-hand guide typically cannot be<br />
much closer to the right-hand guide than 6 inches or so.<br />
Therefore, when cutting smaller section material, be sure<br />
the blade is correctly adjusted, tensioned properly, sharp,<br />
and appropriate to the type of material being cut.<br />
9


